checking oil HONDA ACCORD 2017 9.G Quick Guide
[x] Cancel search | Manufacturer: HONDA, Model Year: 2017, Model line: ACCORD, Model: HONDA ACCORD 2017 9.GPages: 83, PDF Size: 6.77 MB
Page 4 of 83

| 1
V
ISUAL INDEX
*if equipped
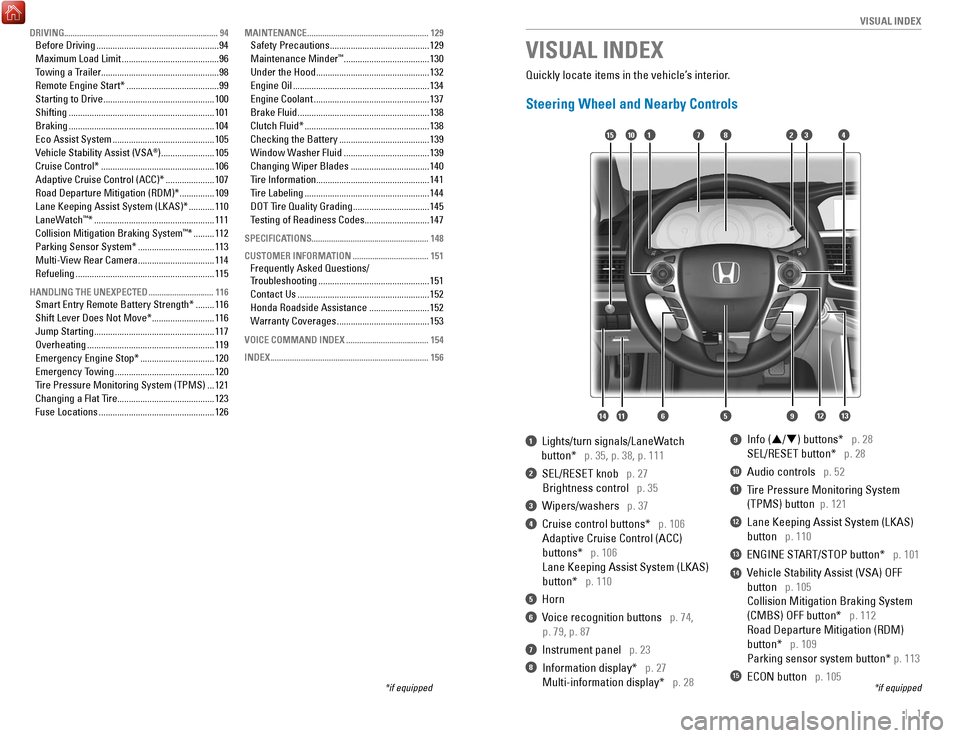
1 Lights/turn signals/LaneWatch
button* p. 35, p. 38, p. 111
2 SeL/reSeT knob p. 27
Brightness control p. 35
3 Wipers/washers p. 37
4 Cruise control buttons* p. 106
Adaptive Cruise Control (ACC)
buttons* p. 106
Lane Keeping Assist System (LKAS)
button* p. 110
5 Horn
6 voice recognition buttons p. 74,
p. 79, p. 87
7 Instrument panel p. 23
8 Information display* p. 27
Multi-information display* p. 28
9 Info (p/q) buttons* p. 28
SeL/reSeT button*
p. 28
10 Audio controls p. 52
11 Tire Pressure Monitoring System
(TPMS) button p. 121
12 Lane Keeping Assist System (LKAS)
button p. 110
13 eNGINe STArT/SToP button* p. 101
14 vehicle Stability Assist (vSA) oFF
button p. 105
Collision Mitigation Braking System
(CMBS) oFF button*
p. 112
road Departure Mitigation (rDM)
button* p. 109
Parking sensor system button* p. 113
15 eCoN button p. 105
VISUAL INDEX
*if equipped
Quickly locate items in the vehicle’s interior.
Steering Wheel and Nearby Controls
12
5
107415
116
38
9121314
DRIVING....................................................................... 94Before Driving ..................................................... 94
Maximum Load Limit
.......................................... 96
T
owing a Trailer...................................................98
remote engine Start* ........................................ 99
Starting to Drive
................................................ 100
Shifting
............................................................... 101
Braking
............................................................... 104
eco Assist System ............................................105
vehicle Stability Assist (vSA®) .......................105
Cruise Control*
................................................. 106
Adaptive Cruise Control (ACC)*
..................... 107
road Departure Mitigation (rDM)* ...............109
Lane Keeping Assist System (LKAS)*
........... 110
LaneW
atch
™* .................................................... 111
Collision Mitigation Braking System™* ......... 112
Parking Sensor System*
................................. 113
Multi-
view rear Camera ................................. 114
refueling ............................................................ 115
HANDLING THE UNEXPECTED ..............................116Smart entry remote Battery Strength* ........116
Shift Lever Does Not Move*
........................... 116
Jump Starting
.................................................... 117
overheating ....................................................... 119
emergency engine Stop* ................................120
emergency T
owing
........................................... 120
T
ire Pressure Monitoring System (TPMS)
... 121
Changing a Flat Tire
..........................................123
Fuse Locations
.................................................. 126
MAINTENANCE ........................................................ 129Safety Precautions ...........................................129
Maintenance Minder™ ..................................... 130
Under the Hood
................................................. 132
engine oil ........................................................... 134
engine Coolant ..................................................137
Brake Fluid
......................................................... 138
Clutch Fluid*
...................................................... 138
Checking the Battery
....................................... 139
Window W
asher Fluid
..................................... 139
Changing Wiper Blades
.................................. 140
T
ire Information.................................................141
Tire Labeling
...................................................... 144
D
oT T
ire Quality Grading
................................. 145
T
esting of
readiness Codes ............................ 147
SPECIFICATIONS...................................................... 148
CUSTOMER INFORMATION
................................... 151Frequently Asked Questions/
Troubleshooting ................................................ 151
Contact Us
......................................................... 152
Honda
roadside Assistance .......................... 152
W
arranty Coverages
........................................ 153
VOICE COMMAND INDEX ......................................154
INDEX
........................................................................\
. 156
Page 71 of 83

134 || 135
M
AINTENANCEMAINTENANCE
Recommended Engine Oil
• Honda Genuine Motor Oil
•
Premium-grade 0W-20 detergent oil with an API Certification Seal on the
container
This seal indicates the oil is energy conserving and
that it meets the American Petroleum Institute’
s
latest requirements.
Use Honda Genuine Motor
oil or another
commercial engine oil of suitable viscosity for the
ambient temperature as shown.
Y
ou may also use synthetic motor oil if it is labeled
with the API Certification Seal and is of the
specified viscosity grade.
Do not fill the engine oil above the upper mark.
overfilling the engine oil can r
esult
in leaks and engine damage.
NOTICE
Adding Oil
1.
Unscrew and remove the engine oil fill cap.
2.
Add oil slowly.
3.
reinstall the engine oil fill cap, and tighten it
securely
.
4.
Wait for three minutes and recheck the engine oil
dipstick.
Ambient temperature
4-cylinder models
Engine oil �ll cap
6-cylinder models
Engine oil �ll cap
Engine Oil
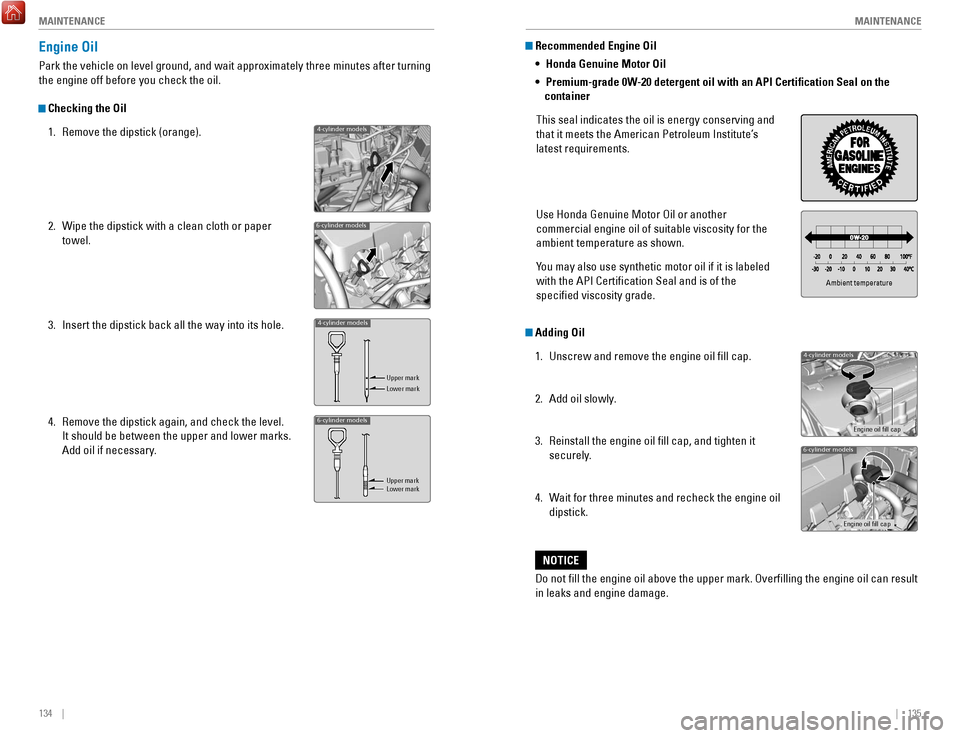
Park the vehicle on level ground, and wait approximately three minutes after turning
the engine off before you check the oil.
Checking the Oil 1.
remove the dipstick (orange).
2.
Wipe the dipstick with a clean cloth or paper
towel.
3.
Insert the dipstick back all the way into its hole.
4.
remove the dipstick again, and check the level.
It should be between the upper and lower marks.
Add oil if necessary
.
4-cylinder models
4-cylinder models
Upper mark
Lower mark
6-cylinder models
Upper mark
Lower mark
6-cylinder models
Page 72 of 83

136 || 137
M
AINTENANCEMAINTENANCE
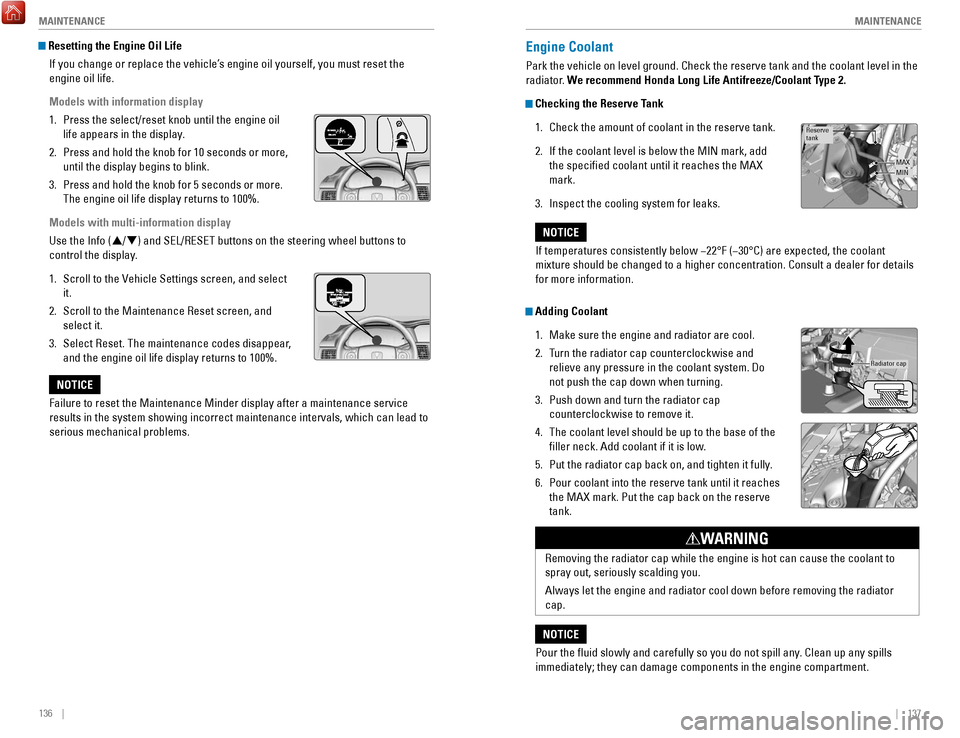
Engine Coolant
Park the vehicle on level ground. Check the reserve tank and the coolant\
level in the
radiator. We recommend Honda Long Life Antifreeze/Coolant Type 2.
Checking the Reserve Tank
1.
Check the amount of coolant in the reserve tank.
2.
If the coolant level is below the MIN mark, add
the specified coolant until it reaches the MAX
mark.
3.
Inspect the cooling system for leaks.
Adding Coolant 1.
Make sure the engine and radiator are cool.
2.
Turn the radiator cap counterclockwise and
relieve any pressure in the coolant system. Do
not push the cap down when turning.
3.
Push down and turn the radiator cap
counterclockwise to remove it.
4.
The coolant level should be up to the base of the
filler neck. Add coolant if it is low.
5.
Put the radiator cap back on, and tighten it fully.
6.
Pour coolant into the reserve tank until it reaches
the MAX mark. Put the cap back on the reserve
tank.
Reserve
tank
MAXMIN
If temperatures consistently below −22°F (−30°C) are expec\
ted, the coolant
mixture should be changed to a higher concentration. Consult a dealer fo\
r details
for more information.
NOTICE
Radiator ca p
removing the radiator cap while the engine is hot can cause the coolant t\
o
spray out, seriously scalding you.
Always let the engine and radiator cool down before removing the radiato\
r
cap.
WARNING
Pour the fluid slowly and carefully so you do not spill any. Clean up any spills
immediately; they can damage components in the engine compartment.
NOTICE
Resetting the Engine Oil Life
If you change or replace the vehicle’s engine oil yourself, you must reset the
engine oil life.
Models with information display
1.
Press the select/reset knob until the engine oil
life appears in the display.
2.
Press and hold the knob for 10 seconds or more,
until the display begins to blink.
3.
Press and hold the knob for 5 seconds or more.
The engine oil life display returns to 100%.
Models with multi-information display
Use the Info (p
/q) and S
eL/reSeT buttons on the steering wheel buttons to
control the display
.
1.
Scroll to the vehicle Settings screen, and select
it.
2.
Scroll to the Maintenance reset screen, and
select it.
3.
Select reset. The maintenance codes disappear
,
and the engine oil life display returns to 100%.
Failure to reset the Maintenance Minder display after a maintenance serv\
ice
results in the system showing incorrect maintenance intervals, which can\
lead to
serious mechanical problems.
NOTICE