engine HONDA ACCORD 2022 Owners Manual
[x] Cancel search | Manufacturer: HONDA, Model Year: 2022, Model line: ACCORD, Model: HONDA ACCORD 2022Pages: 657, PDF Size: 11.42 MB
Page 562 of 657

uuMaintenance Under the Hood uEngine Coolant
560
Maintenance
1. Make sure the engine and radiator are
cool.
2. Turn the radiator cap 1/8 turn counter-
clockwise and relieve any pressure in the
cooling system.
3. Push down and turn the radiator cap
counter-clockwise to remove it.
4. The coolant level should be up to the base
of the filler neck. Add coolant if it is low.
5. Put the radiator cap back on, and tighten it
fully.
■Radiator1Radiator
NOTICE
Pour the fluid slowly and ca refully so you do not spill
any. Clean up any spills immediately; they can
damage components in the engine compartment.Radiator Cap
Page 565 of 657

563
uuMaintenance Under the Hood uRefilling Window Washer Fluid
Maintenance
Refilling Window Washer Fluid
Check the amount of window washer fluid.
If the level is low, fill the washer reservoir.
If the washer fluid is low, a message appears
on the driver information interface.
Pour the washer fluid carefully. Do not overflow the reservoir.1Refilling Window Washer Fluid
NOTICE
Do not use engine antifreeze or a vinegar/water
solution in the windshield washer reservoir.
Antifreeze can damage y our vehicle’s paint. A
vinegar/water solution ca n damage the windshield
washer pump.
Use only commercially avai lable windshield washer
fluid.
Avoid prolonged use of hard water to prevent lime
scale buildup.Canadian models
All models
Page 589 of 657

587
Maintenance
Climate Control System Maintenance
Air Conditioning
To ensure proper and safe operation, the Society of Automotive Engineers (SAE
J2845) recommends that the refrigerant system only be serviced by trained and
certified technicians.
Never repair or replace the air conditio ning evaporator (cooling coil) with one
removed from a used or salvaged vehicle.
New replacement mobile air conditioning evaporators must be certified (and
labeled) as meeting SAE Standard J2842.
Dust and Pollen Filter
The climate control system is equipped with a dust and pollen filter that collects
pollen, dust, and other debris in the air. The Maintenance MinderTM messages will let
you know when to replace the filter.
We recommend that you repl ace the dust and pollen filter sooner when using your
vehicle in areas with high concentrations of dust.
1 Air Conditioning
NOTICE
Vented refrigerant is harmful to the environment.
To avoid refrigerant from venting, never replace the
evaporator with one re moved from a used or
salvaged vehicle.
Refrigerant in your vehicle’ s air conditioning system is
flammable and can be igni ted during servicing if
proper procedures are not followed.
The air conditioner labe l is found under the hood:
2 Safety Labels P. 79
2 Specifications P. 632, 634
Canadian models
: Caution
: Flammable Refrigerant
: Requires Registered
Technician to Service
: Air Conditioning
System
1Dust and Pollen Filter
If the airflow from the climate control system
deteriorates noticeably, and the windows fog up
easily, the filter may need to be replaced. Please
contact a dealer for replacement.
Page 592 of 657
590
uuCleaning uExterior Care
Maintenance
Exterior Care
Dust off the vehicle body after you drive.
Regularly inspect your vehi cle for scratches on painted surfaces. A scratch on a
painted surface can result in body rust. If you find a scratch, promptly repair it.
Wash the vehicle regularly. Wash more frequently when driving in the following
conditions:
• If driving on roads with road salt.
• If driving in coastal areas.
• If tar, soot, bird droppings, insects, or tree sap are stuck to painted surfaces.
• Make sure to follow the instructions indicated on the automated car wash.
• Fold in the door mirrors.
• For models equipped with automatic inte rmittent wipers, turn the wipers off.
• Keep sufficient distance between the cleaning nozzl e and the vehicle body.
• Take particular care around the windows. St anding too close may cause water to
enter the vehicle interior.
• Do not spray high pressure water directly into the engine compartment. Instead,
use low pressure water and a mild detergent.
■Washing the Vehicle
■Using an Automated Car Wash
■Using High Pressure Cleaners
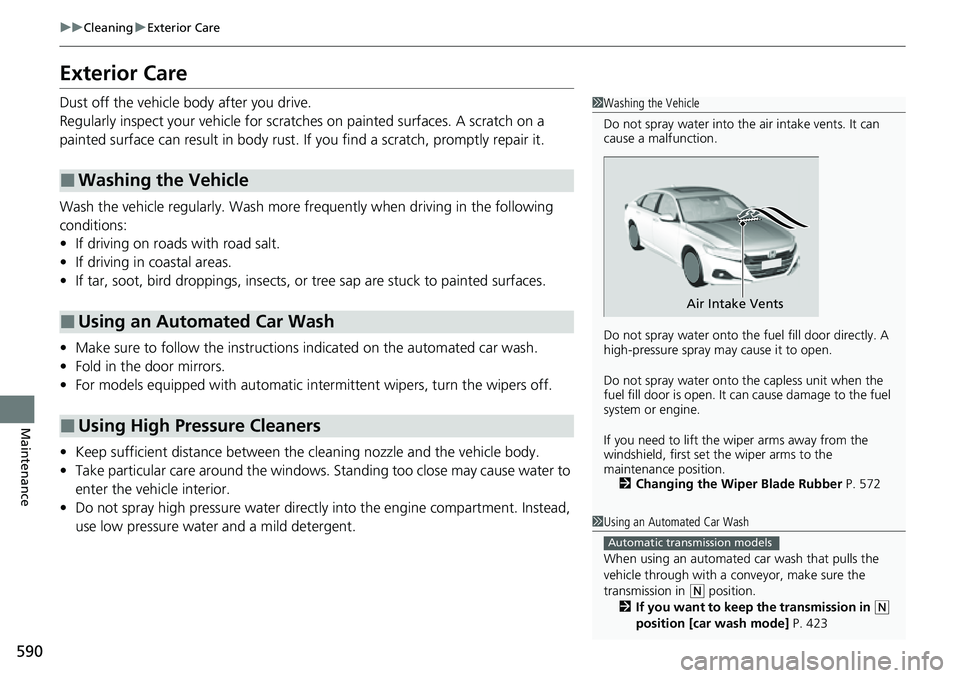
1 Washing the Vehicle
Do not spray water into the air intake vents. It can
cause a malfunction.
Do not spray water onto the fuel fill door directly. A
high-pressure spray ma y cause it to open.
Do not spray water onto the capless unit when the
fuel fill door is open. It ca n cause damage to the fuel
system or engine.
If you need to lift the wiper arms away from the
windshield, first set the wiper arms to the
maintenance position. 2 Changing the Wiper Blade Rubber P. 572
Air Intake Vents
1Using an Automated Car Wash
When using an automated car wash that pulls the
vehicle through with a c onveyor, make sure the
transmission in
( N position.
2 If you want to keep the transmission in (N
position [car wash mode] P. 423
Automatic transmission models
Page 593 of 657

Continued591
uuCleaning uExterior Care
Maintenance
A good coat of automotive body wax helps protect your vehicle’s paint from the
elements. Wax will wear off over time and expose your vehicle’s paint to the
elements, so reapply as necessary.
If you get gasoline, oil, engine coolant, or battery fluid on resi n coated parts, they
may be stained or the coating may peel. Prom ptly wipe it away using a soft cloth and
clean water.
Wipe using a glass cleaner.
Aluminum is susceptible to deterioration caused by salt and other road
contaminants. When necessary, as early as possible use a sponge and mild detergent
to wipe away these contaminants. Do no t use a stiff brush or harsh chemicals
(including some commercial wheel cleaners). These can damage the protective finish
on aluminum alloy wheels, resulting in corrosion. Depending on the type of finish,
the wheels also may lo se their luster or appear burn ished. To avoid water stains,
wipe the wheels dry with a cloth while they are still wet.
■Applying Wax
■Maintaining the Bumpers and Other Resin Coated Parts
■Cleaning the Window
■Maintaining Aluminum Wheels
1 Applying Wax
NOTICE
Chemical solvents and st rong cleaners can damage
the paint, metal, and plasti c on your vehicle. Wipe
away spills immediately.
1 Maintaining the Bumpers an d Other Resin Coated Parts
Ask a dealer about the corr ect coating material when
you want to repair the painted surface of the parts
made of resin.
Page 597 of 657
595
Handling the Unexpected
This chapter explains how to handle unexpected troubles.
ToolsTypes of Tools .................................. 596
If a Tire Goes Flat
Changing a Flat Tire ......................... 597
Engine Does Not Start Checking the Engine ........................ 603
If the Keyless Remote Battery is Weak ....604Emergency Engine Stop ................... 605
If the Battery Is Dead ....................... 606
Shift Lever Does Not Move .............. 609
Overheating How to Handle Overheating ............. 611 Indicator, Coming On/Blinking
If the Low Oil Pressure Warning Appears ... 613If the Charging System Indicator Comes
On ................................................. 613
If the Malfunction Indicator Lamp Comes On or Blinks ................................... 614
If the Brake System Indicator (Red) Comes
On or Blinks ................................... 615
If the Brake System Indicator (Red) Comes On
or Blinks at the Same Time When the Brake
System Indicator (Amber) Comes On.... 616
If the Electric Power Steering (EPS) System Indicator Comes On ....................... 617 If the Low Tire Pressure/TPMS Indicator
Comes On or Blinks ....................... 618
If the Transmission System Indicator Blinks along with the Warning Message... 619
Fuses Fuse Locations ................................. 620
Inspecting and Changing Fuses ........ 625
Emergency Towing ........................... 626
If You Cannot Unlock the Fuel Fill Door....627
If You Cannot Open the Trunk ........... 628
Refueling ........................................... 630
Page 602 of 657

uuIf a Tire Goes Flat uChanging a Flat Tire
600
Handling the Unexpected
1. Place the jack under the jacking point
closest to the tire to be changed.
2. Turn the end bracket clockwise (as shown
in the image) until the top of the jack
contacts the jacking point.
u Make sure that the jacking point tab is
resting in the jack notch.
3. Raise the vehicle, using the jack handle bar
and the jack handle, until the tire is off the
ground.
■How to Set Up the Jack1How to Set Up the Jack
Do not use the jack with people or luggage in the
vehicle.
Use the jack provided in your vehicle.
Other jacks may not support the weight (“load”) or
may not fit the jacking point.
The following instructions must be followed to use
the jack safely:
•Do not use while the engine is running.
•Use only where the ground is firm and level.
•Use only at the jacking points.•Do not get in the vehicl e while using the jack.
•Do not put anything on top of or underneath the
jack.
3WARNING
The vehicle can easily roll off the jack,
seriously injuring anyone underneath.
Follow the directions for changing a tire
exactly, and never get under the vehicle
when it is supported only by the jack.
Jacking Points
Jacking Point
Jack
Handle
Bar Wheel Nut
Wrench as Jack Handle
Page 605 of 657
603
Handling the Unexpected
Engine Does Not Start
Checking the Engine
If the engine does not start, check the starter.
Starter conditionChecklist
Starter doesn’t turn or turns
over slowly.
The battery may be dead. Check
each of the items on the right and
respond accordingly.Check for a message on the driver information interface.●If the To Start, Hold Remote Near Start Button message appears2 If the Keyless Remote Battery is Weak P. 604
uMake sure the keyless remote is in its operating range.2ENGINE START/STOP Button Operating Range P. 191
Check brightness of the interior lights.
Turn on the interior lights and check the brightness.
●If the interior lights are dim or do not come on at all2Battery P. 584●If the interior lights come on normally2 Inspecting and Changing Fuses P. 625
The starter turns over normally
but the engine doesn’t start.
There may be a problem with a
fuse. Check each of the items on
the right and respond accordingly. Review the engine start procedure.
Follow its instructions, and try
to start the engine again.
2 Starting the Engine P. 412
Check the immobilize r system indicator.
When the immobilizer system indicator is blinking, the engine cannot be started.
2 Immobilizer System P. 184
Check the fuel level.
There should be enough fuel in the tank.
2 Fuel Gauge P. 139
Check the fuses.
Check all fuses, or have the vehicle checked by a dealer.
2 Inspecting and Changing Fuses P. 625
If the problem continues:2Emergency Towing P. 626
1Checking the Engine
If you must start the vehi cle immediately, use an
assisting vehicle or booster battery to jump start it.
2 If the Battery Is Dead P. 606
Page 606 of 657
604
uuEngine Does Not Start uIf the Keyless Remote Battery is Weak
Handling the Unexpected
If the Keyless Remote Battery is Weak
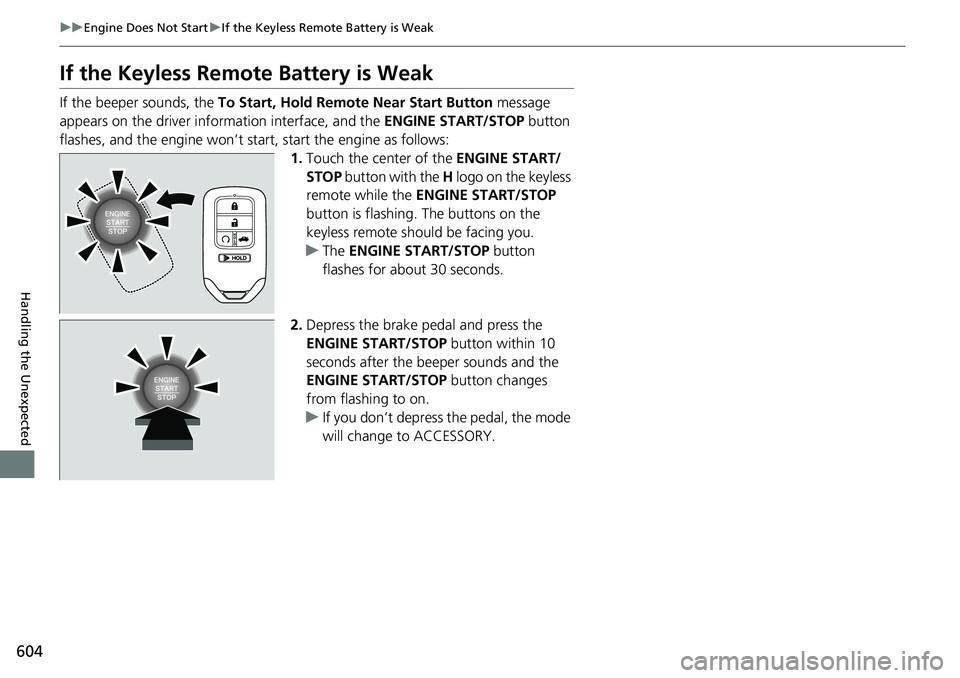
If the beeper sounds, the To Start, Hold Remote Near Start Button message
appears on the driver information interface, and the ENGINE START/STOP button
flashes, and the engine won’t star t, start the engine as follows:
1.Touch the center of the ENGINE START/
STOP button with the H logo on the keyless
remote while the ENGINE START/STOP
button is flashing. The buttons on the
keyless remote should be facing you.
u The ENGINE START/STOP button
flashes for about 30 seconds.
2. Depress the brake pedal and press the
ENGINE START/STOP button within 10
seconds after the beeper sounds and the
ENGINE START/STOP button changes
from flashing to on.
u If you don’t depress the pedal, the mode
will change to ACCESSORY.
Page 607 of 657

605
uuEngine Does Not Start uEmergency Engine Stop
Handling the Unexpected
Emergency Engine Stop
The ENGINE START/STOP button may be used to stop the engine due to an
emergency situation even while driving. If you must stop the engine, do either of the
following operations:
• Press and hold the ENGINE START/STOP button for about two seconds.
• Firmly press the ENGINE START/STOP button three times.
The steering wheel will not lock. However, because turning off the engine disables
the power assist the engine provides to the steering and braking systems, it will
require significantly more physical effort an d time to steer and slow the vehicle. Use
both feet on the brake pedal to slow down the vehicle and stop immediately in a
safe place.
The transmission automa tically changes to
(P after the vehicle comes to a complete
stop. Then, the power mode changes to VEHICLE OFF.
The power mode is in ACCESSORY when the engine is stopped.
To change the mode to VEHICLE OFF, put the transmission into
(P after the vehicle
comes to a complete stop.
Then, press the ENGINE START/STOP button twice without depressing the brake
pedal.
1 Emergency Engine Stop
Do not press the ENGINE START/STOP button while
driving unless it is absolute ly necessary for the engine
to be turned off.
If you press the ENGINE START/STOP button while
driving, the beeper sounds.
Automatic transmission models
Continuously variable transmission models
Continuously variable transmission models for Canadian models