ECO mode HONDA ACCORD 2023 Repair Manual
[x] Cancel search | Manufacturer: HONDA, Model Year: 2023, Model line: ACCORD, Model: HONDA ACCORD 2023Pages: 533, PDF Size: 20.09 MB
Page 387 of 533
Continued385
uuHonda Sensing ®u Road Departure Mitigation System
Driving
You can turn the system on and off using the driver information interface.
2 Switching the Display P. 112
2 Safety Support P. 121
The Road Departure Mitigation system is in the previously selected on or off setting
each time you start the engine.
■Road Departure Mitigation system On and Off1Road Departure Mitigation system On and Off
When you have selected Warning only , the system
does not operate the steering wheel.
2 Vehicle Settings P. 126
The Vehicle Stability Assist
TM (VSA ®) system, Adaptive
Cruise Control (ACC) with Low Speed Follow, low tire
pressure/TPMS
*, safety support, and parking brake
and brake system (amber) indicators may come on in
amber along with a message in the gauge when you
set the power mode to ON after reconnecting the
battery.
Drive a short distance at more than 12 mph (20 km/h).
Each indicator should go off. If any do not, have your
vehicle checked by a dealer.
* Not available on all models
23 ACCORD 4D US PET MAP-3130A6000_01.book 385 ページ 2022年10月19日 水曜日 午前11時49分
Page 404 of 533
uuBraking uBrake System
402
Driving
■Activating and deactivating the au tomatic parking brake feature
With the power mode is in ON, carry out th e following steps to either activate or
deactivate the automatic parking brake feature.
1. Shift the select lever to
(P.
2. Without depressing the brake pedal, pull up and release the electric parking brake
switch.
u Check that the parking brake and brake system indicator (red) has come on.
3. Pull up and hold the electric parking br ake switch. When you hear a beeping
sound, release the switch and within three seconds pull up and hold the switch
again.
4. When you hear a sound indicating that the procedure is completed, release the
switch.
u Two beeps indicates that the feature has been activated.
u One beep indicates that the feature has been deactivated.
u When you have completed activating the feature, the parking brake will
remain applied after you turn off the engine.
u To confirm that the parking brake is ap plied, check if the parking brake and
brake system indicator (red) is on.
1 Parking Brake
In cold climates, the parking brake may freeze in
place if applied.
When parking the vehicle, chock the wheels and
make sure the automatic parking brake feature is
deactivated.
Also, when putting your vehicle through a conveyor-
type car wash or when ha ving your vehicle towed,
deactivate the automatic parking brake feature and
leave the parking brake released.
23 ACCORD 4D US PET MAP-3130A6000_01.book 402 ページ 2022年10月19日 水曜日 午前11時49分
Page 405 of 533
Continued403
uuBraking uBrake System
Driving
If you need to temporarily deactivate the feature while putting your vehicle through
a conveyor type car wash or when having your vehicle towed, follow the procedure
explained below.
1. Depress the brake pedal and bring the vehicle to a stop.
2. Set the power mode to VEHICLE OFF and then within two seconds push down the
electric parking brake switch.
u Activation and deactivation settings for the feature will not be affected.
u Before temporarily deactivating the feat ure, make sure to first turn off both
ACC with Low Speed Follow and the automatic brake hold system.
u To confirm that the parkin g brake is applied, check if the parking brake and
brake system indicator (red) is on.
Your vehicle is equipped with disc brakes at all four wheels. The brake assist system
increases the stopping force when you depress the brake pedal hard in an
emergency situation. The an ti-lock brake system (ABS) helps you retain steering
control when brak ing very hard.
2Brake Assist System P. 408
2 Anti-lock Brake System (ABS) P. 407
■Foot Brake
1Foot Brake
Check the brakes after driving through deep water,
or if there is a buildup of road surface water. If
necessary, dry the brakes by lightly depressing the
pedal several times.
If you hear a continuous me tallic friction sound when
applying the brakes, this is caused by the brake wear
indicator rubbing on the brake rotor and indicates
that the brake pads need to be replaced. Have the
vehicle checked by a deal er. If you hear only an
occasional squeak or squeal when you initially apply
the brake pedal, this may be normal and caused by
high frequency vibr ation of the brake pads against
the rotating brake disc.
Constantly using the brake pedal while going down a
long hill builds up heat, which reduces the brake
effectiveness. Apply engine braking by taking your
foot off the accelerator pe dal and downshifting to a
speed position.
Do not rest your foot on the brake pedal while
driving, as it will lightly apply the brakes and cause
them to lose effectiveness over time and reduce pad
life. It will also conf use drivers behind you.
Whenever the brakes are activated by CMBS
TM or
another system that automa tically controls braking,
the brake pedal is depressed and released in
accordance with braking function.
23 ACCORD 4D US PET MAP-3130A6000_01.book 403 ページ 2022年10月19日 水曜日 午前11時49分
Page 418 of 533
uuMulti-View Rear Camera uAbout Your Multi-View Rear Camera
416
Driving
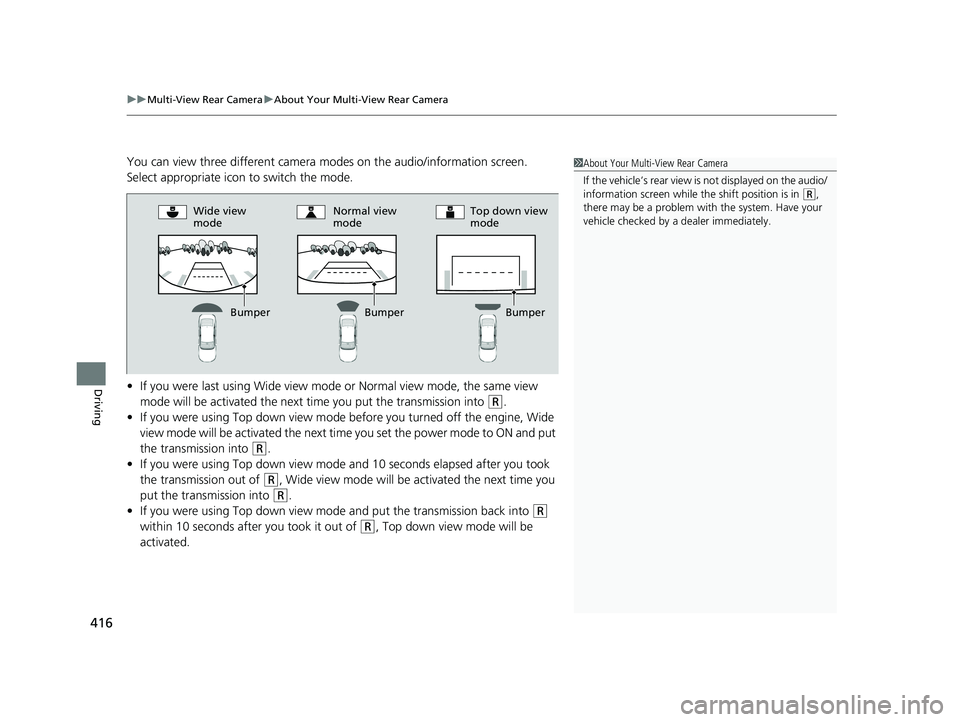
You can view three different camera modes on the audio/information screen.
Select appropriate icon to switch the mode.
• If you were last using Wide view mode or Normal view mode, the same view
mode will be activated the next time you put the transmission into
(R.
• If you were using Top down view mode before you turned off the engine, Wide
view mode will be activated the next time you set the power mode to ON and put
the transmission into
(R.
• If you were using Top down view mode and 10 seconds elapsed after you took
the transmission out of
(R, Wide view mode will be activated the next time you
put the transmission into
(R.
• If you were using Top down view mode and put the transmission back into
(R
within 10 seconds after you took it out of
(R, Top down view mode will be
activated.
1 About Your Multi-View Rear Camera
If the vehicle’s rear view is not displayed on the audio/
information screen while the shift position is in
( R,
there may be a problem with the system. Have your
vehicle checked by a dealer immediately.
Wide view
mode Normal view
modeTop down view
mode
Bumper
BumperBumper
23 ACCORD 4D US PET MAP-3130A6000_01.book 416 ページ 2022年10月19日 水曜日 午前11時49分
Page 426 of 533
424
Maintenance
Before Performing Maintenance
Inspection and Maintenance
For your safety, perform all listed inspections and maintenance to keep your vehicle
in good condition. If you become aware of an y abnormality (noise, smell, insufficient
brake fluid, oil residue on the ground, etc.), have your vehicle inspected by a dealer.
(Note, however, that service at a dealer is not mandatory to keep your warranties in
effect.)
■Routine inspections
Perform inspections before long distance tri ps, when washing the vehicle, or when
refueling.
2 Maintenance P. 29
■Periodic inspections
• Check the brake fluid level monthly.
2 Brake Fluid P. 444
•Check the tire pressure monthly. Examin e the tread for wear and foreign objects.
2Checking and Maintaining Tires P. 451
•Check the operation of the exterior lights monthly.
2 Replacing Light Bulbs P. 446
•Check the condition of the wiper bl ades at least every six months.
2Checking and Maintaining Wiper Blades P. 448
■Types of Inspection and Maintenance
1Inspection and Maintenance
Maintenance, replacement, or repair of
emissions control devices and systems may be
done by any automotive repair establishment or
individuals using parts that are “certified” to
EPA standards.
According to state and fede ral regulations, failure to
perform maintenance on the maintenance main
items marked with # will not void your emissions
warranties. However, all ma intenance services should
be performed in accordan ce with the intervals
indicated by the driver information interface.
2 Maintenance Service Items P. 431
If you want to perform complex maintenance tasks
that require more skills a nd tools, you can purchase a
subscription to the Service Express website at
www.techinfo.honda.com .
2 Authorized Manuals P. 518
If you want to perform ma intenance yourself, make
sure that you have the necessary tools and skills first.
After performing maintenanc e, update the records in
the separate maintenance booklet.
U.S. models
23 ACCORD 4D US PET MAP-3130A6000_01.book 424 ページ 2022年10月19日 水曜日 午前11時49分
Page 434 of 533
432
uuMaintenance MinderTMuTo Use Maintenance MinderTM
Maintenance
U.S. models
*1: If a Maintenance Minder message does not appear more than 12 months after the display is reset,
change the engine oil every year.
# : See information on maintenance and emissions warranty in the first column on page 515.
*2: If you drive in dusty conditions, replace every 15,000 miles (24,000 km).
*3: If you drive primarily in urban areas that have high concentrations of soot in the air from industry and from diesel powered vehicles, replace every 15,000 miles (24,000 km).
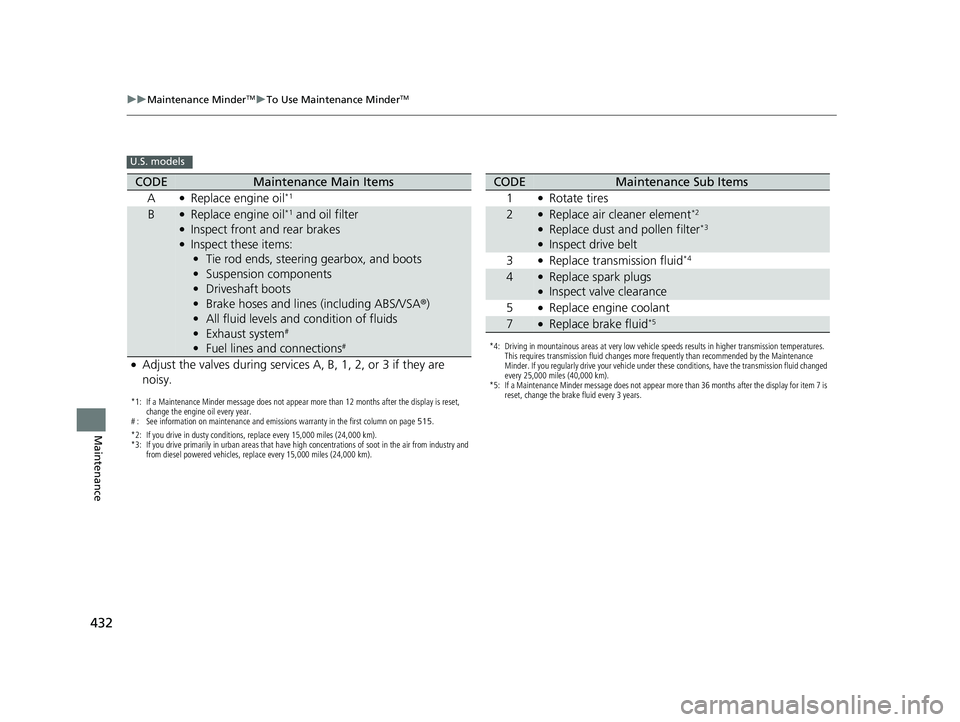
CODEMaintenance Main Items
A
●Replace engine oil*1
B●Replace engine oil*1 and oil filter●Inspect front and rear brakes●Inspect these items: • Tie rod ends, steering gearbox, and boots
• Suspension components
• Driveshaft boots
• Brake hoses and lines (including ABS/VSA ®)
• All fluid levels and condition of fluids
• Exhaust system
#
•Fuel lines and connections#
●Adjust the valves during services A, B, 1, 2, or 3 if they are
noisy.
*4: Driving in mountainous areas at very low vehicle speeds results in higher transmission temperatures.
This requires transmission fluid changes more frequently than recommended by the Maintenance
Minder. If you regularly drive your vehicle under these conditions, have the transmission fluid changed
every 25,000 miles (40,000 km).
*5: If a Maintenance Minder message does not appear more than 36 months after the display for item 7 is reset, change the brake fluid every 3 years.
CODEMaintenance Sub Items
1
●Rotate tires
2●Replace air cleaner element*2
●Replace dust and pollen filter*3
●Inspect drive belt
3
●Replace transmission fluid*4
4●Replace spark plugs●Inspect valve clearance
5
●Replace engine coolant
7●Replace brake fluid*5
23 ACCORD 4D US PET MAP-3130A6000_01.book 432 ページ 2022年10月19日 水曜日 午前11時49分
Page 435 of 533
433
uuMaintenance MinderTMuTo Use Maintenance MinderTM
Continued
Maintenance
Canadian models
*1: If a Maintenance Minder Message does not appear more than 12 months after the display is reset,
change the engine oil every year.
*2: If you drive in dusty conditions, replace every 15,000 miles (24,000 km).
*3: If you drive primarily in urban areas that have high concentrations of soot in the air from industry and from diesel powered vehicles, replace every 15,000 miles (24,000 km).
*4: Driving in mountainous areas at very low vehicle speeds results in higher transmission temperatures. This requires transmission fluid changes more frequently than recommended by the Maintenance
Minder. If you regularly drive your vehicle under these conditions, have the transmission fluid changed
every 25,000 miles (40,000 km).
*5: If a Maintenance Minder Message does not appear more than 36 months after the display for item 7 is reset, change the brake fluid every 3 years.
# : See information on maintenance and emissions warranty in the first column on page 515.
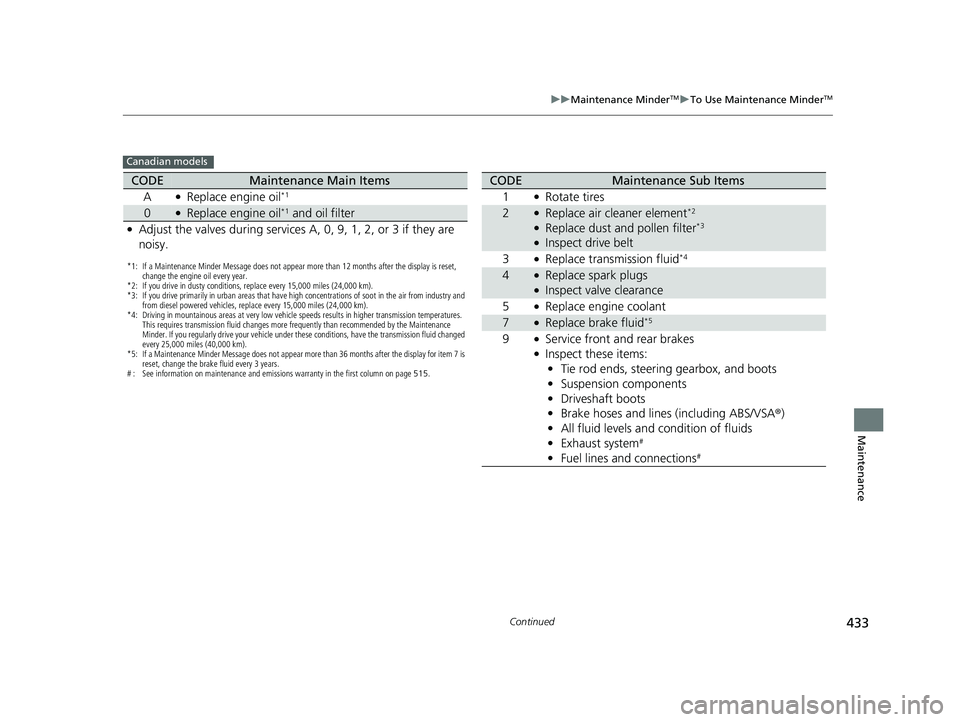
CODEMaintenance Main Items
A
●Replace engine oil*1
0●Replace engine oil*1 and oil filter
●Adjust the valves during services A, 0, 9, 1, 2, or 3 if they are
noisy.
CODEMaintenance Sub Items
1
●Rotate tires
2●Replace air cleaner element*2
●Replace dust and pollen filter*3
●Inspect drive belt
3
●Replace transmission fluid*4
4●Replace spark plugs●Inspect valve clearance
5
●Replace engine coolant
7●Replace brake fluid*5
9●Service front and rear brakes●Inspect these items: • Tie rod ends, steering gearbox, and boots
• Suspension components
• Driveshaft boots
• Brake hoses and lines (including ABS/VSA®)
• All fluid levels and condition of fluids
• Exhaust system
#
•Fuel lines and connections#
23 ACCORD 4D US PET MAP-3130A6000_01.book 433 ページ 2022年10月19日 水曜日 午前11時49分
Page 436 of 533
uuMaintenance MinderTMuTo Use Maintenance MinderTM
434
Maintenance
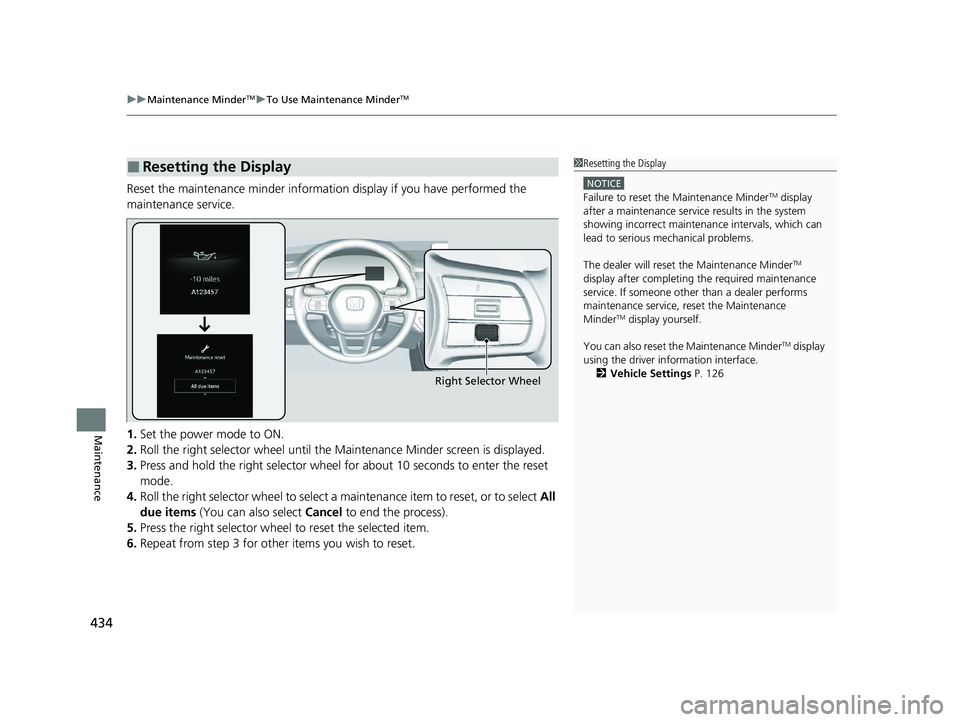
Reset the maintenance minder informat ion display if you have performed the
maintenance service.
1. Set the power mode to ON.
2. Roll the right selector wheel until the Maintenance Minder screen is displayed.
3. Press and hold the right selector wheel for about 10 seconds to enter the reset
mode.
4. Roll the right selector wheel to select a maintenance item to reset, or to select All
due items (You can also select Cancel to end the process).
5. Press the right selector wheel to reset the selected item.
6. Repeat from step 3 for other items you wish to reset.
■Resetting the Display1Resetting the Display
NOTICE
Failure to reset the Maintenance MinderTM display
after a maintenance servic e results in the system
showing incorrect maintenance intervals, which can
lead to serious mechanical problems.
The dealer will reset the Maintenance Minder
TM
display after completing th e required maintenance
service. If someone other than a dealer performs
maintenance service, reset the Maintenance
Minder
TM display yourself.
You can also reset the Maintenance Minder
TM display
using the driver information interface. 2 Vehicle Settings P. 126
Right Selector Wheel
23 ACCORD 4D US PET MAP-3130A6000_01.book 434 ページ 2022年10月19日 水曜日 午前11時49分
Page 450 of 533
448
Maintenance
Checking and Maintaining Wiper Blades
Checking Wiper Blades
If the wiper blade rubber has deteriorated, it will leave streaks and become noisy,
and the hard surfaces of the blade may scratch the window glass.
Changing the Wiper Blade Rubber
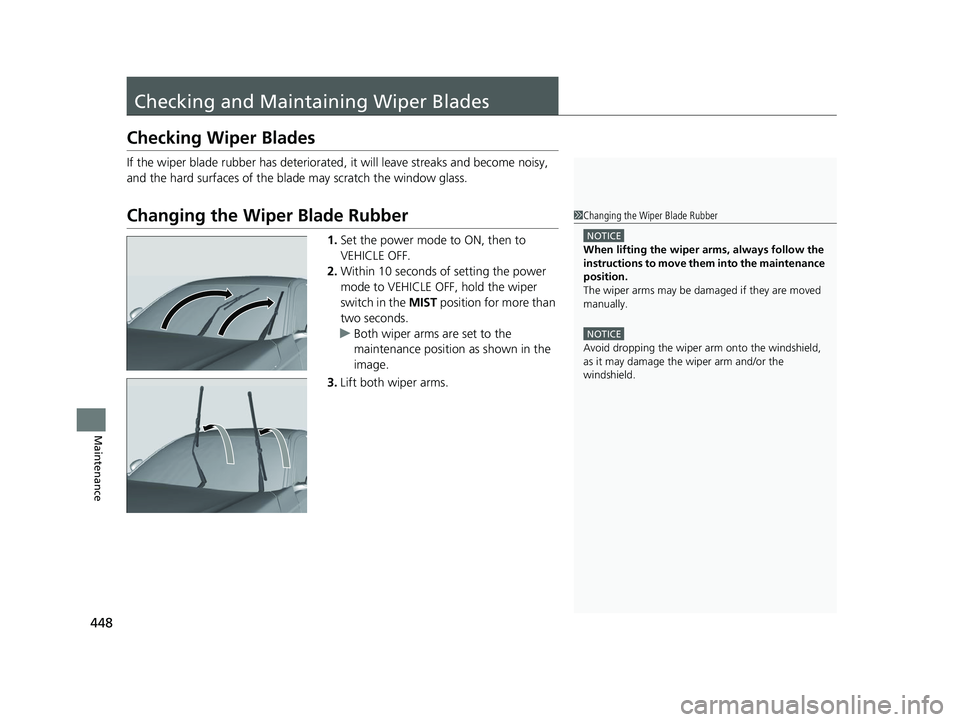
1. Set the power mode to ON, then to
VEHICLE OFF.
2. Within 10 seconds of setting the power
mode to VEHICLE OFF, hold the wiper
switch in the MIST position for more than
two seconds.
u Both wiper arms are set to the
maintenance position as shown in the
image.
3. Lift both wiper arms.
1Changing the Wiper Blade Rubber
NOTICE
When lifting the wiper arms, always follow the
instructions to move them into the maintenance
position.
The wiper arms may be damaged if they are moved
manually.
NOTICE
Avoid dropping the wiper arm onto the windshield,
as it may damage the wiper arm and/or the
windshield.
23 ACCORD 4D US PET MAP-3130A6000_01.book 448 ページ 2022年10月19日 水曜日 午前11時49分
Page 453 of 533
451
Maintenance
Checking and Maintaining Tires
Checking Tires
To safely operate your vehicle, your tires must be of the proper type and size, in
good condition with adequate tread, and properly inflated.
■Inflation guidelines
Properly inflated tires provid e the best combination of hand ling, tread life, and comfort.
Refer to the driver’s doorjamb label or spec ifications page for the specified pressure.
Underinflated tires wear unev enly, adversely affect handling and fuel economy, and
are more likely to fail from overheating.
Overinflated tires make your vehicle ride ha rshly, are more prone to road hazards,
and wear unevenly.
Every day before you drive, look at each of the tires. If one looks lower than the
others, check the pressure with a tire gauge.
At least once a month or before long trips, use a gauge to measure the pressure in all
tires, including the spare. Even tires in good condition can lose 1–2 psi (10–20 kPa,
0.1–0.2 kgf/cm
2) per month.
■Inspection guidelines
Every time you check inflation, also examine the tires and valve stems.
Look for:
• Bumps or bulges on the side or in the tread. Replace the tire if you find any cuts,
splits, or cracks in the side of the tire . Replace it if you see fabric or cord.
• Remove any foreign objects and inspect for air leaks.
• Uneven tread wear. Have a deal er check the wheel alignment.
• Excessive tread wear.
2 Wear Indicators P. 456
•Cracks or other damage around valve stem.
1Checking Tires
Measure the air pressure when tires are cold. This
means the vehicle has been parked for at least three
hours, or driven less than 1 mile (1.6 km). If
necessary, add or releas e air until the specified
pressure is reached.
If checked when hot, tire pressure can be as much as
4–6 psi (30–40 kPa, 0.3–0.4 kgf/cm
2) higher than if
checked when cold.
Whenever tire pressure is adjusted, you must
calibrate the TPMS
*.
2 TPMS Calibration P. 318
Have a dealer check the tires if you feel a consistent
vibration while driving. Ne w tires and any that have
been removed and reinst alled should be properly
balanced.
3WARNING
Using tires that are excessively worn or
improperly inflated can cause a crash in
which you can be seriously hurt or killed.
Follow all instruction s in this owner’s
manual regarding ti re inflation and
maintenance.
* Not available on all models
23 ACCORD 4D US PET MAP-3130A6000_01.book 451 ページ 2022年10月19日 水曜日 午前11時49分