HONDA ACCORD COUPE 2000 CF / 6.G Owners Manual
Manufacturer: HONDA, Model Year: 2000, Model line: ACCORD COUPE, Model: HONDA ACCORD COUPE 2000 CF / 6.GPages: 338, PDF Size: 4.82 MB
Page 231 of 338
Brak
e an d Clutc h Flui d
Chec k th e flui d leve l i n th e reser -
voir s monthly . Ther e ar e u p to tw o
reservoirs , dependin g o n th e model .
The y are :
Brak e flui d reservoi r (al l models )
Clutc h flui d reservoi r
(manua l transmissio n only )
Th e brak e flui d shoul d b e replace d
accordin g to th e tim e an d distanc e
recommendation s in th e mainte-
nanc e schedule . Alway
s us e Genuin e Hond a DO T 3
brak e fluid . I f i t i s no t available , yo u
shoul d us e onl y DO T 3 o r DO T 4
fluid , fro m a seale d container , a s a
temporar y replacement . However ,
th e us e o f an y non-Hond a brak e flui d
ca n caus e corrosio n an d decreas e
th e lif e o f th e system . Hav e th e
brak e syste m flushe d an d refille d
wit h Hond a DO T 3 brak e flui d a s
soo n a s possible .
Brak e flui d marke d DO T 5 is no t
compatibl e wit h you r car' s brakin g
syste m an d ca n caus e extensiv e
damage .
Brak
e Syste m
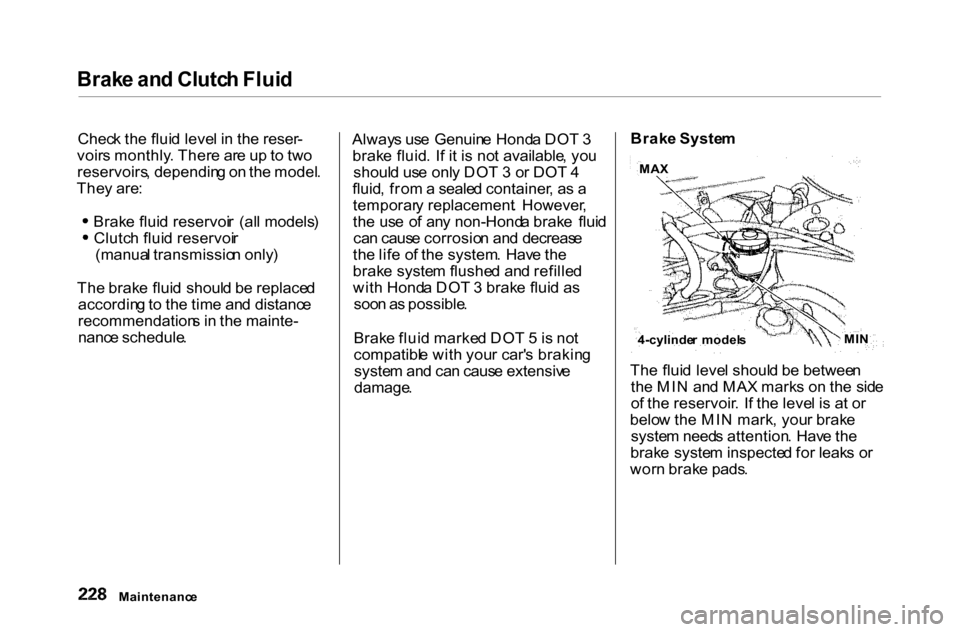
Th e flui d leve l shoul d b e betwee n
th e MI N an d MA X mark s o n th e sid e
o f th e reservoir . I f th e leve l i s a t o r
belo w th e MI N mark , you r brak e
syste m need s attention . Hav e th e
brak e syste m inspecte d fo r leak s o r
wor n brak e pads .
Maintenanc e 4-cylinde
r model s MI
N
MA
X
Page 232 of 338
Brak
e an d Clutc h Flui d
MA X
Clutc
h Syste m
MAX
MI N
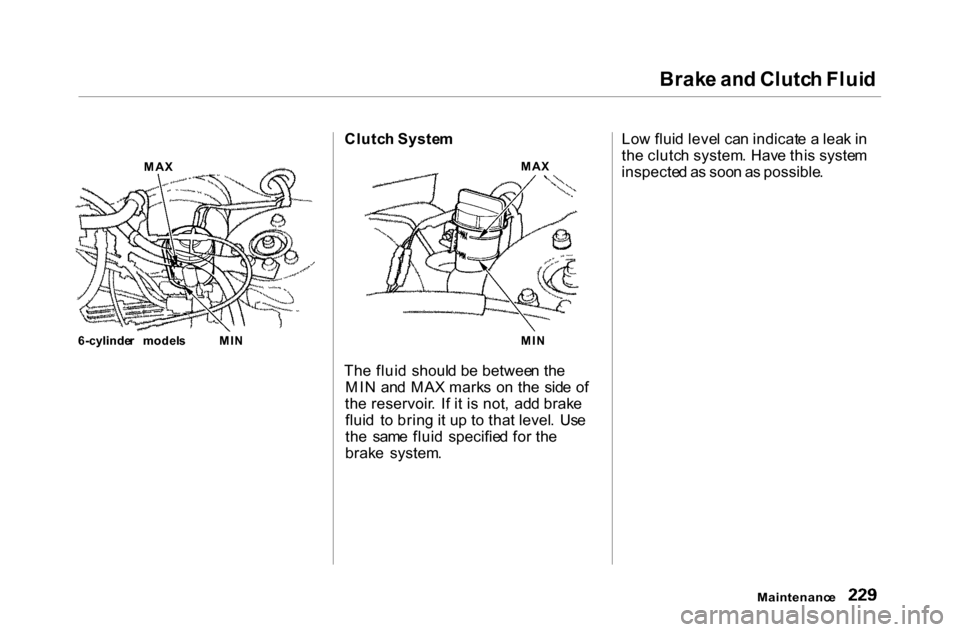
Th e flui d shoul d b e betwee n th e
MI N an d MA X mark s o n th e sid e o f
th e reservoir . I f i t i s not , ad d brak e
flui d t o brin g it u p t o tha t level . Us e
th e sam e flui d specifie d fo r th e
brak e system . Lo
w flui d leve l ca n indicat e a lea k i n
th e clutc h system . Hav e thi s syste m
inspecte d a s soo n a s possible .
Maintenanc e
6-cylinde
r model s
MIN
Page 233 of 338
Powe
r Steerin g
4-cylinde r model s
LOWER LEVE L
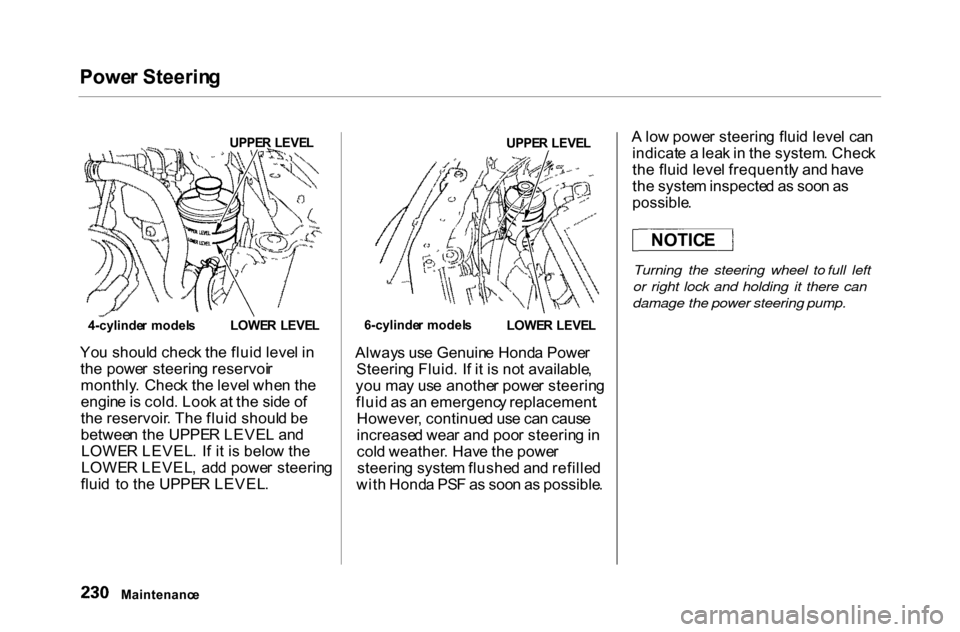
Yo u shoul d chec k th e flui d leve l i n
th e powe r steerin g reservoi r
monthly . Chec k th e leve l whe n th e
engin e is cold . Loo k a t th e sid e o f
th e reservoir . Th e flui d shoul d b e
betwee n th e UPPE R LEVE L an d
LOWE R LEVEL . I f i t i s belo w th e
LOWE R LEVEL , ad d powe r steerin g
flui d t o th e UPPE R LEVEL .
UPPE
R LEVE L
6-cylinde r model s
LOWER LEVE L
Alway s us e Genuin e Hond a Powe r
Steerin g Fluid . I f i t i s no t available ,
yo u ma y us e anothe r powe r steerin g
flui d a s a n emergenc y replacement .
However , continue d us e ca n caus e
increase d wea r an d poo r steerin g in
col d weather . Hav e th e powe r
steerin g syste m flushe d an d refille d
wit h Hond a PS F a s soo n a s possible .A
lo w powe r steerin g flui d leve l ca n
indicat e a lea k in th e system . Chec k
th e flui d leve l frequentl y an d hav e
th e syste m inspecte d a s soo n a s
possible .
Turning the steering wheel to full left
or right lock and holding it there can
damage the power steering pump.
Maintenanc e
NOTIC
E
UPPE
R LEVE L
Page 234 of 338
Ai
r Cleane r Elemen t
Th e ai r cleane r elemen t shoul d b e
cleane d o r replace d accordin g to th e
tim e an d distanc e recommendation s
i n th e maintenanc e schedule .
Cleanin g (Sever e Conditions )
Clea n th e ai r cleane r elemen t b y
blowin g compresse d ai r throug h i t i n
th e opposit e directio n t o norma l ai r
flow . I f yo u d o no t hav e acces s t o
compresse d ai r (suc h a s a servic e
station) , as k you r Hond a deale r t o d o
thi s service .
Follo w th e replacemen t procedur e
fo r remova l an d reinstallation .
Replacemen
t
4-cylinder Models
HOLD-DOW N CLAMP S
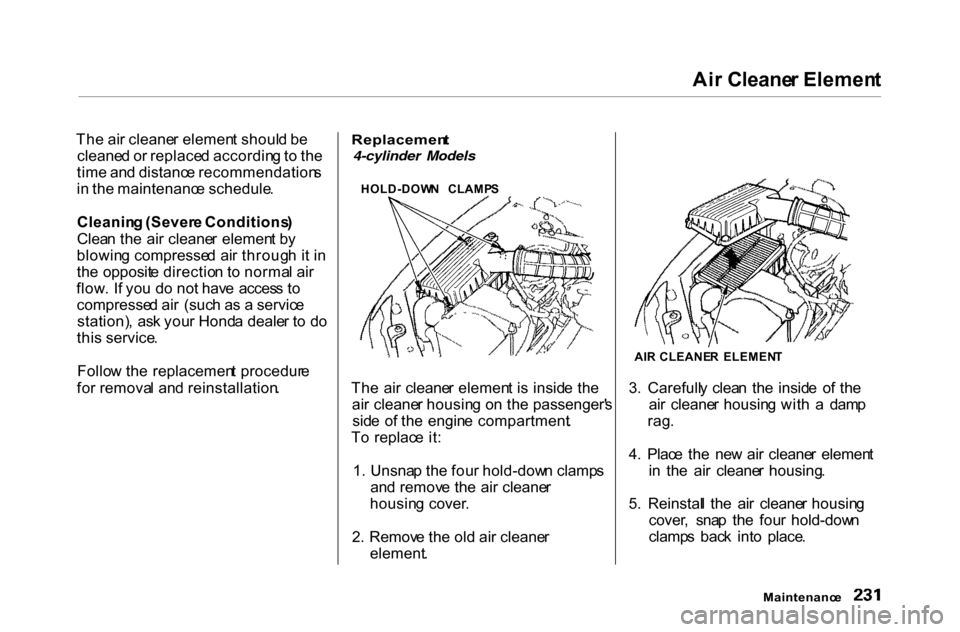
Th e ai r cleane r elemen t i s insid e th e
ai r cleane r housin g o n th e passenger' s
sid e o f th e engin e compartment .
T o replac e it :
1 . Unsna p th e fou r hold-dow n clamp s
an d remov e th e ai r cleane r
housin g cover .
2 . Remov e th e ol d ai r cleane r
element . 3
. Carefull y clea n th e insid e o f th e
ai r cleane r housin g wit h a dam p
rag .
4 . Plac e th e ne w ai r cleane r elemen t
i n th e ai r cleane r housing .
5 . Reinstal l th e ai r cleane r housin g
cover , sna p th e fou r hold-dow n
clamp s bac k int o place .
Maintenanc e
AI
R CLEANE R ELEMEN T
Page 235 of 338
Ai
r Cleane r Elemen t
Replacemen t
6-cylinder Models
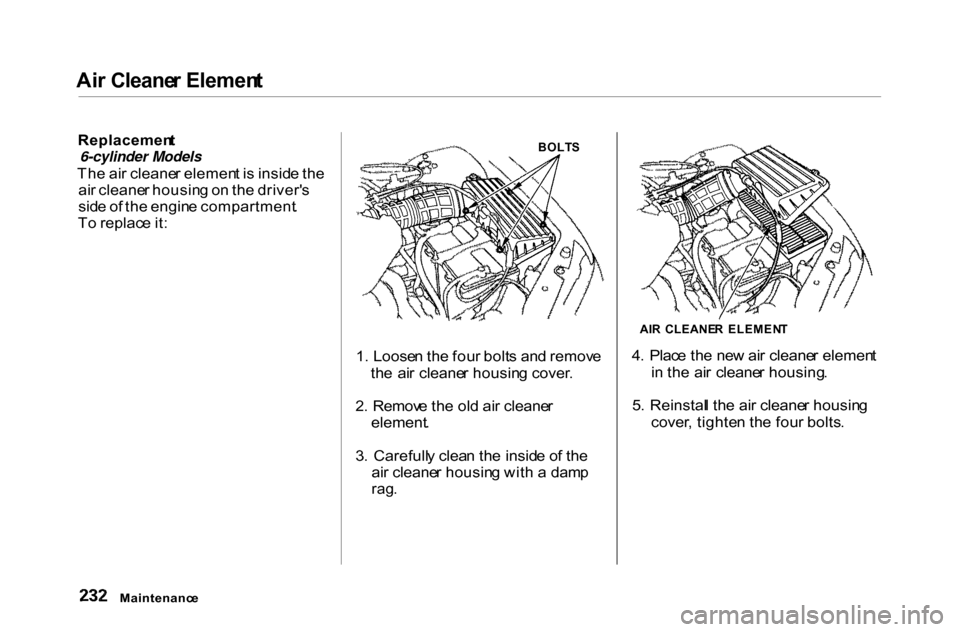
Th e ai r cleane r elemen t i s insid e th e
ai r cleane r housin g o n th e driver' s
sid e o f th e engin e compartment .
T o replac e it :
BOLT
S
1 . Loose n th e fou r bolt s an d remov e
th e ai r cleane r housin g cover .
2 . Remov e th e ol d ai r cleane r
element .
3 . Carefull y clea n th e insid e o f th e
ai r cleane r housin g wit h a dam p
rag .
AI
R CLEANE R ELEMEN T
4 . Plac e th e ne w ai r cleane r elemen t
i n th e ai r cleane r housing .
5 . Reinstal l th e ai r cleane r housin g
cover , tighte n th e fou r bolts .
Maintenanc e
Page 236 of 338
Hoo
d Latch , Spar k Plug s (4-cylinde r Models )
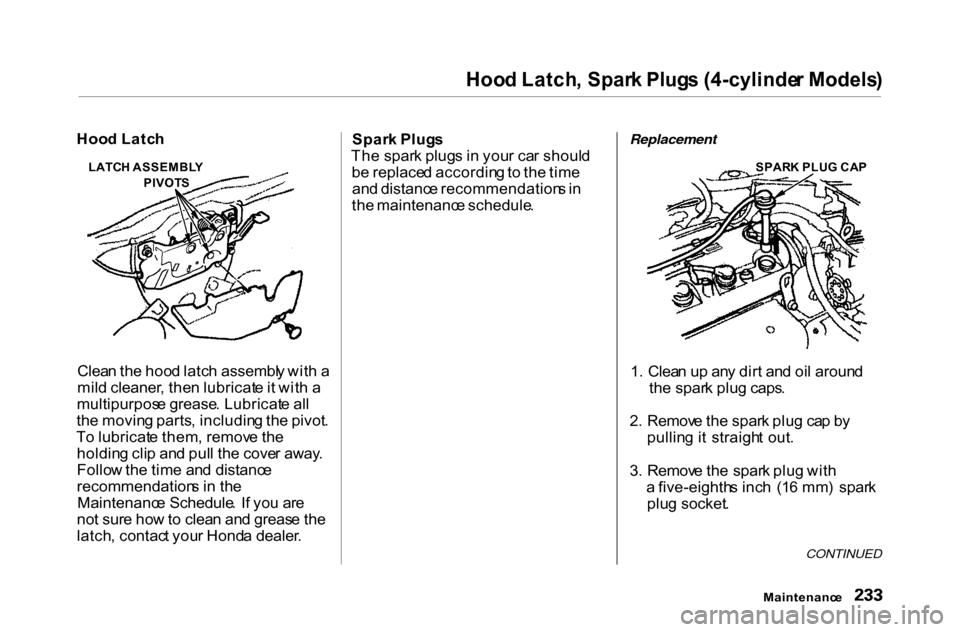
Clea n th e hoo d latc h assembl y wit h a
mil d cleaner , the n lubricat e it wit h a
multipurpos e grease . Lubricat e al l
th e movin g parts , includin g th e pivot .
T o lubricat e them , remov e th e
holdin g cli p an d pul l th e cove r away .
Follo w th e tim e an d distanc e
recommendation s i n th e
Maintenanc e Schedule . I f yo u ar e
no t sur e ho w to clea n an d greas e th e
latch , contac t you r Hond a dealer . Spar
k Plug s
Th e spar k plug s i n you r ca r shoul d
b e replace d accordin g to th e tim e
an d distanc e recommendation s in
th e maintenanc e schedule .
Replacement
SPARK PLU G CA P
1 . Clea n u p an y dir t an d oi l aroun d
th e spar k plu g caps .
2 . Remov e th e spar k plu g ca p b y
pullin g i t straigh t out .
3 . Remov e th e spar k plu g wit h
a five-eighth s inc h (1 6 mm ) spar k
plu g socket .
CONTINUED
Maintenanc e
Hoo
d Latc h
LATC H ASSEMBL Y
PIVOT S
Page 237 of 338
Spar
k Plug s (4-cylinde r Models )
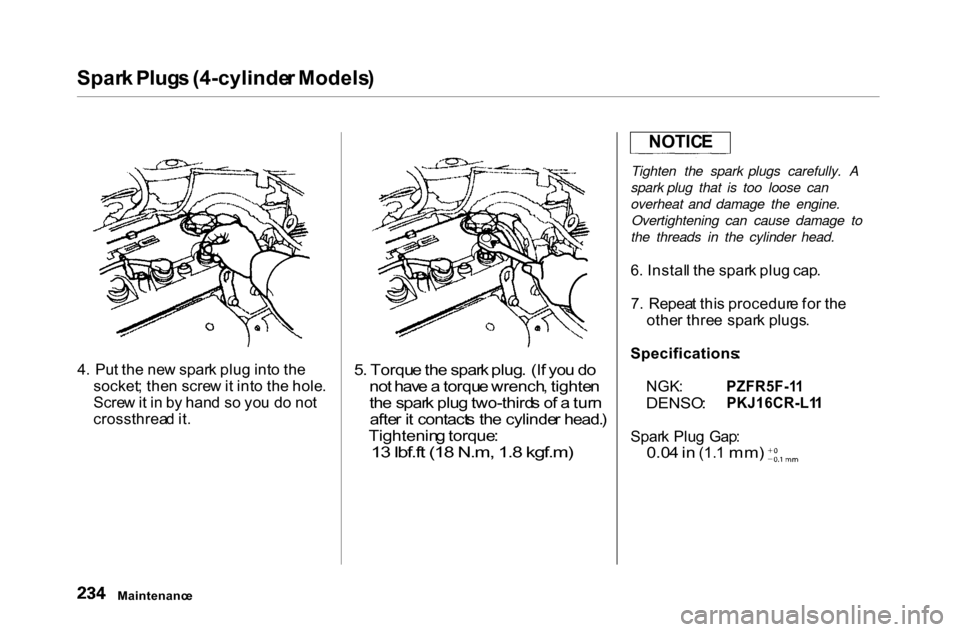
4 . Pu t th e ne w spar k plu g int o th e
socket ; the n scre w it int o th e hole .
Scre w it i n b y han d s o yo u d o no t
crossthrea d it .
5
. Torqu e th e spar k plug . (I f yo u d o
no t hav e a torqu e wrench , tighte n
th e spar k plu g two-third s o f a tur n
afte r i t contact s th e cylinde r head. )
Tightenin g torque :
13 lbf.ft (18 N.m, 1.8 kgf.m)
Tighten the spark plugs carefully. A
spark plug that is too loose can
overheat and damage the engine. Overtightening can cause damage to
the threads in the cylinder head.
6 . Instal l th e spar k plu g cap .
7 . Repea t thi s procedur e fo r th e
othe r thre e spar k plugs .
Specifications :
NGK :
DENSO :
PZFR5F-1
1
PKJ16CR-L1 1
Spar k Plu g Gap :
0.0 4 in
(1. 1
mm )
Maintenanc e
NOTIC
E
Page 238 of 338
Spar
k Plug s (6-cylinde r Models )
Th e spar k plug s in you r ca r shoul d
b e replace d accordin g to th e tim e
an d distanc e recommendation s i n
th e maintenanc e schedule .
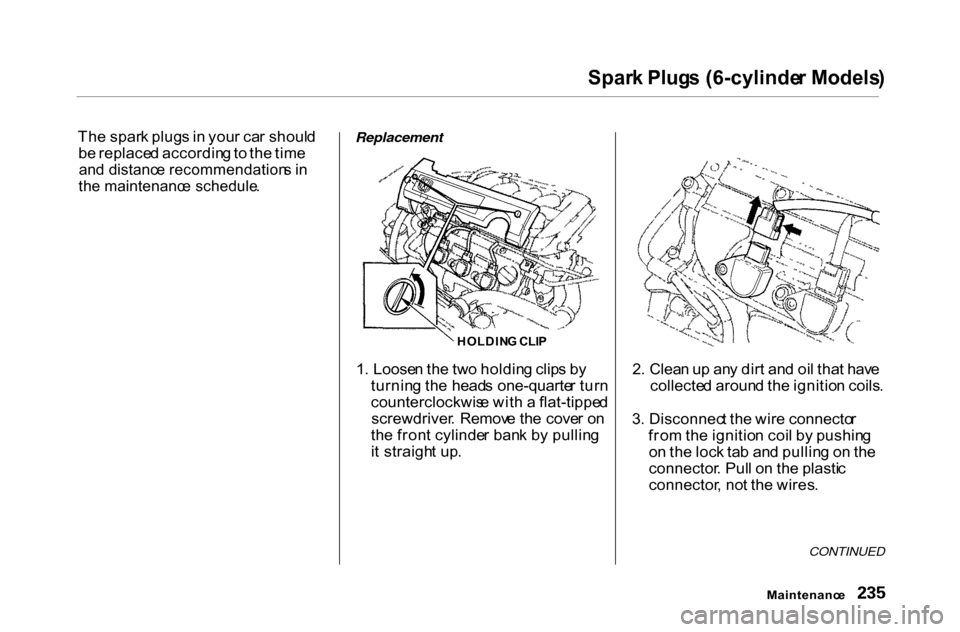
Replacement
HOLDING CLI P
1 . Loose n th e tw o holdin g clip s b y
turnin g th e head s one-quarte r tur n
counterclockwis e wit h a flat-tippe d
screwdriver . Remov e th e cove r o n
th e fron t cylinde r ban k b y pullin g
i t straigh t up . 2
. Clea n u p an y dir t an d oi l tha t hav e
collecte d aroun d th e ignitio n coils .
3 . Disconnec t th e wir e connecto r
fro m th e ignitio n coi l b y pushin g
o n th e loc k ta b an d pullin g o n th e
connector . Pul l o n th e plasti c
connector , no t th e wires .
CONTINUED
Maintenanc e
Page 239 of 338
Spar
k Plug s (6-cylinde r Models )
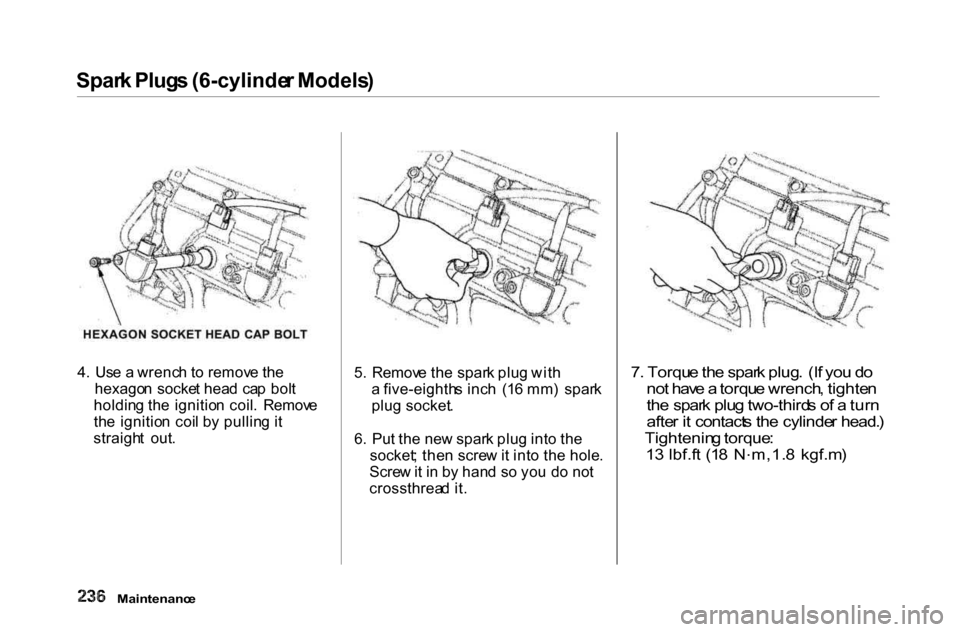
4 . Us e a wrenc h t o remov e th e
hexago n socke t hea d ca p bol t
holdin g th e ignitio n coil . Remov e
th e ignitio n coi l b y pullin g i t
straigh t out . 5
. Remov e th e spar k plu g wit h
a five-eighth s inc h (1 6 mm ) spar k
plu g socket .
6 . Pu t th e ne w spar k plu g int o th e
socket ; the n scre w it int o th e hole .
Scre w it i n b y han d s o yo u d o no t
crossthrea d it .
7
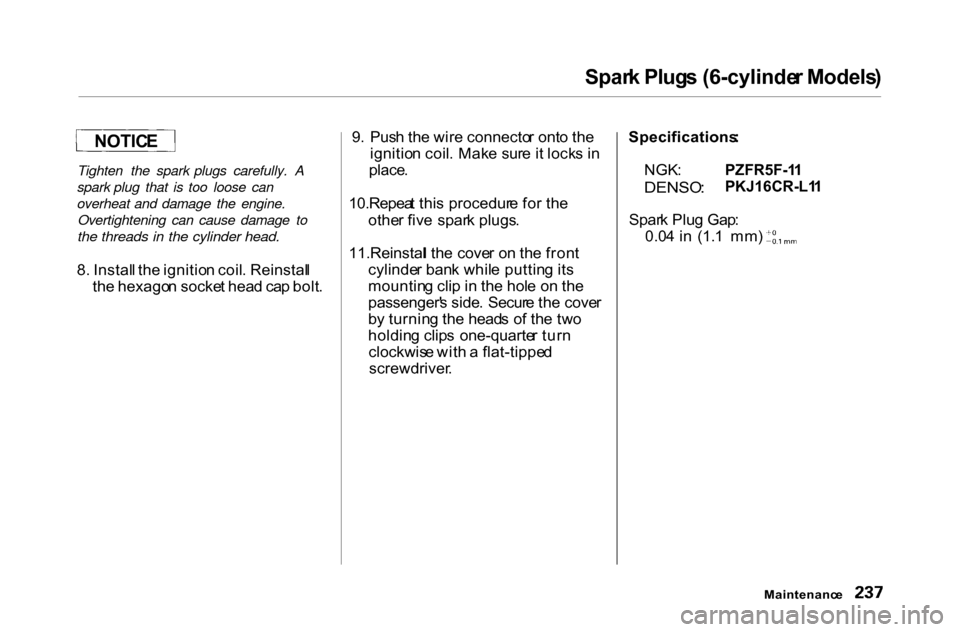
. Torqu e th e spar k plug . (I f yo u d o
no t hav e a torqu e wrench , tighte n
th e spar k plu g two-third s o f a tur n
afte r i t contact s th e cylinde r head. )
Tightenin g torque :
1 3 lbf.f t (1 8 N .
m,1. 8 kgf.m )
Maintenanc e
Page 240 of 338
Spar
k Plug s (6-cylinde r Models )
Tighten the spark plugs carefully. A
spark plug that is too loose can
overheat and damage the engine. Overtightening can cause damage to
the threads in the cylinder head.
8 . Instal l th e ignitio n coil . Reinstal l
th e hexago n socke t hea d ca p bolt . 9
. Pus h th e wir e connecto r ont o th e
ignitio n coil . Mak e sur e i t lock s i n
place .
10.Repea t thi s procedur e fo r th e
othe r fiv e spar k plugs .
11.Reinstal l th e cove r o n th e fron t
cylinde r ban k whil e puttin g it s
mountin g cli p in th e hol e o n th e
passenger' s side . Secur e th e cove r
b y turnin g th e head s o f th e tw o
holdin g clip s one-quarte r tur n
clockwis e wit h a flat-tippe d
screwdriver . Specifications
:
NGK :
DENSO :
PZFR5F-1
1
PKJ16CR-L1 1
Spar k Plu g Gap :
0.0 4 i n (1. 1 mm )
Maintenanc e
NOTIC
E