HONDA ACCORD COUPE 2003 CL7 / 7.G Owners Manual
Manufacturer: HONDA, Model Year: 2003, Model line: ACCORD COUPE, Model: HONDA ACCORD COUPE 2003 CL7 / 7.GPages: 429, PDF Size: 6.42 MB
Page 311 of 429
To thoroughly f lush the transmission,
the technician should drain and ref ill
it with Honda ATF-Z1, then drive the
vehicle a short distance. Do this
three times. Then drain and ref ill the
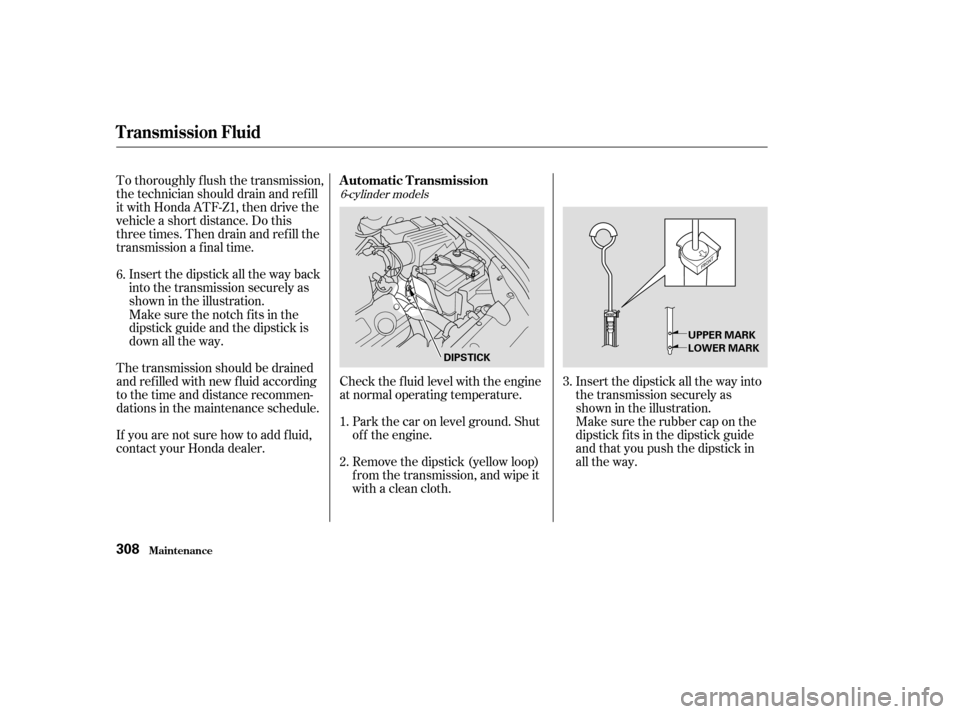
transmission a f inal time.Insert the dipstick all the way back
into the transmission securely as
shown in the illustration.
The transmission should be drained
and ref illed with new f luid according
to the time and distance recommen-
dations in the maintenance schedule.
If you are not sure how to add f luid,
contact your Honda dealer. Check the f luid level with the engine
at normal operating temperature.
Park the car on level ground. Shut
of f the engine.
Remove the dipstick (yellow loop)
f rom the transmission, and wipe it
with a clean cloth. Insert the dipstick all the way into
the transmission securely as
shown in the illustration.
Make sure the notch fits in the
dipstick guide and the dipstick is
down all the way.
Make sure the rubber cap on the
dipstick fits in the dipstick guide
and that you push the dipstick in
all the way.
1.
2.
6.
3.
6-cylinder models
Automatic Transmission
T ransmission Fluid
Maint enance308
DIPSTICKUPPER MARK
LOWER MARK
Page 312 of 429

To thoroughly f lush the transmission,
the technician should drain and ref ill
it with Honda ATF-Z1, then drive the
vehicle a short distance. Do this
three times. Then drain and ref ill the
transmission a f inal time.Insert the dipstick all the way back
into the transmission securely as
shown in the illustration.
Make sure the rubber cap f its in
the dipstick guide and the dipstick
is down all the way.
The transmission should be drained
and ref illed with new f luid according
to the time and distance recommen-
dations in the maintenance schedule.
If you are not sure how to add f luid,
contact your Honda dealer.
Remove the dipstick and check
the f luid level. It should be
between the upper and lower
marks.
If the level is below the lower
mark, remove the f ill plug and add
f luid to bring it to the upper mark.
Pour the f luid slowly and caref ully
so you do not spill. Clean up any
spills immediately. Spilled f luid
could damage components in the
engine compartment.
Always use Honda ATF-Z1
(Automatic Transmission Fluid). If
it is not available, you may use a
DEXRON
III automatic
transmission f luid as a temporary
replacement. However, continued
use can affect shift quality. Have
the transmission f lushed and
ref illed with Honda ATF-Z1 as
soon as it is convenient.
5.
6.
4.
T ransmission Fluid
Maint enance309
Page 313 of 429
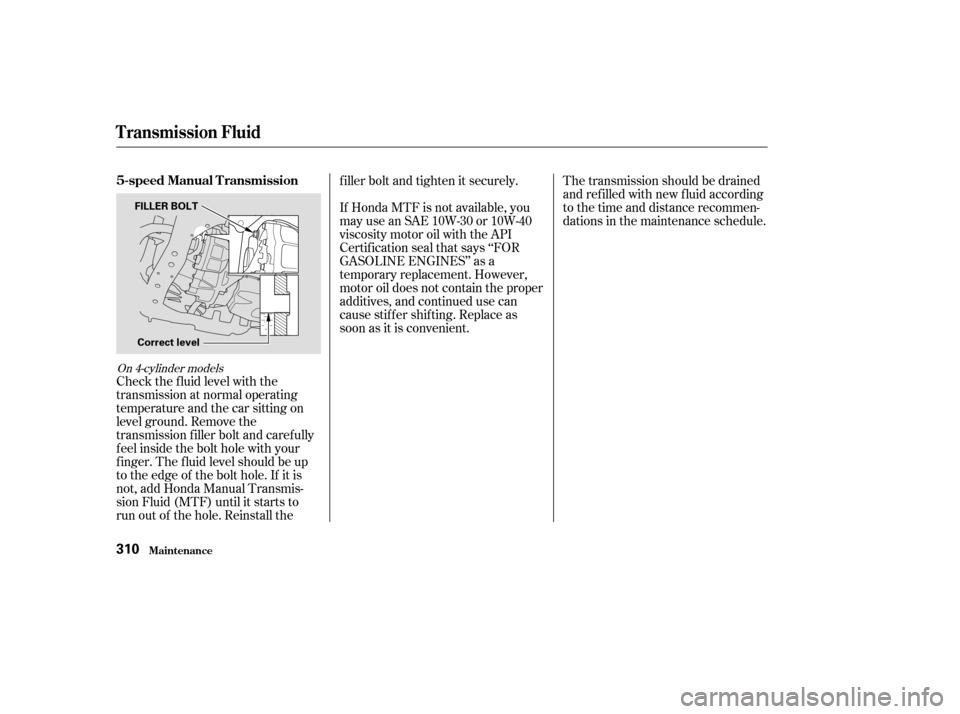
Check the f luid level with the
transmission at normal operating
temperature and the car sitting on
level ground. Remove the
transmission f iller bolt and caref ully
f eel inside the bolt hole with your
f inger. The f luid level should be up
to the edge of the bolt hole. If it is
not, add Honda Manual Transmis-
sion Fluid (MTF) until it starts to
run out of the hole. Reinstall thef iller bolt and tighten it securely.
If Honda MTF is not available, you
may use an SAE 10W-30 or 10W-40
viscosity motor oil with the API
Certif ication seal that says ‘‘FOR
GASOLINE ENGINES’’ as a
temporary replacement. However,
motor oil does not contain the proper
additives, and continued use can
cause stiffer shifting. Replace as
soon as it is convenient.
The transmission should be drained
and ref illed with new f luid according
to the time and distance recommen-
dations in the maintenance schedule.
On 4-cylinder models
5-speed Manual Transmission
T ransmission Fluid
Maint enance310
FILLER BOLT
Correct level
Page 314 of 429
CONT INUED
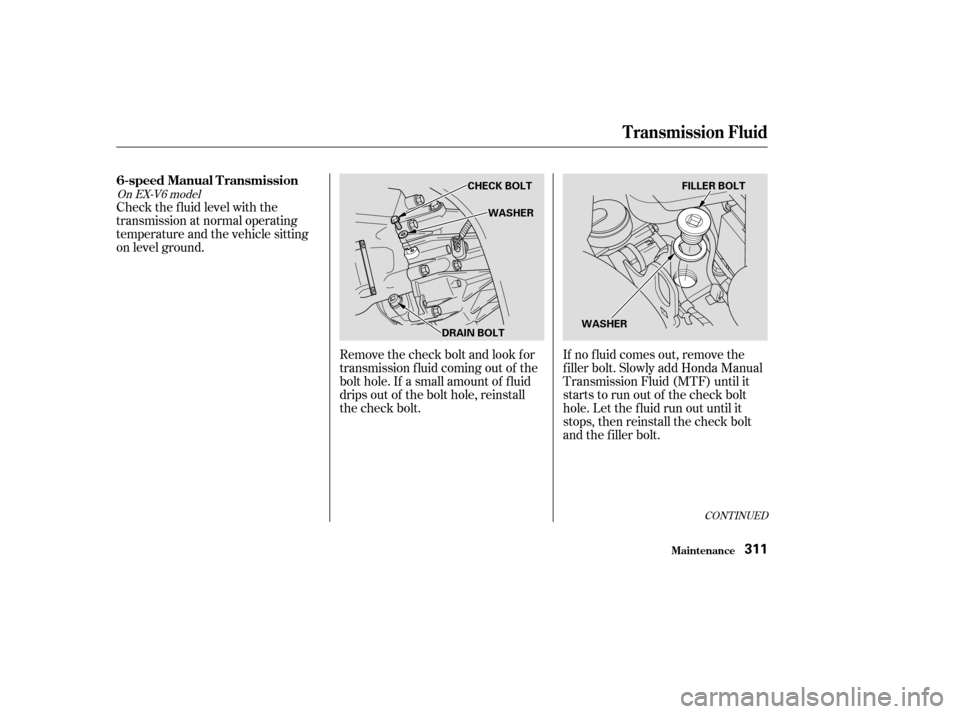
Check the f luid level with the
transmission at normal operating
temperature and the vehicle sitting
on level ground.Remove the check bolt and look for
transmission f luid coming out of the
bolt hole. If a small amount of f luid
drips out of the bolt hole, reinstall
the check bolt.If no f luid comes out, remove the
f iller bolt. Slowly add Honda Manual
Transmission Fluid (MTF) until it
starts to run out of the check bolt
hole. Let the f luid run out until it
stops, then reinstall the check bolt
and the f iller bolt.
On EX-V6 model
6-speed Manual Transmission
T ransmission Fluid
Maint enance311
WASHER
DRAIN BOLT CHECK BOLT
FILLER BOLT
WASHER
Page 315 of 429

Pour the f luid to the f iller hole slowly
and caref ully so you do not spill.
Clean up any spills immediately.
Spilled f luid could damage
components in the engine
compartment.
If Honda MTF is not available, you
may use an SAE 10W-30 or 10W-40
viscosity motor oil with the API
Certif ication seal that says ‘‘FOR
GASOLINE ENGINES’’ as a
temporary replacement. However,
motor oil does not contain the proper
additives, and continued use can
cause stiffer shifting. Replace as
soon as it is convenient.The transmission should be drained
and ref illed with new f luid according
to the time and distance recommen-
dations in the maintenance schedule.
If you are not sure how to check and
add f luid, contact your Honda dealer.
T ransmission Fluid
Maint enance312
Page 316 of 429
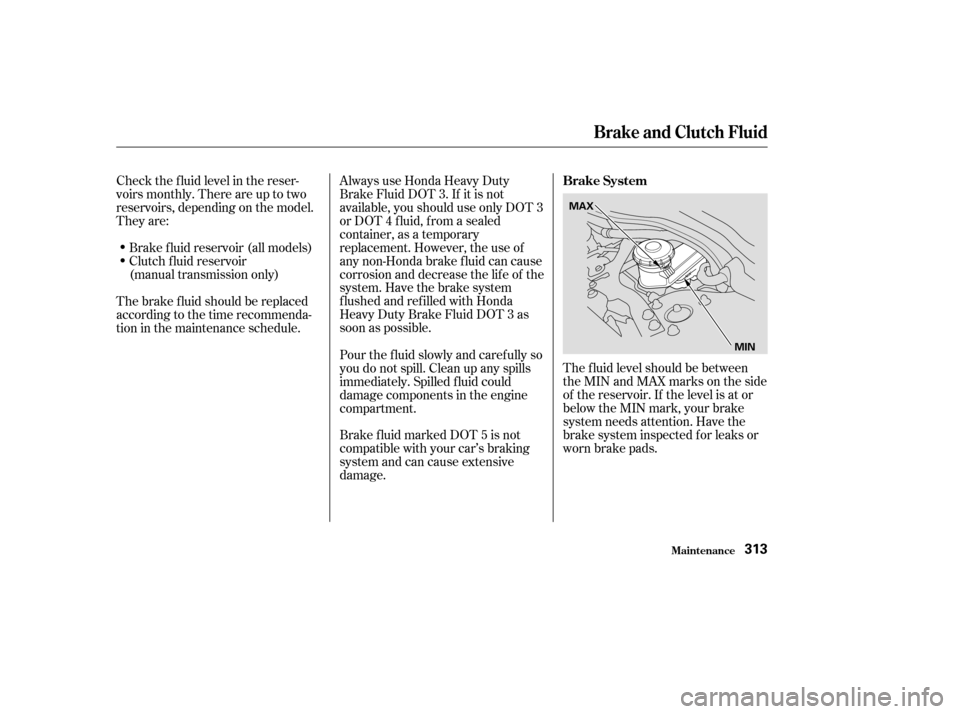
The f luid level should be between
theMINandMAXmarksontheside
of the reservoir. If the level is at or
below the MIN mark, your brake
system needs attention. Have the
brake system inspected f or leaks or
worn brake pads.
Always use Honda Heavy Duty
Brake Fluid DOT 3. If it is not
available, you should use only DOT 3
or DOT 4 f luid, f rom a sealed
container, as a temporary
replacement. However, the use of
any non-Honda brake fluid can cause
corrosion and decrease the lif e of the
system. Have the brake system
f lushed and ref illed with Honda
Heavy Duty Brake Fluid DOT 3 as
soon as possible.
Check the f luid level in the reser-
voirs monthly. There are up to two
reservoirs, depending on the model.
They are:
Brake f luid reservoir (all models)
Clutch f luid reservoir
(manual transmission only)
The brake f luid should be replaced
according to the time recommenda-
tion in the maintenance schedule. Pour the f luid slowly and caref ully so
you do not spill. Clean up any spills
immediately. Spilled f luid could
damage components in the engine
compartment.
Brake f luid marked DOT 5 is not
compatible with your car’s braking
system and can cause extensive
damage.Brake System
Brake and Clutch Fluid
Maint enance313
MAX
MIN
Page 317 of 429
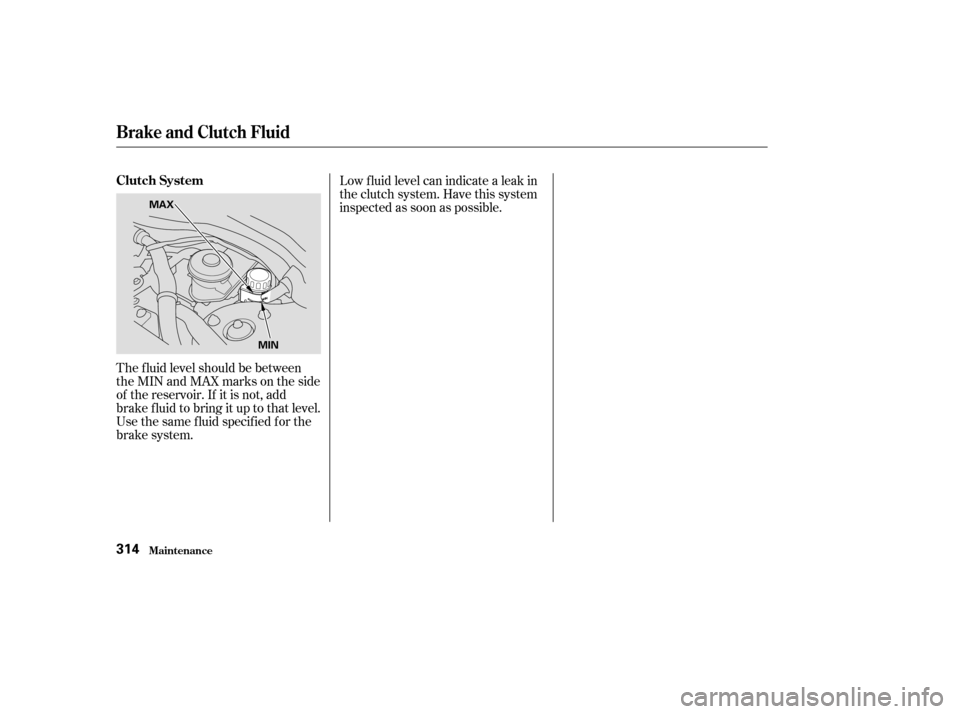
The f luid level should be between
theMINandMAXmarksontheside
of the reservoir. If it is not, add
brake f luid to bring it up to that level.
Use the same fluid specified for the
brake system.Low f luid level can indicate a leak in
the clutch system. Have this system
inspected as soon as possible.
Maint enance
Clutch System
Brake and Clutch Fluid
314
MAX
MIN
Page 318 of 429

Check the level when the engine is
cold. Look at the side of the
reservoir. The f luid should be
between the UPPER LEVEL and
LOWER LEVEL. If it is below the
LOWER LEVEL, add power steering
f luid to the UPPER LEVEL.A low power steering f luid level can
indicate a leak in the system. Check
the f luid level f requently, and have
the system inspected as soon as
possible. Always use Honda Power Steering
Fluid. If it is not available, you may
use another power steering f luid as
an emergency replacement.
However, continued use can cause
increased wear and poor steering in
cold weather. Have the power
steering system f lushed and ref illed
with Honda PSF as soon as possible.
Pour the f luid slowly and caref ully so
you do not spill. Clean up any spills
immediately. Spilled f luid could
damage components in the engine
compartment.
Maint enance
Power Steering
315
6-cylider models UPPER LEVEL
LOWER LEVEL
4-cylider models LOWER LEVEL UPPER LEVEL
T urning the steering wheel to f ull lef t
or right lock and holding it there can
damage the power steering pump.
Page 319 of 429
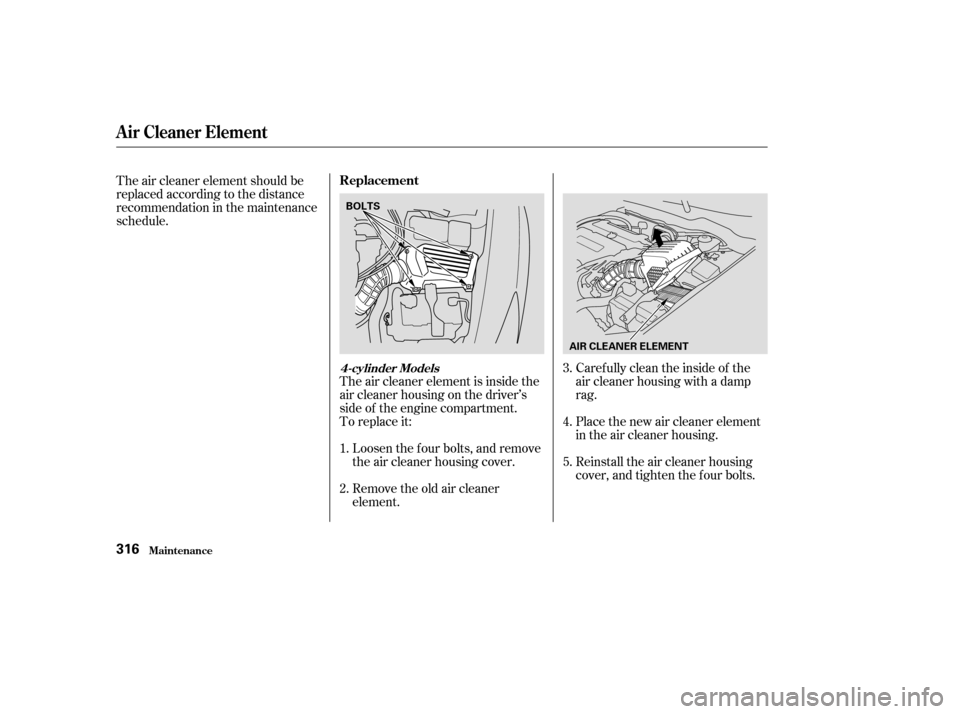
The air cleaner element is inside the
air cleaner housing on the driver’s
side of the engine compartment.
To replace it:Loosen the f our bolts, and remove
the air cleaner housing cover.
Remove the old air cleaner
element. Caref ully clean the inside of the
air cleaner housing with a damp
rag.
Place the new air cleaner element
in the air cleaner housing.
Reinstall the air cleaner housing
cover, and tighten the four bolts.
The air cleaner element should be
replaced according to the distance
recommendation in the maintenance
schedule.
1.3.
4.
5.
2.
Maint enance
Replacement
A ir Cleaner Element
4-cylinder Models
316
BOLTS
AIR CLEANER ELEMENT
Page 320 of 429
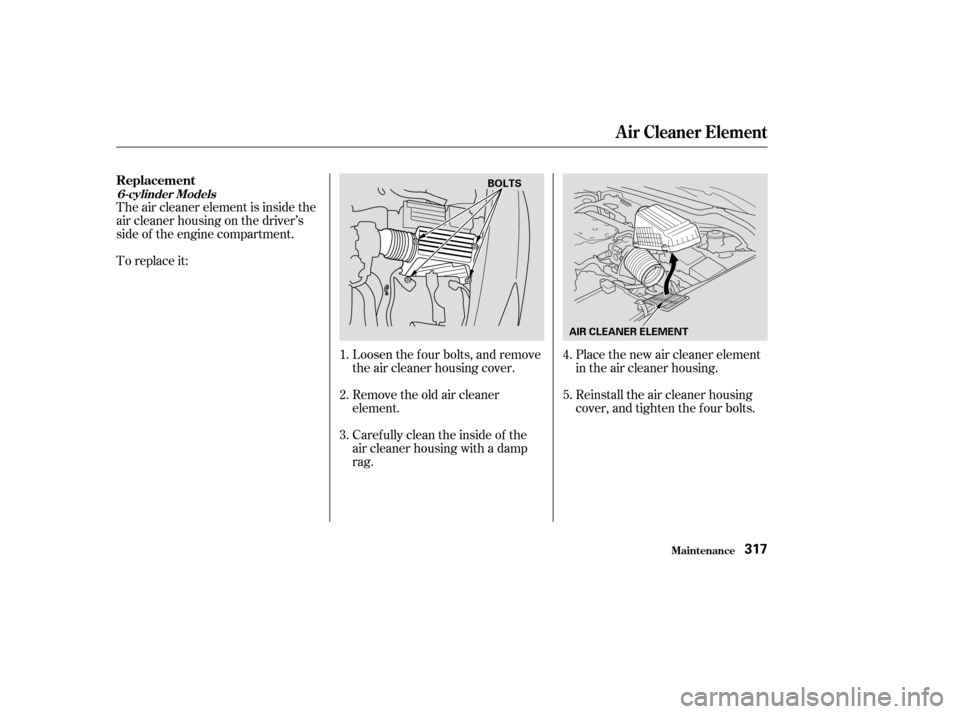
Place the new air cleaner element
in the air cleaner housing.
Reinstall the air cleaner housing
cover, and tighten the four bolts.
To replace it: The air cleaner element is inside the
air cleaner housing on the driver’s
side of the engine compartment.
Loosen the f our bolts, and remove
the air cleaner housing cover.
Remove the old air cleaner
element.
Caref ully clean the inside of the
air cleaner housing with a damp
rag.
1.
3.
4.
5.
2.
Maint enance
A ir Cleaner Element
Replacement
6-cylinder Models
317
AIR CLEANER ELEMENT
BOLTS