ECO mode HONDA ACCORD COUPE 2017 9.G Quick Guide
[x] Cancel search | Manufacturer: HONDA, Model Year: 2017, Model line: ACCORD COUPE, Model: HONDA ACCORD COUPE 2017 9.GPages: 84, PDF Size: 7.3 MB
Page 8 of 84
8 || 9
S
AFETYSAFETY
Airbags
Your vehicle is equipped with three types of airbags: front airbags, side\
airbags, and
side curtain airbags.
Front Airbags (SRS)
The front S
rS airbags inflate in a moderate-to-severe frontal collision to help
protect the head and chest of the driver and/or front passenger
. They are housed
in the center of the steering wheel for the driver, and in the dashboard for the front
passenger. Both airbags are marked SRS AIRBAG.
S
rS (Supplemental restraint System) indicates that the airbags are designed to
supplement seat belts, not replace them. Seat belts are the occupant’\
s primary
restraint system.
Advanced Airbags
Your front airbags have advanced features to help reduce the likelihood o\
f airbag-
related injuries to smaller occupants.
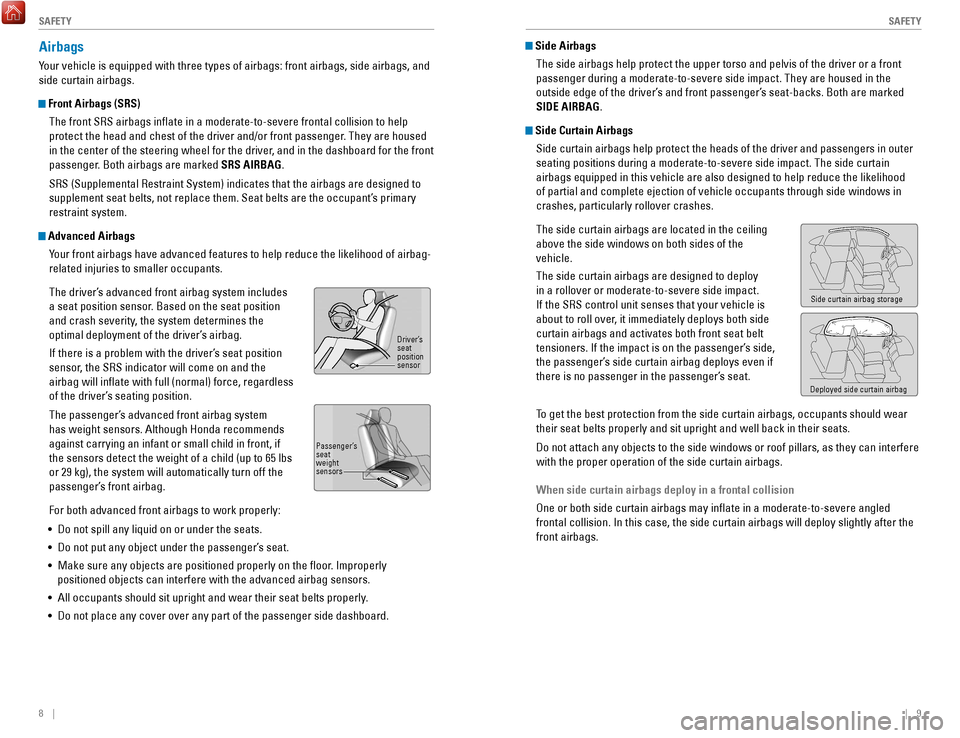
The driver’s advanced front airbag system includes
a seat position sensor. Based on the seat position
and crash severity, the system determines the
optimal deployment of the driver’s airbag.
If there is a problem with the driver’s seat position
sensor, the S
rS indicator will come on and the
airbag will inflate with full (normal) force, regardless
of the driver’
s seating position.
The passenger’s advanced front airbag system
has weight sensors. Although Honda recommends
against carrying an infant or small child in front, if
the sensors detect the weight of a child (up to 65 lbs
or 29 kg), the system will automatically turn off the
passenger’s front airbag.
For both advanced front airbags to work properly:
•
Do not spill any liquid on or under the seats.
•
Do not put any object under the passenger’s seat.
•
Make sure any objects are positioned properly on the floor. Improperly
positioned objects can interfere with the advanced airbag sensors.
•
All occupants should sit upright and wear their seat belts properly.
•
Do not place any cover over any part of the passenger side dashboard.
Side Airbags The side airbags help protect the upper torso and pelvis of the driver o\
r a front
passenger during a moderate-to-severe side impact. They are housed in th\
e
outside edge of the driver’s and front passenger’s seat-backs. Both are marked
SIDE AIRBAG.
Side Curtain AirbagsSide curtain airbags help protect the heads of the driver and passengers\
in outer
seating positions during a moderate-to-severe side impact. The side curt\
ain
airbags equipped in this vehicle are also designed to help reduce the li\
kelihood
of partial and complete ejection of vehicle occupants through side windo\
ws in
crashes, particularly rollover crashes.
The side curtain airbags are located in the ceiling
above the side windows on both sides of the
vehicle.
The side curtain airbags are designed to deploy
in a rollover or moderate-to-severe side impact.
If the S
rS control unit senses that your vehicle is
about to roll over
, it immediately deploys both side
curtain airbags and activates both front seat belt
tensioners. If the impact is on the passenger’s side,
the passenger’s side curtain airbag deploys even if
there is no passenger in the passenger’s seat.
To get the best protection from the side curtain airbags, occupants shoul\
d wear
their seat belts properly and sit upright and well back in their seats.
Do not attach any objects to the side windows or roof pillars, as they c\
an interfere
with the proper operation of the side curtain airbags.
When side curtain airbags deploy in a frontal collision
one or both side curtain airbags may inflate in a moderate-to-severe an\
gled
frontal collision. In this case, the side curtain airbags will deploy sl\
ightly af
ter the
front airbags.
Driver’s
seat
position
sensor
Passenger’s
seat
weight
sensors
Side curtain airbag storage
Deployed side curtain airbag
Page 10 of 84
12 || 13
S
AFETYSAFETY
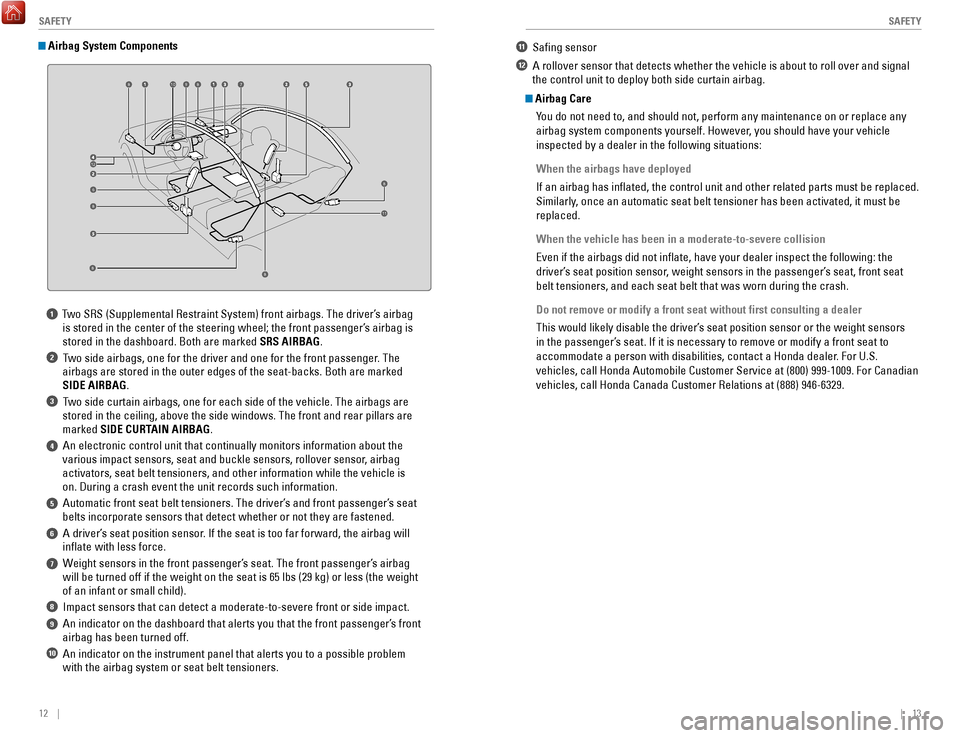
1 Two SrS (Supplemental restraint System) front airbags. The driver’s airbag
is stored in the center of the steering wheel; the front passenger’s airbag is
stored in the dashboard. Both are marked
SRS AIRBAG.
2 Two side airbags, one for the driver and one for the front passenger. The airbags are stored in the outer edges of the seat-backs. Both are marked\
SIDE AIRBAG.
3 Two side curtain airbags, one for each side of the vehicle. The airbags a\
re stored in the ceiling, above the side windows. The front and rear pillar\
s are
marked SIDE CURTAIN AIRBAG.
4 An electronic control unit that continually monitors information about\
the various impact sensors, seat and buckle sensors, rollover sensor, airbag
activators, seat belt tensioners, and other information while the vehicl\
e is
on. During a crash event the unit records such information.
5 Automatic front seat belt tensioners. The driver’s and front passenger’s seat belts incorporate sensors that detect whether or not they are fastened.
6 A driver’s seat position sensor. If the seat is too far forward, the airbag will inflate with less force.
7 Weight sensors in the front passenger’s seat. The front passenger’s airbag will be turned off if the weight on the seat is 65 lbs (29 kg) or less\
(the weight
of an infant or small child).
8 Impact sensors that can detect a moderate-to-severe front or side impa\
ct.
9 An indicator on the dashboard that alerts you that the front passenger\
’s front airbag has been turned off.
10 An indicator on the instrument panel that alerts you to a possible pro\
blem with the airbag system or seat belt tensioners.
Airbag System Components
Airbag Care
You do not need to, and should not, perform any maintenance on or replace\
any
airbag system components yourself. However, you should have your vehicle
inspected by a dealer in the following situations:
When the airbags have deployed
If an airbag has inflated, the control unit and other related parts mu\
st be replaced.
Similarly, once an automatic seat belt tensioner has been activated, it must be
replaced.
When the vehicle has been in a moderate-to-severe collision
even if the airbags did not inflate, have your dealer inspect the follo\
wing: the
driver’
s seat position sensor, weight sensors in the passenger’s seat, front seat
belt tensioners, and each seat belt that was worn during the crash.
Do not remove or modify a front seat without first consulting a dealer
This would likely disable the driver’s seat position sensor or the weight sensors
in the passenger’s seat. If it is necessary to remove or modify a front seat to
accommodate a person with disabilities, contact a Honda dealer. For U.S.
vehicles, call Honda Automobile Customer Service at (800) 999-1009. Fo\
r Canadian
vehicles, call Honda Canada Customer
relations at (888) 946-6329.
6
7
8
9
8
8
8
8810
11
12
11 Safing sensor
12 A rollover sensor that detects whether the vehicle is about to roll ov\
er and signal the control unit to deploy both side curtain airbag.
Page 14 of 84
20 || 21
S
AFETYSAFETY
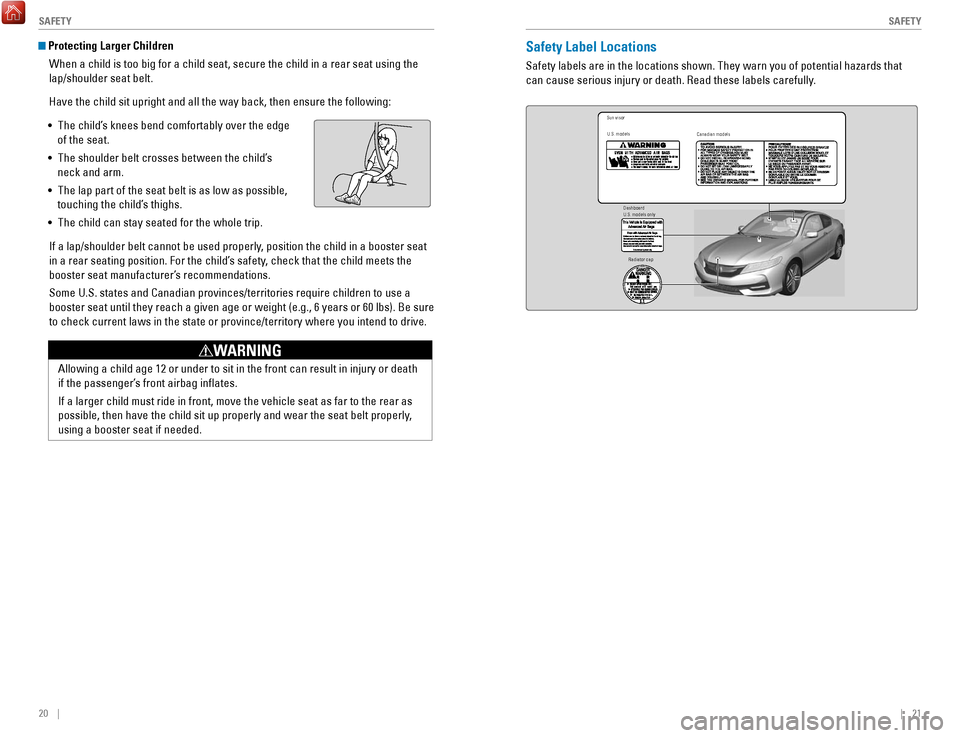
Protecting Larger Children
When a child is too big for a child seat, secure the child in a rear sea\
t using the
lap/shoulder seat belt.
Have the child sit upright and all the way back, then ensure the followi\
ng:
•
The child’s knees bend comfortably over the edge
of the seat.
•
The shoulder belt crosses between the child’s
neck and arm.
•
The lap part of the seat belt is as low as possible,
touching the child’s thighs.
•
The child can stay seated for the whole trip.
If a lap/shoulder belt cannot be used properly, position the child in a booster seat
in a rear seating position. For the child’
s safety, check that the child meets the
booster seat manufacturer’s recommendations.
Some U.S. states and Canadian provinces/territories require children to \
use a
booster seat until they reach a given age or weight (e.g., 6 years or 6\
0 lbs). Be sure
to check current laws in the state or province/territory where you inten\
d to drive.Safety Label Locations
Safety labels are in the locations shown. They warn you of potential haz\
ards that
can cause serious injury or death.
read these labels carefully
.
Sun visor
U.S. models Canadian models
Radiator cap
U.S. models only
Dashboard
Allowing a child age 12 or under to sit in the front can result in injur\
y or death
if the passenger’s front airbag inflates.
If a larger child must ride in front, move the vehicle seat as far to th\
e rear as
possible, then have the child sit up properly and wear the seat belt pro\
perly,
using a booster seat if needed.
WARNING
Page 16 of 84
24 || 25
I
NSTRUMENT PANELINSTRUMENT PANEL
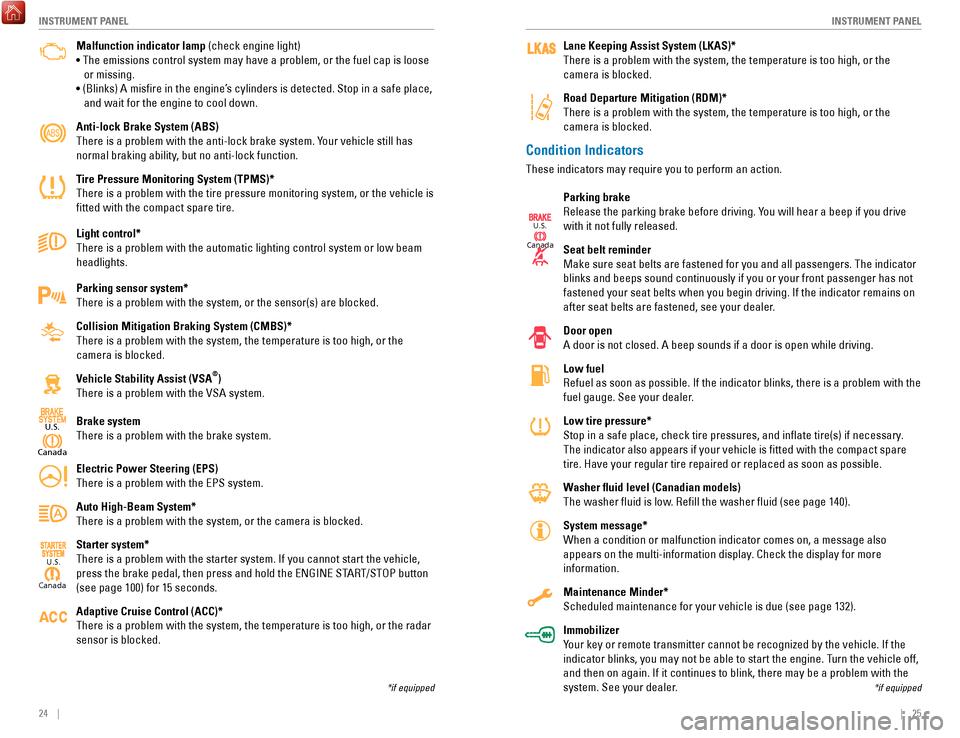
Malfunction indicator lamp (check engine light)
• The emissions control system may have a problem, or the fuel cap is\
loose
or missing.
• (Blinks) A
misfire in the engine’
s cylinders is detected. Stop in a safe place,
and wait for the engine to cool down.
Anti-lock Brake System (ABS)
There is a problem with the anti-lock brake system. Your vehicle still has
normal braking ability, but no anti-lock function.
Tire Pressure Monitoring System (TPMS)*
There is a problem with the tire pressure monitoring system, or the vehi\
cle is
fitted with the compact spare tire.
Light control*
There is a problem with the automatic lighting control system or low bea\
m
headlights.
Parking sensor system*
There is a problem with the system, or the sensor(s) are blocked.
Collision Mitigation Braking System (CMBS)*
There is a problem with the system, the temperature is too high, or the \
camera is blocked.
Vehicle Stability Assist (VSA
®)
There is a problem with the
vSA system.
Brake system
There is a problem with the brake system.
Electric Power Steering (EPS)
There is a problem with the
ePS system.
Auto High-Beam System*
There is a problem with the system, or the camera is blocked.
Starter system*
There is a problem with the starter system. If you cannot start the vehi\
cle,
press the brake pedal, then press and hold the
eNGINe ST
A
rT/SToP button
(see page 100) for 15 seconds.
Adaptive Cruise Control (ACC)*
There is a problem with the system, the temperature is too high, or the \
r
adar
sensor is blocked.
Canad a
U.S.
*if equipped
Condition Indicators
These indicators may require you to perform an action.
Parking brake
release the parking brake before driving. Y
ou will hear a beep if you drive
with it not fully released.
Seat belt reminder
Make sure seat belts are fastened for you and all passengers. The indicator
blinks and beeps sound continuously if you or your front passenger has not
fastened your seat belts when you begin driving. If the indicator remain\
s on
after seat belts are fastened, see your dealer.
Door open
A door is not closed. A beep sounds if a door is open while driving.
Low fuel
refuel as soon as possible. If the indicator blinks, there is a problem w\
ith t
he
fuel gauge. See your dealer.
Low tire pressure*
Stop in a safe place, check tire pressures, and inflate tire(s) if n\
ecessary.
The indicator also appears if your vehicle is fitted with the compact \
spare
tire. Have your regular tire repaired or replaced as soon as possible.
Washer fluid level (Canadian models)
The washer fluid is low.
refill the washer fluid (see page 140).
System message*
When a condition or malfunction indicator comes on, a message also
appears on the multi-information display
. Check the display for more
information.
Maintenance Minder*
Scheduled maintenance for your vehicle is due (see page 132).
Immobilizer
Your key or remote transmitter cannot be recognized by the vehicle. If th\
e
indicator blinks, you may not be able to start the engine. Turn the vehicle off,
and then on again. If it continues to blink, there may be a problem with\
the
system. See your dealer.
*if equipped
Lane Keeping Assist System (LKAS)*
There is a problem with the system, the temperature is too high, or the \
camera is blocked.
Road Departure Mitigation (RDM)*
There is a problem with the system, the temperature is too high, or the \
camera is blocked.
Canad a
U.S.
Canada
U.S.
Page 17 of 84
26 || 27
I
NSTRUMENT PANELINSTRUMENT PANEL
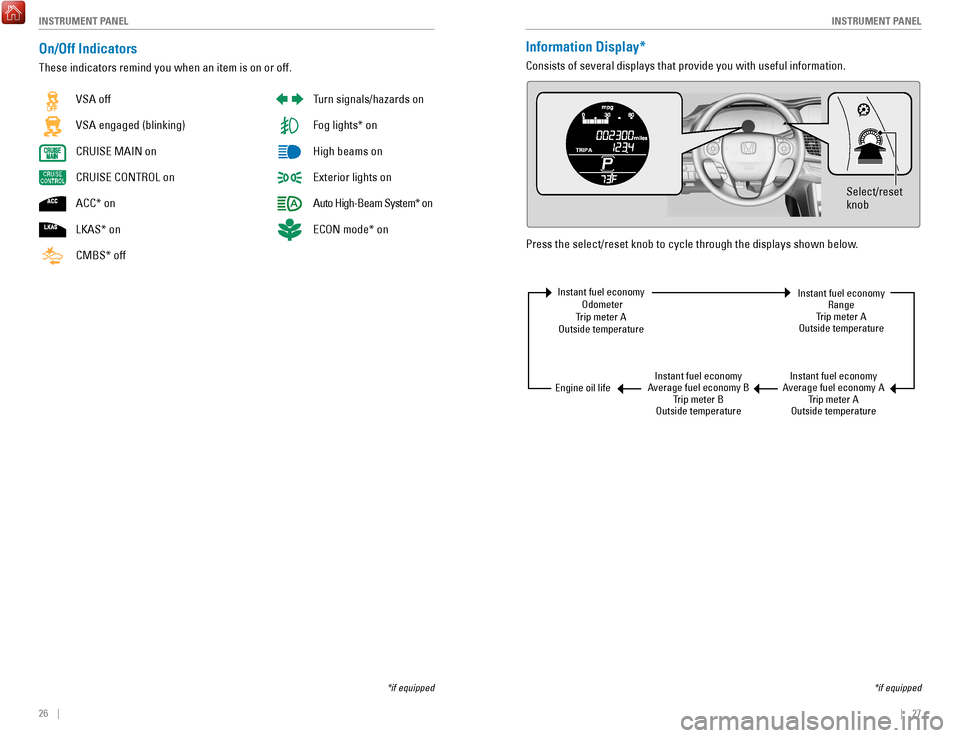
On/Off Indicators
These indicators remind you when an item is on or off.
*if equipped
vSA off
vSA engaged (blinking)
C
rUISe MAIN on
C
rUISe CoNTroL on
ACC*
on
LKAS*
on
CMBS*
off
Turn signals/hazards on
Fog lights* on
High beams on
exterior lights on
Auto High-Beam System* on
eCoN mode* on
Information Display*
Consists of several displays that provide you with useful information.
Press the select/reset knob to cycle through the displays shown below.
Select/reset
knob
Instant fuel economy
odometer
T
rip meter A
outside temperature
Instant fuel economy
A
verage fuel economy BTrip meter B
outside temperature Instant fuel economy
A
verage fuel economy ATrip meter A
outside temperatureInstant fuel economy
range
T
rip meter A
outside temperature
engine oil life
*if equipped
Page 33 of 84
58 || 59
AUDIO AND CONNECTIVITY
AUDIO AND CONNECTIVITY
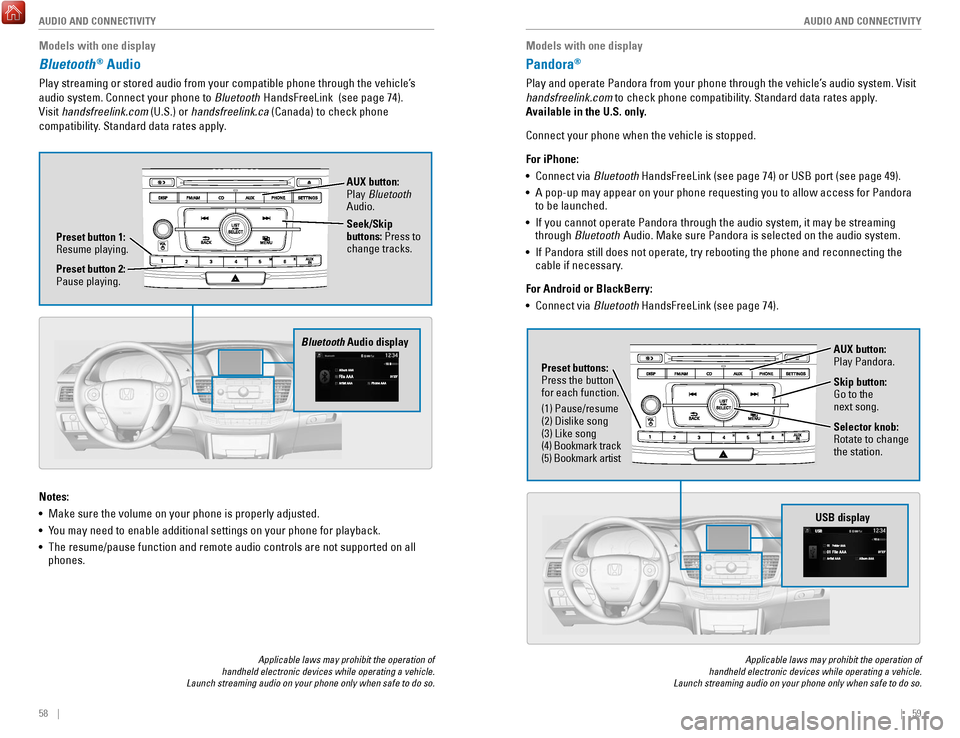
Models with one display
Bluetooth® Audio
Play streaming or stored audio from your compatible phone through the ve\
hicle’s
audio system. Connect your phone to Bluetooth HandsFreeLink (see page 74).
visit
handsfreelink.com (U.S.) or handsfreelink.ca (Canada) to check phone
compatibility. Standard data rates apply.
Applicable laws may prohibit the operation of
handheld electronic devices while operating a vehicle.
Launch streaming audio on your phone only when safe to do so.
Notes:
•
Make sure the volume on your phone is properly adjusted.
•
You may need to enable additional settings on your phone for playback.
•
The resume/pause function and remote audio controls are not supported on\
all
phones.
Bluetooth Audio display
Preset button 1: resume playing. AUX button:
Play Bluetooth
Audio.
Seek/Skip
buttons: Press to
change tracks.
Preset button 2:
Pause playing.
Models with one display
Pandora®
Play and operate Pandora from your phone through the vehicle’s audio system. visit
handsfreelink.com to check phone compatibility . Standard data rates apply.
Available in the U.S. only.
Connect your phone when the vehicle is stopped.
For iPhone:
•
Connect via Bluetooth
HandsFreeLink (see page 74) or USB port (see page 49).
•
A pop-up may appear on your phone requesting you to allow access for Pan\
dora
to be launched.
•
If you cannot operate Pandora through the audio system, it may be stream\
ing
through Bluetooth Audio. Make sure Pandora is selected on the audio system.
•
If Pandora still does not operate, try rebooting the phone and reconnect\
ing the
cable if necessary
.
For Android or BlackBerry:
•
Connect via Bluetooth
HandsFreeLink (see page 74).
Applicable laws may prohibit the operation of
handheld electronic devices while operating a vehicle.
Launch streaming audio on your phone only when safe to do so.
Selector knob: rotate to change
the station.
USB display
AUX button:
Play Pandora.
Skip button:
Go to the
next song.
Preset buttons:
Press the button
for each function.
(1) Pause/resume
(2) Dislike song
(3) Like song
(4) Bookmark track
(5) Bookmark artist
Page 35 of 84
62 || 63
AUDIO AND CONNECTIVITY
AUDIO AND CONNECTIVITY
Models with touchscreen
HondaLink®
Provides you with useful information about your vehicle directly from Ho\
nda.
To check phone compatibility, visit handsfreelink.com (U.S.) or handsfreelink.ca
(Canada). Standard data rates may apply with your phone service provid\
er.
To get more information on HondaLink, visit www.hondalink.com (U.S.) or honda.ca/
hondalink (Canada).
If there is an active connection to Apple CarPlay or Android Auto, Honda\
Link can
only be connected through Wi-Fi.
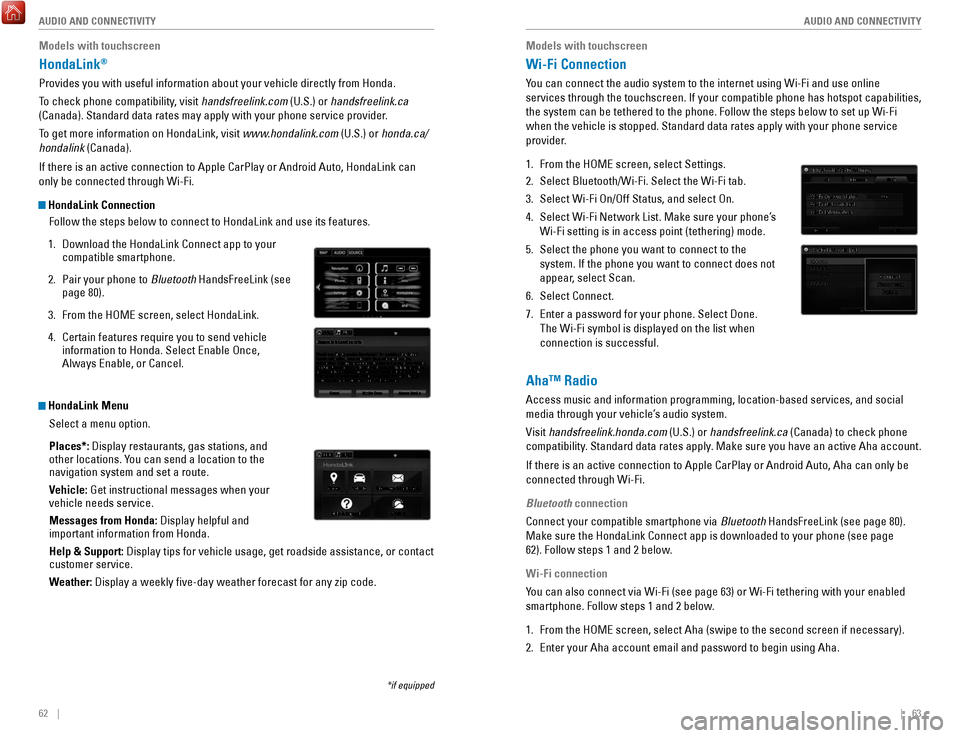
HondaLink Connection
Follow the steps below to connect to HondaLink and use its features.
1.
Download the HondaLink Connect app to your
compatible smartphone.
2.
Pair your phone to Bluetooth
HandsFreeLink (see
page 80).
3.
From the HoMe screen, select HondaLink.
4.
Certain features require you to send vehicle
information to Honda. Select enable once,
Always enable, or Cancel.
HondaLink Menu
Select a menu option.
Places*: Display restaurants, gas stations, and
other locations. You can send a location to the
navigation system and set a route.
Vehicle: Get instructional messages when your
vehicle needs service.
Messages from Honda: Display helpful and
important information from Honda.
Help & Support: Display tips for vehicle usage, get roadside assistance, or contact
customer service.
Weather: Display a weekly five-day weather forecast for any zip code.
*if equipped
Models with touchscreen
Wi-Fi Connection
You can connect the audio system to the internet using Wi-Fi and use onli\
ne
services through the touchscreen. If your compatible phone has hotspot c\
apabilities,
the system can be tethered to the phone. Follow the steps below to set u\
p Wi-Fi
when the vehicle is stopped. Standard data rates apply with your phone s\
ervice
provider.
1.
From the HoMe screen, select Settings.
2.
Select Bluetooth/Wi-Fi. Select the Wi-Fi tab.
3.
Select Wi-Fi on/off Status, and select on.
4.
Select Wi-Fi Network List. Make sure your phone’s
Wi-Fi setting is in access point (tethering) mode.
5.
Select the phone you want to connect to the
system. If the phone you want to connect does not
appear, select Scan.
6.
Select Connect.
7.
enter a password for your phone. Select Done.
The Wi-Fi symbol is displayed on the list when
connection is successful.
Aha™ Radio
Access music and information programming, location-based services, and social
media through your vehicle’s audio system.
visit
handsfreelink.honda.com (U.S.) or handsfreelink.ca (Canada) to check phone
compatibility. Standard data rates apply. Make sure you have an active Aha account.
If there is an active connection to Apple CarPlay or Android Auto, Aha c\
an only be
connected through Wi-Fi.
Bluetooth connection
Connect your compatible smartphone via Bluetooth HandsFreeLink (see page 80).
Make sure the HondaLink Connect app is downloaded to your phone (see pa\
ge
62). Follow steps 1 and 2 below.
Wi-Fi connection
You can also connect via Wi-Fi (see page 63) or Wi-Fi tethering with yo\
ur enabled
smartphone. Follow steps 1 and 2 below.
1.
From the HoMe screen, select Aha (swipe to the second screen if necessary).
2.
enter your Aha account email and password to begin using Aha.
Page 40 of 84
| 7372 | AUDIO AND CONNECTIVITY
Models with touchscreen
Pandora®
Play and operate Pandora from your compatible phone through the vehicle’\
s audio
system.
visit
handsfreelink.com to check phone compatibility. Standard data rates
apply with your phone service provider. Available in the U.S. only.
Connect your phone when the vehicle is stopped.
For iPhone:
•
Connect via Bluetooth
HandsFreeLink (see page 80) or USB port (see page 49).
•
A pop-up may appear on your phone requesting you to allow access for Pan\
dora
to be launched.
•
If you cannot operate Pandora through the audio system, it may be stream\
ing
through Bluetooth Audio. Make sure Pandora is selected on the audio system.
•
If a phone is connected via Apple CarPlay, Pandora can only be used within Apple
CarPlay
.
•
If Pandora still does not operate, try rebooting the phone and reconnect\
ing the
cable if necessary
.
For other compatible smartphones:
•
Connect via Bluetooth
HandsFreeLink (see page 80).
Applicable laws may prohibit the operation of
handheld electronic devices while operating a vehicle.
Launch streaming audio on your phone only when it is safe to do so.
Pandora display
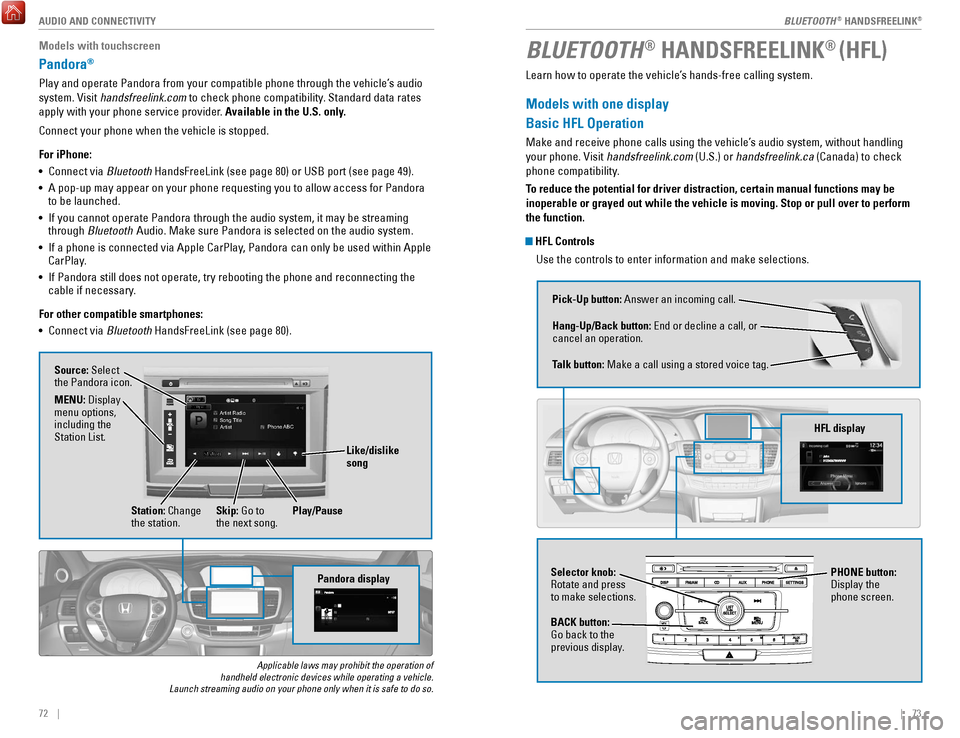
Artist Radio
Song Title
Artist Phone ABC
Source: Select
the Pandora icon.
Station: Change
the station. Skip: Go to
the next song.
MENU: Display
menu options,
including the
Station List.
Like/dislike
song
Play/Pause
BLUETOOTH® HANDSFREELINK® (HFL)
Learn how to operate the vehicle’s hands-free calling system.
Models with one display
Basic HFL Operation
Make and receive phone calls using the vehicle’s audio system, without handling
your phone.
visit
handsfreelink.com (U.S.) or handsfreelink.ca (Canada) to check
phone compatibility.
To reduce the potential for driver distraction, certain manual functions \
may be
inoperable or grayed out while the vehicle is moving. Stop or pull over \
to perform
the function.
HFL Controls
Use the controls to enter information and make selections.
Pick-Up button: Answer an incoming call.
Hang-Up/Back button:
end or decline a call, or
cancel an operation.
T
alk button: Make a call using a stored voice tag.
HFL display
Selector knob: rotate and press
to make selections.
BACK button:
Go back to the
previous display
. PHONE button:
Display the
phone screen.
BLUETOOTH® HANDSFreeLINK®
BLUETOOTH® HANDSFreeLINK®
Page 46 of 84
84 || 85
Models with touchscreen
HondaLink® Assist
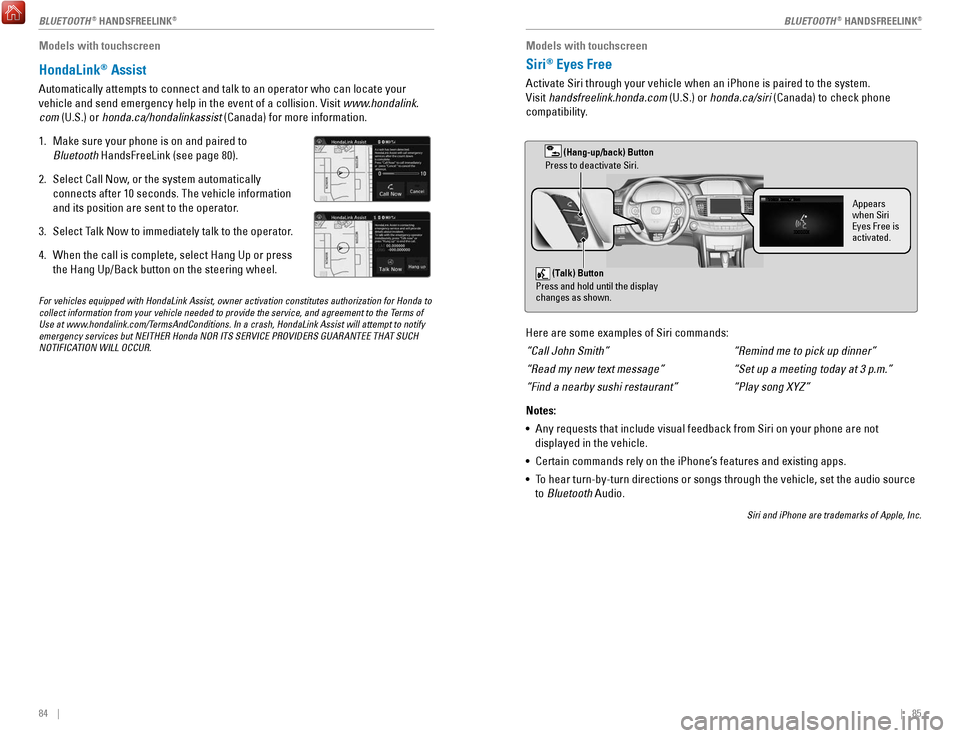
Automatically attempts to connect and talk to an operator who can locate\
your
vehicle and send emergency help in the event of a collision.
visit
www.hondalink.
com (U.S.) or honda.ca/hondalinkassist (Canada) for more information.
1.
Make sure your phone is on and paired to
Bluetooth HandsFreeLink (see page 80).
2.
Select Call Now, or the system automatically
connects after 10 seconds. The vehicle information
and its position are sent to the operator
.
3.
Select Talk Now to immediately talk to the operator
.
4.
When the call is complete, select Hang Up or press
the Hang Up/Back button on the steering wheel.
Models with touchscreen
Siri® Eyes Free
Activate Siri through your vehicle when an iPhone is paired to the syste\
m.
visit
handsfreelink.honda.com (U.S.) or honda.ca/siri (Canada) to check phone
compatibility.
(Talk) Button
Press and hold until the display
changes as shown.
(Hang-up/back) Button
Press to deactivate Siri.
Appears
when Siri
Eyes Free is
activated.
Here are some examples of Siri commands:
“Call John Smith”
“Read my new text message”
“Find a nearby sushi restaurant”
Notes:
•
Any requests that include visual feedback from Siri on your phone are no\
t
displayed in the vehicle.
•
Certain commands rely on the iPhone’s features and existing apps.
•
To hear turn-by-turn directions or songs through the vehicle, set the aud\
io source
to
Bluetooth Audio.
Siri and iPhone are trademarks of Apple, Inc.
“Remind me to pick up dinner”
“Set up a meeting today at 3 p.m.”
“Play song XYZ”
For vehicles equipped with HondaLink Assist, owner activation constitute\
s authorization for Honda to
collect information from your vehicle needed to provide the service, and\
agreement to the Terms of
Use at www.hondalink.com/TermsAndConditions. In a crash, HondaLink Assist will attempt to notify
emergency services but NEITHER Honda NOR ITS SERVICE PROVIDERS GUARANTEE\
THAT SUCH
NOTIFICATION WILL OCCUR.
BLUETOOTH® HANDSFreeLINK®BLUETOOTH® HANDSFreeLINK®
Page 53 of 84
98 || 99
DRIVING
DRIVING
Remote Engine Start*
Start your vehicle’s engine using the remote transmitter before you enter the vehicle.
Make sure the vehicle is in a safe location when using remote engine start (i.e., a
well-ventilated area, away from any flammable materials).
Starting the Engine
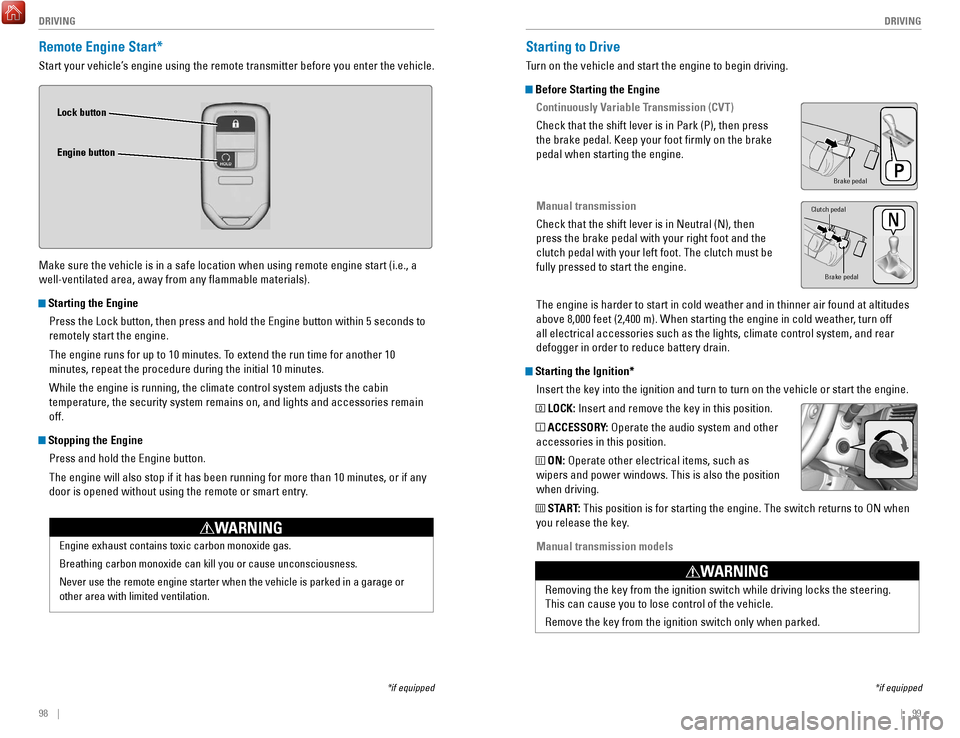
Press the Lock button, then press and hold the
engine button within 5 seconds to
remotely start the engine.
The engine runs for up to 10 minutes. T
o extend the run time for another 10
minutes, repeat the procedure during the initial 10 minutes.
While the engine is running, the climate control system adjusts the cabi\
n
temperature, the security system remains on, and lights and accessories remain
off.
Stopping the Engine
Press and hold the
engine button.
The engine will also stop if it has been running for more than 10 minute\
s
, or if any
door is opened without using the remote or smart entry.
engine exhaust contains toxic carbon monoxide gas.
Breathing carbon monoxide can kill you or cause unconsciousness.
Never use the remote engine starter when the vehicle is parked in a gara\
ge or
other area with limited ventilation.
WARNING
Lock button
Engine button
*if equipped
Starting to Drive
Turn on the vehicle and start the engine to begin driving.
Before Starting the Engine Continuously Variable Transmission (CVT)
Check that the shift lever is in Park (P), then press
the brake pedal. Keep your foot firmly on the brake
pedal when starting the engine.
Manual transmission
Check that the shift lever is in Neutral (N), then
press the brake pedal with your right foot and the
clutch pedal with your left foot. The clutch must be
fully pressed to start the engine.
The engine is harder to start in cold weather and in thinner air found a\
t altitudes
above 8,000 feet (2,400 m). When starting the engine in cold weather, turn off
all electrical accessories such as the lights, climate control system, a\
nd rear
defogger in order to reduce battery drain.
Starting the Ignition*Insert the key into the ignition and turn to turn on the vehicle or star\
t the engine.
0 LOCK: Insert and remove the key in this position.
I ACCESSORY: operate the audio system and other
accessories in this position.
II ON: operate other electrical items, such as
wipers and power windows. This is also the position
when driving.
III START: This position is for starting the engine. The switch returns to oN when
you release the key.
Manual transmission models
*if equipped
Brake peda l
Brake pedal
Clutch pedal
removing the key from the ignition switch while driving locks the steerin\
g.
This can cause you to lose control of the vehicle.
remove the key from the ignition switch only when parked.
WARNING