USB port HONDA ACCORD SEDAN 2020 (in English) User Guide
[x] Cancel search | Manufacturer: HONDA, Model Year: 2020, Model line: ACCORD SEDAN, Model: HONDA ACCORD SEDAN 2020Pages: 728, PDF Size: 34.06 MB
Page 281 of 728
Continued279
uuAudio System Basic Operation uAudio/Information Screen
Features
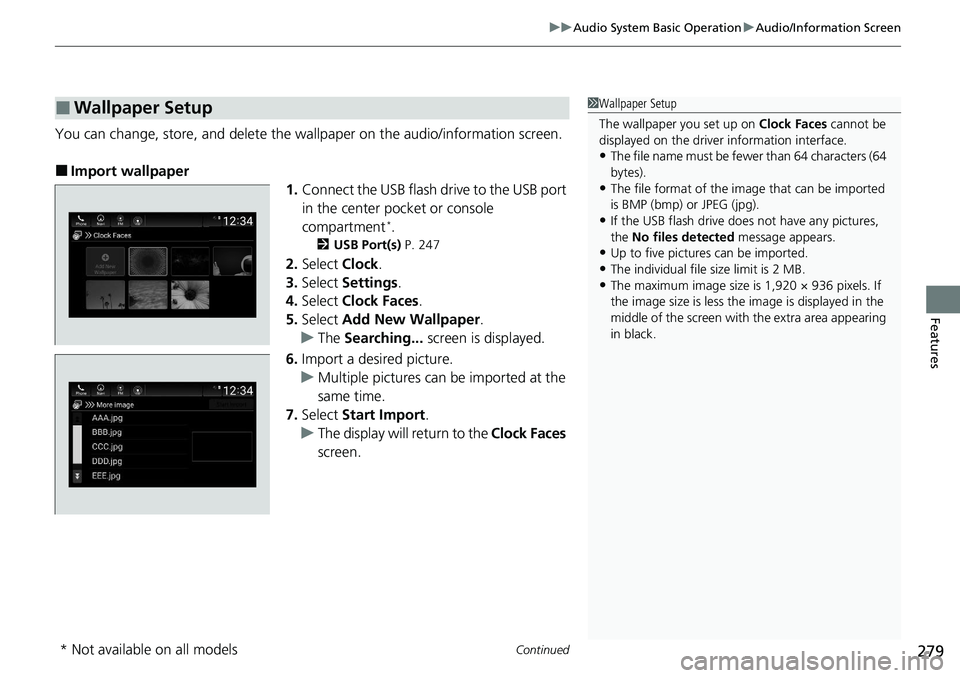
You can change, store, and delete the wallpaper on the audio/ information screen.
■Import wallpaper
1.Connect the USB flash drive to the USB port
in the center pocket or console
compartment
*.
2 USB Port(s) P. 247
2.Select Clock.
3. Select Settings .
4. Select Clock Faces .
5. Select Add New Wallpaper .
u The Searching... screen is displayed.
6. Import a desired picture.
u Multiple pictures can be imported at the
same time.
7. Select Start Import .
u The display will return to the Clock Faces
screen.
■Wallpaper Setup1 Wallpaper Setup
The wallpaper you set up on Clock Faces cannot be
displayed on the driver information interface.
•The file name must be fewe r than 64 characters (64
bytes).
•The file format of the im age that can be imported
is BMP (bmp) or JPEG (jpg).
•If the USB flash drive doe s not have any pictures,
the No files detected message appears.
•Up to five pictur es can be imported.
•The individual file size limit is 2 MB.•The maximum image size is 1,920 × 936 pixels. If
the image size is less the image is displayed in the
middle of the screen with the extra area appearing
in black.
* Not available on all models
Page 294 of 728
uuAudio System Basic Operation uSystem Updates
292
Features
■Download the update files from the server
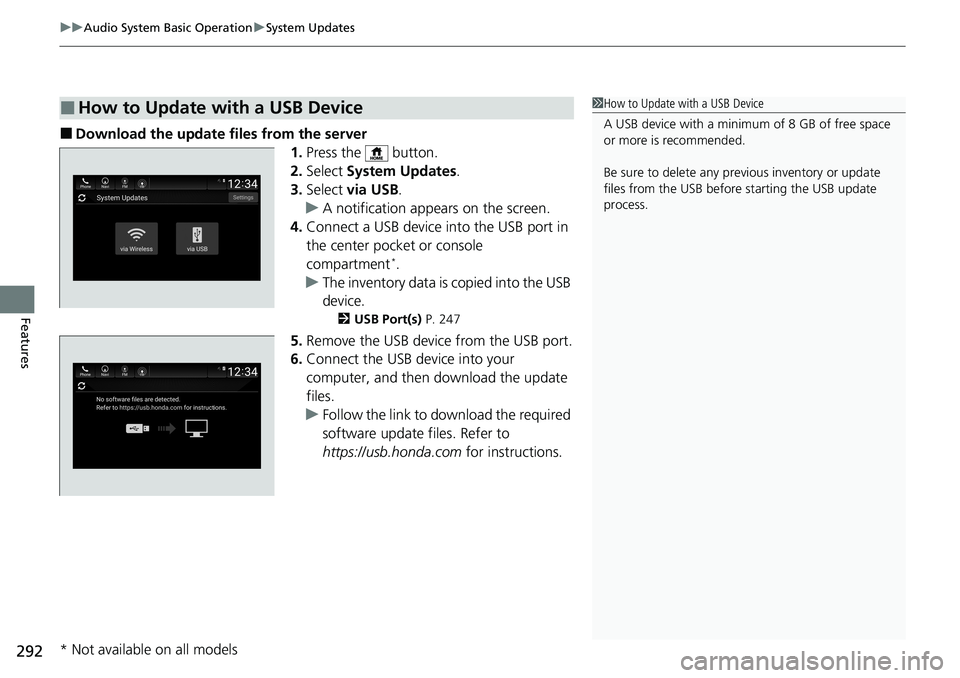
1.Press the button.
2. Select System Updates .
3. Select via USB .
u A notification appears on the screen.
4. Connect a USB device into the USB port in
the center pocket or console
compartment
*.
u The inventory data is copied into the USB
device.
2 USB Port(s) P. 247
5.Remove the USB device from the USB port.
6. Connect the USB device into your
computer, and then download the update
files.
u Follow the link to download the required
software update files. Refer to
https://usb.honda.com for instructions.
■How to Update with a USB Device1How to Update with a USB Device
A USB device with a minimum of 8 GB of free space
or more is recommended.
Be sure to delete any pr evious inventory or update
files from the USB before starting the USB update
process.
* Not available on all models
Page 295 of 728
293
uuAudio System Basic Operation uSystem Updates
Features
■Update the audio system
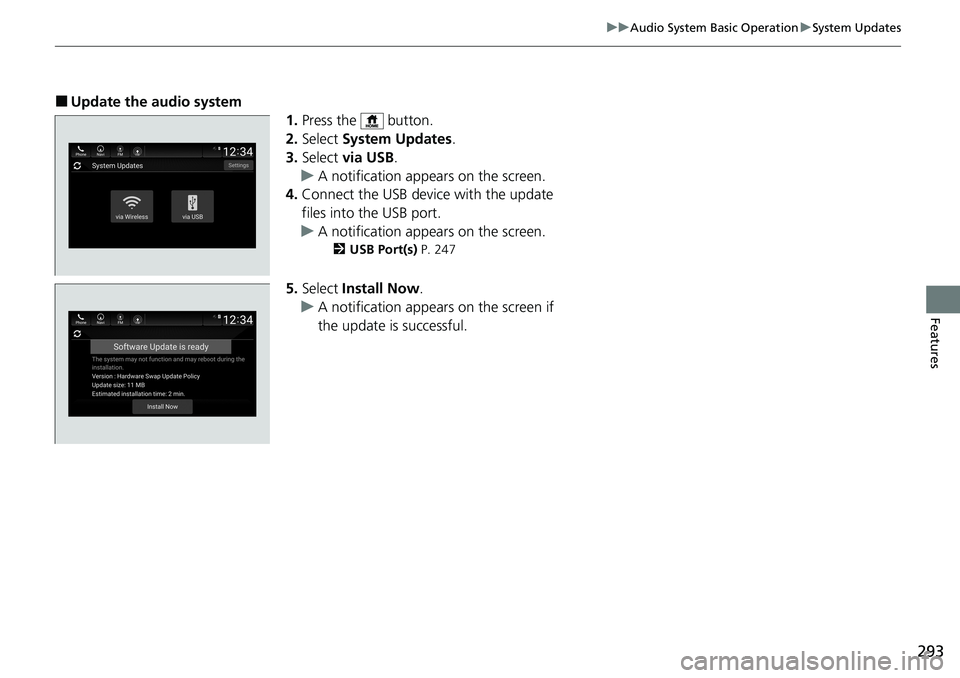
1.Press the button.
2. Select System Updates .
3. Select via USB .
u A notification appears on the screen.
4. Connect the USB device with the update
files into the USB port.
u A notification appears on the screen.
2 USB Port(s) P. 247
5.Select Install Now .
u A notification appears on the screen if
the update is successful.
Page 300 of 728
298
uuAudio System Basic Operation uVoice Control Operation
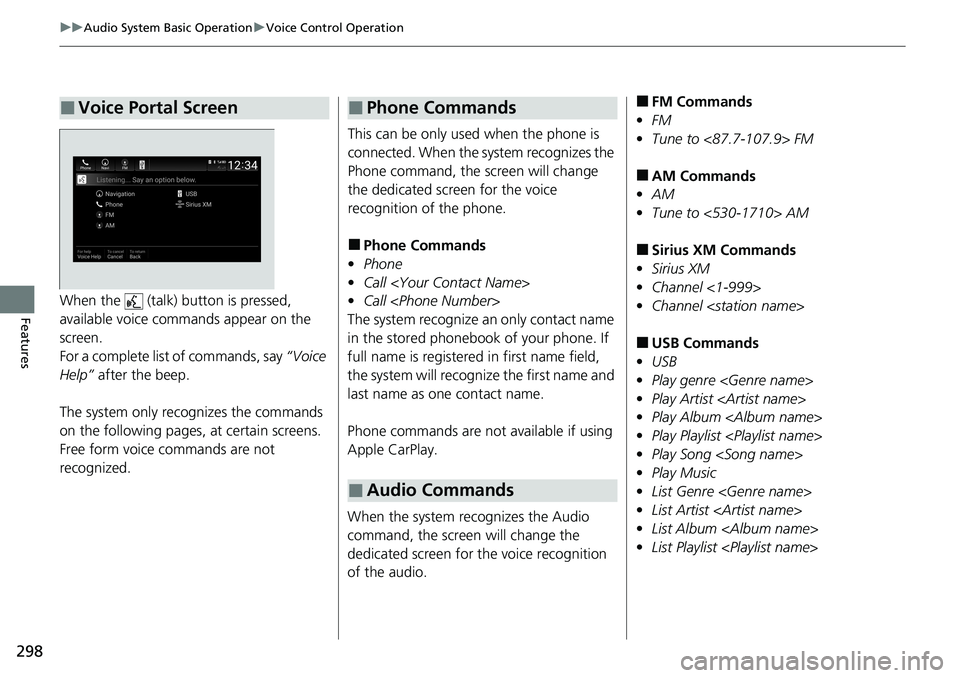
FeaturesWhen the (talk) button is pressed,
available voice commands appear on the
screen.
For a complete list of commands, say “Voice
Help” after the beep.
The system only reco gnizes the commands
on the following pages, at certain screens.
Free form voice commands are not
recognized.
■Voice Portal Screen
This can be only used when the phone is
connected. When the sy stem recognizes the
Phone command, the screen will change
the dedicated screen for the voice
recognition of the phone.
■Phone Commands
• Phone
• Call
• Call
The system recognize an only contact name
in the stored phonebook of your phone. If
full name is registered in first name field,
the system will recognize the first name and
last name as one contact name.
Phone commands are not available if using
Apple CarPlay.
When the system recognizes the Audio
command, the screen will change the
dedicated screen for the voice recognition
of the audio.
■Phone Commands
■Audio Commands
■FM Commands
• FM
• Tune to <87.7-107.9> FM
■AM Commands
• AM
• Tune to <530-1710> AM
■Sirius XM Commands
• Sirius XM
• Channel <1-999>
• Channel
■USB Commands
• USB
• Play genre
• Play Artist
• Play Album
• Play Playlist
• Play Song
• Play Music
• List Genre
• List Artist
• List Album
• List Playlist
Page 317 of 728
315
uuAudio System Basic Operation uPlaying an iPod
Continued
Features
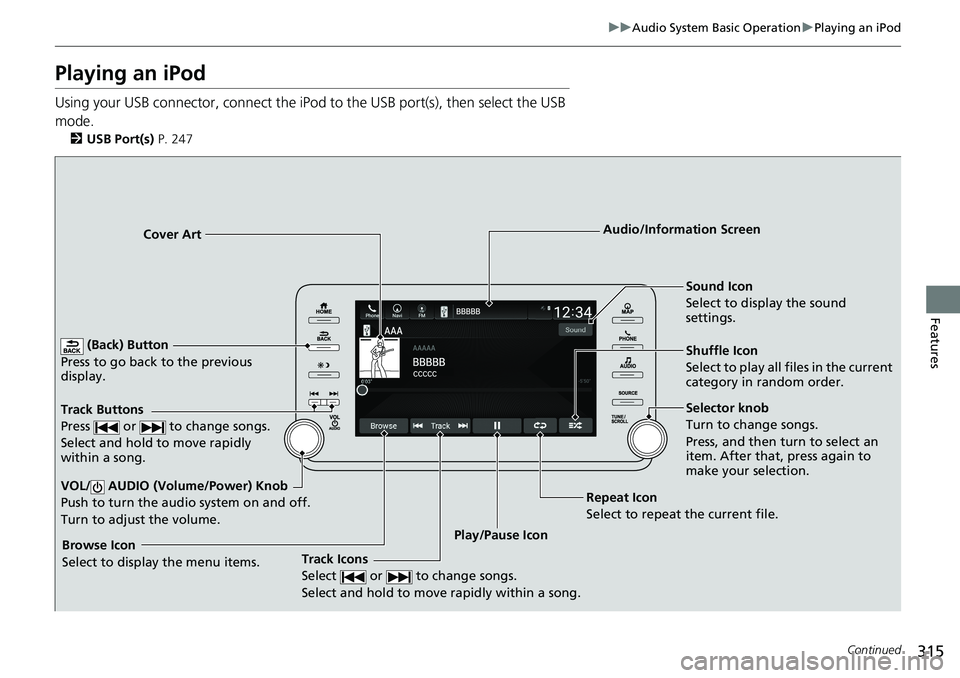
Playing an iPod
Using your USB connector, connect the iPod to the USB port(s), then select the USB
mode.
2 USB Port(s) P. 247
(Back) Button
Press to go back to the previous
display.
Track Buttons
Press or to change songs.
Select and hold to move rapidly
within a song.
VOL/ AUDIO (Volume/Power) Knob
Push to turn the audio system on and off.
Turn to adjust the volume.
Cover Art Audio/Information Screen
Play/Pause Icon S
ound Icon
Select to display the sound
settings.
Shuffle Icon
Select to play all files in the current
category in random order.
Track Icons
Select or to change songs.
Select and hold to move rapidly within a song.Browse Icon
Select to display the menu items. Repeat Icon
Select to repeat the current file.
Selector knob
Turn to change songs.
Press, and then turn to select an
item. After that, press again to
make your selection.
Page 320 of 728
318
uuAudio System Basic Operation uPlaying a USB Flash Drive
Features
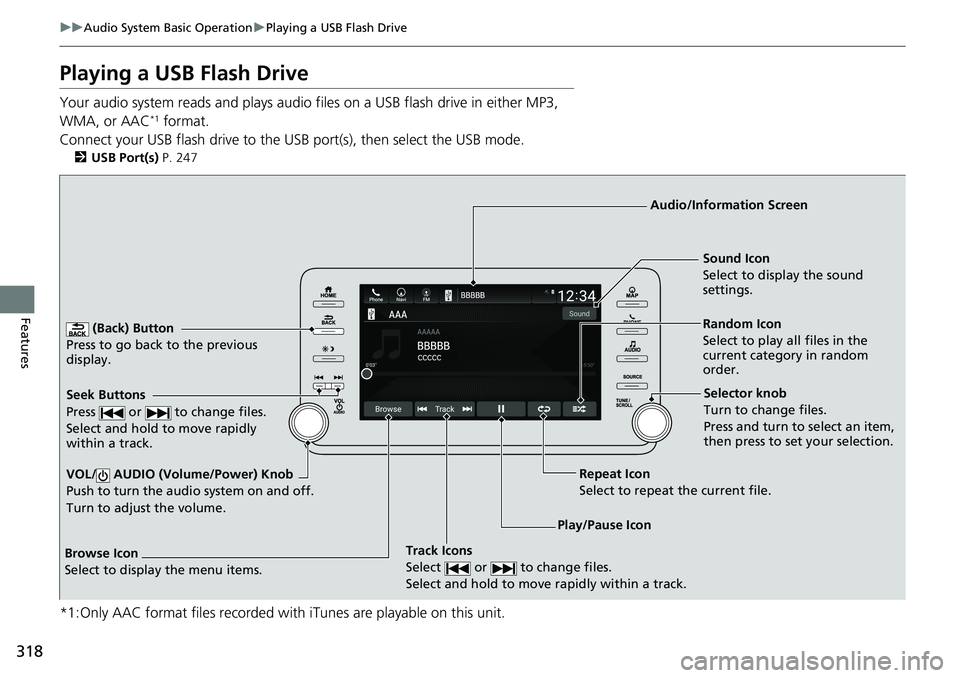
Playing a USB Flash Drive
Your audio system reads and plays audio f iles on a USB flash drive in either MP3,
WMA, or AAC*1 format.
Connect your USB flash drive to the USB port(s), then select the USB mode.
2 USB Port(s) P. 247
*1:Only AAC format files recorded with iTunes are playable on this unit.
(Back) Button
Press to go back to the previous
display.
Track Icons
Select or to change files.
Select and hold to move rapidly within a track.
VOL/ AUDIO (Volume/Power) Knob
Push to turn the audio system on and off.
Turn to adjust the volume.
Audio/Information Screen
Play/Pause Icon
S
eek Buttons
Press or to change files.
Select and hold to move rapidly
within a track.
Random Icon
Select to play all files in the
current category in random
order. Sound Icon
Select to disp lay the sound
settings.
Browse Icon
Select to display the menu items.
Repeat Icon
Select to repeat the current file.
Selector knob
Turn to change files.
Press and turn to select an item,
then press to set your selection.
Page 338 of 728
uuAudio System Basic Operation uNear Field Communication (NFC)*
336
Features
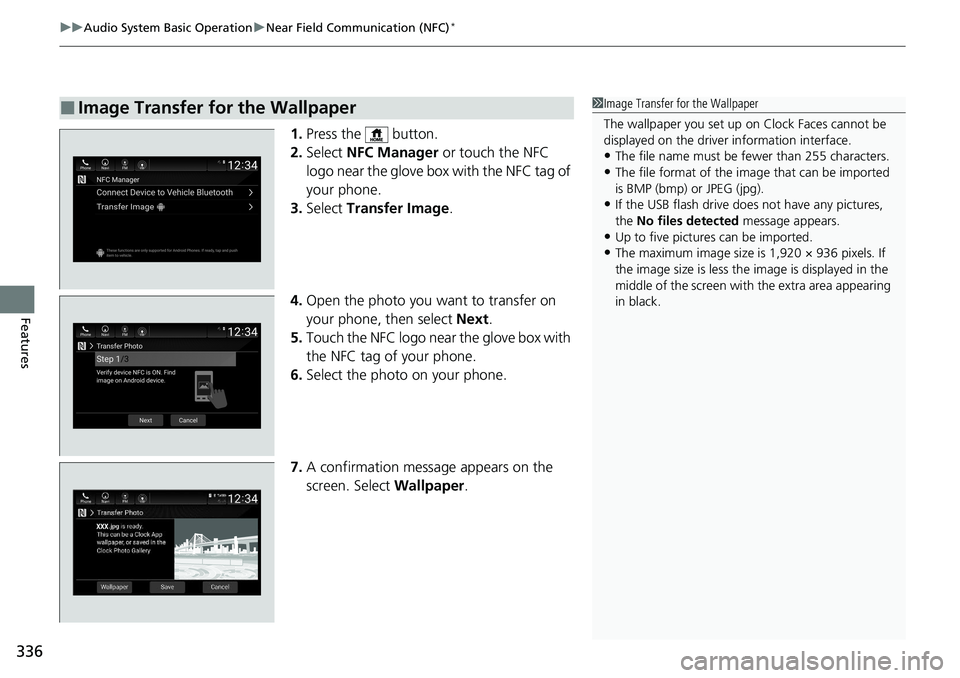
1. Press the button.
2. Select NFC Manager or touch the NFC
logo near the glove box with the NFC tag of
your phone.
3. Select Transfer Image .
4. Open the photo you want to transfer on
your phone, then select Next.
5. Touch the NFC logo near the glove box with
the NFC tag of your phone.
6. Select the photo on your phone.
7. A confirmation message appears on the
screen. Select Wallpaper.
■Image Transfer for the Wallpaper1Image Transfer for the Wallpaper
The wallpaper you set up on Clock Faces cannot be
displayed on the driver information interface.
•The file name must be fewer than 255 characters.
•The file format of the im age that can be imported
is BMP (bmp) or JPEG (jpg).
•If the USB flash drive doe s not have any pictures,
the No files detected message appears.
•Up to five pictur es can be imported.
•The maximum image size is 1,920 × 936 pixels. If
the image size is less the image is displayed in the
middle of the screen with the extra area appearing
in black.
Page 340 of 728
338
uuAudio System Basic Operation uApple CarPlay ®
Features
Apple CarPlay ®
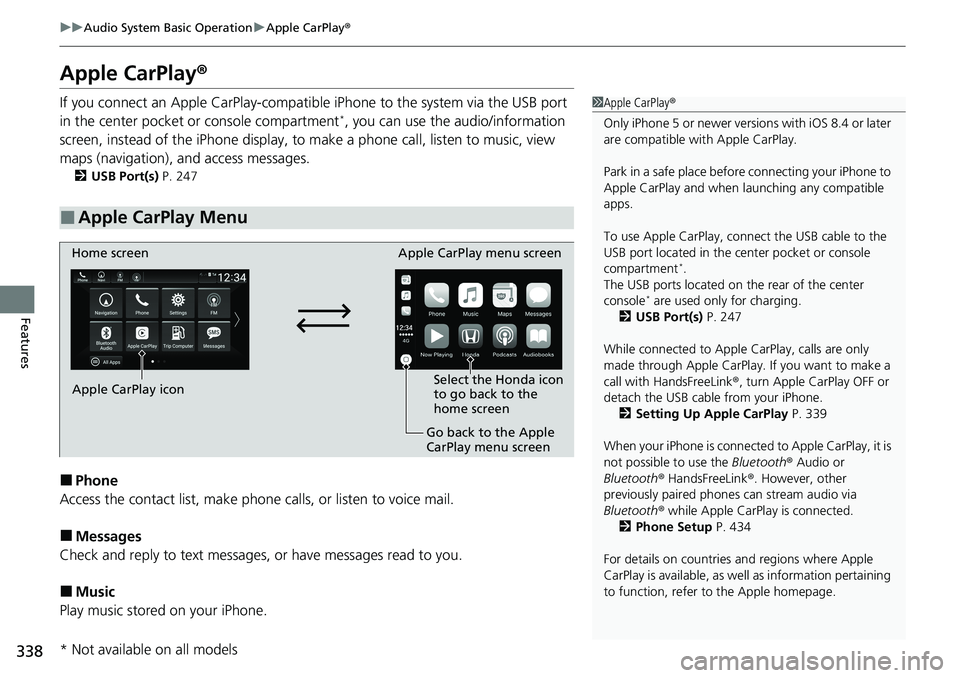
If you connect an Apple CarPlay-compatible iPhone to the system via the USB port
in the center pocket or console compartment*, you can use the audio/information
screen, instead of the iPhone display, to make a phone call, listen to music, view
maps (navigation), an d access messages.
2USB Port(s) P. 247
■Phone
Access the contact list, make phone calls, or listen to voice mail.
■Messages
Check and reply to text messages, or have messages read to you.
■Music
Play music stored on your iPhone.
■Apple CarPlay Menu
1 Apple CarPlay ®
Only iPhone 5 or newer versi ons with iOS 8.4 or later
are compatible with Apple CarPlay.
Park in a safe place before connecting your iPhone to
Apple CarPlay and when launching any compatible
apps.
To use Apple CarPlay, connect the USB cable to the
USB port located in the center pocket or console
compartment
*.
The USB ports located on the rear of the center
console
* are used only for charging.
2 USB Port(s) P. 247
While connected to Apple CarPlay, calls are only
made through Apple CarPlay. If you want to make a
call with HandsFreeLink ®, turn Apple CarPlay OFF or
detach the USB cable from your iPhone. 2 Setting Up Apple CarPlay P. 339
When your iPhone is connected to Apple CarPlay, it is
not possible to use the Bluetooth® Audio or
Bluetooth ® HandsFreeLink ®. However, other
previously paired phones can stream audio via
Bluetooth ® while Apple CarPlay is connected.
2 Phone Setup P. 434
For details on c ountries and regions where Apple
CarPlay is available, as well as information pertaining
to function, refer to the Apple homepage.
Home screen
Apple CarPlay icon Apple CarPlay menu screen
Go back to the Apple
CarPlay menu screen
Select the Honda icon
to go back to the
home screen
* Not available on all models
Page 341 of 728
Continued339
uuAudio System Basic Operation uApple CarPlay ®
Features
■Maps
Display Apple Maps and use the navigation function just as you would on your
iPhone.
Only one navigation system (pre-installed navigation or Apple CarPlay) can give
directions at a time. When you are using one system, directions to any prior
destination set on the other system will be canceled, and the system you are
currently using will direct you to your destination.
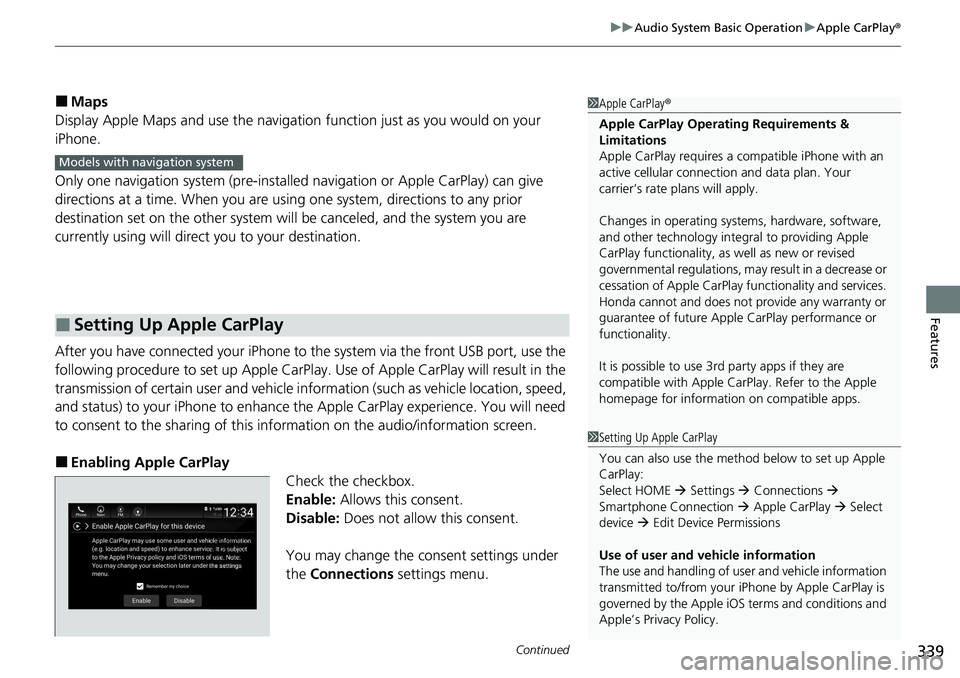
After you have connected your iPhone to the system via the front USB port, use the
following procedure to set up Apple CarPlay. Use of Apple CarPlay will result in the
transmission of certain user and vehicle information (such as vehicle location, speed,
and status) to your iPhone to enhance the Apple CarPlay experience. You will need
to consent to the sharing of this in formation on the audio/information screen.
■Enabling Apple CarPlay
Check the checkbox.
Enable: Allows this consent.
Disable: Does not allow this consent.
You may change the consent settings under
the Connections settings menu.
■Setting Up Apple CarPlay
1Apple CarPlay ®
Apple CarPlay Operating Requirements &
Limitations
Apple CarPlay requi res a compatible iPhone with an
active cellular connecti on and data plan. Your
carrier’s rate plans will apply.
Changes in operating systems, hardware, software,
and other technology integral to providing Apple
CarPlay functionality, as well as new or revised
governmental regulations, may result in a decrease or
cessation of Apple CarPlay functionality and services.
Honda cannot and does not pr ovide any warranty or
guarantee of future Appl e CarPlay performance or
functionality.
It is possible to use 3r d party apps if they are
compatible with Apple CarPlay. Refer to the Apple
homepage for information on compatible apps.
Models with navigation system
1 Setting Up Apple CarPlay
You can also use the method below to set up Apple
CarPlay:
Select HOME Settings Connections
Smartphone Connection Apple CarPlay Select
device Edit Device Permissions
Use of user and vehicle information
The use and handling of user and vehicle information
transmitted to/from your iP hone by Apple CarPlay is
governed by the Apple iOS terms and conditions and
Apple’s Privacy Policy.
Page 343 of 728
341
uuAudio System Basic Operation uAndroid AutoTM
Continued
Features
Android AutoTM
When you connect an Android phone to the audio system via the front USB port,
Android Auto is automatically initiated. When connected via Android Auto, you can
use the audio/information screen to access the Phone, Google Maps (Navigation),
Google Play Music, and Google Now functions. When you first use Android Auto, a
tutorial will appear on the screen.
We recommend that you complete this tuto rial while safely parked before using
Android Auto.
2 USB Port(s) P. 247
2 Auto Pairing Connection P. 343
1Android AutoTM
To use Android Auto, you need to download the
Android Auto app from Google Play to your
smartphone.
Only Android 5.0 (Lollipop) or later versions are
compatible with Android Auto.
Bluetooth A2DP cannot be used with Android Auto
phone.
Park in a safe place befo re connecting your Android
phone to Android Auto and when launching any
compatible apps.
To use Android Auto, connect the USB cable to the
USB port(s) located in the center pocket or the
console compartment
*. The USB ports located on the
rear of the center console* will not enable Android
Auto operation. 2 USB Port(s) P. 247
To directly access the Android Auto phone function,
press Phone on the home screen.
2 Auto Pairing Connection P. 343
When your Android phone is connected to Android
Auto, it is not possible to use the Bluetooth® Audio.
However, other previously paired phones can stream
audio via Bluetooth ® while Android Auto is
connected.
2 Phone Setup P. 434
* Not available on all models