lock HONDA ACCORD SEDAN 2020 (in English) Owner's Guide
[x] Cancel search | Manufacturer: HONDA, Model Year: 2020, Model line: ACCORD SEDAN, Model: HONDA ACCORD SEDAN 2020Pages: 728, PDF Size: 34.06 MB
Page 65 of 728
63
uuChild Safety uSafety of Infants and Small Children
Continued
Safe Driving
Safety of Infants and Small Children
An infant must be properly restrained in a rear-facing, reclining child seat until the
infant reaches the seat manufacturer’s weig ht or height limit for the seat, and the
infant is at least one year old.
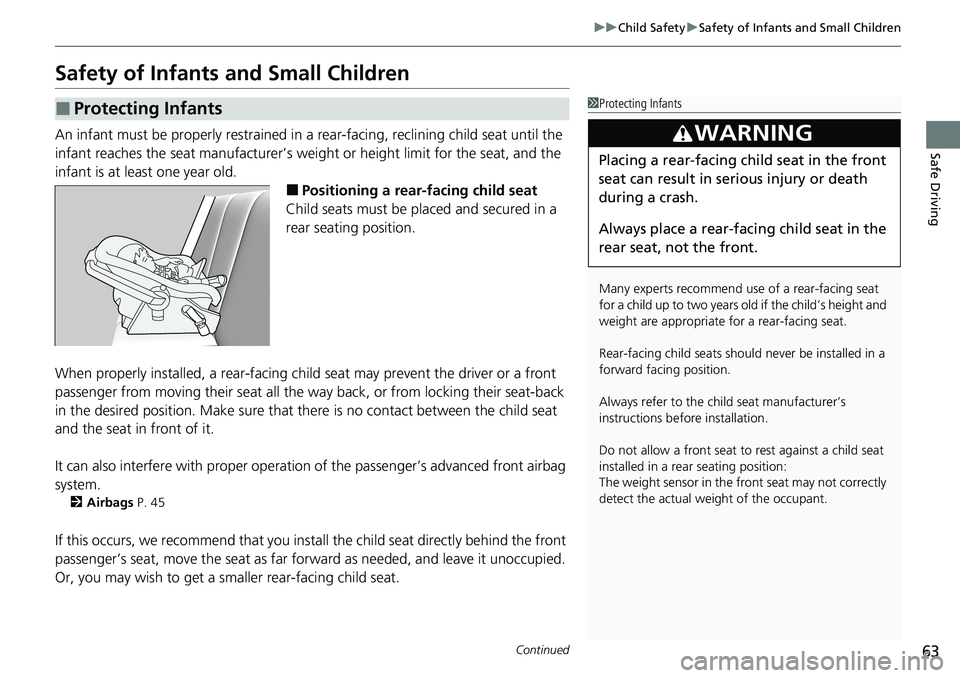
■Positioning a rear-facing child seat
Child seats must be placed and secured in a
rear seating position.
When properly installed, a rear-facing chil d seat may prevent the driver or a front
passenger from moving their seat all the wa y back, or from locking their seat-back
in the desired position. Make sure that there is no contact between the child seat
and the seat in front of it.
It can also interfere with proper operation of the passenger’s advanced front airbag
system.
2 Airbags P. 45
If this occurs, we recommend that you insta ll the child seat directly behind the front
passenger’s seat, move the seat as far fo rward as needed, and leave it unoccupied.
Or, you may wish to get a smaller rear-facing child seat.
■Protecting Infants1 Protecting Infants
Many experts recommend us e of a rear-facing seat
for a child up to two years ol d if the child’s height and
weight are appropriate for a rear-facing seat.
Rear-facing child seats should never be installed in a
forward facing position.
Always refer to the child seat manufacturer’s
instructions before installation.
Do not allow a front seat to rest against a child seat
installed in a rear seating position:
The weight sensor in the fr ont seat may not correctly
detect the actual weight of the occupant.
3WARNING
Placing a rear-facing child seat in the front
seat can result in serious injury or death
during a crash.
Always place a rear-fac ing child seat in the
rear seat, not the front.
Page 70 of 728
uuChild Safety uSafety of Infants and Small Children
68
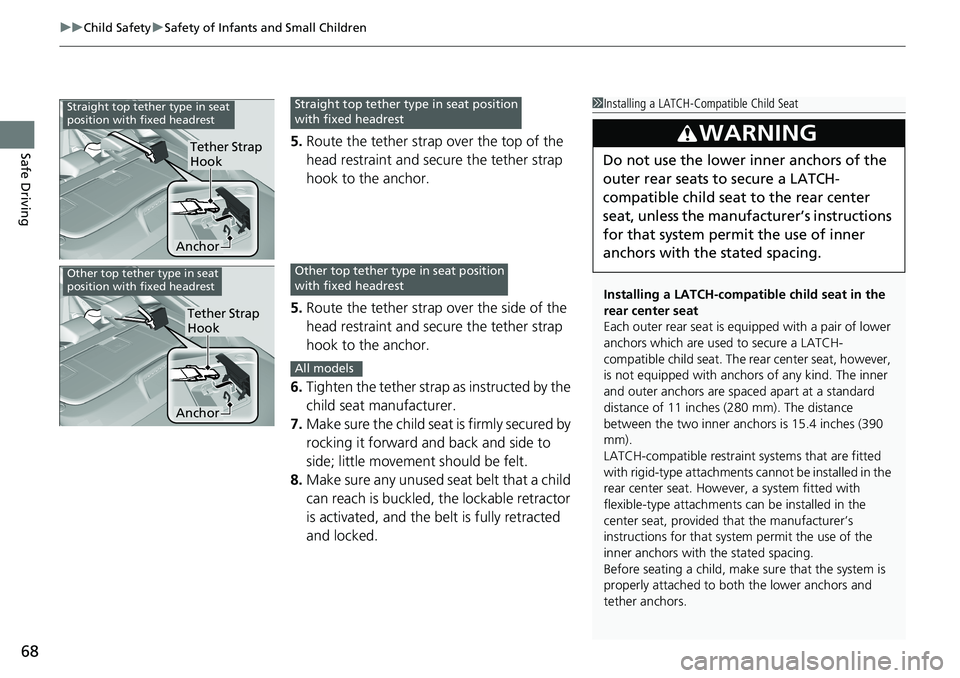
Safe Driving5. Route the tether strap over the top of the
head restraint and secure the tether strap
hook to the anchor.
5. Route the tether strap over the side of the
head restraint and secure the tether strap
hook to the anchor.
6. Tighten the tether strap as instructed by the
child seat manufacturer.
7. Make sure the child seat is firmly secured by
rocking it forward and back and side to
side; little movement should be felt.
8. Make sure any unused seat belt that a child
can reach is buckled, the lockable retractor
is activated, and the be lt is fully retracted
and locked.
1 Installing a LATCH-Compatible Child Seat
Installing a LATCH-compatible child seat in the
rear center seat
Each outer rear seat is equi pped with a pair of lower
anchors which are used to secure a LATCH-
compatible child seat. The rear center seat, however,
is not equipped with anchors of any kind. The inner
and outer anchors are spaced apart at a standard
distance of 11 inches (280 mm). The distance
between the two inner anc hors is 15.4 inches (390
mm).
LATCH-compatible restraint systems that are fitted
with rigid-type attachments cannot be installed in the
rear center seat. However, a system fitted with
flexible-type attachments can be installed in the
center seat, provided that the manufacturer’s
instructions for that system permit the use of the
inner anchors with the stated spacing.
Before seating a child, make sure that the system is
properly attached to both the lower anchors and
tether anchors.
3WARNING
Do not use the lower inner anchors of the
outer rear seats to secure a LATCH-
compatible child seat to the rear center
seat, unless the manufacturer’s instructions
for that system permit the use of inner
anchors with the stated spacing.
Anchor
Tether Strap
Hook
Straight top tether type in seat
position with fixed headrestStraight top tether type in seat position
with fixed headrest
Anchor
Tether Strap
Hook
Other top tether type in seat
position with fixed headrestOther top tether type in seat position
with fixed headrest
All models
Page 71 of 728
Continued69
uuChild Safety uSafety of Infants and Small Children
Safe DrivingA child seat can be installed with a lap/should er belt in any rear seat or, if absolutely
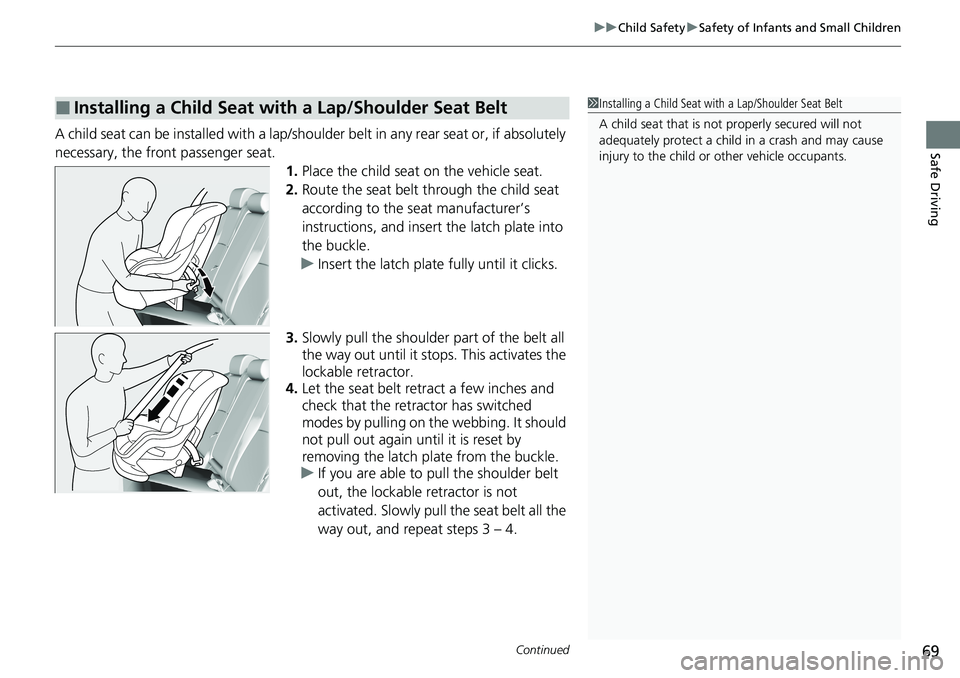
necessary, the front passenger seat. 1.Place the child seat on the vehicle seat.
2. Route the seat belt through the child seat
according to the seat manufacturer’s
instructions, and insert the latch plate into
the buckle.
u Insert the latch plate fully until it clicks.
3. Slowly pull the shoulder part of the belt all
the way out until it stops. This activates the
lockable retractor.
4. Let the seat belt retract a few inches and
check that the retractor has switched
modes by pulling on the webbing. It should
not pull out again until it is reset by
removing the latch pl ate from the buckle.
u If you are able to pull the shoulder belt
out, the lockable retractor is not
activated. Slowly pull the seat belt all the
way out, and repeat steps 3 – 4.
■Installing a Child Seat with a Lap/Shoulder Seat Belt1Installing a Child Seat with a Lap/Shoulder Seat Belt
A child seat that is not properly secured will not
adequately protect a child in a crash and may cause
injury to the child or other vehicle occupants.
Page 72 of 728
uuChild Safety uSafety of Infants and Small Children
70
Safe Driving
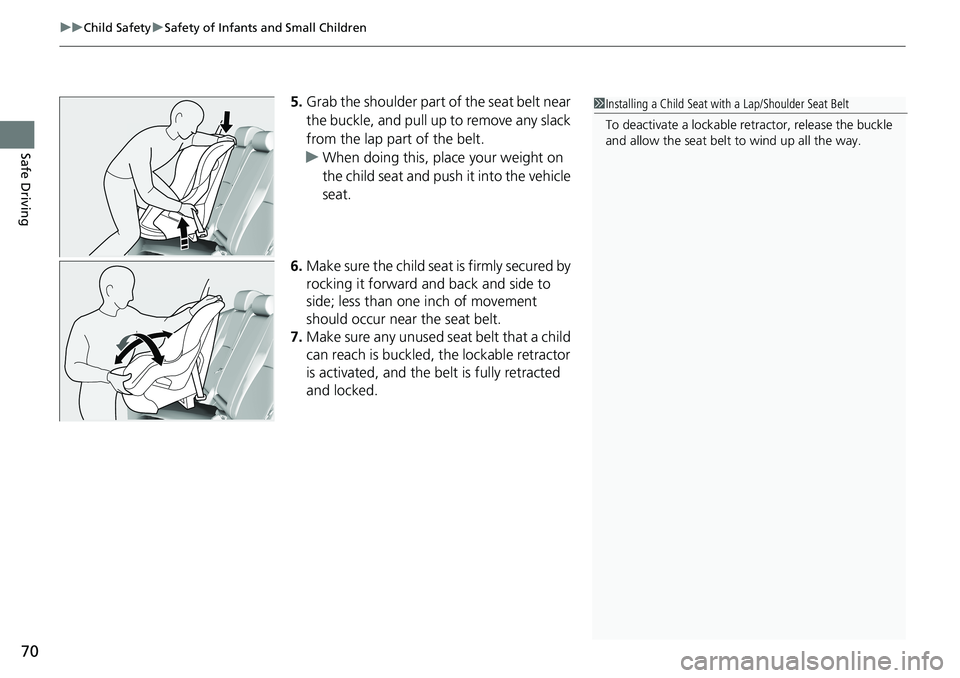
5. Grab the shoulder part of the seat belt near
the buckle, and pull up to remove any slack
from the lap part of the belt.
u When doing this, plac e your weight on
the child seat and push it into the vehicle
seat.
6. Make sure the child seat is firmly secured by
rocking it forward and back and side to
side; less than one inch of movement
should occur near the seat belt.
7. Make sure any unused seat belt that a child
can reach is buckled, the lockable retractor
is activated, and the be lt is fully retracted
and locked.1 Installing a Child Seat with a Lap/Shoulder Seat Belt
To deactivate a lockable retractor, release the buckle
and allow the seat belt to wind up all the way.
Page 80 of 728
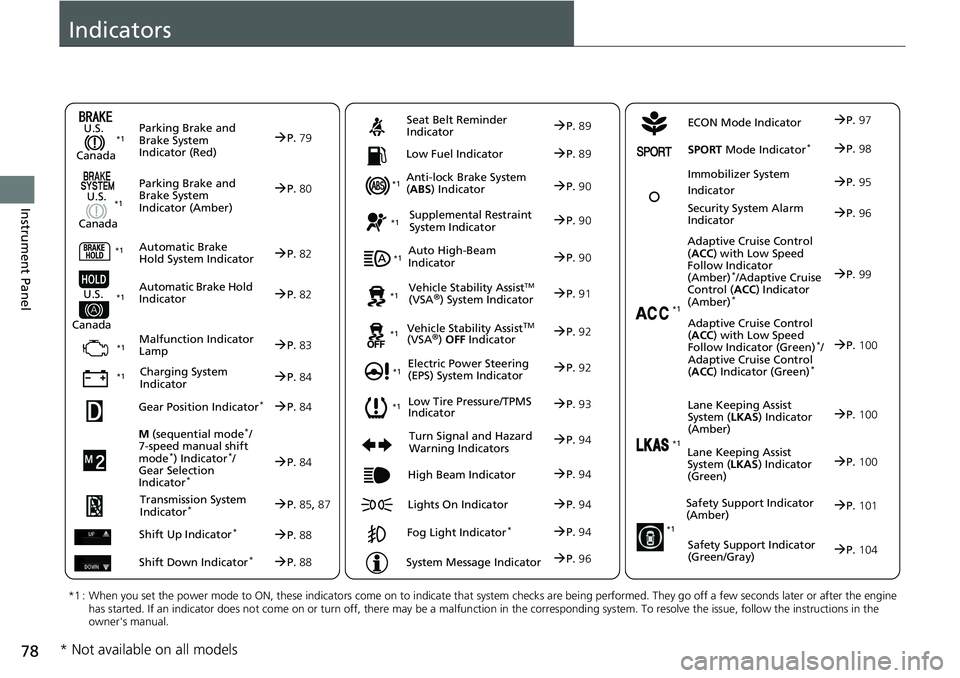
78
Instrument Panel
Indicators
ECON Mode Indicator
M (sequential mode
*/
7-speed manual shift
mode
*) Indicator*/
Gear Selection
Indicator
*
P. 84
Parking Brake and
Brake System
Indicator (Red)
Parking Brake and
Brake System
Indicator (Amber)
U.S.
Canada
U.S.
Canada Automatic Brake
Hold System Indicator
Automatic Brake Hold
IndicatorU.S.
Canada
*1 : When you set the power mode to ON, these indicators come on to indicate that system checks are being performed. They go off a few seconds later or after the engine
has started. If an indicator does not come on or turn off, ther e may be a malfunction in the corresponding system. To resolve the issue, follow the instructions in the
owner's manual.
P. 79*1
Malfunction Indicator
Lamp
Charging System
Indicator
Anti-lock Brake System
( ABS ) Indicator
Seat Belt Reminder
Indicator
Low Fuel Indicator
Vehicle Stability AssistTM (VSA®) System Indicator
Vehicle Stability Assist
TM (VSA®) OFF Indicator
Supplemental Restraint
System Indicator
Auto High-Beam
Indicator
Low Tire Pressure/TPMS
Indicator
Electric Power Steering
(EPS) System Indicator
Turn Signal and Hazard
Warning Indicators
Lights On Indicator High Beam Indicator
Fog Light Indicator*
System Message Indicator Adaptive Cruise Control
(
ACC ) with Low Speed
Follow Indicator
(Amber)
*/Adaptive Cruise
Control ( ACC) Indicator
(Amber)
*
Lane Keeping Assist
System ( LKAS) Indicator
(Amber)
Safety Support Indicator
(Amber)
Safety Support Indicator
(Green/Gray)
P. 80
P.82
P.82
P.83
P.84
*1
*1 *1 *1
P.
93
*1
*1
Gear Position Indicator*P. 84
Transmission System
I
ndicator*P. 85, 87
Shift Up Indicator
*P. 88
Shift Down Indicator
*P. 88
P. 89
P.89
P.90
P.90
P.90
P.91
*1
*1
*1
*1
P. 92
*1P.92
P.94
P.99
*1
P.94
P.94
P.94 Security System Alarm
Indi
cator P.96
P.96
P.100
P.101
P.104
*1Adaptive Cruise Control
(ACC ) with Low Speed
Follow Indicator (Green)
*/
Adaptive Cruise Control
( ACC ) Indicator (Green)
*
P.100
*1Lane Keeping Assist
System ( LKAS) Indicator
(Green)P. 100
*1
Immobilizer System
IndicatorP.95
SPORT Mode Indicator*P.98
P.97
* Not available on all models
Page 92 of 728
90
uuIndicators u
Instrument Panel
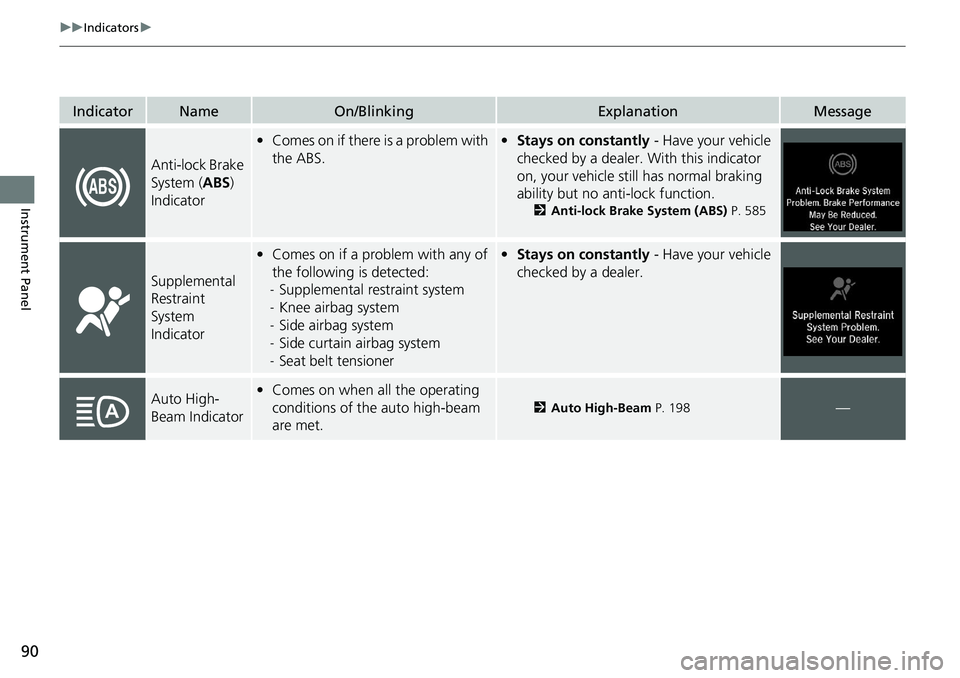
IndicatorNameOn/BlinkingExplanationMessage
Anti-lock Brake
System (ABS)
Indicator
• Comes on if there is a problem with
the ABS.• Stays on constantly - Have your vehicle
checked by a dealer. With this indicator
on, your vehicle still has normal braking
ability but no anti-lock function.
2 Anti-lock Brake System (ABS) P. 585
Supplemental
Restraint
System
Indicator
•Comes on if a problem with any of
the following is detected:
- Supplemental restraint system
- Knee airbag system
- Side airbag system
- Side curtain airbag system
- Seat belt tensioner• Stays on constantly - Have your vehicle
checked by a dealer.
Auto High-
Beam Indicator• Comes on when all the operating
conditions of the auto high-beam
are met.
2 Auto High-Beam P. 198—
Page 104 of 728
102
uuIndicators u
Instrument Panel
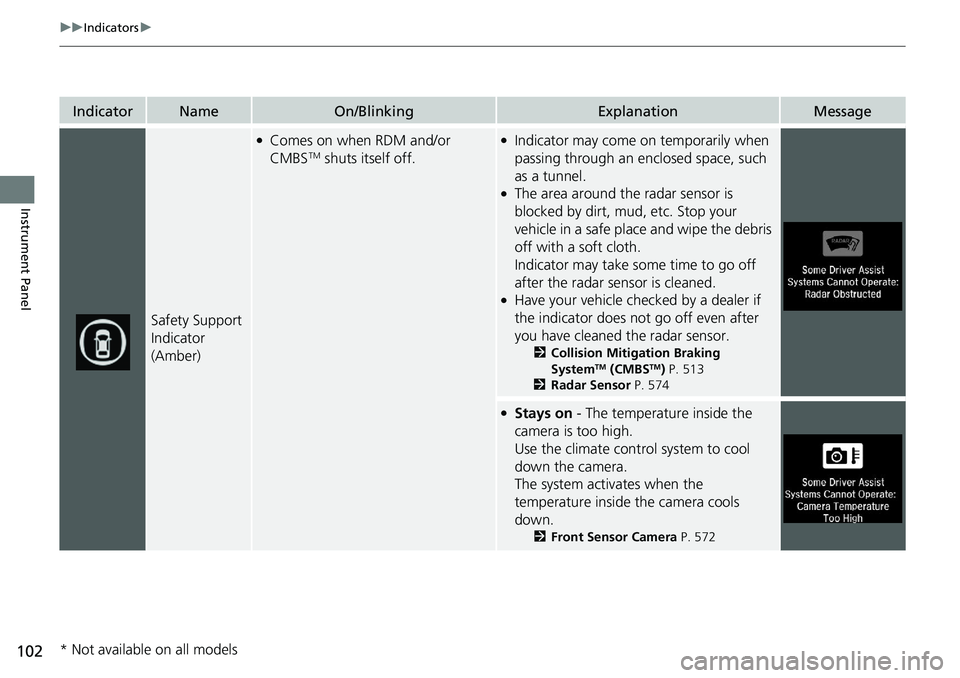
IndicatorNameOn/BlinkingExplanationMessage
Safety Support
Indicator
(Amber)
●Comes on when RDM and/or
CMBSTM shuts itself off.
●Indicator may come on temporarily when
passing through an enclosed space, such
as a tunnel.
●The area around the radar sensor is
blocked by dirt, mud, etc. Stop your
vehicle in a safe place and wipe the debris
off with a soft cloth.
Indicator may take some time to go off
after the radar sensor is cleaned.
●Have your vehicle checked by a dealer if
the indicator does not go off even after
you have cleaned the radar sensor.
2 Collision Mitigation Braking
SystemTM (CMBSTM) P. 513
2 Radar Sensor P. 574
●Stays on - The temperature inside the
camera is too high.
Use the climate control system to cool
down the camera.
The system activates when the
temperature inside the camera cools
down.
2 Front Sensor Camera P. 572
* Not available on all models
Page 105 of 728
103
uuIndicators u
Continued
Instrument Panel
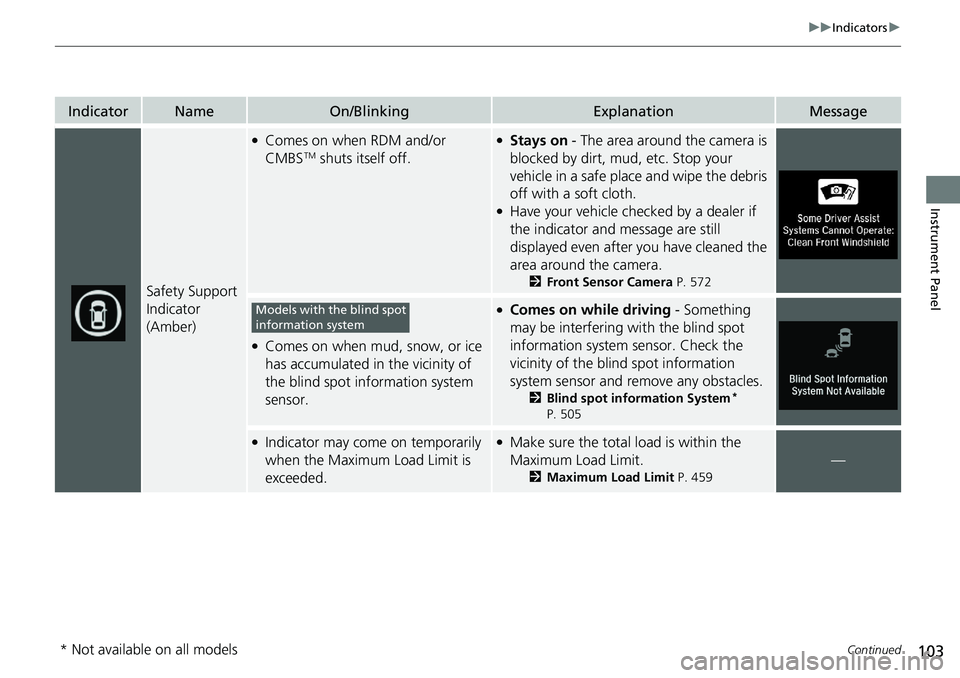
IndicatorNameOn/BlinkingExplanationMessage
Safety Support
Indicator
(Amber)
●Comes on when RDM and/or
CMBSTM shuts itself off.
●Stays on - The area around the camera is
blocked by dirt, mud, etc. Stop your
vehicle in a safe place and wipe the debris
off with a soft cloth.
●Have your vehicle checked by a dealer if
the indicator and message are still
displayed even after you have cleaned the
area around the camera.
2 Front Sensor Camera P. 572
●Comes on when mud, snow, or ice
has accumulated in the vicinity of
the blind spot information system
sensor.
●Comes on while driving - Something
may be interfering wi th the blind spot
information system sensor. Check the
vicinity of the blind spot information
system sensor and remove any obstacles.
2 Blind spot information System*
P. 505
●Indicator may come on temporarily
when the Maximum Load Limit is
exceeded.●Make sure the total load is within the
Maximum Load Limit.
2 Maximum Load Limit P. 459
—
Models with the blind spot
information system
* Not available on all models
Page 114 of 728
112
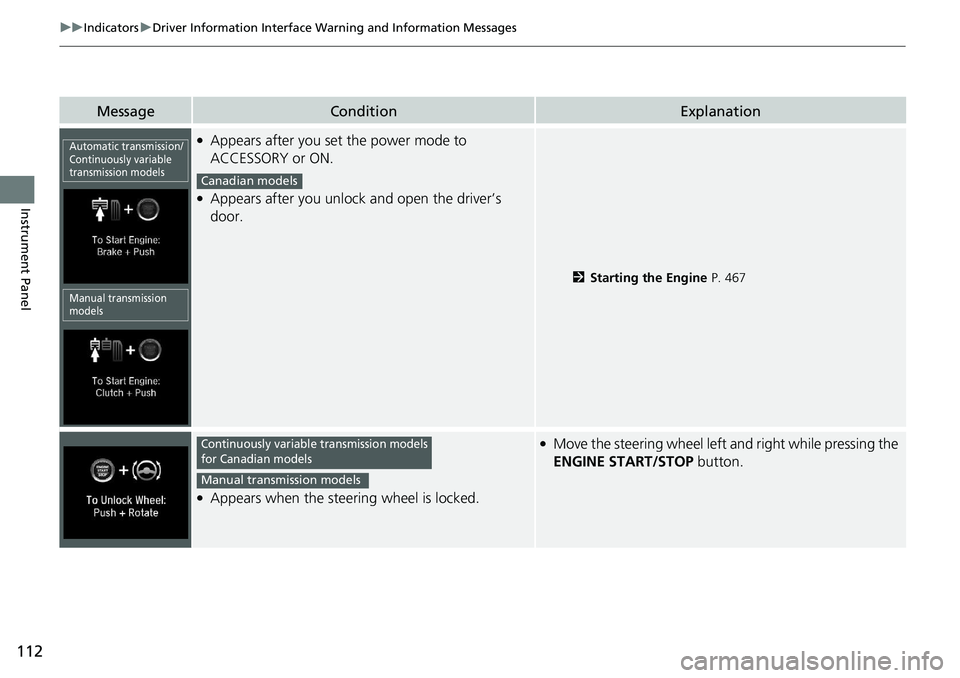
uuIndicators uDriver Information Interface Wa rning and Information Messages
Instrument Panel
MessageConditionExplanation
●Appears after you set the power mode to
ACCESSORY or ON.
●Appears after you unlock and open the driver’s
door.
2Starting the Engine P. 467
●Appears when the steering wheel is locked.
●Move the steering wheel left and right while pressing the
ENGINE START/STOP button.
Automatic transmission/
Continuously variable
transmission models
Manual transmission
models
Canadian models
Continuously variable transmission models
for Canadian models
Manual transmission models
Page 135 of 728
133
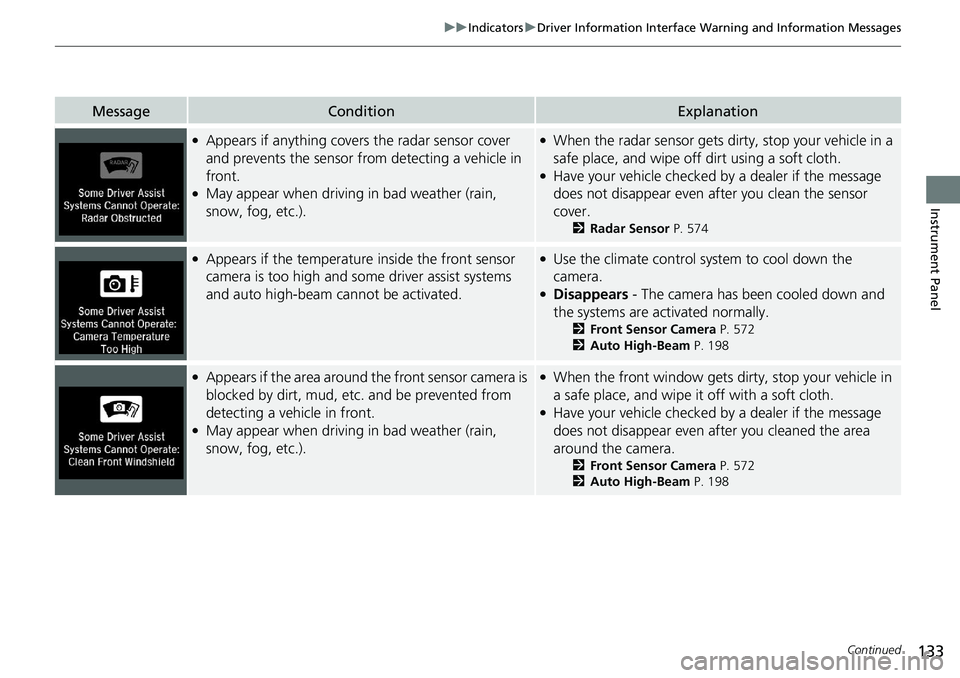
uuIndicators uDriver Information Interface Wa rning and Information Messages
Continued
Instrument Panel
MessageConditionExplanation
●Appears if anything covers the radar sensor cover
and prevents the sensor from detecting a vehicle in
front.
●May appear when driving in bad weather (rain,
snow, fog, etc.).
●When the radar sensor gets dirty, stop your vehicle in a
safe place, and wipe off dirt using a soft cloth.
●Have your vehicle checked by a dealer if the message
does not disappear even after you clean the sensor
cover.
2 Radar Sensor P. 574
●Appears if the temperature inside the front sensor
camera is too high and some driver assist systems
and auto high-beam cannot be activated.●Use the climate control sy stem to cool down the
camera.
●Disappears - The camera has b een cooled down and
the systems are activated normally.
2 Front Sensor Camera P. 572
2 Auto High-Beam P. 198
●Appears if the area around th e front sensor camera is
blocked by dirt, mud, etc. and be prevented from
detecting a vehicle in front.
●May appear when driving in bad weather (rain,
snow, fog, etc.).
●When the front window gets dirty, stop your vehicle in
a safe place, and wipe it off with a soft cloth.
●Have your vehicle checked by a dealer if the message
does not disappear even a fter you cleaned the area
around the camera.
2 Front Sensor Camera P. 572
2 Auto High-Beam P. 198