steering HONDA ACCORD SEDAN 2020 (in English) Service Manual
[x] Cancel search | Manufacturer: HONDA, Model Year: 2020, Model line: ACCORD SEDAN, Model: HONDA ACCORD SEDAN 2020Pages: 728, PDF Size: 34.06 MB
Page 210 of 728
208
uuOperating the Switches Around the Steering Wheel uAdjusting the Steering Wheel
Controls
Adjusting the Steering Wheel
The steering wheel height and distance from your body can be adjusted so that you
can comfortably grip the steering wheel in an appropriate driving posture.
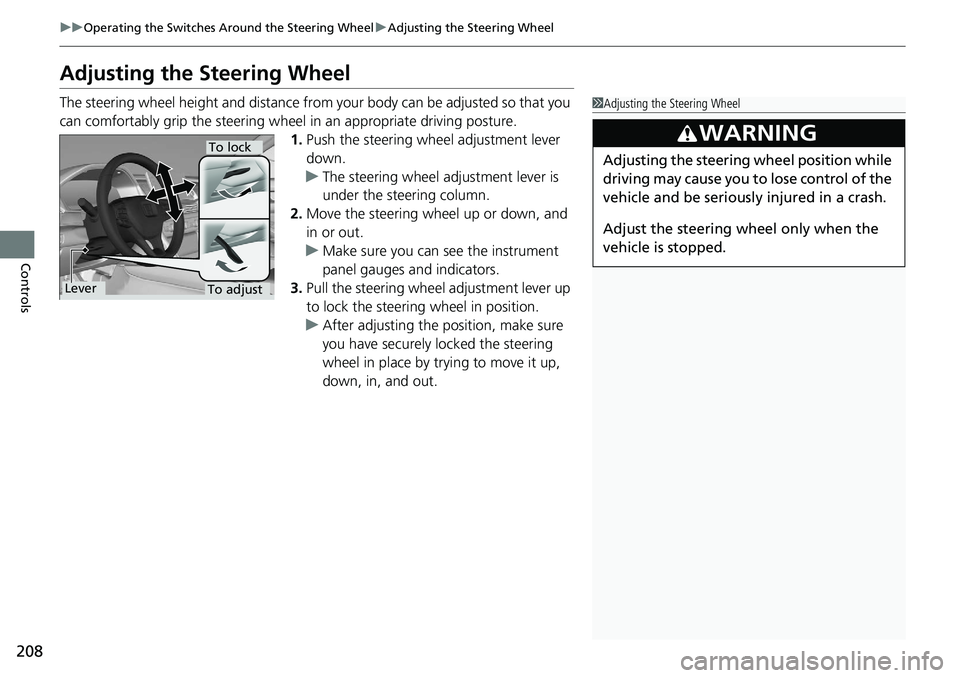
1.Push the steering wheel adjustment lever
down.
u The steering wheel adjustment lever is
under the steering column.
2. Move the steering wheel up or down, and
in or out.
u Make sure you can see the instrument
panel gauges and indicators.
3. Pull the steering wheel adjustment lever up
to lock the steerin g wheel in position.
u After adjusting the position, make sure
you have securely locked the steering
wheel in place by trying to move it up,
down, in, and out.1Adjusting the Steering Wheel
3WARNING
Adjusting the steering wheel position while
driving may cause you to lose control of the
vehicle and be seriously injured in a crash.
Adjust the steering wheel only when the
vehicle is stopped.
To adjust
To lock
Lever
Page 213 of 728
211Continued
Controls
Adjusting the Seats
Front Seats
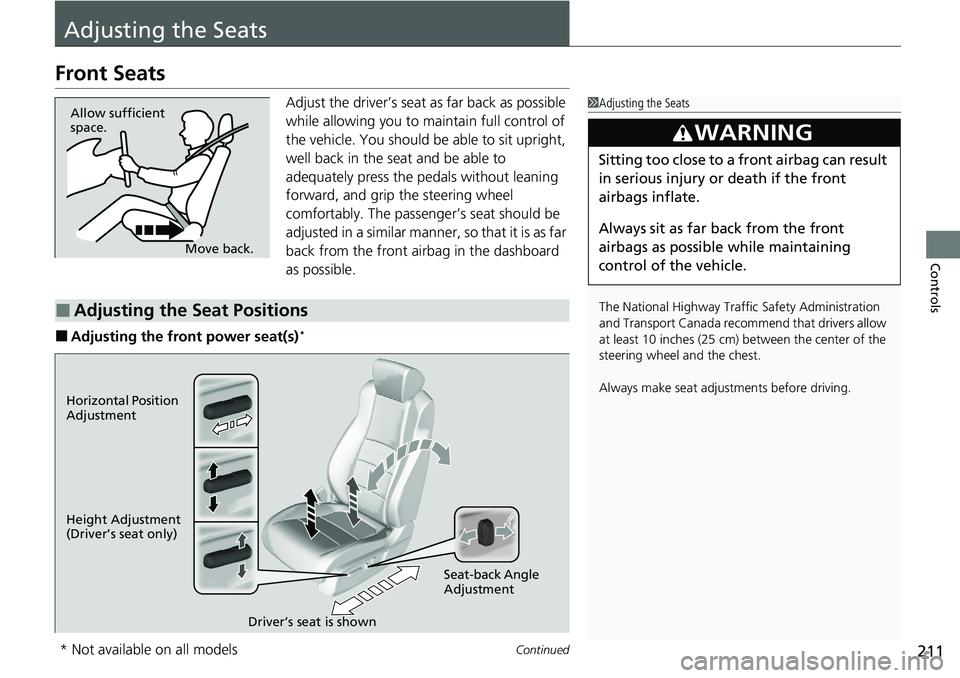
Adjust the driver’s seat as far back as possible
while allowing you to ma intain full control of
the vehicle. You should be able to sit upright,
well back in the seat and be able to
adequately press the pedals without leaning
forward, and grip the steering wheel
comfortably. The passenger’s seat should be
adjusted in a similar manner, so that it is as far
back from the front airbag in the dashboard
as possible.
■Adjusting the front power seat(s)*
1 Adjusting the Seats
The National Highway Traffic Safety Administration
and Transport Cana da recommend that drivers allow
at least 10 inches (25 cm) between the center of the
steering wheel and the chest.
Always make seat adjustments before driving.
3WARNING
Sitting too close to a front airbag can result
in serious injury or death if the front
airbags inflate.
Always sit as far back from the front
airbags as possible while maintaining
control of the vehicle.
Move back.
Allow sufficient
space.
■Adjusting the Seat Positions
Horizontal Position
Adjustment
Height Adjustment
(Driver’s seat only)
Seat-back Angle
Adjustment
Driver’s seat is shown
* Not available on all models
Page 216 of 728
uuAdjusting the Seats uFront Seats
214
Controls
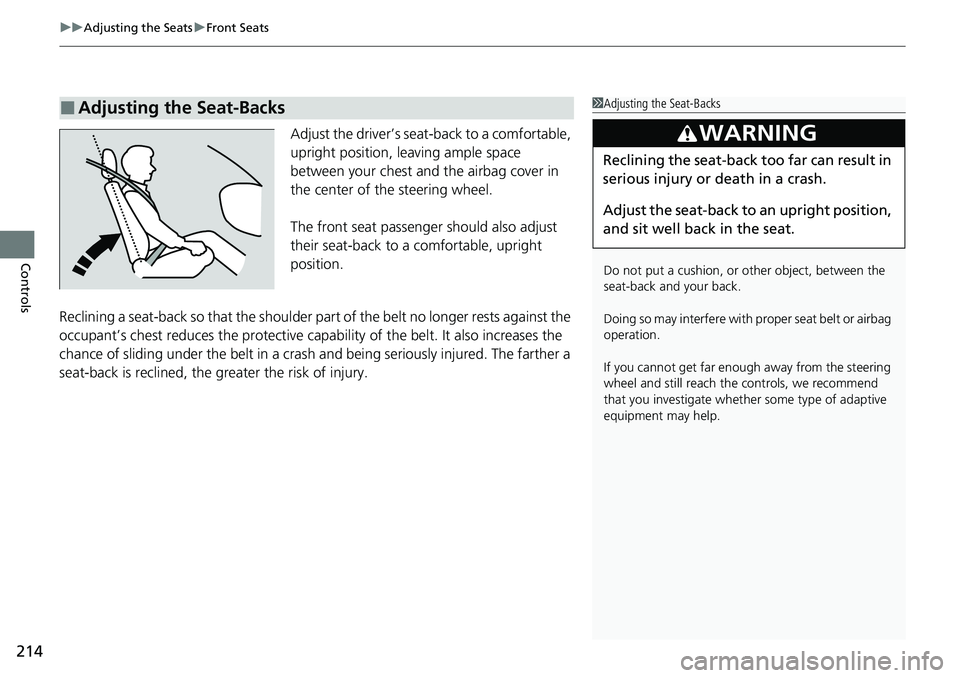
Adjust the driver’s sea t-back to a comfortable,
upright position, leaving ample space
between your chest and the airbag cover in
the center of the steering wheel.
The front seat passenger should also adjust
their seat-back to a comfortable, upright
position.
Reclining a seat-back so that the shoulder part of the belt no longer rests against the
occupant’s chest reduces the protective capa bility of the belt. It also increases the
chance of sliding under the belt in a crash and being seriously injured. The farther a
seat-back is reclined, the gr eater the risk of injury.
■Adjusting the Seat-Backs1Adjusting the Seat-Backs
Do not put a cushion, or other object, between the
seat-back and your back.
Doing so may interfere with pr oper seat belt or airbag
operation.
If you cannot get far e nough away from the steering
wheel and still reach th e controls, we recommend
that you investigate whether some type of adaptive
equipment may help.
3WARNING
Reclining the seat-back too far can result in
serious injury or death in a crash.
Adjust the seat-back to an upright position,
and sit well back in the seat.
Page 238 of 728
uuInterior Lights/Interior Convenience Items uInterior Convenience Items
236
Controls
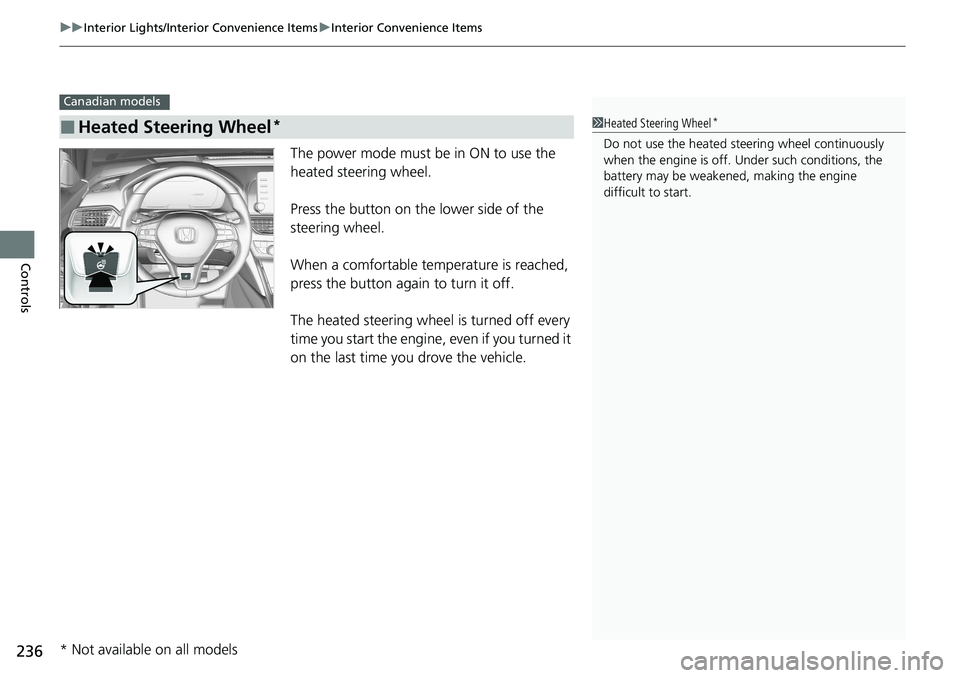
The power mode must be in ON to use the
heated steering wheel.
Press the button on the lower side of the
steering wheel.
When a comfortable temperature is reached,
press the button again to turn it off.
The heated steering wheel is turned off every
time you start the engine, even if you turned it
on the last time you drove the vehicle.
■Heated Steering Wheel*
Canadian models
1Heated Steering Wheel*
Do not use the heated st eering wheel continuously
when the engine is off. Under such conditions, the
battery may be weaken ed, making the engine
difficult to start.
* Not available on all models
Page 248 of 728
246
Features
Audio System
About Your Audio System
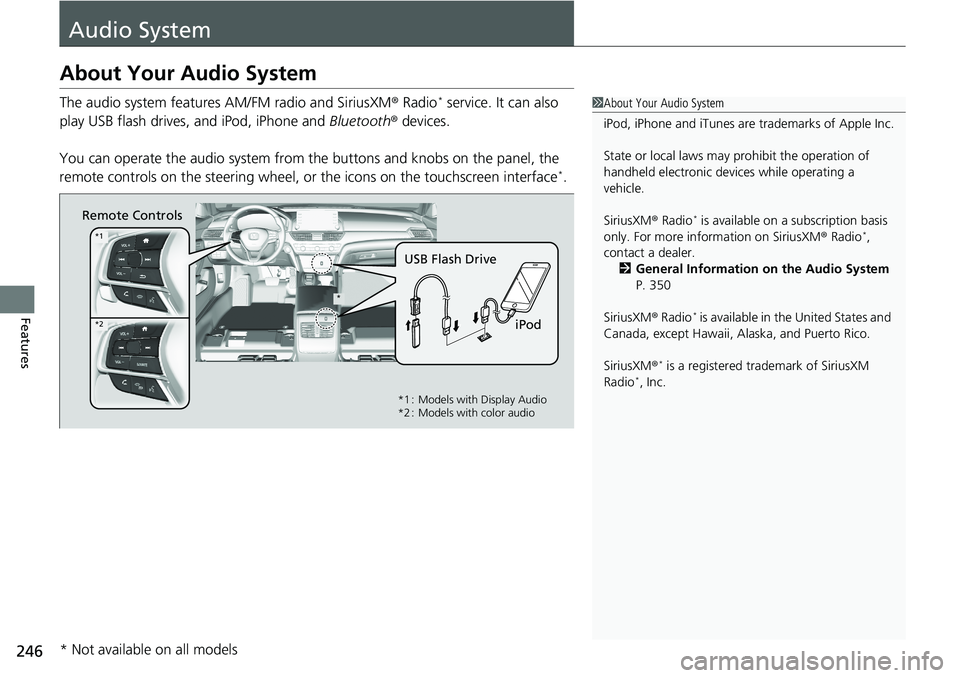
The audio system features AM/FM radio and SiriusXM® Radio* service. It can also
play USB flash drives, and iPod, iPhone and Bluetooth® devices.
You can operate the audio system from the buttons and knobs on the panel, the
remote controls on the steering wheel, or the icons on the touchscreen interface
*.
1 About Your Audio System
iPod, iPhone and iTunes are trademarks of Apple Inc.
State or local laws may pr ohibit the operation of
handheld electronic devices while operating a
vehicle.
SiriusXM ® Radio
* is available on a subscription basis
only. For more information on SiriusXM ® Radio*,
contact a dealer.
2 General Information on the Audio System
P. 350
SiriusXM ® Radio
* is available in the United States and
Canada, except Ha waii, Alaska, and Puerto Rico.
SiriusXM ®
* is a registered tra demark of SiriusXM
Radio*, Inc.
Remote Controls
iPod
USB Flash Drive
*
*1
*2
*1 : Models with Display Audio
*2 : Models with color audio
* Not available on all models
Page 256 of 728
254
Features
Audio System Basic Operation
To use the audio system function, the power mode must be in ACCESSORY or ON.
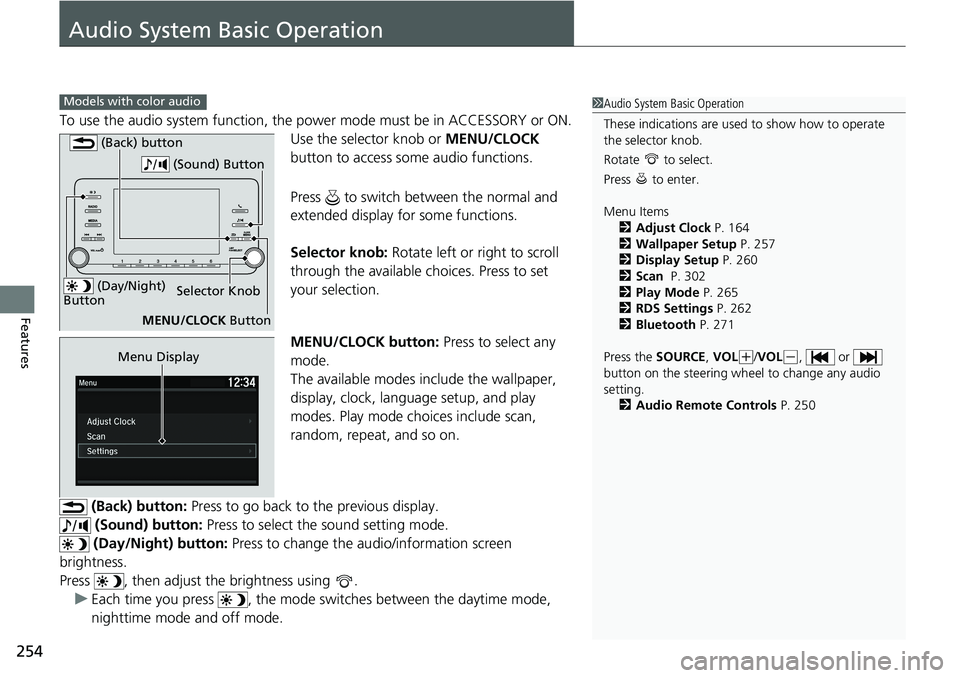
Use the selector knob or MENU/CLOCK
button to access some audio functions.
Press to switch between the normal and
extended display fo r some functions.
Selector knob: Rotate left or right to scroll
through the available choices. Press to set
your selection.
MENU/CLOCK button: Press to select any
mode.
The available modes include the wallpaper,
display, clock, langu age setup, and play
modes. Play mode choices include scan,
random, repeat, and so on.
(Back) button: Press to go back to the previous display.
(Sound) button: Press to select the sound setting mode.
(Day/Night) button: Press to change the audio/information screen
brightness.
Press , then adjust the brightness using . u Each time you press , the mode sw itches between the daytime mode,
nighttime mode and off mode.
Models with color audio1 Audio System Basic Operation
These indications are used to show how to operate
the selector knob.
Rotate to select.
Press to enter.
Menu Items
2 Adjust Clock P. 164
2 Wallpaper Setup P. 257
2 Display Setup P. 260
2 Scan P. 302
2 Play Mode P. 265
2 RDS Settings P. 262
2 Bluetooth P. 271
Press the SOURCE, VOL
(+/VOL(-, or
button on the steering whee l to change any audio
setting. 2 Audio Remote Controls P. 250
(Day/Night)
ButtonSelector Knob
MENU/CLOCK Button
(Back) button
(Sound) Button
Menu Display
Page 264 of 728
uuAudio System Basic Operation uPlaying AM/FM Radio
262
Features
Provides text data information related to your selected RDS-capable FM station.
■To find an RDS station from Station List
1. Press while listening to an FM station.
2. Rotate to select the station, then press .
■Update List
Updates your available station list at any time.
1. Press while listening to an FM station.
2. Rotate to select Update List, then press .
■Radio text
Displays the radio text informat ion of the selected RDS station.
1. Press the MENU/CLOCK button.
2. Rotate to select Settings, then press .
3. Rotate to select RDS Settings, then press .
4. Rotate to select Radio Text, then press .
■Scan
Samples each of the strongest stations on the selected band for 10 seconds.
1. Press the MENU/CLOCK button.
2. Rotate to select Scan, then press .
To turn off scan, press .
■Radio Data System (RDS)1 Playing AM/FM Radio
The ST indicator appears on the display indicating
stereo FM broadcasts.
Stereo reproduction in AM is not available.
Switching the Audio Mode
Press the SOURCE button on the steering wheel.
2 Audio Remote Controls P. 250
You can store 6 AM stations and 12 FM stations into
the preset memory. FM1 and FM2 let you store 6
stations each.
1 Radio Data System (RDS)
When you select an RDS-capable FM station, the RDS
automatically turns on, and the frequency display
changes to the station name. However, when the
signals of that station become weak, the display
changes from the statio n name to the frequency.
Page 276 of 728
274
uuAudio System Basic Operation uSiri ® Eyes Free
Features
Siri ® Eyes Free
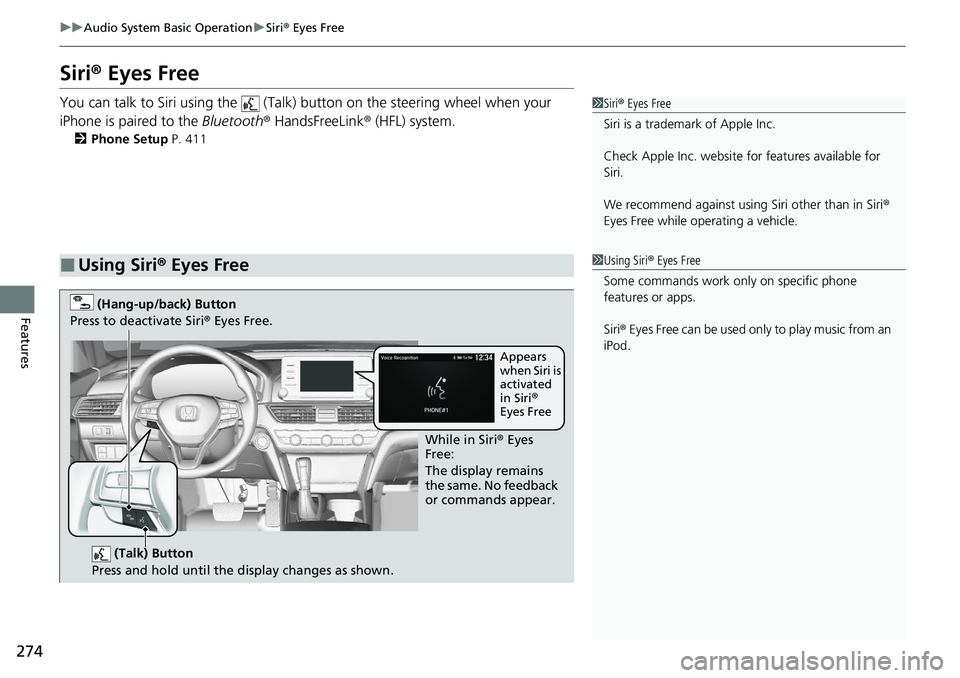
You can talk to Siri using the (Talk) button on the steering wheel when your
iPhone is paired to the Bluetooth® HandsFreeLink ® (HFL) system.
2Phone Setup P. 411
■Using Siri® Eyes Free
1 Siri ® Eyes Free
Siri is a trademark of Apple Inc.
Check Apple Inc. website for features available for
Siri.
We recommend against using Siri other than in Siri ®
Eyes Free while operating a vehicle.
1 Using Siri ® Eyes Free
Some commands work only on specific phone
features or apps.
Siri ® Eyes Free can be used only to play music from an
iPod.
(Talk) Button
Press and hold until the display changes as shown.
(Hang-up/back) Button
Press to deactivate Siri ® Eyes Free.
While in Siri ® Eyes
Free:
The display remains
the same. No feedback
or commands appear.
Appears
when Siri is
activated
in Siri
® Eyes Free
Page 299 of 728
297
uuAudio System Basic Operation uVoice Control Operation
Continued
Features
Voice Control Operation
Your vehicle has a voice control syst em that allows hands-free operation.
The voice control system uses the (tal k) and (back) buttons on the steering
wheel and a microphone near the map lights on the ceiling.
To achieve optimum voice recognition when using the voice control system:
• Make sure the correct screen is displa yed for the voice command that you are
using.
The system recognizes only certain commands.
Available voice commands.
2 Voice Portal Screen P. 298
•Close the windows and moonroof*.
• Adjust the dashboard and side vents so air does not blow onto the microphone
on the ceiling.
• Speak clearly in a clear, natural speaking voice without pausing between words.
• Reduce any background noise if possible. The system may misinterpret your
command if more than one person is speaking at the same time.
■Voice Recognition
1Voice Control Operation
When you press the button, a helpful prompt asks
what you would like to do. Press and release the
button again to bypass this prompt and give a
command.
* Not available on all models
Page 332 of 728
uuAudio System Basic Operation uHondaLink ® Service*
330
Features
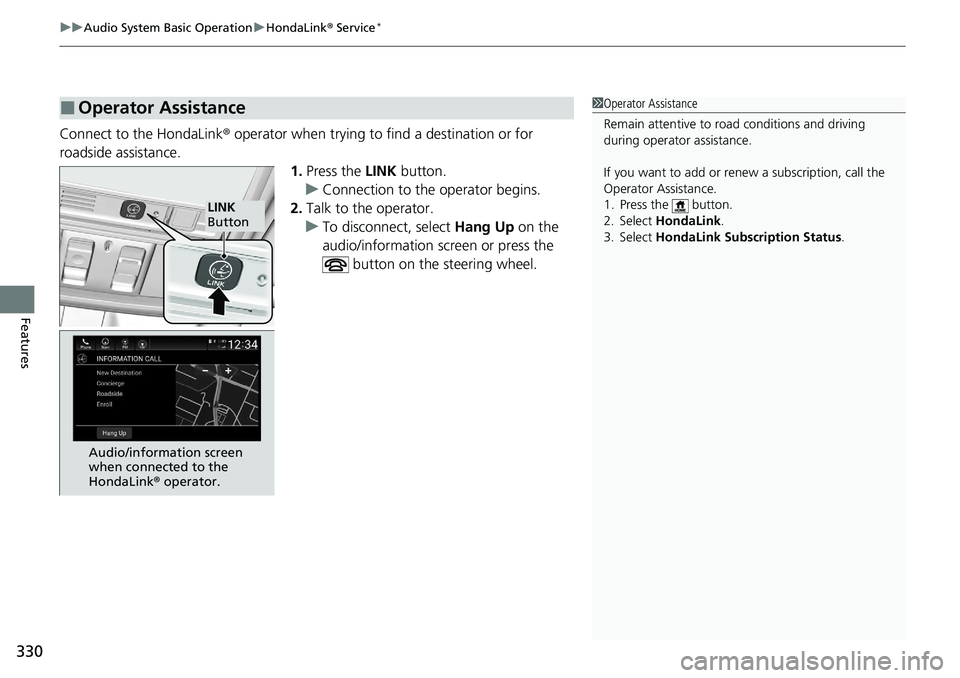
Connect to the HondaLink ® operator when trying to find a destination or for
roadside assistance. 1.Press the LINK button.
u Connection to the operator begins.
2. Talk to the operator.
u To disconnect, select Hang Up on the
audio/information screen or press the
button on the steering wheel.
■Operator Assistance1Operator Assistance
Remain attentive to road conditions and driving
during operator assistance.
If you want to add or re new a subscription, call the
Operator Assistance.
1. Press the button.
2. Select HondaLink .
3. Select HondaLink Subscription Status .
LINK
Button
Audio/information screen
when connected to the
HondaLink ® operator.