charging HONDA ACCORD SEDAN 2020 Owner's Manual (in English)
[x] Cancel search | Manufacturer: HONDA, Model Year: 2020, Model line: ACCORD SEDAN, Model: HONDA ACCORD SEDAN 2020Pages: 728, PDF Size: 34.06 MB
Page 80 of 728
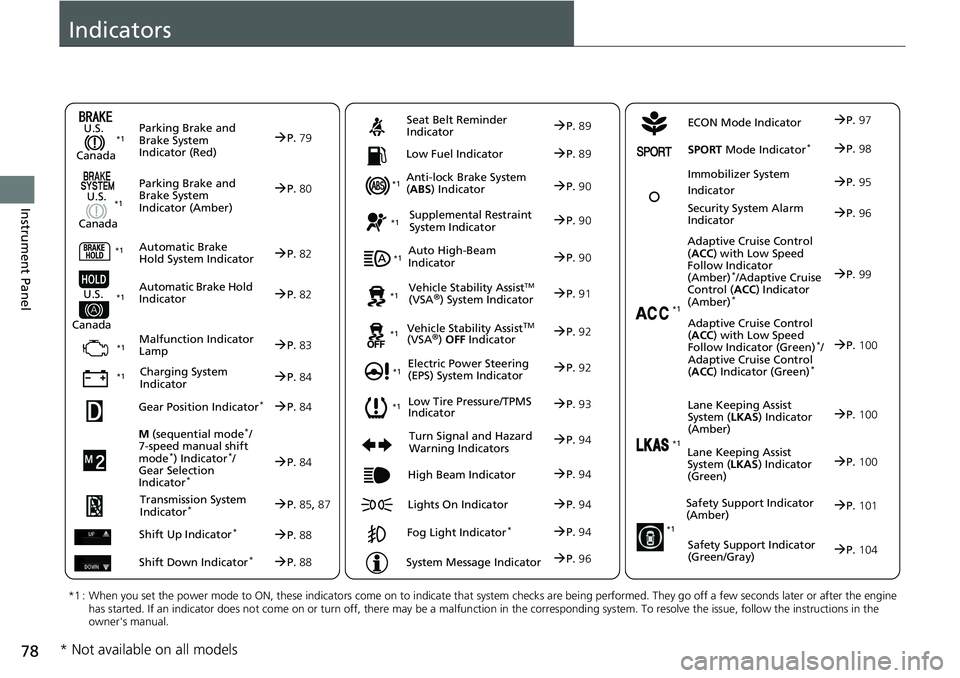
78
Instrument Panel
Indicators
ECON Mode Indicator
M (sequential mode
*/
7-speed manual shift
mode
*) Indicator*/
Gear Selection
Indicator
*
P. 84
Parking Brake and
Brake System
Indicator (Red)
Parking Brake and
Brake System
Indicator (Amber)
U.S.
Canada
U.S.
Canada Automatic Brake
Hold System Indicator
Automatic Brake Hold
IndicatorU.S.
Canada
*1 : When you set the power mode to ON, these indicators come on to indicate that system checks are being performed. They go off a few seconds later or after the engine
has started. If an indicator does not come on or turn off, ther e may be a malfunction in the corresponding system. To resolve the issue, follow the instructions in the
owner's manual.
P. 79*1
Malfunction Indicator
Lamp
Charging System
Indicator
Anti-lock Brake System
( ABS ) Indicator
Seat Belt Reminder
Indicator
Low Fuel Indicator
Vehicle Stability AssistTM (VSA®) System Indicator
Vehicle Stability Assist
TM (VSA®) OFF Indicator
Supplemental Restraint
System Indicator
Auto High-Beam
Indicator
Low Tire Pressure/TPMS
Indicator
Electric Power Steering
(EPS) System Indicator
Turn Signal and Hazard
Warning Indicators
Lights On Indicator High Beam Indicator
Fog Light Indicator*
System Message Indicator Adaptive Cruise Control
(
ACC ) with Low Speed
Follow Indicator
(Amber)
*/Adaptive Cruise
Control ( ACC) Indicator
(Amber)
*
Lane Keeping Assist
System ( LKAS) Indicator
(Amber)
Safety Support Indicator
(Amber)
Safety Support Indicator
(Green/Gray)
P. 80
P.82
P.82
P.83
P.84
*1
*1 *1 *1
P.
93
*1
*1
Gear Position Indicator*P. 84
Transmission System
I
ndicator*P. 85, 87
Shift Up Indicator
*P. 88
Shift Down Indicator
*P. 88
P. 89
P.89
P.90
P.90
P.90
P.91
*1
*1
*1
*1
P. 92
*1P.92
P.94
P.99
*1
P.94
P.94
P.94 Security System Alarm
Indi
cator P.96
P.96
P.100
P.101
P.104
*1Adaptive Cruise Control
(ACC ) with Low Speed
Follow Indicator (Green)
*/
Adaptive Cruise Control
( ACC ) Indicator (Green)
*
P.100
*1Lane Keeping Assist
System ( LKAS) Indicator
(Green)P. 100
*1
Immobilizer System
IndicatorP.95
SPORT Mode Indicator*P.98
P.97
* Not available on all models
Page 86 of 728
84
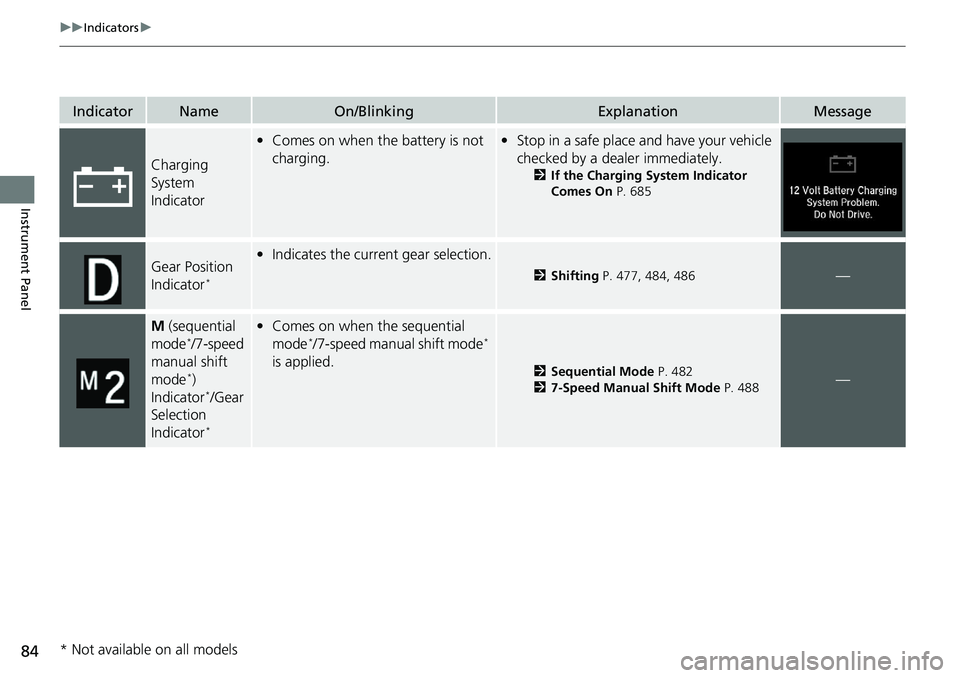
uuIndicators u
Instrument Panel
IndicatorNameOn/BlinkingExplanationMessage
Charging
System
Indicator
•Comes on when the battery is not
charging.• Stop in a safe place and have your vehicle
checked by a dealer immediately.
2 If the Charging System Indicator
Comes On P. 685
Gear Position
Indicator*
•Indicates the current gear selection.
2 Shifting P. 477, 484, 486—
M (sequential
mode*/7-speed
manual shift
mode
*)
Indicator*/Gear
Selection
Indicator
*
• Comes on when the sequential
mode*/7-speed manual shift mode*
is applied.
2 Sequential Mode P. 482
2 7-Speed Manual Shift Mode P. 488—
* Not available on all models
Page 233 of 728
Continued231
uuInterior Lights/Interior Convenience Items uInterior Convenience Items
Controls
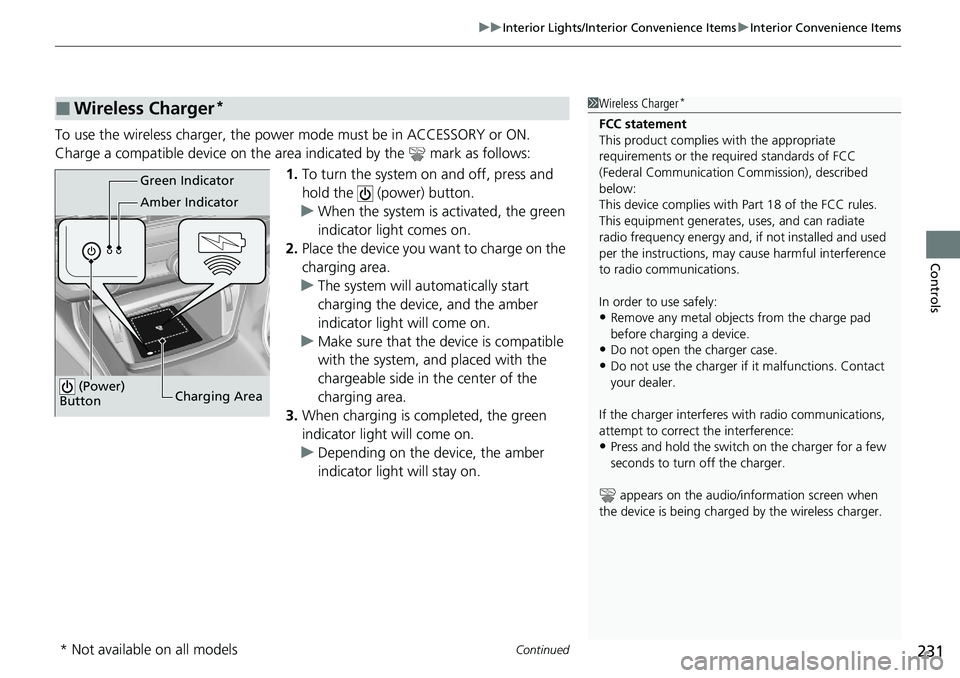
To use the wireless charger, the power mode must be in ACCESSORY or ON.
Charge a compatible device on the ar ea indicated by the mark as follows:
1. To turn the system on and off, press and
hold the (power) button.
u When the system is activated, the green
indicator light comes on.
2. Place the device you want to charge on the
charging area.
u The system will au tomatically start
charging the device, and the amber
indicator light will come on.
u Make sure that the device is compatible
with the system, and placed with the
chargeable side in the center of the
charging area.
3. When charging is completed, the green
indicator light will come on.
u Depending on the device, the amber
indicator light will stay on.
■Wireless Charger*1Wireless Charger*
FCC statement
This product complies with the appropriate
requirements or the requ ired standards of FCC
(Federal Communication Commission), described
below:
This device complies with Part 18 of the FCC rules.
This equipment generates, uses, and can radiate
radio frequency energy and, if not installed and used
per the instructions, may cause harmful interference
to radio communications.
In order to use safely:
•Remove any metal objects from the charge pad
before charging a device.
•Do not open the charger case.
•Do not use the charger if it malfunctions. Contact
your dealer.
If the charger interferes with radio communications,
attempt to correct the interference:
•Press and hold the switch on the charger for a few
seconds to turn off the charger.
appears on the audio/information screen when
the device is being charge d by the wireless charger.
Green Indicator
Amber Indicator
Charging Area
(Power)
Button
* Not available on all models
Page 234 of 728
uuInterior Lights/Interior Convenience Items uInterior Convenience Items
232
Controls
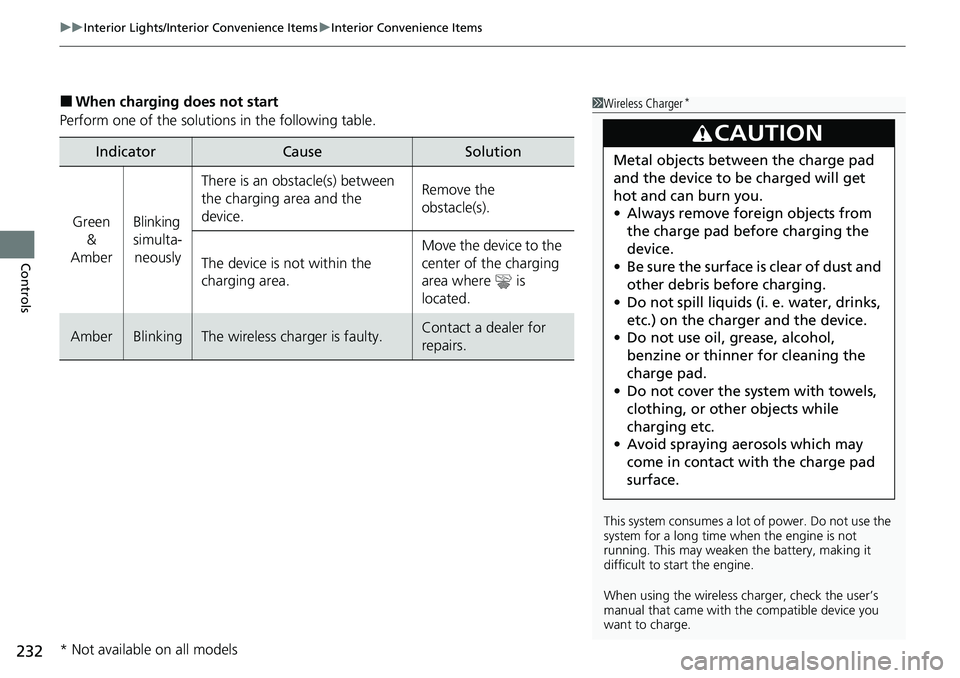
■When charging does not start
Perform one of the solution s in the following table.
IndicatorCauseSolution
Green
&
AmberBlinking
simulta- neously
There is an obstacle(s) between
the charging area and the
device.Remove the
obstacle(s).
The device is not within the
charging area. Move the device to the
center of the charging
area where is
located.
AmberBlinkingThe wireless charger is faulty.Contact a dealer for
repairs.
1
Wireless Charger*
This system consumes a lot of power. Do not use the
system for a long time when the engine is not
running. This may weaken the battery, making it
difficult to start the engine.
When using the wireless charger, check the user’s
manual that came with th e compatible device you
want to charge.
3CAUTION
Metal objects between the charge pad
and the device to be charged will get
hot and can burn you.
• Always remove foreign objects from
the charge pad before charging the
device.
• Be sure the surface is clear of dust and
other debris before charging.
• Do not spill liquids (i. e. water, drinks,
etc.) on the charger and the device.
• Do not use oil, grease, alcohol,
benzine or thinner for cleaning the
charge pad.
• Do not cover the system with towels,
clothing, or other objects while
charging etc.
• Avoid spraying aerosols which may
come in contact with the charge pad
surface.
* Not available on all models
Page 235 of 728
Continued233
uuInterior Lights/Interior Convenience Items uInterior Convenience Items
Controls
1Wireless Charger*
NOTICE
Do not place any magnetic re cording media or precision
machines within the charging area while charging.
The data on your cards such as credit cards can be
lost because of the magneti c effect. Also precision
machines such as watches can go wrong.
“Qi” and marks are the registered trademarks
owned by Wire less Power Consortium (WPC).
In the following cases, ch arging may stop or not start:
•The device is already fully charged.•The temperature of the device is extremely high
while charging.
•You are at a place that emits strong
electromagnetic waves or noises such as TV station,
electric power plant, or gas station.
A device may not charge if the size or shape of its
chargeable side is not a ppropriate for use with the
charging area.
Not all devices are compatible with the system.
During the charging phase, it is normal for the
charging area and de vice to heat up.
Charging may be briefl y interrupted when:
•All the doors or the trunk are closed
- to avoid interference with the proper functioning
of the smart entry system.
•The position of the device is altered.
Do not charge more than one device at a time on a
charging area.
* Not available on all models
Page 249 of 728
247
uuAudio System uUSB Port(s)
Continued
Features
USB Port(s)
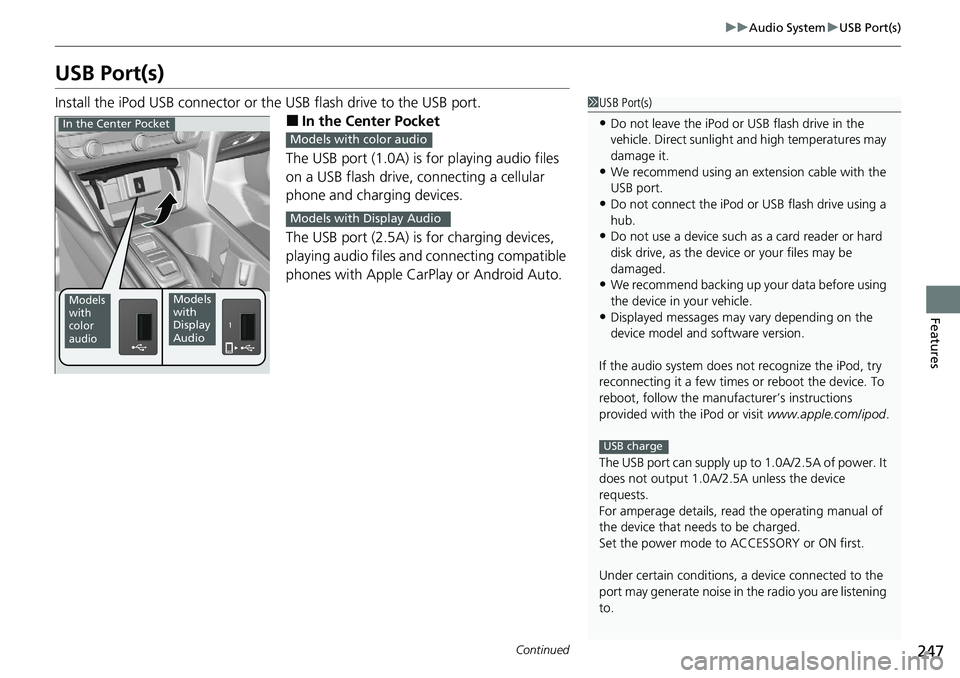
Install the iPod USB connector or the USB flash drive to the USB port.
■In the Center Pocket
The USB port (1.0A) is for playing audio files
on a USB flash drive, connecting a cellular
phone and charging devices.
The USB port (2.5A) is for charging devices,
playing audio files and connecting compatible
phones with Apple CarPlay or Android Auto.
1 USB Port(s)
•Do not leave the iPod or USB flash drive in the
vehicle. Direct sunlight and high temperatures may
damage it.
•We recommend using an ex tension cable with the
USB port.
•Do not connect the iPod or USB flash drive using a
hub.
•Do not use a device such as a card reader or hard
disk drive, as the device or your files may be
damaged.
•We recommend backing up yo ur data before using
the device in your vehicle.
•Displayed messages may vary depending on the
device model and software version.
If the audio system does not recognize the iPod, try
reconnecting it a few times or reboot the device. To
reboot, follow the manufac turer’s instructions
provided with the iPod or visit www.apple.com/ipod.
The USB port can supply up to 1.0A/2.5A of power. It
does not output 1.0A/2.5A unless the device
requests.
For amperage details, read the operating manual of
the device that ne eds to be charged.
Set the power mode to ACCESSORY or ON first.
Under certain condi tions, a device connected to the
port may generate noise in the radio you are listening
to.
USB charge
Models
with
color
audioModels
with
Display
Audio
In the Center PocketModels with color audio
Models with Display Audio
Page 250 of 728
uuAudio System uUSB Port(s)
248
Features
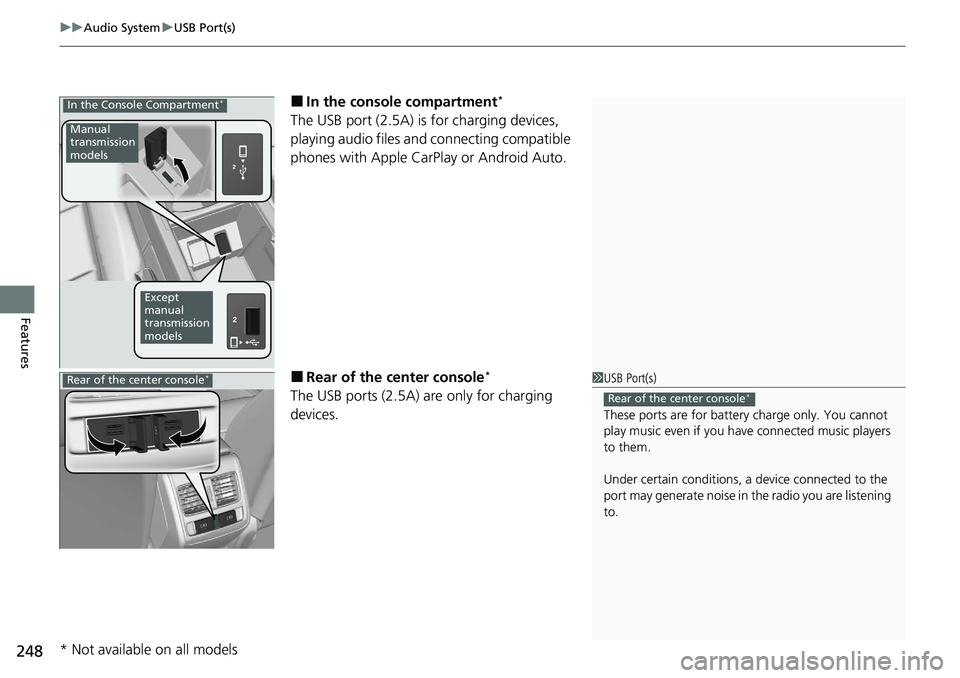
■In the consol e compartment*
The USB port (2.5A) is for charging devices,
playing audio files and connecting compatible
phones with Apple CarPlay or Android Auto.
■Rear of the center console*
The USB ports (2.5A) are only for charging
devices.
In the Console Compartment*
Manual
transmission
models
Except
manual
transmission
models
1 USB Port(s)
These ports are for battery charge only. You cannot
play music even if you ha ve connected music players
to them.
Under certain condi tions, a device connected to the
port may generate noise in the radio you are listening
to.
Rear of the center console*Rear of the center console*
* Not available on all models
Page 340 of 728
338
uuAudio System Basic Operation uApple CarPlay ®
Features
Apple CarPlay ®
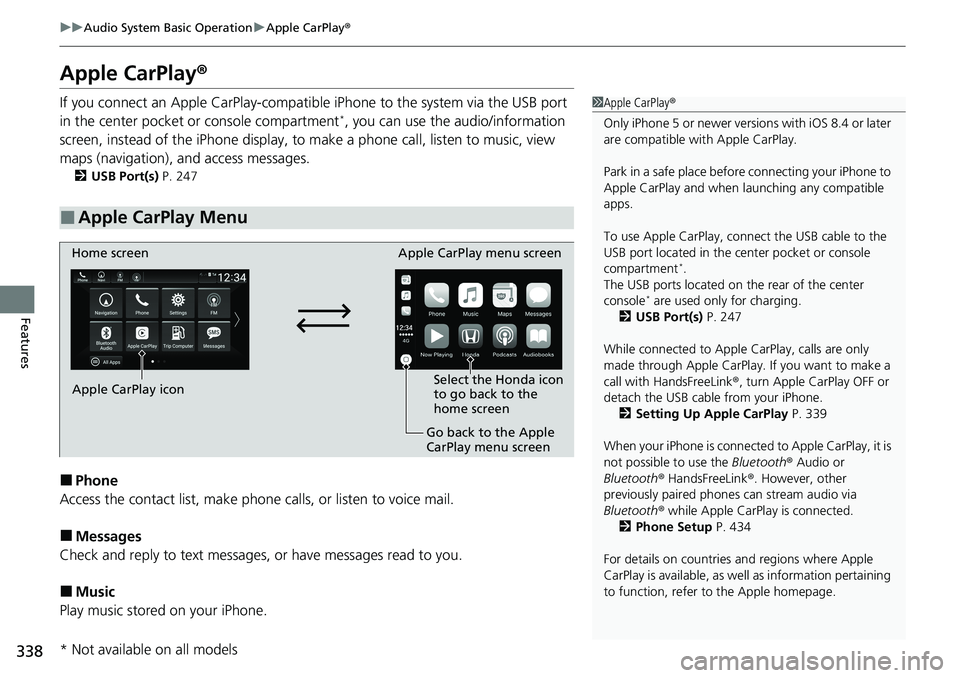
If you connect an Apple CarPlay-compatible iPhone to the system via the USB port
in the center pocket or console compartment*, you can use the audio/information
screen, instead of the iPhone display, to make a phone call, listen to music, view
maps (navigation), an d access messages.
2USB Port(s) P. 247
■Phone
Access the contact list, make phone calls, or listen to voice mail.
■Messages
Check and reply to text messages, or have messages read to you.
■Music
Play music stored on your iPhone.
■Apple CarPlay Menu
1 Apple CarPlay ®
Only iPhone 5 or newer versi ons with iOS 8.4 or later
are compatible with Apple CarPlay.
Park in a safe place before connecting your iPhone to
Apple CarPlay and when launching any compatible
apps.
To use Apple CarPlay, connect the USB cable to the
USB port located in the center pocket or console
compartment
*.
The USB ports located on the rear of the center
console
* are used only for charging.
2 USB Port(s) P. 247
While connected to Apple CarPlay, calls are only
made through Apple CarPlay. If you want to make a
call with HandsFreeLink ®, turn Apple CarPlay OFF or
detach the USB cable from your iPhone. 2 Setting Up Apple CarPlay P. 339
When your iPhone is connected to Apple CarPlay, it is
not possible to use the Bluetooth® Audio or
Bluetooth ® HandsFreeLink ®. However, other
previously paired phones can stream audio via
Bluetooth ® while Apple CarPlay is connected.
2 Phone Setup P. 434
For details on c ountries and regions where Apple
CarPlay is available, as well as information pertaining
to function, refer to the Apple homepage.
Home screen
Apple CarPlay icon Apple CarPlay menu screen
Go back to the Apple
CarPlay menu screen
Select the Honda icon
to go back to the
home screen
* Not available on all models
Page 360 of 728
358
uuGeneral Information on the Audio System uHonda App License Agreement
Features
E. Information Coll ection and Storage
1. Information Collection, Use, Transmission and Storage of Data. Consent to Use of Data:
You agree that HONDA and PROVIDERS may
collect and use your information gathered in any manner as part of product support services related to the SOFTWARE or related services.
HONDA may share such information with third parties, including, without limitation, PROVIDERS, th ird party software and services
suppliers, their affiliates and/or their desi gnated agents, solely to improve their products or to provide services or technolo gies to you.
HONDA, third party software and systems s uppliers, their affiliates and/or their designated agent may disclose this information to others,
but not in a form that pe rsonally identifies you.
2. Information Storage.
Depending on the type of multimedia system you have in your VEHICLE, certain information may be stored for ease
of use of the SOFTWARE including, without limitation, search hi story, location history in certain applications, previous and saved
destinations, map locations within certain applications, and device numbers and contact information.
(a) Vehicle Health Information.
Your VEHICLE may remotely trans mit information regarding the status and health of your VEHICLE
(“VEHICLE INFORMATION”) to HONDA without notification to you. VEHICLE INFORMATION may contain VEHICLE maintenance and
malfunction status that is derived from VEHICLE diagnostic data and includes, but is not limited to, status of powered doors and windows,
battery life data, battery charging data, VEHICLE speed, coolant temperat ure, air compressor revolution, output power, warning codes,
diagnostic trouble codes, fuel injection volu me, and engine rotations per minute. VEHICL E HEALTH INFORMATION may be used by HON DA
for research and development, to deliver HONDA SERVICES and information to you, and to contact you, and is retained only for a period
of time necessary to fulfill these goals.
(b) VEHICLE Geolocation Data (non-navigation/map based).
If you opt-in to geolocation-based SERVICES, your vehicle’s geolocation data
(latitude and longitude) will be automatically se nt from your VEHICLE to HONDA and PROVIDERS.
(c) You understand that the inputting or uploading of information to your VEHICLE’s multimedia system or the SOFTWARE or SERVIC ES is
at your own risk and that HONDA is not responsible for unauthorized access to or use of any personal or other information. All information
uploaded to the SOFTWARE and SERVICES may be stored on your VEHICLES’s multimedia system and you understand that the security and
safety of your VEHICLE’s multimedia system is your sole responsibility.
Page 482 of 728
![HONDA ACCORD SEDAN 2020 Owners Manual (in English) uuWhen Driving uShifting
480
Driving
■If you want to keep the transmission in (N position [car wash mode]
With the engine running:
1. Press and hold the brake pedal.
2. Press and release the
(N but HONDA ACCORD SEDAN 2020 Owners Manual (in English) uuWhen Driving uShifting
480
Driving
■If you want to keep the transmission in (N position [car wash mode]
With the engine running:
1. Press and hold the brake pedal.
2. Press and release the
(N but](/img/13/34454/w960_34454-481.png)
uuWhen Driving uShifting
480
Driving
■If you want to keep the transmission in (N position [car wash mode]
With the engine running:
1. Press and hold the brake pedal.
2. Press and release the
(N button.
u
(N (Neutral) hold mode will appear on the driver information interface.
3. Press the
(N button again and hold it for two seconds.
u The vehicle will enter car wash mode, wh ich must be used when your vehicle
is pulled through a conveyor type automatic car wash where you or an
attendant do not remain in the vehicle.
If the ENGINE STOP/START button is pressed
after car wash mode has been activated, the
power mode will change to ACCESSORY and
a message will be displayed on the driver
information interface. u For 15 minutes the transmission remains
in
(N with the power mode will remain
in ACCESSORY. After that, the
transmission automatically changes to
(P and the power mode changes to OFF.
u Manually changing to
(P cancels
ACCESSORY mode. The
(P indicator
comes on and the power mode changes
to OFF. You must always put the
transmission into
(P when car wash
mode is no longer needed.
1 If you want to keep the transmission in (N position [car wash
mode]
NOTICE
When transmission is too hot, carwash mode may
not be available. Let the engine idle and cool down
transmission.
To keep the vehicle in
(N position, you can also
follow this procedure:
While the power mode is on, select
(N, and then
within five seconds, press the ENGINE STOP/START
button.
Note that the transmiss ion may not stay in
(N
position while any of the following indicators is on:
•Transmission system indicator.
•Malfunction indicator lamp.•Charging system indicator.