coolant HONDA CIVIC 1991 Owners Manual
[x] Cancel search | Manufacturer: HONDA, Model Year: 1991, Model line: CIVIC, Model: HONDA CIVIC 1991Pages: 136, PDF Size: 1.33 MB
Page 28 of 136
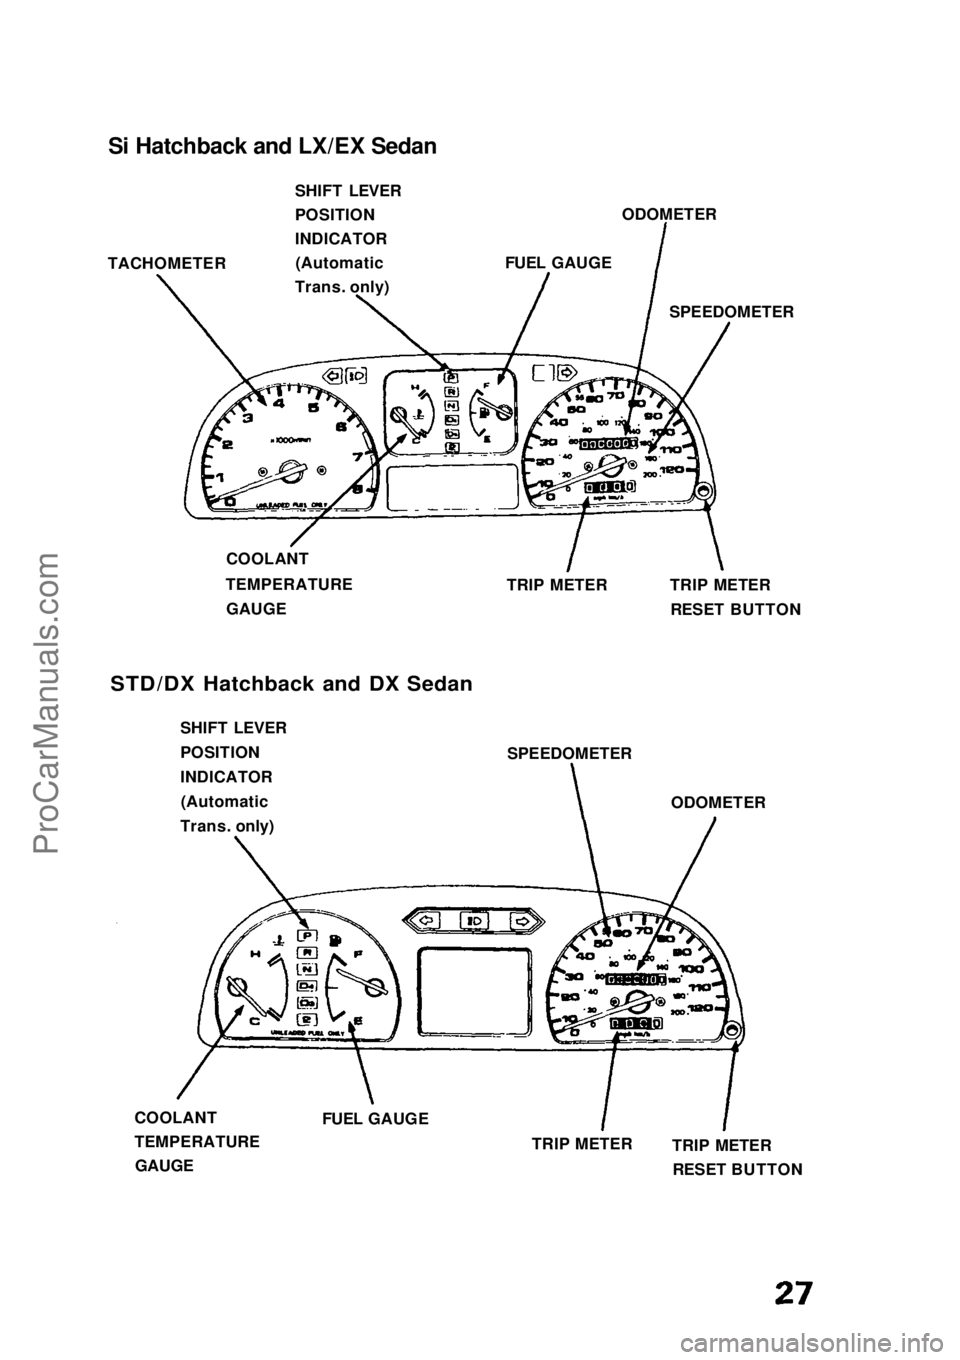
Si Hatchback and LX/EX Sedan
STD/DX Hatchback and DX Sedan
TACHOMETER
SHIFT LEVER
POSITION
INDICATOR
(Automatic
Trans. only) FUEL GAUGEODOMETER
SPEEDOMETER
TRIP METER TRIP METER
RESET BUTTON
COOLANT
TEMPERATURE GAUGE
SHIFT LEVER
POSITION
INDICATOR (Automatic
Trans. only) SPEEDOMETER
ODOMETER
COOLANT
TEMPERATURE GAUGE FUEL GAUGE
TRIP METERTRIP METER
RESET BUTTONProCarManuals.comMain Menu s t
Page 29 of 136

Speedometer
The speed is indicated in miles per hour (outside scale) and kilometers per hour (inside).
Odometer
The numbers on the odometer indicate miles.
The odometer registers total distance traveled, and serves as your guide for determining when periodic maintenance is due. Federal lawmakes it illegal to alter the odometer of any motor vehicle with the
intent to change the number of miles indicated.
Trip Meter The numbers on the trip meter indicate miles.
The trip meter can be returned to zero by pushing in the reset button. Use it for checking fuel consumption or distance traveled
per trip.
Tachometer (Si Hatchback and LX/EX Sedan) The tachometer indicates engine speed in revolutions per minute.
The beginning of the RED ZONE indicates the maximum allowableengine R.P.M. Do not run the engine with the tachometer indicator
needle in the RED ZONE.
Fuel Gauge
FUEL TANK CAPACITY: 45 (11.9 US gal ,9.9 Imp gal)
As a convenience, the gauge continues to show the same fuel level
as when the ignition was last on. After refueling, the gauge will
slowly change to the new fuel level when the ignition is switched on.
When the needle first indicates E (empty), you have a usable
reserve left in the tank of about:
4 (1.1 US gal, 0.9 Imp gal)
Coolant Temperature Gauge
CAUTION:
The needle should stay within the white range. If the needle reaches the red line at "H" (Hot), pull safely off the road, stop theengine and check the coolant level in the reserve tank on the
driver's side of the radiator under the hood.
Do not remove the radiator cap when the engine is hot. The
coolant is under pressure and may blow out and scald you.
GaugesProCarManuals.comMain Menu s t
Page 30 of 136
Warning and Indicator Lights
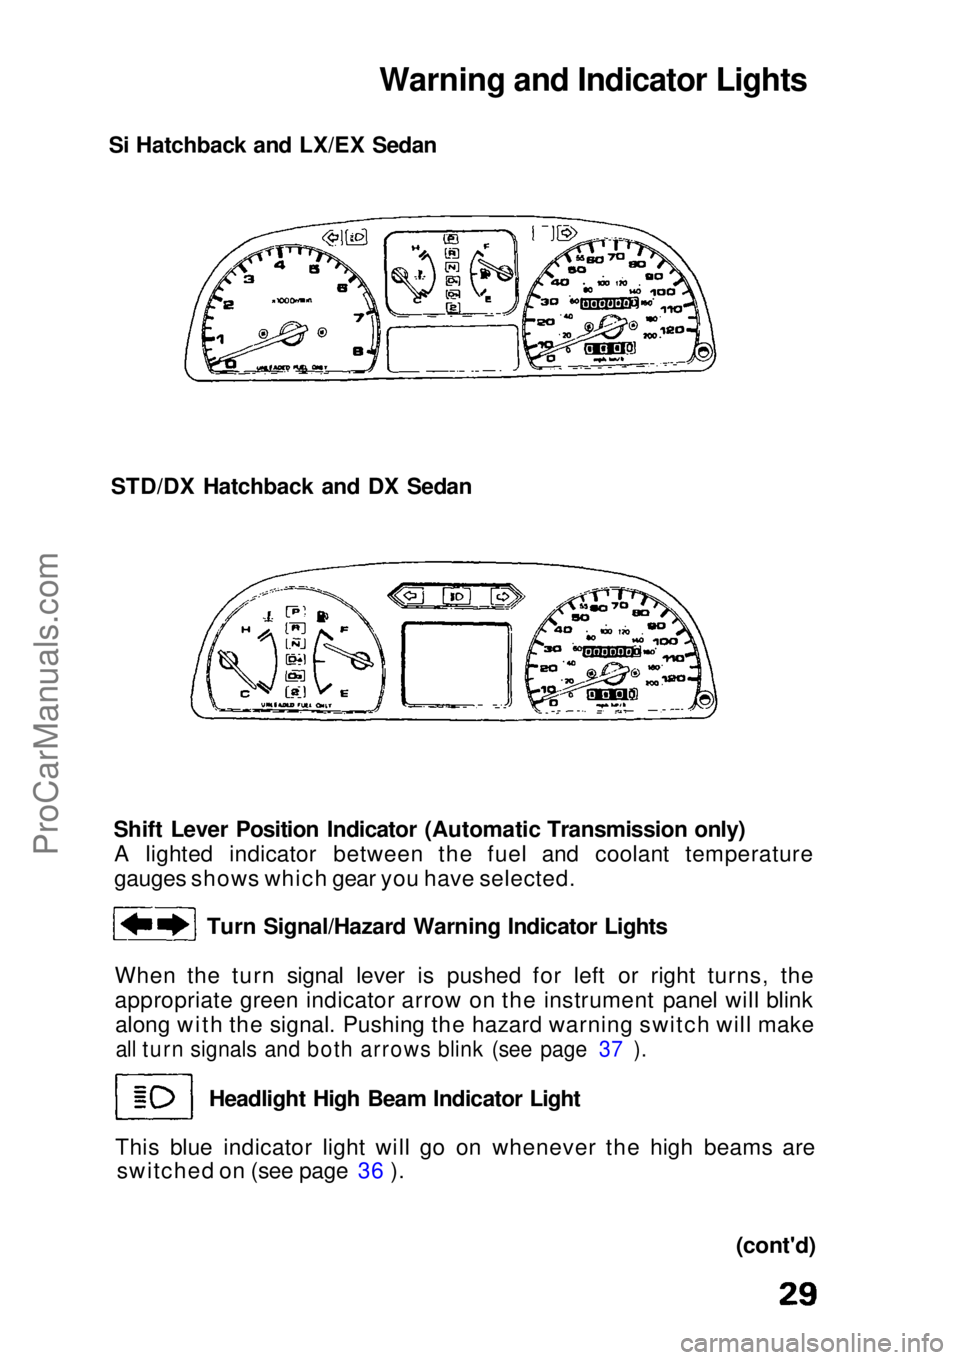
Si Hatchback and LX/EX Sedan
STD/DX Hatchback and DX Sedan
Shift Lever Position Indicator (Automatic Transmission only)A lighted indicator between the fuel and coolant temperature
gauges shows which gear you have selected.
Turn Signal/Hazard Warning Indicator Lights
When the turn signal lever is pushed for left or right turns, the
appropriate green indicator arrow on the instrument panel will blink along with the signal. Pushing the hazard warning switch will make
all turn signals and both arrows blink (see page 37 ).
Headlight High Beam Indicator Light
This blue indicator light will go on whenever the high beams are switched on (see page 36 ).
(cont'd)ProCarManuals.comMain Menu s t
Page 50 of 136
To Cool (with optional air conditioner)
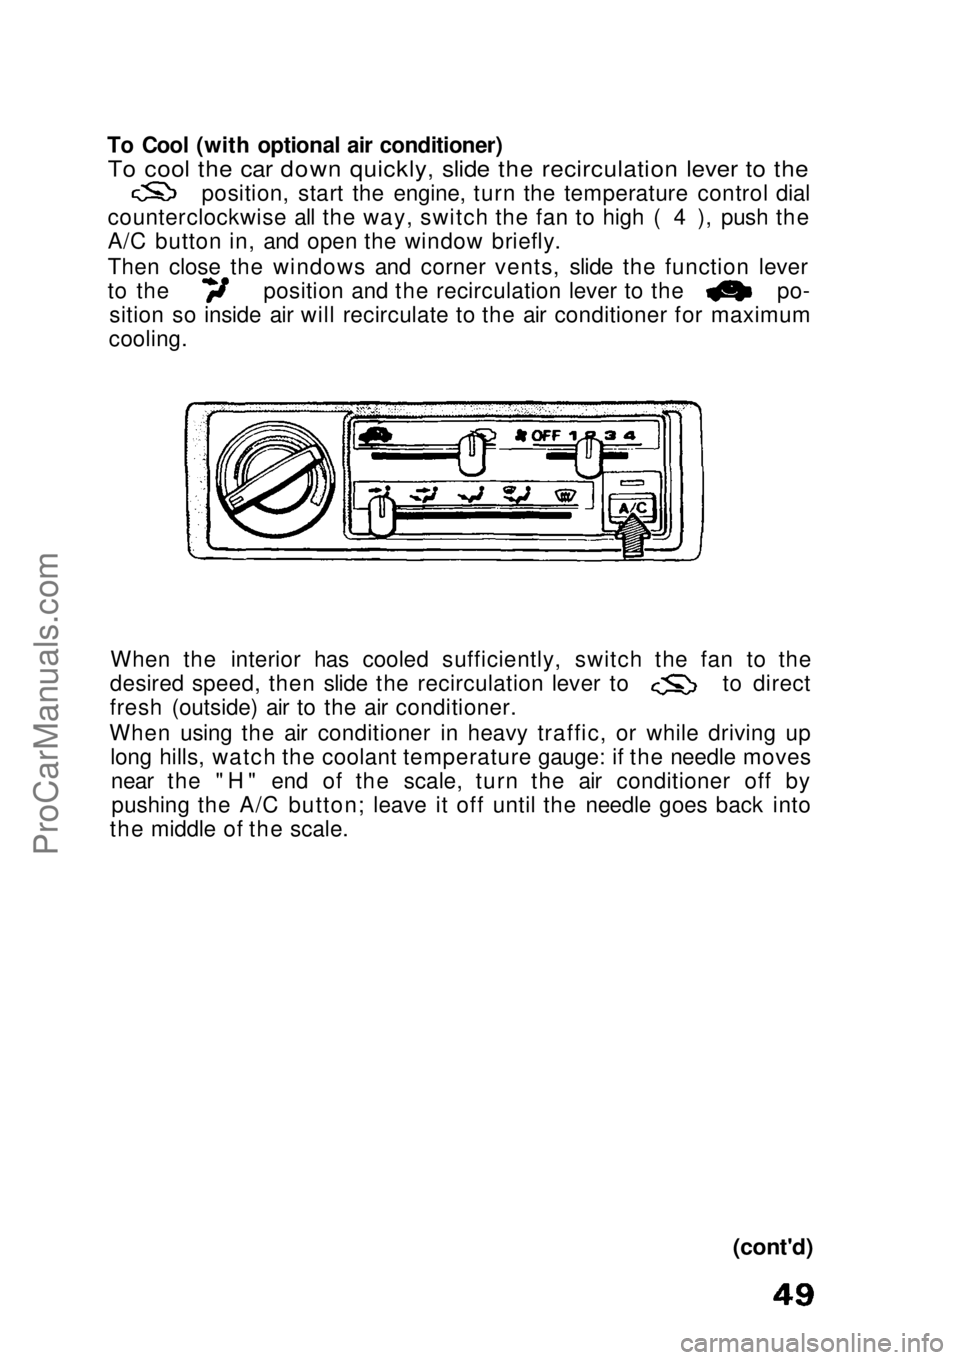
To cool the car down quickly, slide the recirculation lever to the
position, start the engine, turn the temperature control dial
counterclockwise all the way, switch the fan to high ( 4 ), push the
A/C button in, and open the window briefly.
Then close the windows and corner vents, slide the function lever to the position and the recirculation lever to the po-
sition so inside air will recirculate to the air conditioner for maximum
cooling.
When the interior has cooled sufficiently, switch the fan to the desired speed, then slide the recirculation lever to to direct
fresh (outside) air to the air conditioner.
When using the air conditioner in heavy traffic, or while driving up long hills, watch the coolant temperature gauge: if the needle movesnear the "H" end of the scale, turn the air conditioner off bypushing the A/C button; leave it off until the needle goes back into
the middle of the scale.
(cont'd)ProCarManuals.comMain Menu s t
Page 69 of 136

Check the following items at each fuel stop:
1. Engine oil level.
2. Radiator coolant level.
Check the following items periodically: 1. Brakes: for braking efficiency, brake pedal travel and hydraulic
fluid level.
2. Lights: for operation of headlights, taillights, side marker lights, stoplights, turn signals and back-up lights.
3. Tires: for correct pressures (including spare); inspect for cuts and uneven or excessive wear. Rotate every 7,500 miles (12,000 km)
in the pattern shown on page 97.
4. Steering: for excessive play or vibration while driving. 5. Exhaust system: for leaks or loose mounts.
6. Wipers: for operation of windshield wipers and washer, and condition of wiper blades.
7. Seat belts: for condition of fabric and buckles, and operation of the restraint mechanism.
8. Battery condition.
9. Clutch adjustment (clutch pedal free travel).
(cont'd)ProCarManuals.comMain Menu s t
Page 70 of 136
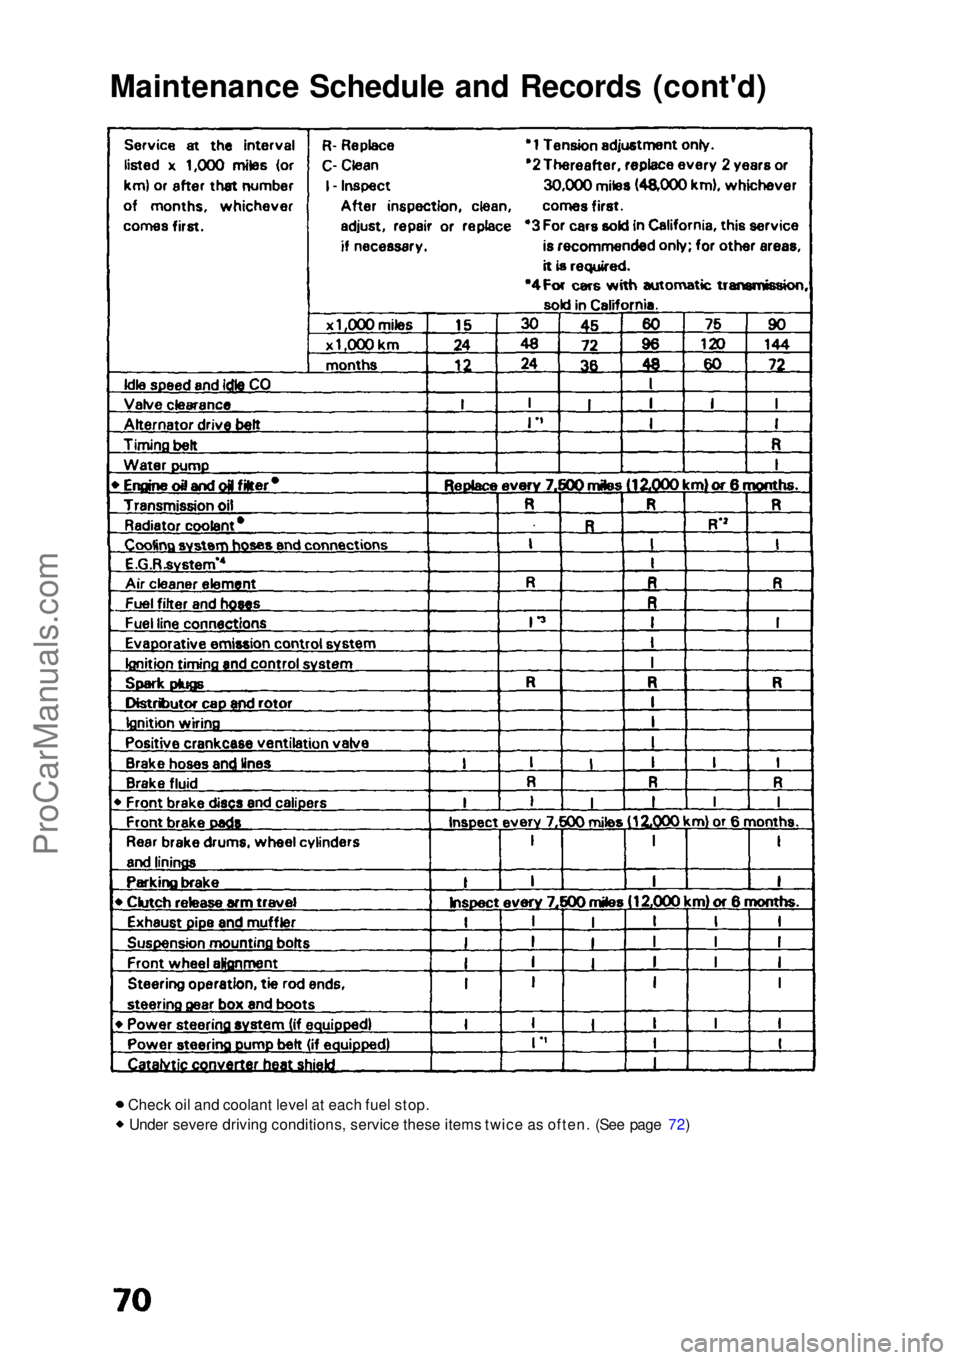
Maintenance Schedule and Records (cont'd)
Check oil and coolant level at each fuel stop.Under severe driving conditions, service these items twice as often. (See page 72)ProCarManuals.comMain Menu s t
Page 80 of 136
Cooling System
The engine in your Honda contains a number of aluminum parts. Therefore, it requires an antifreeze/coolant specifically formulated
to protect the aluminum parts from corrosion. Failure to use asuitable antifreeze/coolant may seriously shorten the life of the
engine as the result of rapid corrosion damage. Some antifreeze/
coolants, although labelled for use in engines containing aluminum,may not provide adequate protection for your engine.
Therefore, use only a Honda RECOMMENDED antifreeze/coolant.
CHECK WITH YOUR AUTHORIZED HONDA DEALER.
For best corrosion protection, the mixture of coolant and water
must be maintained year-round at 50/50. Concentrations less than 50% coolant may not provide sufficient protection against
corrosion and freezing. Concentrations of greater than 60% coolant
will impair cooling efficiency and are not recommended. Low- mineral drinking water or distilled water should be mixed with the
antifreeze/coolant. Coolant loss should be replenished by a mixture
containing the proper concentration of antifreeze and water.Do not mix different antifreeze/coolants.
Do not use additional rust inhibitors or anti-rust products, as they
may not be compatible with the radiator coolant.
ENGINE DAMAGE CAUSED BY IMPROPER COOLANT USAGE IS
NOT COVERED BY THE NEW CAR WARRANTY.
Checking Coolant
Check the coolant level in the reserve tank when the engine is at
normal operating temperature.
Do not remove the radiator cap when the engine is hot; the
coolant is under pressure and could severely scald you.ProCarManuals.comMain Menu s t
Page 81 of 136
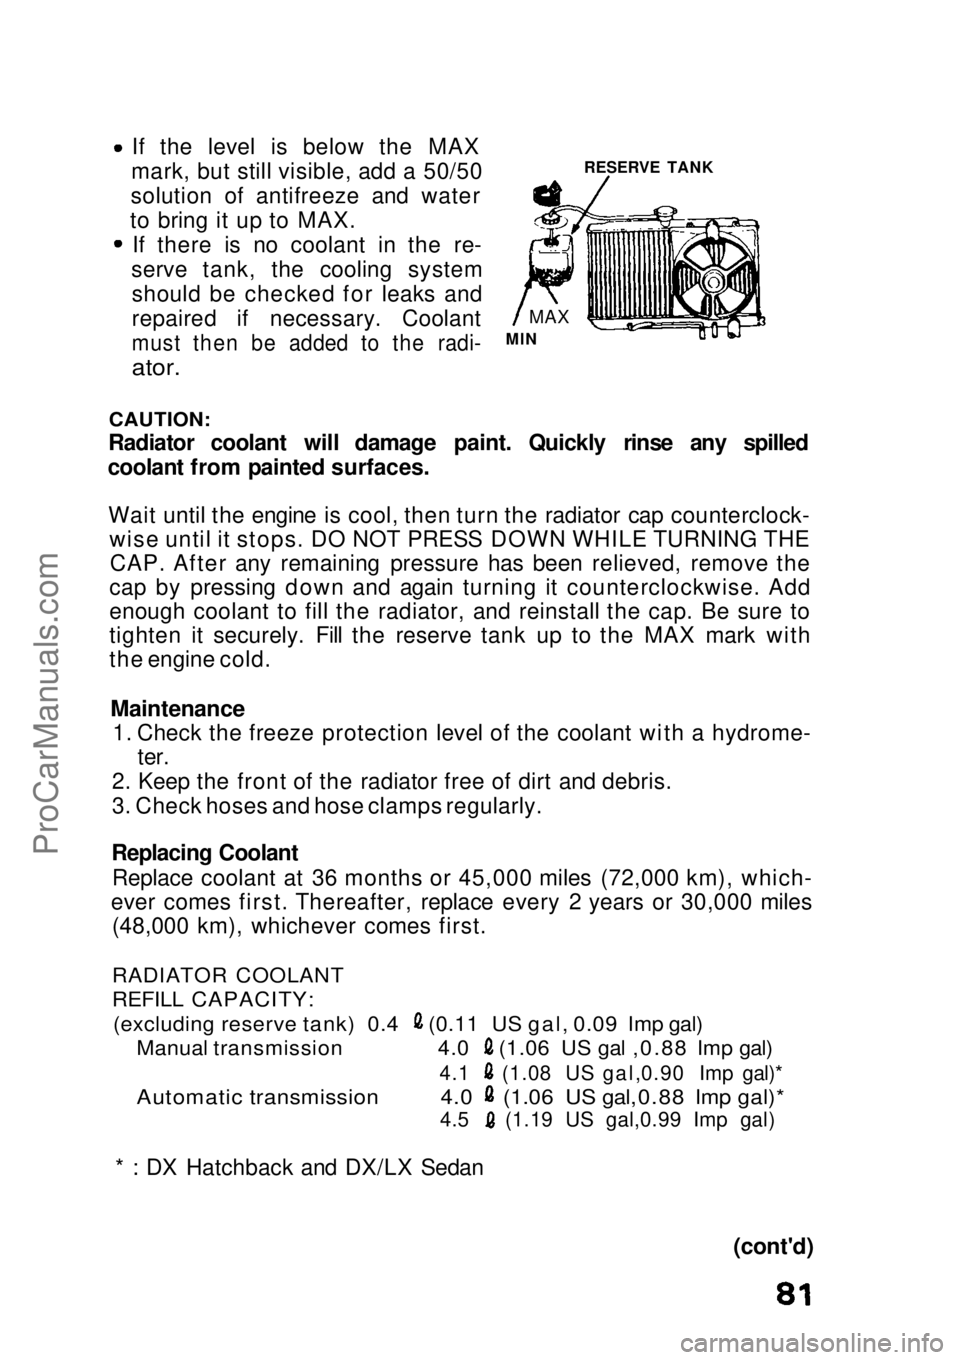
RESERVE TANKIf the level is below the MAX
mark, but still visible, add a 50/50
solution of antifreeze and water
to bring it up to MAX. If there is no coolant in the re-
serve tank, the cooling system should be checked for leaks and
repaired if necessary. Coolant
must then be added to the radi-
ator.
CAUTION:
Radiator coolant will damage paint. Quickly rinse any spilled
coolant from painted surfaces.
Wait until the engine is cool, then turn the radiator cap counterclock- wise until it stops. DO NOT PRESS DOWN WHILE TURNING THECAP. After any remaining pressure has been relieved, remove the
cap by pressing down and again turning it counterclockwise. Add
enough coolant to fill the radiator, and reinstall the cap. Be sure to
tighten it securely. Fill the reserve tank up to the MAX mark with
the engine cold.
Maintenance
1. Check the freeze protection level of the coolant with a hydrome- ter.
2. Keep the front of the radiator free of dirt and debris.
3. Check hoses and hose clamps regularly.
Replacing Coolant Replace coolant at 36 months or 45,000 miles (72,000 km), which-
ever comes first. Thereafter, replace every 2 years or 30,000 miles (48,000 km), whichever comes first.
(cont'd)
MAX
MIN
RADIATOR COOLANT
REFILL CAPACITY:
(excluding reserve tank) 0.4 (0.11 US gal, 0.09 Imp gal)
Manual transmission 4.0 (1.06 US gal ,0.88 Imp gal)
4.1 (1.08 US gal,0.90 Imp gal)*
Automatic transmission 4.0 (1.06 US gal,0.88 Imp gal)*
4.5 (1.19 US gal,0.99 Imp gal)
* : DX Hatchback and DX/LX Sedan
ProCarManuals.comMain Menu s t
Page 82 of 136
Cooling System (cont'd)
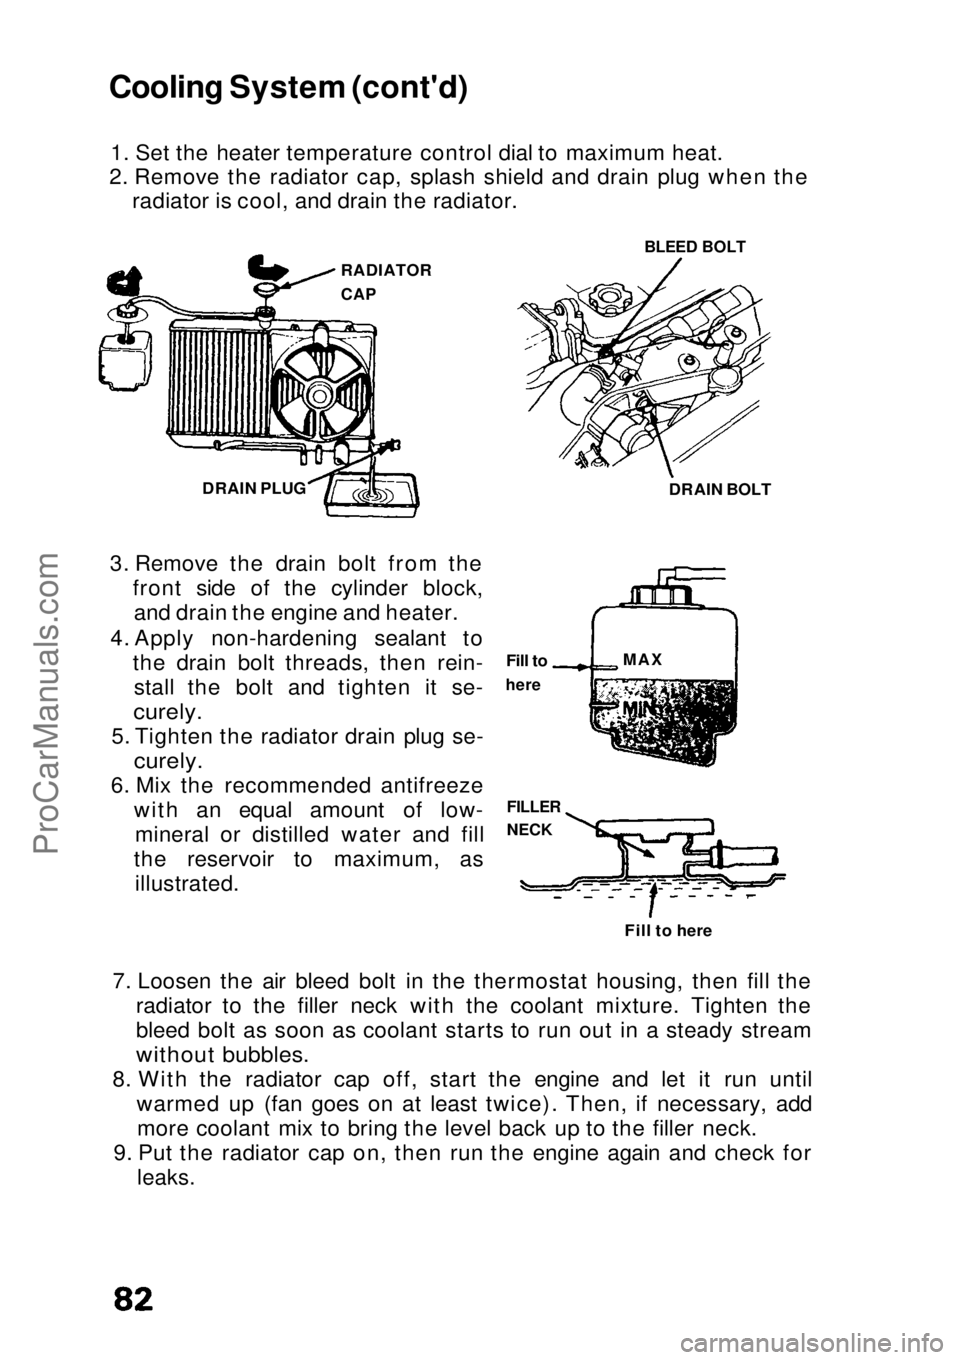
1. Set the heater temperature control dial to maximum heat.
2. Remove the radiator cap, splash shield and drain plug when the radiator is cool, and drain the radiator.
3. Remove the drain bolt from the front side of the cylinder block,and drain the engine and heater.
4. Apply non-hardening sealant to the drain bolt threads, then rein-stall the bolt and tighten it se-
curely.
5. Tighten the radiator drain plug se-
curely.
6. Mix the recommended antifreeze with an equal amount of low-mineral or distilled water and fill
the reservoir to maximum, as illustrated.
7. Loosen the air bleed bolt in the thermostat housing, then fill the radiator to the filler neck with the coolant mixture. Tighten the
bleed bolt as soon as coolant starts to run out in a steady stream
without bubbles.
8. With the radiator cap off, start the engine and let it run until warmed up (fan goes on at least twice). Then, if necessary, addmore coolant mix to bring the level back up to the filler neck.
9. Put the radiator cap on, then run the engine again and check for
leaks.
RADIATOR
CAP
BLEED BOLT
DRAIN BOLT
DRAIN PLUG
Fill to
here
FILLER
NECK
Fill to here
MAXProCarManuals.comMain Menu s t
Page 115 of 136
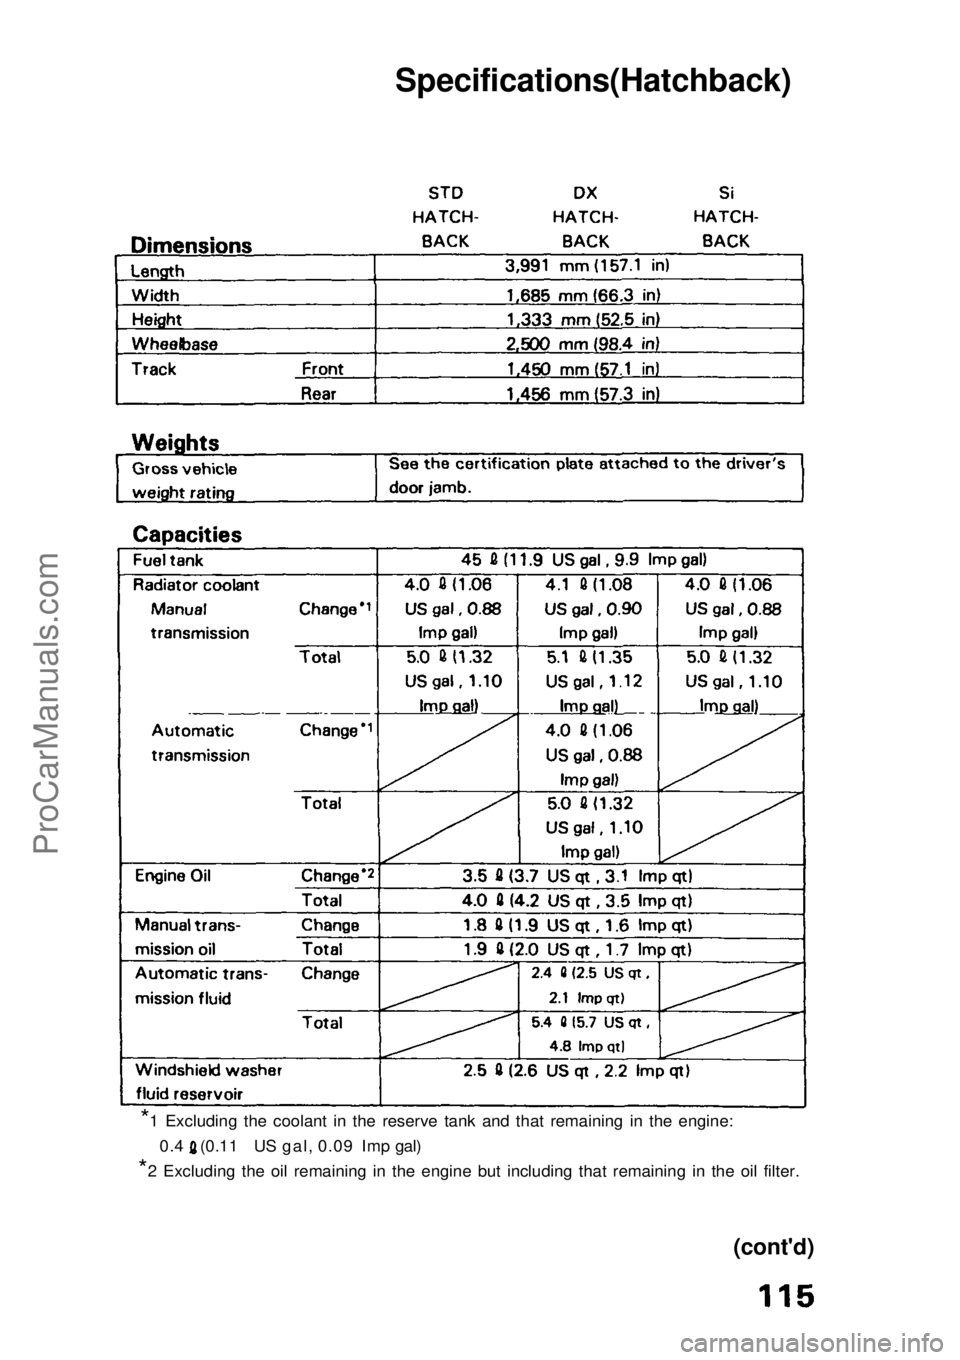
Specifications(Hatchback)*1 Excluding the coolant in the reserve tank and that remaining in the en\
gine:
0.4 (0.11 US gal, 0.09 Imp gal)
*
2
Excluding the oil remaining in the engine but including that remaining \
in the oil filter.
(cont'd)
ProCarManuals.comMain Menu s t