engine HONDA CIVIC 1998 6.G Workshop Manual
[x] Cancel search | Manufacturer: HONDA, Model Year: 1998, Model line: CIVIC, Model: HONDA CIVIC 1998 6.GPages: 2189, PDF Size: 69.39 MB
Page 1958 of 2189
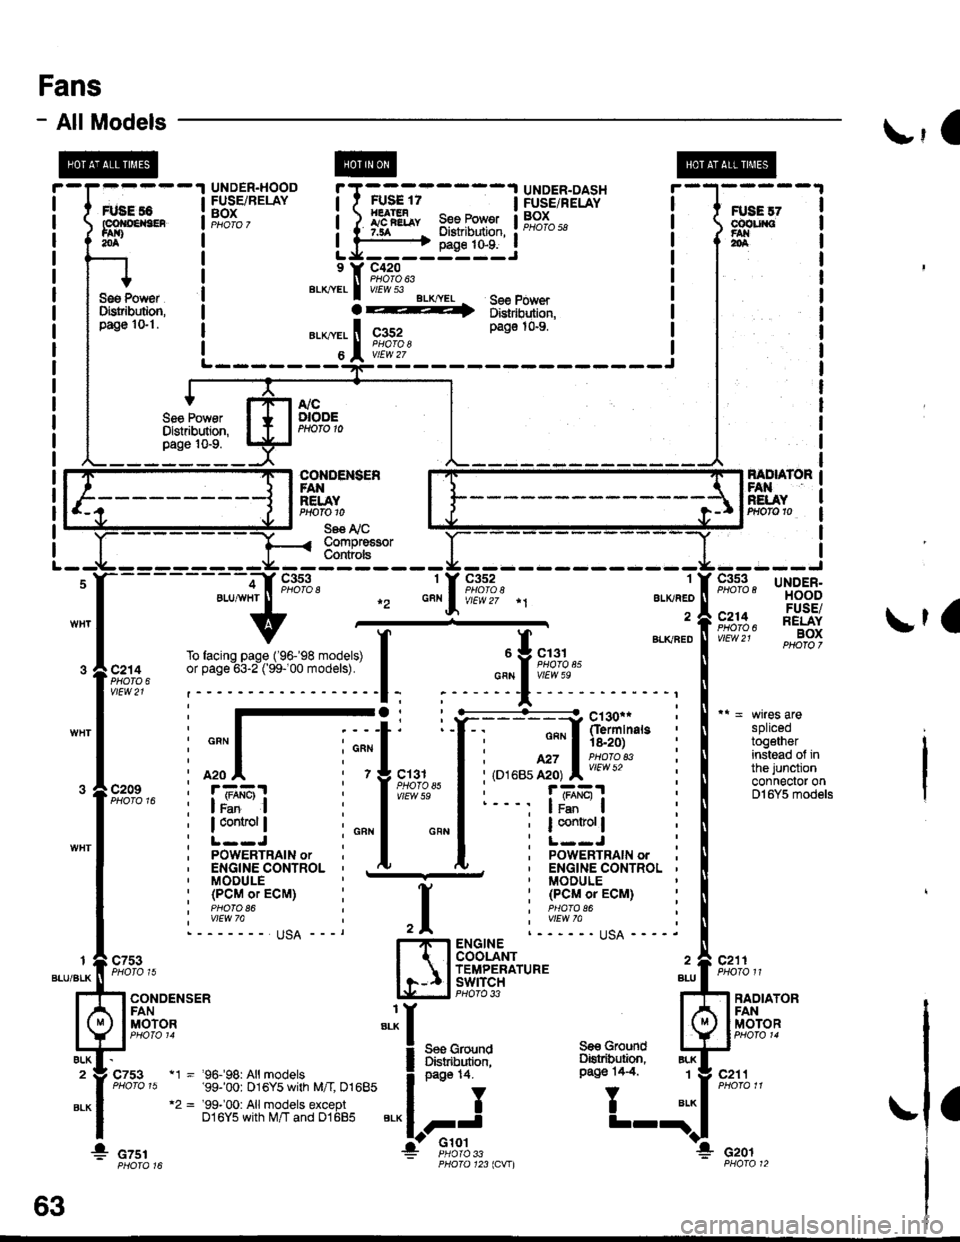
Fans
- AllModels\,1 |
splicedtogetherinstead of inthe junctionconnector onDl6Y5 models
c211PHOTO 11
FANRELAYPrtofo 10
Se€ I'i CCompre€sorCont ols
1
ALKAED
a
c352
f BLKaEou Y 9,;%,.cFN I vIEw 5e
;
"'
T
";::-:.."-!
Y:. ---::Y h!ii'in"," :
I : ""'I 'is.2o) :
I i,o''ur,ff;, l;l:'l?'* i
I r- - -, |JBEI :
I ; I control | ;
I :L--J :I ' PoWERTRAIN ordu. ' ENGINE CONTROL '' MODULE
: (PCMoTECM) :I PHAfO 86I wEw 7allqA ----.ENGINECOOLANTTEMPERATUREswtrcH BLLPHO|O 33 ?
Ses GrolndDiskibution,oaqe 14.
,I
H
:I
i:
"'*
1_l
c7531
BLU/BLK
ALK2
BLK
RADIATORFANMOTORI
BLK
BLK1
ELK
c753
CONDENSERFANMOTOR
a
* czsr
page 14.
II
FJ'Glot
c211
Gro!nd
T
Se€ GroundOstribution,Pago 14.4"t1 - '96.f98: All models'99-'00: 016Y5 with M/I 01685"2 = '99-'00: Allmodels exceptD16Y5 with M/T and 01685
cof{oENs€R
* czor33123lCVIl
63
Page 1961 of 2189
- How the Circuit Works
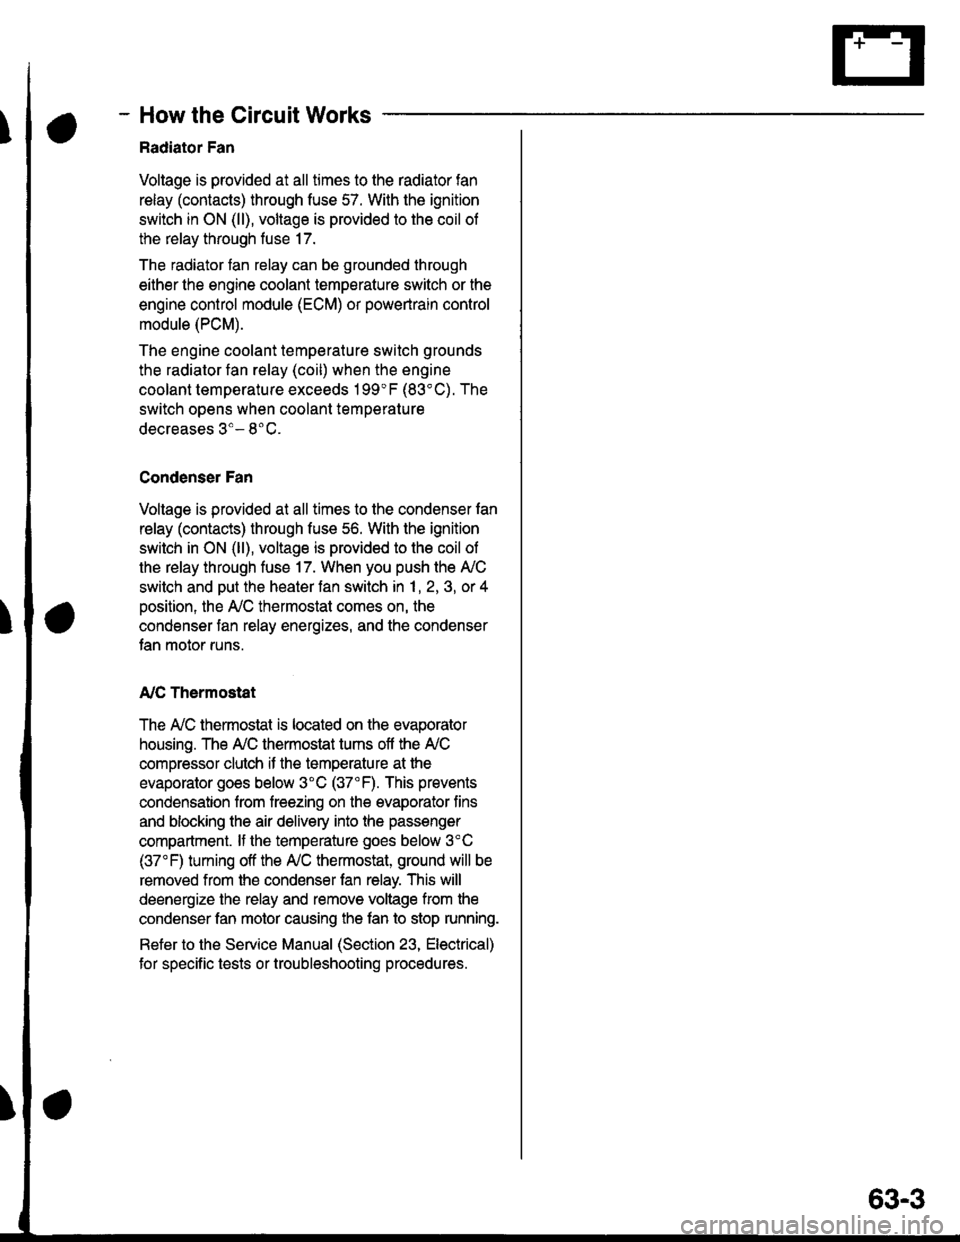
Radiator Fan
Voltage is provided at all times to the radiator fan
relay (contacts) through fuse 57. With the ignition
swilch in ON (ll), voltage is provided to the coil of
the relay through luse 17.
The radiator tan relay can be grounded through
either the engine coolant temperature switch or the
engine control module (ECM) or powertrain control
module (PCM).
The engine coolant temperature switch grounds
the radiator fan relay (coil) when the engine
coolant temperature exceeds 199'F (83'C). The
switch opens when coolanl temperature
decreases 3'- 8'C.
Condenser Fan
Voltage is provided at all times to the condenser fan
relay (contacts) through fuse 56. With the ignition
switch in ON (ll), voltage is provided to the coil of
the relay through fuse 17. When you push the A'lC
switch and put the heater fan switch in 1, 2,3, o( 4
position, the ly'C thermostat comes on, the
condenser fan relay energizes, and the condenser
fan motor runs.
A,/C Thermostat
The A,/C thermostat is located on the evaporator
housing. The A,/C thermostat tums off the A/C
compressor clutch if the temperature at the
evaporator goes below 3'C (37'F). This prevents
condensation from freezing on the evaporator fins
and blocking the air delivery into the passenger
compartment. lf the temperature goes below 3'C
(37"F) tuming off the Ay'C thermostat, ground will be
removed from the condenser fan relay. This will
deenergize the relay and remove voltage from the
condenser fan motor causing the fan to stop running.
Reter to the Service Manual (Section 23, Eleckical)
for specific tests or troubleshooting procedures.
63-3
Page 1969 of 2189
Brake System Indicator Light (cont'd)
- How the Circuit Works
The brake system indicator light comes on to alert
the driver that the parking brake is applied, or that
the brake fluid level is low. lt also comes on as a
bulb test when the engine is cranked.
Parking Brake
With the ignition switch in ON (ll) or START (lll),
voltage is applied through fuse 25 to the brake
system light. When you apply the parking brake, the
switch closes and provides a ground for the light.
The light then comes on to remind you that the
parking brake is applied.
Brake Fluid Level
With the ignition switch in ON (ll) or START (lll),
voltage is applied through fuse 25 to the brake
system light. lf the brake fluid level is low, the brake
fluid level switch closes, providing ground to the
circuit. The brake system light then comes on,
alerting the d verto a low brake fluid level in the
brake master cylinder. (Check brake pad wear
before you add fluid).
Bulb Check
With the ignition switch in START (lll) and clutch
pedal depressed or A'lT gear selector in PARK (P)
or NEUTRAL (N), voltage is applied through fuse 31
to the brake bulb check circuit. The brake bulb
check circuit closes, allowing current to flow through
the brake system light and bulb check circuit to
ground. The brake system light then comes on to
test the bulb.
Refer to the Service Manual (Section 23, Electrical)
for specific tests or troubleshooting procedures.
71-2
a
\fa
Page 1977 of 2189
,\
c2Y
IIPNK II
III,0.+.P,0;1""
,--_. aivtEw60
' l', PNK I'T
i -t^-. 3l;33;" 'i'H;"^
i 1n''n"o :
: "n*l :,l
i z f czrs
;T
: fTl Pt[?5'" :
i l/ | LEVEL: l.-: I swrrcH _, I Sae Grourd
: ,9c215 g:"Jifll' ;,t'lY
I l--t
v-i ! czoz :| - PHOfO 19
"""r::I
I
t
PGM.FI
B6Y C3
"aor"au I
I YEURE'
See SeatBell R€minder
o\
Hol
c4t1
vlEw 60
ct01
vtEw 2e
ENGINE OILPRESSUREswrTcHClosed withlow oil pressure.PHOfO 131
Page 1980 of 2189
Gauges (cont'd)
- How the Gircuit Works
When the ignition switch is in ON (ll) or START (lll),
battery voltage is supplied through fuse 25 to the
gauges in the gauge assembly.
Speedometer and Odometer
The odometer and soeedometer drive circuits
receive pulses from the vehicle speed sensor
(VSS). The pulse rate increases as the car
accelerates. The frequency and duration of these
input pulses are measured and displayed by the
speedometer, odometer and tripmeter.
Tachometer
The tachometer drive circuit receives pulses from
the ignition control module (lCM) in the distributor
assembly or the ECM/PCM. The solid-state
lachometer then displays these pulses as engine
speed. For each 200 pulses per minute from the
ignition control modul€ (lCM) or the ECM/PCM, the
tachometer displays 100 RPM.
Engine Coolant Temperature Gauge
The engine coolant temperature gauge has two
intersecting coils wound around a permanent
magnet rotor. Voltage applied to the coils, through
fuse 25, generates a magnetic lield. The magnetic
field, controlled by the coolant temperature sending
unit, causes the rotor to rotate and the gauge
needle to move. As the resistance in the sending
unit varies, current through the gauge coils
changes. The gauge needle moves toward the coil
with the strongest magnetic field.
The 6ngine coolant temperature sending unit's
resistance varies from about 137 ohms at low
engine temperature to between 3H6 ohms at high
temperature (radiator fan running).
Refer to the Service Manual (Section 23, Electrical)
for specific tests or troubleshooting procedures.
81-2
(
Fuel Gauge (All except cX)
The fuel gauge has two intersecting coils wound
around a permanent magnet rotor. Voltage applied
to the coils, through tuse 25, generates a magnetic
field. The magnetic field, controlled by the fuel
gauge sending unit, causes the rotor to rotate and
the gauge needle to move. As the resislance in the
sending unit varies, current through the gauge coils
changes. The gauge needle moves toward the coil
with the strongest magnetic field.
The fuel gauge sending unit's resistance varies
from about 2-5 ohms at full, to about 110 ohms at
empty. When you turn the ignition switch off, the
gauge remains at the last reading until you turn the
ignition switch to ON (ll) or START (lll) again,
Refer to the Service Manual (Section 23, Electrical)
for specific tests or troubleshooting procedures.
Fuel Gauge (GX)
The fuel gauge has two intersecting coils wound
around a permanent magnet rotor. Voltage applied
to the coils, through fuse 25, generates a magnetic
field. The magnetic field, controlled by the PCM,
causes the rotor to rotate and the gauge needle to
move. The PCM calculates the gas quantity in the
fuel tank by using the fuel pressure value detected
by the tuel tank pressure sensor and the fuel
temperature value detected by the fuel tank
temperalure sensor, and outputs the signal to the
gauge assembly. The gauge needle moves toward
the coil with the strongest magnetic field.
When you turn the ignition switch off , the gauge
remains at the last reading until you turn the ignition
switch to ON (ll) or START (lll) again. When the
PCM detects a malfunction with the fuel pressure or
temperature, or detects a gas leak, the PCM
reduces the fuel meter to 0.
Refer to the Service Manual GX Supplement
(Section 11 , Fuel and Emissions) for specific tests
or troubleshooting procedures.
a
a
Page 2072 of 2189
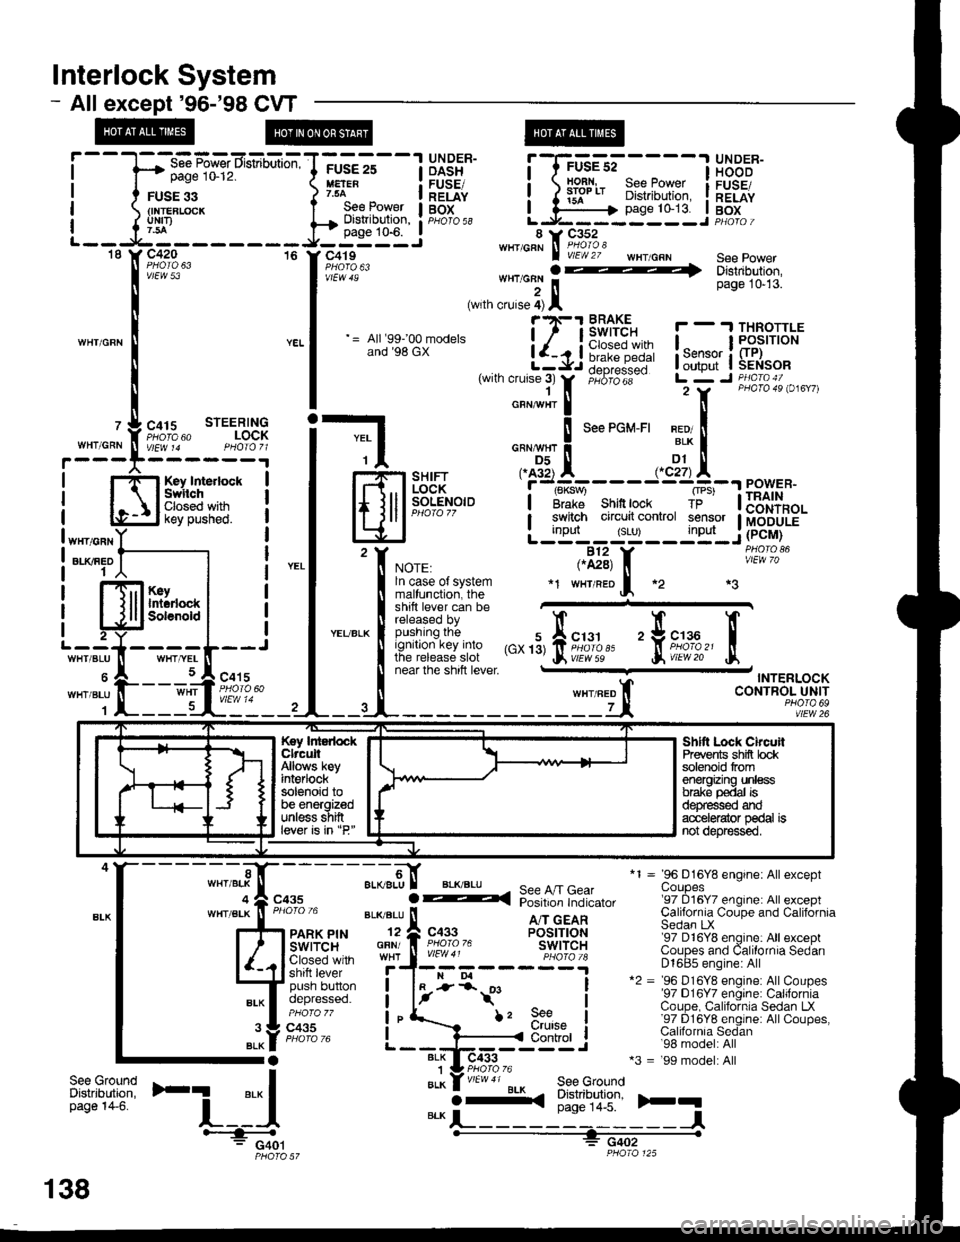
lnterlock System
- Allexcept'96-'98 CVT
page 10-12.
FUSE 33{INTEBLCICKuNrI)
WHIICRN
OASH I HOOD
H:" - IlEiE" i ) iifl* 8i?[',ffii i[".tfi
;GE-st----l glD^:R-
page 10-13. I BoxL.J------ --J PHotoi
*1 = 96 D16Y8 engine: Allexceptuoupes'97 D16Y7 engine: All exceptCalifornia Coupe and CaliforniaSedan LX'97 D16Y8 engine: All exceptCoupes and Calilornia SedanD1685 engine: All*2 = '96 D16Y8 engine: AllCoupes'97 D16Y7 engine: CaliforniaCoupe, California Sedan LX'97 D16Y8 englne: AllCoupes,Calilornia Sedan'98 model: All*3 = '99 model: All
)rq
,'",:[*nu'
=-CF'!,n:E!-l
Hfl*gff* i
l#?;"'" -,,;:::?i-ili:itlll:
|
= lr.u:;.Br-* i-{Ji6i1!-- !,*;L$il{:*
|
,wrn cruse;r
tr,
;"6;dii-- Lr7 r ii\l,B".i o,",,,
i-l o,"*",!
'""'o*-'' x?!
| -$-.",., .^AX-----.,'dtA--"^",."
lfl.iil F]iH*,"'i''t#'---.r=23[11
eowen.
lElJP-".'.'
-
L;tT'#:yTltijF.iu.'f, *or., ,.il3, f, iii"^'?o'
| !^:?::^?l:t:9" *r w'raeof, *2 *3
t:l*ii** ffi"""'"
! fit:'/:,:iffJff ,",'3,fii;1,1,'' 'trii'df,'
tr
I near lne snrn rever - TNTERLOCK
ll wxrneo t CONTROL UNIT
--4-------------Lt, *?,1fl92
T-----1 UNDER-FUSE 25
See Power I BOtDisilibution, : pHb'ro ss
.----
'[il:'ff*,,,,**
., J*:]l ., '"*""
;.-9,[ aL(BLU
GFN/
I
See A/T GearPosition Indicator
A/T GEARPOSITIONswtTcHc433
BLK I-
i-*t'
BLK1BLK
f, 9e€urutse
I
I
I
IControl
ilt:tfi'F1
'-i_:{BLKO-<(
See GroundDistribution,page 14-5.
-l#: G401PHO|O 57
Key IntedockClrcuitAllows keyint€rlocksolenoid tobe energizedunless shiftlever is in "P"
Shltt Lock ChcuilPrevents shifi bcksolenoid tromenergizing unlessbrake p€dal isd€pfessed ardacc€le{ator pedal isnot depr€ssed.
";t-,".f";,
138
Page 2081 of 2189

1. Behind Front Grille
Component Location
4. Right Rear Corner of Engine Compartment
2. Behind Left Side of Front Bumper5. Right Side of Engine Compartment
\
\b
3. Behind Left Side of Front Bumper6. Right Side of Engine Compartment
201
\
Page 2082 of 2189

7. Right Rear Corner of Engine Compartment10. Right Rear Corner of Engine Compartmentb
8. Right Rear Corner of Engine Compartment11. Right Front Corner of Engine Compartment
\
9. Right Rear Corner of Engine Compartment12. Right Front Gorner of Engine Compartment
L
tr
201 -1
Page 2083 of 2189

13. Lower Right Front of Engine Compartment
Component Location
\16. Left Front Corner of Engine Compartment
14. Front of Engine Compartment17. Left Front Corner of Engine Compartment
\
15. !-ower Left Front of Engine Compartment18. Left Front Corner of Engine Compartment
*
201-2
\
Page 2084 of 2189

\
\
19. Left Front Corner of Engine Compartment22. Letl Rear Corner of Engine Compartment
20. Left Front of Engine Compartment23. Left Rear Corner of Engine Compartment
21. Left Rear Corner of Engine Compartment24. Lower Left Rear of Engine Compartment
POWER STEERING I
\
201 -3