Engine wire harness HONDA CIVIC 1998 6.G Workshop Manual
[x] Cancel search | Manufacturer: HONDA, Model Year: 1998, Model line: CIVIC, Model: HONDA CIVIC 1998 6.GPages: 2189, PDF Size: 69.39 MB
Page 96 of 2189
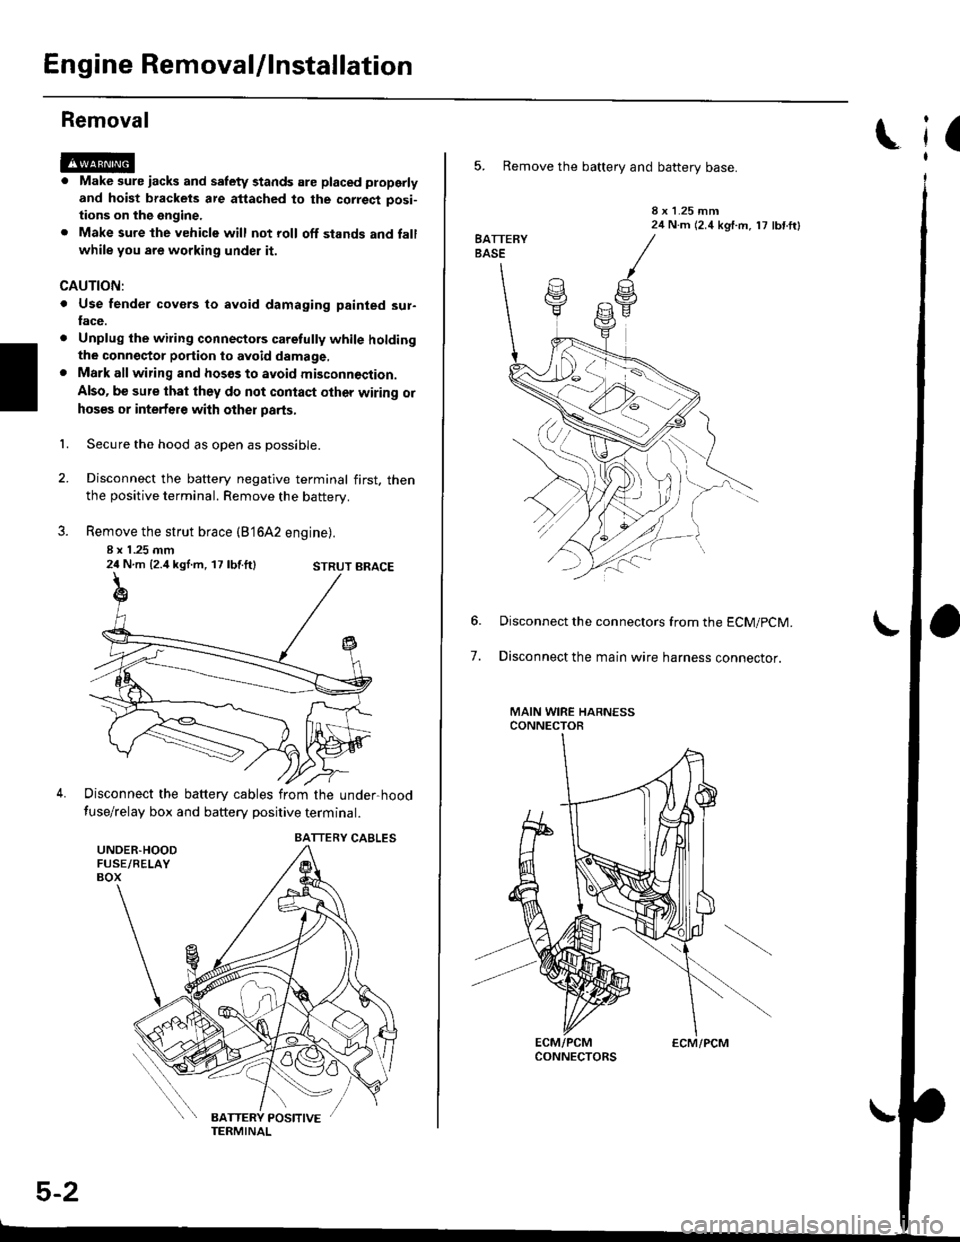
Engine RemovaUlnstallation
Removal
@@
1.
. Make sure iacks and salety stands are placed ploperly
and hoist brackets are attached to the correct posi-
tions on the engine.
. Make sure the vehicle will not roll off stands and fall
while you are working under it.
CAUTION:
. Use fender covers to avoid damaging painted sur-face.
. Unplug the wilin9 connectors caretully while holdingthe conngstor portion to avoid damage,. Mark all wiring and hosos to avoid misconnoction.
Also, be sure that they do not contact other wiring or
hoses or interfere with other parts,
Secure the hood as open as possible.
Disconnect the battery negative terminal first. thenthe positive terminal. Remove the battery.
Remove the strut brace (B'16A2 engine).
8 x 1 .25 mm24 N.m {2.4 kgl.m, 17 lbf.ft}
Disconnect the battery cables from the under-hood
fuse/relay box and battery positive terminal.
STRUT BRACE
UNDER.HOODFUSE/RELAYBOX
BATTERY CABLES
5-2
ECM/PCM
(
5. Remove the battery and battery base.
8 x 1.25 mm24 N.m (2.4 kgf.m, 17 lbf ftl
7.
Disconnect the connectors from the ECM/pCM.
Disconnect the main wire harness connector.
MAIN WIRE HARNESSCONNECTOR
Page 97 of 2189
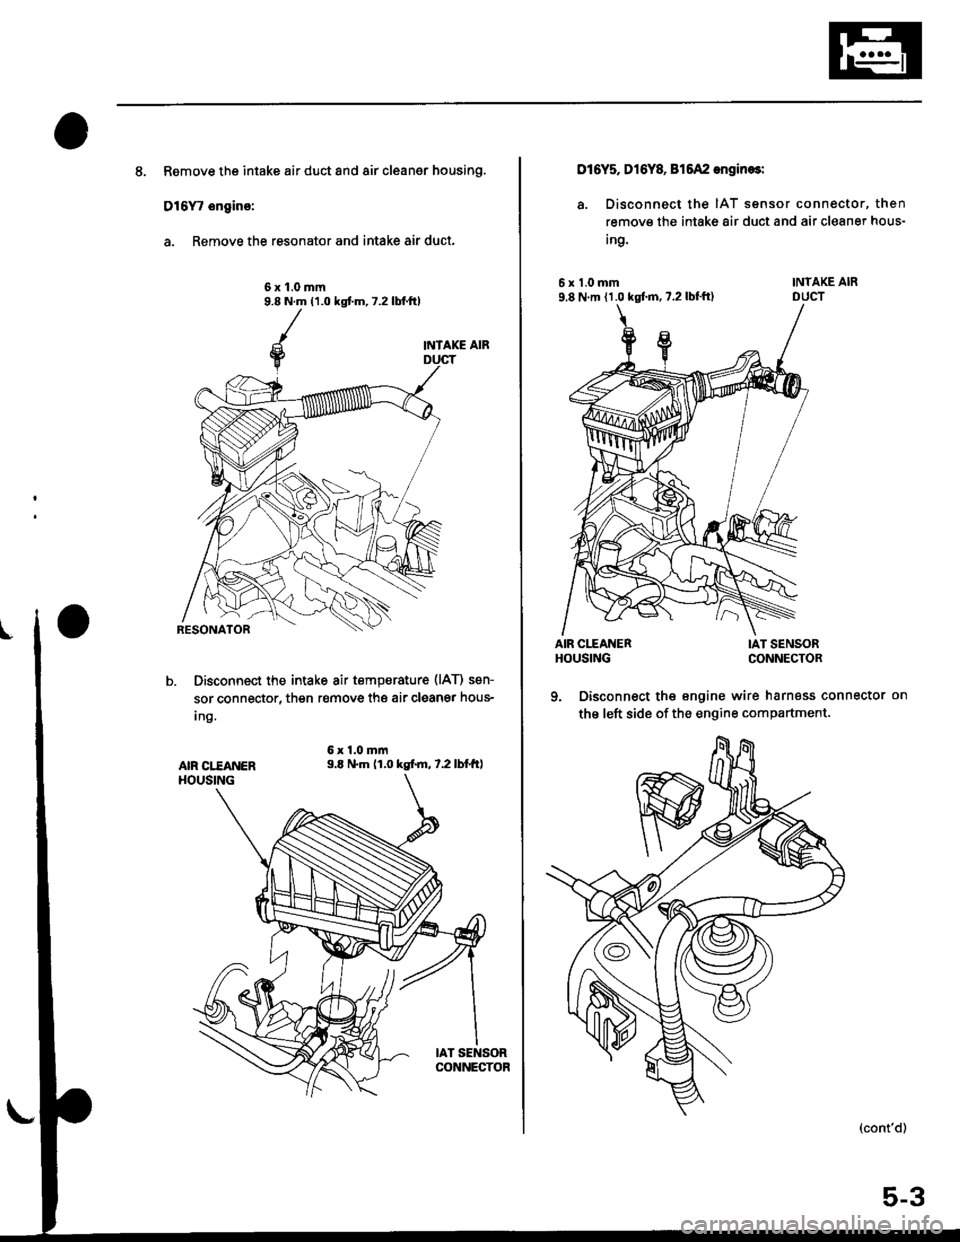
8. Remove the intake air duct and air cleaner housing.
D16Y, ongino:
a. Remove the resonator and intake air duct.
6x1.0mm9.8 N.m (1.0 kgt m, 7.2 lbf.tt)
INTAKE AIR
Disconnect the intake air tempsrature (lAT) sen-
sor connector, then r€move thg air cleaner hous-
Ing.
6x1.0mm9.E N.m (1.0 kgtm, t.2lbtft,AIR CI."EANERHOUSING
IAT SENSORCONNECTOR
016Y5, Dl6Y& 815A2 engin€sl
a. Disconnect the IAT sensor connector, then
remove the intake 8ir duct and air cleaner hous-
Ing.
6x1.0mm9.8 N m {1.0 kgtm, 7.2 lbl'ft)
AIR CITANERHOUSING
INTAKE AIRDUCT
IAT SENSORCONNECTOR
9. Disconnect the engine wire harness connector on
the left side of the engine compartment.
(cont'd)
5-3
Page 99 of 2189
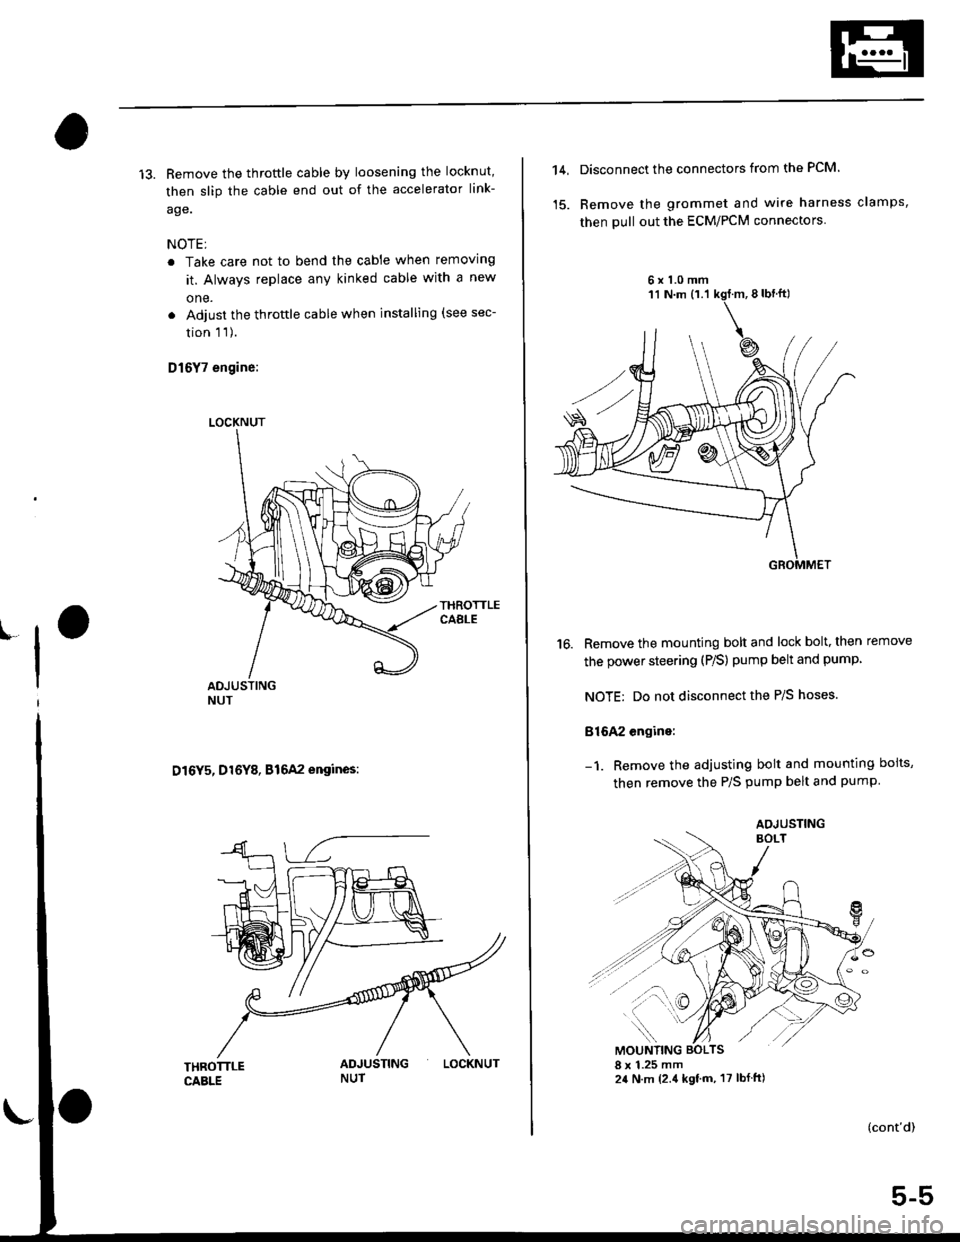
13. Remove the throftle cable by loosening the locknut,
then slip the cable end out of the accelerator link-
age.
NOTE;
. Take care not to bend the cable when removing
it. Always replace any kinked cable with a new
one.
. Adjust the throttle cable when installing (see sec-
tion 1 1).
D16Y7 engine:
D16Y5, D16Y8, B16A2 engines:
LOCKNUT
LOCKNUT
14,Disconnect the connectors from the PCM.
Remove the grommet and wire harness clamps,
then pull out the ECM/PCM connectors
6x1.0mm
16. Remove the mounting bolt and lock bolt, then remove
the power steering (P/S) pump belt and pump
NOTE: Do not disconnect the P/S hoses.
816A2 engine:
Remove the adjusting bolt and mounting boits,
then remove the P/S pump belt and pump
(cont'd)
5-5
AOJUSTING
Page 101 of 2189
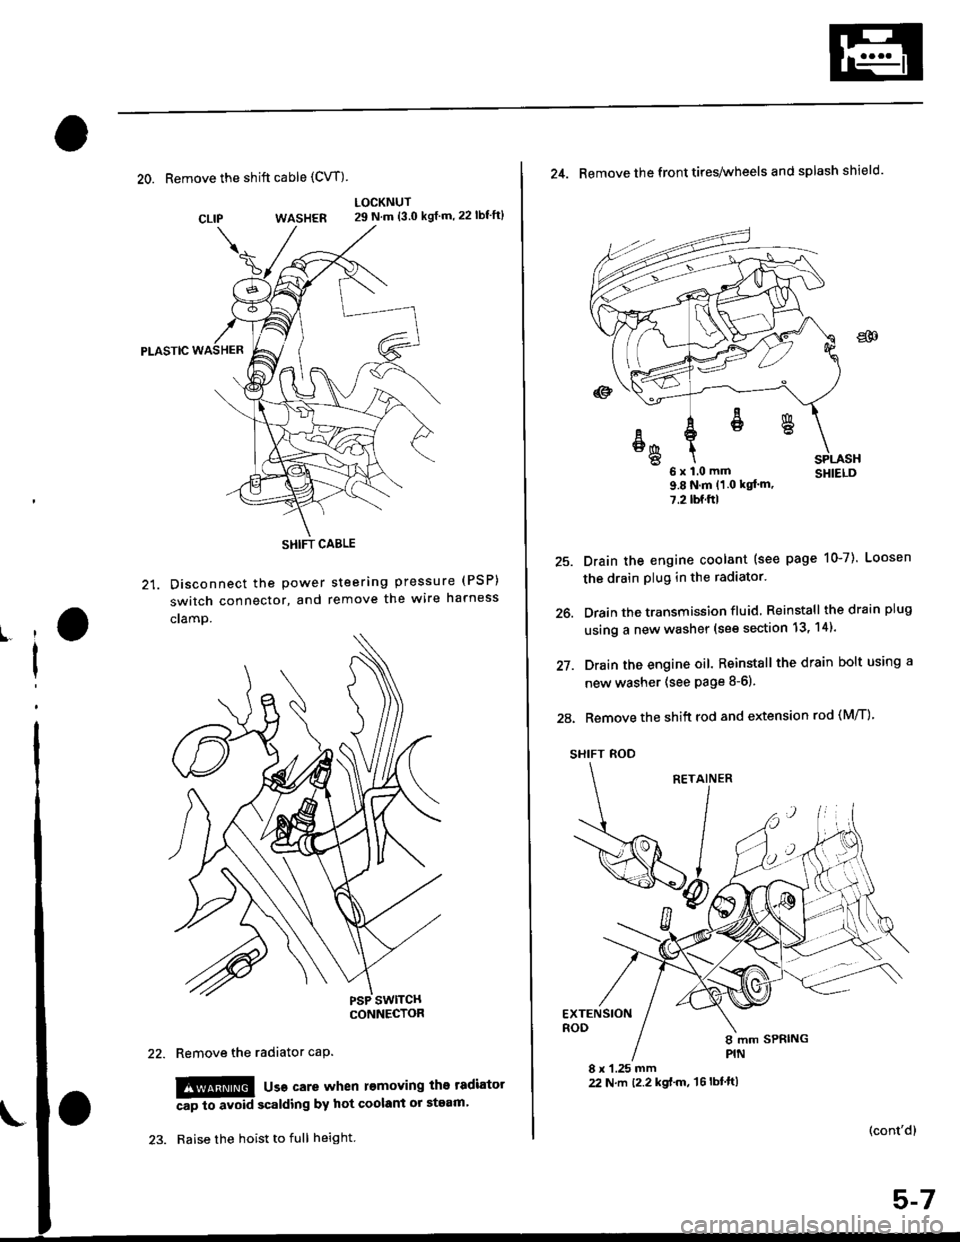
20. Remove the shift cable (CVT)
WASHER
Pt-Aslc
21. Disconnect the Power
switch connector, and
cramp.
LOCKNUT29 N.m {3.0 kgf m,22lbf'ft}
steering pressure (PSP)
remove the wire harness
CLIP
ll
I
Remove the radiator caP.
!!!@ usa care when l€moving the tadiator
Ap to avoid scalding by hot coolant or steam'
Raise the hoist to full height.
SHIFT CABLE
(cont'd)
25.
26.
27.
24. Remove the front tires/wheels and splash shield.
u x l.u mm SHIELD9.8Nm(1 0 kqt'm,
7.2lbf.ftl
Drain the engine coolant (see page 10-7). Loosen
the drain plug in the radiator.
Drain the transmission fluid Reinstall thedrainplug
using a new washer (see section 13, 14).
Drain the engine oil. Reinstall the drain bolt using a
new washer (see page 8-6).
28. Remove the shift rod and extension rod (M/T)
SHIFT ROD
EXTENSIONROD
8 x 1.25 mm22 N.m t2.2 kgf'm, 't6lbtft)
ER
6x1.0mm
Page 140 of 2189
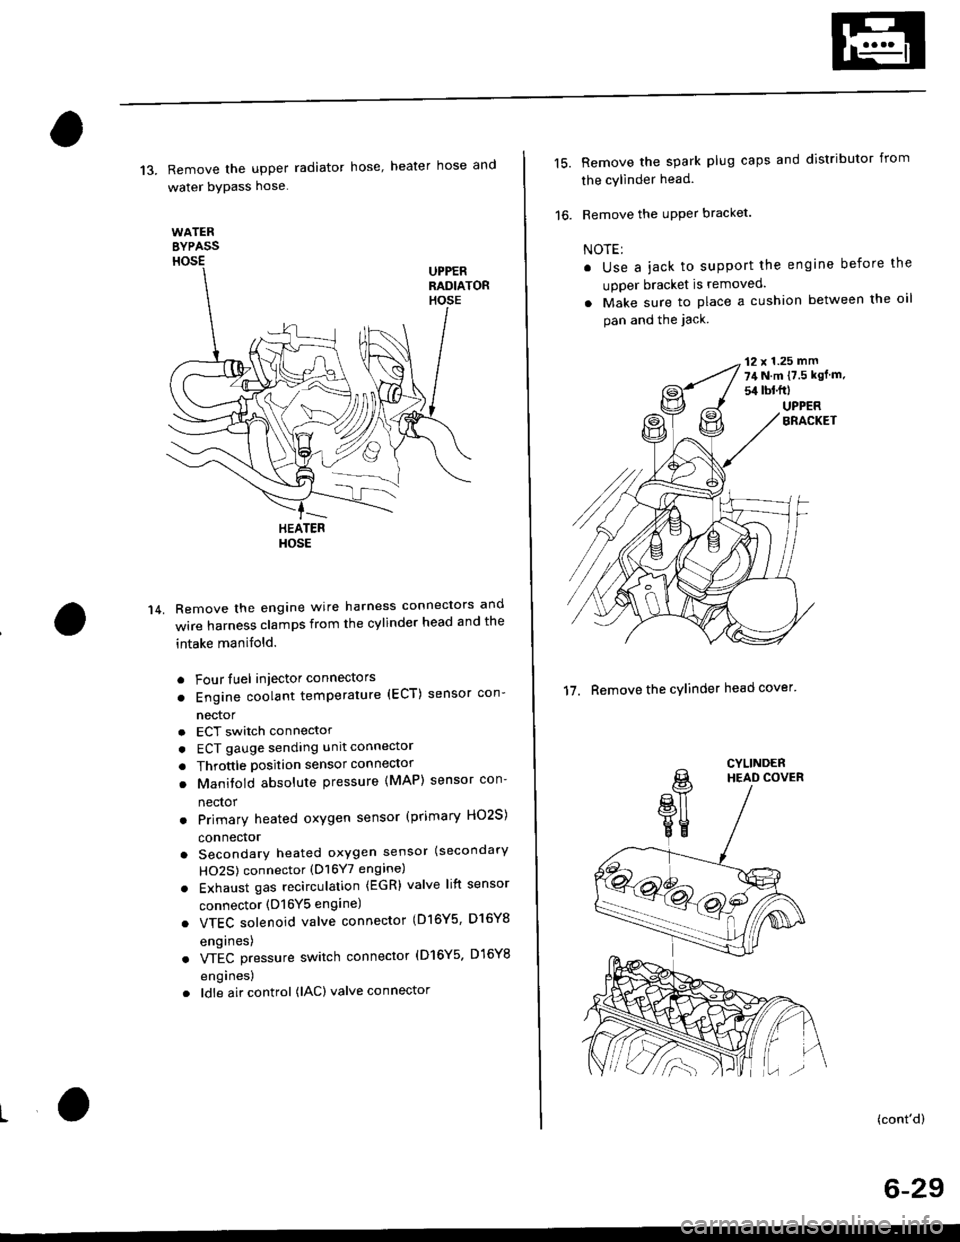
13. Remove the upper radiator hose' heater hose and
water bYPass hose
WATEREYPASSHOSEUPPERRADIATORHOSE
14.
HEATERHOSE
Remove the engine wire harness connectors and
wire harness clamps from the cylinder head and the
intake manifold.
o Four fuel injector connectors
. Engine coolant temperature (ECT) sensor con-
nector
a
a
a
ECT switch connector
ECT gauge sending unit connector
Throttle position sensor connector
Manitold absolute pressure (MAP) sensor con-
nector
Primary heated oxygen sensor (primary HO2S)
connector
Secondary heated oxygen sensor (secondary
HO2S) connector (D16Y7 engine)
Exhaust gas recirculation (EGR) valve lift sensor
connector (D16Y5 engine)
. VTEC solenoid valve connector (Dl6Y5, D16Y8
engrnes)
. VTEC pressure switch connector (D16Y5. D16Y8
engrnes,
. ldle air control (lAC) valve connector
15.Remove the spark plug caps and distributor from
the cylinder head.
Remove the uPPer bracket.
NOTE:
. Use a jack to support the engine before the
upper bracket is removed.
. Make sure to place a cushion between the oil
pan and the jack.
12 x 1.25 mm
74 N.m {7.5 kgf m.
sil lbl.ftl
UPPERBRACKET
'17. Remove the cylinder head cover'
CYLINDERHEAD COVER
(cont'd)
6-29
Page 179 of 2189
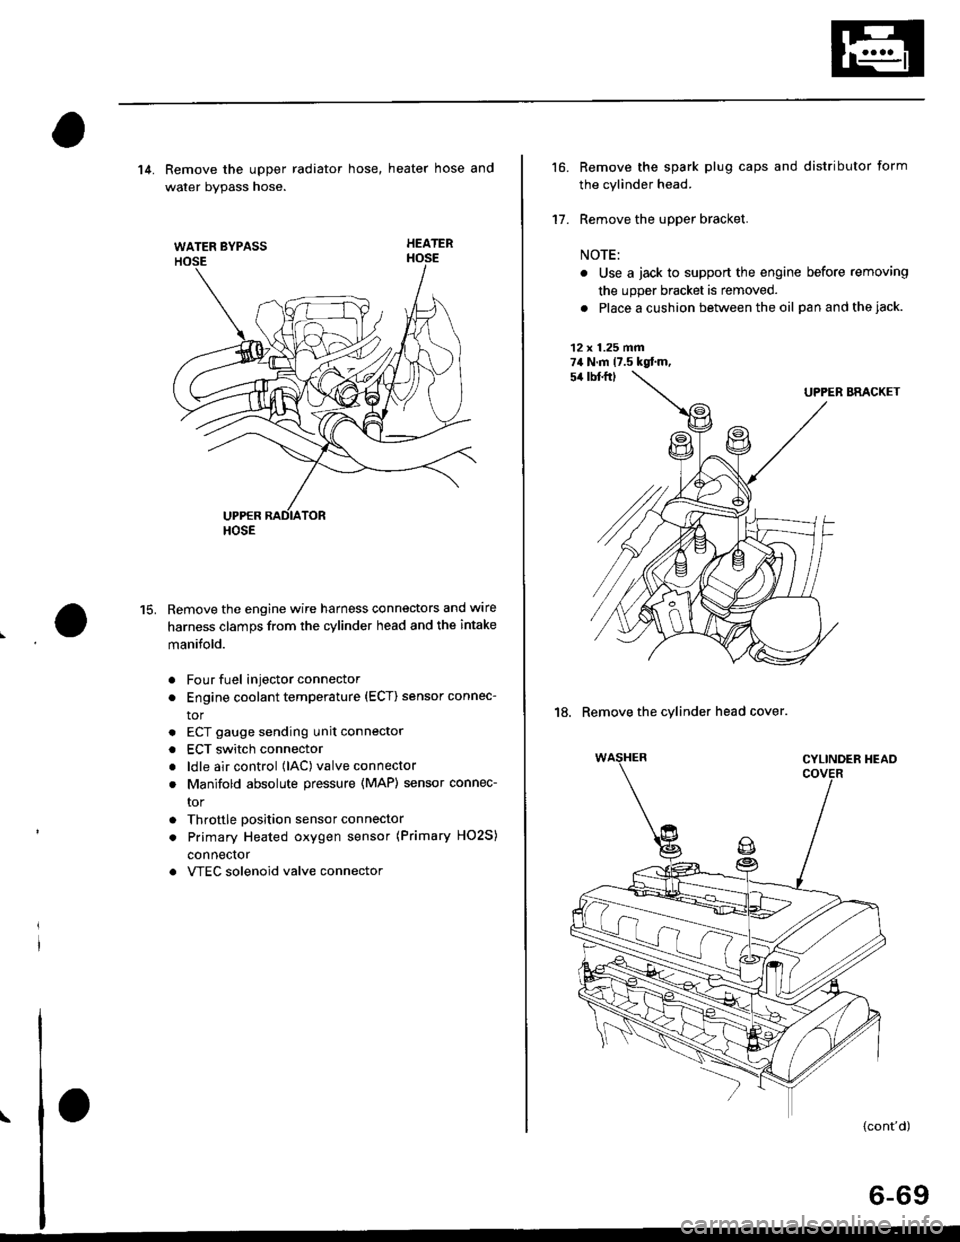
WATER BYPASS
HOSE
14. Remove the upper radiator hose, heater hose and
water bvpass hose.
HEATER
Remove the engine wire harness connectors and wlre
harness clamps from the cylinder head and the intake
manifold.
Four fuel injector connector
Engine coolant temperature (ECT) sensor connec-
tor
ECT gauge sending unit connector
ECT switch connector
ldle air control (lAC) valve connector
Manifold absolute pressure (MAP) sensor connec-
tor
Throttle position sensor connector
Primary Heated oxygen sensor (Primary HO2S)
connecror
VTEC solenoid valve connector
15.
a
a
a
a
a
\
16.
17.
Remove the spark plug caps and distributor form
the cylinder head.
Remove the upper bracket.
NOTE:
. Use a jack to support the engine before removing
the upp€r bracket is removed.
. Place a cushion between the oil panandthejack.
12 x 1.25 fin74 N.m 17.5 kgtm,
UPPER BRACKET
18. Remove the cylinder head cover.
{cont'd)
6-69
Page 405 of 2189
PGM-FI System
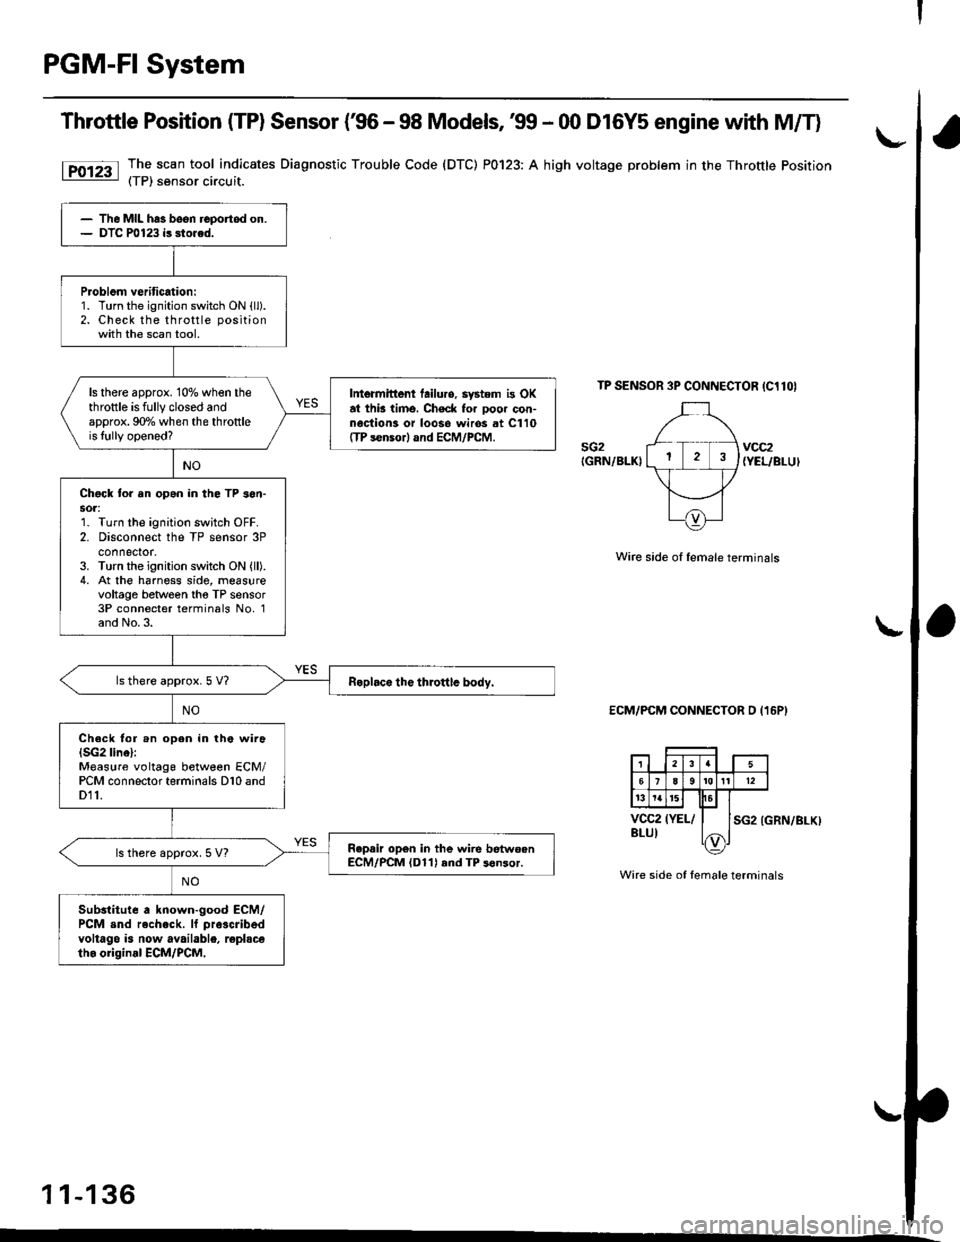
Throttle Position (TP) Sensor (€6 - 98 Models, 39 - 00 D16Y5 engine with M/T)
The scan tool indicates Diagnostic Trouble Code (DTC) P0123: A high voltage problem in the Throttle Position(TP) sensor circuit.
TP SENSOR 3P CONNECTOR IC1lOI
sG2IGRN/BLKIvcc2{YEL/BLUI
Wire side of female terminals
ECM/PCM CONNECTOR D (16P)
SG2 (GRN/BLKI
Wire side of female terminals
1 1-136
The MIL has been reportod on.DTC P0123 is sto.ed.
Problom veritication:1. Turn the ignition switch ON {ll).2. Check the throttle positionwith the scan tool.
ls there approx. 10% when thethrottle is fully closed andapprox. 90o/o when the throttleis lully opened?
Intermittont tailuro, system is OKat thb timo, Check for ooor con-nociion3 or loos6 wiros at C110ffP s€nsor) and ECM/PCM.
Chgck to. an opan in the TP son-sot:1. Turn the ignition switch OFF.2. Disconnect the TP sensor 3Pconnector.3. Turn the ignition switch ON (ll).
4. At the harness side, measurevoltage between tho TP sensor3P connecter terminals No, 1and No.3.
ls there approx.5 V?
Ch.ck tor .n open in the wira(SG2 linel:Measure voltage between ECM/PCM connector terminals D10 andD11.
Repair op6n in the wire betwoenECM/PCM (D11) rnd TP s6nsor.ls there approx. 5 V?
Substitute a known-good ECM/PCM snd rech.ck. lf pra3cribed
voltago is now available, replscetho original ECM/PCM,
Page 406 of 2189
I
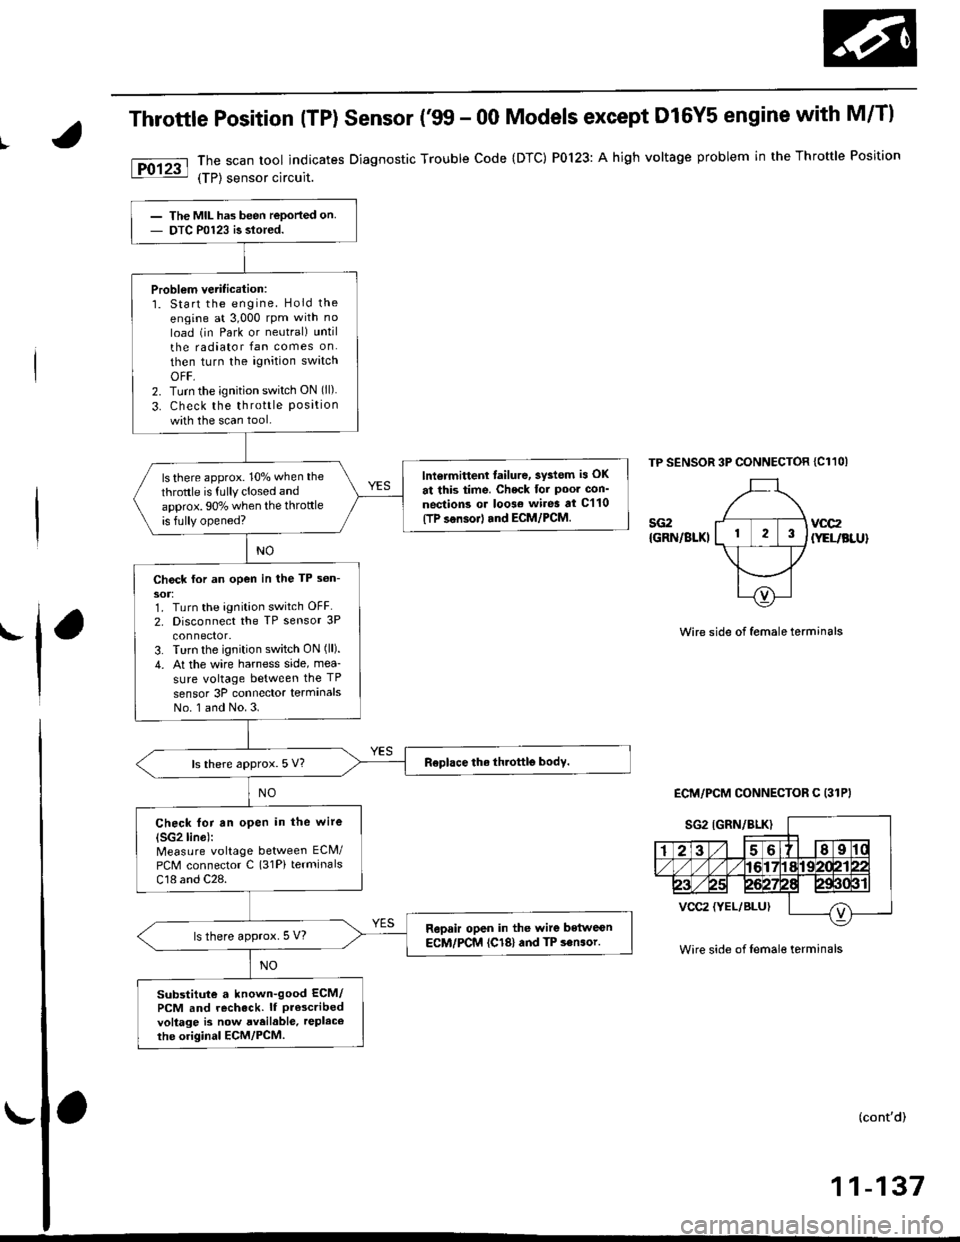
Throttle Position (TP) Sensor ('�99 - 00 Models except D16Y5 engine with M/Tl
The scan tool indicates Diagnostic Trouble Code {DTC) P0123: A high voltage problem in the Throftle Position
{TP) sensor circuit.
TP SENSOR 3P CONNECTOR {C11OI
sG2{GRN/BLKIvoc2
{YEUBLU}
'l'Wire side of female term;nals
ECM/PCM CONNECTOR C (31PI
Wire side of femal€ terminals
(cont'd)
11-137
The MIL has been reported on
DTC P0123 is slored.
Problem verification:1. Start the engine. Hold the
engine at 3,000 rpm with no
load (in Park or neutral) until
the radiator fan comes on
then turn the ignition swatch
OFF,2. Turn the;gnition switch ON (ll).
3. Check the throttle Positionwith the scan tool.
lntormittenl tailure, 3ystom is OK
at this time. Check tor Poor con'
neqtions or loo3€ wires at C'110(TP sensorl tnd ECM/PCM.
ls there approx. 10% when the
throttle is fully closed and
approx. 90% when the throttleis fully opened?
Ch€ck for an open in the TP s6n-
soJ:1. Turn the ignition switch OFF.
2. Disconnect the TP sensor 3P
3. Turn the ignition switch ON (ll).
4. At the wire harness side, mea-
sure voltage between the TP
sensor 3P connector terminalsNo. 1 and No.3.
ls there approx. 5 V?
Check tor an open in the wire(SG2lino):
Measure voltage between ECM/
PCM connector C (31Pi terminals
C18 and C28.
Repair open in the wite betwe€nECM/PCM (Cl81and TP son.or.ls there approx. 5 V?
Substitute a known-good ECM/PCM and recheck. lf Pr$cribedvoltage is now aveilabl6. replacethe original ECM/PCM.
Page 431 of 2189
PGM-FI System
I
a
a
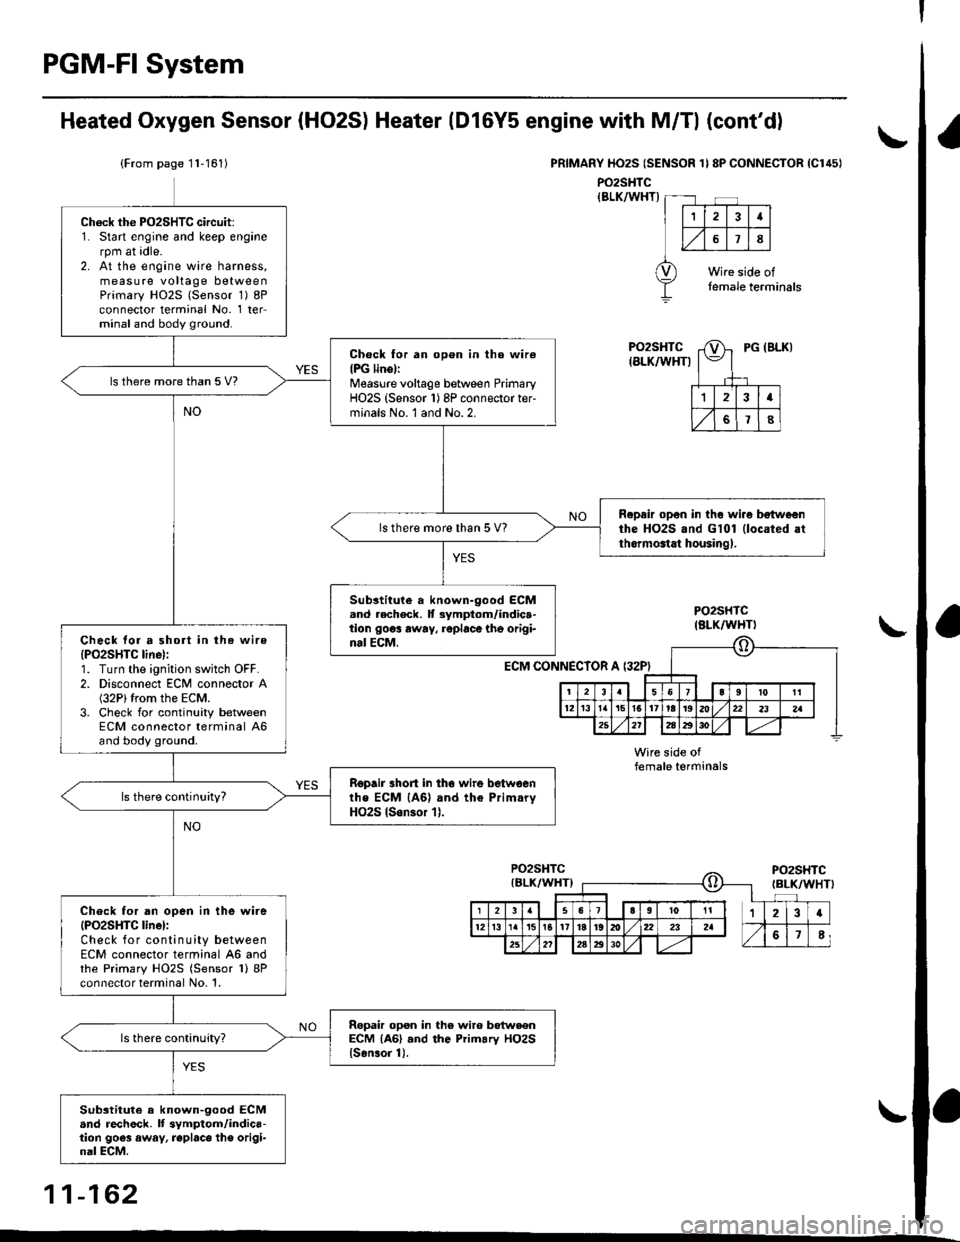
Ch6ck the PO2SHTC circuit:1. Start engine and keep enginerpm at idle.2. At the engine wire harness,measure voltage betweenPrimary HO2S (Sensor 1) 8Pconnector terminal No. 1 terminal and body ground.
Check for an open in the wire(PG linellMeasurc voltage between PrimaryHO2S (Sensor 1) 8P connector ter-minals No. l and No.2.
ls there morethan 5 V?
Repair opon in the wi.o bEtwoonthe HO2S.nd G101 (located atth.rmonat housingl.
ls there more than 5 V?
Substitule a known-good ECM.nd .echeck. lt 3ymptom/indica-tion 906! rwry, roplace the origi-nal ECM,Check lor a short in the wire
{PO2SHTC line):1. Turn the ignition switch OFF.2. Disconnect ECM connector A(32P)trom the ECM.3. Check for continuity betweenECM connector terminal 46and body ground.
Ropair 3hort in tho wire betwoenthe ECM {46} and the Prim.ryHO2S lson3or 11.
Check for an open in the wire(PO2SHTC linel:Check for continuity betweenECM connector terminal 46 andthe Primary HO2S (Sensor 1)8Pconnector terminal No. 1.
Repair opsn in the wir6 botweenECM {A6} .nd the Primary HO2Slsonror 1).
Substituto a known-9ood ECMand rech6ck. lf symptom/indica-tion goes away, replace the origi-nal ECM.
Heated Oxygen Sensor (HO2S) Heater (Dl6Y5 engine with M/Tl (cont'd)
(From page 11-161)PRIMARY HO2S (SENSOR 1} 8P CONNECTOR {Cl45I
PO2SHTC{BtK/WHT)
PO2SHTCIALK/WHTI
ECM CONNECTOR
female terminals
11-162
\.
!
\
A {32P}
o
6I9l roIt
12t3l5t61't8t9a221 232a
252'2aEito,1| ---
Page 481 of 2189
ldle Control System
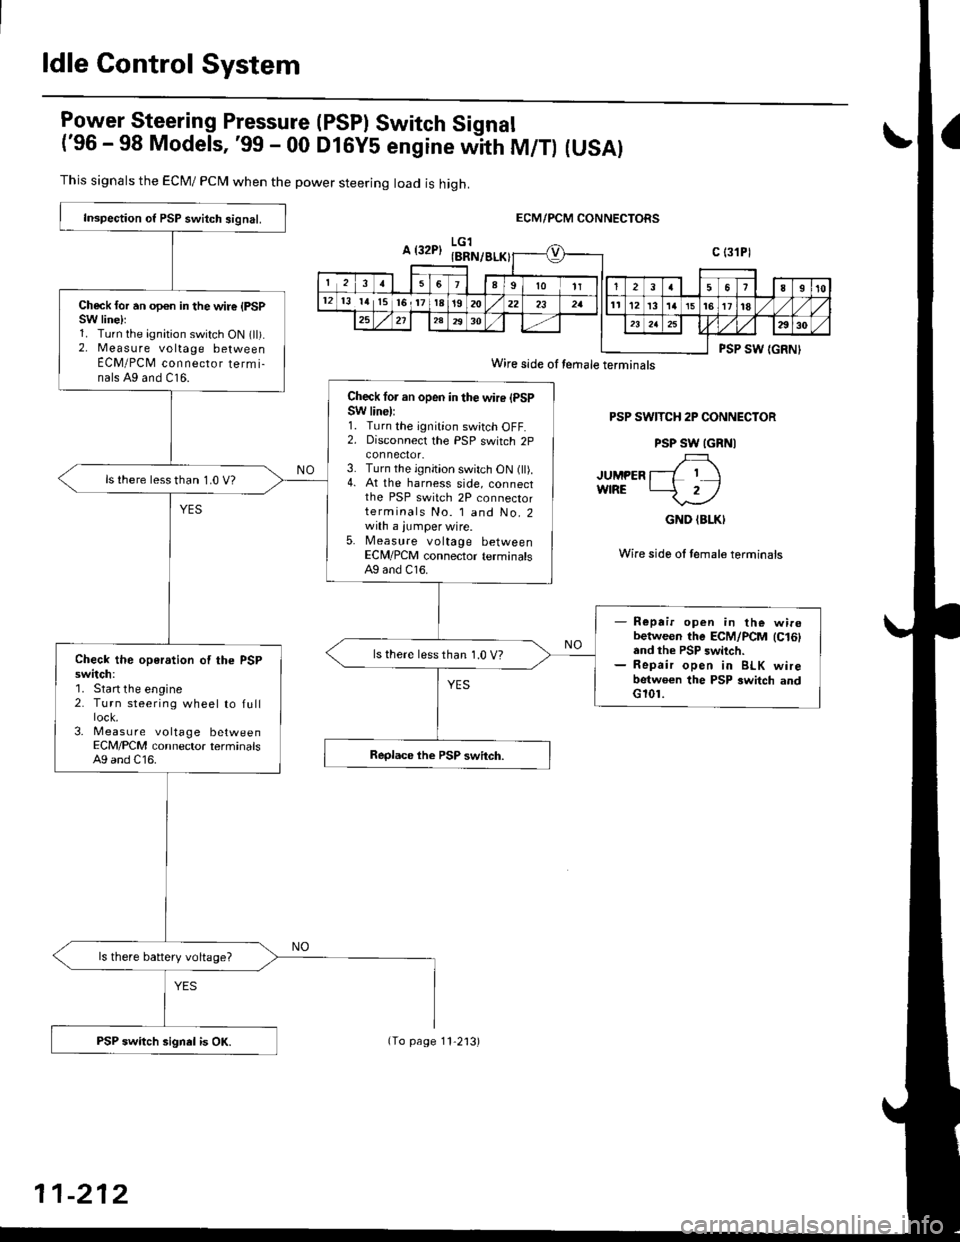
lgy"t9!"_"ring Pressure (PSPI Switch Signal
('96 - 98 Models, '99 - 00 DlGy5 engine witn fU/f) (USAI
This signals the ECM/ PCN4 when the power steering load is high.
ECM/PCM CONNECTORS
PSP SWITCH 2P CONNECTOR
PSP SW IGRNI
JUMPER l--L I IwfRE -2/
GND (BLKI
Wire side ol female terminais
Inspection o{ PSP switch signal.
Check for an opon in the wire {PSPSW linelr1. Turn the ignition switch ON (ll).2. Measure voltage betweenECM/PCM connecror termi-nals A9 and C16.
Check lor an open in the wire (PSPSW line):1. Turn the ignition switch OFF.2. Disconnecl the PSP switch 2p
3. Turn the ignition switch ON (ll).4. At the harness side, connectthe PSP switch 2P connectorterminals No. l and No.2with a jumper wire.5. Measure voltage betweenECM/PCM connector terminalsAg and C16.
ls there lessthan 1.0 V?
- Repair open in the wirobetween the ECM/PCM lc16land the PSP switch.- Repair open in BLK wirebetwoen the PSP switch andG101.
ls there less than 1.0 V?Check the operation of the PSPswitch:'1. Start the engine2. Turn steering wheel to full
3- Measu re voltage betweenECM/PCM connector terminalsA9 and C16.
ls there battery voltage?
PSP switch signel is OK.
Wire side oI temale terminals
11-212
(To page 11'2'13)