22-146 HONDA CIVIC 2002 7.G Workshop Manual
[x] Cancel search | Manufacturer: HONDA, Model Year: 2002, Model line: CIVIC, Model: HONDA CIVIC 2002 7.GPages: 1139, PDF Size: 28.19 MB
Page 679 of 1139
Rear Window Replacement
NOTE:. Put on gloves to protect your hands.. Wear eye protection while cutting the glass adhesive
with piano wire.. Use seat covers to avoid damaging any surfaces.. Do not damage the rear window defogger grid lines
and terminals.
1.Remove these items:
. Hatch lower trim panel (see page 20-53). Hatch spoiler (see page 20-99)
Remove these items:
. High mount brake light {see page 22-821. Rear window wiper motor {see page 22-1461
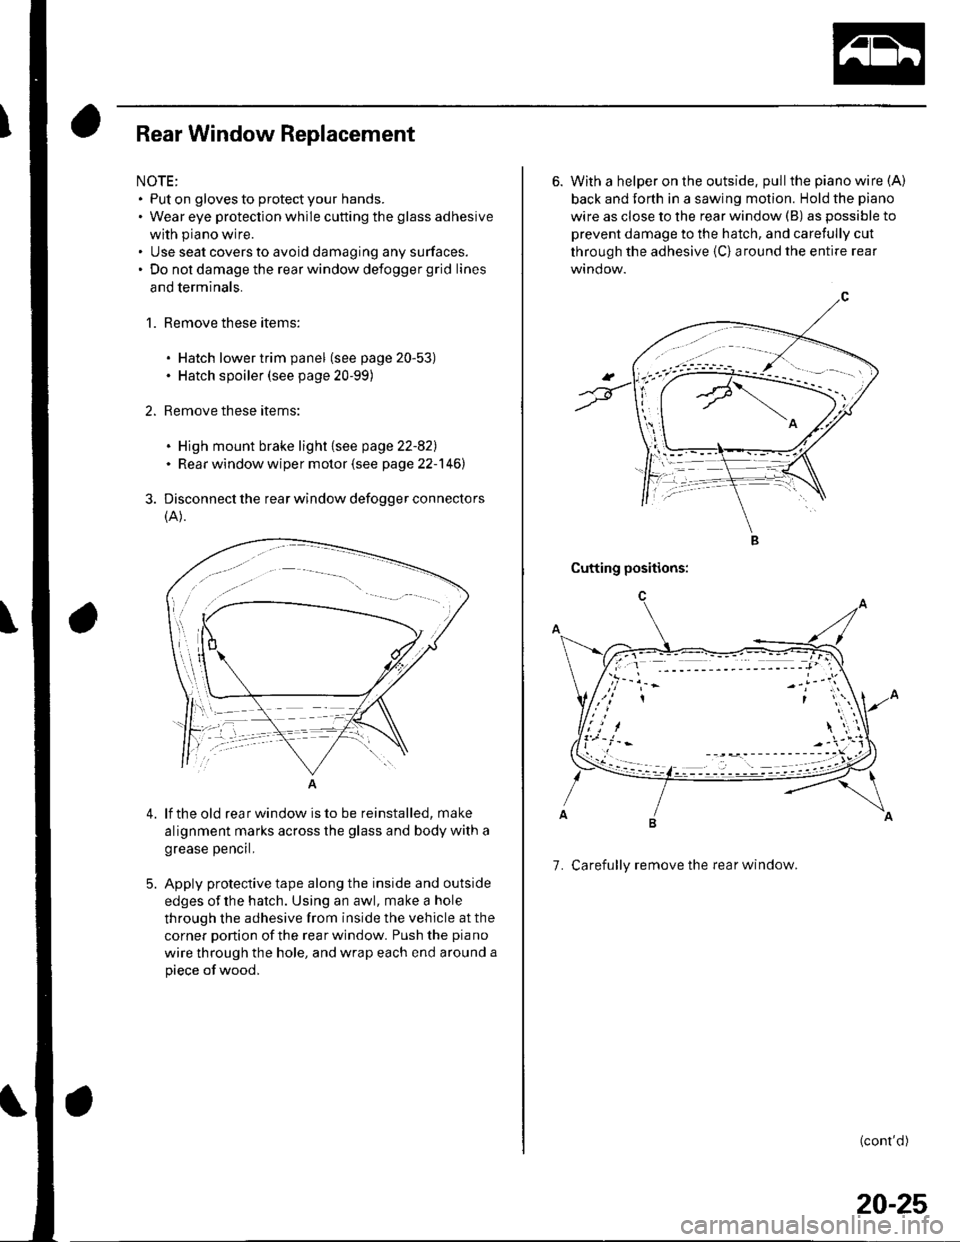
Disconnect the rear window defogger connectors
(A).
4.lf the old rear window is to be reinstalled, make
alignment marks across the glass and body with a
grease pencrl,
Apply protective tape along the inside and outside
edges of the hatch. Using an awl, make a hole
through the adhesive from inside the vehicle at the
corner portion of the rearwindow. Push the piano
wire through the hole, and wrap each end around a
piece of wood,
6. With a helper on the outside, pull the piano wire (A)
back and Jorth in a sawing motion. Hold the piano
wire as close to the rear window (B) as possible to
prevent damage to the hatch, and carefully cut
through the adhesive {C} around the entire rear
Cutting positions:
7. Carefully remove the rear window.
(cont'd)
20-25
Page 764 of 1139
Openers
Hatch Handle Replacement
NOTE: Put on gloves to protect your hands.
1. Remove these items:
. Hatch lower trim panel (see page 20-53). Rear license trim panel (see page 20-98)
2. Remove the rear window wiper motor (see page
22-1461.
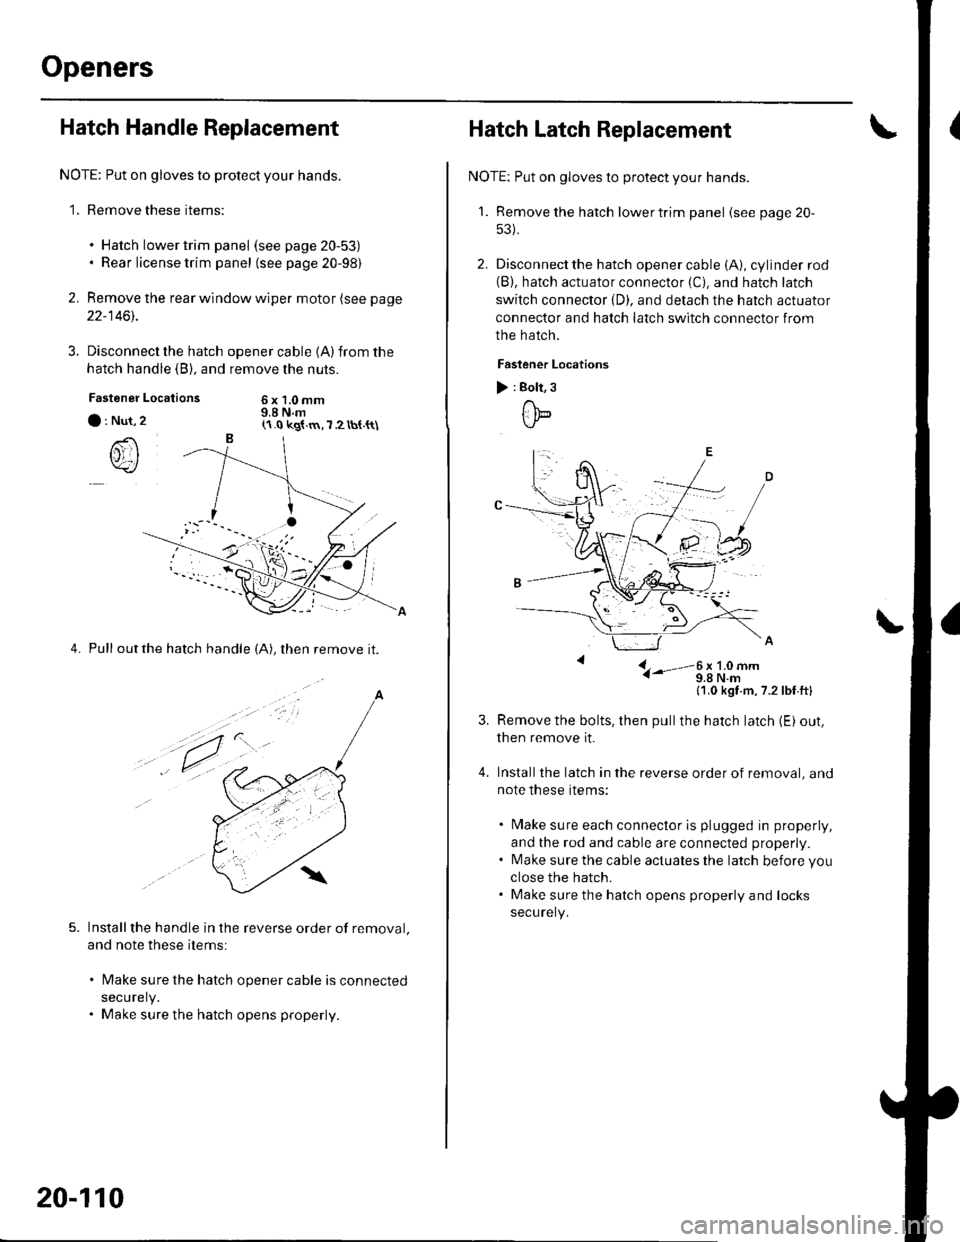
3. Disconnect the hatch
hatch handle (B), and
Locations
opener cable 1A)from the
remove the nuts.
6x1.0mm9.8 N.mFastener
a : Nut,
()rI
4. Pull outthe hatch handle (A), then remove it.
Installthe handle in the reverse order of removal.
and note these items:
lMake sure the hatch opener cable is connected
securely.
Make sure the hatch opens properly.
(1.0 kg{.m,7 2 tbt.{t\
a
,t.
20-110
Hatch Latch Replacement
NOTE: Put on gloves to protect your hands.
'1. Remove the hatch lowertrim panel (see page 20-
53).
2. Disconnect the hatch opener cable (A), cylinder rod(B). hatch actuator connector (C). and hatch latch
switch connector {D). and detach the hatch actuator
connector and hatch latch switch connector from
the hatch.
Faslener Locations
) : Bolt, 3
ttb
L- i-'-3;li9#-
11,0 kgt m,7.2lbf ftl
Remove the bolts, then pullthe hatch latch (E) out,
then remove it.
Installthe latch in the reverse order of removal, and
note these items:
. Make sure each connector is plugged in properly,
and the rod and cable are connected properly.. l\4ake sure the cable actuates the latch before you
close the hatch.. Make sure the hatch opens properly and locks
securely.
Page 832 of 1139
Power WindowsComponent Location Index ..........
circuit Diagram . .. ............... .........:.::::.::::.:Master Switch Input Test ...........................Master Switch TestDriver's Window Motor Test .....................
Passenger's Window Switch lnput Test ...Passenger's Window Switch Test .............
Passenger's Window Motor Test ..............
lMaster Switch Replacement ......................
Passenger's Window SwitchReplacement
Wipers/WashersComponent Location Index .......................
Circuit DiagramRear Window Wiper Intermiftent
Control Unit Input Test ...........................Wiper/Washer SwitchTesVReplacementControl Unit Input Test ...............................Wiper Motor Test
Washer Motor TestWasher Fluid Level Switch TesV
Replacement (Canadal ..........................
Windshield Wiper Motor Replacement ....
Rear Window Wiper MotorReplacementWasher Reservoir Replacement ................
Washer Tubes Beplacement ......................
Accessory Power SocketCircuit Diagram ......... 22-149
Accessory Power Socket
TesVReplacement ................................... 22-1 49
Keyless/Power Door Lock System
Component Location Index ....................... 22-150
Circuit Diagram ......... 22-151Keyless Receiver Unit InputTest ............... 22-153
Control Unit Input Test ............................... 22-155
Door LockActuatorTest .........,.......,..,.,..... 22-158Hatch LockActuatorTest ........................... 22-159
Door Lock Knob Switch Test ...................... 22-160
Door Lock Switch Test ................................ 22-160
Transmitter Test ....... 22-161
Transmitter Programming ......................... 22-161
Multiplex Control SystemComponent Location Index ...........
circuit Diagram ...... ........................::.:..:.::.:
Svstem DescriDtionTroubleshootingMultiolex Control Unit InDut Test .............
22 12422-12522-12622-12822-129
22- t30
22-13222 13222-133
22-133
22-134
22-138
22-14022-14122-14322-144
22-14422-145
22-14622-14622 147
22,16422-16922-17'l22,11222-175
lmmobilizer Systemcomponent Location Index ...........
System Description ....... ............. ..:..:..:.:...
Circuit DiagramTroubleshootinglmmobilizer Control Unit-Receiver Replacement ...........................
22-16222-16322-164
22-167
Page 966 of 1139
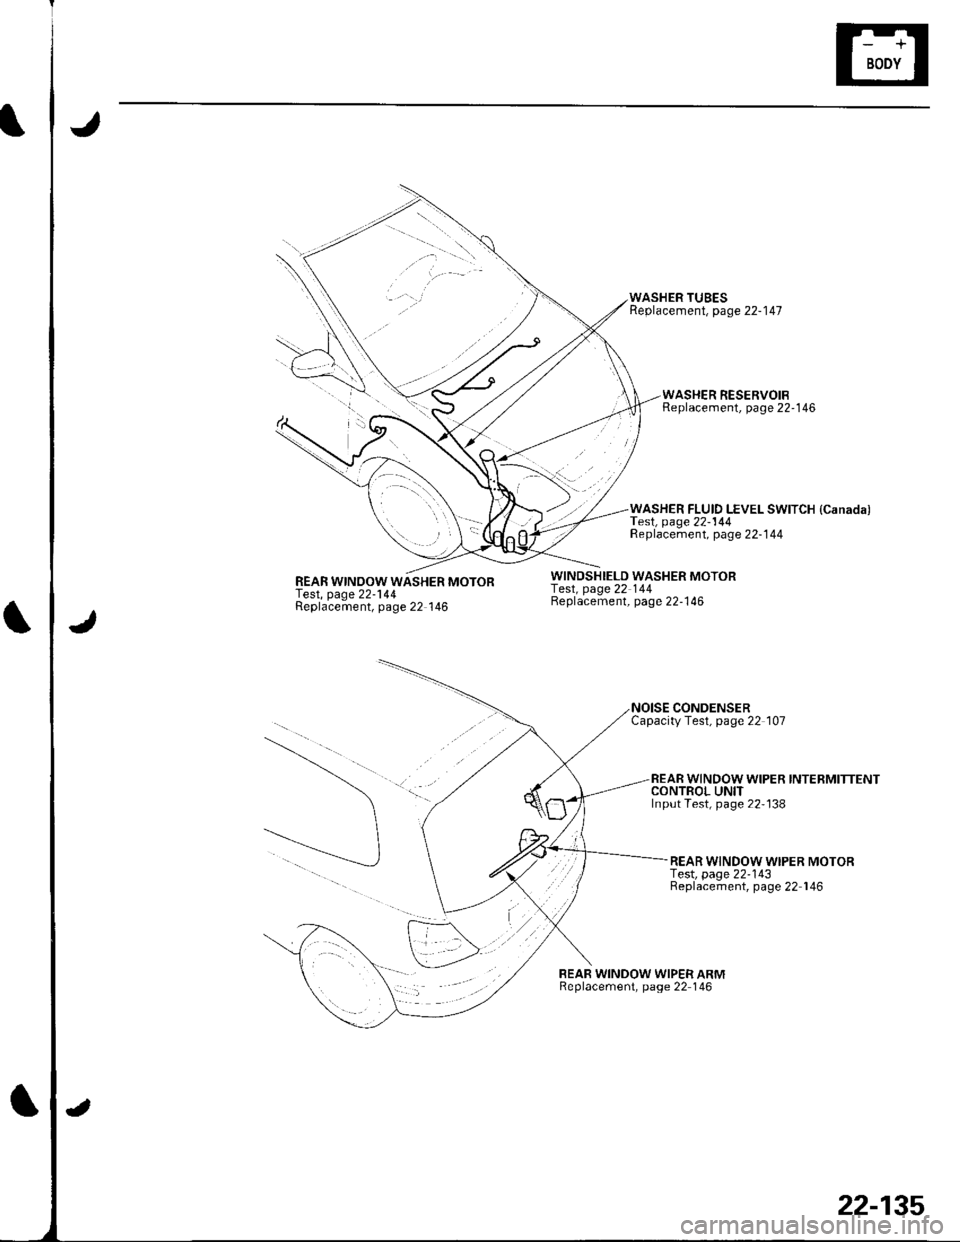
REAR WINOOW WASHER MOTORTest, page 22-144Replacement, page 22 146
WINDSHIELD WASHER MOTORfesl, page 22 144Beplacement, page 22-146
WASHER TUBESReplacement, page 22-147
CONDENSERCapacityTest, page 22 107
BEAR WINDOW WIPER ARMReplacement, page 22 146
WASHER RESERVOIBReplacement, page 22'146
WASHER FLUID LEVEL SWITCH {Canada)TesI, page22-144Replacement, page 22-144
REAR WINDOW WIPER INTERMITTENTCONTROL UNITInput Test, page 22'138
REAR WINDOW WIPER MOTORf e$, page 22-143Replacement, page 22 146
22-135
Page 977 of 1139
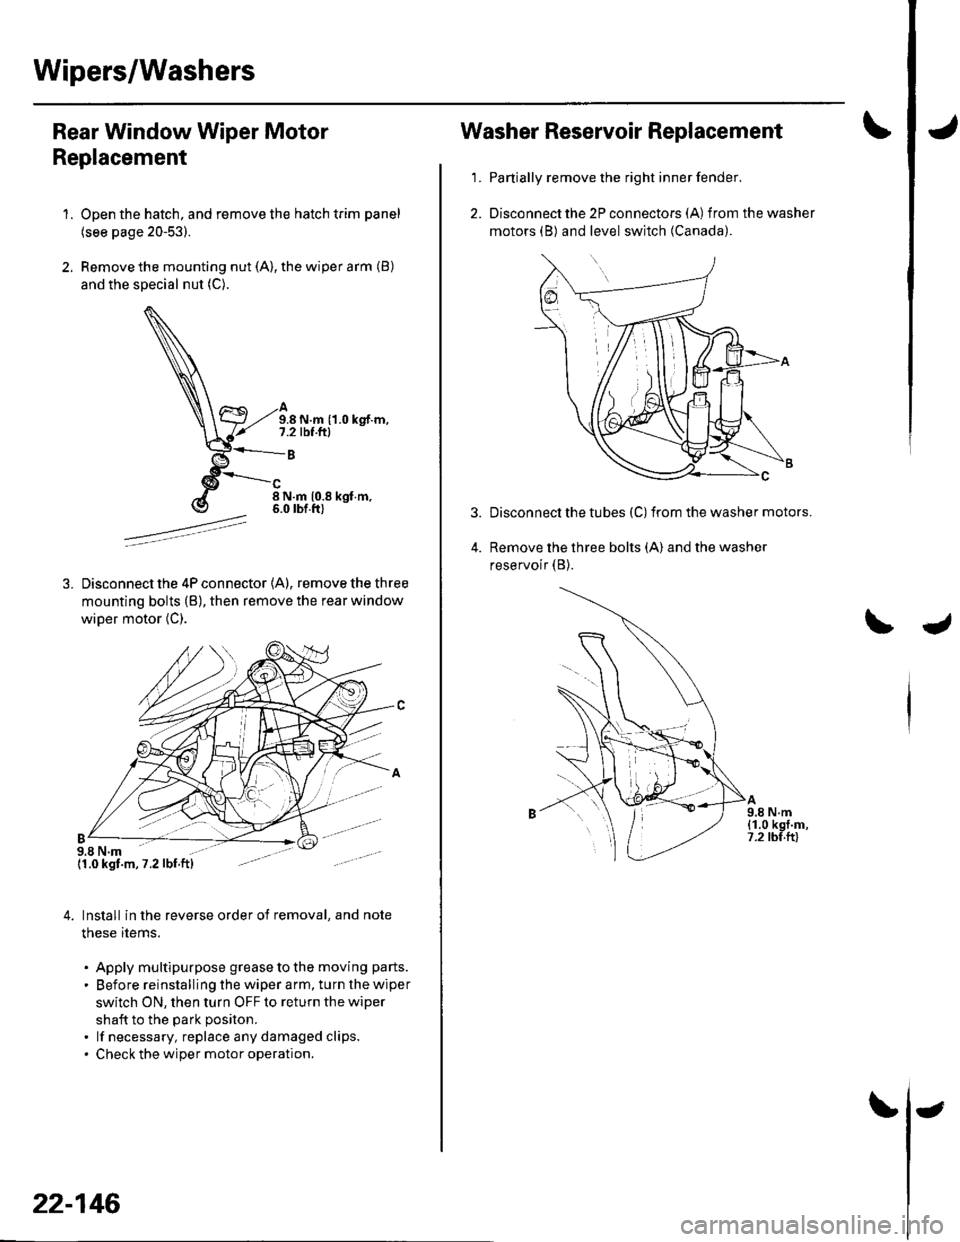
Wipers/Washers
Rear Window Wiper Motor
Replacement
1.
B
Open the hatch, and remove the hatch trim panel
(see page 20-53).
Remove the mounting nut (A), the wiper arm (B)
and the special nut (C).
A9.8 N.m {1.0 kgf.m,7.2 rbf.ftl
B
8 N.m 10.8 kgt.m,6.0 rbf.ft)
Disconnect the 4P connector {A), remove the three
mounting bolts (B), then remove the rear window
wiDer motor (C).
9.8 N.m{1.0 kgt.m,7.2lbf ftl
4,Install in the reverse order oI removal, and note
these items.
Apply multipurpose grease to the moving parts.
Before reinstalling the wiper arm, turn the wiper
switch ON, then turn OFF to return the wiper
shaft to the Dark oositon.
lf necessary, replace any damaged clips.
Check the wiDer motor operation.
22-146
-
Washer Reservoir Replacement
1.Partially remove the right inner fender.
Disconnect the 2P connectors (A) irom the washer
motors (B) and level switch (Canada).
3.Disconnecl the tubes (C) from the washer motors.
Remove the three bolts (A) and the washer
reservoir (B).
A9.8 N.m(1.0 kgt.m,7.2 tbf.tt)