Synchro HONDA CIVIC 2003 7.G User Guide
[x] Cancel search | Manufacturer: HONDA, Model Year: 2003, Model line: CIVIC, Model: HONDA CIVIC 2003 7.GPages: 1139, PDF Size: 28.19 MB
Page 440 of 1139
Manual Transmission
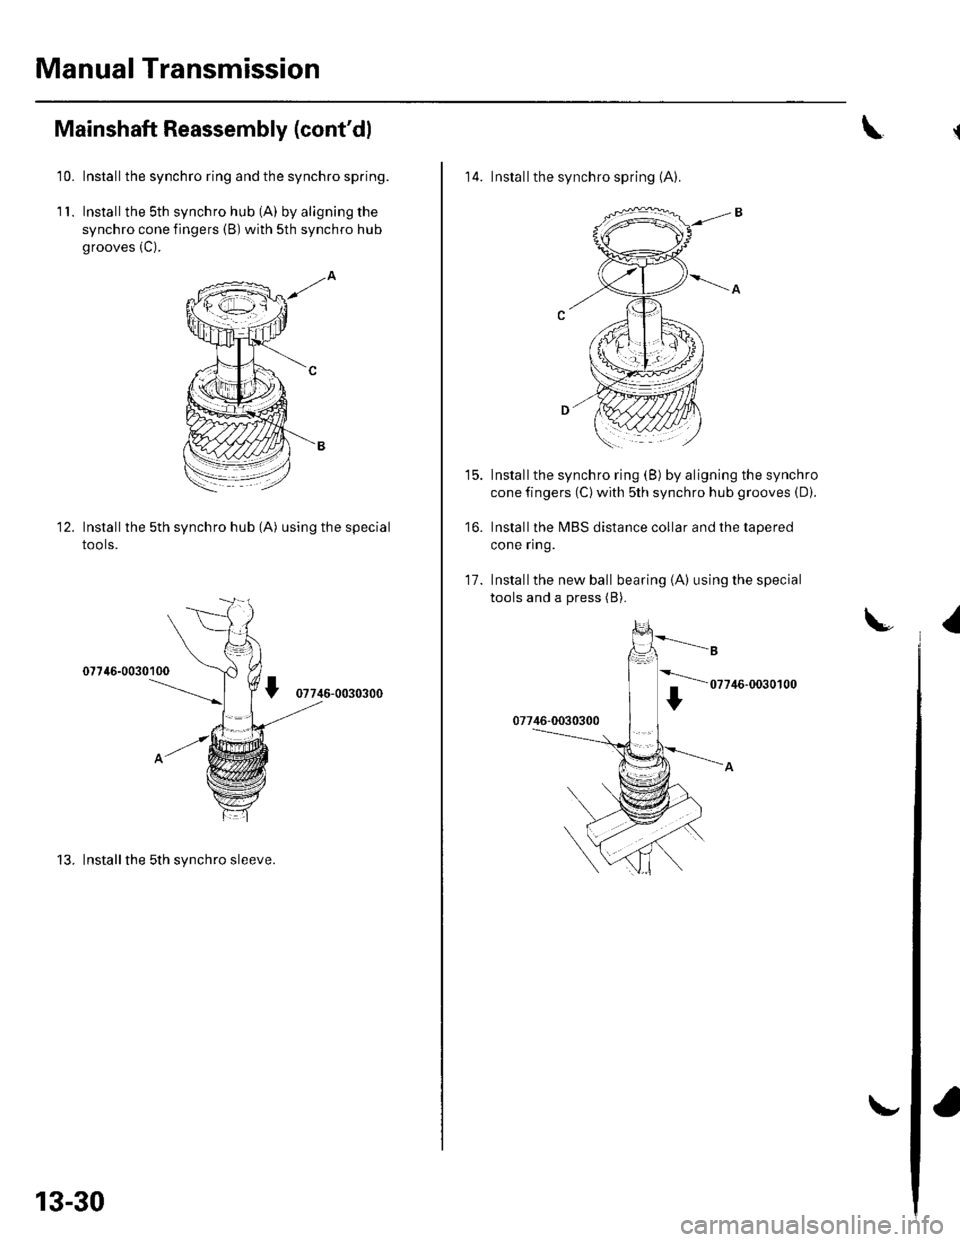
Mainshaft Reassembly (cont'dl
10. Installthe synchro ring and the synchro spring.
1 '1. Installthe sth synchro hub (A) by aligning the
synchro cone fingers (B) with sth synchro hub
grooves (C).
Installthe 5th synchro hub (A) using the special
tools.
07746-0030100
07746-0030300
13. Installthe 5th synchro sleeve.
12.
13-30
\.
\
14. Installthe synchro spring (A).
Installthe synchro ring (B) by aligning the synchro
cone fingers (C) with sth synchro hub grooves (D).
Installthe MBS distance collar and the tapered
cone ring.
Installthe new ball bearing {A) using the special
tools and a press (B).
t5.
16.
11.
U1
07746-0030100
Page 441 of 1139
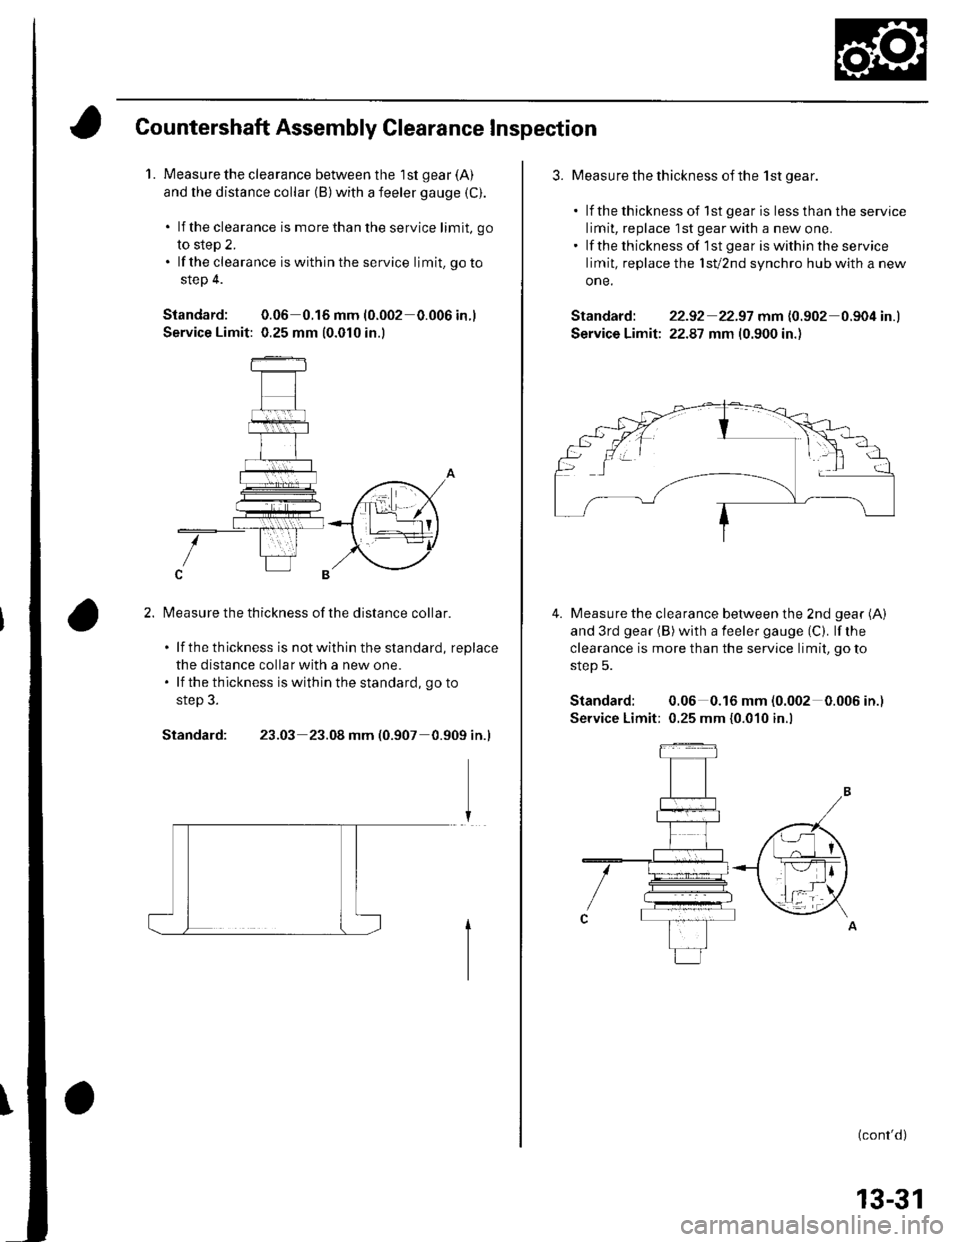
Countershaft Assembly Clearance lnspection
1.Measure the clearance between the 1st gear (A)
and the distance collar (B)with a feeler gauge (C).
. lf the clearance is more than the service limit, go
to step 2.. lf the clearance is within the service limit. go to
step 4.
Standard: 0.06 0.16 mm 10.002 0.006in.l
Service Limit: 0.25 mm (0.010 in.l
2. fvleasure the thickness of the distance collar.
. lf thethickness is notwithin the standard, replace
the distance collar with a new one.' lf the thickness is within the standard, go to
Standard:23.03 23.08 mm (0.907 0.909 in.l
3. Measu re the thickness of the 1st oear.
. lf thethicknessof lst gearis lessthanthe service
limit, replace lstgearwith a newone.. lf the thickness of '1st gear is within the service
limit, replace the lst/2nd synchro hub with a new
one.
Standard: 22-92 22.97 mm 10.902 0.904 in.l
Service Limit; 22.87 mm {0.900 in.)
Measure the clearance between the 2nd gear (A)
and 3rd gear (B) with a feeler gauge (C). lf the
clearance is more than the service limit, go to
steD 5.
Standard: 0.06 0.16 mm (0.002 0.006in.)
Service Limit: 0.25 mm {0.010 in.l
4.
(cont'd)
13-31
Page 442 of 1139
Manual Transmission
Countershaft Assembly Clearance
Inspection (cont'd)
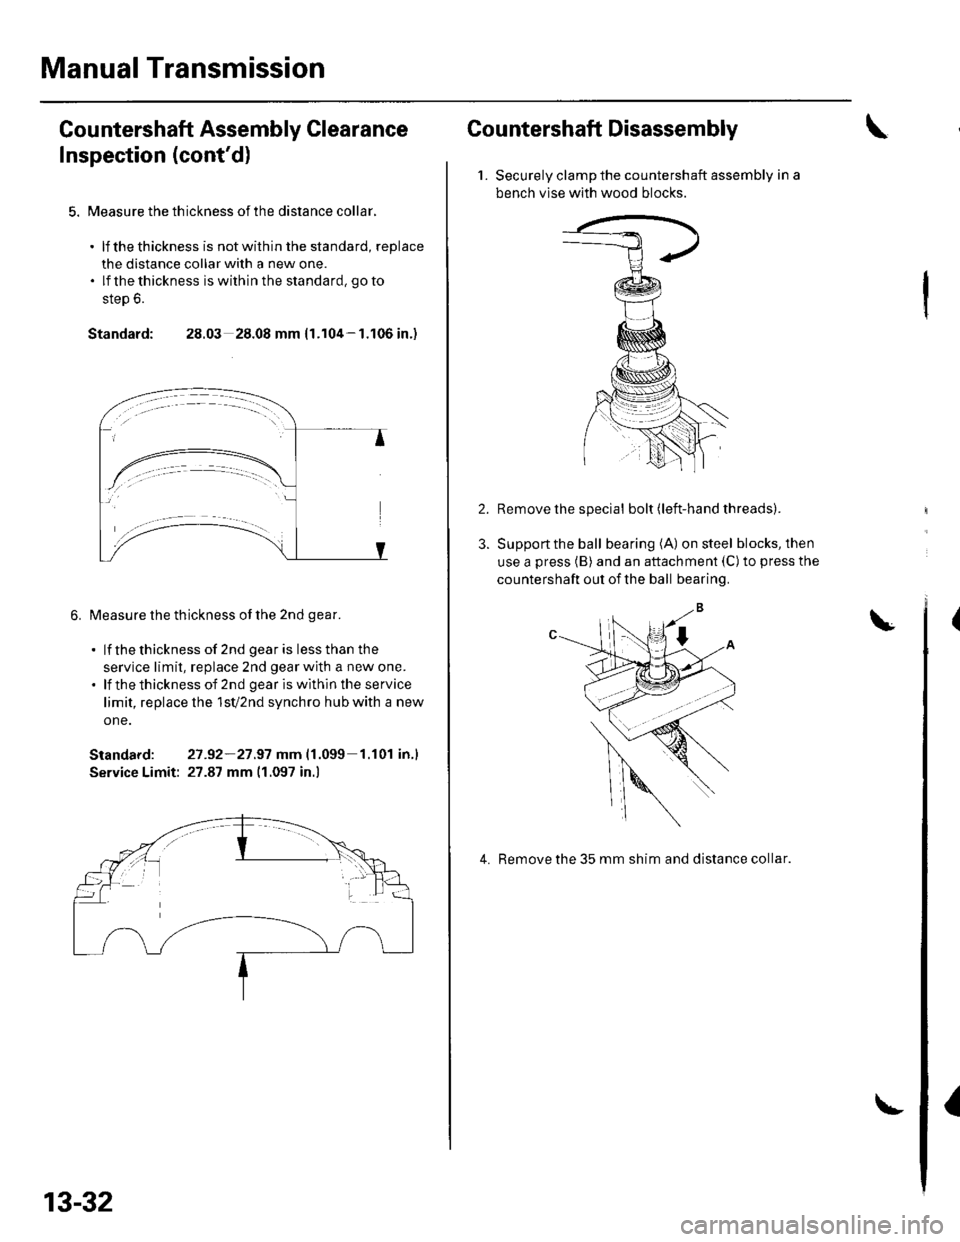
5. Measure the th ickness of the distance collar.
. lf thethickness is notwithin the standard, replace
the distance collar with a new one.. lf thethickness iswithinthe standard, goto
step 6.
Standard: 28.03 28.08 mm {1.104-1.106 in.)
6. Measure the thickness of the 2nd qear.
. lf thethickness of 2nd gearis lessthan the
service limit, replace 2nd gear with a new one.. lf thethicknessof 2nd geariswithintheservice
limit, replace lhe 1sV2nd synchro hub with a new
one.
Standard: 27 -92-21.97 mm|.1.099 1.r01 in.l
Service Limit: 27.87 mm 11.097 in.)
13-32
Countershaft Disassembly
1.Securely clamp the countershaft assembly in a
bench vlse with wood blocks.
Remove the special bolt (left-hand threads).
Support the ball bearing (A) on steel blocks, then
use a press (B) and an attachment (C)to press the
countershaft out of the ball bearing.
4. Remove the 35 mm shim and distance collar.
I
Page 444 of 1139
Manual Transmission
(
(
Countershaft Reassembly
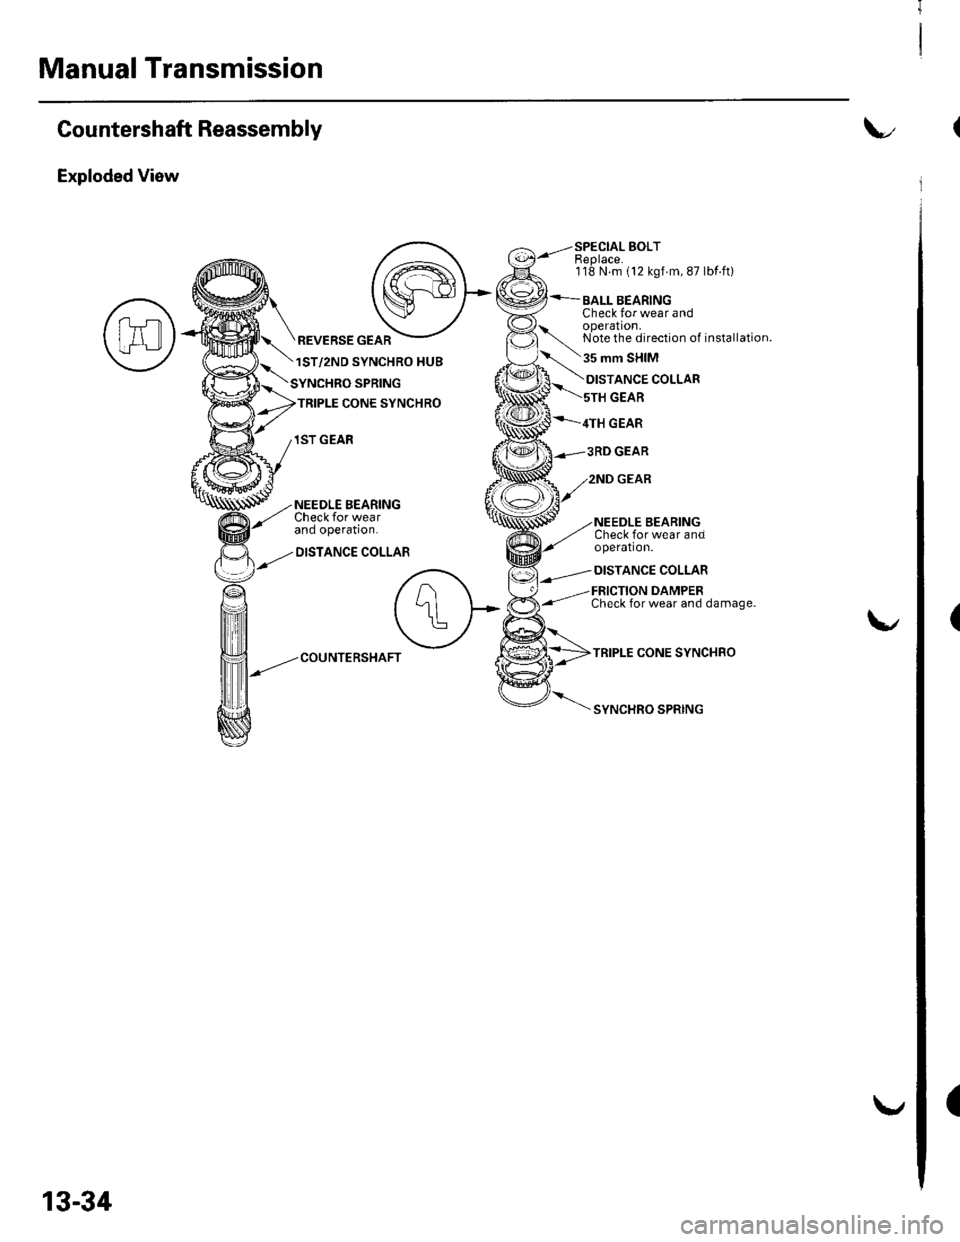
Exploded View
SPECIAL BOLTEeplace.118 N.m (12 kgf m, 87 lbf ft)
BALL BEARINGCheck for wear andoperation.Note the direction of installation.
35 mm SHIM
REVERSE GEAR
1ST/2ND SYNCHRO HUB
SPRING
TRIPLE CONE SYNCHRO
1ST GEAR
NEEDLE BEARINGCheck for wearano opera!on.
DISTANCE COLLAR
ANCE COLLAR
GEAR
4TH GEAR
Check for wear andoperation.
DISTANCE COLLAR
FRICTION DAMPERCheck for wear and damage.
TRIPLE CONE SYNCHRO
SYNCHRO SPRING
COUNTERSHAFT
13-34
Page 445 of 1139
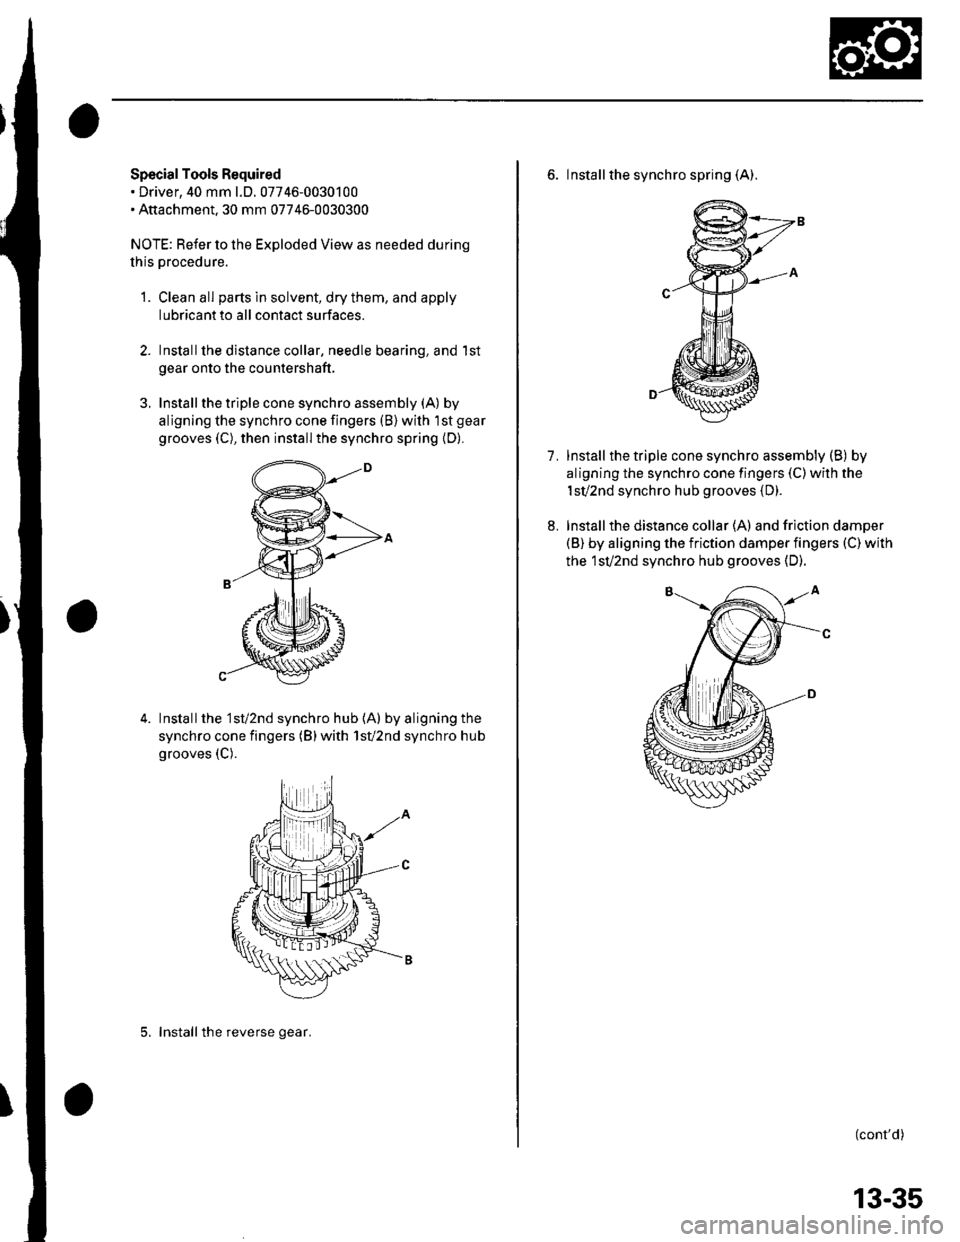
Special Tools Required. Driver, 40 mm l.D.07746-0030100. Aftachment.30 mm 07746-0030300
NOTE: Refer to the Exploded View as needed during
lhis procedure.
1. Clean all parts in solvent, dry them, and apply
lubricantto all contact surfaces.
Installthe dislance collar, needle bearing, and 1st
gear onto the countershaft.
Install the triple cone synchro assembly (A) by
aligning the synchro cone fingers (B) with 'lst gear
grooves (C), then install the synchro spring {D).
3.
Installthe '1st/2nd synchro hub (A) by aligning the
synchro cone fingers (B)with 1sV2nd synchro hub
grooves (C).
5. Installthe reverse gear.
13-35
6. Installthe synchro spring (A).
lnstall the triple cone synchro assembly (B) by
aligning the synchro cone fingers (C) with the
1sv2nd synchro hub grooves (D).
Installthe distance collar (A) and friction damper(B) by aligning the friction damper fingers (C) with
the 1sv2nd synchro hub grooves (D).
1.
8.
(cont'd)
Page 446 of 1139
Manual Transmission
10.
Countershaft Reassembly (cont'dl
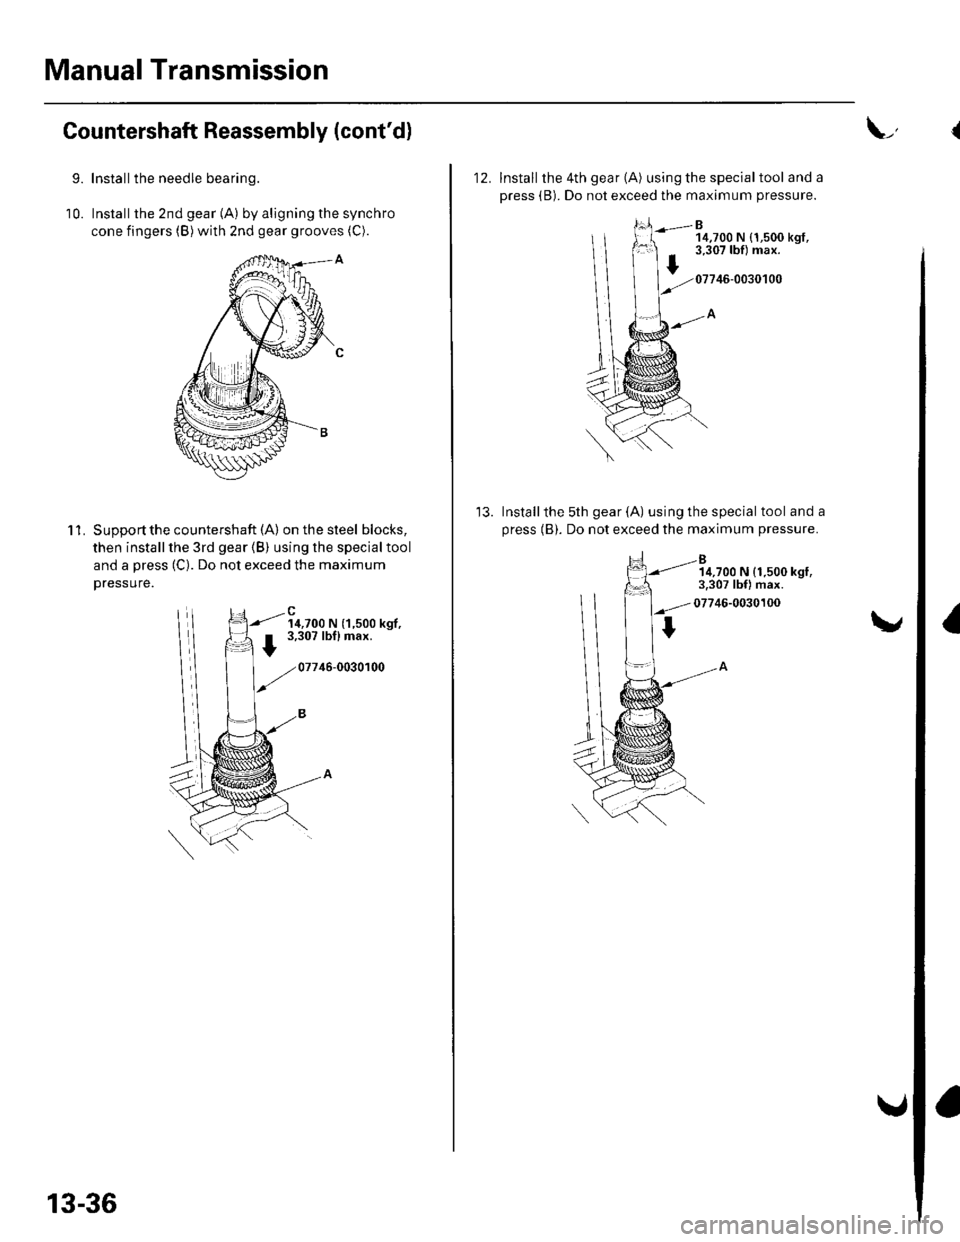
9.Install the needle bearing.
Installthe 2nd gear (A) by aligning the synchro
cone fingers (B) with znd gear grooves (C).
'l 1.Supoort the countershaft (A) on the steel blocks,
then install the 3rd gear (B) using the special tool
and a press (C). Do not exceed the maximum
Dressure.
14,700 N (1,500 kgf,3,307 lbflmax.
07746-0030100
13-36
L,
12. Install the 4th gear (A) using the specialtool and a
press (B). Do not exceed the maximum pressure.
B14,700 N {1,500 kgt,3,307 lbf) max.
07746-0030100
Installthe 5th gear (A) using the special tool and a
press (B). Do not exceed the maximum pressure.
14,700 N (1.500 kgl,3.307 lbf) max.
07746-0030100
I
Page 449 of 1139
\
Synchro Sleeve and Hub Inspection
and Reassembly
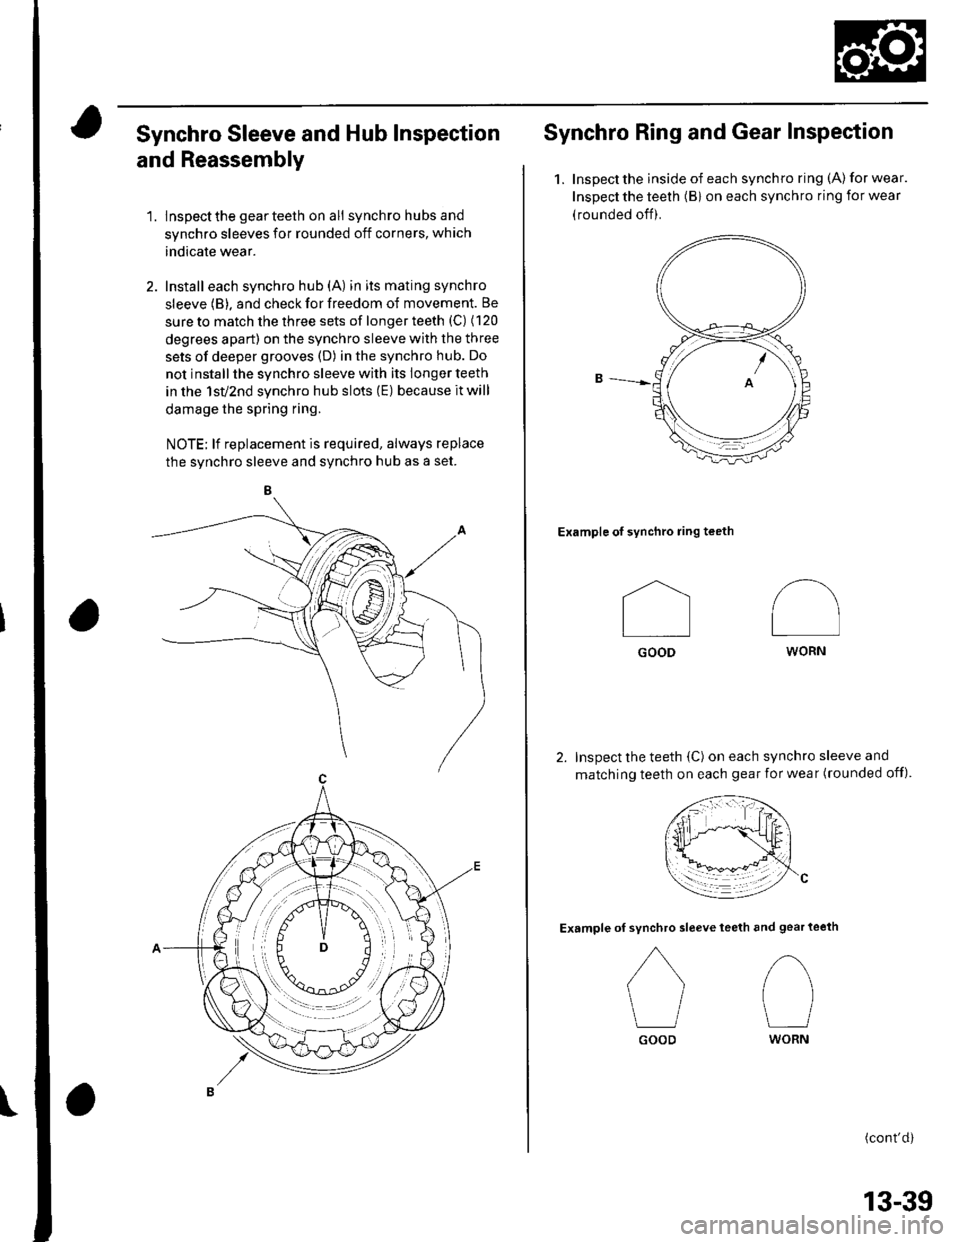
1. lnspectthe gearteeth on ali synchro hubs and
synchro sleeves for rounded off corners, which
indicate wear.
2. Install each synchro hub (A) in its mating synchro
sleeve (B), and check for freedom of movement. Be
sure to match the three sets of longer teeth (C) (120
degrees apart) on the synchro sleeve with the three
sets of deeper grooves (D) in the synchro hub. Do
not install the synchro sleeve with its longer teeth
in the 1sv2nd synchro hub slots (E) because it will
damage the spring ring.
NOTE; lf replacement is required, always replace
the svnchro sleeve and svnchro hub as a set.
Synchro Ring and Gear Inspection
1.Inspect the inside of each synchro ring (A) for wear.
Inspect the teeth (Bi on each synchro ring for wear
(rounded off).
Example of synchro ring teeth
Inspect the teeth (C) on each synchro sleeve and
matching teeth on each gear for wear (rounded off).
Example ofteeth and gear teeth
(cont'd)
I
Il
GOOD
synchro sleeve
GOOD
/\
I
WORN
tl
WORN
13-39
Page 450 of 1139
Manual Transmission
Synchro Ring and Gear Inspection (cont'dl
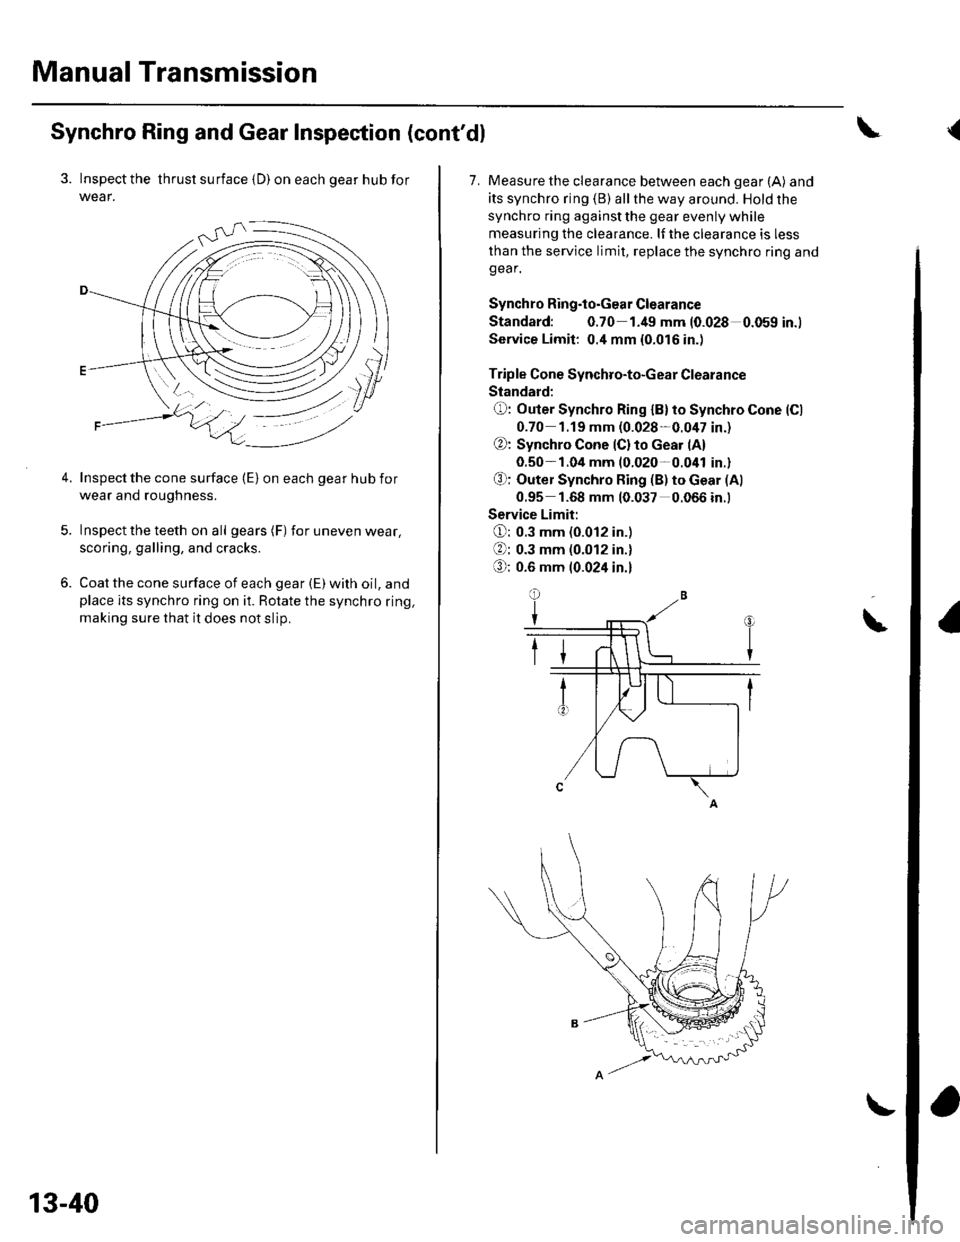
3. Inspect the thrust surface {D) on each gear hub for
wear.
Inspect the cone surface (E) on each gear hub for
wear ano rougnness.
Inspect the teeth on all gears (F) for uneven wear,
scoring, galling, and cracks.
Coat the cone surface of each gear (E) with oil, andplace its synchro ring on it. Rotate the synchro ring,
making sure that it does not slip.
13-40
\
7. Measure the clearance between each gear (A) and
its synchro ring (B) allthe way around. Hold the
synchro ring against the gear evenly while
measuring the clearance. lf the clearance is less
than the service limit, replace the synchro ring andgear.
Synchro Ring.to.Gear Clearance
Standard: 0.70 1.49 mm 10.028 0.059 in.)
Service Limit: 0.4 mm {0.016 in.)
Triple Cone Synchro-to-Gear Clearance
Slandard:
O: Outer Synchro Ring {B}to Synchro Cone (Cl
0-70 1.19 mm (0.028-0.047 in.)
@: Synchro Cone lC) to cear (A)
0.50- 1.04 mm (0.020-0.041 in.)
O: Outer Synchro Ring (B) to Gear (Al
0.95 1.68 mm 10.037 0.066 in.)
Service Limit:
O: 0.3 mm (0.012 in.)
: 0.3 mm (0.012 in.)
O; 0.6 mm 10.024 in.l
\
{
Page 453 of 1139
Mainshaft Thrust Clearance Adiustment
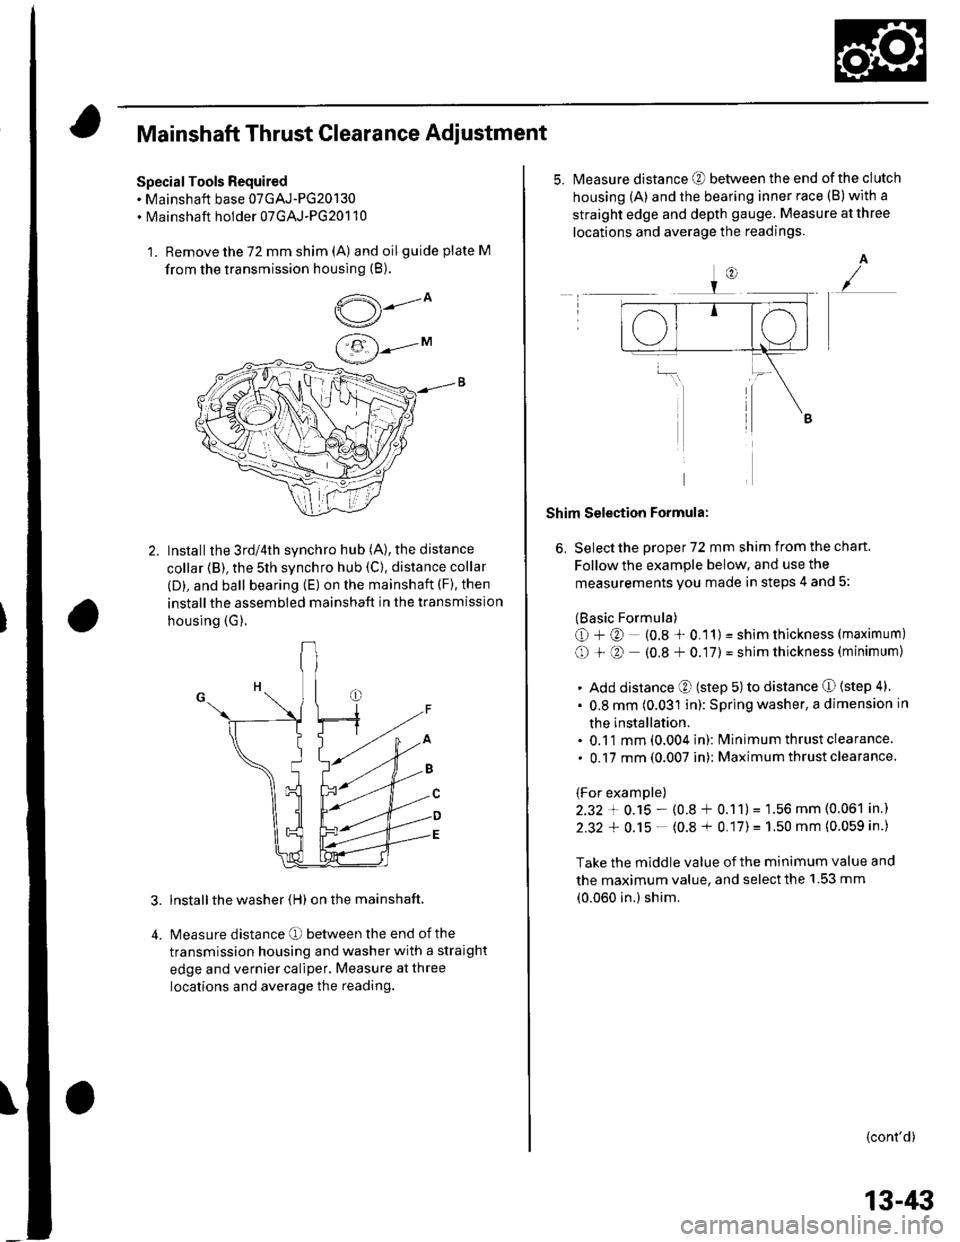
Special Tools Required. Mainshaft base 07GAJ-PG20130. Mainshaft holder 07GAJ-PG20110
1. Remove the 72 mm shim (A) and oilguide plate M
from the transmission housing (B).
,5---ov/
Installthe 3rd/4th synchro hub (A), the distance
collar (B), the 5th synchro hub {C). distance collar
(D), and ball bearing (E) on the mainshaft (F), then
installthe assembled mainshaft in the transmission
housing (G).
lnstall the washer (H) on the mainshaft.
Measure distance O between the end of the
transmission housing and washer with a straight
edge and vernier caliper. Measure at three
locations and average the reading.
5.Measure distance @ between the end of the clutch
housing (A) and the bearing inner race (B)with a
straight edge and depth gauge. Measure at three
locations and average the readings.
A
Shim Selection Formula:
6, Select the proper 72 mm shim from the chan.
Follow the example below, and use the
measurements you made in steps 4 and 5:
(Basic Formula)
O+@ (0.8 * 0.11) = shim thickness (maximum)
O + O (0.8 + 0.17) = shim thickness (minimum)
. Add distance O (step 5) to distance O (step 4)
. 0.8 mm (0.031 in): Spring washer, a dimension in
the installation.. 0.11 mm (0.004 in): lvlinimum thrust clearance
. 0.17 mm (0.007 in): Maximum thrust clearance.
(For example)
2.32 + 0.15 - (0.8 + 0.11)= 1.56 mm (0.061 in.)
2.32 + 0.15 - (0.8 + 0.17)= 1.50 mm (0.059 in.)
Take the middle value of the minimum value and
the maximum value, and select the 1.53 mm
(0.060 in.) shim.
{cont'd)
13-/li|
Page 1139 of 1139
SuspensionAdjustment................-............................184 VComponent Location Index................. 20-17
Windshield GlessReplacement............-..............-............. 20 19
Synchro Ring, Triple-coneInspection...............-..........................1339 ValveGuides
Synchro SleeveInspectaon/Reassemb1y ....................... 13 39
Inspection ............-.-................................ 6 32Beplacement ..........-................................ 6 33 Wiper Intermittent Control Unit,Rear WindowInput Test
T
Valve SeatsRepair ...................................................... 6 35.....22-134
WiDer Motor, Rear WindowRep1acement....................................... 22-1 46Adjustment .-.-.......Removal ...-...-......................................-... 6-31 WiDer Motor, windshield6-9
.....6-32 Test.......-..........-.....-.............................22-143Taillight
ThermostaiTest ........................
Inspec!on
Vehicle Speed Signal Circuit
VTC System
Wiper/WasheI
Wi.ing System
10 4 Troubleshooting .....-... ..........................22-65 Component Location In dex ..............22-134Replacement.....-...-....... ...................... 10 IvssThrottle BodyTest ..................Removal/lnstallation .. . . . . . .. ... 11-'165 VTC ActuatorDisassembly/Feassemb|y................-11-166 Inspection
Circuit Diagram .......................... 22-136, 131
Replacement -.............. ............ .............22 61 Wiper/Washor SwitchTesVReplacement .............................. 22-1 40
.................68 WireHarnesses
11-160
Replacement ........................................... 6 24 (Seefirstpageofthislndex)Throttle CableAdjustment ...... ...-.................... 11163 VTC Oil ConlrolSolenoid ValveRemoval/1nsta11ation..........................11164 Removal....-...-... |1-127 HowtoIn{ormation ...............................223Belay and Control UnitLocations .-....-.............. -.-.-....- 22-7, 4, 1 1, 12Beplacement.........-............................... 1767 ComponentLocationlndex.............. 11-117Tie-rod Ball Joint Boots
lnstallation
Replacement
Turn Signal/Hazard Relay
tsTiming/Cam ChainVTEC Solenoid Valve...612 Femoval/lnspection....-......................11-128................ 6 15
Timing/Cam Chain Auto-tensionelRemoval/1nsta11ation..............................6-19 W
Troubleshooting{See first page ot this Index)
Turn Signal Light
Timing/Cam Chain CaseOil SealInstallation......................-......................6,21 Washer Fluid Level SwitchTesVReplacement .............................. 22 1 44Trailing ArmsRemoval/lnstallation .............. . . . . ..... 18 33 Washer Fluid ReservoirReplacement ....................................... 22-1 46tnmComponent Location lndex ................- 20 49 Washer Motor, WindshieldRemoval/lnstallation ..-.......20 50,51,52,53 Test -..............-.............. ........................22 144
Washer Tube, WindshieldReplacement......-...-............................ 22 1 47
W.ter Outlet.........22 A4 Installation ..................-........................... '10-9
InputTest........22-87 lnstallation................ 10IWeter Passage
Wheels andTires
Turn Signal/Hazard Warning Lights Water PumpComponent Location In dex .................22 85 Inspection ........................... .. . . . ....... 10 5Circu it Diagram ................-................... 22-86 Replacement .-......................................... 10 5
U
WheelBearingsInspec|ion ....................................... ....... 18 8
Wheel Speed SensorsInspection ..-..,.,.,,.,,,,,.,.,,,...................... 19-59Replac€ment ........-....... . . . . . . .. -.... 19-59UndeFdash Fuse/R€lay BoxRemoval/lnstaf lation ............................ 22-49
Upper ArmsRemoval/|nsta11ation................. ... 18-32
],sInspect|on