switch HONDA CIVIC 2003 7.G User Guide
[x] Cancel search | Manufacturer: HONDA, Model Year: 2003, Model line: CIVIC, Model: HONDA CIVIC 2003 7.GPages: 1139, PDF Size: 28.19 MB
Page 74 of 1139
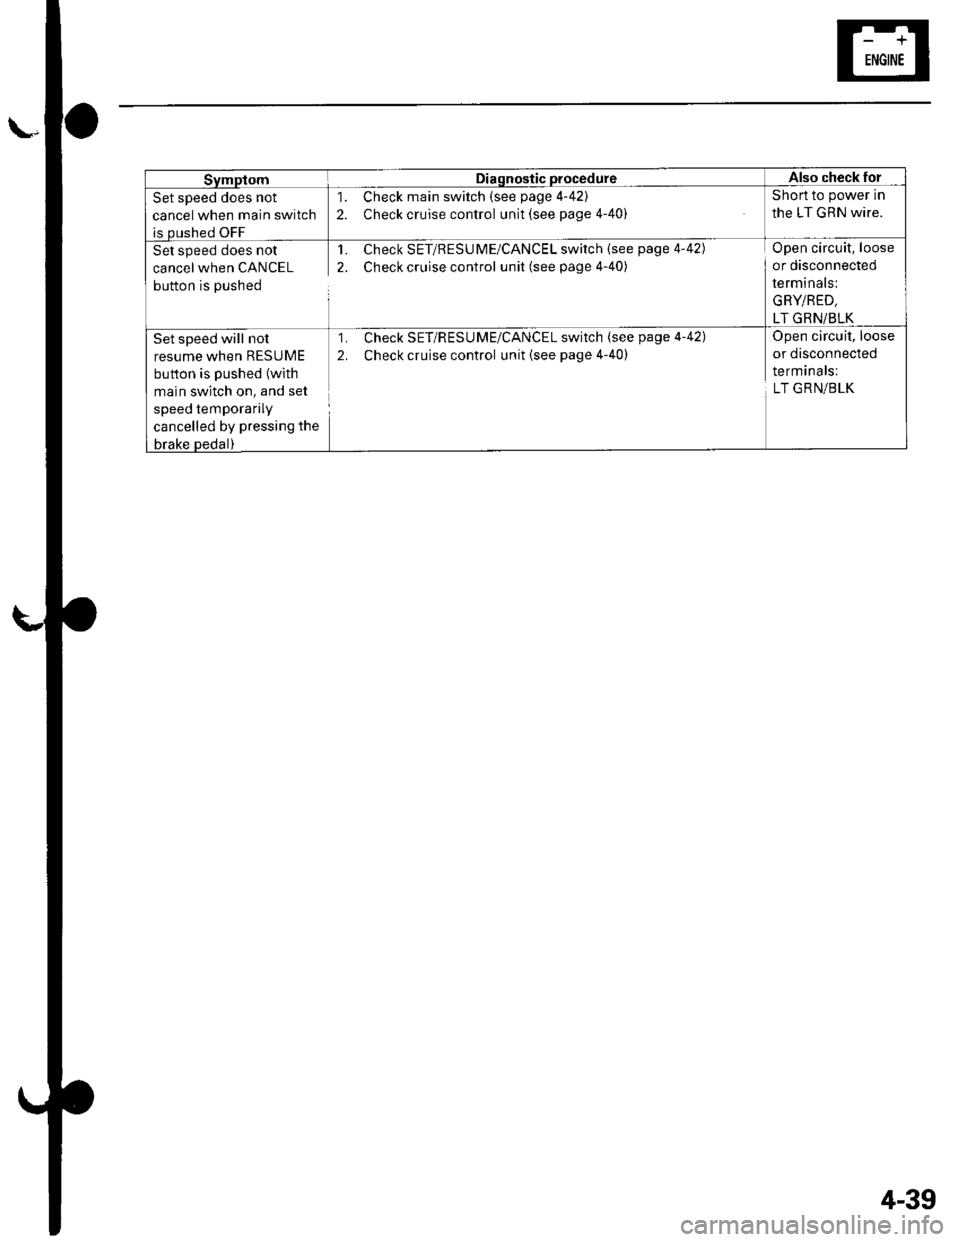
svmptomDiagnostic procedureAlso check for
Set speed does not
cancel when main switch
is oushed OFF
1. Check main switch (see page 4-42)
2. Check cruise control unit (see page 4-40)
Short to power in
the LT GRN wire.
Set speed does not
cancel when CANCEL
button is pushed
1. Check SET/RESU ME/CANCEL switch (see page 4-42)
2. Check cruise control unit (see page 4-40)
Open circuit, loose
or disconnected
terminals:
GRYiRED,
LT GRN/BLK
Set speed will not
resume when RESUME
button is pushed (with
main switch on, and set
speed temporarily
cancelled by pressing the
brake Dedal)
1. Check SET/RESU ME/CANCEL switch (see page 4-42)
2. Check cruise control unit {see page 4-40)
Open circuit, loose
or disconnected
terminals:
LT GRN/BLK
4-39
Page 75 of 1139
Cruise Gontrol
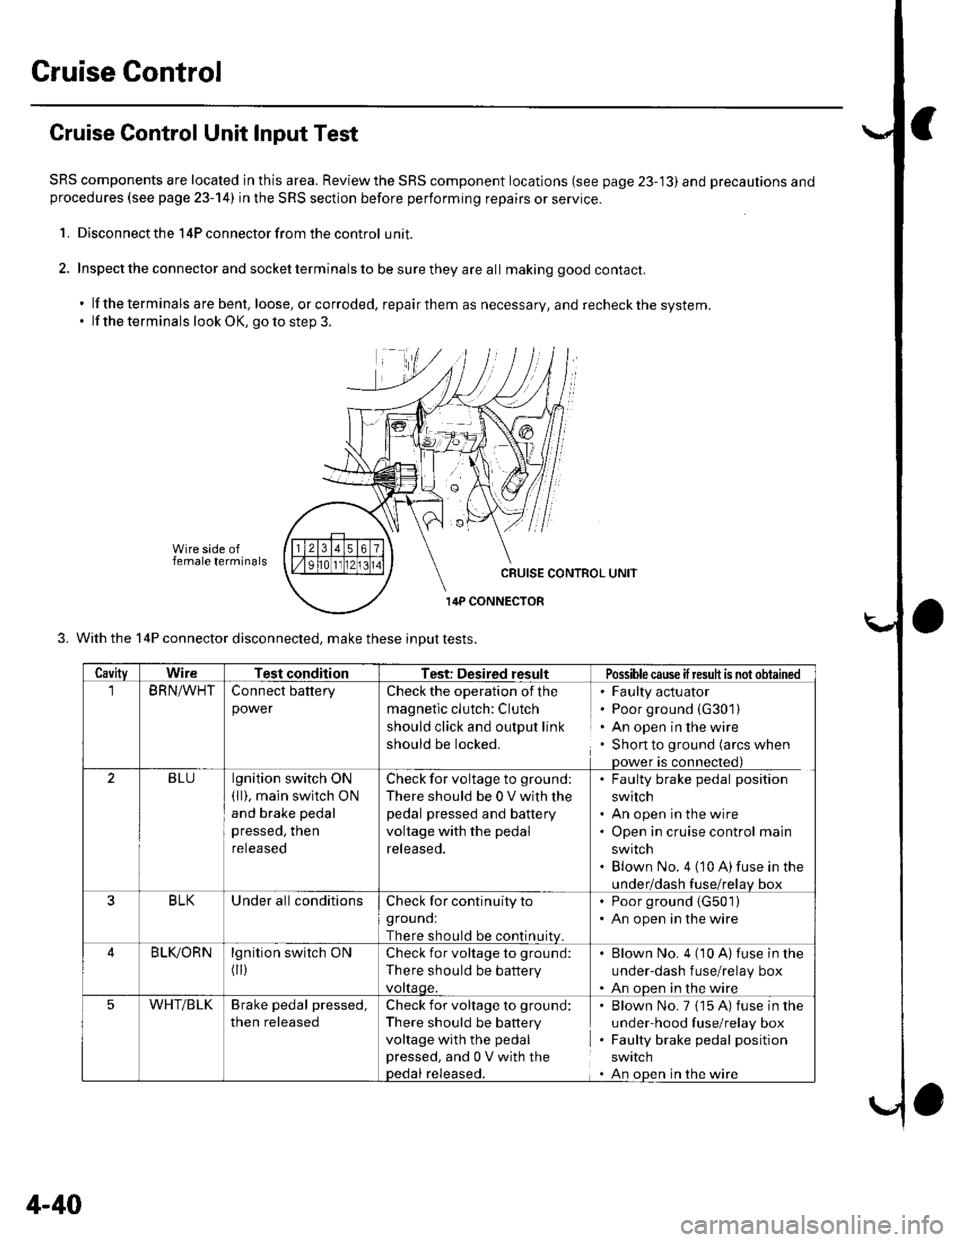
Cruise Control Unit Input Test
SRS components are located in this area. Reviewthe SRS component locations (see page 23-'13) and precautions andprocedures (see page 23-14) in the SRS section before performing repairs or service.
1. Disconnect the 14P connector from the control unit.
2. Inspect the connector and socket terminals to be sure they are all making good contact.
. lf the terminals are bent, loose, orcorroded, repairthem as necessary, and recheckthe system.. lf the terminals look OK, go to step 3.
Wire side offemale terminals
3. With the 14P connector disconnected, make these inDut tests.
CavityWireTest conditionTest: Desired resultPossiblecause ifresuh is not obtained
BRN/WHTConnect battery
power
Check the operation of the
magnetic clutch: Clutch
should click and output link
should be locked.
' Faulty actuator. Poor ground (G301)
. An open in the wire. Shon to ground (arcs when
Dower is connected)
2BLUlgnition switch ON(ll), main swltch ON
and brake pedal
pressed, then
reteaseo
Check for voltage to ground;
There should be 0 V with lhe
pedal pressed and battery
voltage with the pedal
released.
. Faulty brake pedal position
switch. An open in the wire. Open in cruise control main
swrtcn. Blown No. 4 (10 A)fuse in the
under/dash fuse/relav box
3BLKUnder all conditionsCheck for continuity to
grouno:
There should be continuitv
. Poor ground (G501)
. An open in the wire
BLIVORNlgnition switch ON
flr)
Check for voltage to ground:
There should be battery
vottaqe.
Blown No. 4 (10 A)fuse in the
under-dash f use/relay box
An oDen in the wire
5WHT/BLKBrake pedal pressed,
then released
Check for voltage to ground:
There should be battery
voltage with the pedal
pressed, and 0 V with thepedal released.
Blown No. 7 {15 A) fuse in the
under-hood fuse/relay box
Faulty brake pedal position
SWIICN
An oDen in the wire
4-40
Page 76 of 1139
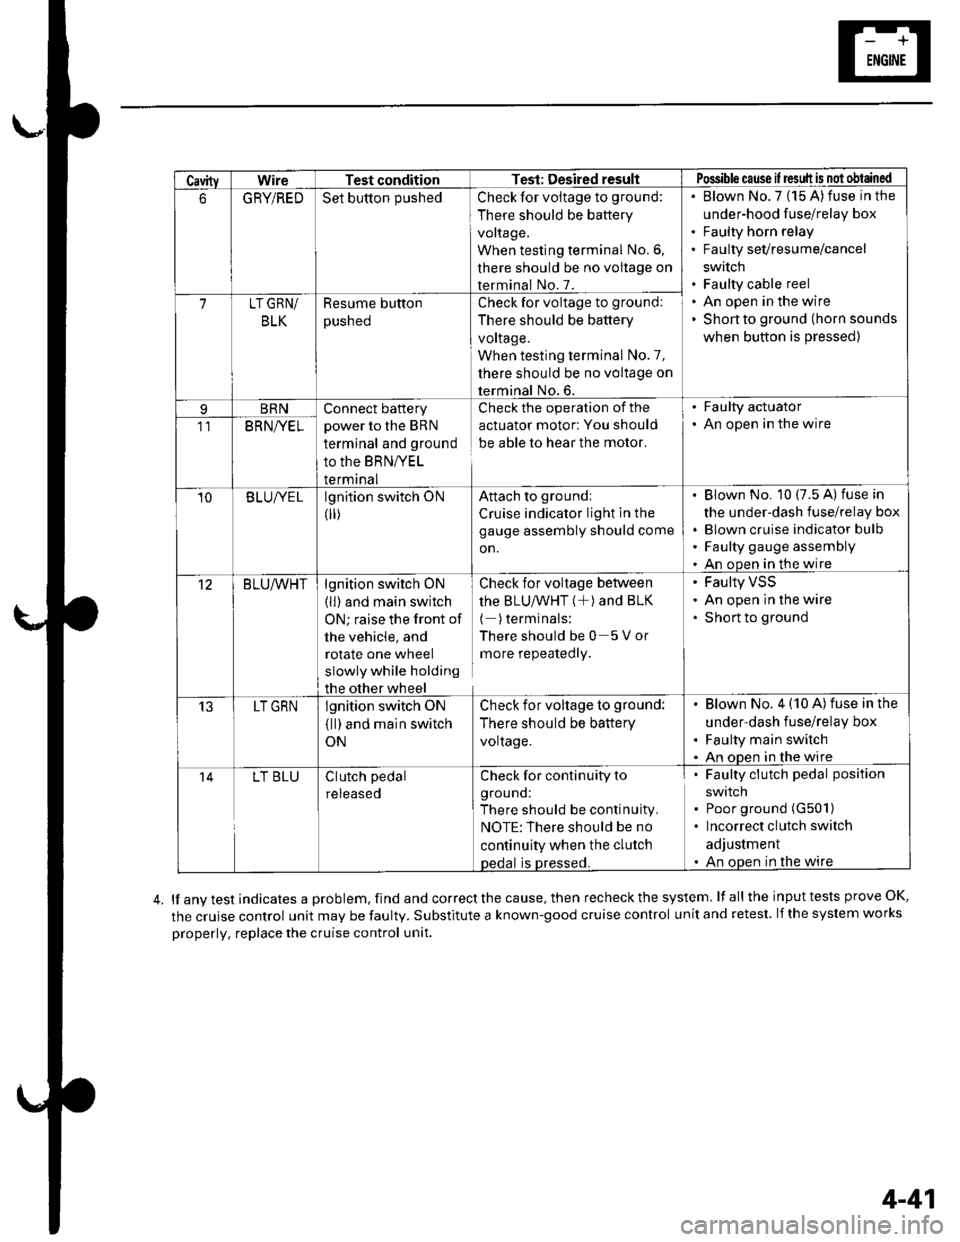
CavityWireTest conditionTest: Desired resultPossible cause il result is not obtained
6GRYiREDSet button pushedCheck for voltage to ground:
There should be battery
voltage,
When testing terminal No.6,
there should be no voltage on
terminal No. 7.
Blown No.7 (15 A)fuse in the
under-hood fuse/relay box
Faulty horn relay
Faulty sevresume/cancel
swrtch
Faulty cable reel
An open in the wire
Shon to ground (horn sounds
when button is pressed)
7LT GRN/
BLK
Resume button
pusneo
Check for voltage to ground:
There should be battery
voltage.
When testing terminal No.7,
there should be no voltage on
terminal No. 6.
BRNConnect battery
power to the BRN
terminal and ground
to the BRNIVEL
termrnal
Check the operation of the
actuator motor: You should
be able to hear the motor.
. Faulty actuator. An open in the wire11BRNI/EL
10B LUIVE Llgnition switch ON
0r)
Attach to groundi
Cruise indicator light in the
gauge assembly should come
on.
Blown No. 10 (7.5 A) fuse in
the under-dash fuse/relay box
Blown cruise indicator bulfl
Faulty gauge assembly
An open in the wire
12BLU/VVHTlgnition switch ON
(ll) and main switch
ON; raise the front of
the vehicle, and
rotate one wheel
slowly while holding
the other wheel
Check for voltage between
thE BLU/VVHT (+) ANd BLK
( )terminals:
Thereshouldbe0 5Vor
more repeatedly.
Faulty VSS
An open in the wire
Short to ground
13LT GRNlgnition switch oN
{ll) and main switch
ON
Check for voltage to ground:
There should be battery
voltage.
Blown No. 4 (10 A)fuse in the
under-dash fuse/relay box
Faulty main switch
An oDen in the wire
14LT BLUClutch pedal
reteaseo
Check for continuity to
grouno:
There should be continuity.
NOTE:There should be no
continuity when the clutch
oedal is Dressed.
Faulty clutch pedal position
swtlcn
Poor ground (G501)
Incorrect clutch switch
adjustment
An open in the wire
lf any test indicates a problem, find and correct the cause, then recheck the system. lf all the input tests prove OK,
the cruise control unit may be faulty. Substitute a known-good cruise control unit and retest. lf the system works
properly, replace the cruise control unit.
4-41
Page 77 of 1139
Cruise Control
1.
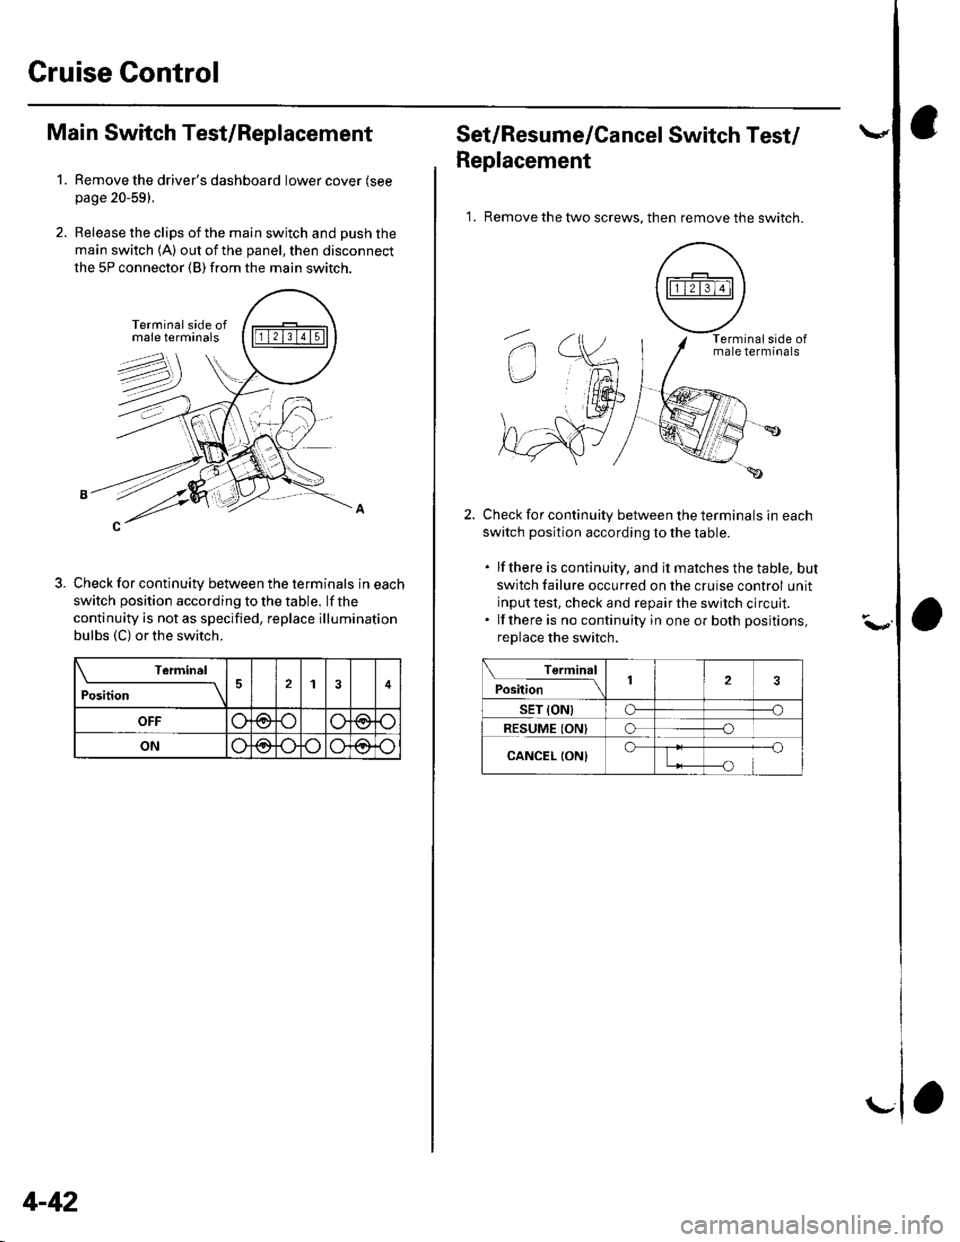
Main Switch Test/Replacement
Remove the driver's dashboard lower cover (see
page 20-59).
Release the clips of the main switch and push the
main switch 1A) out of the panel, then disconnect
the 5P connector (B) from the main switch.
Check for continuity between the terminals in each
switch position according to the table. lf the
continuity is not as specified, replace illumination
bulbs (C) or the switch.
\-------11v1
Position14
OFF(9@
ONo@o\Jo
4-42
r\--
Set/Resume/Cancel Switch Test/
Replacement
1. Remove the two screws. then remove the switch.
Check for continuity between the terminals in each
switch position according to the table.
. lfthere is continuity, and it matches the table, but
switch failure occurred on the cruise control unit
input test, check and repair the switch circult.. lf there is no continuity in one or both positions,
replace the switch.
Terminal
;"itl* '\2
sET (ONtCF--o
RESUME ION)o--o
CANCEL {ON}o
Page 80 of 1139
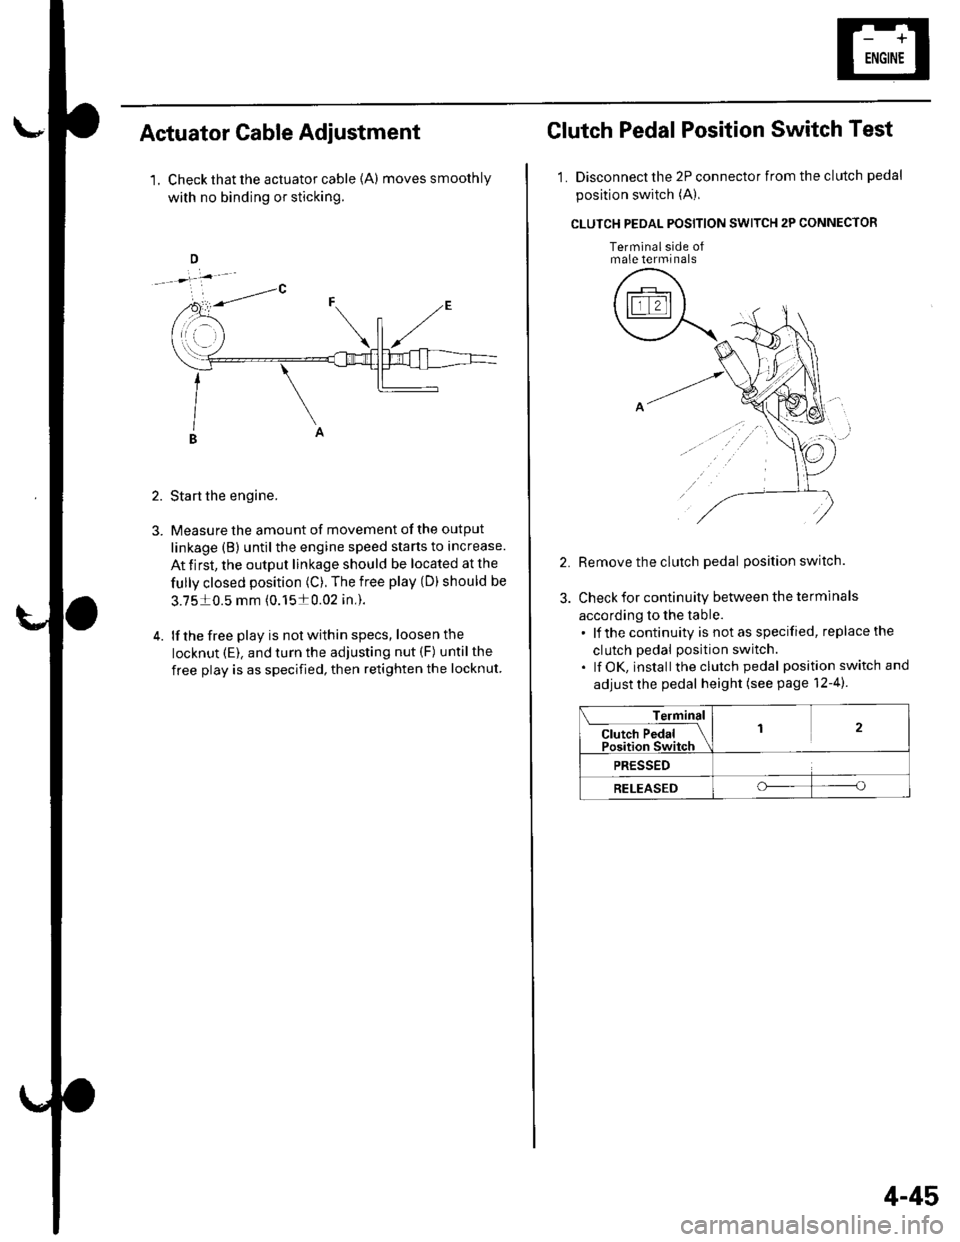
Actuator Cable Adiustment
1. Check that the actuator cable {A) moves smoothly
with no binding or sticking.
2. Start the engine.
3. Measure the amount of movement of the output
linkage (B) until the engine speed starts to increase.
At first, the output linkage should be located at the
fully closed position (C). The free play (D) should be
3.7510.5 mm (0.1510.02 in,).
4. lf the free play is not within specs, loosenthe
locknut (E). and turn the adjusting nut (F) untilthe
free play is as specified, then retighten the locknut
Clutch Pedal Position Switch Test
1. Disconnect the 2P connector from the clutch pedal
position switch (A),
CLUTCH PEOAL POSITION SWITCH 2P CONNECTOR
Terminalside ofmale terminals
Remove the clutch pedal position switch.
Check for continuity between the terminals
according to the table.. lf the continuity is not as specified, replace the
clutch pedal position switch.. lf OK, install theclutch pedal position switch and
adjust the pedal height (see page 12-4).
Terminal
Cl"t"h P"d"l IPosition Switch
12
PRESSED
RELEASEDoo
4-45
Page 95 of 1139
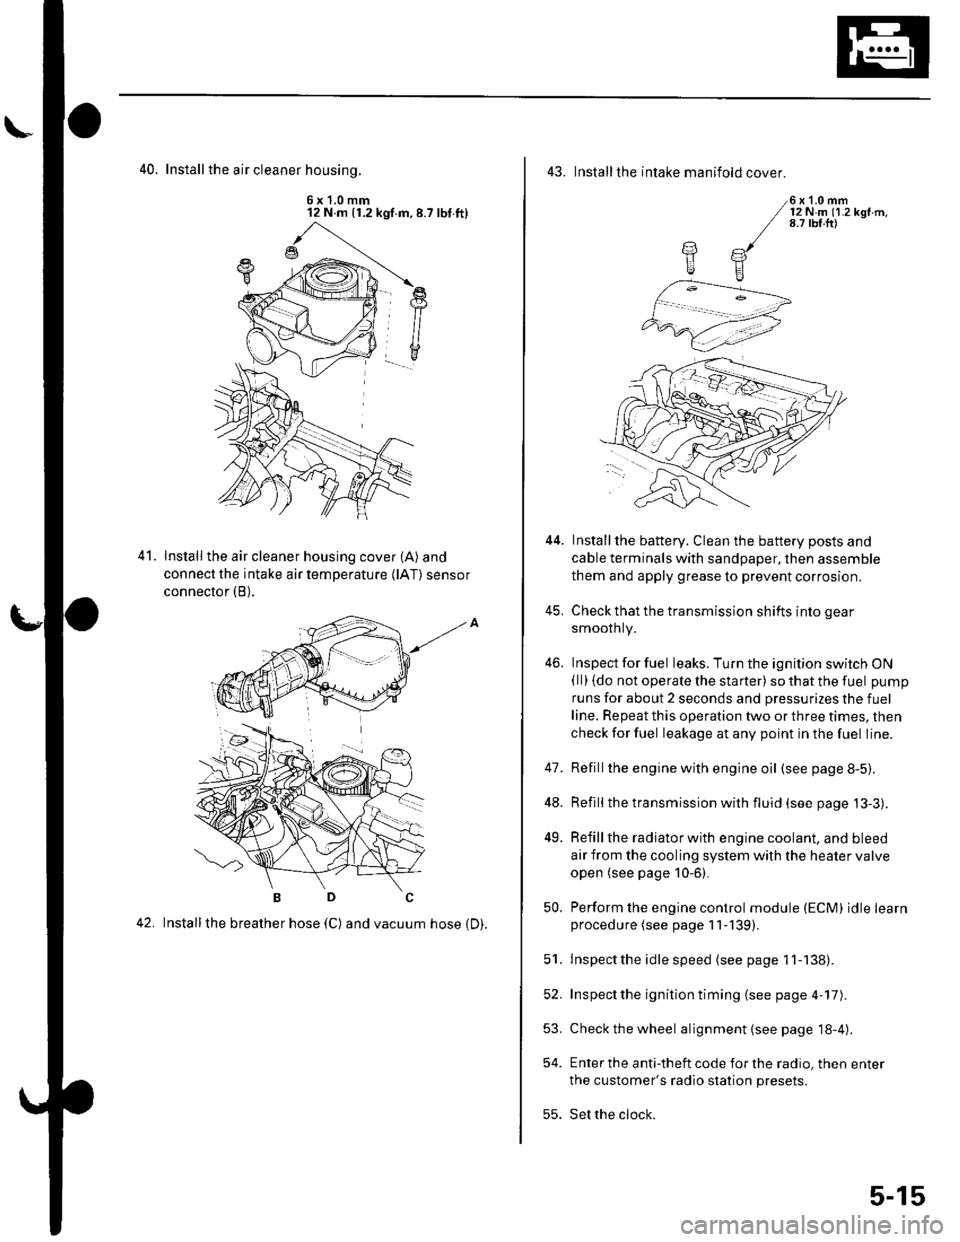
40. Install the air cleaner housinq.
6x1.0mm12 N m (1.2 kgf.m,8.7 lbt.ft)
Install the air cleaner housing cover (A) and
connect the intake air temperature (lAT) sensor
connector (B),
42. Installthe breather hose (C) and vacuum hose 1D).
41.
43. Installthe intake manifold cover.
6x1.0mm12Nm11.2kgf.m.8.7 tbf.ft)
Installthe battery. Clean the battery posts and
cable terminals with sandpaper, then assemble
them and apply grease to prevent corrosion.
Check that the transmission shifts into gear
smoothly.
Inspect for fuel leaks. Turn the ignition switch ON(ll) {do not operate the starter) so that the fuel pump
runs for about 2 seconds and pressurizes the fuel
line. Repeat this operation two or three times, then
check for fuel leakage at any point in the fuel line.
Refillthe engine with engine oil (see page 8-5).
Refill the transmission with fluid (see page 13-3).
Refill the radiator with engine coolant, and bleed
air from the cooling system with the heater valve
open (see page 10-6).
Perform the engine control module (ECM) idle learnprocedure (see page 11-139).
Inspect the idle speed (see page 1 1-138).
Inspect the ignition timing (see page 4-17).
Check the wheel alignment {see page 18-4).
Enter the anti-theft code for the radio, then enter
the customer's radio station presets.
Set the clock.
YE
44.
41.
]tE
46.
48.
49.
52.
53.
54.
50.
51.
55.
5-15
Page 101 of 1139
Cylinder Head
Engine Compression Inspection
1. Warm up the engine to normal operating
temperature (cooling fan comes on).
2. Turn the ignition switch OFF.
3. Remove the intake manifold cover (see step 1 onpage 6-22).
4, Disconnect all four injector connectors.
5. Start the engine, and let it run until it stalls.
6. Remove the iour ignition coils (see page 4-18).
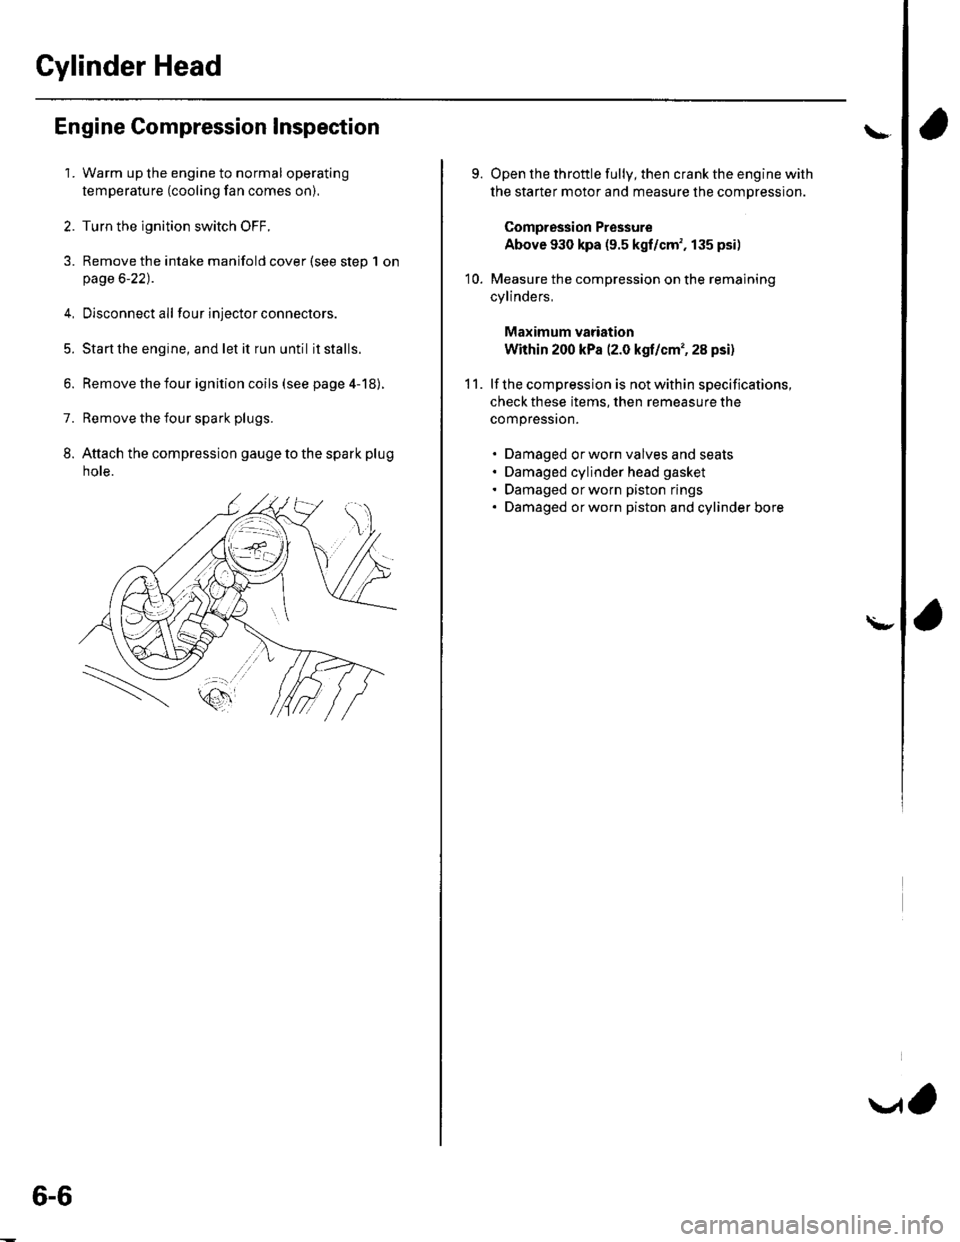
7. Remove the four spark plugs.
8. Attach the compression gauge to the spark plug
note.
6-6
V,
\
9.
10.
Open the throttle fully, then crank the engine with
the starter motor and measure the compression.
Compression Pressure
Above 930 kpa (9.5 kgf/cm', 135 psi)
Measure the compression on the remaining
cylinders,
Maximum vadation
Within 200 kPa (2.0 kgf/cm', 28 psi)
lf the compression is not within specifications,
check these items, then remeasure the
compressron.
. Damaged orworn valves and seats. Damaged cylinder head gasket. Damaged or worn piston rings. Damaged orworn piston and cylinder bore
11.
\-
Page 136 of 1139
14. Installthe water bvpass hose.
15. Installthe air cleaner housing (see step 37 on page
5-15).
16. Installthe intake manifold (see page 9-5).
17. Installthe exhaust manifold (see page 9-7).
'18. Installthe cam chain (see page 6-15).
19. Adjust the valve clearance (seepage6-9).
20. Installthe drive belt (see page 4-26).
21. Clean the battery posts and cable terminals with
sandpaper, then assemble them and apply grease
to prevent corrosion.
22. After installation, checkthatall tubes, hosesand
connectors are installed correctly.
23. Inspectforfuel leaks. Turn the ignition switch ON
{ll) {do not operate the starter) so that the fuel pump
runs for about 2 seconds and pressurizes the fuel
line. Repeat thls operation two or three times, then
check for fuel leakage at any point in the fuel line.
24. Refillthe radiator with engine coolant, and bleed
air from the cooling system with the heater valve
open (see page 10-6).
25. Inspect the idle speed (see page 11-'138).
26. Inspect the ignition timing (see page 4-17).
Gylinder Head Cover lnstallation
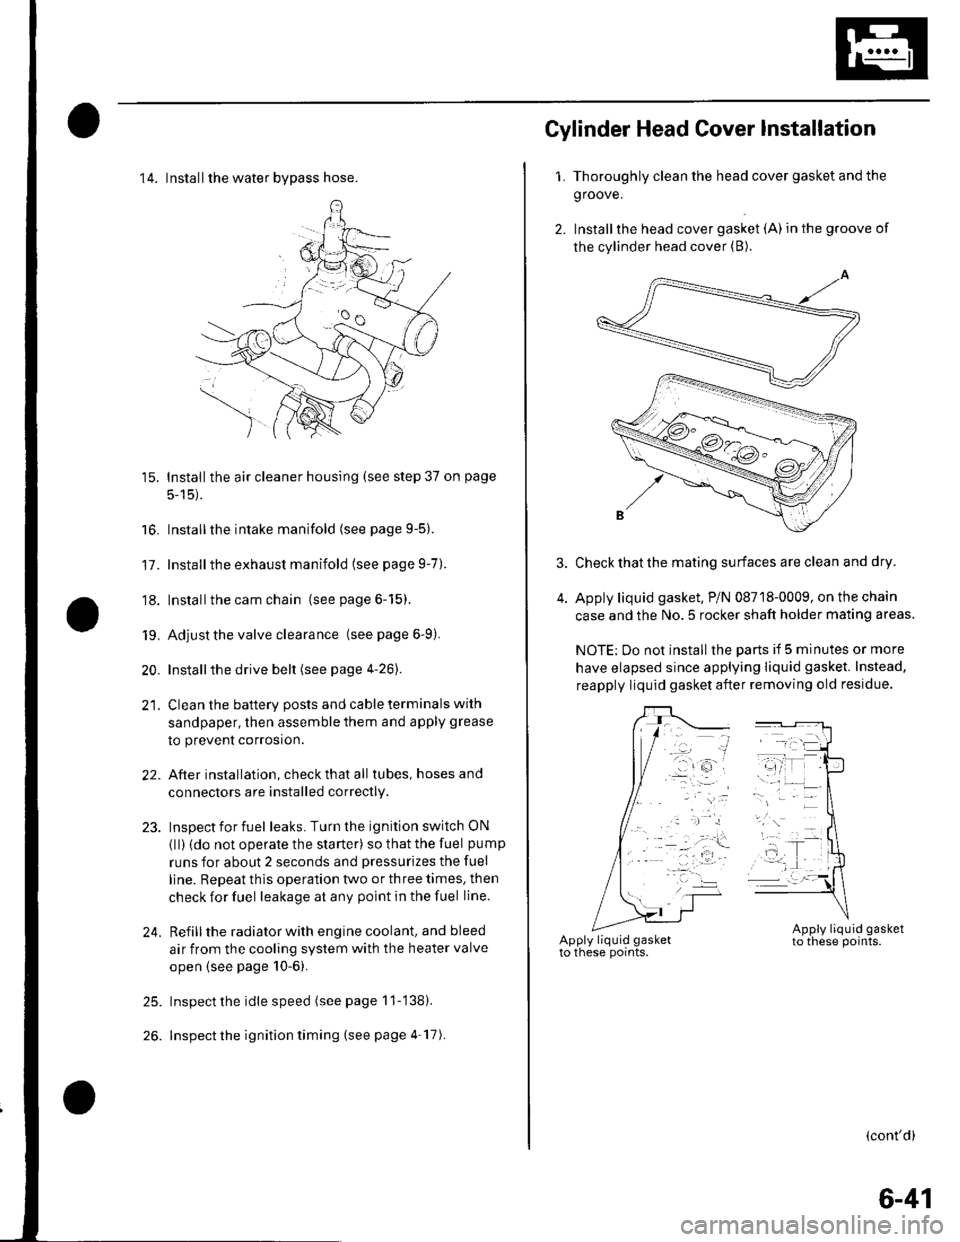
1. Thoroughly clean the head cover gasket and the
groove.
2. Installthe head cover gasket (A) in the groove of
the cylinder head cover (B).
Check that the mating surfaces are clean and dry.
Apply liquid gasket. P/N 08718-0009, on the chain
case and the No.5 rocker shaft holder mating areas.
NOTE: Do not install the parts if 5 minutes or more
have elapsed since applying liquid gasket. Instead,
reapply liquid gasket after removing old residue.
(cont'd)
6-41
Page 169 of 1139
![HONDA CIVIC 2003 7.G User Guide Component Location Index
OIL PUMPCHAIN TENSIONER
DRAIN BOLT
OIL PANRemoval, page 7 11Installataon, page 7-27
OIL PUMPOverhaLrl, page 8-8
HL]
BAFFLE PLATE
OIL FILTER FEED PIPEReplacement, page 8-7
OIL HONDA CIVIC 2003 7.G User Guide Component Location Index
OIL PUMPCHAIN TENSIONER
DRAIN BOLT
OIL PANRemoval, page 7 11Installataon, page 7-27
OIL PUMPOverhaLrl, page 8-8
HL]
BAFFLE PLATE
OIL FILTER FEED PIPEReplacement, page 8-7
OIL](/img/13/5744/w960_5744-168.png)
Component Location Index
OIL PUMPCHAIN TENSIONER
DRAIN BOLT
OIL PANRemoval, page 7 11Installataon, page 7-27
OIL PUMPOverhaLrl, page 8-8
HL]
BAFFLE PLATE
OIL FILTER FEED PIPEReplacement, page 8-7
OIL FILTERReplacement, page 8-6
OIL CONTROLORIFICE
WASHER
OIL PRESSURE SWITCHSwitch Test, page 8 4Oil Pressure test, page 8'4Replacement, page 8 16
-&\JrI
--t N\ksrarr lN-?cKEr dczt$)
#1
\OIL PUMPCHAIN GUIDE
8-3
Page 170 of 1139
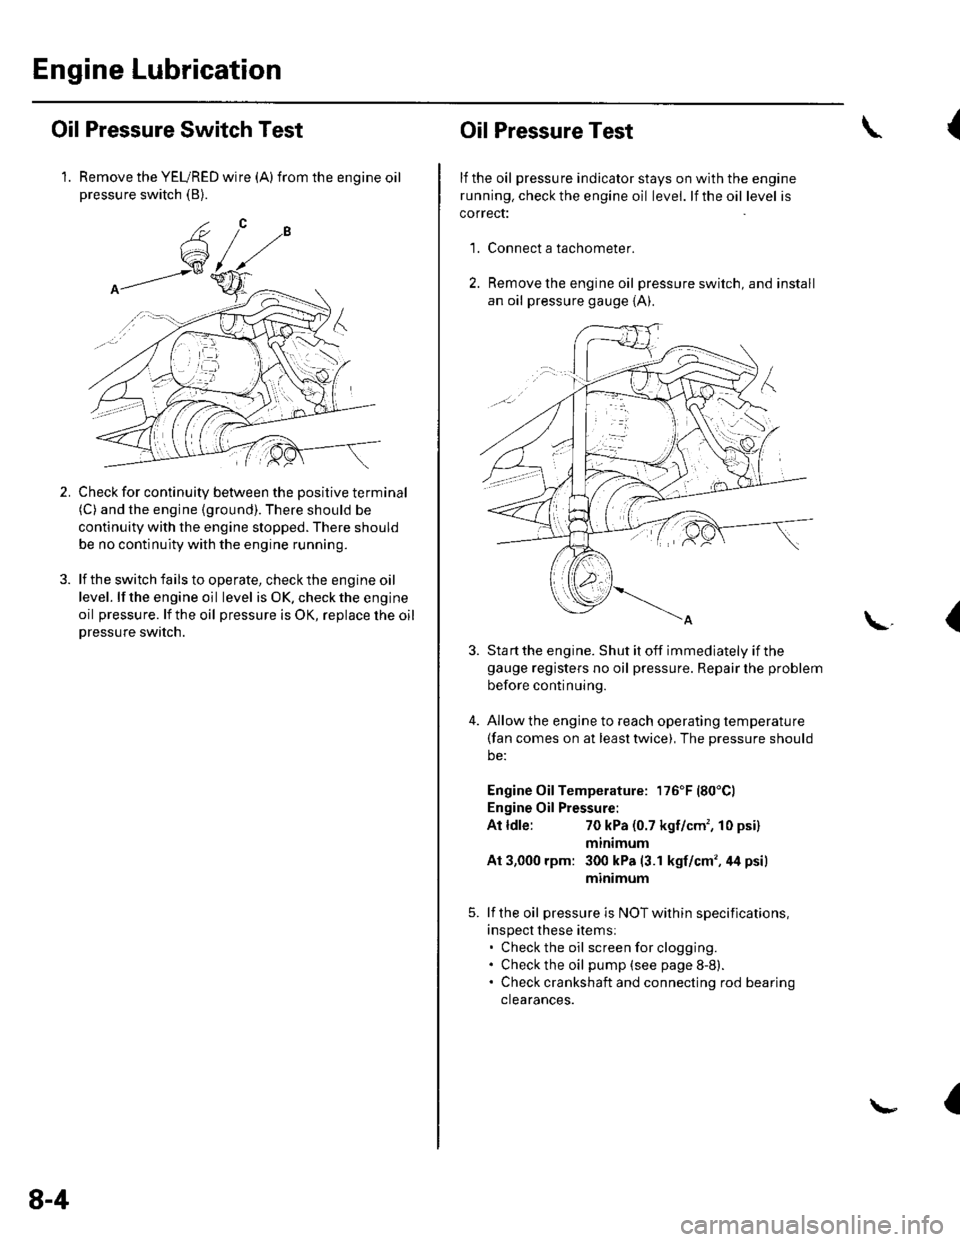
Engine Lubrication
Oil Pressure Switch Test
1. Remove the YEURED wire (A)from the engine oilpressure switch (B).
Check for continuity between the positive terminal(C) and the engine (ground). There should be
continuity with the engine stopped. There should
be no continuity with the engine running.
lf the switch fails to operate, check the engine oil
level. lf the engine oil level is OK. check the engine
oil pressure. lf the oil pressure is OK, replace lhe oil
Dressure switch.
2.
8-4
Oil Pressure Test
lf the oil pressure indicator stays on with the engine
running. check the engine oil level. lf the oil level is
correct:
Connect a tachometer.
Remove the engine oil pressure switch, and install
an oil pressure gauge {A).
{
'1.
\.(
4.
Sta rt the engine. Shut it off immediately if thegauge registers no oil pressure. Repair lhe problem
before continuing.
Allow the engine to reach operating temperature(fan comes on at least twice), The pressure should
be:
Engine Oil Temperature: 176'F (80'Cl
Engine Oil Pressure:
At ldle:70 kPa (0.7 kgf/cm', 10 psi)
mtntmum
At 3,000 rpm: 300 kPa (3.1 kgf/cm',44 psi)
minimum
lf the oil pressure is NOT within specifications,
inspect these items:. Check the oil screenforclogging.. Check the oil pump (see page 8-8).. Check crankshaft and connecting rod bearing
clearances.
I