HONDA CIVIC 2003 7.G Workshop Manual
Manufacturer: HONDA, Model Year: 2003, Model line: CIVIC, Model: HONDA CIVIC 2003 7.GPages: 1139, PDF Size: 28.19 MB
Page 821 of 1139
Heating and Air Gonditioning
Compressor Clutch Overhaul (cont'd)
5. Reassemble the clutch in the reverse order of
disassembly, and note these items:
. Installthe field coil with the wire side facing
down, and align the boss on the field coil with the
hole in the compressor.. Clean the rotor pulley and compressor sliding
surfaces with contact cleaner or other
non-petroleum solvent..Install new snap rings, note the installation
direction, and make sure they are fully seated in
the groove.
. Make sure that the rotor pulley turns smoothly
after it's reassembled,. Route and clamp the wires properly or they can
be damaged by the rotor pulley.
21-50
Page 822 of 1139
Compressor Thermal Protector
Replacement
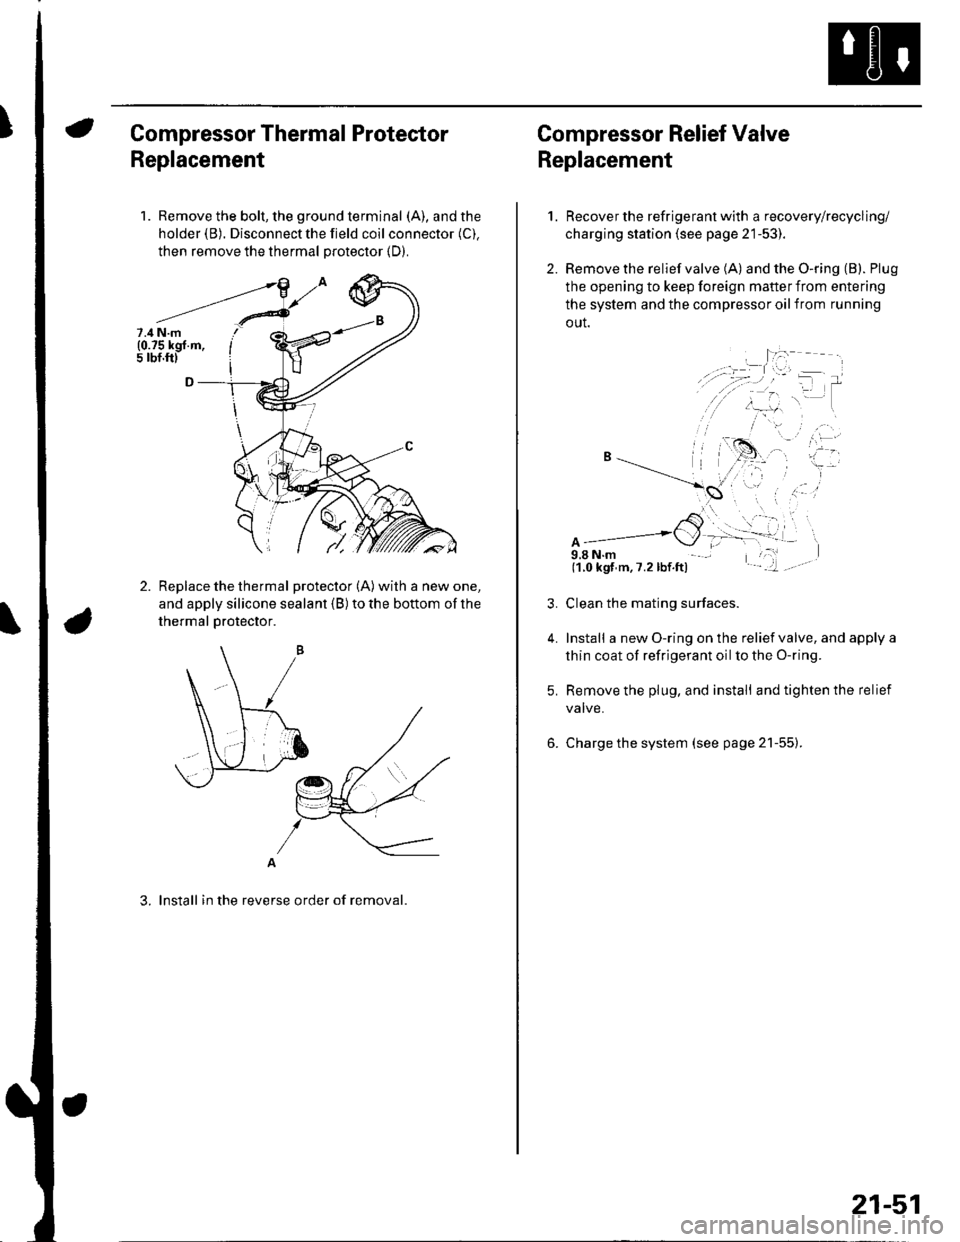
1. Remove the bolt, the ground terminal (A), and the
holder (B). Disconnect the field coil connector (C).
then remove the thermal protector (D).
Replace the thermal protector (A) with a new one,
and apply silicone sealant (B) to the bottom of the
thermal Drotector.
A
3. lnstall in the reverse order of removal.
7.4 N.m(0.75 kgf.m,5 rbf.ftl
Compressor Relief Valve
Replacement
2.
1.
4.
Recover the refrigerant with a recovery/recycling/
charging station (see page 21-53).
Remove the relief valve (A) and the O-ring (B). Plug
the opening to keep foreign mafter from entering
the system and the compressor oil from running
out.
A9,8 N.m(1.0 kgf m,7.2lbf.ft)
Clean the mating surfaces.
Install a new O-ring on the relief valve, and apply a
thin coat of refrigerant oil to the O-ring.
Remove the plug, and install and tighten the relief
valve.
Charge the system (see page 21-55).
21-51
Page 823 of 1139
Heating and Air Conditioning
Gondenser Replacement
1.
6x1.0mm9.8 N.m ('1.0 kgf.m,7.2lbf.ft)
Recover the refrigerant with a recovery/recycling/
charging station (see page 21-53).
Remove the front bumper {see page 20-85).
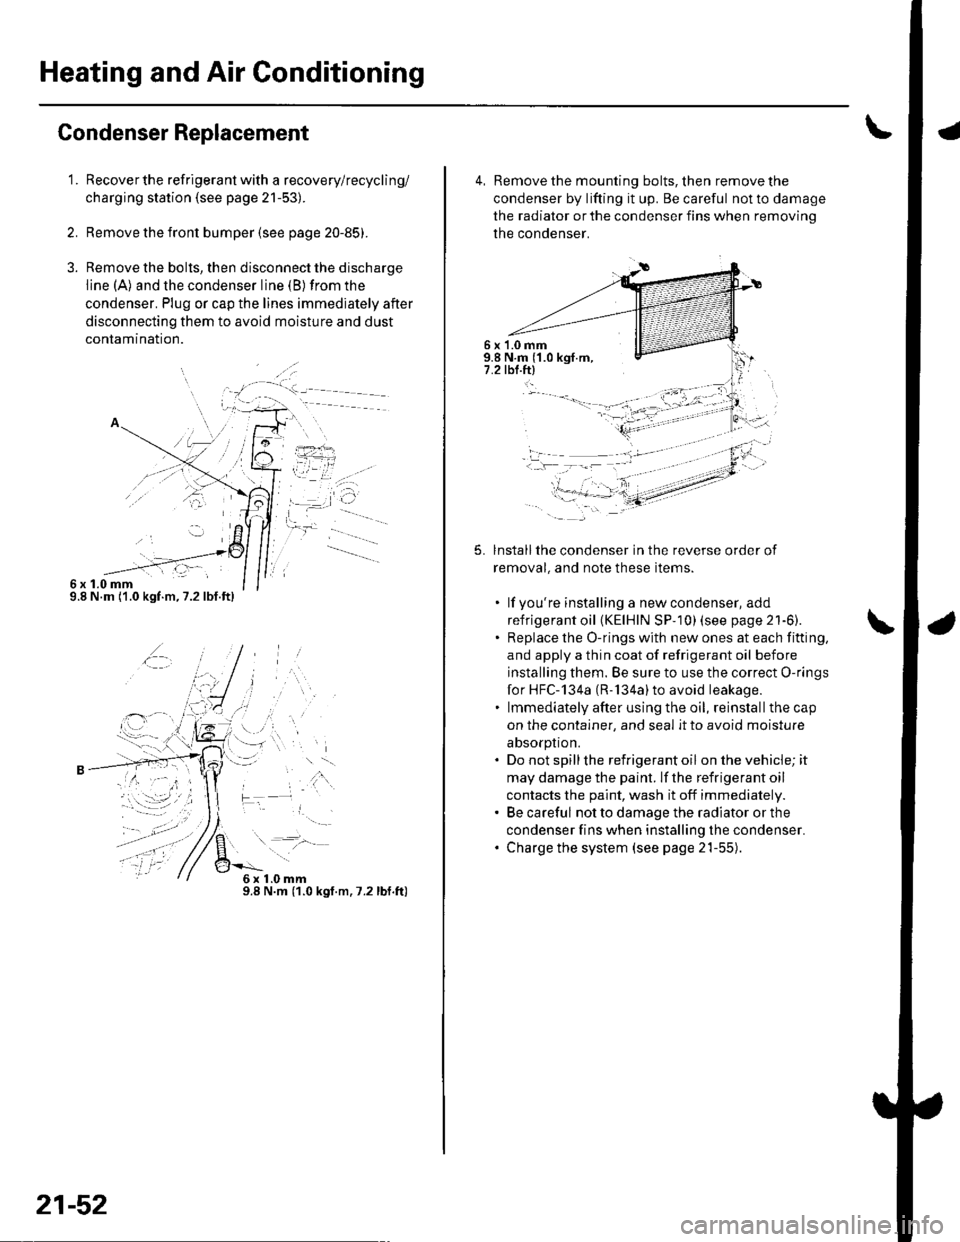
Remove the bolts, then disconnect the discharge
line (A) and the condenser line (B) from the
condenser. Plug or cap the lines immediately after
disconnecting them to avoid moisture and dust
conlamtnaflon.
,t\
6x1.0mm9.8 N.m (1.0 kgt.m.7.2lbf.ft)
21-52
4, Remove the mounting bolts, then remove the
condenser by lifting it up. Be careful not to damage
the radiator or the condenser fins when removino
the condenser.
6 x '1.0 mm9.8 N.m ('1.0 kgf.m,7.2 tbl.ftl
5.lnstallthe condenser in the reverse order of
removal, and note these items.
. lf you're installing a newcondenser, add
refrigerant oil (KElHlN SP- 10) lsee page 21'6).. Replace the O-rings with new ones at each fitting,
and apply a thin coat of refrigerant oil before
installing them. Be sure to use the correct O-rings
for HFC-134a (R-'134a)to avoid leakage.. lmmediately after using the oil, reinstallthe cap
on the container, and seal it to avoid moisture
absorption.. Do not spillthe refrigerant oil onthevehicle;it
may damage the paint. lf the refrigerant oil
contacts the paint, wash it off immediately.. Be careful not to damage the radiator or the
condenser fins when installing the condenser.. Charge the system (see page 21-55).
t -"'.
f,
t-
-li .:)-:.-- ---- - -'
Page 824 of 1139
Refrigerant Recovery
Air conditioning refrigerant or lubricant vapor
can irritate your eyes, nose. or throat.
Be careful when connecting service equipment.
Do not breathe refrigerant or vapor
Use only service equipment that is U.L.-listed and is
certified to meet the requirements of SAE J2210 to
remove HFC-134a (R-134a) from the air conditioning
system.
lf accidental system discharge occurs, ventilate the
work area before resuming service
Additional health and safety information may be
obtained from the refrigerant and lubricant
manufacturers.
1!l r: i t: -:
-'', -
-
(
'=i
r
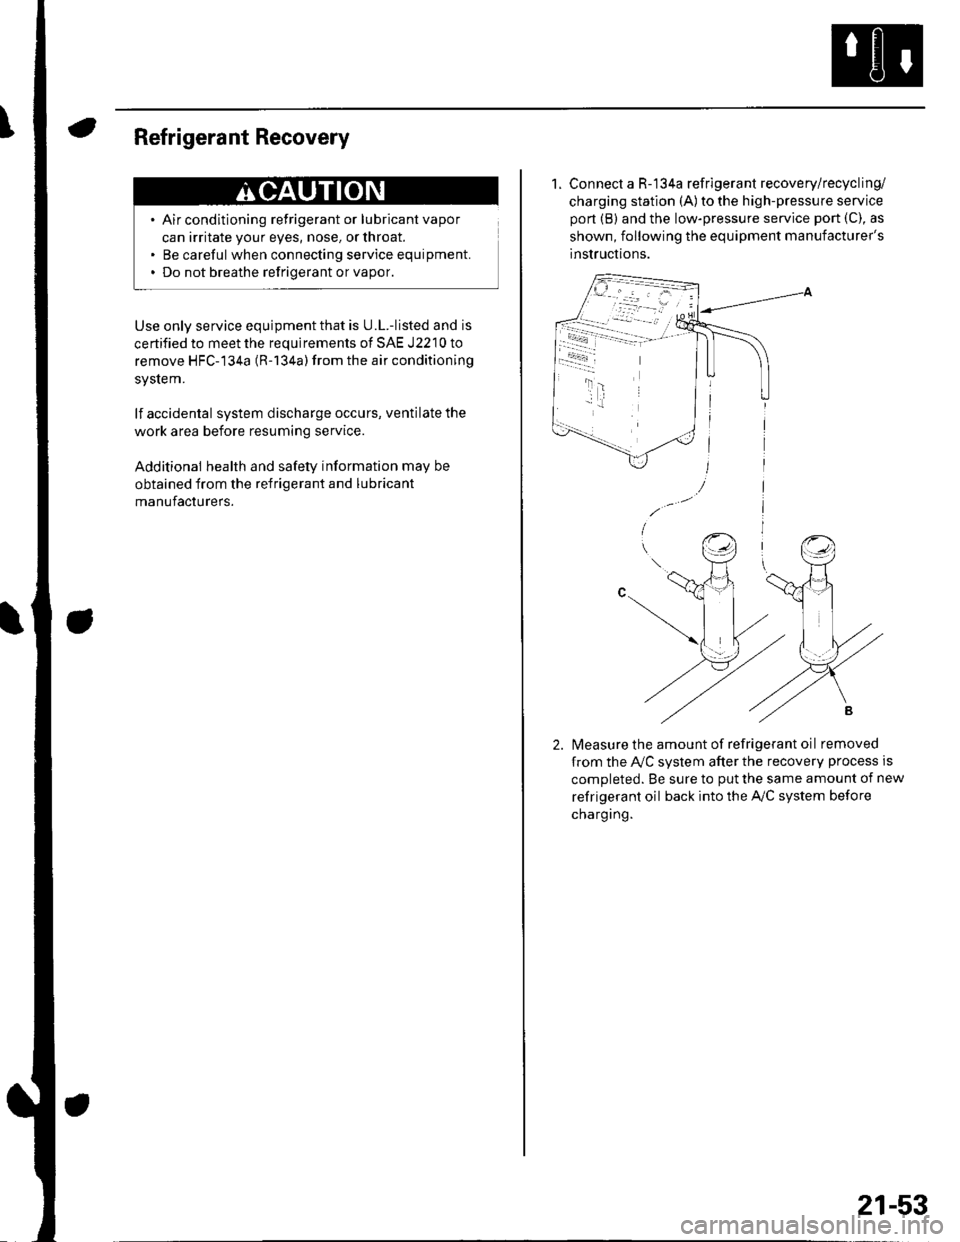
1. Connect a R-134a refrigerant recovery/recycling/
charging station {A) to the high-pressure service
port (B) and the low-pressure service port (C), as
shown, following the equipment manufacturer's
instructions.
lvleasure the amount of refrigerant oil removed
from the Ay'C system after the recovery process is
completed. Be sure to put the same amount of new
refrigerant oil back into the Ay'C system before
chargrng.
21-53
Page 825 of 1139
Heating and Air Conditioning
System Evacuation
Use only service equipment that is U.L.-listed and is
certified to meet the requirements of SAE J2210 to
remove HFC-134a (R-134a)from the air conditioninq
system.
lf accidental system discharge occurs, ventilate the
work area before resuming service.
Additional health and safety information may be
obtained from the refrigerant and lubricant
manufacturers.
1. When an Ay'C system has been opened to the
atmosphere, such as during installation or repair, it
must be evacuated using a R-134a refrigerant
recovery/recycling/charging station (lf the system
has been open for several days, the receiver/dryer
should be replaced, and the system should be
evacuated for several hours.)
. Air conditioning refrigerant or lubricant vapor
can irritate your eyes, nose, or throat.. Be carefulwhen connecting service equipment.. Do not breathe refrigerant or vapor.
21-54
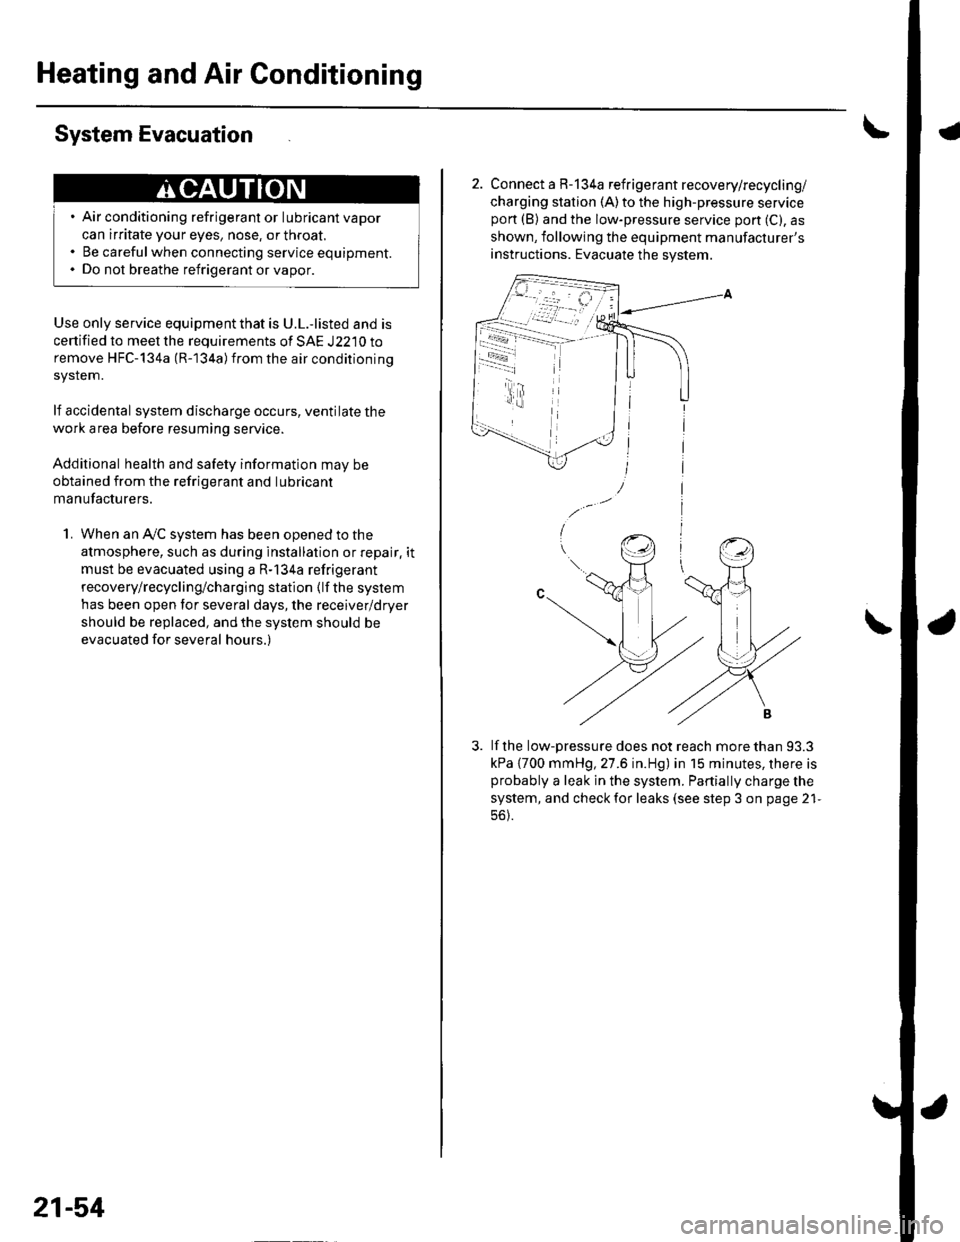
2. Connect a R-134a refrigerant recovery/recycling/
charging station (A)to the high-pressure servicepon (B) and the low-pressure service port (C), as
shown, following the equipment manufacturer's
instructions. Evacuate the system.
lf the low-pressure does not reach more than 93.3
kPa {700 mmHg, 27.6 in.Hg) in 15 minutes, there isprobably a leak in the system. Partially charge the
system, and check for leaks (see step 3 on page 21-
56).
-i - r4.t
Page 826 of 1139
System Charging
Air conditioning refrigerant or lubricant vapor
can irritate your eyes, nose, or throat.
Be carefulwhen connecting service equipment.
Do not breathe refrigerant or vapor,
Use only service equipment that is U.L.'listed and is
certified to meet the requirements of SAE J2210 to
remove HFC-134a {R-134a) from the air conditioning
system.
lf accidental system discharge occurs, ventilate the
work area before resuming service
Additional health and safety information may be
obtained from the refrigerant and lubricant
manufacturers.
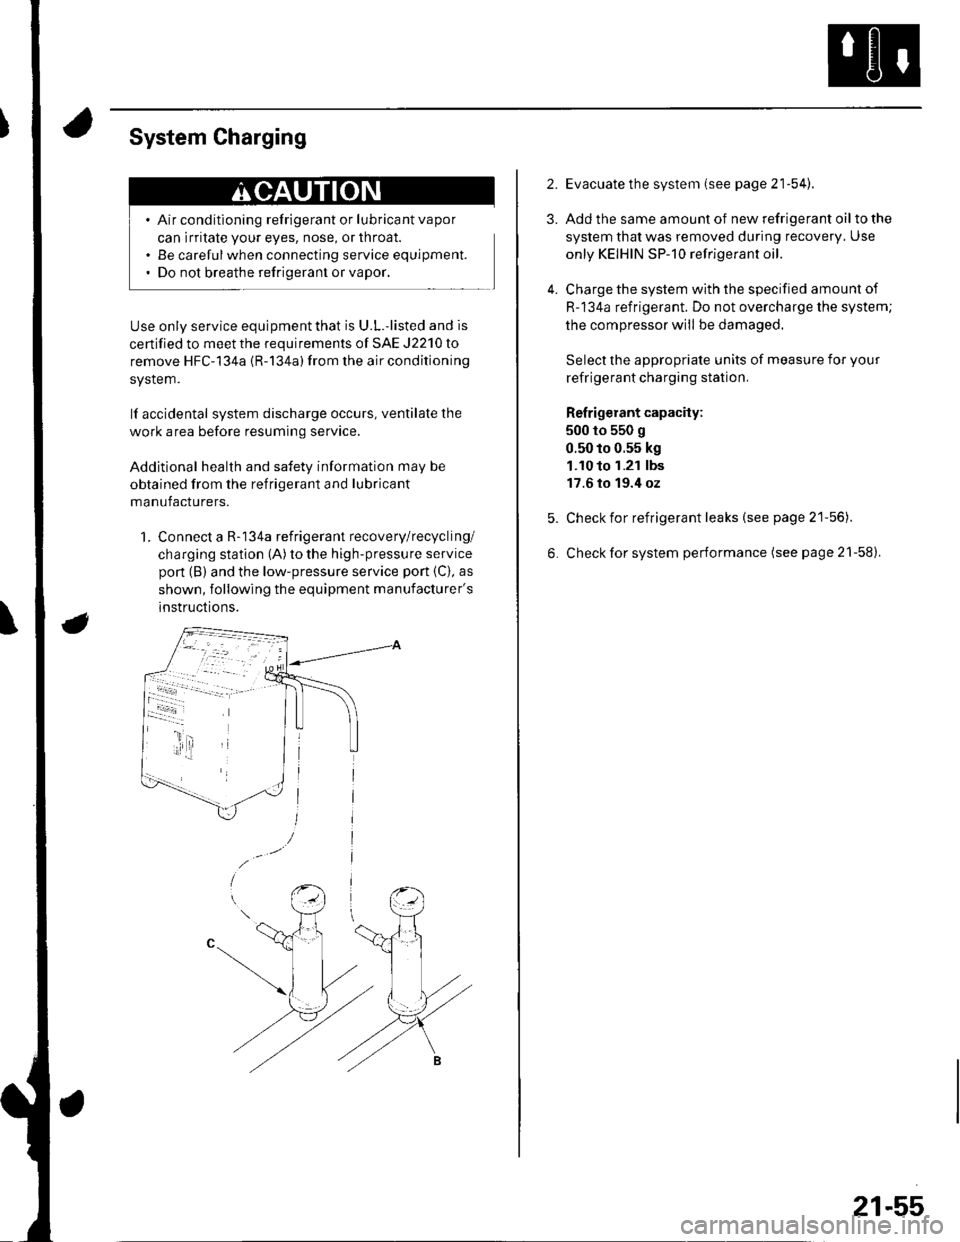
1. Connect a R-134a refrigerant recovery/recycling/
charging station (A) to the high-pressure service
pon (B) and the low-pressure service port {C), as
shown, following the equipment manufacturer's
instructions.
2.
3.
4.
Evacuate the system (see page 21'54).
Add the same amount of new refrigerant oil to the
system that was removed during recovery. Use
only KEIHIN SP-10 refrigerant oil.
Charge the system with the specified amount of
R-134a refrigerant. Do not overcharge the system;
the compressor will be damaged.
Select the appropriate units of measure for your
refrigerant charging station.
Refrigerant capacity:
500 to 550 g
0.50 to 0.55 kg
1.10 to 1.21 lbs
17.6 to 19.4 oz
Check for refrigerant leaks (see page 21'56).
Check for system performance (see page 21-58).
21-55
Page 827 of 1139
Heating and Air Conditioning
Refrigerant Leak Test
Special Tool Required
Leak detector, Honda Tool and Equipment YGK-H-10PM
commerciallv available
Compressed air mixed with R-134a forms a
combustible vapor.
The vapor can burn or explode causing serious
injury.
Never use compressed air to pressure test
R-134a service equipment or vehicle air
conditioning system.
Air conditioning refrigerant or lubricant vapor
can irritate your eyes, nose, or throat.
Be carefulwhen connecting service equipment.
Do not breathe refrigerant or vapor
Use only service equipment that is U.L.-listed and is
certiified to meet the requirements of SAE J2210 to
remove HFC-134a (R-134a) from the air conditioning
system.
lf accidental system discharge occurs, ventilate the
work area before resuming service.
R-134a service equipment or vehicle air conditioning
systems should not be pressure tested or leak tested
with compressed air.
Additional health and safety information may be
obtained from the refrigerant and lubricant
manufacturers.
21-56
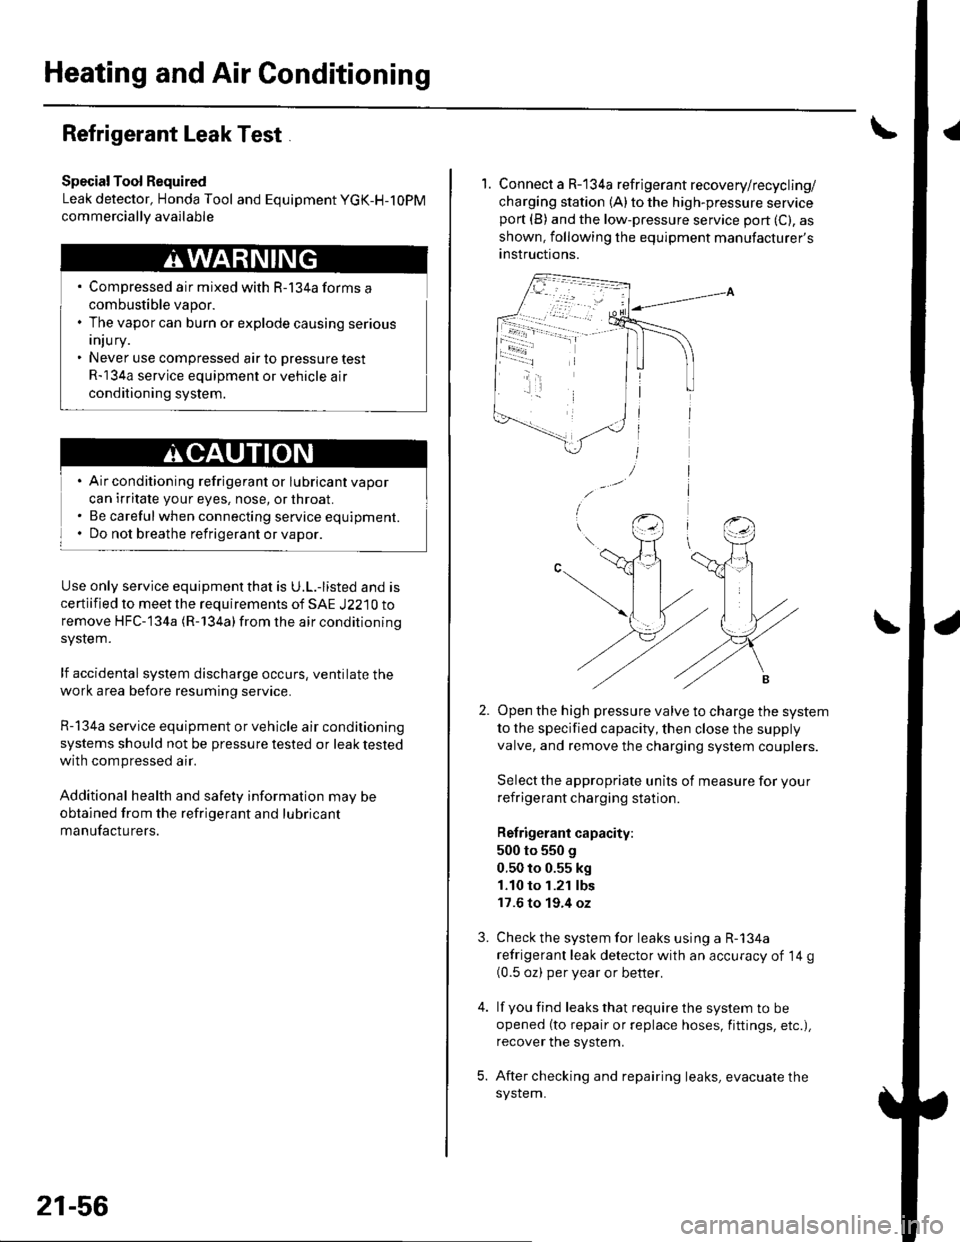
1. Connect a R-134a refrigerant recovery/recycling/
charging station (A) to the high-pressure serviceport (B) and the low-pressure service port (C), as
shown, following the equipment manufacturer's
anstructions.
Open the high pressure valve to charge the system
to the specified capacity, then close the supply
valve, and remove the charging system couplers.
Select the appropriate units of measure for your
refrigerant charging station.
Refrigerant capacity:
500 to 550 g
0.50 to 0.55 kg
1.10 to 1.21 lbs
17.6 to 19.4 oz
Check the system for leaks using a R-134a
refrigerant leak detector with an accuracy of 14 g(0.5 oz) per year or better.
lf you find leaks that require the system to be
opened (to repair or replace hoses, fittings, etc.),
recover the system.
After checking and repairing leaks, evacuate the
system.
3.
Page 828 of 1139
A/C System Tests
Pressure Test
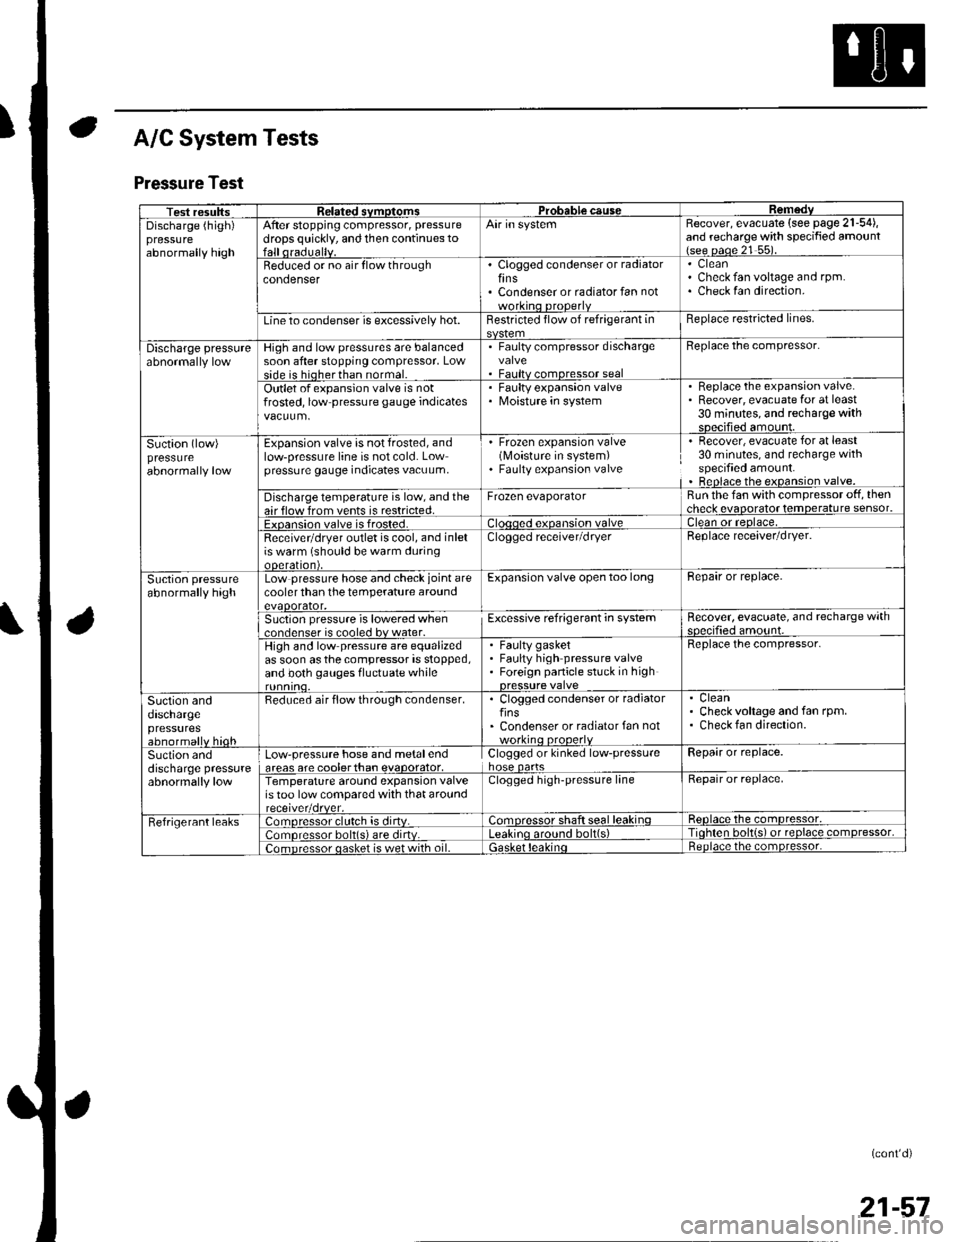
Test resultssvmotom3DGaUSeDischarge (high)pressureabnormally high
After stopping compressor, pressure
drops quickly, and then continues toAir in systemRecover, evacuate (see page 21-54),and recharge with specified amount{see oaoe 21 55).
Beduced or no air flow throughcondenserClogged condenser or radiatorfinsCondenser or radiator fan not
CleanCheck fan voltage and rpm.Check fan direction.
Line to condenser is excessively hot.Restricted flow of refrigerant inReplace restricted lines.
Discharge pressureHigh and low pressures are balancedsoon after stopping compressor, Lowside is hioherthan normal.
. Faulty compressor dischargevalve. Faultv comoressor seal
Beplace the compressor.
Outlet of expansion valve is notfrosted, low pressure gauge indicatesFaulty expansion valveMoisture in system
. Replace the expansion valve.. Recover, evacuate for at least30 minutes, and recharge withsDecified amount.
Suction (low)pressureabnormally low
Expansion valve is not frosted, andlow-pressure line is not cold. Lowpressure gauge indicates vacuum,
' Frozen expansion valve(Moisture in system). Faulty expansion valve
Recover, evacuate for at least30 minutes, and recharge withspecified amount.Beplace the expansion valve.
Discharge temperature is low, and theair flow from vents is restricted.Frozen evaporatorRun the fan with compressor off, thencheck evaooratot temoerature sensor.
Exoansion valve is frosted.ean or reolace,
Receivetdryer outlet is cool, and inletis warm (should be warm duringooeralton),
Clogged receiver/dryerReplace receaver/dryer.
Suction pressureabnormally highLow pressure hose and check joint arecooler than the temperature aroundevaoorator,
Expansion valve open too longBepair or replace.
Suction pressure is lowered when..nrlenser is cooled bv water.Excessive refrigerant in systemRecover, evacuate, and recharge withqnp.ifie.lamo'rnr
High and low pressure are equalizedas soon asthecompressor is stopped,and both gauges fluctuate while
Faulty gasketFaulty high pressure valveForeign panicle stuck in high
Replace the compressor.
Suction anddaschargepressuresabnormallv hioh
Reduced air flow through condenser.. Clogged condenser or radiatorfins' Condenser or radiator fan notworkino orooerlv
CleanCheck voltage and fan rpm.Check fan direction.
Suction anddischarge pressureabnormally low
Low-pressure hose and metalendareas are coolerthan evaoorator,Clogged or kinked low-pressurehose oartsRepair or replace.
Temperature around expansion valveis too low compared with that aroundClogged high-pressure lineRepair or replace,
Fefrigerant leaks:omoressor clulch is dirtv.:omoressor shaft seal leakinqReolace the comDressor,
lomoressor bolt(s) are dirtv.no around bolt(s)Tiohten bolt{s) ot reolace comDressor,
;omDressor oasket is wet with oil.ietnoace the comoressor.
(cont'd)
21-57
Page 829 of 1139
Heating and Air Conditioning
A/C System Tests (cont'd)
1.
Performance Test
Air conditioning refrigerant or lubricant vapor
can irritate your eyes, nose, or throar.
Be carefulwhen connecting service equipment.
Do not breathe refrigerant or vapor.
The performance test will help determine if the air
conditioner system is operating within specifications.
Use only service equipment that is U.L.-listed and is
cenified to meet the requirements of SAE J2210 toremove HFC-134a (R-134alfrom the air conditioning
system.
lf accidental system discharge occurs, ventilate the
work area before resuming service
R-134a service equipment or vehicle air conditioning
systems should not be pressure tested or leak testedwith compressed air.
Additional health and safety information may be
obtained from the refrigerant and lubricant
manufacturers.
Connect a R-134a refrigerant recover/recycling/
charging station to the high-pressure service port
and the low-pressure service port, following the
equipment manufacturer's instructions.
Determine the relative humidity and air
Iemperaru re.
' Compressed air mixed with R-134a forms a
combustible vapor.. The vapor can burn or explode causing serious
Injury.. Never use compressed air to pressure test
R-134a service equipment or vehicle air
conditioning systems.
21-58
4.
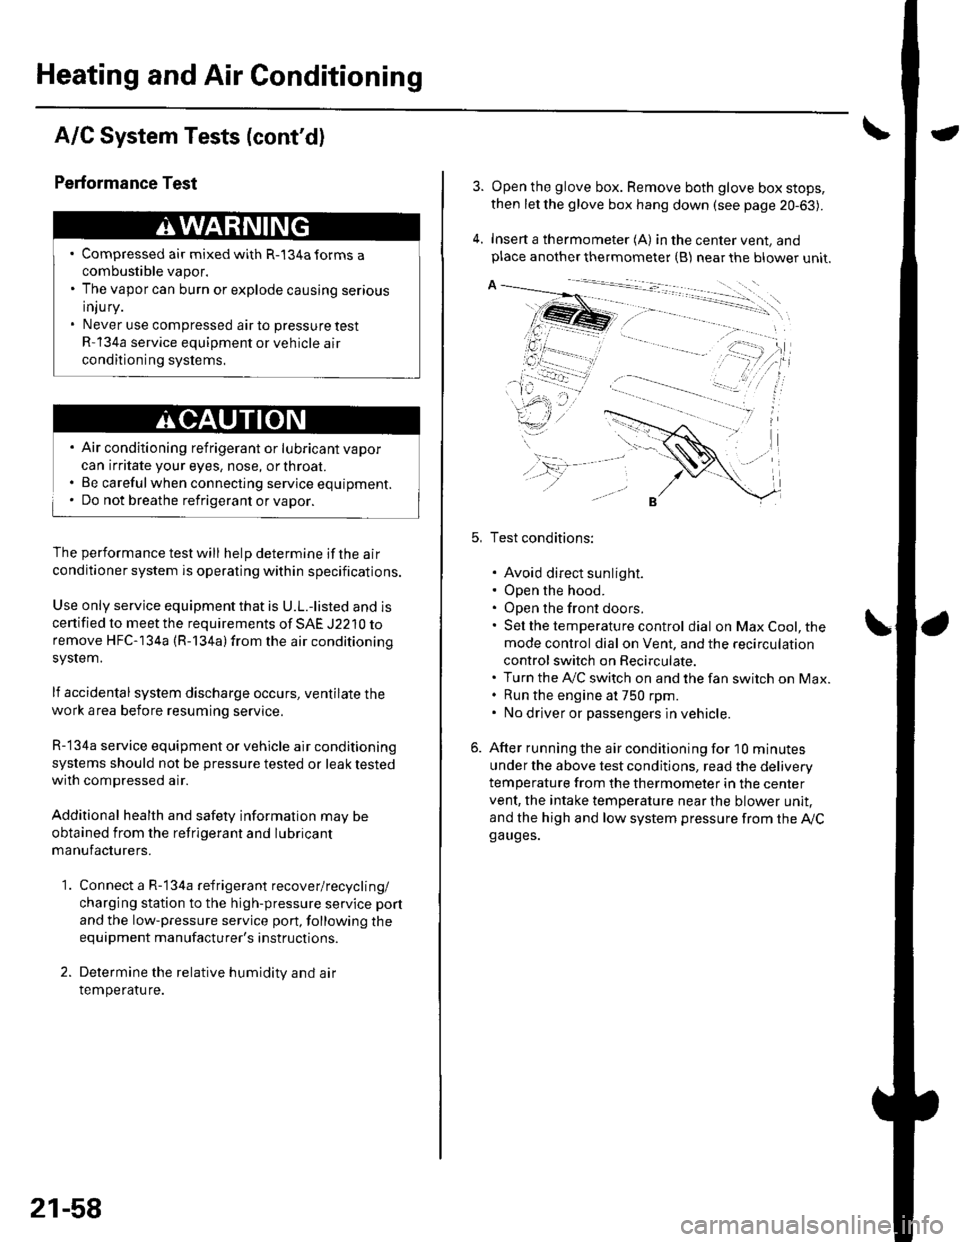
Open the glove box. Remove both glove box stops,
then let the glove box hang down (see page 20-63).
Insert a thermometer (A) in the center vent, andplace another thermometer {B) near the blower unit.
Test conditions:
. Avoid direct sunlight.. Open the hood.. Open the front doors.. Sel the temperature control dial on Max Cool, the
mode control dial on Vent, and the recirculation
control switch on Recirculate.. Turn the A,/C switch on and the fan switch on Max.. Run the engine at 750 rpm.. No driver or passengers in vehicle.
After running the air conditioning for I0 minutes
under the above test conditjons, read the delivery
temperature from the thermometer in the center
vent, the intake temperature near the blower unit,
and the high and low system pressure from the Ay'Cga uges.
Page 830 of 1139
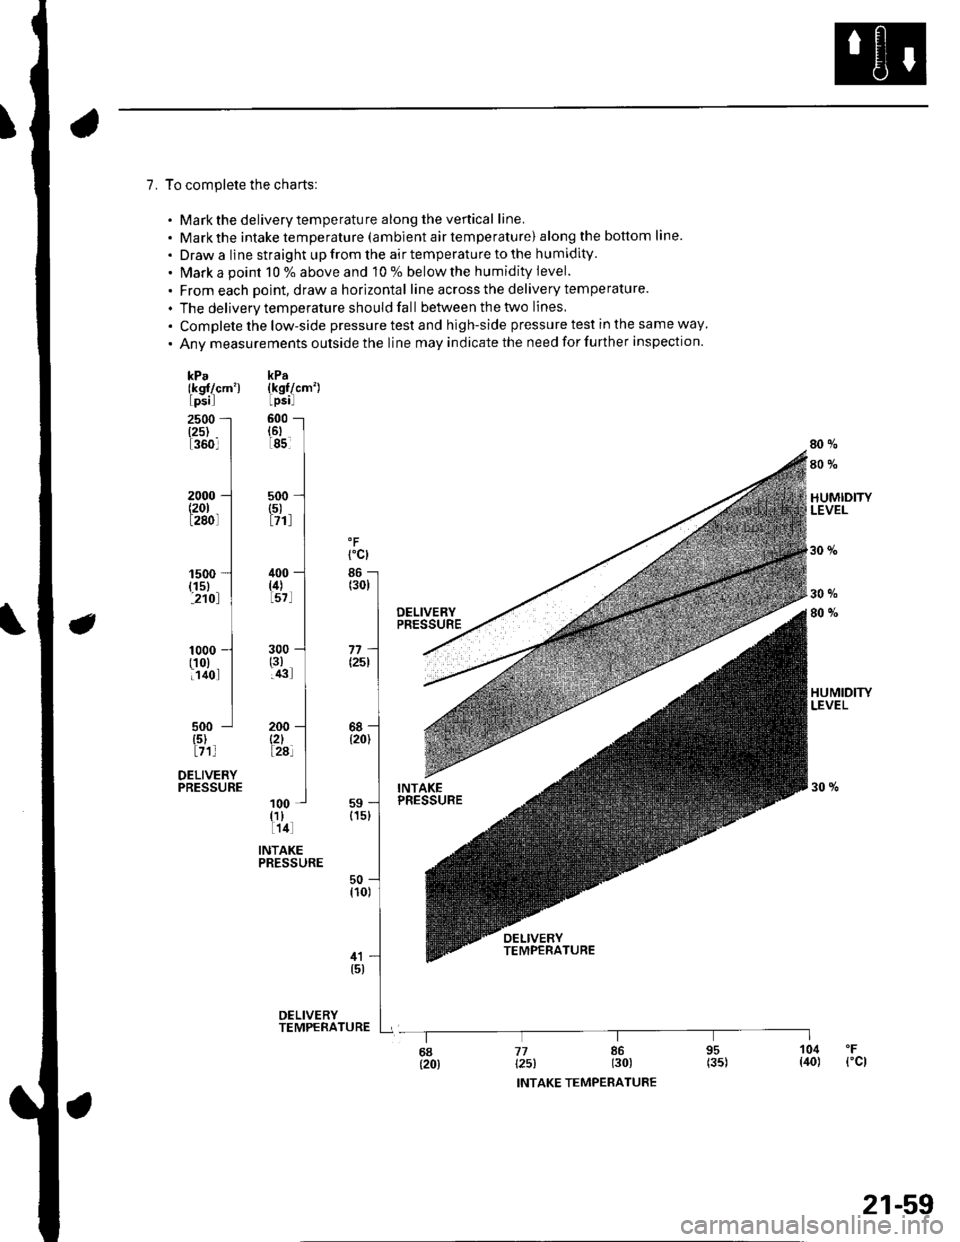
7. To complete the charts:
. Markthe deliverytemperature along the vertical line.
. Mark the intake temperature (ambient air temperature) along the bottom line.
. Draw a line straight up from the air temperature to the humidity.
. Mark a point 10 % above and 10 % belowthe humidity level.
. From each point. drawa horizontal line across the delivery temperature.
. The delivervtemperature should fall between thetwo lines
. Complete the low-side pressure test and high-side pressure test in the same way.
. Anv measurements outside the line may indicate the need for further inspection.
kPa(ksl{cm')Lpsrl
2500 -
[25) _360l
1500 -
{1s},21o)
1000 -(101:1401
500 -
{5)171l
DELIVERYPRESSURE
80 yo
a0 0/"
HUMIDITYLEVEL
30 9o
30%
80%
{kgflcm')Lpsil
600{6ttssl
2000(2011280
fcl
100{11h4l
INTAKEPRESSURE
OELIVERYTEMPERATURE
.F
{'cl
I104{40)95(35)
I86t30)
I77t25l68t20l
INTAKE TEMPEBATURE
21-59