Panel HONDA CIVIC 2003 7.G Workshop Manual
[x] Cancel search | Manufacturer: HONDA, Model Year: 2003, Model line: CIVIC, Model: HONDA CIVIC 2003 7.GPages: 1139, PDF Size: 28.19 MB
Page 28 of 1139
Lubricants and Fluids
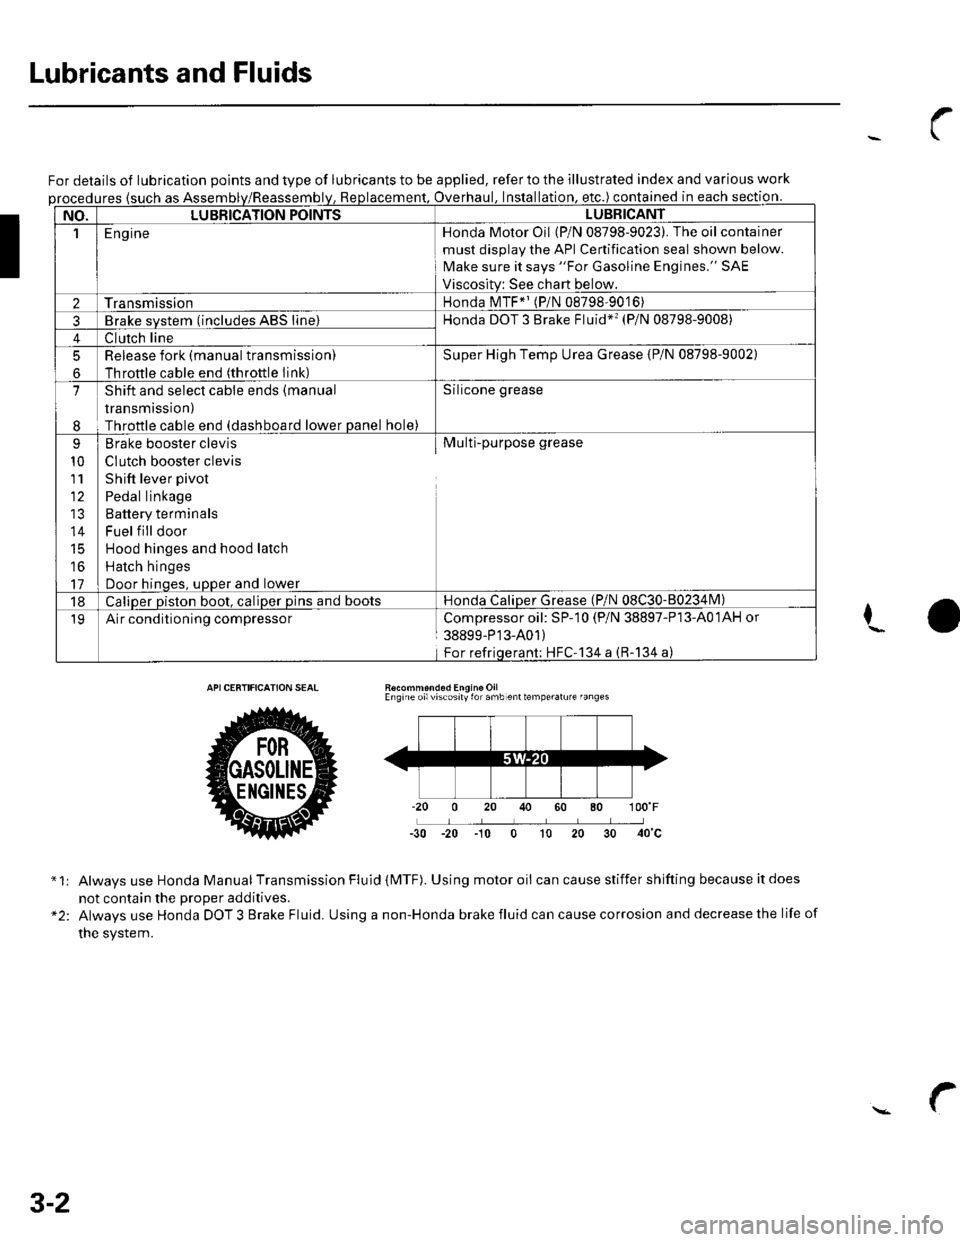
For details of lubrication points and type of lubricants to be applied, refer to the illustrated index and various work
ures {such as Assemoverhaul. lnstallation. etc.) contained in each section.
NO.LUBBICATION POINTSLUBBICANT
1E ng ineHonda Motor Oil (P/N 08798-9023). The oil container
must disolav the API Cenification seal shown below.
Make sure it says "For Gasoline Engines." SAE
Viscositv: See chart below.
2TransmissionHonda MTF*' (P/N 08798-9016)
3Brake svstem (includes ABS line)Honda DOT 3 Brake Fluid*'� (P/N 08798-9008)
4Clutch line
5
6
Release fork (manual transmissionl
Throftle cable end (throttle Iink)
Super High Temp Urea Grease {P/N 08798-9002)
7
I
Shift and select cable ends (manual
transmission)
Throttle cable end (dashboard lower panel hole)
Silicone grease
9
10
111'
14
16
17
Brake booster clevis
CIutch booster clevis
Shift lever pivot
Pedal linkage
Battery terminals
Fuel f ill door
Hood hinges and hood latch
Hatch hinges
Door hinoes, uoDer and lower
Multi-purpose grease
18Caliper piston boot, caliper pins and bootsHonda CaliDer Grease (P/N 08C30-80234lvl)
19Air conditioning compressorCompressoroil: SP-10 (P/N 38897-P13-A01AH or
38899-P'13-A01)
For refriqerant; HFC'134 a (R-134 a)
I
Recommond6d Engine OilEngine oilviscosily for amb enttemperalure fanges
-30 -20 -10 0 t0 20
*1:
"2:
Always use Honda Manual Transmission Fluid (MTF). Using motor oii can cause stiffer shifting because it does
not contain the Drooer additives.
Always use Honda DOT 3 Brake Fluid. Using a non-Honda brake fluid can cause corrosion and decrease the life of
the system.
3-2
Page 77 of 1139
Cruise Control
1.
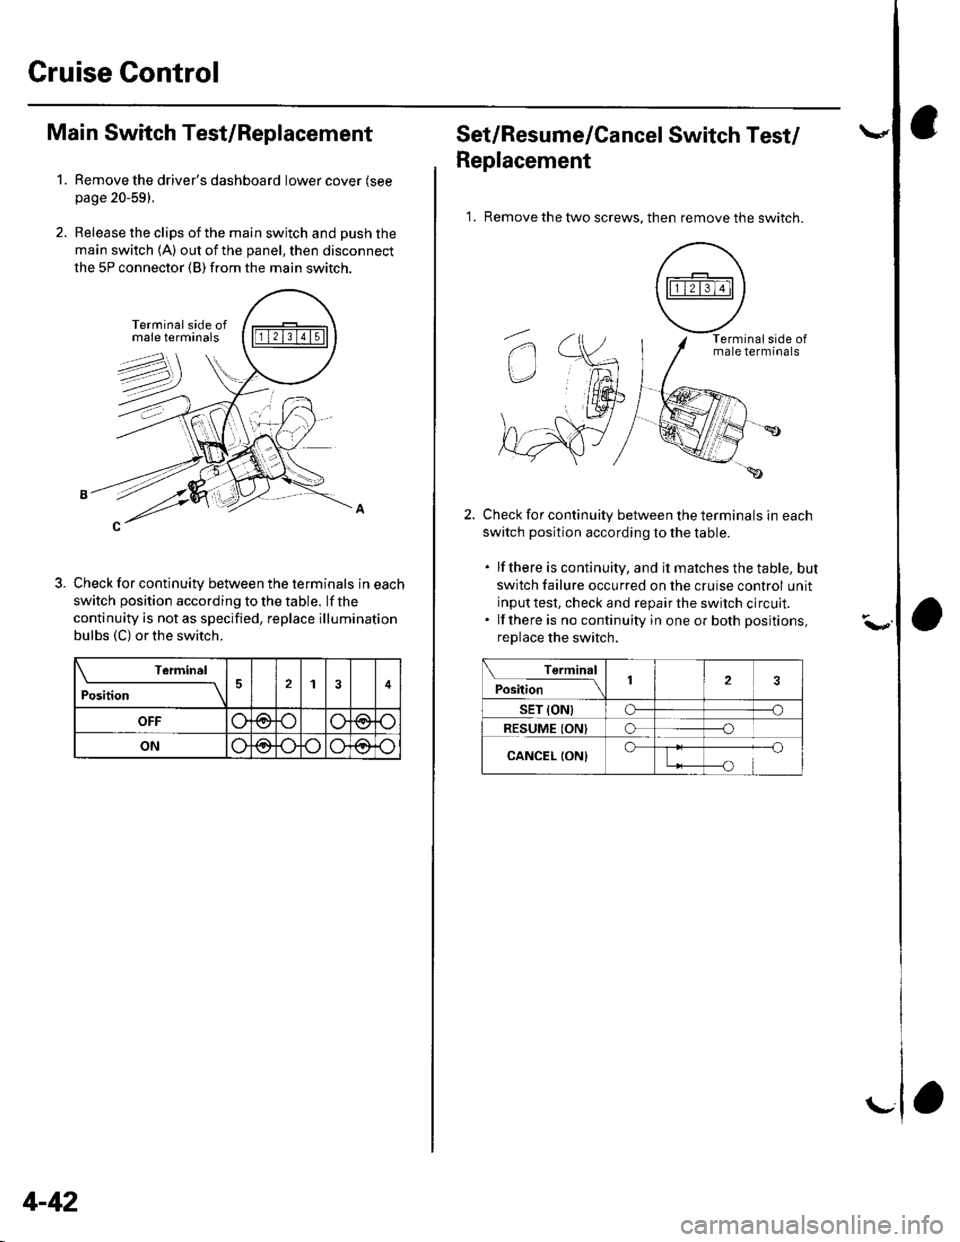
Main Switch Test/Replacement
Remove the driver's dashboard lower cover (see
page 20-59).
Release the clips of the main switch and push the
main switch 1A) out of the panel, then disconnect
the 5P connector (B) from the main switch.
Check for continuity between the terminals in each
switch position according to the table. lf the
continuity is not as specified, replace illumination
bulbs (C) or the switch.
\-------11v1
Position14
OFF(9@
ONo@o\Jo
4-42
r\--
Set/Resume/Cancel Switch Test/
Replacement
1. Remove the two screws. then remove the switch.
Check for continuity between the terminals in each
switch position according to the table.
. lfthere is continuity, and it matches the table, but
switch failure occurred on the cruise control unit
input test, check and repair the switch circult.. lf there is no continuity in one or both positions,
replace the switch.
Terminal
;"itl* '\2
sET (ONtCF--o
RESUME ION)o--o
CANCEL {ON}o
Page 209 of 1139
Fuel and Emissions Systems
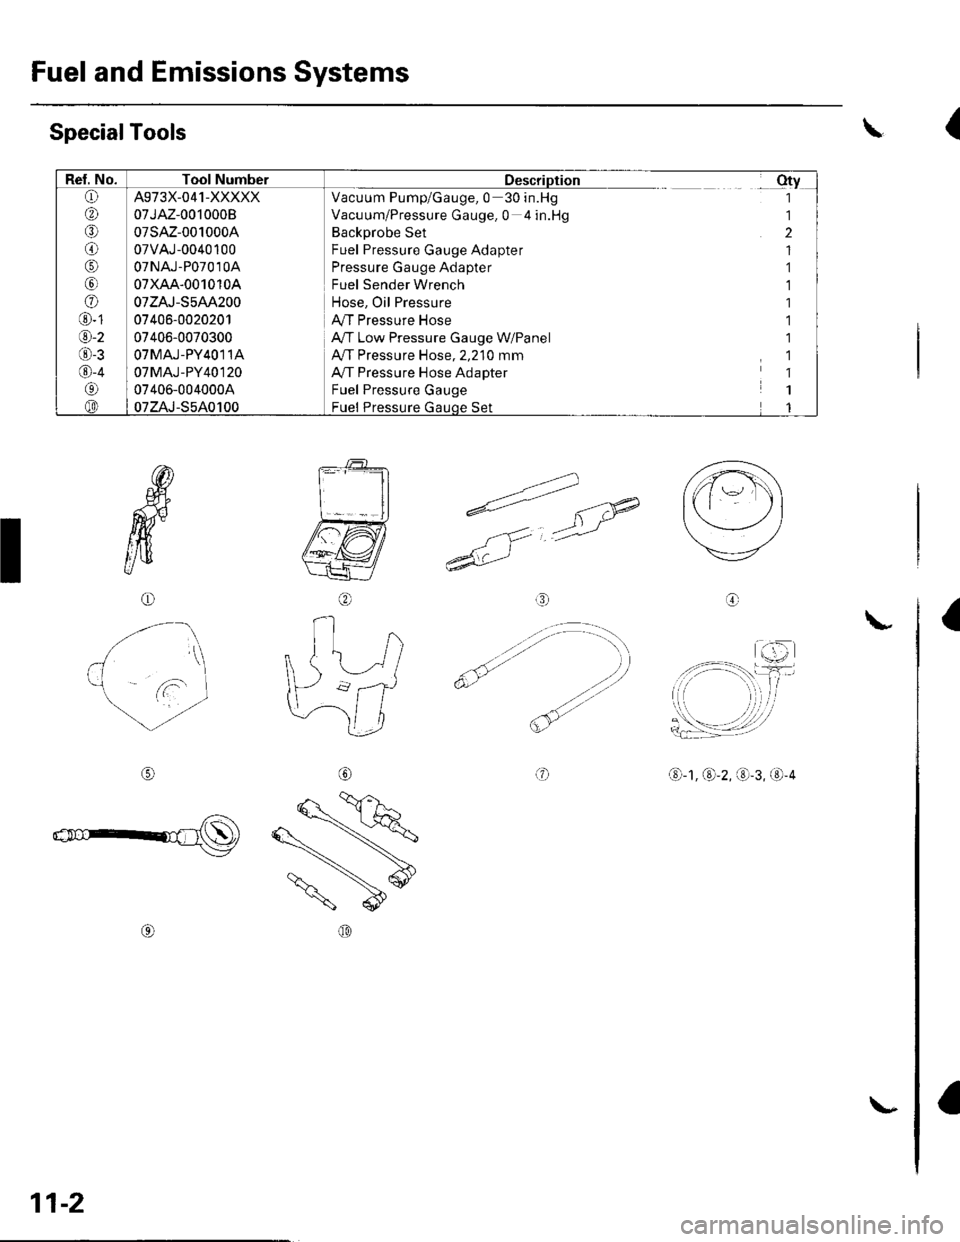
Rel. No.Tool NumberDescriptionotv(L)
@
o
@
@
@
o
@-t
@-2
O-3
@-4
@(iD
A973X-041-XXXXX
07JAZ-0010008
07sAz-001000A
07vAJ-0040100
07NAJ-P07010A
07xAA-001010A
07zAJ-S5AA200
07406-0020201
07406-0070300
OTMAJ-PY4O11A
07MAJ-PY40120
07406-004000A
07zAJ-S5A0100
Vacuum Pump/Gauge, 0 30 in.Hg
Vacuum/Pressure Gauge. 0 4 in.Hg
Backprobe Set
Fuel Pressure Gauge Adapter
Pressure Gauge Adapter
Fuel Sender Wrench
Hose, Oil Pressure
A,/T Pressure Hose
A,/T Low Pressure Gauge W/Panel
A,/T Pressure Hose ,2,210 mm
A,/T Pressure Hose Adapter
Fuel Pressure Gauge
Fuel Pressure Gauoe Set
1
1
2
1
1
1
SpecialTools
ffi
W
UtB
o
o
*.'l€)
(\,
I
/6\
l
)l
\-,/
\7
@
--1
a=:t=' (F
/'r';-:'-;--'
At-''
o
\-I-'-,---=---1,-'.
ut/t
) i-==.€
'jt' *==-.2'l
(i) -1,40-2, -3, @-4@
\h
\:
\d
@o
a
11-2
\-
Page 211 of 1139
Fuel and Emissions Systems
General Troubleshooting Information (cont'dl
How to Reset the ECM
You can reset the ECM in either of two ways:
. Use the OBD ll scantool or Honda PGMTesterto
reset the ECM memory.
See the OBD ll scan tool or Honda PGI\4 Tester user's
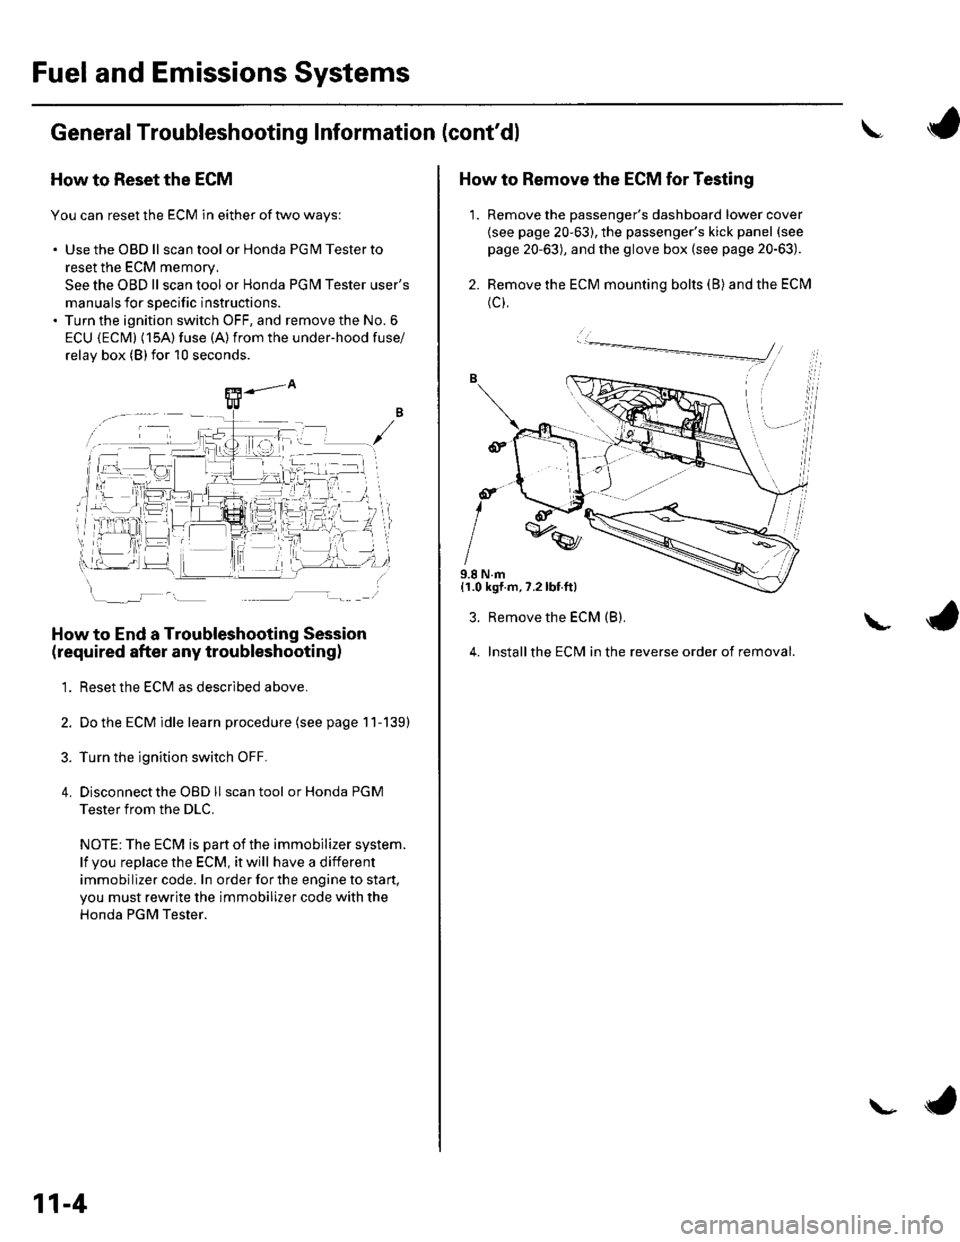
manuals for specific instructions.' Turn the ignition switch OFF, and remove the No. 6
ECU {ECM} (15A) fuse (A)from the under-hood fuse/
relav box (Blfor 10 seconds.
How to End a Troubleshooting Session
(required after any troubleshootingl
1. Reset the ECM as described above.
2. Do the ECM idle learn procedure (see page 11-139)
3. Turn the ignition switch OFF.
4. Disconnectthe OBD ll scan tool or Honda PGM
Tester from the DLC.
NOTE: The ECM is part of the immobilizer system.
lf vou replace the ECM, it will have a different
immobilizer code. In order for the engine to start,
you must rewrite the immobilizer code with the
Honda PGM Tester.
11-4
\- ta
J
How to Remove the ECM for Testing
1. Remove the passenger's dashboard lower cover
{see page 20-63), the passenger's kick panel (see
page 20-63), and the glove box (see page 20-63).
2. Remove the ECM mounting bolts (B) and the ECM
(c),
9.8 N.m{1.0 kgf.m,7.2lbt.ft}
3. Remove the ECM (B).
4. Installthe ECM in the reverse order of removal.
L
Page 307 of 1139
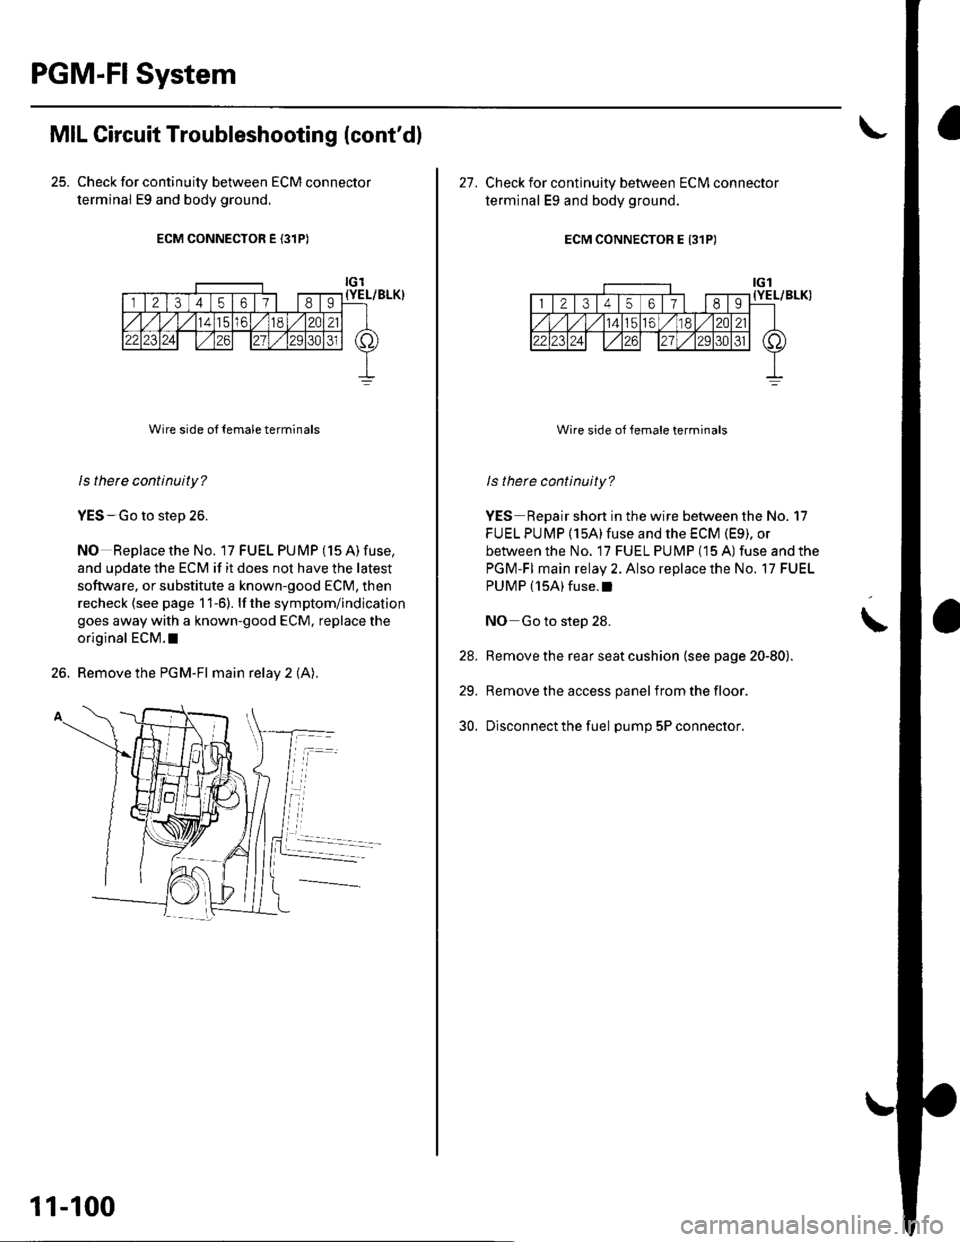
PGM-FI System
25.
MIL Circuit Troubleshooting (cont'dl
Check for continuity between ECM connector
terminal E9 and body ground.
ECM CONNECTOR E (31P)
Wire side o{ {emale terminals
ls therc continuity?
YES-Go to step 26.
NO Replace the No. lTFUELPUMP(15A)fuse,
and update the ECM if it does not have the latest
software. or substitute a known-good ECM, then
recheck (see page 1 1-6). lf the symptom/indication
goes away with a known-good ECM. replace the
original ECM.I
26. Remove the PGM-Fl main relay 2 (A).
11-100
27. Check for continuity between ECIVI connector
terminal Eg and body ground.
ECM CONNECTOR E 131P)
Wire side oI Jemale terminals
ls there continuity?
YES Repair short in the wire between the No. 17
FU EL PUMP (15A)fuse and the ECM (E9), or
between the No. 17 FUEL PU MP (15 A) fuse and the
PGM-FI main relay 2. Also replace the No. 17 FUEL
PUMP (15A)fuse.l
NO Go to step 28.
Remove the rear seat cushion (see page 20-80).
Remove the access panel from the floor.
Disconnect the fuel pump 5P connector.
\
28.
29.
30.
Page 330 of 1139
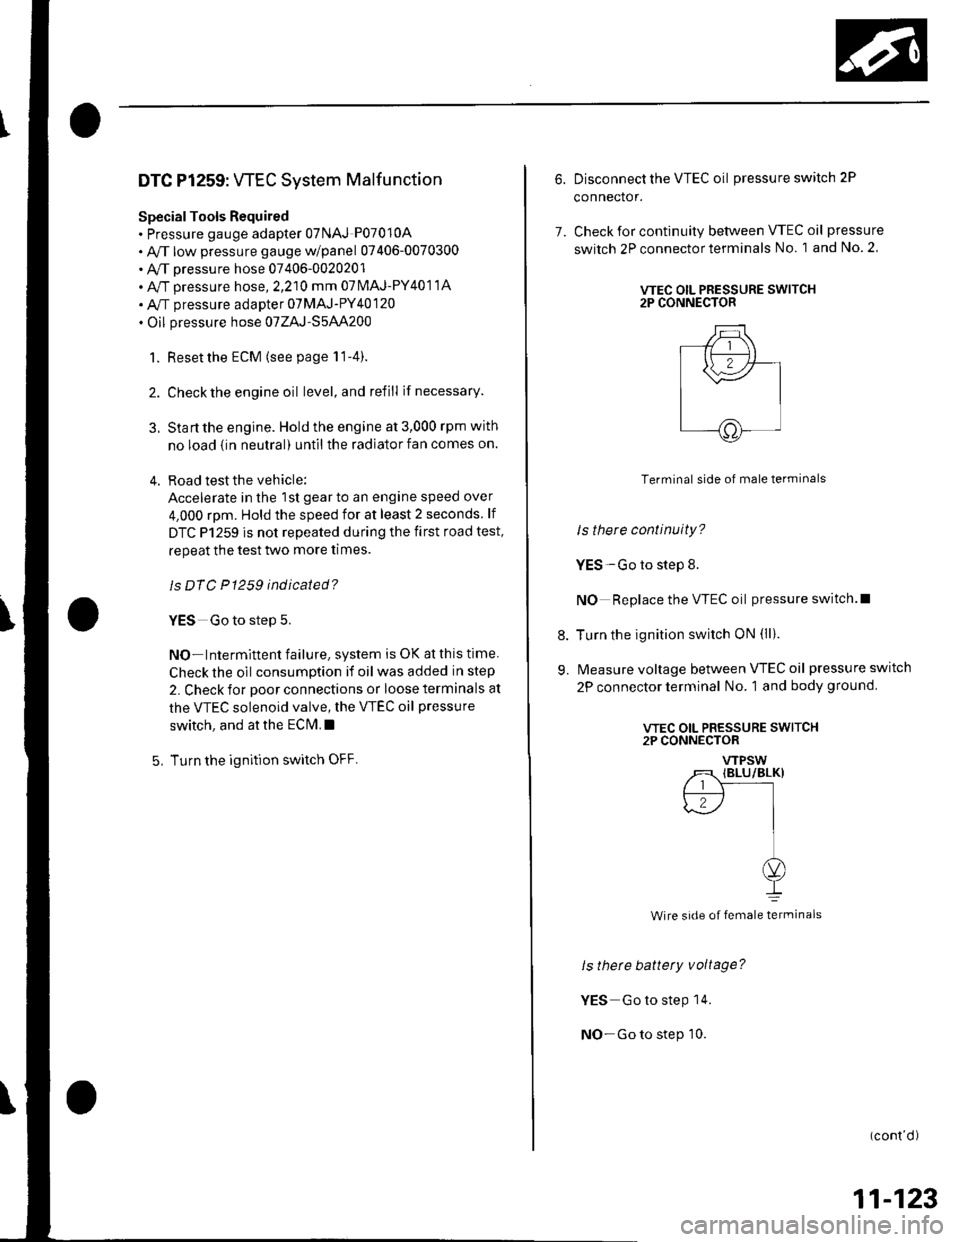
DTC Pl259: WEC System Malf unction
SpecialTools Required. Pressure gauge adapter 07NAJ P07010A
. A/T low pressure gauge w/panel 07406-0070300. A/T pressure hose 07406-0020201. Av/T pressure hose,2,210 mm 07IMAJ-PY4o11A
. l"/T pressure adapter 07MAJ-PY40120
. Oil pressure hose 07ZAJ-S54,4200
1. Reset the ECM (see page 11-4).
2. Check the engine oil level, and refill ifnecessary.
3. Start the engine. Hold the engine at 3,000 rpm with
no load {in neutral) until the radiator fan comes on.
4. Road testthe vehicle:
Accelerate in the 1st gear to an engine speed over
4.000 rpm. Hold the speed for at least 2 seconds. lf
DTC P1259 is not repeated during the first road test,
repeat the test two more times.
ls DTC P1259 indicated?
YES Go to step 5.
NO-lntermittent failure, system is OK at this time
Check the oil consumption if oil was added in step
2. Check for poor connections or loose terminals at
the VTEC solenoid valve, the VTEC oil pressure
switch, and at the ECI\4. I
5, Turn the ignitjon switch OFF.
6. Disconnect the VTEC oil pressureswitch 2P
connector.
7. Check for continuity between VTEC oil pressure
switch 2P connector terminals No. 1 and No. 2
VTEC OIL PRESSURE SWITCH2P CONNECTOR
Terminal side of male terminals
Is there continuity?
YES-Go to step 8.
NO Replace the VTEC oil pressure switch.l
8. Turn the ignition switch ON (ll).
9. Measure voltage between VTEC oil pressure switch
2P connector terminal No. 1 and body ground
ls there battety voltage?
YES Go to steP 14.
NO-Go to step 10.
(cont'd)
VTEC OIL PRESSURE SWITCH2P CONNECTOR
VTPSW
/T {BLU/BLK}
{.--r r-l'--.l
J II
oI
Wire side of female terminals
11-123
Page 349 of 1139
![HONDA CIVIC 2003 7.G Workshop Manual FuelSupply System
(
(
L
10.
1�].
Fuel Pump Circuit Troubleshooting (contdl
Reinstallthe PGM-Fl main relay 2.
Turn the ignition switch ON (ll).
Measure voltage between ECI\4/PCM connector
terminal E1 HONDA CIVIC 2003 7.G Workshop Manual FuelSupply System
(
(
L
10.
1�].
Fuel Pump Circuit Troubleshooting (contdl
Reinstallthe PGM-Fl main relay 2.
Turn the ignition switch ON (ll).
Measure voltage between ECI\4/PCM connector
terminal E1](/img/13/5744/w960_5744-348.png)
FuelSupply System
(
(
L
10.
1'�].
Fuel Pump Circuit Troubleshooting (cont'dl
Reinstallthe PGM-Fl main relay 2.
Turn the ignition switch ON (ll).
Measure voltage between ECI\4/PCM connector
terminal E1 and body ground.
ECM CONNECTOB E {31P)
ls there battety voltage?
YES Go to step 12.
NO-Replace the PGM-Fl main relay 2.1
Turn the ignition switch OFF.
Reconnecl ECM connector E (31P).
Turn the ignition switch ON (ll), and measure
voltage between ECM connector terminal E1 and
body ground within the first 2 seconds after the
ignition switch was turned ON (ll).
ECM CONNECTOR E (31PI
13.
14.
Wire side of female terminals
Wire side of female terminals
11-142
t5.
to.
11.
18.
ls there battery voltage?
YES U pdate the ECM if it does not have the latest
so{1ware, or substitute a known-good ECM. then
recheck (see page 1 1-6). lf the symptom/indication
goes away with a known-good ECM, replace the
original ECM.I
NO Go to step 15.
Turn the ignition switch OFF.
Remove the rear seat cushion (see page 20-80).
Remove the access panel from the floor.
Measure voltage between fuel pump 5P connector
terminal No. 5 and body ground within the first 2
seconds after the ignition switch was turned ON (ll).
FUEL PUMP 5P CONNECTOR
wire side oI female terminals
ls there battery voltage?
YES Go to step 24.
NO-Go to step 19.
Turn the ignition switch OFF.
Remove the PGM-Fl main relay 2.
19.
20.
Page 360 of 1139
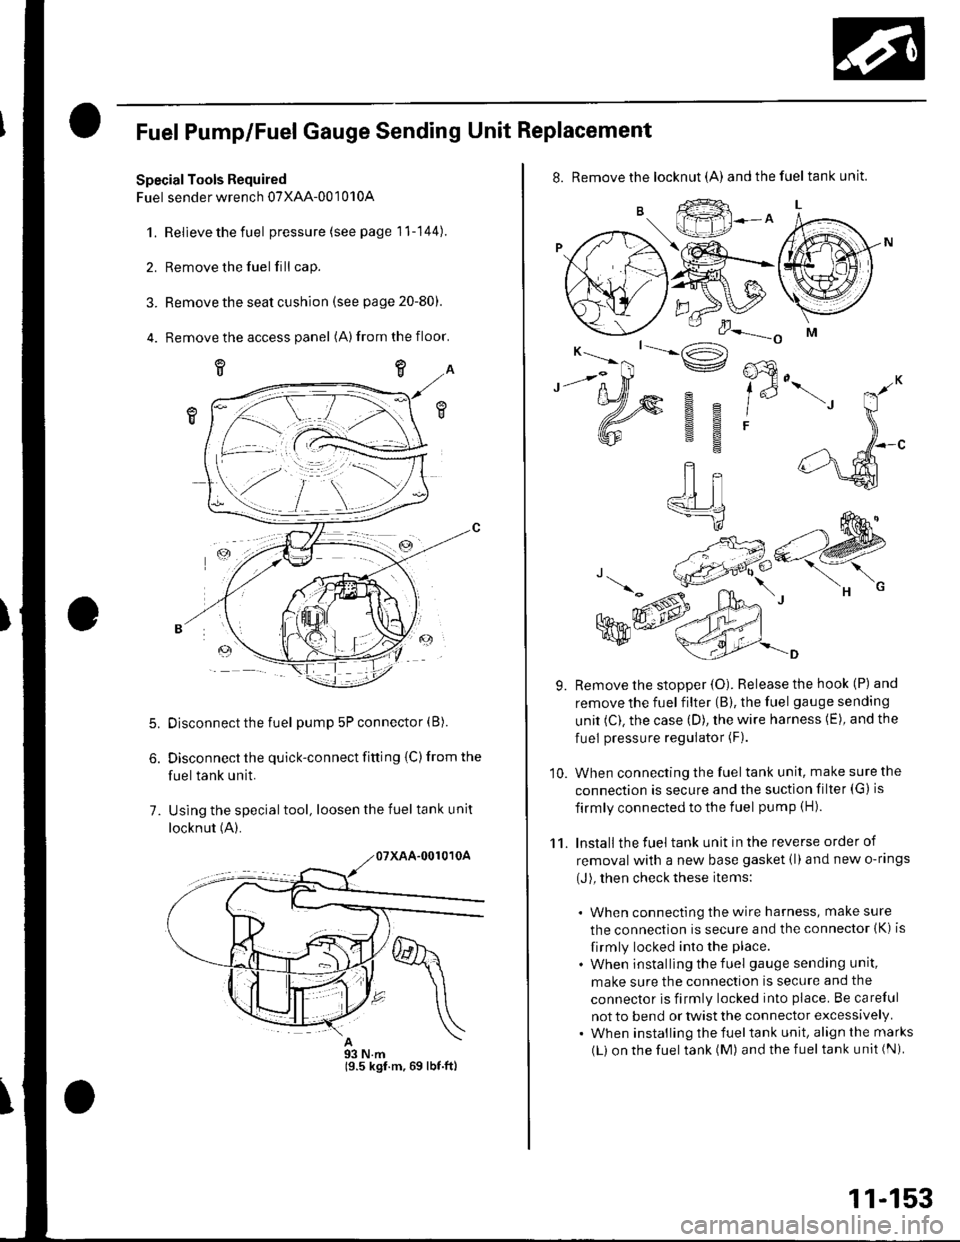
Fuel Pump/Fuel Gauge Sending Unit Replacement
SpecialTools Required
Fuel sender wrench 07XAA-001010A
1.Relieve the fuel pressure (see page 11-144).
Remove the fuel fill cap.
Remove the seat cushion (see page 20-80).
Remove the access panel (A)from the floor.
5.
7.
Disconnect the fuel pump 5P connector (B).
Disconnect the quick-connect fitting {C) from the
fuel tank unit.
Using the special tool, loosen the fuel tank unit
locknut (A).
93 N.m19.5 kgf.m,69 lbf.ftl
11-153
8. Remove the locknut (A) andthefuel tankunit.
9. Remove the stopper {O). Release the hook (P) and
remove the fuel filter (B), the fuel gauge sending
unit (C). the case (D), the wire harness (E), and the
fuel pressure regulator (F).
10. When connecting the fuel tank unit, make sure the
connection is secure and the suction filter (G) is
firmly connected to the f uel pump (H).
11. Install the fuel tank unit in the reverse order of
removal with a new base gasket (l)and new o-rings
(J), then check these items:
. When connecting the wire harness, make sure
the connection is secure and the connector (K) is
firmly locked into the place.
. When installing the f uel gauge sending unit,
make sure the connection is secure and the
connector is firmly locked into place. Be careful
not to bend or twist the connector excessively.. When installing the fueltank unit, align the marks
(L) on the fuel tank (M) and the fuel tank unit (Ni
Page 363 of 1139
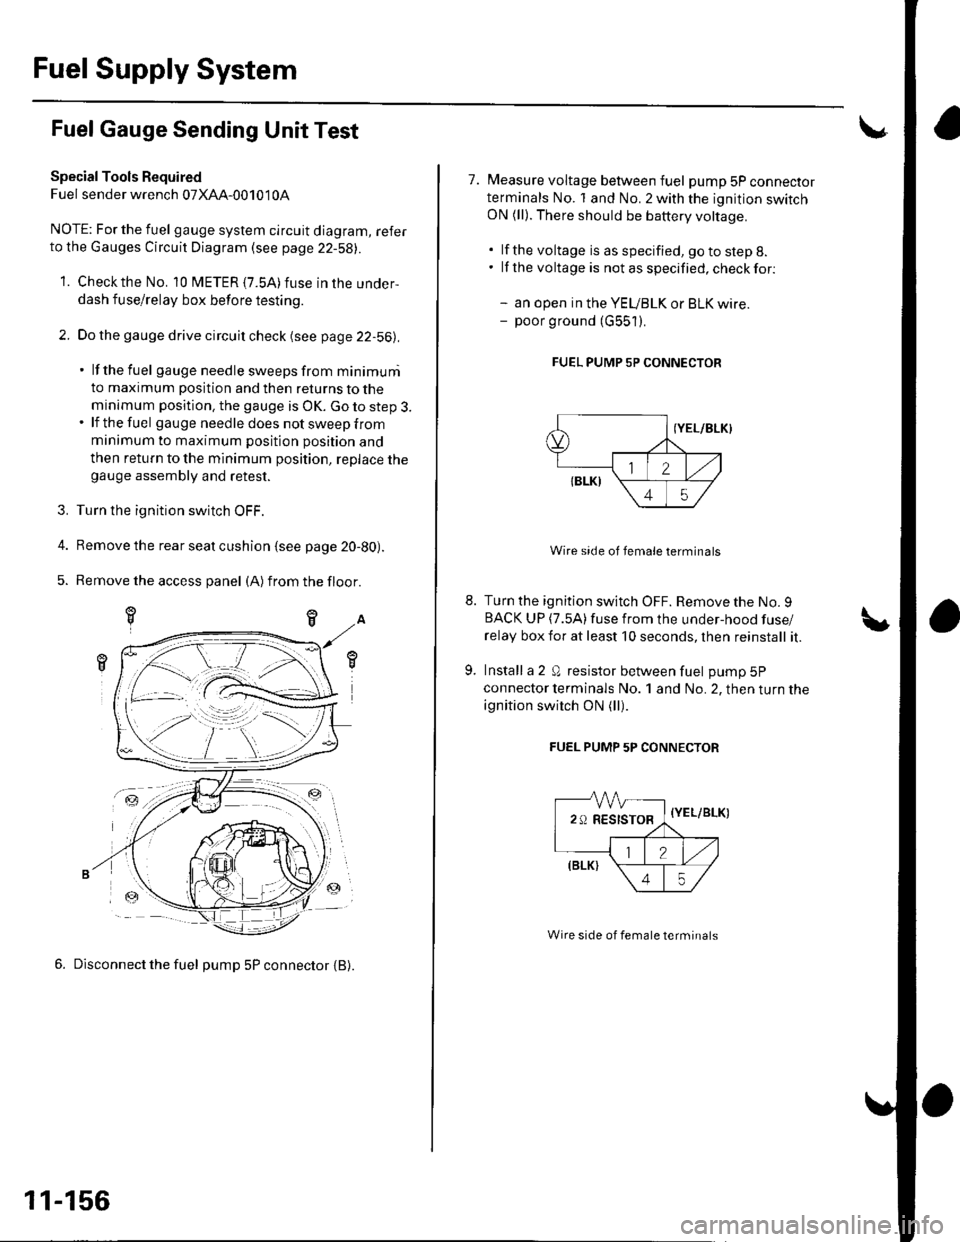
Fuel Supply System
Fuel Gauge Sending Unit Test
Special Tools Required
Fuel sender wrench 07XAA-001010A
NOTE; For the fuel gauge system circuit diagram, referto the Gauges Circuit Diagram (see page 22-58||.
1. Checkthe No. 10 fUETER {7.5A)fuse in the under-
dash fuse/relay box before testing.
2. Do the gauge drive circuit check (see page 22-56|l.
' lf the fuel gauge needle sweeps from minimuni
to maximum position and then returns to the
minimum position. the gauge is OK. Go to step 3.. lf the fuel gau ge need le does not sweep from
minimum to maximum position position and
then return to the minimum position, replace thegauge assembly and retest.
3. Turn the ignition switch OFF.
4. Remove the rear seat cushion {see page 20-80).
5. Remove the access panel (A)from the floor.
6. Disconnect the fuel pump 5P connector {B).
-ztr
11-156
7. Measure voltage between fuel pump 5P connectorterminals No. 1 and No. 2 with the ignition switchON (ll). There should be battery voltage.
. lf the voltage is as specified, go to step 8.. lf the voltage is notasspecified,checkfor:
- an open in the YEUBLK or BLK wire.- poor ground (G551).
FUEL PUMP 5P CONNECTOR
Wire side of female terminals
Turn the ignition switch OFF. Remove the No. 9BACK UP (7.5A)fuse from the under-hood fuse/
relay box for at least 10 seconds, lhen reinstall it.
Install a 2 Q resistor between fuel pump 5P
connector lerminals No. 1 and No. 2, then turn the
ignition switch ON (ll).
FUEL PUMP 5P CONNECTOR
-VVV-
29RESISTOR,
=-a
{Y
\
//,(elrt \
\45/
{YEL/BLK)
Wire side of female terminals
Page 499 of 1139
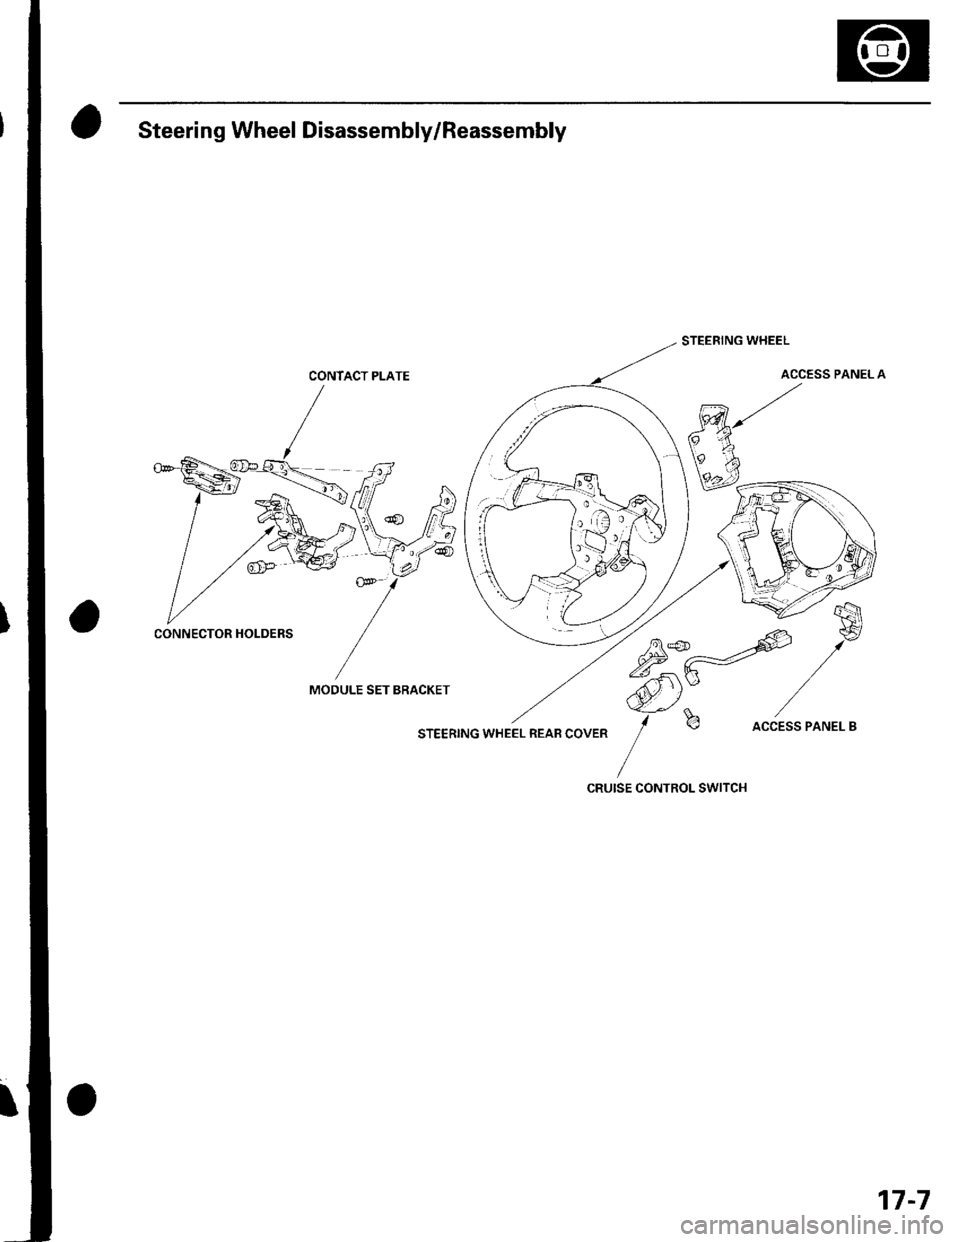
Steering Wheel Disassembly/Reassembly
CONTACT PLATE
MOOULE SET BRACKET
STEERING WHEEL REAB COVER
STEERING WHEEL
ACCESS PANEL A
75*-=offi
,/*
ffi)Y /-f
b accEss PANEL B
CRUISE CONTROL SWITCH
CONNECTOR HOLDERS
17-7