key HONDA CIVIC COUPE 1998 Owners Manual
[x] Cancel search | Manufacturer: HONDA, Model Year: 1998, Model line: CIVIC COUPE, Model: HONDA CIVIC COUPE 1998Pages: 251, PDF Size: 2.04 MB
Page 24 of 251

Protecting Children
If A Child Requires Close
Attention Many parents say they prefer to put
an infant or small child in the front
passenger seat so they can watch the child, or because the child requires
attention.
Placing a child in the front seat
exposes them to hazards from the airbag, and paying close attention to
a child distracts the driver from the
important tasks of driving, creating serious safety risks.
If a child requires physical attention or frequent visual contact, westrongly recommend that another
adult ride with the child in the back
seat. The back seat is far safer for a
child than the front. Additional Safety Precaution
Do not leave children alone in your
vehicle. Leaving children without
adult supervision is illegal in most states and can be very hazardous. For
example, infants and small children left in a vehicle on a hot day can die
from heatstroke. And children left
alone with the key in the ignition can
accidentally set the vehicle in
motion, possibly injuring themselves
or others.
Driver and Passenger SafetyMain Menu Table of Contents s t
Page 51 of 251
Instruments and Controls
This section gives information about the controls and displays that
contribute to the daily operation of
your Honda. All the essential
controls are within easy reach.
Control Locations............................ 50
Indicator Lights................................ 51
Gauges.............................................. 55
Speedometer................................ 55
Tachometer.................................. 55 Odometer...................................... 55
Trip Meter.................................... 55 Fuel Gauge................................... 56
Temperature Gauge.................... 56
Maintenance Required
Indicator.................................... 57
Controls Near the Steering
Wheel........................................58
Headlights.................................... 59
Daytime Running Lights............. 59
Instrument Panel Brightness..... 60
Turn Signals................................. 60
Windshield Wipers...................... 61
Windshield Washers................... 61
Hazard Warning........................... 62
Rear Window Defogger.............. 62
Steering Wheel Adjustment....... 63
Steering Wheel Controls ................ 64
Cruise Control.............................. 64
Keys and Locks................................ 67
Keys...............................................67
Ignition Switch............................. 67
Door Locks................................... 68
Power Door Locks....................... 69
Remote Transmitter.................... 70
Trunk............................................ 73
Seat Adjustments............................. 74
Front Seat Adjustments.............. 74
Rear Seat Access......................... 75
Head Restraints........................... 75
Folding Rear Seat............................ 76
Power Windows............................... 77
Moonroof.......................................... 79
Mirrors.............................................. 79
Adjusting the Power Mirrors..... 80
Parking Brake.................................. 80
Glove Box......................................... 81
Beverage Holder.............................. 82
Accessory Power Socket................ 83
Ashtrays............................................ 83
Interior Light.................................... 84
Instruments and ControlsMain Menu s t
Page 59 of 251
Gauges
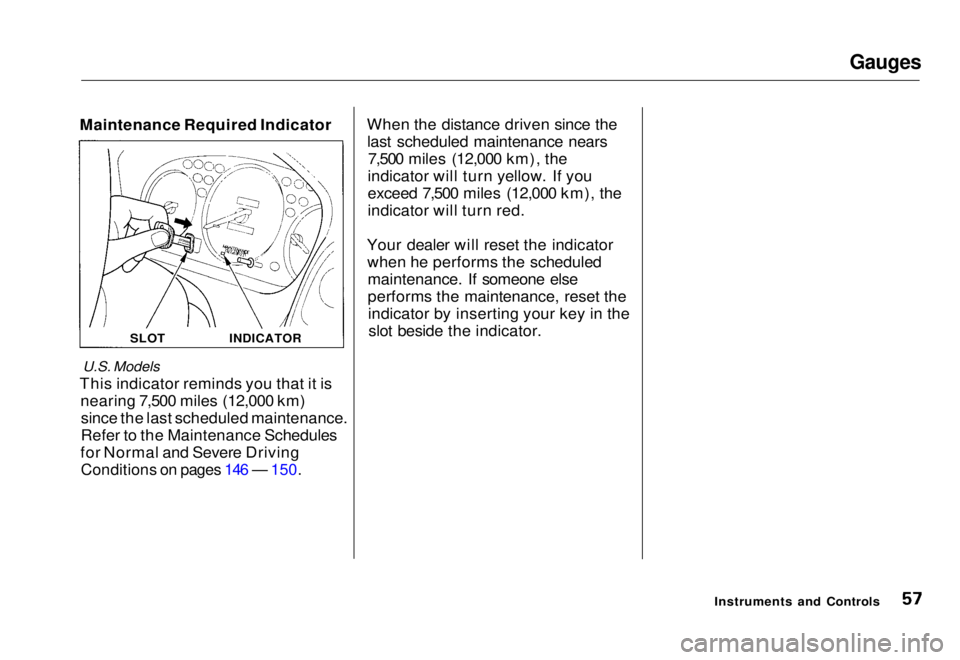
Maintenance Required Indicator
U.S. Models
This indicator reminds you that it is nearing 7,500 miles (12,000 km)since the last scheduled maintenance.
Refer to the Maintenance Schedules
for Normal and Severe Driving
Conditions on pages 146 — 150.
When the distance driven since the
last scheduled maintenance nears 7,500 miles (12,000 km), the
indicator will turn yellow. If you
exceed 7,500 miles (12,000 km), the
indicator will turn red.
Your dealer will reset the indicator when he performs the scheduledmaintenance. If someone else
performs the maintenance, reset theindicator by inserting your key in theslot beside the indicator.
Instruments and Controls
SLOT
INDICATORMain Menu Table of Contents s t
Page 69 of 251
Keys and Locks
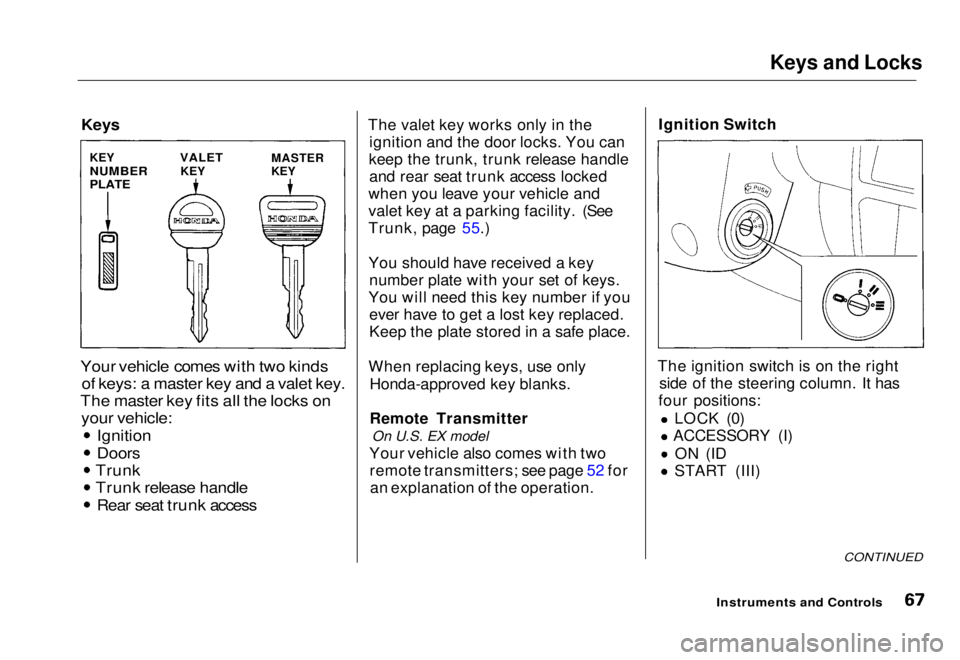
Keys
Your vehicle comes with two kinds
of keys: a master key and a valet key.
The master key fits all the locks on
your vehicle:
Ignition
Doors
Trunk
Trunk release handle Rear seat trunk access
The valet key works only in the
ignition and the door locks. You can
keep the trunk, trunk release handle and rear seat trunk access locked
when you leave your vehicle and
valet key at a parking facility. (See
Trunk, page 55.)
You should have received a key number plate with your set of keys.
You will need this key number if you ever have to get a lost key replaced.
Keep the plate stored in a safe place.
When replacing keys, use only Honda-approved key blanks.
Remote Transmitter On U.S. EX model
Your vehicle also comes with two remote transmitters; see page 52 foran explanation of the operation. Ignition Switch
The ignition switch is on the right side of the steering column. It has
four positions:
LOCK (0)
ACCESSORY (I)
ON (ID START (III)
CONTINUED
Instruments and Controls
KEY
NUMBER
PLATE
VALET
KEY MASTER
KEYMain Menu Table of Contents s t
Page 70 of 251
Keys and Locks
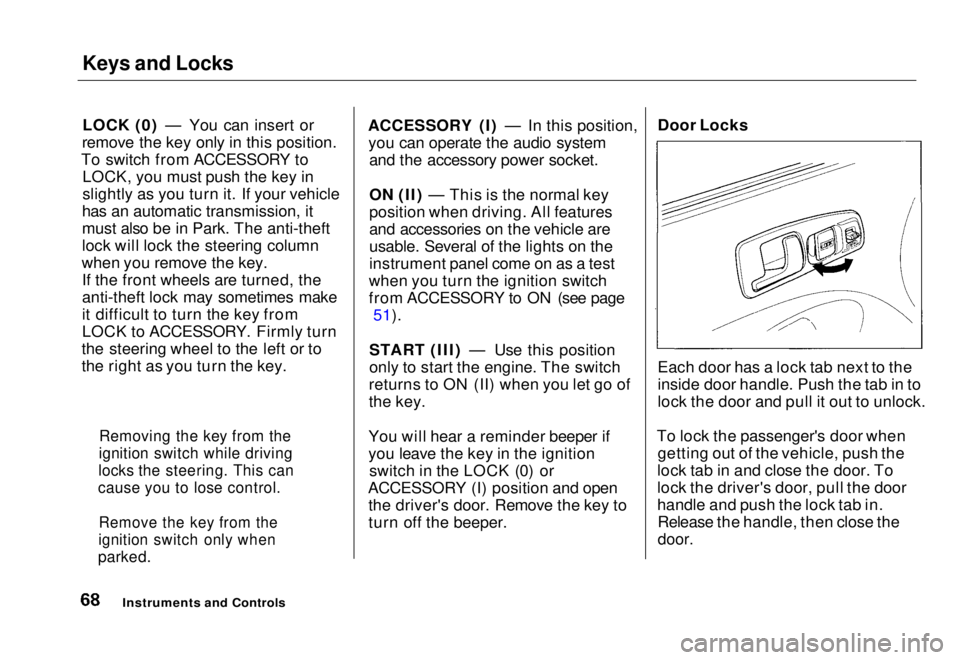
LOCK (0) — You can insert or
remove the key only in this position.
To switch from ACCESSORY to LOCK, you must push the key in
slightly as you turn it. If your vehicle
has an automatic transmission, it
must also be in Park. The anti-theft
lock will lock the steering column
when you remove the key. If the front wheels are turned, the
anti-theft lock may sometimes make
it difficult to turn the key from
LOCK to ACCESSORY. Firmly turn
the steering wheel to the left or to
the right as you turn the key. ACCESSORY (I) — In this position,
you can operate the audio system and the accessory power socket.
ON (II) — This is the normal key
position when driving. All features
and accessories on the vehicle are
usable. Several of the lights on the
instrument panel come on as a test
when you turn the ignition switch
from ACCESSORY to ON (see page 51).
START (III) — Use this position
only to start the engine. The switch
returns to ON (II) when you let go of
the key.
You will hear a reminder beeper if
you leave the key in the ignition switch in the LOCK (0) or
ACCESSORY (I) position and open the driver's door. Remove the key to
turn off the beeper. Door Locks
Each door has a lock tab next to the
inside door handle. Push the tab in to
lock the door and pull it out to unlock.
To lock the passenger's door when getting out of the vehicle, push the
lock tab in and close the door. To
lock the driver's door, pull the door
handle and push the lock tab in. Release the handle, then close the
door.
Instruments and Controls
Removing the key from the
ignition switch while driving
locks the steering. This can
cause you to lose control.
Remove the key from the
ignition switch only when
parked.Main Menu Table of Contents s t
Page 71 of 251
Keys and Locks
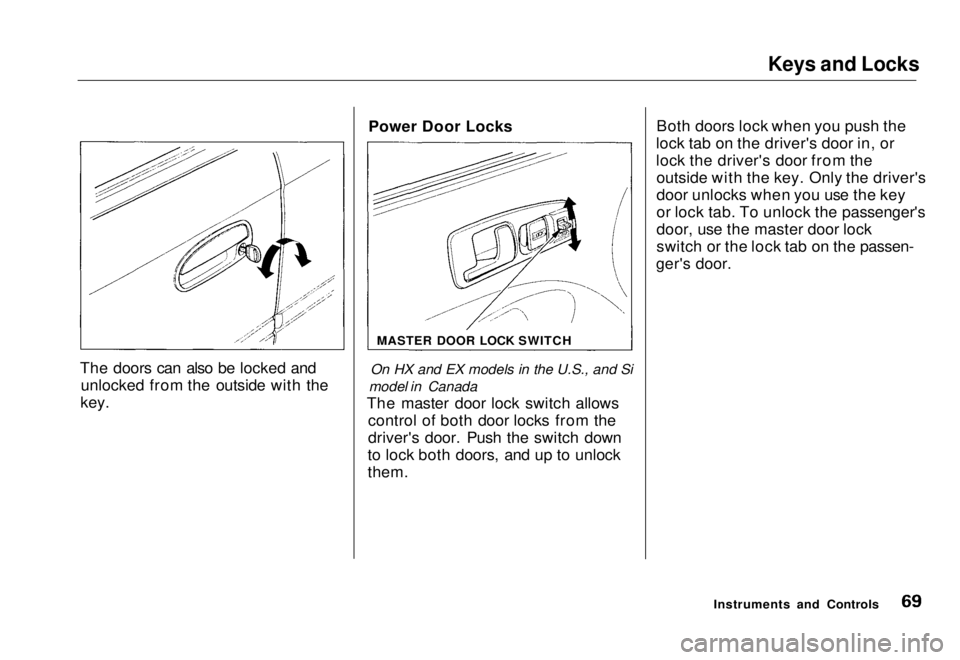
The doors can also be locked and unlocked from the outside with the
key. Power Door Locks
On HX and EX models in the U.S., and Si
model in Canada
The master door lock switch allows control of both door locks from the
driver's door. Push the switch down
to lock both doors, and up to unlock
them. Both doors lock when you push the
lock tab on the driver's door in, or
lock the driver's door from the outside with the key. Only the driver's
door unlocks when you use the key
or lock tab. To unlock the passenger's
door, use the master door lock
switch or the lock tab on the passen-
ger's door.
Instruments and Controls
MASTER DOOR LOCK SWITCHMain Menu Table of Contents s t
Page 72 of 251
Keys and Locks
Remote Transmitter
On EX model in the U.S.
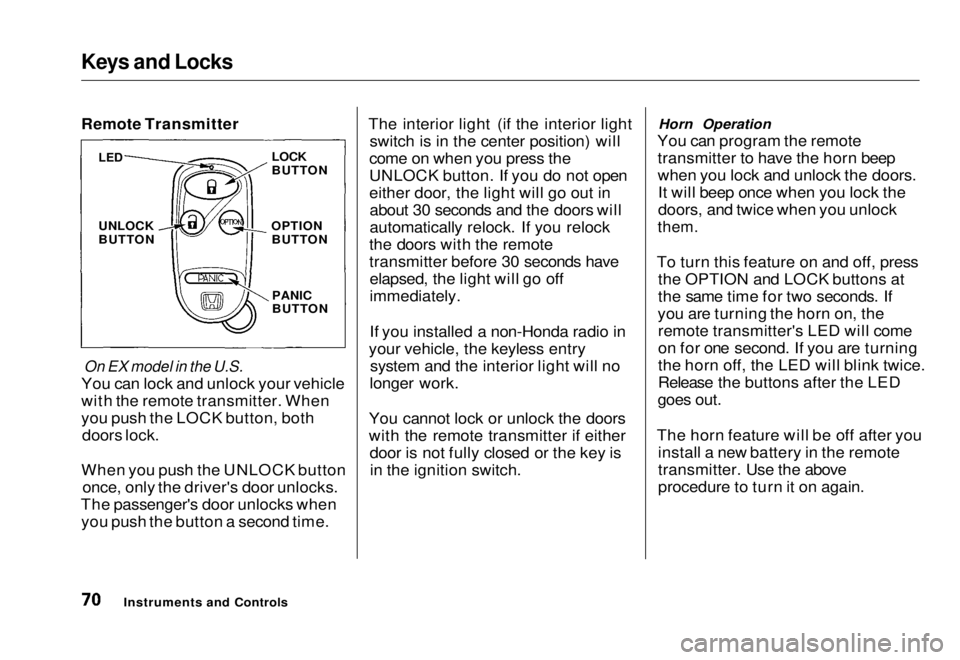
You can lock and unlock your vehicle
with the remote transmitter. When
you push the LOCK button, both doors lock.
When you push the UNLOCK button once, only the driver's door unlocks.
The passenger's door unlocks when you push the button a second time. The interior light (if the interior light
switch is in the center position) will
come on when you press the
UNLOCK button. If you do not open
either door, the light will go out in about 30 seconds and the doors will
automatically relock. If you relock
the doors with the remote
transmitter before 30 seconds have elapsed, the light will go off
immediately.
If you installed a non-Honda radio in
your vehicle, the keyless entry system and the interior light will no
longer work.
You cannot lock or unlock the doors
with the remote transmitter if either door is not fully closed or the key isin the ignition switch. Horn Operation
You can program the remote transmitter to have the horn beep
when you lock and unlock the doors.It will beep once when you lock the
doors, and twice when you unlock
them.
To turn this feature on and off, press the OPTION and LOCK buttons at
the same time for two seconds. If
you are turning the horn on, the remote transmitter's LED will come
on for one second. If you are turning
the horn off, the LED will blink twice.
Release the buttons after the LED
goes out.
The horn feature will be off after you install a new battery in the remote
transmitter. Use the above
procedure to turn it on again.
Instruments and Controls
LED
UNLOCK
BUTTON
LOCK
BUTTON
OPTION BUTTON
PANIC
BUTTONMain Menu Table of Contents s t
Page 73 of 251
Keys and Locks
Panic Mode
Panic mode allows you to remotely
sound your vehicle's horn to attract
attention. To activate this mode,
press and hold the PANIC button for
about one second. Your vehicle's
horn will beep for about 30 seconds.
To cancel PANIC mode before 30 seconds, press any button on the
remote transmitter. You can also
turn the ignition switch to
ACCESSORY (I) or ON (II).
Panic mode will not activate if the
ignition switch is in ACCESSORY (I)or ON (II).
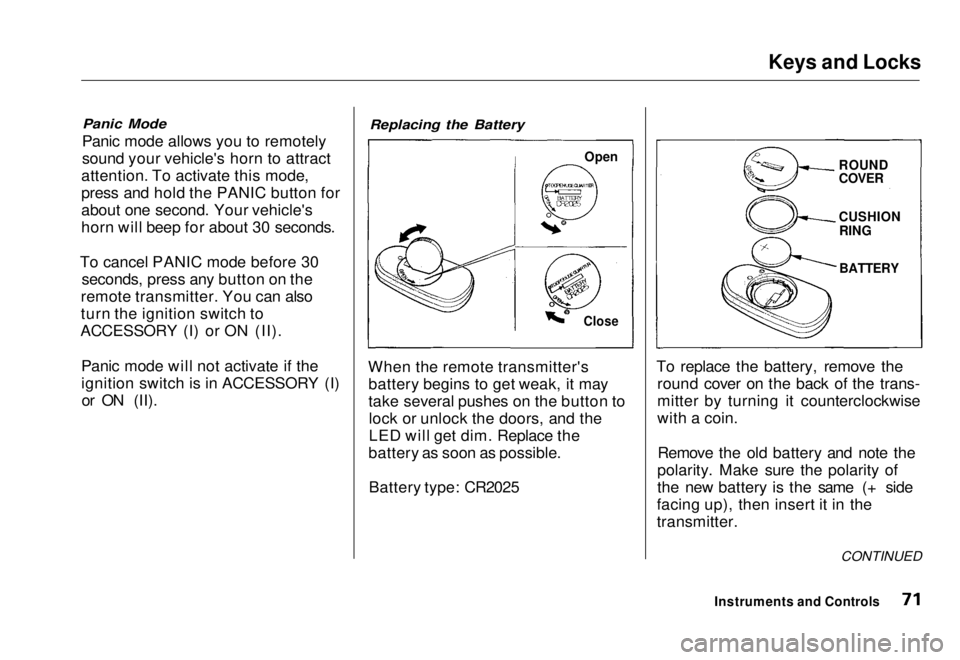
Replacing the Battery
When the remote transmitter's battery begins to get weak, it may
take several pushes on the button tolock or unlock the doors, and the
LED will get dim. Replace the
battery as soon as possible.
Battery type: CR2025 To replace the battery, remove the
round cover on the back of the trans-
mitter by turning it counterclockwise
with a coin.
Remove the old battery and note the
polarity. Make sure the polarity of
the new battery is the same (+ side
facing up), then insert it in the
transmitter.
Instruments and Controls
Open
Close
ROUND
COVER
CUSHION
RING
BATTERY
CONTINUEDMain Menu Table of Contents s t
Page 74 of 251
Keys and Locks
Reinstall the 0-ring. Align the
mark on the cover with the mark on the transmitter,
then set the cover in place and turn it
clockwise.
After the battery is changed, the transmitter must be synchronized
with the main unit. With the doors and trunk lid closed, press either theLOCK or UNLOCK button six times.
Test the transmitter by locking and unlocking the doors several times. Transmitter Care
Avoid severe shock to the trans- mitter, such as dropping or throwing
it. Also, protect it from extreme hotor cold temperatures.
Clean the transmitter case with a
soft cloth. Do not use strong
cleaners or solvents that could harm
the case. Immersing the transmitter in any liquid will harm the trans-
mitter and cause it to not function
properly.
Use the ring on the transmitter to
attach it to your main key ring. You
could damage the transmitter if you
try to use its ring as a key ring. If you lose a transmitter, you will
need to have the replacement
programmed to your vehicle's
system by your Honda dealer. Any
other transmitters you have will also
need to be reprogrammed.
As required by the FCC: This device complies with Part 15 of the
FCC rules. Operation is subject to the
following two conditions: (1) This device may not cause harmful interference, and (2) this device must accept any
interference received, including
interference that may cause undesired operation.
Changes or modifications not expressly
approved by the party responsible for
compliance could void the user's
authority to operate the equipment.
Instruments and ControlsMain Menu Table of Contents s t
Page 75 of 251
Keys and Locks
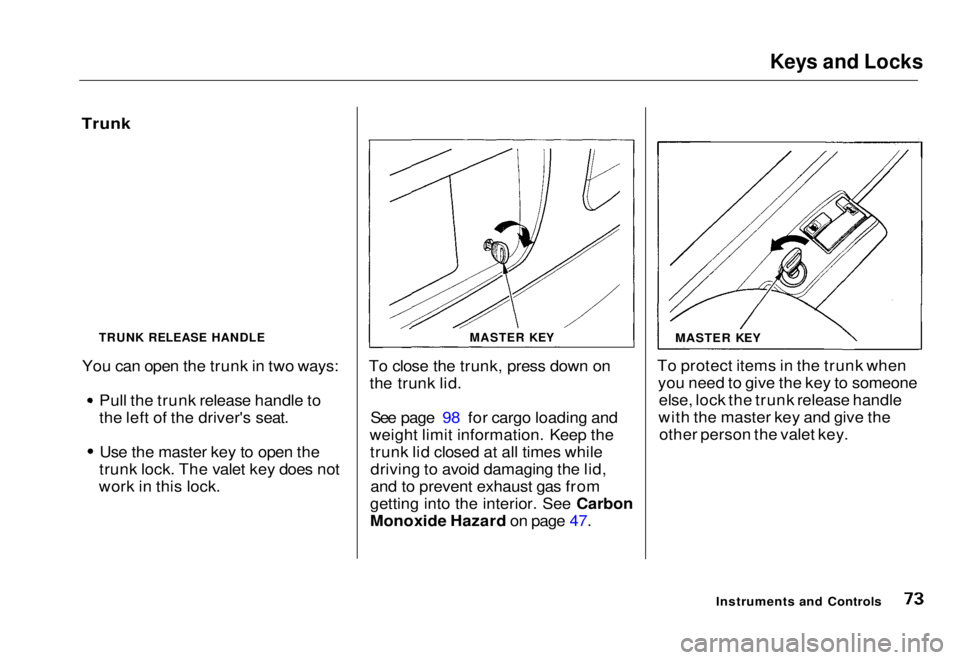
Trunk
You can open the trunk in two ways: Pull the trunk release handle to
the left of the driver's seat.
Use the master key to open the
trunk lock. The valet key does not
work in this lock. To close the trunk, press down on
the trunk lid.
See page 98 for cargo loading and
weight limit information. Keep the trunk lid closed at all times whiledriving to avoid damaging the lid,
and to prevent exhaust gas from
gettin
g
into the interior. See Carbon
Monoxide Hazar d
on page 47.To protect items in the trunk when
you need to give the key to someoneelse, lock the trunk release handle
with the master key and give the other person the valet key.
Instruments and Controls
MASTER KEY
MASTER KEY
TRUNK RELEASE HANDLEMain Menu Table of Contents s t