roof HONDA CIVIC COUPE 1999 Owners Manual
[x] Cancel search | Manufacturer: HONDA, Model Year: 1999, Model line: CIVIC COUPE, Model: HONDA CIVIC COUPE 1999Pages: 269, PDF Size: 2.42 MB
Page 5 of 269
Your Car at a Glance
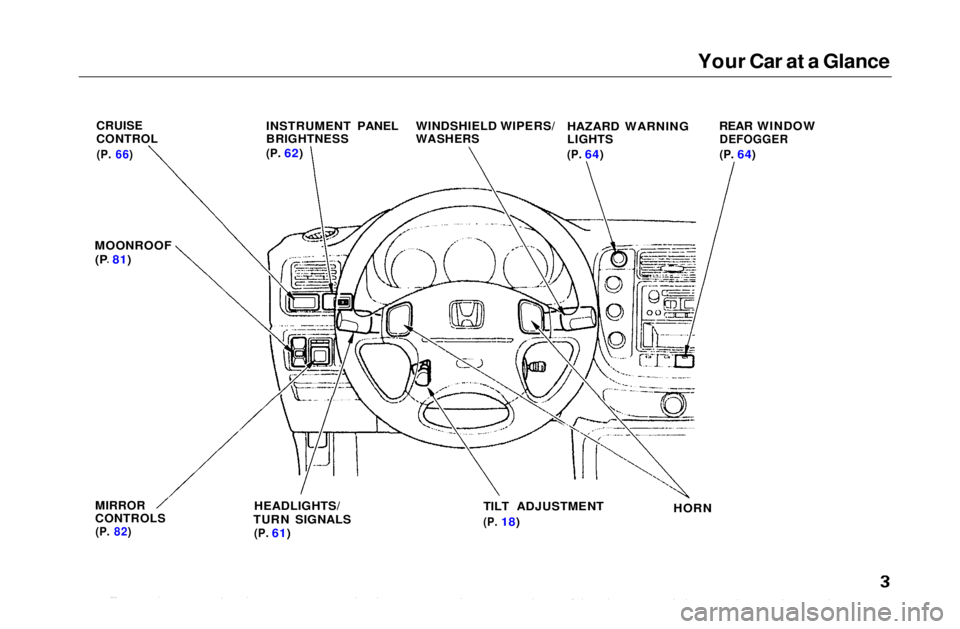
CRUISE
CONTROL
(P.
66)
INSTRUMENT PANEL
BRIGHTNESS
(P.
62)
WINDSHIELD WIPERS/
WASHERS
HAZARD WARNING
LIGHTS
(P.
64) REAR WINDOW
DEFOGGER
(P.
64)
MOONROOF (P 81)
MIRROR
CONTROLS
(P.
82)
HEADLIGHTS/
TURN SIGNALS
(P.
61) TILT ADJUSTMENT
(P.
18)
HORNMain Menu s t
Page 52 of 269
Instruments and Controls
This section gives information about
the controls and displays thatcontribute to the daily operation of
your Honda. All the essential
controls are within easy reach.
Control Locations............................ 52
Indicator Lights................................ 53
Gauges.............................................. 57
Speedometer................................ 57
Tachometer.................................. 57
Odometer...................................... 57
Trip Meter.................................... 57
Fuel Gauge................................... 58
Temperature Gauge.................... 58
Maintenance Required
Indicator.................................... 59
Controls Near the Steering Wheel........................................ 60
Headlights.................................... 61
Daytime Running Lights............. 61
Instrument Panel Brightness..... 62
Turn Signals................................. 62
Windshield Wipers...................... 63
Windshield Washers................... 63
Hazard Warning........................... 64
Rear Window Defogger.............. 64
Steering Wheel Adjustment....... 65
Steering Wheel Controls ................ 66 Cruise Control.............................. 66
Keys and Locks................................ 69
Keys.............................................. 69
Ignition Switch............................. 69
Door Locks................................... 70
Power Door Locks....................... 71
Remote Transmitter.................... 72
Trunk............................................ 75
Seat Adjustments............................. 76
Front Seat Adjustments.............. 76
Rear Seat Access......................... 77
Head Restraints........................... 77
Folding Rear Seat............................ 78
Power Windows............................... 79
Moonroof.......................................... 81
Mirrors.............................................. 81
Adjusting the Power Mirrors..... 82
Parking Brake.................................. 83 Glove Box......................................... 83
Beverage Holder.............................. 84
Accessory Power Socket................ 85
Ashtrays............................................ 85
Interior Light.................................... 86
Instruments and ControlsMain Menu s t
Page 61 of 269
Controls Near the Steering Wheel
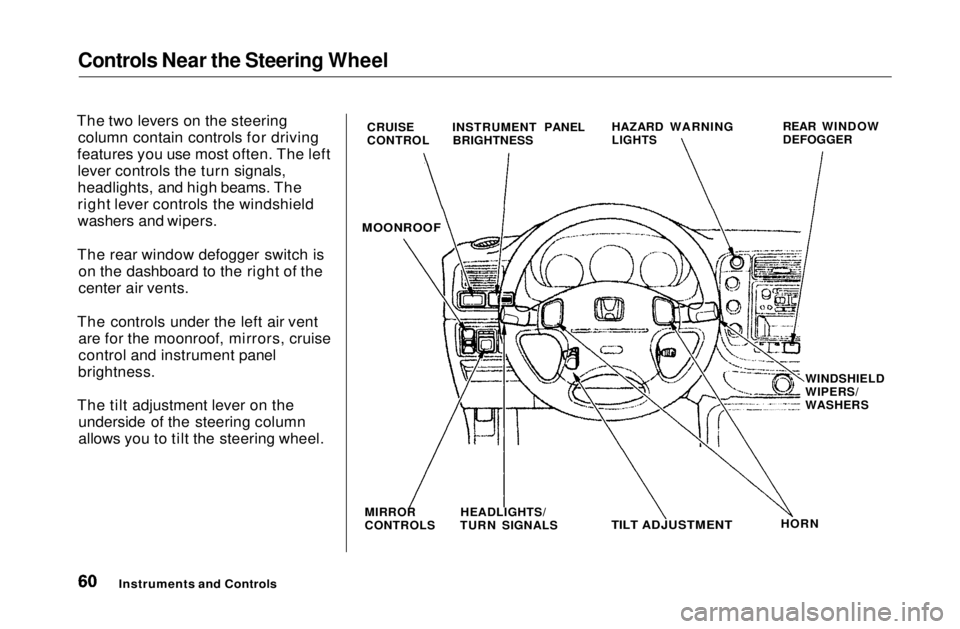
The two levers on the steering column contain controls for driving
features you use most often. The left lever controls the turn signals,
headlights, and high beams. The
right lever controls the windshield
washers and wipers.
The rear window defogger switch is on the dashboard to the right of the
center air vents.
The controls under the left air vent are for the moonroof, mirrors, cruise
control and instrument panel
brightness.
The tilt adjustment lever on the underside of the steering column
allows you to tilt the steering wheel.
Instruments and Controls
CRUISE
CONTROL
INSTRUMENT PANEL
BRIGHTNESS HAZARD WARNING
LIGHTS
REAR WINDOW
DEFOGGER
MOONROOF
MIRROR
CONTROLS HEADLIGHTS/
TURN SIGNALS
TILT ADJUSTMENT
HORNWINDSHIELD
WIPERS/
WASHERSMain Menu Table of Contents s t
Page 82 of 269
Moonroof, Mirrors
On EX and Si models in the U.S., and Si
and SiR models in Canada
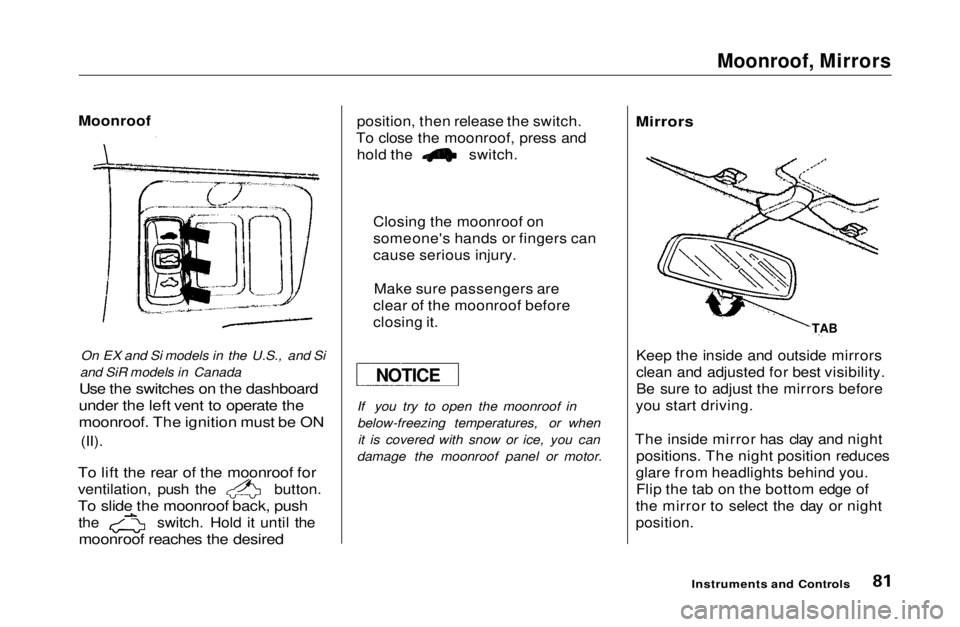
Use the switches on the dashboard
under the left vent to operate the
moonroof. The ignition must be ON
(II).
To lift the rear of the moonroof for
ventilation, push the button.
To slide the moonroof back, push
the switch. Hold it until the
moonroof reaches the desired
position, then release the switch.
To close the moonroof, press and hold the switch.
If you try to open the moonroof in
below-freezing temperatures, or whenit is covered with snow or ice, you can
damage the moonroof panel or motor.
Mirrors
Keep the inside and outside mirrors
clean and adjusted for best visibility.
Be sure to adjust the mirrors before
you start driving.
The inside mirror has clay and night positions. The night position reduces
glare from headlights behind you. Flip the tab on the bottom edge of
the mirror to select the day or night
position.
Instruments and Controls
Moonroof
Closing the moonroof on
someone's hands or fingers can
cause serious injury.Make sure passengers are
clear of the moonroof before
closing it.
NOTICE TABMain Menu Table of Contents s t
Page 134 of 269

Carrying Cargo
Carrying Cargo in the Trunk or on
a Roof Rack Distribute cargo evenly on the
floor of the trunk, placing the
heaviest items on the bottom and as far forward as possible. If you fold down the back seat, tie
down items that could be thrown
about the car during a crash or
sudden stop. If you carry large items that
prevent you from closing the
hatch, exhaust gas can enter the
passenger area. To avoid the
possibility of carbon monoxide
poisoning, follow the instructions
on page 49. If you can carry any items on a
roof rack, be sure the total weight
of the rack and the items does not
exceed the maximum allowable
weight. Please contact your Honda dealer for further information.
Before DrivingMain Menu Table of Contents s t
Page 149 of 269

Parking
Always use the parking brake when
you park your car. The indicator on the instrument panel shows that theparking brake is not fully released; it
does not indicate that the parking
brake is firmly set. Make sure the parking brake is set firmly or your
car may roll if it is parked on an
incline.
If your car has an automatic
transmission, set the parking brake
before you put the transmission inPark. This keeps the car from
moving and putting pressure on the
parking mechanism in the
transmission — making it easier to
move the shift lever out of Park
when you want to drive away. If the car is facing uphill, turn the
front wheels away from the curb. If
you have a manual transmission, put it in first gear.
If the car is facing downhill, turn the
front wheels toward the curb. If you
have a manual transmission, put it in reverse gear.
Make sure the parking brake is fully
released before driving away.
Driving with the parking brake
partially set can overheat or damage
the rear brakes. Parking Tips Make sure the moonroof and the
windows are closed. Turn off the lights.
Place any packages, valuables, etc.,
in the trunk or take them with you. Lock the doors with the key or the
remote transmitter.
Never park over dry leaves, tall
grass, or other flammable materials. The three way catalytic
converter gets very hot, and could
cause these materials to catch on
fire.
DrivingMain Menu Table of Contents s t
Page 160 of 269

Maintenance Schedule
Your authorized Honda dealer knows your car best and can provide competent, efficient service.However, service at a dealer is not
mandatory to keep your warrantiesin effect. Maintenance may be done
by any qualified service facility or person who is skilled in this type of automotive service. Keep all the
receipts as proof of completion, and
have the person who does the work
fill out the Maintenance Record. Check your warranty booklet for
more information. We recommend the use of Genuine
Acura parts and fluids whenever you have maintenance done. These aremanufactured to the same high-quality standards as the original
components, so you can be confidentof their performance and durability.
U.S. Vehicles:
Maintenance, replacement orrepair of emissions control
devices and systems may be done
by any automotive repair establishment or individual using
parts that are "certified" to EPAstandards. According to state and federal
regulations, failure to performmaintenance on the items marked
with # will not void your emissions warranties. However, Hondarecommends that all maintenance services be performed at the
recommended time or mileage
period to ensure long-term reliability.
MaintenanceMain Menu Table of Contents s t
Page 163 of 269
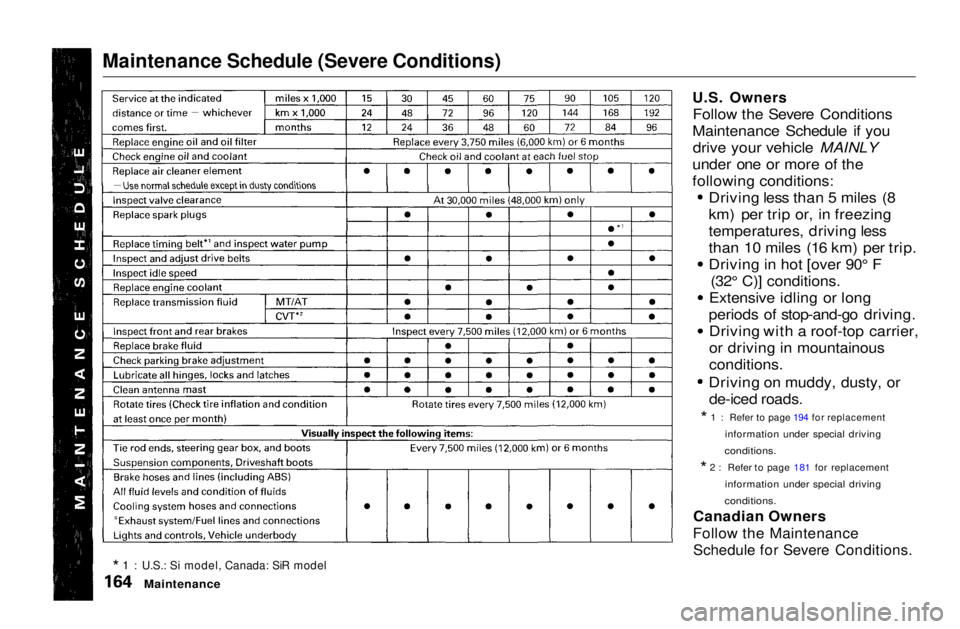
Maintenance Schedule (Severe Conditions)
U.S. Owners
Follow the Severe Conditions
Maintenance Schedule if you drive your vehicle MAINLY
under one or more of the
following conditions: Driving less than 5 miles (8
km) per trip or, in freezing
temperatures, driving less
than 10 miles (16 km) per trip.
Driving in hot [over 90° F(32° C)] conditions.
Extensive idling or long
periods of stop-and-go driving. Driving with a roof-top carrier,
or driving in mountainous
conditions.
Driving on muddy, dusty, or de-iced roads.
* 1 : Refer to page 194 for replacement
information under special driving
conditions.
* 2: Refer to page 181 for replacement
information under special driving
conditions.
Canadian Owners
Follow the Maintenance
Schedule for Severe Conditions.
* 1 : U.S.: Si model, Canada: SiR model
MaintenanceMain Menu Table of Contents s t
Page 218 of 269

Taking Care of the Unexpected
This section covers the more- common problems that motorists
experience with their vehicles. It
gives you information about how to safely evaluate the problem and what
to do to correct it. If the problem has stranded you on the side of the road,
you may be able to get going again. If not, you will also find instructions
on getting your car towed. Compact Spare Tire....................... 220
Changing a Flat Tire..................... 221
If Your Engine Won't Start........... 226
Nothing Happens or theStarter Motor OperatesVery Slowly............................. 226
The Starter Operates Normally................................. 227
Jump Starting................................. 227 If Your Engine Overheats............. 229
Low Oil Pressure Indicator.......... 231Charging System Indicator........... 232
Malfunction Indicator Lamp ........ 233
Brake System Indicator................ 234 Closing the Moonroof................... 235
Fuses............................................... 236 Checking and Replacing........... 237
Emergency Towing....................... 241
Taking Care of the UnexpectedMain Menu s t
Page 234 of 269
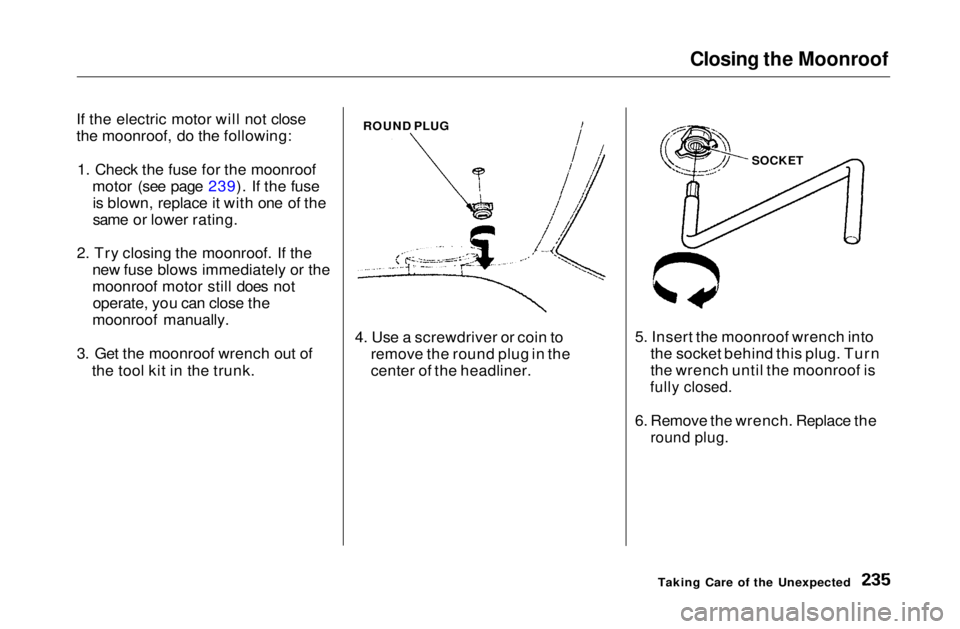
Closing the Moonroof
If the electric motor will not close
the moonroof, do the following: 1. Check the fuse for the moonroof motor (see page 239). If the fuseis blown, replace it with one of the
same or lower rating.
2. Try closing the moonroof. If the new fuse blows immediately or the
moonroof motor still does notoperate, you can close the
moonroof manually.
3. Get the moonroof wrench out of the tool kit in the trunk. 4. Use a screwdriver or coin to
remove the round plug in the
center of the headliner. 5. Insert the moonroof wrench into
the socket behind this plug. Turn
the wrench until the moonroof is
fully closed.
6. Remove the wrench. Replace the
round plug.
Taking Care of the Unexpected
ROUND PLUG
SOCKETMain Menu Table of Contents s t