hood open HONDA CIVIC COUPE 2015 9.G Owners Manual
[x] Cancel search | Manufacturer: HONDA, Model Year: 2015, Model line: CIVIC COUPE, Model: HONDA CIVIC COUPE 2015 9.GPages: 441, PDF Size: 18.4 MB
Page 4 of 441
Contents
Child Safety P. 50Exhaust Gas Hazard P. 62Safety Labels P. 63
Opening and Closing the Trunk P. 113 Security System P. 116 Opening and Closing the Windows P. 119
Operating the Switches Around the Steering Wheel P. 122 Adjusting the Mirrors P. 135
Interior Lights/Interior Convenience Items P. 145 Heating and Cooling
* P. 152
Audio Error Messages P. 211General Information on the Audio System P. 217
When Driving P. 298 Braking P. 326Parking Your Vehicle P. 330
Accessories and Modifications P. 336
Maintenance Under the Hood P. 345 Replacing Light Bulbs P. 360
Checking and Maintaining Tires P. 372 Battery P. 381 Remote Transmitter Care P. 382
Cleaning P. 385
Engine Does Not Start P. 400 Jump Starting P. 403 Shift Lever Does Not Move P. 406
Fuses P. 413 Emergency Towing P. 417
Devices that Emit Radio Waves P. 425 Reporting Safety Defects P. 426
Authorized Manuals P. 431 Customer Service Information P. 432
Quick Reference GuideP. 4
Safe DrivingP. 25
Instrument PanelP. 65
ControlsP. 99
FeaturesP. 159
DrivingP. 291
MaintenanceP. 337
Handling the UnexpectedP. 391
InformationP. 419
IndexP. 433
Page 9 of 441
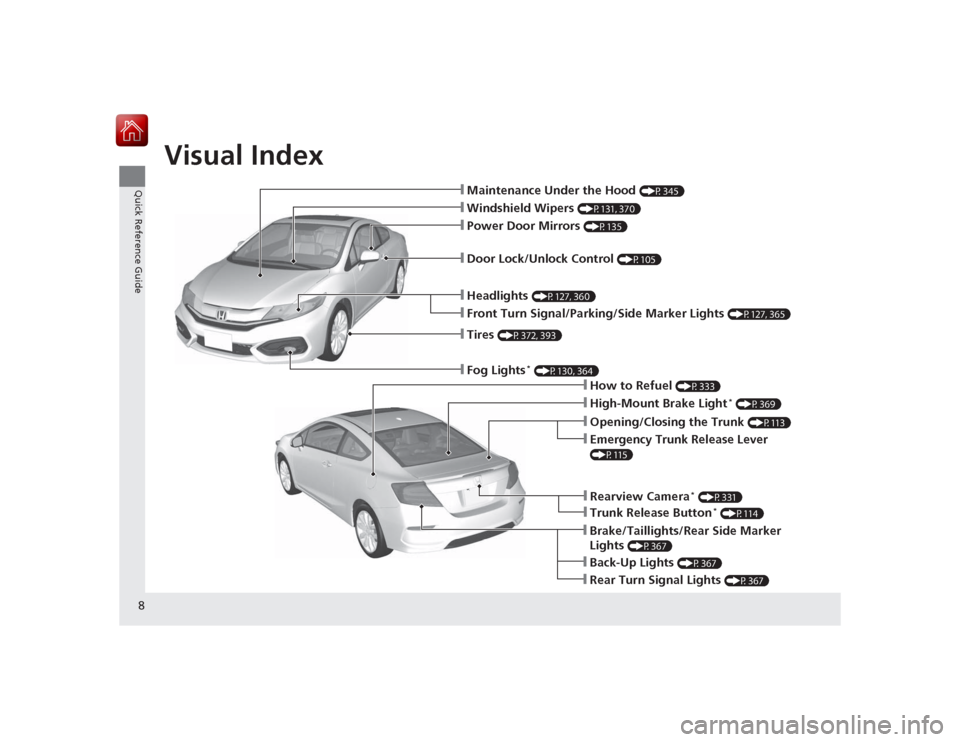
Visual Index
8Quick Reference Guide
❙Maintenance Under the Hood
(P345)
❙Windshield Wipers
(P131, 370)
❙Tires
(P372, 393)
❙Fog Lights
* (P130, 364)
❙Door Lock/Unlock Control
(P105)
❙Power Door Mirrors
(P135)
❙Headlights
(P127, 360)
❙Emergency Trunk Release Lever (P115)❙Opening/Closing the Trunk
(P113)
❙How to Refuel
(P333)
❙High-Mount Brake Light
* (P369)
❙Front Turn Signal/Parking/Side Marker Lights
(P127, 365)
❙Back-Up Lights
(P367)
❙Rear Turn Signal Lights
(P367)
❙Brake/Taillights/Rear Side Marker
Lights
(P367)
❙Rearview Camera
* (P331)
❙Trunk Release Button
* (P114)
Page 22 of 441
Quick Reference Guide21
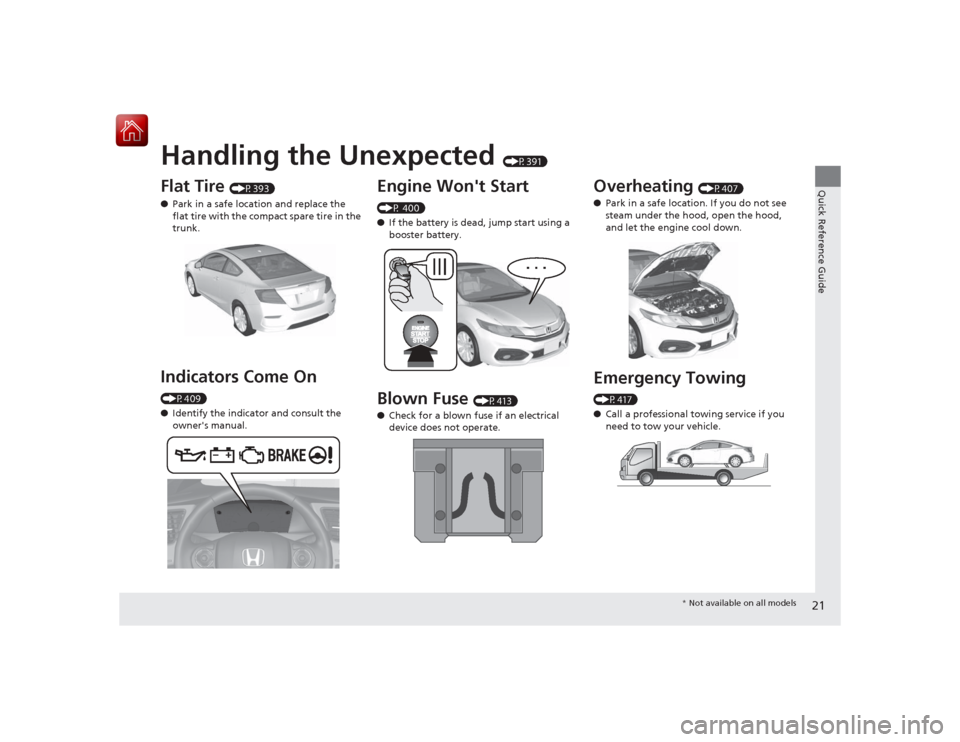
Handling the Unexpected
(P391)
Flat Tire
(P393)
● Park in a safe location and replace the
flat tire with the compact spare tire in the
trunk.
Indicators Come On (P409)
●Identify the indicator and consult the
owner's manual.
Engine Won't Start (P 400)
●If the battery is dead, jump start using a
booster battery.Blown Fuse
(P413)
● Check for a blown fuse if an electrical
device does not operate.
Overheating
(P407)
● Park in a safe location. If you do not see
steam under the hood, open the hood,
and let the engine cool down.
Emergency Towing (P417)
●Call a professional towing service if you
need to tow your vehicle.
* Not available on all models
Page 117 of 441
116Controls
Security SystemImmobilizer SystemThe immobilizer system prevents a key that has not been pre-registered from
starting the engine. Each key contains electronic transmitters that use electronic
signals to verify the key.
Pay attention to the following when inserting the key into the ignition switch or
pressing the ENGINE START/STOP button:
• Do not allow objects that emit strong radio waves near the ignition switch or the
ENGINE START/STOP button.
• Make sure the key is not covered by or touching a metal object.
• Do not bring a key from another vehicle's immobilizer system near the ignition
switch.Security System AlarmThe security system alarm activates when the trunk, hood or doors are forcibly
opened. The alarm does not go off if the trunk or doors are opened with the key,
remote transmitter or smart entry system.
However, the alarm goes off when a door is op ened with the key, then the shift
lever is moved out of
(P
(continuously variable transmission models) or the hood is
opened before the ignition switch is turned to ON
(w
*1.
■When the security system alarm activates
The horn sounds intermittently and all the exterior lights flash.■To deactivate the security system alarm
Unlock the vehicle using the remote transmitter, or smart entry system. The system,
along with the horn and flashing lights, is deactivated.*1: Models with the smart entry system have an ENGINE START/STOP button instead of an
ignition switch.
1 Immobilizer SystemNOTICELeaving the ignition key in the vehicle can result in
theft or accidental movement of the vehicle.
Always take the ignition key with you whenever you
leave the vehicle unattended.
Do not alter the system or add other devices to it.
Doing so may damage the system and make your
vehicle inoperable.1Security System Alarm
The security alarm continues for a maximum of two
minutes until the security system deactivates.
Page 118 of 441
Continued
117
uuSecurity System uSecurity System Alarm
Controls
■Setting the security system alarm
The security system alarm automatically sets when the following conditions have
been met:
• The ignition switch is in LOCK
(0
*1, and the key has been removed from the
ignition switch.
• The hood and trunk are closed.
• Both doors are locked with the key, the remote transmitter, or smart entry
system.
■When the security system alarm sets
The security system indicator in the instrument panel blinks. When the blinking
interval changes after about 15 seconds, the security system is set.■To cancel the security system alarm
The security system is canceled when the vehicle is unlocked using the remote
transmitter, smart entry system, or the ignition switch is turned to ON
(w
*1. The
security system indicator goes off at the same time.
*1: Models with the smart entry system have an ENGINE START/STOP button instead of an
ignition switch.
1 Security System Alarm
Do not set the security system alarm when someone
is in the vehicle or a window is open. The system can
accidentally activate when:•Unlocking the door with the lock tab.•Opening the trunk with th e trunk release or the
emergency trunk opener.•Opening the hood with the hood release.•Moving the shift lever out of
( P.
If the battery goes dead after you have set the
security system alarm, the security alarm may go off
once the battery is recharged or replaced.
If this occurs, deactivate the security system alarm by
unlocking a door using the remote transmitter.
Do not attempt to alter this system or add another
device to it.
Continuously variable transmission models
Page 293 of 441
292Driving
Before DrivingDriving PreparationCheck the following items before you start driving.
•Make sure there are no obstructions on the windows, door mirrors, exterior
lights, or other parts of the vehicle.
u Remove any frost, snow, or ice.
u Remove any snow on the roof, as this can slip down and obstruct your field of
vision while driving. If frozen solid, remove ice once it has softened.
u When removing ice from around the wheels, be sure not to damage the wheel
or wheel components.
• Make sure the hood is securely closed.
u If the hood opens while driving, your front view will be blocked.
• Make sure the tires are in good condition.
u Check air pressure, check for damage and excessive wear.
2 Checking and Maintaining Tires P. 372
•Make sure there are no people or objects behind or around the vehicle.
u There are blind spots from the inside.■
Exterior Checks
1Exterior ChecksNOTICEWhen doors are frozen shut, use warm water around
the door edges to melt any ice. Do not try to force
them open, as this can damage the rubber trim
around the doors. When done, wipe dry to avoid
further freezing.
Do not pour warm water into the key cylinder.
You will be unable to inse rt the key if the water
freezes in the hole.
Heat from the engine and exhaust can ignite
flammable materials left under the hood, causing a
fire. If you've parked your vehicle for an extended
period, inspect and remove any debris that may have
collected, such as dried grass and leaves that have
fallen or have been carried in for use as a nest by a
small animal.
Also check under the hood for leftover flammable
materials after you or someone else has performed
maintenance on your vehicle.
Page 338 of 441
337
Maintenance
This chapter discusses basic maintenance.
Before Performing MaintenanceInspection and Maintenance ............ 338Safety When Performing Maintenance..... 339Parts and Fluids Used in Maintenance Service ........................................... 340
Maintenance Minder
TM..................... 341
Maintenance Under the Hood
Maintenance Items Under the Hood ..... 345Opening the Hood ........................... 347
Recommended Engine Oil ................ 348
Oil Check ......................................... 349
Adding Engine Oil ............................ 351Changing the Engine Oil and Oil Filter ..... 352
Engine Coolant ................................ 355
Transmission Fluid ............................ 357
Brake/Clutch Fluid ............................ 358
Refilling Window Washer Fluid......... 359
Replacing Light Bulbs ....................... 360Checking and Maintaining Wiper
Blades .......................................... 370Checking and Maintaining Tires
Checking Tires ................................. 372Tire and Loading Information Label ...... 373Tire Labeling .................................... 373DOT Tire Quality Grading (U.S. Vehicles)....... 375Wear Indicators................................ 377 Tire Service Life ................................ 377
Tire and Wheel Replacement ........... 378
Tire Rotation .................................... 379
Winter Tires ..................................... 380
Battery ............................................... 381
Remote Transmitter Care
Replacing the Button Battery ........... 382
Heating and Cooling System
*/Climate
Control System
* Maintenance ....... 384
Cleaning
Interior Care .................................... 385
Exterior Care.................................... 387
* Not available on all models
Page 348 of 441
347
uuMaintenance Under the Hood uOpening the Hood
Maintenance
Opening the Hood
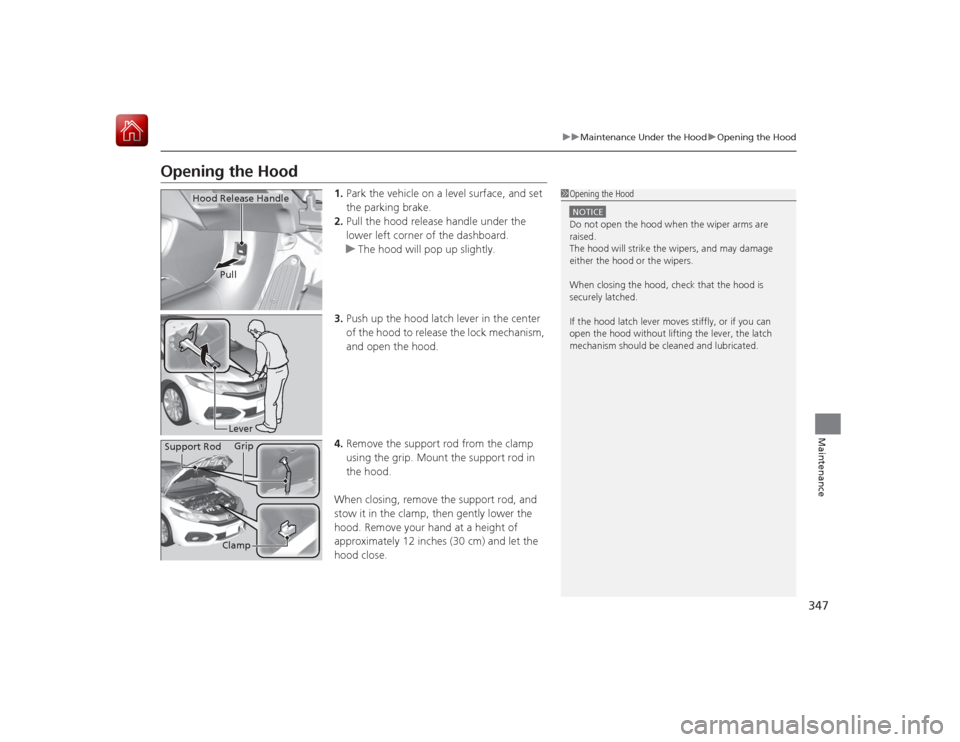
1. Park the vehicle on a level surface, and set
the parking brake.
2. Pull the hood release handle under the
lower left corner of the dashboard.
u The hood will pop up slightly.
3. Push up the hood latch lever in the center
of the hood to release the lock mechanism,
and open the hood.
4. Remove the support rod from the clamp
using the grip. Mount the support rod in
the hood.
When closing, remove the support rod, and
stow it in the clamp, then gently lower the
hood. Remove your hand at a height of
approximately 12 inches (30 cm) and let the
hood close.
1 Opening the HoodNOTICEDo not open the hood when the wiper arms are
raised.
The hood will strike the wipers, and may damage
either the hood or the wipers.
When closing the hood, check that the hood is
securely latched.
If the hood latch lever moves stiffly, or if you can
open the hood without lifting the lever, the latch
mechanism should be cleaned and lubricated.
Hood Release Handle
Pull
Lever
Support Rod Grip
Clamp
Page 353 of 441
352
uuMaintenance Under the Hood uChanging the Engine Oil and Oil Filter
Maintenance
Changing the Engine Oil and Oil FilterYou must change the engine oil and oil filter regularly in order to maintain the
engine's lubrication. The engine may be damaged if they are not changed regularly.
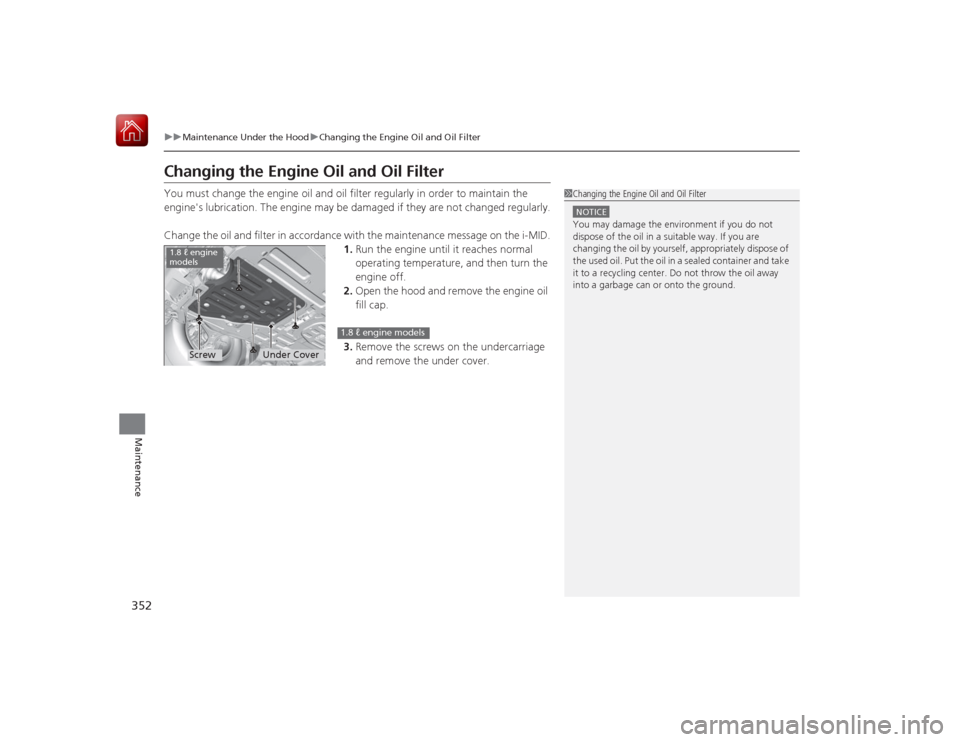
Change the oil and filter in accordance with the maintenance message on the i-MID. 1.Run the engine until it reaches normal
operating temperature, and then turn the
engine off.
2. Open the hood and remove the engine oil
fill cap.
3. Remove the screws on the undercarriage
and remove the under cover.
1Changing the Engine Oil and Oil FilterNOTICEYou may damage the environment if you do not
dispose of the oil in a suitable way. If you are
changing the oil by yourself, appropriately dispose of
the used oil. Put the oil in a sealed container and take
it to a recycling center. Do not throw the oil away
into a garbage can or onto the ground.
Under Cover
Screw
1.8 ℓ engine
models
1.8 ℓ engine models
Page 404 of 441
403
Continued
Handling the Unexpected
Jump StartingTurn off the power to electric devices, such as audio and lights. Turn off the engine,
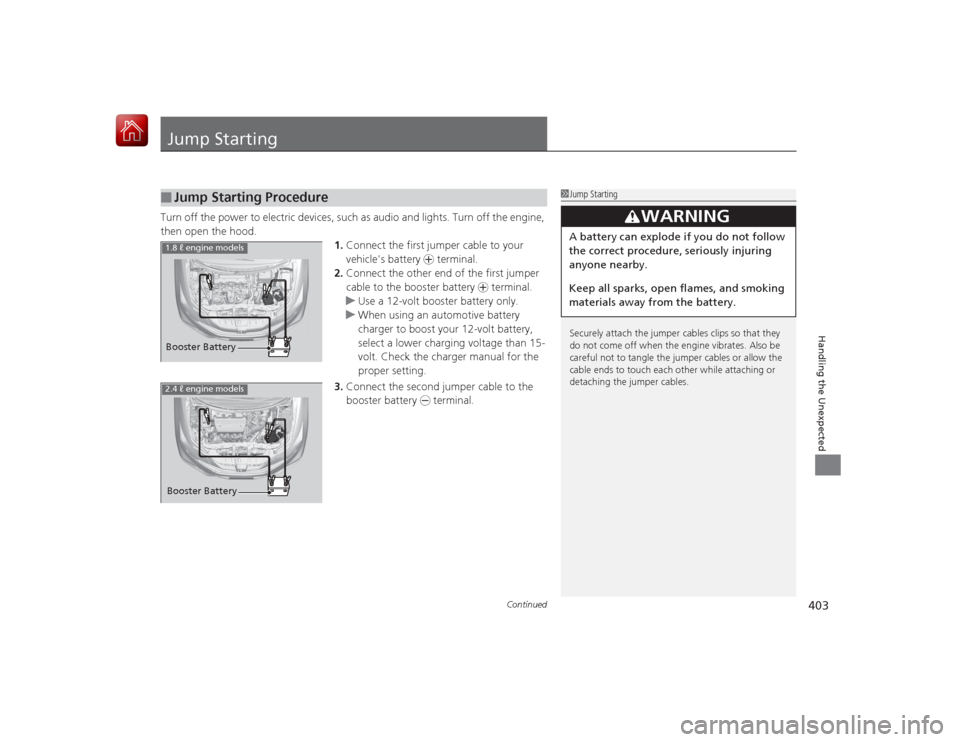
then open the hood. 1.Connect the first jumper cable to your
vehicle's battery + terminal.
2. Connect the other end of the first jumper
cable to the booster battery + terminal.
u Use a 12-volt booster battery only.
u When using an automotive battery
charger to boost your 12-volt battery,
select a lower charging voltage than 15-
volt. Check the charger manual for the
proper setting.
3. Connect the second jumper cable to the
booster battery - terminal.■
Jump Starting Procedure
1Jump Starting
Securely attach the jumper cables clips so that they
do not come off when the engine vibrates. Also be
careful not to tangle the jumper cables or allow the
cable ends to touch each other while attaching or
detaching the jumper cables.
3
WARNING
A battery can explode if you do not follow
the correct procedure, seriously injuring
anyone nearby.
Keep all sparks, open flames, and smoking
materials away from the battery.
Booster Battery1.8 ℓ engine models2.4 ℓ engine modelsBooster Battery