fuel HONDA CIVIC COUPE 2015 9.G Quick Guide
[x] Cancel search | Manufacturer: HONDA, Model Year: 2015, Model line: CIVIC COUPE, Model: HONDA CIVIC COUPE 2015 9.GPages: 79, PDF Size: 19.07 MB
Page 55 of 79
102 || 103
HANDLING THE UNEXPECTEDDRIVING
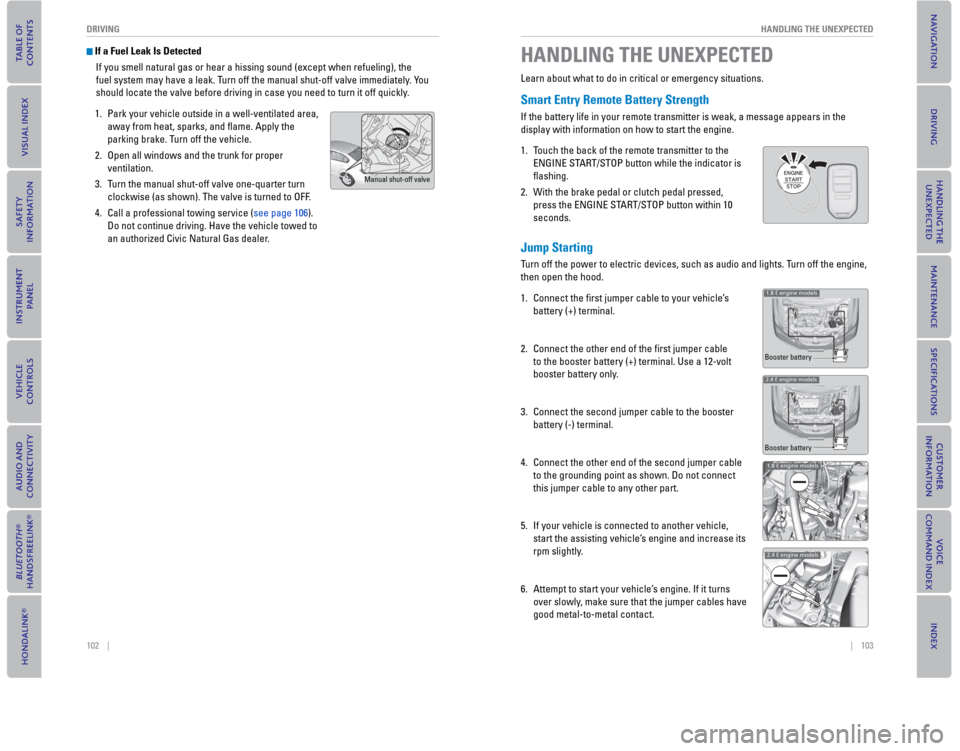
If a Fuel Leak Is Detected
If you smell natural gas or hear a hissing sound (except when refueling), the
fuel system may have a leak. Turn off the manual shut-off valve immediately. You
should locate the valve before driving in case you need to turn it off quickly.
1. Park your vehicle outside in a well-ventilated area,
away from heat, sparks, and fl ame. Apply the
parking brake. Turn off the vehicle.
2. Open all windows and the trunk for proper
ventilation.
3. Turn the manual shut-off valve one-quarter turn
clockwise (as shown). The valve is turned to OFF.
4. Call a professional towing service (see page 106).
Do not continue driving. Have the vehicle towed to
an authorized Civic Natural Gas dealer.
Manual shut-off valve
HANDLING THE UNEXPECTED
Learn about what to do in critical or emergency situations.
Smart Entry Remote Battery Strength
If the battery life in your remote transmitter is weak, a message appears in the
display with information on how to start the engine.
1. Touch the back of the remote transmitter to the
ENGINE START/STOP button while the indicator is
fl ashing.
2. With the brake pedal or clutch pedal pressed,
press the ENGINE START/STOP button within 10
seconds.
Jump Starting
Turn off the power to electric devices, such as audio and lights. Turn off the engine,
then open the hood.
1. Connect the fi rst jumper cable to your vehicle’s
battery (+) terminal.
2. Connect the other end of the fi rst jumper cable
to the booster battery (+) terminal. Use a 12-volt
booster battery only.
3. Connect the second jumper cable to the booster
battery (-) terminal.
4. Connect the other end of the second jumper cable
to the grounding point as shown. Do not connect
this jumper cable to any other part.
5. If your vehicle is connected to another vehicle,
start the assisting vehicle’s engine and increase its
rpm slightly.
6. Attempt to start your vehicle’s engine. If it turns
over slowly, make sure that the jumper cables have
good metal-to-metal contact.
1.8 ℓ engine models
2.4 ℓ engine models
Booster battery
Booster battery
1.8 ℓ engine models
2.4 ℓ engine models
Page 60 of 79

112 || 113
HANDLING THE UNEXPECTED
HANDLING THE UNEXPECTED
Fuse Locations
If any electrical devices are not working, turn the vehicle off and chec\
k to see if any
applicable fuse is blown. Fuse locations are shown on the fuse box cover\
. Locate the
fuse in question by the fuse number and box cover number.
Engine Compartment Fuse Box
Located under the hood near the brake fl uid reservoir. Push the tabs to open the
box.
*1: Models with smart entry system
*2: Models without smart entry system
9−−
−−
10
11Oil Level7.5 A
12 (20 A)
13Driver’s Power Seat Sliding*(20 A)
14
15FI Sub15A
15A
16
17Stop15A
18
19Premium Amp*(20A)
20 Right Headlight Low Beam*1Injection*, *215 A
(15A)
21IGP15A
15A
22
23Left Headlight Low Beam*1Headlight Low Beam*215A
20 A
24 Driver’s Power Seat
Reclining
*(20 A)
25MG Clutch7.5A
26 Washer*1−*215 A
−
27SMALL20A
28
29Backup10A
Circuit ProtectedAmps
Fog Lights*
10A
Hazard
IG Coil 10A
Horn
DBW
7.5 A
Interior Lights
Circuit ProtectedAmps
1
EPS70 A−(40 A)ABS/VSA Motor30 AABS/VSA FSR30 AWiper Motor*1−*230 A
(30 A)
Main Fuse100 A
2
IG Main30 A*250 A*3
Fuse Box MainFuse Box Main 260 A
Headlight Main
ST MG Switch*1−*230 A
30 A
(30 A)
Rear Defogger IG Main 2
*1−*230 A
40 A
(30 A)
Blower
−
Sub Fan Motor
Main Fan Motor
3−−
4 −*1Left Headlight Low Beam*2−
15 A
5START DIAG*1ST MG*27.5 A
7.5 A
6 −
*1Right Headlight Low Beam*2−
15 A
7−−
8
60 A
30 A30 A
(30 A) 20 A
20 A
−
−
*if equipped
Interior Fuse Box
Located under the dashboard on the driver’s side.
23HAC*(7.5 A)24ABS/VSA7.5A25ACC*(7.5 A)26−−
27Accessory Power Socket (Front)20A
28Washer(15A)29ODS7.5A
30Driver’s Door Lock Motor (Lock)*(10A)
31SMART*(10A)32Door Lock Motor 2 (Lock)15A
Circuit ProtectedAmps
33Door Lock Motor 1 (Lock)15 A34Small Lights7.5 A35Illumination7.5 A36−−37−−38Left Headlight High Beam10 A39Right Headlight High Beam10 A40TPMS*(7.5 A)41Door Lock20 A42Driver’s Power Window20 A
43Rear Passenger’s Side Power Window(20 A)
44Front Passenger’s Side Power Window20 A
45Rear Driver’s Side Power
Window(20 A)
46Wiper(30A)−STS*(7.5A)
Circuit ProtectedAmps1HAC Option*(20 A)2ACG10A3SRS10A4Fuel Pump15A5Meter7.5A6Power Window7.5A7VB SOL*(15A)8Door Lock Motor 2 (Unlock)15A9Door Lock Motor 1 (Unlock)15A
10−−11Moonroof*(20A)
12Accessory Power Socket (Center Console)*(20A)
13−−
14Seat Heaters*(15A)
15Driver’s Door Lock Motor (Unlock)*(10 A)
16−−17−−18−−19ACC7.5A20ACC Key Lock7.5A21Daytime Running Lights7.5 A22HAC7.5A
Fuse label
*if equipped
Page 61 of 79
114 || 115
MAINTENANCE
HANDLING THE UNEXPECTED
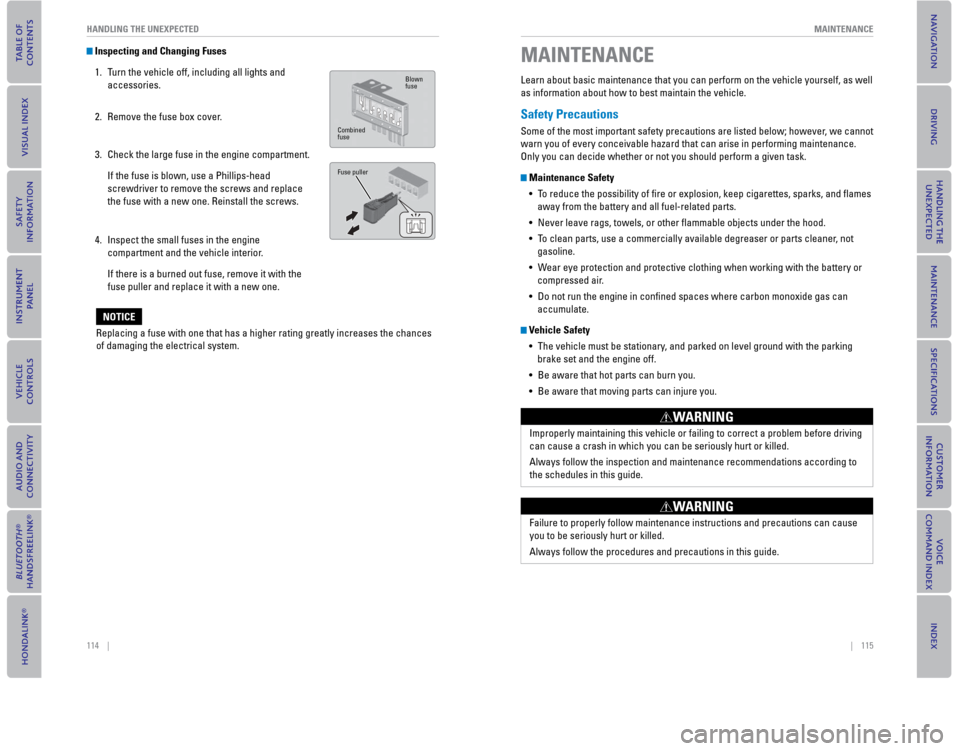
Inspecting and Changing Fuses
1. Turn the vehicle off, including all lights and accessories.
2.
Remove the fuse box cover.
3. Check the large fuse in the engine compartment. If the fuse is blown, use a Phillips-head
screwdriver to remove the screws and replace
the fuse with a new one. Reinstall the screws.
4. Inspect the small fuses in the engine compartment and the vehicle interior.
If there is a burned out fuse, remove it with the
fuse puller and replace it with a new one.Blown
fuse
Combined
fuse
Fuse puller
Replacing a fuse with one that has a higher rating greatly increases the\
chances
of damaging the electrical system.
NOTICE
MAINTENANCE
Learn about basic maintenance that you can perform on the vehicle yourse\
lf, as well
as information about how to best maintain the vehicle.
Safety Precautions
Some of the most important safety precautions are listed below; however, we cannot
warn you of every conceivable hazard that can arise in performing mainte\
nance.
Only you can decide whether or not you should perform a given task.
Maintenance Safety • To reduce the possibility of fi re or explosion, keep cigarettes, sparks, and fl ames away from the battery and all fuel-related parts.
•
Never leave rags, towels, or other fl ammable objects under the hood.
• To clean parts, use a commercially available degreaser or parts cleaner, not gasoline.
• Wear eye protection and protective clothing when working with the battery\
or compressed air.
• Do not run the engine in confi ned spaces where carbon monoxide gas can accumulate.
Vehicle Safety
• The vehicle must be stationary, and parked on level ground with the parking brake set and the engine off.
•
Be aware that hot parts can burn you.
• Be aware that moving parts can injure you.
Improperly maintaining this vehicle or failing to correct a problem befo\
re driving
can cause a crash in which you can be seriously hurt or killed.
Always follow the inspection and maintenance recommendations according t\
o
the schedules in this guide.
WARNING
Failure to properly follow maintenance instructions and precautions can \
cause
you to be seriously hurt or killed.
Always follow the procedures and precautions in this guide.
WARNING
Page 62 of 79
116 || 117
MAINTENANCE
MAINTENANCE
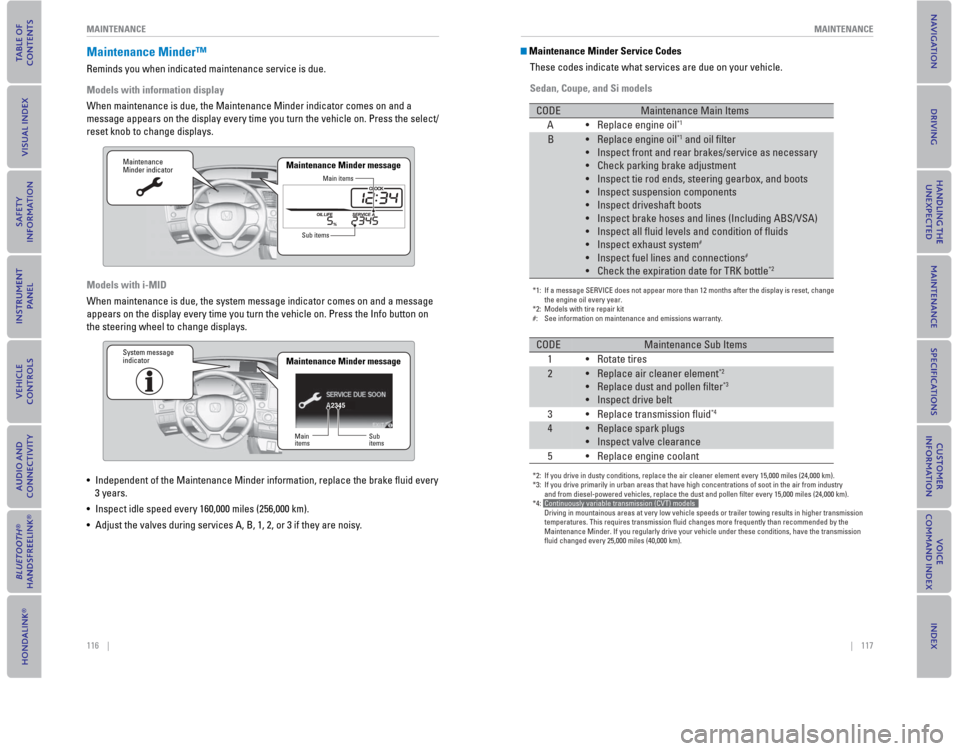
Maintenance Minder™
Reminds you when indicated maintenance service is due.
Models with information display
When maintenance is due, the Maintenance Minder indicator comes on and a\
message appears on the display every time you turn the vehicle on. Press\
the select/
reset knob to change displays.
Models with i-MID
When maintenance is due, the system message indicator comes on and a mes\
sage
appears on the display every time you turn the vehicle on. Press the Inf\
o button on
the steering wheel to change displays.
• Independent of the Maintenance Minder information, replace the brake fl\
uid every
3 years.
• Inspect idle speed every 160,000 miles (256,000 km).
• Adjust the valves during services A, B, 1, 2, or 3 if they are noisy.
Maintenance
Minder indicator
Main items
Sub items
Maintenance Minder message
2345
Maintenance
Minder indicator
Main
items Sub
items
Maintenance Minder messageSystem message
indicator
Maintenance Minder Service Codes
These codes indicate what services are due on your vehicle.
Sedan, Coupe, and Si models
*1: If a message SERVICE does not appear more than 12 months after the displ\
ay is reset, change the engine oil every year.
*2: Models with tire repair kit
#: See information on maintenance and emissions warranty.
CODEMaintenance Main Items
A• Replace engine oil*1
B•Replace engine oil*1 and oil filter
•
Inspect front and rear brakes/service as necessary
•
Check parking brake adjustment
•
Inspect tie rod ends, steering gearbox, and boots
•
Inspect suspension components
•
Inspect driveshaft boots
•
Inspect brake hoses and lines (Including ABS/VSA)
•
Inspect all fluid levels and condition of fluids
•
Inspect exhaust system
#
•Inspect fuel lines and connections#
•Check the expiration date for TRK bottle*2
*2: If you drive in dusty conditions, replace the air cleaner element every \
15,000 miles (24,000 km).
*3: If you drive primarily in urban areas that have high concentrations of s\
oot in the air from industry and from diesel-powered vehicles, replace the dust and pollen filter e\
very 15,000 miles (24,000 km).
*4: Continuously variable transmission (CVT) models
Driving in mountainous areas at very low vehicle speeds or trailer towin\
g results in higher transmission
temperatures. This requires transmission fluid changes more frequently\
than recommended by the
Maintenance Minder. If you regularly drive your vehicle under these cond\
itions, have the transmission
fluid changed every 25,000 miles (40,000 km).
CODEMaintenance Sub Items
1• Rotate tires
2•Replace air cleaner element*2
•Replace dust and pollen filter*3
•Inspect drive belt
3
• Replace transmission fluid*4
4•Replace spark plugs
•
Inspect valve clearance
5 •
Replace
engine coolant
Page 63 of 79
118 || 119
MAINTENANCE
MAINTENANCE
Natural Gas (CNG) models
CODE Maintenance Main Items
A Replace engine oil
•*1
B Replace engine oil•*1 and oil filter
Replace fuel filter element (low pressure)
•
Dr
ain fuel filter (high pressure)
•
I
nspect front and rear brakes/service as necessary
•
C
heck parking brake adjustment
•
I
nspect tie rod ends, steering gearbox, and boots
•
I
nspect suspension components
•
I
nspect driveshaft boots
•
I
nspect brake hoses and lines (Including ABS/ VSA)
•
I
nspect all fluid levels and condition of fluids
•
In
spect exhaust system
•#
Inspect fuel lines and connections•#
Check the expiration date for TRK bottle•
CODE Maintenance Sub Items
1 Rotate tires
•
2
Replace air cleaner element
•*2
Replace dust and pollen filter•*3
Replace fuel filter element (high pressure)•
I
nspect drive belt
•
I
nspect valve clearance
•
I
nspect fuel tank
•*4
3 Replace transmission fluid•
4
Replace spark plugs
•
5
Replace engine coolant
•
*1: If a message SERVICE does not appear more than 12 months after the display is reset, change the
engine oil every year.
# : See information on maintenance and emissions warranty.
*2: If you drive in dusty conditions, replace the air cleaner element every 15,000 miles (24,000 km).
*3: If you drive primarily in urban areas that have high concentrations of soot in the air from industry and
from diesel-powered vehicles, replace the dust and pollen filter every 15,000 miles (24,000 km).
*4: If sub item 2 does not appear more than 36 months after the display is reset, inspect the fuel tank
every three years.
See CNG tank expiration and production dates for inspection and replacement information.
Fuel tank should be replaced 15 years after it was manufactured.
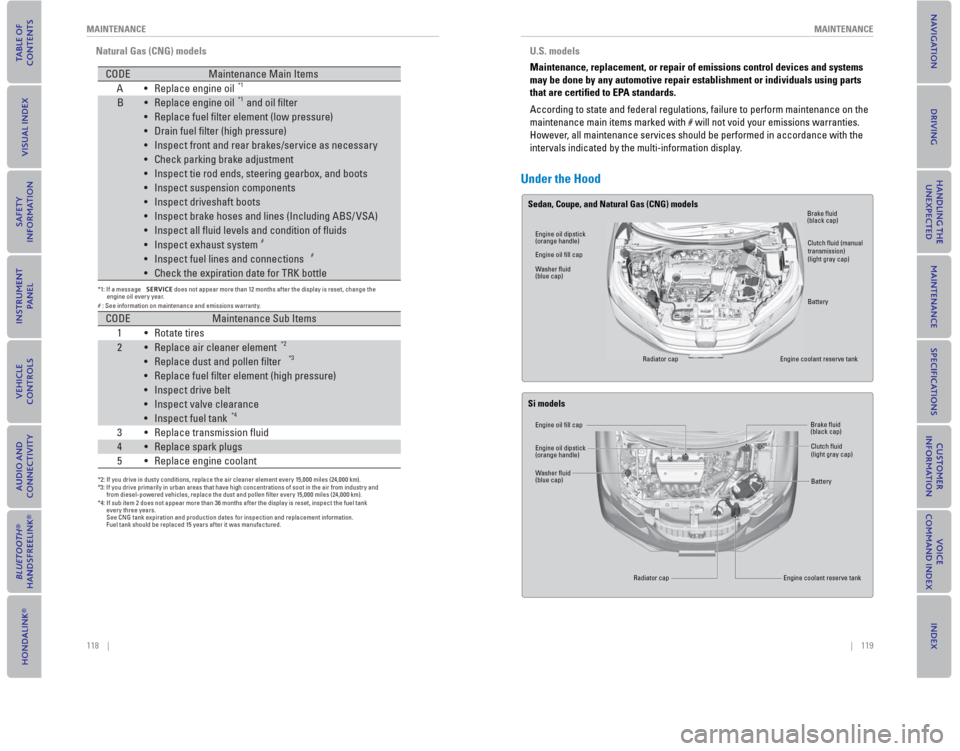
Under the Hood
Engine oil dipstick
(orange handle)
Engine oil dipstick
(orange handle) Brake fl
uid
(black cap)
Brake fl uid
(black cap)
Clutch fl
uid (manual
transmission)
(light gray cap)
Clutch fl uid
(light gray cap)
Battery
Battery
Engine coolant reserve tank
Engine coolant reserve tank
Engine oil fi
ll cap
Engine oil fi ll cap
Washer fl uid
(blue cap)
Washer fl uid
(blue cap)
Radiator cap
Radiator cap
Sedan, Coupe, and Natural Gas (CNG) models
Si models
U.S. models
Maintenance, replacement, or repair of emissions control devices and sys\
tems
may be done by any automotive repair establishment or individuals using \
parts
that are certi ed to EPA standards.
According to state and federal regulations, failure to perform maintenan\
ce on the
maintenance main items marked with # will not void your emissions warran\
ties.
However, all maintenance services should be performed in accordance with the
intervals indicated by the multi-information display.
Page 67 of 79

126 || 127
MAINTENANCEMAINTENANCE
Changing Wiper Blades
If the wiper blades leave streaks across the windshield, try cleaning them fi rst with a
paper towel or soft cloth and wiper fl uid. If the wiper blade rubber has deteriorated,
you should change the wiper blades.
1. Lift the driver side wiper arm fi rst, then the
passenger side.
2. Place a cloth on the edge of the lock tab. Push the
lock tab up with a fl at-tip screwdriver.
3. Slide the blade from the wiper arm.
4. Slide the wiper blade out from its holder by pulling
the tabbed end out.
5. Remove the retainers from the rubber blade that
has been removed, and mount to a new rubber
blade. Correctly align the rubber protrusion and the
retainer grooves.
6. Slide the new wiper blade onto the holder from the
bottom end. The tab on the holder should fi t in the
indent of the wiper blade.
7. Slide the wiper blade onto the wiper arm, then push
down the lock tab.
8. Lower the passenger side wiper arm fi rst, then the
driver side.
End cap at the bottom
Holder
Holder
Cap
Lock tab
Blade
To pBlade
Retainer
Indent
Ta b
Avoid dropping the wiper arm, as it may damage the windshield.
NOTICE
Tire Information
To safely operate your vehicle, your tires must be of the proper type and size, in good
condition with adequate tread, and properly infl ated.
Inflation Guidelines
• Properly infl ated tires provide the best combination of handling, tread life, and
comfort. Refer to the driver’s doorjamb label or the specifi cations (see page
135) for the specifi ed pressure.
• Underinfl ated tires wear unevenly, adversely affect handling and fuel economy,
and are more likely to fail from overheating.
• Overinfl ated tires make your vehicle ride harshly, are more prone to road
hazards, and wear unevenly.
• Every day before you drive, look at each of the tires. If one looks lower than the
others, check the pressure with a tire gauge.
• Measure the air pressure when tires are cold. This means the vehicle has been
parked for at least 3 hours, or driven less than 1 mile (1.6 km). If necessary, add
or release air until the specifi ed pressure is reached, and then calibrate the
system (see page 107). If checked when hot, tire pressure can be as much as
4–6 psi (30–40 kPa, 0.3–0.5 kgf/cm2) higher than checked when cold.
• At least once a month or before long trips, use a gauge to measure the pressure
in all tires, including the spare*. Even tires in good condition can lose 1–2 psi
(10–20 kPa, 0.1–0.2 kgf/cm2) per month.
Inspection Guidelines
Every time you infl ate the tires, check for the following:
• Any damage to tires, including bumps, bulges, cuts, splits, or cracks in the side
or tread. Remove any foreign objects and inspect for air leaks. Replace tires if
you see fabric or cord.
• Uneven or excessive tread wear. Have a dealer check the wheel alignment.
• Cracks or other damage around the valve stems.
Wear Indicators
The groove where the wear indicator is located is
1/16 inch (1.6 mm) shallower than elsewhere on the
tire. If the tread has worn so low that the indicator is
exposed, replace the tire. Worn out tires have poor
traction on wet roads.
Example of a wear indicator mark
*if equipped
Page 70 of 79
, B, and C, representing the\
tire’s
resistance to the generation of heat and its ability to")
132 || 133
MAINTENANCE
MAINTENANCE
Temperature
The temperature grades are A (the highest), B, and C, representing the\
tire’s
resistance to the generation of heat and its ability to dissipate heat w\
hen tested
under controlled conditions on a specifi
ed indoor laboratory test wheel. Sustained
high temperature can cause the material of the tire to degenerate and re\
duce
tire life, and excessive temperature can lead to sudden tire failure. Th\
e grade
C corresponds to a level of performance which all passenger car tires mu\
st
meet under the Federal Motor Vehicle Safety Standard No. 109. Grades B and
A represent higher levels of performance on the laboratory test wheel th\
an the
minimum required by law.
WARNING: The temperature grade for this tire is established for a tire that
is properly infl ated and not overloaded. Excessive speed, underinfl ation, or
excessive loading, either separately or in combination, can cause heat b\
uildup
and possible tire failure.
Tire Pressure Monitoring System ( TPMS) - Required Federal
Explanation
U.S. models
Each tire, including the spare (if provided), should be checked monthl\
y
when cold and infl ated to the infl ation pressure recommended by the
vehicle manufacturer on the vehicle placard or tire infl ation pressure label.
(If your vehicle has tires of a different size than the size indicated \
on the
vehicle placard or tire infl ation pressure label, you should determine the
proper tire infl ation pressure for those tires.)
As an added safety feature, your vehicle has been equipped with
a tire pressure monitoring system (TPMS) that illuminates a low
tire pressure telltale when one or more of your tires is signifi cantly
underinfl ated.
Accordingly, when the low tire pressure telltale illuminates, you should stop
and check your tires as soon as possible, and infl ate them to the proper
pressure.
Driving on a signifi cantly underinfl ated tire causes the tire to overheat and
can lead to tire failure. Underinfl ation also reduces fuel effi ciency and tire
tread life, and may affect the vehicle’s handling and stopping ability.
Please note that the TPMS is not a substitute for proper tire maintenanc\
e,
and it is the driver’s responsibility to maintain correct tire pressure, even if
underinfl ation has not reached the level to trigger illumination of the TPMS
low tire pressure telltale.
Your vehicle has also been equipped with a TPMS malfunction indicator to \
indicate when the system is not operating properly. The TPMS malfunction
indicator is combined with the low tire pressure telltale. When the syst\
em
detects a malfunction, the telltale will fl ash for approximately one minute
and then remain continuously illuminated. This sequence will continue up\
on
subsequent vehicle start-ups as long as the malfunction exists.
When the malfunction indicator is illuminated, the system may not be abl\
e
to detect or signal low tire pressure as intended.
TPMS malfunctions may occur for a variety of reasons, including the
installation of replacement or alternate tires or wheels on the vehicle \
that
prevent the TPMS from functioning properly.
Always check the TPMS malfunction telltale after replacing one or more
tires or wheels on your vehicle to ensure that the replacement or altern\
ate
tires and wheels allow the TPMS to continue to function properly.
Page 71 of 79

134 || 135
SPECIFICATIONS
MAINTENANCE
Testing of Readiness Codes
Your vehicle has “readiness codes” as part of the onboard self-diag\
nostic system.
Some states refer to these codes as a test to see if your vehicle’s emissions
components are working properly. The codes may not be read if you go through the
testing just after the battery has gone dead or been disconnected.
To check if they are set, turn the vehicle on without starting the engine\
. The
malfunction indicator lamp will come on for several seconds. If it goes \
off, the
readiness codes are set. If it blinks fi ve times, the readiness codes are not set.
If you are required to have your vehicle tested before the readiness cod\
es are set,
prepare the vehicle for retesting by doing the following:
1. Fill the gas tank to approximately 3/4 full.
2. Park the vehicle and leave the engine off for 6 hours or more.
3. Make sure the ambient temperature is between 40°F and 95°F (4°\
C and 35°C).
4. Start the engine without touching the accelerator pedal, and let it idle\
for 20
seconds.
5. Keep the vehicle in Park (P) or Neutral for manual transmission. Incre\
ase the engine speed to 2,000 rpm, and hold it there for about 3 minutes.
6. Let the engine idle with your foot off the accelerator for 20 seconds.
7. Select a nearby, lightly traveled major highway where you can maintain a speed of 50 to 60 mph (80 to 97 km/h) for at least 20 minutes. Drive on the \
highway
with the vehicle in Drive (D) or 5th gear. Do not use cruise control. When traffi c
allows, drive for 90 seconds without using the accelerator pedal. (Vehicle speed
may vary slightly; this is OK.) If you cannot do this for a continuous \
90 seconds
because of traffi c conditions, drive for at least 30 seconds, then repeat two more
times (for a total of 90 seconds).
8. Drive in city/suburban traffi c for at least 10 minutes. When traffi c conditions allow, let the vehicle coast for several seconds without using the accelerato\
r
pedal or the brake pedal.
9. Park the vehicle and leave the engine off for 30 minutes.
The readiness codes are erased when the battery is disconnected, and set\
again
only after several days of driving under a variety of conditions.
If a testing facility determines that the readiness codes are not set, y\
ou may be
requested to return at a later date to complete the test, or see your de\
aler. SPECIFICATIONS
Civic Sedan
Vehicle
*1: Manual transmission models
*2: Automatic transmission models
*3: LX and LX-C models with manual transmission
*4: LX and LX-C models with automatic transmission
*5: EX, EX-C, and EX-L models
ModelHonda Civic 4-Door
Curb Weight (2,734-2,826 lbs)
*11,275-1,311 kg
(2,811-2,890 lbs)*2Maximum permissible
weight 1,660 kg (3,660 lbs)*31,685 kg (3,715 lbs)*41,720 kg (3,792 lbs)*5
1,240-1,282 kg
Dimensions
*1: LX, LX-C, EX, EX-C, and EX-L models without front licence
plate base
*2: LX, LX-C, EX, EX-C, and EX-L mo dels with front licence plate
base
*3: LX, LX-C, EX, EX-C, and EX-L mo dels with front licence plate
bases
Length4,555 mm (179.3 in)*14,570 mm (179.9 in)*24,580 mm (180.3 in)*3WidthHeight1,450 mm (57.1 in)
Wheelbase 2,670 mm (105.1 in)
TrackFront1,492 mm (58.7 in)Rear1,516 mm (59.7 in)
1,755 mm (69.1 in)
Engine and Fuel
Fuel Engine Specifications
Displacement110 cu-in (1,798 cm3)
Spark Plugs NGK
DENSO
Fuel:
TypeUnleaded gasoline, Pump
octane number of 87 or higher
Fuel Tank Capacity 13.2 US gal (50 ℓ)
DILZKR7B11GS
DXU22HCR-D11S
Tires
*1: Vehicle with 16 inch wheel
*2: Vehicle with 17 inch wheel
*3: Vehicle with 18 inch wheel
RegularSize215/70R16 100S*1225/65R17 102T*2P225/60R18 99H*3
Pressure
psi (kPa [kgf/cm2])32 (220 [2.2])*133 (230 [2.3])*230 (210 [2.1])*3
Compact
Spare Size
T165/80D17 104M
Pressure
psi (kPa [kgf/cm2]) 60 (420 [4.2])
Wheel SizeRegular16 x 6.5J*117 x 7J*218 x 7J*3Compact Spare17 x 4T
Light Bulbs
Headlights (Low Beam)55W (H11)
Headlights (High Beam) 60W (HB3)
Fog Lights*35W (H8)
Front Turn Signal/Side Marker/
Parking Lights
*28/8W (Amber)Front Turn Signal/
Side Marker Lights*28/8W (Amber)
Side Turn Signal Lights
(on Door Mirrors)
*LEDParking Lights*LED
Upper Rear Side Marker/Taillights 3CP
Lower Rear Side Marker/Brake/
Taillights21/5W
Back-Up Lights 21W
Rear Turn Signal Lights21W (Amber)
High-Mount Brake Light LED
Rear License Plate Light3CP
Cargo Area Light 8W
Vanity Mirror Lights*14W
Fluids
Brake/Clutch Fluid
Automatic Transmission (CVT) Fluid
Manual Transmission FluidSpecifiedHonda Heavy Duty Brake Fluid DOT 3
SpecifiedHCF-2
Capacity
SpecifiedHonda Manual Transmission Fluid
Capacity
Engine Oil
Engine Coolant
Recommended· Honda Genuine Motor Oil 0W-20
· API Premium-grade 0W-20
detergent oil
Capacity Change
Change
including
filter
3.9 US qt (3.7 ℓ)
SpecifiedHonda Long-Life Antifreeze/Coolant
Type2
Ratio
Capacity1.48 US gal (5.59 ℓ)
(change including the remaining 0.125
US gal (0.475 ℓ) in the reserve tank)
Washer Fluid
Tank CapacityU.S.: 2.6 US qt (2.5 ℓ)
Canada: 4.8 US qt (4.5 ℓ)
3.6 US qt (3.4 ℓ)Change
Change 1.5 US qt (1.4 ℓ)
3.7 US qt (3.5 ℓ)
50/50 with distilled water
Page 72 of 79

136 || 137
SPECIFICATIONS
SPECIFICATIONS
Civic Sedan Si
Vehicle
ModelHonda Civic 4-Door
No. of Passengers: 2
3
5
Front
Rear
Total
Weights:Gross Vehicle
Weight Rating U.S.: 3,925 lbs (1,780 kg)
Canada: 1,780 kg
Gross Axle Weight
Rating (Front)U.S.: 2,117 lbs (960 kg)
Canada: 960 kg
Gross Axle Weight
Rating (Rear)U.S.: 1,830 lbs (830 kg)
Canada: 830 kg
Air Conditioning:
Refrigerant Type HFC-134a (R-134a)
Charge Quantity 13.2 – 15.0 oz (375 – 425 g)
Lubricant Type SP-10
Engine and Fuel
Engine Specifications
FuelDisplacement144 cu-in (2,354 cm3)
Spark Plugs NGK
DENSOILZKR7B-11S
SXU22HCR11S
Fuel:
TypeUnleaded premium gasoline, Pump
octane number of 91 or higher
Fuel Tank Capacity 13.2 US gal (50 ℓ)
Tires
*1: Optional for U.S. models (summer tires)
RegularSize225/40R18 92V
225/40R18 92Y*1Pressure
psi (kPa [kgf/cm2])33 (230 [2.3])
32 (220 [2.2])*1
Compact
Spare Size
T135/80D16 101M
Pressure
psi (kPa [kgf/cm2]) 60 (420 [4.2])
Wheel SizeRegular18 x 7 1/2JCompact Spare16 x 4T
Light Bulbs
Headlights (Low Beam)51W (HB4)
Headlights (High Beam) 60W (HB3)
Fog Lights35W (H8)
Front Turn Signal/Parking/Side
Marker Lights 28/8W (Amber)
Brake/Taillights21/5W
Rear Turn Signal Lights 21W (Amber)
Rear Side Marker LightsLED
Back-Up Lights 16W
Taillights3CP
High-Mount Brake Light LED
Rear License Plate Lights5W
Trunk Light 5W
Interior LightsMap Lights8WCeiling Light8W
Fluids
Engine Oil
Engine Coolant
Recommended· Honda Genuine Motor Oil 0W-20
· API Premium-grade 0W-20
detergent oil
Capacity Change 4.2 US qt (4.0 ℓ)
Change
including
filter
4.4 US qt (4.2 ℓ)
SpecifiedHonda Long-Life Antifreeze/
Coolant Type2
Ratio 50/50 with distilled water
Capacity1.45 US gal (5.5 ℓ)
(change including the remaining
0.125 US gal (0.475 ℓ) in the
reserve tank)
Washer Fluid
Tank CapacityU.S.: 2.6 US qt (2.5 ℓ)
Canada: 4.8 US qt (4.5 ℓ)
Civic Coupe
Vehicle
Vehicle Specications
*1: Manual transmission models
*2: Automatic transmission models
ModelHonda Civic 2-Door
Curb Weight 1,279 kg (2,820 lbs)*11,306 kg (2,879 lbs)*2
weight 1,720 kg (3,792 lbs)
DimensionsLength4,550 mm (179.1 in)
Width 1,755 mm (69.1 in)
Height1,415 mm (55.7 in)
Wheelbase 2,620 mm (103.1 in)
TrackFront1,492 mm (58.7 in)Rear1,516 mm (59.7 in)
Maximum permissible
Engine and Fuel
Displacement110 cu-in (1,798 cm3)
Spark Plugs NGK DILZKR7B11GS
DENSO DXU22HCR-D11S
Fuel:
TypeUnleaded gasoline, Pump octane
number of 87 or higher
Fuel Tank Capacity 13.2 US gal (50 ℓ)
Engine Specifications
Fuel
Tires
Tires
*1: Except EX-L model
*2: EX-L model
RegularSizeP205/55R16 89H*1P215/45R17 87V*2Pressure
psi(kPa[kgf/cm2])32 (220 [2.2])
Compact
Spare Size T135/80D15 99M
Pressure
psi(kPa[kgf/cm
2])
60 (420 [4.2])
Wheel SizeRegular16 x 6 1/2J*117 x 7J*2Compact Spare15 x 4T
Light Bulbs
Headlights (Low Beam)55 W (H11)
Headlights (High Beam) 60 W (HB3)
Front Turn Signal/Position/Side
Marker Lights28/8 W
Brake/Taillights 21/5 W
Rear Side Marker Lights5 W
Rear Turn Signal Lights 21 W (Amber)
Back-Up Lights16 W
High-Mount Brake Light 21 W
Rear Licence Plate Light5 W
Interior Lights Map Lights 8 W
Ceiling Light 8 W
Fluids
Engine Oil
Engine Coolant
RecommendedGenuine Honda Motor Oil
API service SL or higher grade
0W-30, 0W-40, 5W-30, 5W-40, 10W-30,
10W-40, 15W-40
Capacity Change 3.5 ℓ (3.7 US qt)
Change
including
filter
3.7 ℓ (3.9 US qt)
SpecifiedHonda All Season Antifreeze/Coolant Type2
Ratio 50/50 with distilled water
Capacity5.59 ℓ (1.48 US gal)
(change including the remaining 0.475 ℓ
(0.125 US gal) in the reserve tank)
Washer FluidTank Capacity2.5 ℓ (2.6 US qt)
Brake/Clutch Fluid
Automatic Transmission Fluid
Manual Transmission FluidSpecifiedBrake Fluid with DOT3 or DOT4
SpecifiedHonda ATF DW-1
(automatic transmission fluid)
Capacity Change 2.4 ℓ (2.5 US qt)
SpecifiedHonda Manual Transmission Fluid
Capacity Change 1.4 ℓ (1.5 US qt)
Page 73 of 79

138 || 139
SPECIFICATIONS
SPECIFICATIONS
Civic Coupe Si
Vehicle
ModelHonda Civic 2-Door
Curb Weight 1,374 kg (3,029 lbs)
weight 1,780 kg (3,924 lbs)
DimensionsLength4,550 mm (179.1 in)
Width 1,755 mm (69.1 in)
Height1,415 mm (55.7 in)
Wheelbase 2,620 mm (103.1 in)
TrackFront1,496 mm (58.9 in)Rear1,516 mm (59.7 in)
Maximum permissible
Engine and Fuel
Engine Specifications
FuelDisplacement144 cu-in (2,354 cm3)
Spark Plugs NGK ILZKR7B-11S
DENSO SXU22HCR11S
Fuel:
TypeUnleaded premium gasoline, Pump octane
number of 91 or higher
Fuel Tank Capacity 13.2 US gal (50 ℓ)
Tires
*1: Optional for U.S. models (summer tires)
RegularSize225/40R18 92V
225/40R18 92Y*1Pressure
psi(kPa[kgf/cm2])33 (230 [2.3])
32 (220 [2.2])*1
Compact
Spare Size
T135/80D16 101M
Pressure
psi(kPa[kgf/cm2]) 60 (420 [4.2])
Wheel SizeRegular18 x 7 1/2JCompact Spare16 x 4T
Light Bulbs
Headlights (Low Beam)55 W (H11)
Headlights (High Beam) 60 W (HB3)
Fog Lights55 W (H11)
Front Turn Signal/Position/Side
Marker Lights 28/8 W
Brake/Taillights21/5 W
Rear Side Marker Lights 5 W
Rear Turn Signal Lights21 W (Amber)
Back-Up Lights 16 W
High-Mount Brake LightLED
Rear Licence Plate Light 5 W
Interior Lights Map Lights 8 W
Ceiling Light 8 W
Fluids
Brake/Clutch Fluid
Manual Transmission FluidSpecifiedBrake Fluid with DOT3 or DOT4
SpecifiedHonda Manual Transmission Fluid
Capacity Change 1.9 ℓ (2.0 US qt)
Engine Oil
Engine Coolant
RecommendedGenuine Honda Motor Oil
API service SM or higher grade
0W-30, 0W-40, 5W-30, 5W-40, 10W-30,
10W-40, 15W-40
Capacity Change 4.0 ℓ (4.2 US qt)
Change
including
filter
4.2 ℓ (4.4 US qt)
SpecifiedHonda All Season Antifreeze/Coolant Type2
Ratio 50/50 with distilled water
Capacity5.5 ℓ (1.45 US gal)
(change including the remaining 0.475 ℓ
(0.125 US gal) in the reserve tank)
Civic Natural Gas (CNG)
Vehicle
Model Honda Civic 4-Door Natural Gas
No. of Passengers:
Front
Rear
Tot al 2
3
5
Weights:
Gross Vehicle Weight
Rating 3,870 lbs (1,755 kg)
Gross Axle Weight
Rating (Front) 2,007 lbs (910 kg)
Gross Axle Weight
Rating (Rear) 1,863 lbs (845 kg)
Air Conditioning:
Refrigerant Type
Charge Quantity
Lubricant Type HFC-134a (R-134a)
13.2 – 15.0 oz (375 – 425 g)
SP-10
Engine and Fuel
Engine SpecificationsDisplacement 110 cu-in (1,798 cm3)
Spark Plugs NGK SILKR8B8DS
FuelFuel Tank
Service Pressure 3,600 psi (24,800 kPa) at 70°F (21°C)
Fuel Tank
Capacity 3,000 psi:
Slow filling
Fast filling6.96 GGE
5.84 GGE
3,600 psi:
Slow filling
Fast filling 7.7 7 G G E
6.51 GGE
Tires
RegularSize P195/65R15 89H
Pressure
psi (kPa[kgf/cm2]) 3 0 ( 210 [2.1] )
Compact
Spare
*1Size T135/80D15 99M
Pressure
psi (kPa[kgf/cm
2]) 60 (420 [4.2])
Wheel Size Regular 15 x 6J
Compact Spare
*115 x 4T
*1: Models with compact spare tire
Light Bulbs
Headlights (Low Beam) 51W (HB4)
Headlights (High Beam) 60W (HB3)
Front Turn Signal/Parking/Side
Marker Lights 28/8W (Amber)
Brake/Taillights 21/5W
Rear Turn Signal Lights 21W (Amber)
Rear Side Marker Lights LED
Back-Up Lights 16W
Taillights 3CP
High-Mount Brake Light 21W
Rear License Plate Lights 5W
Tr unk Light 5W
Interior Lights
Map
Lights
C
eiling Light 8W
8W
Fluids
Washer FluidTank Capacity 2.6 US qt (2.5 ℓ)
Brake FluidSpecified Honda Heavy Duty Brake Fluid DOT 3Automatic Transmission Fluid
Specified
Honda ATF DW-1
(automatic transmission fluid)
Capacity Change 2.5 US qt (2.4 ℓ)
Engine Oil
Recommended • Honda Genuine Motor Oil 0W-20
• API Premium-grade 0W-20
detergent oil
Capacity Change 3.7 US qt (3.5 ℓ)
Change
including
filter
3.9 US qt (3.7 ℓ)
Engine Coolant
Specified Honda Long-Life Antifreeze/Coolant
Type2
Ratio 50/50 with distilled water
Capacity 1.45 US gal (5.50 ℓ)
(change including the remaining
0.125 US gal (0.475 ℓ) in the reserve tank)