engine HONDA CIVIC HATCHBACK 2019 Owner's Manual (in English)
[x] Cancel search | Manufacturer: HONDA, Model Year: 2019, Model line: CIVIC HATCHBACK, Model: HONDA CIVIC HATCHBACK 2019Pages: 699, PDF Size: 35.16 MB
Page 580 of 699
uuMaintenance Under the Hood uEngine Coolant
578
Maintenance
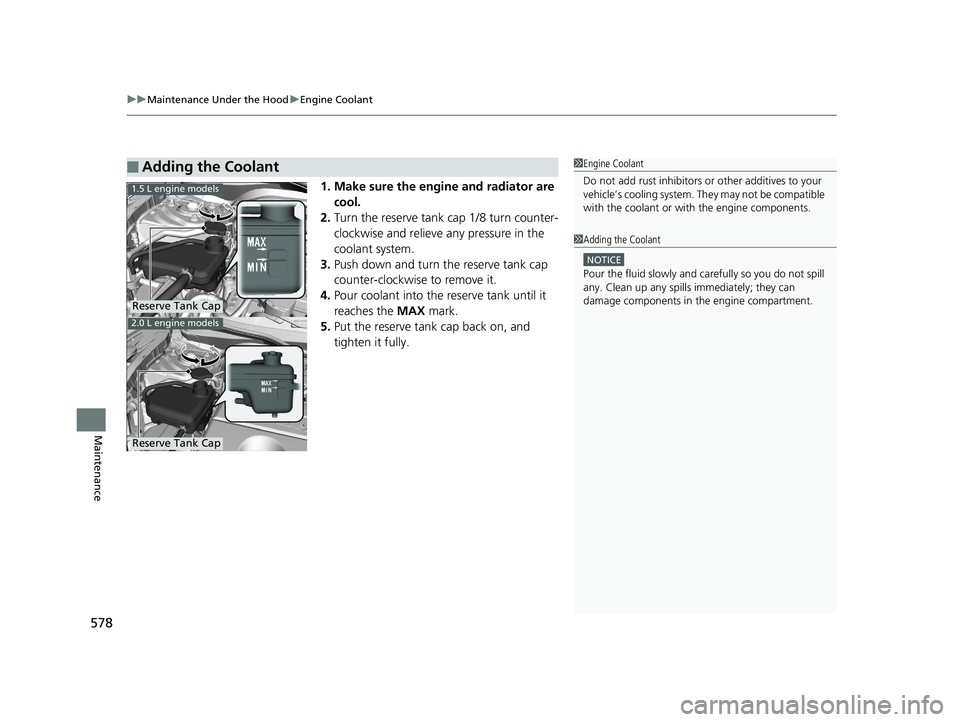
1. Make sure the engine and radiator are
cool.
2. Turn the reserve tank cap 1/8 turn counter-
clockwise and relieve any pressure in the
coolant system.
3. Push down and turn the reserve tank cap
counter-clockwise to remove it.
4. Pour coolant into the reserve tank until it
reaches the MAX mark.
5. Put the reserve tank cap back on, and
tighten it fully.
■Adding the Coolant1Engine Coolant
Do not add rust inhibitors or other additives to your
vehicle’s cooling system. They may not be compatible
with the coolant or with the engine components.
1 Adding the Coolant
NOTICE
Pour the fluid slowly and ca refully so you do not spill
any. Clean up any spills immediately; they can
damage components in the engine compartment.
Reserve Tank Cap
1.5 L engine models
2.0 L engine models
Reserve Tank Cap
19 CIVIC 5D HUM (KA KC KL)-31TGG6201.book 578 ページ 2018年10月25日 木曜日 午後4時12分
Page 582 of 699
580
uuMaintenance Under the Hood uBrake/Clutch* Fluid
Maintenance
Brake/Clutch* Fluid
Use the same fluid for both the brakes and clutch*.
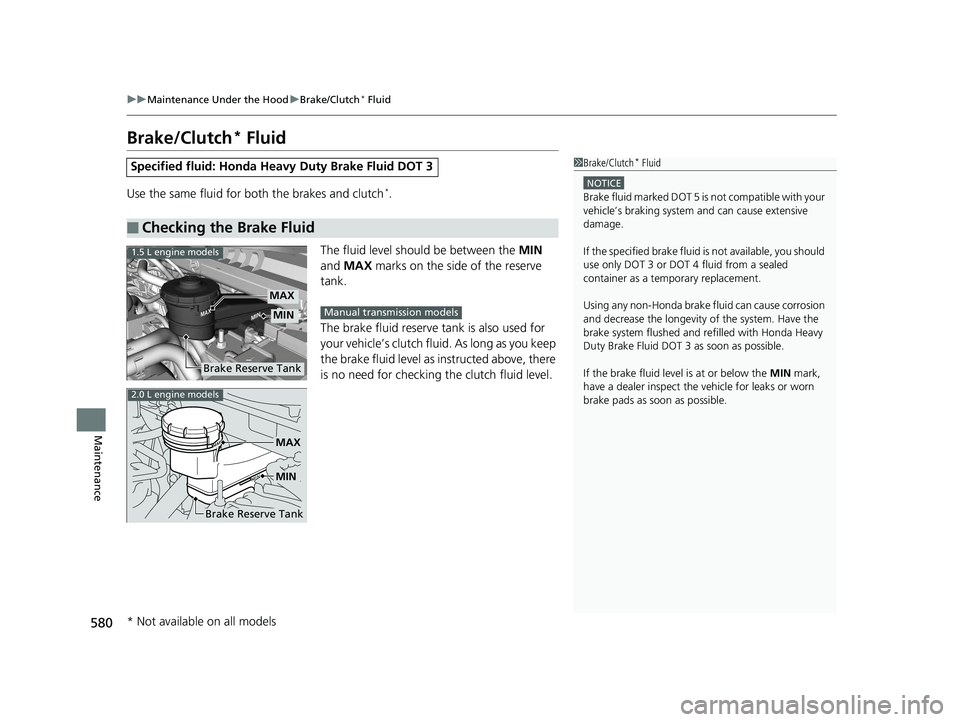
The fluid level should be between the MIN
and MAX marks on the side of the reserve
tank.
The brake fluid reserve tank is also used for
your vehicle’s clutch flui d. As long as you keep
the brake fluid level as in structed above, there
is no need for checking the clutch fluid level.
Specified fluid: Honda Heavy Duty Brake Fluid DOT 3
■Checking the Brake Fluid
1Brake/Clutch* Fluid
NOTICE
Brake fluid marked DOT 5 is not compatible with your
vehicle’s braking system and can cause extensive
damage.
If the specified brake fluid is not available, you should
use only DOT 3 or DOT 4 fluid from a sealed
container as a temporary replacement.
Using any non-Honda brake fluid can cause corrosion
and decrease the longevity of the system. Have the
brake system flushed and re filled with Honda Heavy
Duty Brake Fluid DOT 3 as soon as possible.
If the brake fluid level is at or below the MIN mark,
have a dealer inspect the vehicle for leaks or worn
brake pads as soon as possible.
1.5 L engine models
Brake Reserve Tank
MIN
MAX
Manual transmission models
2.0 L engine models
MIN
MAX
Brake Reserve Tank
* Not available on all models
19 CIVIC 5D HUM (KA KC KL)-31TGG6201.book 580 ページ 2018年10月25日 木曜日 午後4時12分
Page 583 of 699
581
uuMaintenance Under the Hood uRefilling Window Washer Fluid
Maintenance
Refilling Window Washer Fluid
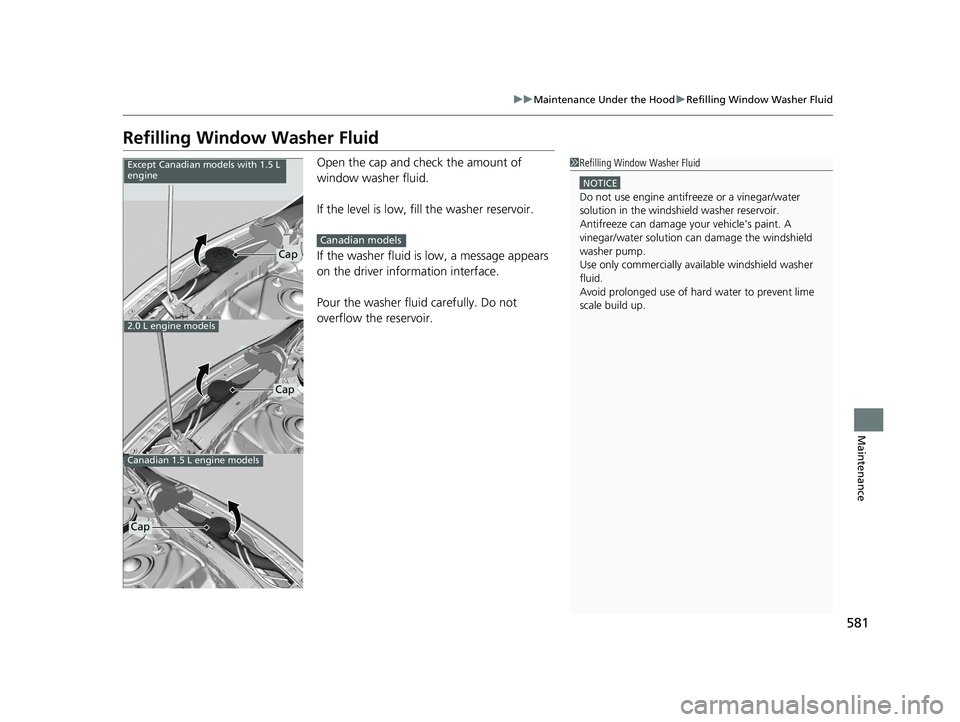
Open the cap and check the amount of
window washer fluid.
If the level is low, fill the washer reservoir.
If the washer fluid is low, a message appears
on the driver information interface.
Pour the washer fluid carefully. Do not
overflow the reservoir.1Refilling Window Washer Fluid
NOTICE
Do not use engine antifreeze or a vinegar/water
solution in the windshield washer reservoir.
Antifreeze can damage y our vehicle's paint. A
vinegar/water solution ca n damage the windshield
washer pump.
Use only commercially avai lable windshield washer
fluid.
Avoid prolonged use of hard water to prevent lime
scale build up.
Cap
Except Canadian models with 1.5 L
engine
2.0 L engine models
Canadian 1.5 L engine models
Cap
Cap
Canadian models
19 CIVIC 5D HUM (KA KC KL)-31TGG6201.book 581 ページ 2018年10月25日 木曜日 午後4時12分
Page 586 of 699
584
uuReplacing Light Bulbs uFog Light Bulbs*
Maintenance
Fog Light Bulbs*
When replacing, use the following bulbs.
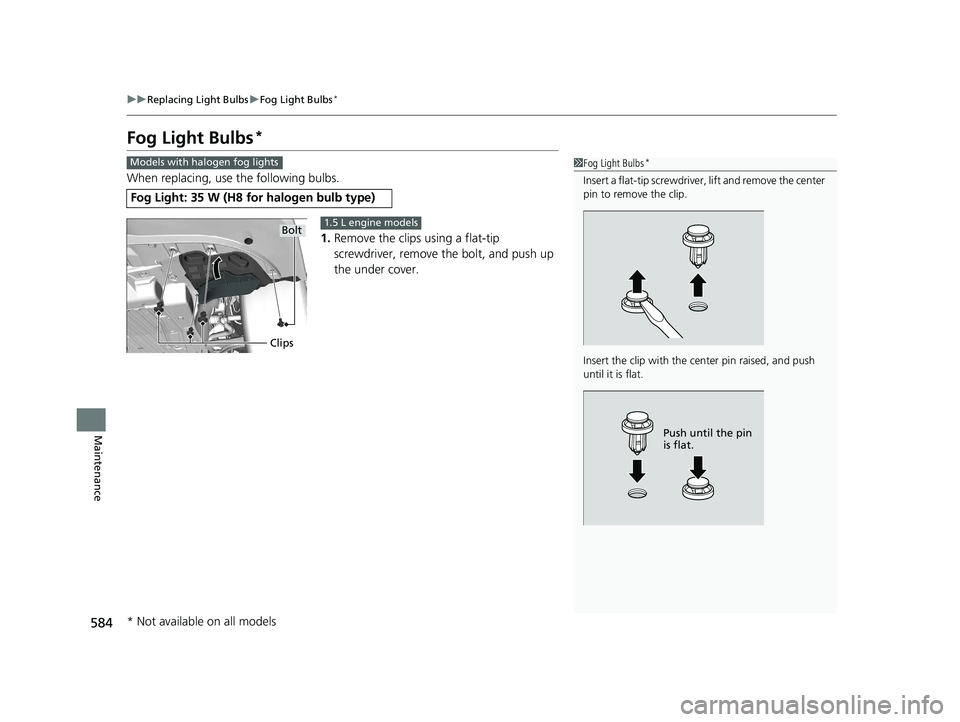
1.Remove the clips using a flat-tip
screwdriver, remove the bolt, and push up
the under cover.
Fog Light: 35 W (H8 for halogen bulb type)
1 Fog Light Bulbs*
Insert a flat-tip screwdriver, lift and remove the center
pin to remove the clip.
Insert the clip with the center pin raised, and push
until it is flat.
Push until the pin
is flat.
Models with halogen fog lights
Clips
Bolt1.5 L engine models
* Not available on all models
19 CIVIC 5D HUM (KA KC KL)-31TGG6201.book 584 ページ 2018年10月25日 木曜日 午後4時12分
Page 587 of 699
585
uuReplacing Light Bulbs uFog Light Bulbs*
Maintenance
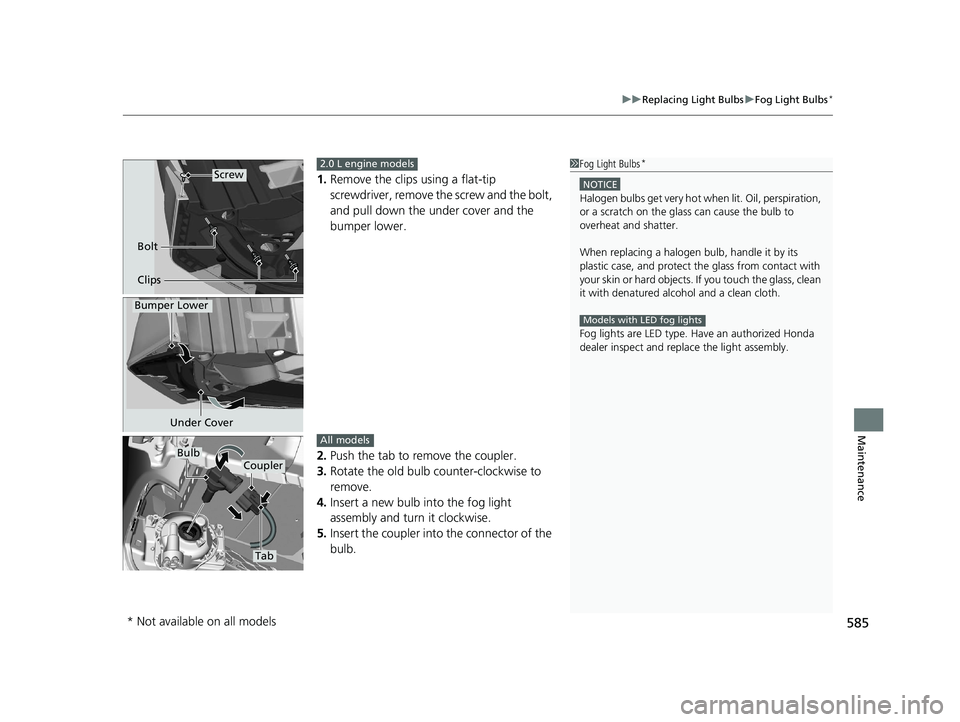
1. Remove the clips using a flat-tip
screwdriver, remove th e screw and the bolt,
and pull down the under cover and the
bumper lower.
2. Push the tab to remove the coupler.
3. Rotate the old bulb counter-clockwise to
remove.
4. Insert a new bulb into the fog light
assembly and turn it clockwise.
5. Insert the coupler into the connector of the
bulb.
1 Fog Light Bulbs*
NOTICE
Halogen bulbs get very hot wh en lit. Oil, perspiration,
or a scratch on the glass can cause the bulb to
overheat and shatter.
When replacing a halogen bulb, handle it by its
plastic case, and protect th e glass from contact with
your skin or hard objects. If you touch the glass, clean
it with denatured alc ohol and a clean cloth.
Fog lights are LED type. Ha ve an authorized Honda
dealer inspect and replace the light assembly.
Models with LED fog lights
Screw
Bolt
Clips
2.0 L engine models
Bumper Lower
Under Cover
Tab
CouplerBulbAll models
* Not available on all models
19 CIVIC 5D HUM (KA KC KL)-31TGG6201.book 585 ページ 2018年10月25日 木曜日 午後4時12分
Page 589 of 699
587
uuReplacing Light Bulbs uFront Side Marker Light Bulbs
Continued
Maintenance
Front Side Marker Light Bulbs
When replacing, use the following bulbs.
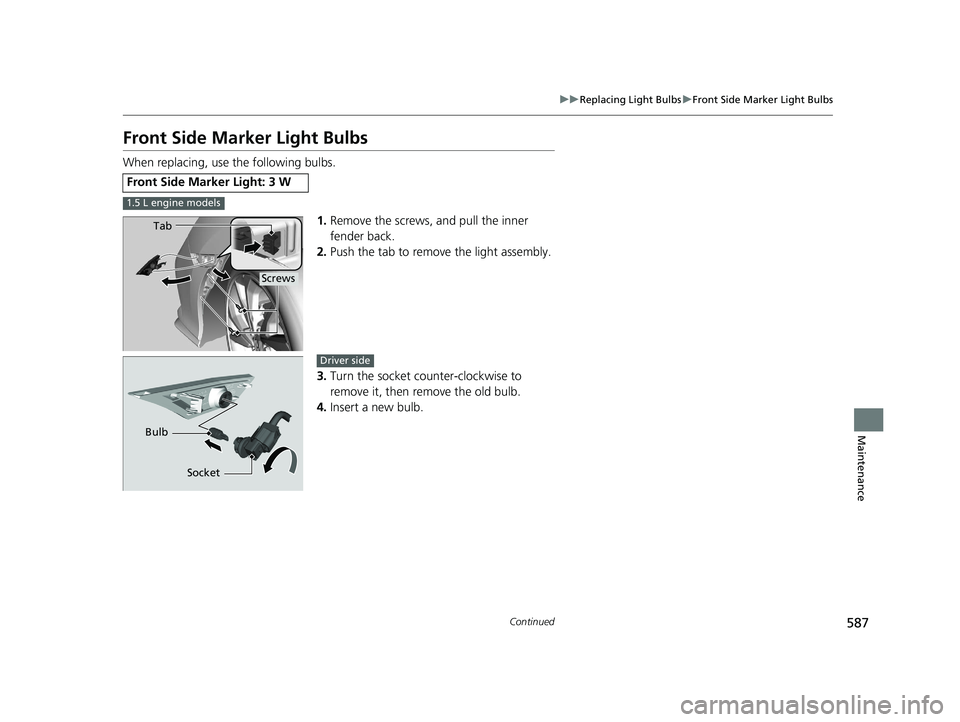
1.Remove the screws, and pull the inner
fender back.
2. Push the tab to remove the light assembly.
3. Turn the socket counter-clockwise to
remove it, then remove the old bulb.
4. Insert a new bulb.
Front Side Marker Light: 3 W
1.5 L engine models
Tab
Screws
Socket
Bulb
Driver side
19 CIVIC 5D HUM (KA KC KL)-31TGG6201.book 587 ページ 2018年10月25日 木曜日 午後4時12分
Page 590 of 699
588
uuReplacing Light Bulbs uFront Side Marker Light Bulbs
Maintenance
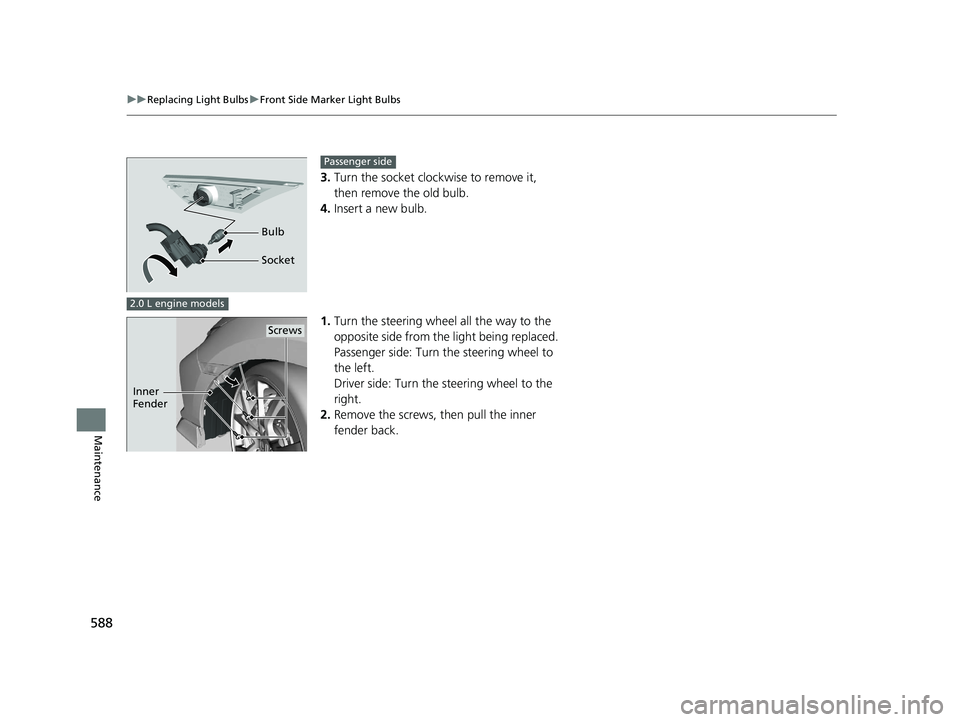
3. Turn the socket clockwise to remove it,
then remove the old bulb.
4. Insert a new bulb.
1. Turn the steering wheel all the way to the
opposite side from the light being replaced.
Passenger side: Turn the steering wheel to
the left.
Driver side: Turn the steering wheel to the
right.
2. Remove the screws, then pull the inner
fender back.
Bulb
Socket
Passenger side
2.0 L engine models
Screws
Inner
Fender
19 CIVIC 5D HUM (KA KC KL)-31TGG6201.book 588 ページ 2018年10月25日 木曜日 午後4時12分
Page 594 of 699
592
Maintenance
Checking and Maintaining Wiper Blades
Checking Wiper Blades
If the wiper blade rubber has deteriorated, it will leave streaks and the hard surfaces
of the blade may scratch the window glass.
Changing the Front Wiper Blade Rubber
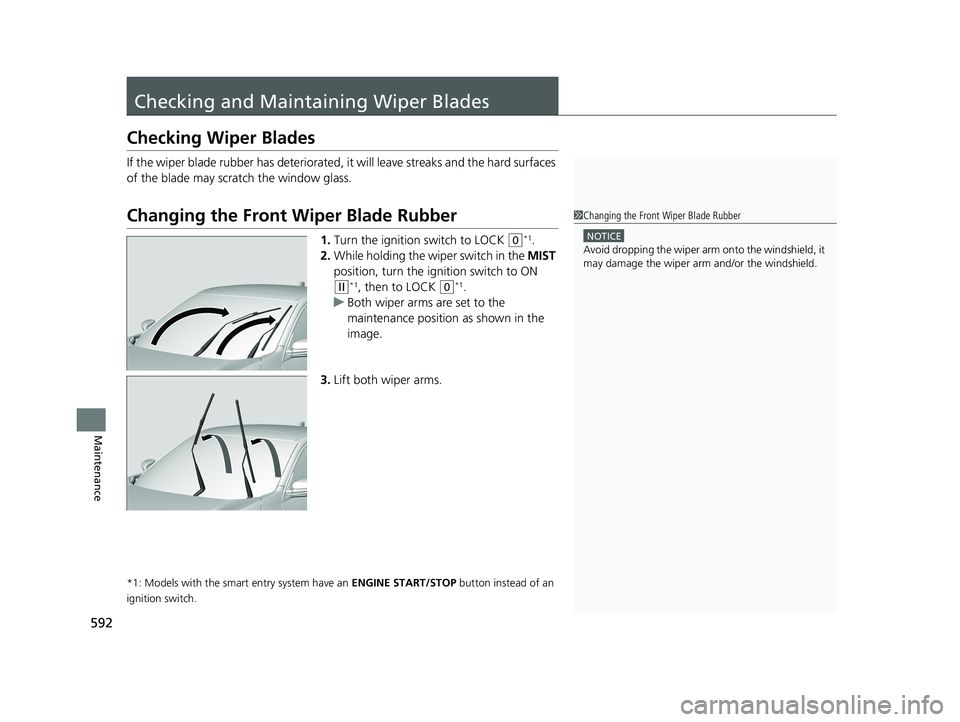
1. Turn the ignition switch to LOCK (0*1.
2. While holding the wiper switch in the MIST
position, turn the igni tion switch to ON
(w*1, then to LOCK (0*1.
u Both wiper arms are set to the
maintenance position as shown in the
image.
3. Lift both wiper arms.
*1: Models with the smart entry system have an ENGINE START/STOP button instead of an
ignition switch.
1 Changing the Front Wiper Blade Rubber
NOTICE
Avoid dropping the wiper arm onto the windshield, it
may damage the wiper arm and/or the windshield.
19 CIVIC 5D HUM (KA KC KL)-31TGG6201.book 592 ページ 2018年10月25日 木曜日 午後4時12分
Page 596 of 699

594
uuChecking and Maintaining Wiper Blades uChanging the Front Wiper Blade Rubber
Maintenance
7. Insert the flat side of the new wiper blade
onto the bottom part of the holder. Insert
the blade all the way.
8. Install the end of the wiper blade into the
cap.
9. Slide the holder onto the wiper arm until it
locks.
10. Lower both wiper arms.
11. Turn the ignition switch to ON
(w*1 and
hold the wiper switch in the MIST position
until both wiper arms return to the
standard position.
*1: Models with the smart entry system have an ENGINE START/STOP button instead of an
ignition switch.
Holder Wiper
Blade
Cap
19 CIVIC 5D HUM (KA KC KL)-31TGG6201.book 594 ページ 2018年10月25日 木曜日 午後4時12分
Page 604 of 699
602
uuChecking and Maintaining Tires uWear Indicators
Maintenance
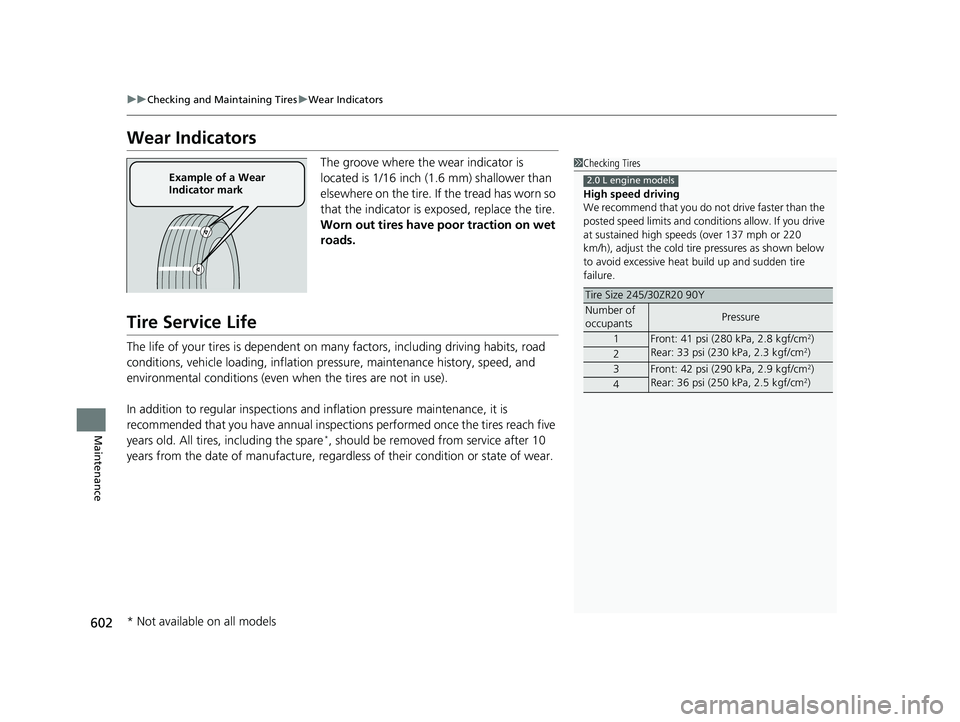
Wear Indicators
The groove where the wear indicator is
located is 1/16 inch (1.6 mm) shallower than
elsewhere on the tire. If the tread has worn so
that the indicator is ex posed, replace the tire.
Worn out tires have poor traction on wet
roads.
Tire Service Life
The life of your tires is dependent on many factors, including driving habits, road
conditions, vehicle loading, inflation pre ssure, maintenance history, speed, and
environmental conditions (even when the tires are not in use).
In addition to regular inspections and inflation pressure maintenance, it is
recommended that you have annual inspections performed once the tires reach five
years old. All tires, including the spare
*, should be removed from service after 10
years from the date of manufacture, regard less of their condition or state of wear.
1Checking Tires
High speed driving
We recommend that you do not drive faster than the
posted speed limits and condi tions allow. If you drive
at sustained high speeds (over 137 mph or 220
km/h), adjust the cold tire pressures as shown below
to avoid excessive heat build up and sudden tire
failure.
Tire Size 245/30ZR20 90Y
Number of
occupantsPressure
1Front: 41 psi (280 kPa, 2.8 kgf/cm2)
Rear: 33 psi (230 kPa, 2.3 kgf/cm2)2
3Front: 42 psi (290 kPa, 2.9 kgf/cm2)
Rear: 36 psi (250 kPa, 2.5 kgf/cm2)4
2.0 L engine modelsExample of a Wear
Indicator mark
* Not available on all models
19 CIVIC 5D HUM (KA KC KL)-31TGG6201.book 602 ページ 2018年10月25日 木曜日 午後4時12分