oil level HONDA CIVIC HYBRID 2012 9.G Owners Manual
[x] Cancel search | Manufacturer: HONDA, Model Year: 2012, Model line: CIVIC HYBRID, Model: HONDA CIVIC HYBRID 2012 9.GPages: 313, PDF Size: 8.65 MB
Page 202 of 313
201
uuWhen Driving uPrecautions While Driving
Driving
Precautions While DrivingAvoid driving in deep water and on flooded roads. This can damage the engine or
cause electrical component failure.
If there is a strong impact with something under the vehicle, stop in a safe location.
Check the underside of the vehicle for damage or any fluid leaks.■
In Rain
■
Other Precautions
1Precautions While Driving
NOTICEDo not operate the shift lever while pressing the
accelerator pedal. You could damage the
transmission.
If the ignition switch is turned to ACCESSORY
(q
or
LOCK
( 0
while driving, the engine will shut down
and all steering and brake power assist functions will
stop, making it difficult to control the vehicle.
Do not put the shift lever in
( N
, as you will lose
engine braking (and acceleration) performance.
During the first 600 miles (1,000 km) of operation,
avoid sudden acceleration or full throttle operation so
as to not damage the engine or powertrain.
Avoid hard braking for the first 200 miles (300 km).
You should also follow this when the brake pads are
replaced.
NOTICEFollowing can damage the under spoiler:•Parking the vehicle by a parking block•Parallel parking along the road shoulder•Driving towards the bottom of a hill•Driving up or down to a different surface level
(such as a road shoulder)•Driving on a rutted or bumpy road•Driving on a road with potholes
Page 229 of 313
228Maintenance
Before Performing MaintenanceInspection and MaintenanceFor your safety, perform all listed inspections and maintenance to keep your vehicle
in good condition. If you become aware of any abnormality (noise, smell, insufficient
brake fluid, oil residue on the ground, etc.), have your vehicle inspected by a dealer.
(Note, however, that service at a dealer is not mandatory to keep your \
warranties in
effect.) Refer to the separate maintenance booklet for detailed maintenance and
inspection information.■
Daily inspections
Perform inspections before long distance trips, when washing the vehicle, or when
refueling.
■
Periodic inspections
• Check the continuously variable transmission fluid level monthly.
2 Continuously Variable Transmission (CVT) Fluid P. 244
•Check the brake fluid level monthly.
2 Checking the Brake Fluid P. 245
•Check the tire pressure monthly. Examine the tread for wear and foreign objects.
2 Checking and Maintaining Tires P. 254
•Check the operation of the exterior lights monthly.
2 Replacing Light Bulbs P. 247
•Check the condition of the wiper blades at least every six months.
2Checking and Mainta ining Wiper Blades P. 252
■
Types of Inspection and Maintenance
1Inspection and Maintenance
Maintenance, replacement, or repair of
emissions control devices and systems may be
done by any automotive repair establishment or
individuals using parts that are "certified" to
EPA standards.
According to state and federal regulations, failure to
perform maintenance on the maintenance main
items marked with # will not void your emissions
warranties. However, all maintenance services should
be performed in accordance with the intervals
indicated by the multi-information display. 2 Maintenance Service Items P. 233
If you want to perform complex maintenance tasks
that require more skills and tools, you can purchase a
subscription to the Service Express website at
www.techinfo.honda.com .
2 Authorized Manuals P. 303
If you want to perform maintenance yourself, make
sure that you have the necessary tools and skills first.
After performing maintenance, update the records in
the separate maintenance booklet.
U.S. models
Page 234 of 313
233
uuMaintenance Minder™ uTo Use Maintenance Minder
TM
Continued
Maintenance
■
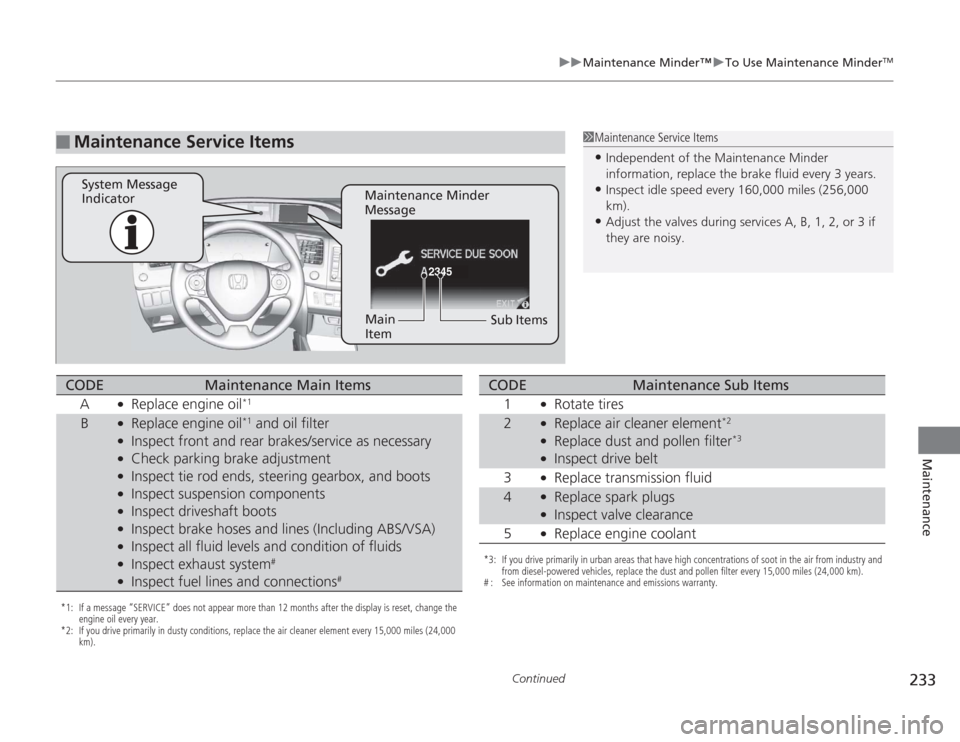
Maintenance Service Items
1Maintenance Service Items•Independent of the Maintenance Minder
information, replace the brake fluid every 3 years.•Inspect idle speed every 160,000 miles (256,000
km).•Adjust the valves during services A, B, 1, 2, or 3 if
they are noisy.
2345
Maintenance Minder
Message
System Message
Indicator
Sub Items
Main
Item
*1: If a message “SERVICE” does not appear more than 12 months after the display is reset, change the
engine oil every year.
*2: If you drive primarily in dusty conditions, replace the air cleaner element every 15,000 miles (24,000 km).CODE
Maintenance Main Items
A
●
Replace engine oil
*1
B
●
Replace engine oil
*1 and oil filter
●
Inspect front and rear brakes/service as necessary
●
Check parking brake adjustment
●
Inspect tie rod ends, steering gearbox, and boots
●
Inspect suspension components
●
Inspect driveshaft boots
●
Inspect brake hoses and lines (Including ABS/VSA)
●
Inspect all fluid levels and condition of fluids
●
Inspect exhaust system
#
●
Inspect fuel lines and connections
#
*3: If you drive primarily in urban areas that have high concentrations of soot in the air from industry and from diesel-powered vehicles, replace the dust and pollen filter every 15,000 miles (24,000 km).
# : See information on maintenance and emissions warranty.CODE
Maintenance Sub Items
1
●
Rotate tires
2
●
Replace air cleaner element
*2
●
Replace dust and pollen filter
*3
●
Inspect drive belt
3
●
Replace transmission fluid
4
●
Replace spark plugs
●
Inspect valve clearance
5
●
Replace engine coolant
Page 239 of 313
238
uuMaintenance Under the Hood uOil Check
Maintenance
Oil CheckWe recommend that you check the engine oil level every time you refuel.
Park the vehicle on level ground.
Wait approximately three minutes after turning the engine off before you check the
oil.
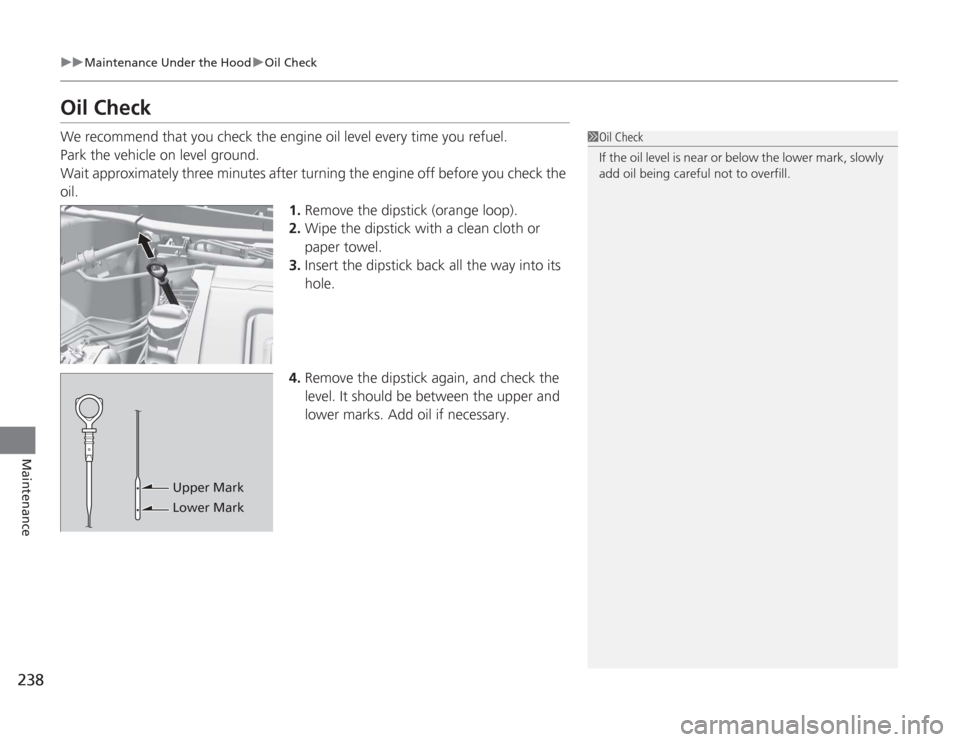
1.Remove the dipstick (orange loop).
2. Wipe the dipstick with a clean cloth or
paper towel.
3. Insert the dipstick back all the way into its
hole.
4. Remove the dipstick again, and check the
level. It should be between the upper and
lower marks. Add oil if necessary.
1Oil Check
If the oil level is near or below the lower mark, slowly
add oil being careful not to overfill.
Upper Mark
Lower Mark
Page 242 of 313
241
uuMaintenance Under the Hood uChanging the Engine Oil and Oil Filter
Maintenance
5. Remove the oil filter and dispose of the
remaining oil.
6. Check that the filter gasket is not stuck to
the engine contact surface.
u If it is stuck, you must detach it.
7. Wipe away dirt and dust adhering to the
contact surface of the engine block, and
install a new oil filter.
u Apply a light coat of new engine oil to
the oil filter rubber seal.
8. Put a new washer on the drain bolt, then
reinstall the drain bolt.
u Tightening torque:
29 lbf∙ft (39 N∙m, 4.0 kgf∙m)
9. Pour the recommended engine oil into the engine.
u Engine oil change capacity (including filter):
3.8 US qt (3.6 L)
10. Reinstall the engine oil fill cap securely and
start the engine.
11. Run the engine for a few minutes, and
then check that there is no leak from the
drain bolt or oil filter.
12. Stop the engine, wait for three minutes,
and then check the oil level on the
dipstick.
u If necessary, add more engine oil.
1Changing the Engine Oil and Oil Filter
You will need a special wrench to replace the oil
filter. You can buy this wrench from a dealer.
When installing the new oil filter, follow the
instructions supplied with the oil filter.
Reinstall the engine oil fill cap. Start the engine. The
low oil pressure indicator should go off within five
seconds. If it does not, turn off the engine, and check
your work.
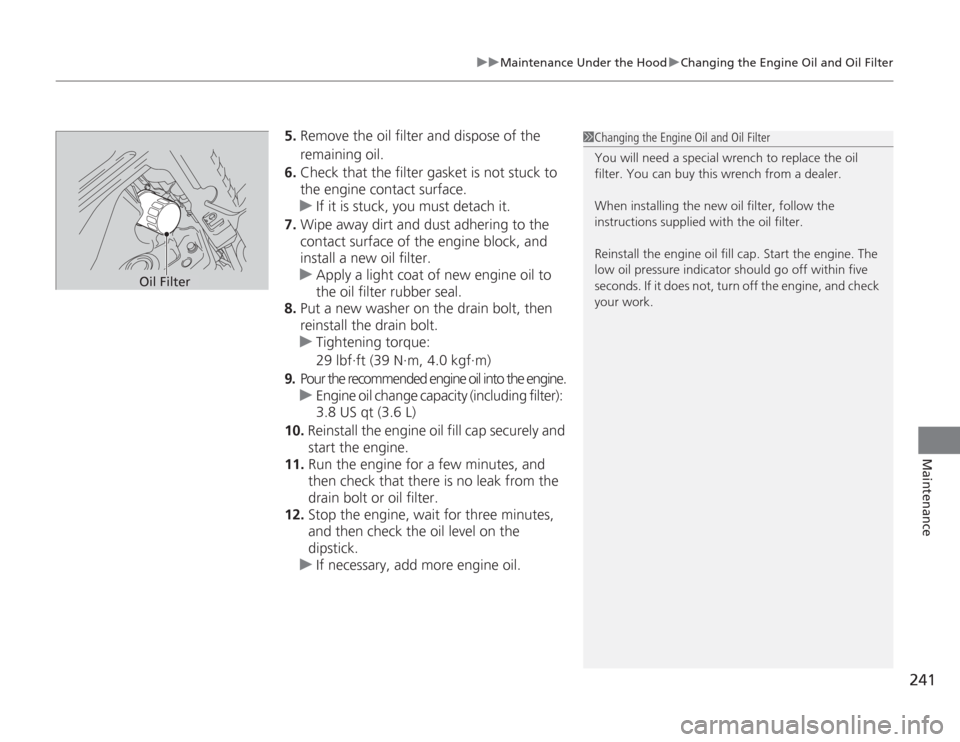
Oil Filter
Page 286 of 313
285
Handling the Unexpected
Indicator, Coming On/BlinkingIf the Low Oil Pressure Indicator Comes On
■
Reasons for the indicator to come on
Comes on when the engine oil pressure is low.
■
What to do as soon as the indicator comes on
1. Immediately park the vehicle in a safe place.
2. If necessary, turn the hazard warning lights on.
■
What to do after parking the vehicle
1. Stop the engine and let it sit for about one minute.
2. Open the hood and check the oil level.
u Add oil as necessary.
3. Start the engine and check the low oil pressure indicator.
u The light goes out: Start driving again.
u The light does not go out within 10 seconds: Stop the engine and
contact a dealer for repairs immediately.
If the Charging System Indicator Comes On
■
Reasons for the indicator to come on
Comes on when the 12 volt battery is not being charged.
■
What to do when the indicator comes on
Turn off the climate control system, rear defogger, and other electrical
systems, and immediately contact a dealer for repairs.
1 If the Low Oil Pressure Indicator Comes On
NOTICERunning the engine with low oil pressure can cause
serious mechanical damage almost immediately.1If the Charging System Indicator Comes On
If you need to stop temporarily, do not turn off the
engine. Restarting the engine may rapidly discharge
the 12 volt battery.
This indicator may blink after starting when the
outside temperature is below -20°F (-30°C). It will
stop blinking after the IMA battery warms up.
Page 290 of 313
289
Continued
Handling the Unexpected
FusesFuse LocationsIf any electrical devices are not working,
turn the ignition switch to LOCK
(0
and
check to see if any applicable fuse is blown.
Fuse locations are shown on the fuse box cover.
Locate the fuse in question by the fuse
number and box cover number.
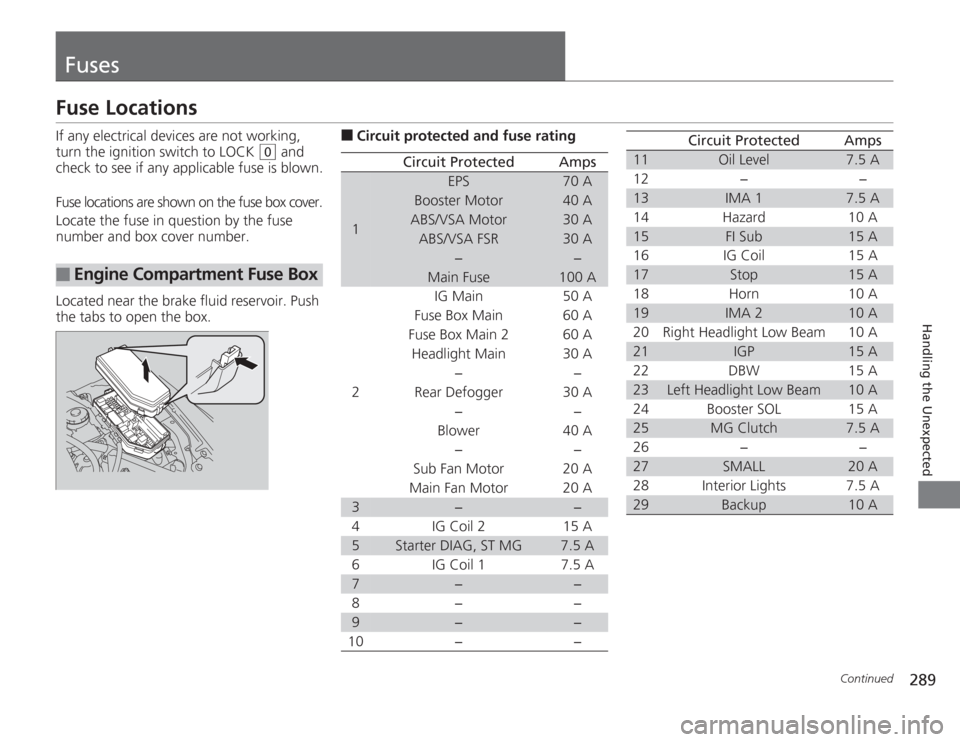
Located near the brake fluid reservoir. Push
the tabs to open the box.
■
Engine Compartmen t Fuse Box
■
Circuit protected and fuse rating
Circuit Protected
Amps
1
EPS
70 A
Booster Motor
40 A
ABS/VSA Motor
30 A
ABS/VSA FSR
30 A
−
−
Main Fuse
100 A
2
IG Main
50 A
Fuse Box Main 60 A
Fuse Box Main 2
60 A
Headlight Main 30 A
−
−
Rear Defogger 30 A −−
Blower 40 A
−−
Sub Fan Motor 20 A
Main Fan Motor 20 A
3
−
−
4 IG Coil 2 15 A
5
Starter DIAG, ST MG
7.5 A
6 IG Coil 1 7.5 A
7
−
−
8− −
9
−
−
10 − −
11
Oil Level
7.5 A
12 − −
13
IMA 1
7.5 A
14 Hazard 10 A
15
FI Sub
15 A
16 IG Coil 15 A
17
Stop
15 A
18 Horn 10 A
19
IMA 2
10 A
20 Right Headlight Low Beam 10 A
21
IGP
15 A
22 DBW 15 A
23
Left Headlight Low Beam
10 A
24 Booster SOL 15 A
25
MG Clutch
7.5 A
26 − −
27
SMALL
20 A
28 Interior Lights 7.5 A
29
Backup
10 A
Circuit Protected
Amps