spare tire HONDA CIVIC HYBRID 2012 9.G Owners Manual
[x] Cancel search | Manufacturer: HONDA, Model Year: 2012, Model line: CIVIC HYBRID, Model: HONDA CIVIC HYBRID 2012 9.GPages: 313, PDF Size: 8.65 MB
Page 22 of 313

Quick Reference Guide21
Handling the Unexpected
(P271)
Flat Tire
(P273)
● Park in a safe location and replace the
flat tire with the compact spare tire in the
trunk.
Indicators Come On (P285)
●Identify the indicator and consult the
owner's manual.
Engine Won't Start
(P279)
● If the battery is dead, jump start using a
booster battery.
Blown Fuse
(P289)
● Check for a blown fuse if an electrical
device does not operate.
Overheating
(P283)
● Park in a safe location. If you do not see
steam under the hood, open the hood,
and let the engine cool down.
Emergency Towing
(P292)
● Call a professional towing service if you
need to tow your vehicle.
Page 76 of 313
75
uuIndicators u
Continued
Instrument Panel
Indicator
Name
On/Blinking
Explanation
Message
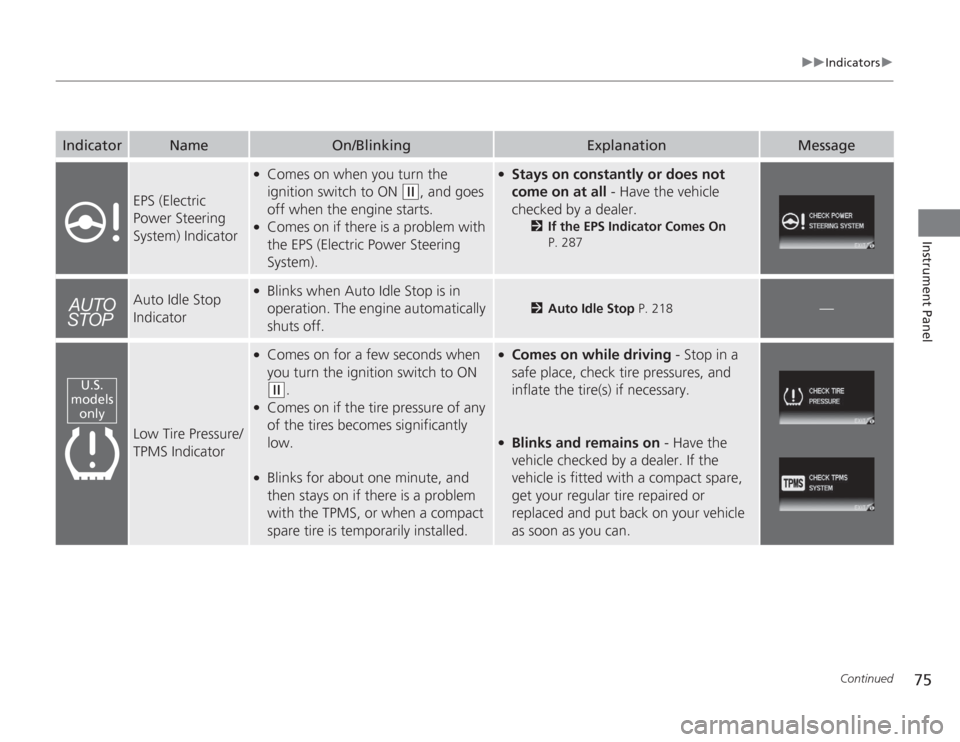
EPS (Electric
Power Steering
System) Indicator
●
Comes on when you turn the
ignition switch to ON
(w
, and goes
off when the engine starts.
●
Comes on if there is a problem with
the EPS (Electric Power Steering
System).
●
Stays on constantly or does not
come on at all - Have the vehicle
checked by a dealer.
2 If the EPS Indicator Comes On
P. 287
Auto Idle Stop
Indicator
●
Blinks when Auto Idle Stop is in
operation. The engine automatically
shuts off.
2 Auto Idle Stop P. 218
—
Low Tire Pressure/
TPMS Indicator
●
Comes on for a few seconds when
you turn the ignition switch to ON (w
.
●
Comes on if the tire pressure of any
of the tires becomes significantly
low.
●
Blinks for about one minute, and
then stays on if there is a problem
with the TPMS, or when a compact
spare tire is temporarily installed.
●
Comes on while driving - Stop in a
safe place, check tire pressures, and
inflate the tire(s) if necessary.
●
Blinks and remains on - Have the
vehicle checked by a dealer. If the
vehicle is fitted with a compact spare,
get your regular tire repaired or
replaced and put back on your vehicle
as soon as you can.
U.S.
models only
Page 212 of 313
211
uuWhen Driving uTire Pressure Monitoring System (TPMS) - Required Federal Explanation
Continued
Driving
Tire Pressure Monitoring System (TPMS) - Required Federal ExplanationEach tire, including th e spare (if provided), should be checked
monthly when cold and inflated to the inflation pressure
recommended by the vehicle manufacturer on the vehicle placard
or tire inflation pressure label.
(If your vehicle has tires of a different size than the size indicated
on the vehicle placard or tire inflatio n pressure label, you should
determine the proper tire inflation pressure for those tires.)
As an added safety feature, your ve hicle has been equipped with
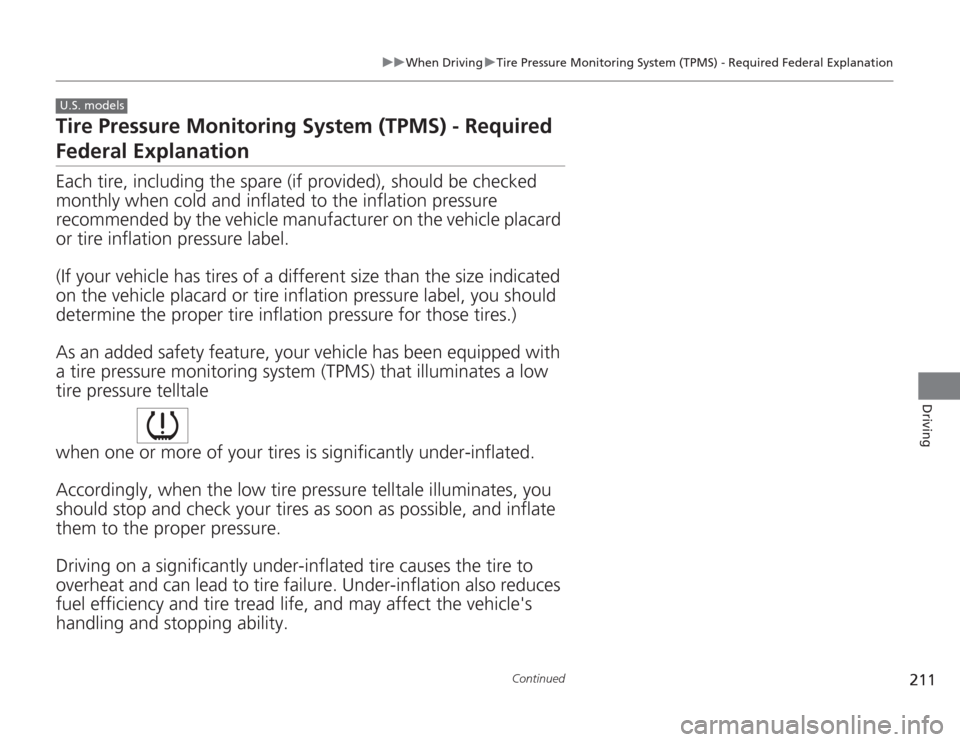
a tire pressure monitoring system (TPMS) that illuminates a low
tire pressure telltale
when one or more of your tires is significantly under-inflated.
Accordingly, when the low tire pressure telltale illuminates, you
should stop and check your tires as soon as possible, and inflate
them to the proper pressure.
Driving on a significantly under-inflated tire causes the tire to
overheat and can lead to tire fa ilure. Under-inflation also reduces
fuel efficiency and tire tread life, and may affect the vehicle's
handling and stopping ability.U.S. models
Page 255 of 313
254Maintenance
Checking and Maintaining TiresChecking TiresTo safely operate your vehicle, your tires must be of the proper type and size, in
good condition with adequate tread, and properly inflated.■
Inflation guidelines
Properly inflated tires provide the best combination of handling, tread life, and comfort.
Refer to the driver’s doorjamb label or sp ecification’s page for the specified pressure.
Underinflated tires wear unevenly, adversely affect handling and fuel economy, and
are more likely to fail from overheating.
Overinflated tires make your vehicle ride harshly, are more prone to road hazards,
and wear unevenly.
Every day before you drive, look at each of the tires. If one looks lower than the
others, check the pressure with a tire gauge.
At least once a month or before long trips, use a gauge to measure the pressure in
all tires, including the spare. Even tires in good condition can lose 1 to 2 psi (10 to
20 kPa, 0.1 to 0.2 kgf/cm
2) per month.
■
Inspection guidelines
Every time you check inflation, also examine the tires and valve stems.
Look for:
• Bumps or bulges on the side or in the tread. Replace the tire if you find any cuts,
splits, or cracks in the side of the tire. Re place it if you see fabric or cord.
• Remove any foreign objects and inspect for air leaks.
• Uneven tread wear. Have a dealer check the wheel alignment.
• Excessive tread wear.
2 Wear Indicators P. 259
•Cracks or other damage around valve stem.
1Checking Tires
Measure the air pressure when tires are cold. This
means the vehicle has been par ked for at least three
hours, or driven less than 1 mile (1.6 km). If
necessary, add or release air until the specified
pressure is reached.
If checked when hot, tire pressure can be as much as
4–6 psi (30–40 kPa, 0.3–0.4 kgf/cm
2) higher than if
checked when cold.
Have a dealer check the tires if you feel a consistent
vibration while driving. New tires and any that have
been removed and reinstalled should be properly
balanced.
3
WARNING
Using tires that are excessively worn or
improperly inflated can cause a crash in
which you can be seri ously hurt or killed.
Follow all instruc tions in this owner’s
manual regarding tire inflation and
maintenance.
Page 256 of 313
255
uuChecking and Maintaining Tires uTire and Loading Information Label
Continued
Maintenance
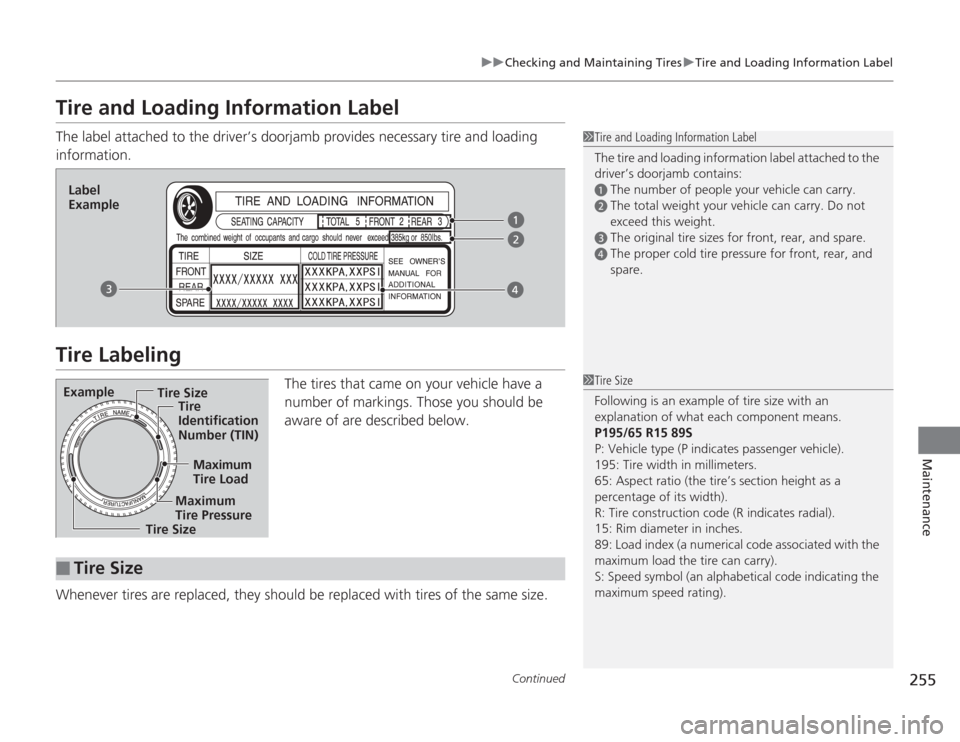
Tire and Loading Information LabelThe label attached to the driver’s doorjamb provides necessary tire and loading
information.Tire Labeling
The tires that came on your vehicle have a
number of markings. Those you should be
aware of are described below.
Whenever tires are replaced, they should be replaced with tires of the same size.
1 Tire and Loading Information Label
The tire and loading information label attached to the
driver’s doorjamb contains:a
The number of people your vehicle can carry.
b
The total weight your vehicle can carry. Do not
exceed this weight.
c
The original tire sizes for front, rear, and spare.
d
The proper cold tire pressure for front, rear, and
spare.
Label
ExampleExample
Tire Size
Tire
Identification
Number (TIN)
Maximum
Tire Load
Maximum
Tire Pressure
Tire Size■
Tire Size
1 Tire Size
Following is an example of tire size with an
explanation of what each component means.
P195/65 R15 89S
P: Vehicle type (P indicates passenger vehicle).
195: Tire width in millimeters.
65: Aspect ratio (the tire’s section height as a
percentage of its width).
R: Tire construction code (R indicates radial).
15: Rim diameter in inches.
89: Load index (a numerical code associated with the
maximum load the tire can carry).
S: Speed symbol (an alphabetical code indicating the
maximum speed rating).
Page 260 of 313
259
uuChecking and Maintaining Tires uWear Indicators
Maintenance
Wear Indicators
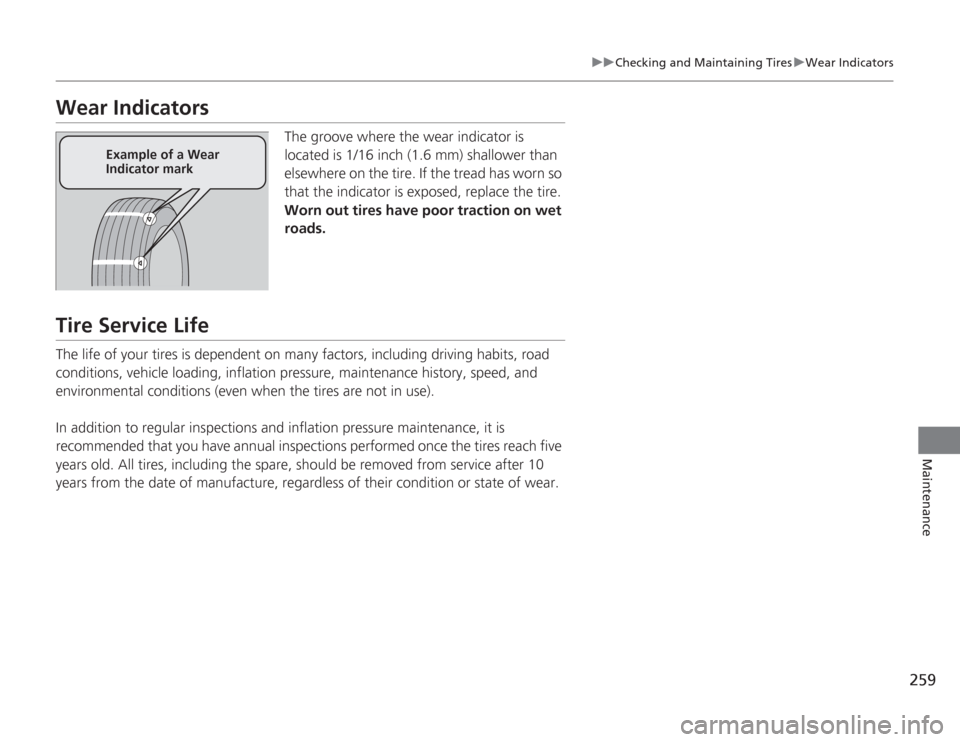
The groove where the wear indicator is
located is 1/16 inch (1.6 mm) shallower than
elsewhere on the tire. If the tread has worn so
that the indicator is exposed, replace the tire.
Worn out tires have poor traction on wet
roads.
Tire Service LifeThe life of your tires is dependent on man y factors, including driving habits, road
conditions, vehicle loading, inflation pr essure, maintenance history, speed, and
environmental conditions (even when the tires are not in use).
In addition to regular inspections and inflation pressure maintenance, it is
recommended that you have annual inspections performed once the tires reach five
years old. All tires, including the spare, should be removed from service after 10
years from the date of manufacture, regardless of their condition or state of wear.
Example of a Wear
Indicator mark
Page 274 of 313
273
Continued
Handling the Unexpected
If a Tire Goes FlatChanging a Flat TireIf a tire goes flat while driving, grasp the steering wheel firmly, and brake gradually
to reduce speed. Then, stop in a safe place. Replace the flat tire with a compact
spare tire. Go to a dealer as soon as possible to have the full size tire repaired or
replaced.
1.Park the vehicle on firm, level, and non-slippery ground.
2. Put the shift lever in
(P
.
3. Set the parking brake.
4. Turn on the hazard warning lights and turn the ignition switch to LOCK
(0
.
1Changing a Flat Tire
Follow compact spare precautions:
Periodically check the tire pressure of the compact
spare. It should be set to the specified pressure.
Specified Pressure: 60 psi (420 kPa, 4.2 kgf/cm
2)
When driving with the compact spare tire, keep the
vehicle speed under 50 mph (80 km/h). Replace with
a full size tire as soon as possible.
The compact spare tire and wheel in your vehicle are
specifically for this model.
Do not use them with another vehicle.
Do not use another type of compact spare tire or
wheel with your vehicle.
Do not mount tire chains on a compact spare tire.
If a chain-mounted front tire goes flat, remove one of
the full-size rear tires and replace it with the compact
spare tire. Remove the flat front tire and replace it
with the full size tire that was removed from the rear.
Mount the tire chains on the front tire.
Do not use a puncture-repairing agent on a flat tire,
as it can damage the tire pressure sensor.
U.S. models only
Page 275 of 313
274
uuIf a Tire Goes Flat uChanging a Flat Tire
Handling the Unexpected
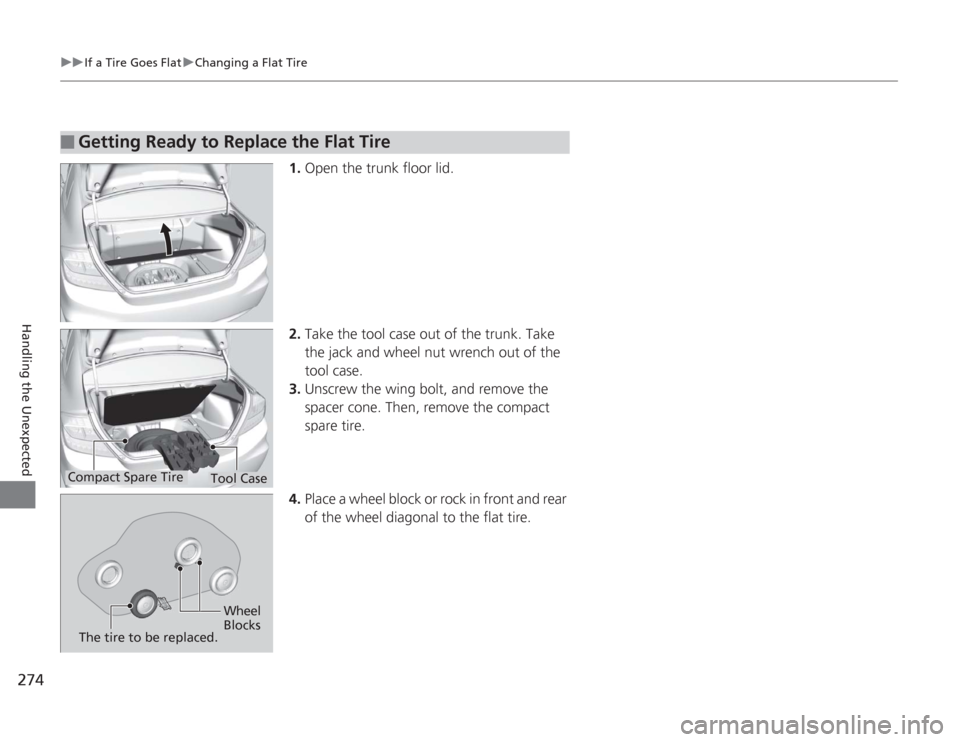
1. Open the trunk floor lid.
2. Take the tool case out of the trunk. Take
the jack and wheel nut wrench out of the
tool case.
3. Unscrew the wing bolt, and remove the
spacer cone. Then, remove the compact
spare tire.
4. Place a wheel block or rock in front and rear
of the wheel diagonal to the flat tire.
■
Getting Ready to Replace the Flat Tire
Tool Case
Compact Spare Tire
Wheel
Blocks
The tire to be replaced.
Page 276 of 313
275
uuIf a Tire Goes Flat uChanging a Flat Tire
Continued
Handling the Unexpected
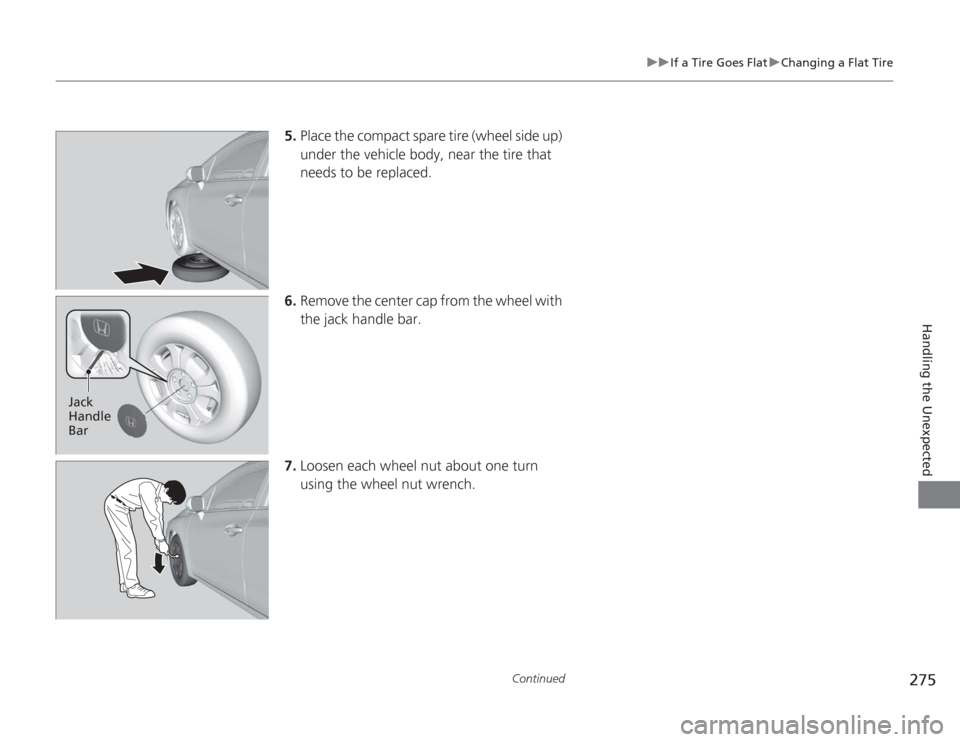
5. Place the compact spare tire (wheel side up)
under the vehicle body, near the tire that
needs to be replaced.
6. Remove the center cap from the wheel with
the jack handle bar.
7. Loosen each wheel nut about one turn
using the wheel nut wrench.
Jack
Handle
Bar
Page 278 of 313
Continued
277
uuIf a Tire Goes Flat uChanging a Flat Tire
Handling the Unexpected
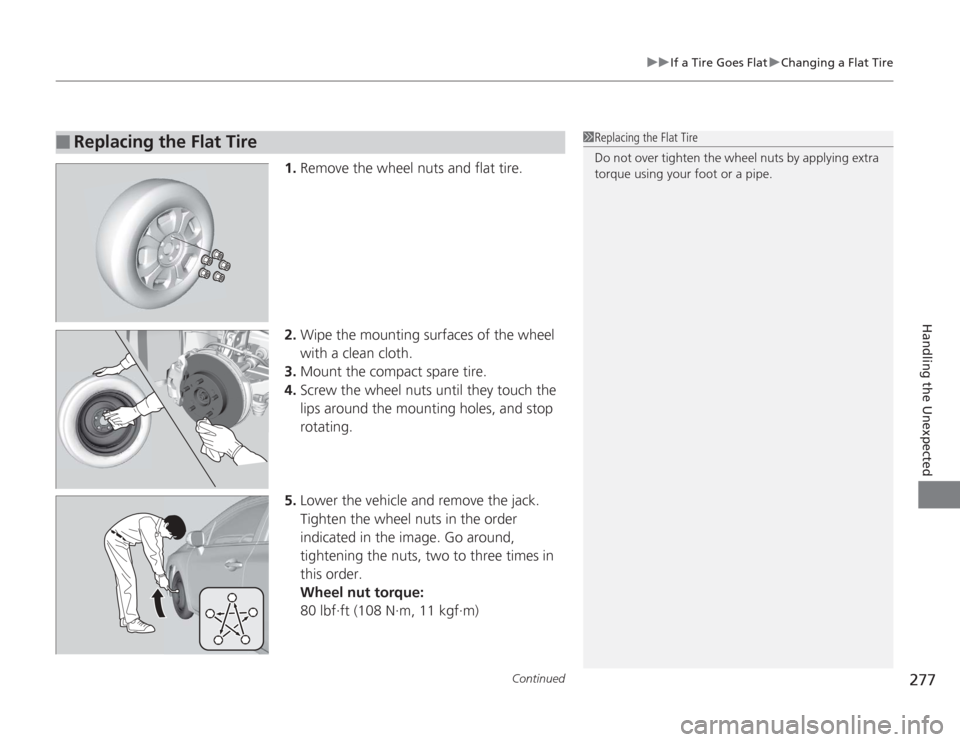
1. Remove the wheel nuts and flat tire.
2. Wipe the mounting surfaces of the wheel
with a clean cloth.
3. Mount the compact spare tire.
4. Screw the wheel nuts until they touch the
lips around the mounting holes, and stop
rotating.
5. Lower the vehicle and remove the jack.
Tighten the wheel nuts in the order
indicated in the image. Go around,
tightening the nuts, two to three times in
this order.
Wheel nut torque:
80 lbf∙ft (108 N∙m, 11 kgf∙m)
■
Replacing the Flat Tire
1Replacing the Flat Tire
Do not over tighten the wheel nuts by applying extra
torque using your foot or a pipe.