change wheel HONDA CIVIC HYBRID 2013 9.G Owners Manual
[x] Cancel search | Manufacturer: HONDA, Model Year: 2013, Model line: CIVIC HYBRID, Model: HONDA CIVIC HYBRID 2013 9.GPages: 346, PDF Size: 6.95 MB
Page 1 of 346
ContentsThis owner’s manual should be considered a permanent part of the
vehicle and should remain with the vehicle when it is sold.
This owner’s manual covers all models of your vehicle. You may find
descriptions of equipment and features that are not on your
particular model.
Images throughout this owner’s manual (including the front cover)
represent features and equipment that are available on some, but
not all, models. Your particular model may not have some of these
features.
This owner’s manual is for vehicles sold in the United States and
Canada.
The information and specifications included in this publication were
in effect at the time of approval for printing. Honda Motor Co., Ltd.
reserves the right, however, to discontinue or change specifications
or design at any time without notice and without incurring any
obligation.
2Safe Driving P. 27For Safe Driving P. 28 Seat Belts P. 32 Airbags P. 392Instrument Panel P. 67Indicators P. 68
Gauges and intelligent Multi-Information Display (i-MID) P. 82
2Controls P. 103Setting the Clock P. 104 Locking and Unlocking the Doors P. 105
Operating the Switches Around the Steering Wheel P. 119
Interior Lights/Interior Convenience Items P. 1342Features P. 143Audio System P. 144 Audio System Basic Operation P. 147
Bluetooth® HandsFreeLink® P. 1752Driving P. 207Before Driving P. 208 Towing a Trailer P. 213
Rearview Camera P. 245 Refueling P. 246 Fuel Economy P. 2492Maintenance P. 251Before Performing Maintenance P. 252 Maintenance Minder
TM P. 255
Checking and Maintaining Wiper Blades P. 277
Climate Control System Maintenance P. 290
2Handling the Unexpected P. 295Tools P. 296 If a Tire Goes Flat P. 297
Overheating P. 315 Indicator, Coming On/Blinking P. 3172Information P. 325Specifications P. 326 Identification Numbers P. 328
Emissions Testing P. 331 Warranty Coverages P. 333
Page 121 of 346
120
uuOperating the Switches Around the Steering WheeluTurn Signals
Controls
Turn Signals
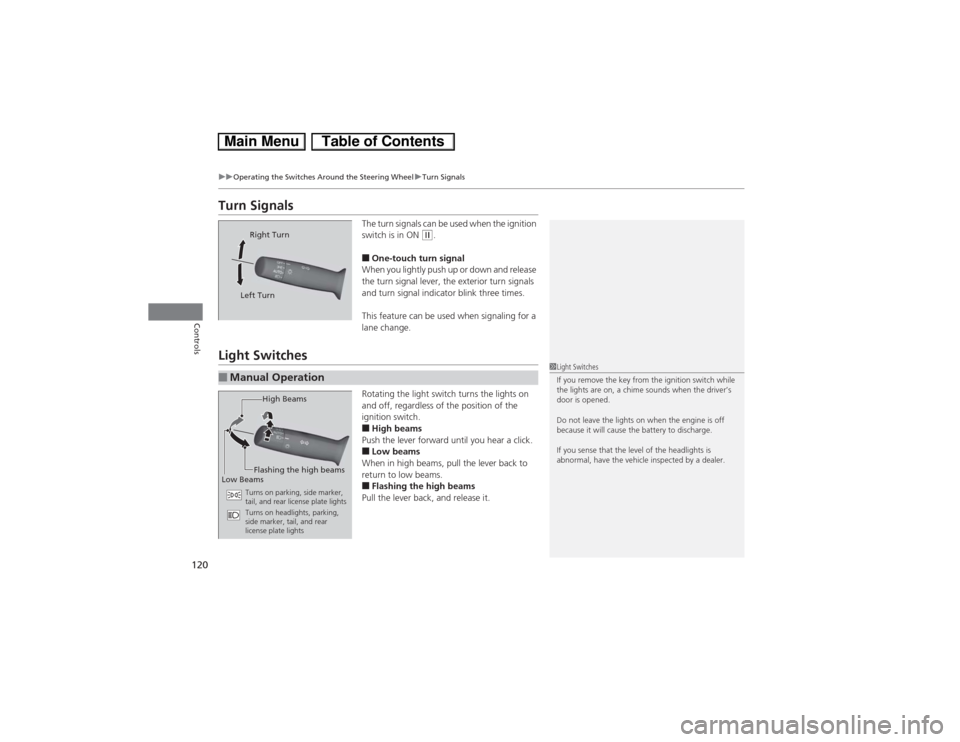
The turn signals can be used when the ignition
switch is in ON
(w.
■One-touch turn signal
When you lightly push up or down and release
the turn signal lever, the exterior turn signals
and turn signal indicator blink three times.
This feature can be used when signaling for a
lane change.
Light Switches
Rotating the light switch turns the lights on
and off, regardless of the position of the
ignition switch.■High beams
Push the lever forward until you hear a click.■Low beams
When in high beams, pull the lever back to
return to low beams.■Flashing the high beams
Pull the lever back, and release it.
Right Turn
Left Turn
■Manual Operation
1Light Switches
If you remove the key from the ignition switch while
the lights are on, a chime sounds when the driver’s
door is opened.
Do not leave the lights on when the engine is off
because it will cause the battery to discharge.
If you sense that the level of the headlights is
abnormal, have the vehicle inspected by a dealer.
High Beams
Flashing the high beams
Low Beams
Turns on parking, side marker,
tail, and rear license plate lights
Turns on headlights, parking,
side marker, tail, and rear
license plate lights
Page 122 of 346
Continued
121
uuOperating the Switches Around the Steering WheeluLight Switches
Controls
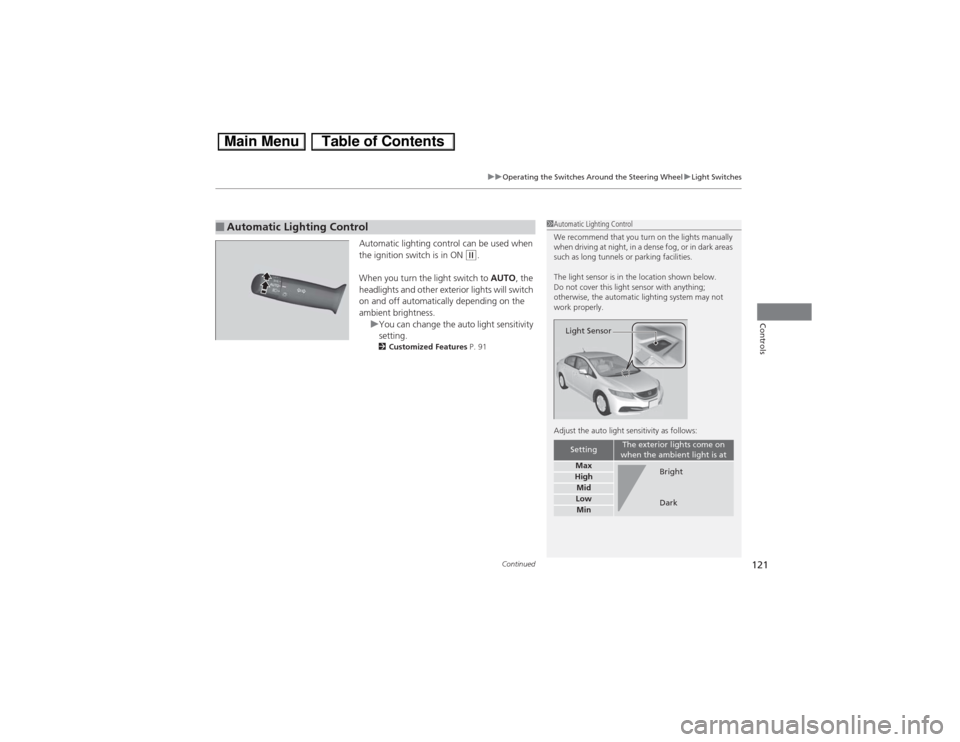
Automatic lighting control can be used when
the ignition switch is in ON
(w.
When you turn the light switch to AUTO, the
headlights and other exterior lights will switch
on and off automatically depending on the
ambient brightness.
uYou can change the auto light sensitivity
setting.
2Customized Features P. 91
■Automatic Lighting Control
1Automatic Lighting Control
We recommend that you turn on the lights manually
when driving at night, in a dense fog, or in dark areas
such as long tunnels or parking facilities.
The light sensor is in the location shown below.
Do not cover this light sensor with anything;
otherwise, the automatic lighting system may not
work properly.
Adjust the auto light sensitivity as follows:
Setting
The exterior lights come on
when the ambient light is at
MaxHighMidLowMinLight Sensor
Bright
Dark
Page 123 of 346
uuOperating the Switches Around the Steering WheeluLight Switches
122Controls
The headlights automatically come on when the wipers are used several times within
a certain intervals with the headlight switch in AUTO.
The headlights automatically go off a few minutes later if the wipers are stopped.
The headlights, all other exterior lights, and the instrument panel lights turn off
within 15 seconds after you remove the key and close the driver’s door.
uYou can change the headlight auto off timer setting.
2Customized Features P. 91
If you turn the ignition switch to LOCK
(0 with the headlight switch on, but do not
open the door, the lights turn off after 10 minutes (three minutes, if the switch is in
the AUTO position).
The lights turn on again when you unlock or open the driver’s door. If you unlock
the door, but do not open it within 15 seconds, the lights go off. If you open the
driver’s door, you will hear a lights on reminder chime.
■Headlight Integration with Wiper
*
■Automatic Lighting Off Feature
1Headlight Integration with Wiper
*
This feature activates during the headlights are off in
AUTO.
The instrument panel brightness does not change
when the headlights come on.
When the ambient light is at dark, the automatic
lighting control feature overrides, and the headlights
come on with or without the wipers sweeping more
than several times.
* Not available on all models
Page 125 of 346
124
uuOperating the Switches Around the Steering WheeluWipers and Washers
Controls
Wipers and Washers
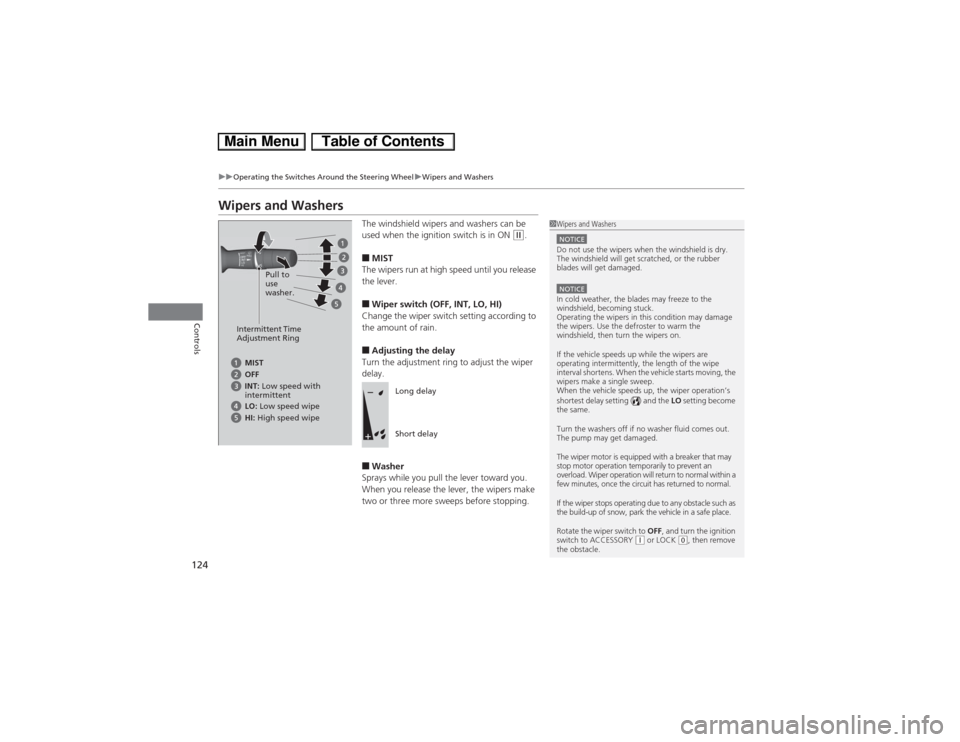
The windshield wipers and washers can be
used when the ignition switch is in ON
(w.
■MIST
The wipers run at high speed until you release
the lever.■Wiper switch (OFF, INT, LO, HI)
Change the wiper switch setting according to
the amount of rain.■Adjusting the delay
Turn the adjustment ring to adjust the wiper
delay.■Washer
Sprays while you pull the lever toward you.
When you release the lever, the wipers make
two or three more sweeps before stopping.
1Wipers and WashersNOTICEDo not use the wipers when the windshield is dry.
The windshield will get scratched, or the rubber
blades will get damaged.NOTICEIn cold weather, the blades may freeze to the
windshield, becoming stuck.
Operating the wipers in this condition may damage
the wipers. Use the defroster to warm the
windshield, then turn the wipers on.
If the vehicle speeds up while the wipers are
operating intermittently, the length of the wipe
interval shortens. When the vehicle starts moving, the
wipers make a single sweep.
When the vehicle speeds up, the wiper operation’s
shortest delay setting ( ) and the LO setting become
the same.
Turn the washers off if no washer fluid comes out.
The pump may get damaged.
The wiper motor is equipped with a breaker that may
stop motor operation temporarily to prevent an
overload. Wiper operation will return to normal within a
few minutes, once the circuit has returned to normal.
If the wiper stops operating due to any obstacle such as
the build-up of snow, park the vehicle in a safe place.
Rotate the wiper switch to OFF, and turn the ignition
switch to ACCESSORY
(q or LOCK
(0, then remove
the obstacle.
Intermittent Time
Adjustment Ring
MIST
INT: Low speed with
intermittent OFF
LO: Low speed wipe
HI: High speed wipePull to
use
washer.
Long delay
Short delay
Page 130 of 346
129
Continued
Controls
Adjusting the SeatsAdjusting the Seat Positions
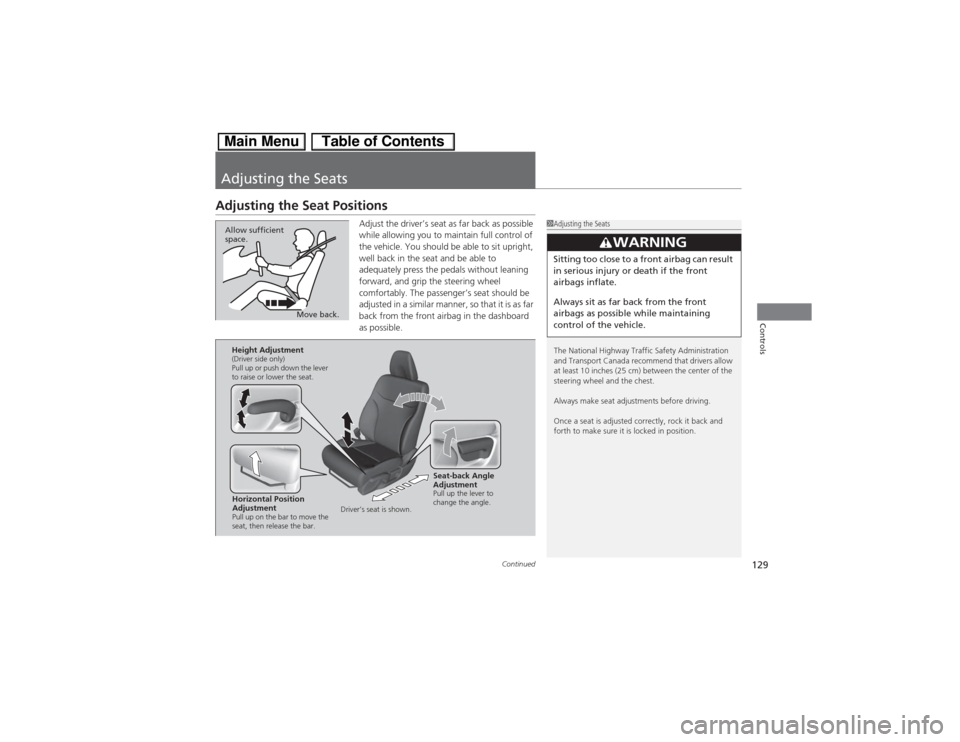
Adjust the driver’s seat as far back as possible
while allowing you to maintain full control of
the vehicle. You should be able to sit upright,
well back in the seat and be able to
adequately press the pedals without leaning
forward, and grip the steering wheel
comfortably. The passenger’s seat should be
adjusted in a similar manner, so that it is as far
back from the front airbag in the dashboard
as possible.
1Adjusting the Seats
The National Highway Traffic Safety Administration
and Transport Canada recommend that drivers allow
at least 10 inches (25 cm) between the center of the
steering wheel and the chest.
Always make seat adjustments before driving.
Once a seat is adjusted correctly, rock it back and
forth to make sure it is locked in position.
3
WARNING
Sitting too close to a front airbag can result
in serious injury or death if the front
airbags inflate.
Always sit as far back from the front
airbags as possible while maintaining
control of the vehicle.
Move back. Allow sufficient
space.
Horizontal Position
AdjustmentPull up on the bar to move the
seat, then release the bar.Height Adjustment(Driver side only)
Pull up or push down the lever
to raise or lower the seat.
Seat-back Angle
AdjustmentPull up the lever to
change the angle.
Driver’s seat is shown.
Page 148 of 346
147Features
Audio System Basic OperationTo use the audio system function, the ignition switch must be in ACCESSORY
(q or
ON
(w.
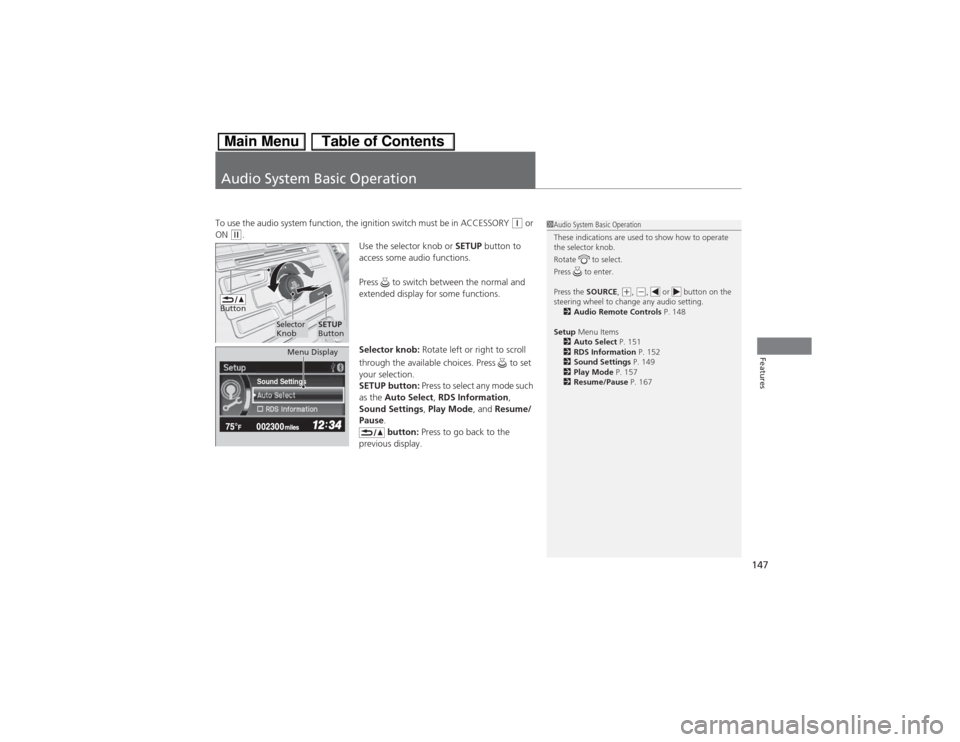
Use the selector knob or SETUP button to
access some audio functions.
Press to switch between the normal and
extended display for some functions.
Selector knob: Rotate left or right to scroll
through the available choices. Press to set
your selection.
SETUP button: Press to select any mode such
as the Auto Select, RDS Information,
Sound Settings, Play Mode, and Resume/
Pause.
button: Press to go back to the
previous display.
1Audio System Basic Operation
These indications are used to show how to operate
the selector knob.
Rotate to select.
Press to enter.
Press the SOURCE,
(+, (-, or button on the
steering wheel to change any audio setting.
2Audio Remote Controls P. 148
Setup Menu Items
2Auto Select P. 151
2RDS Information P. 152
2Sound Settings P. 149
2Play Mode P. 157
2Resume/Pause P. 167
Button
Selector
Knob
SETUP
Button
Sound Settings
Menu Display
Page 176 of 346
175
Continued
Features
Bluetooth® HandsFreeLink®See the Navigation System Manual for how to operate the Bluetooth®
HandsFreeLink®.
Bluetooth® HandsFreeLink® (HFL) allows you to place and receive phone calls using
your vehicle’s audio system, without handling your cell phone.Using HFL
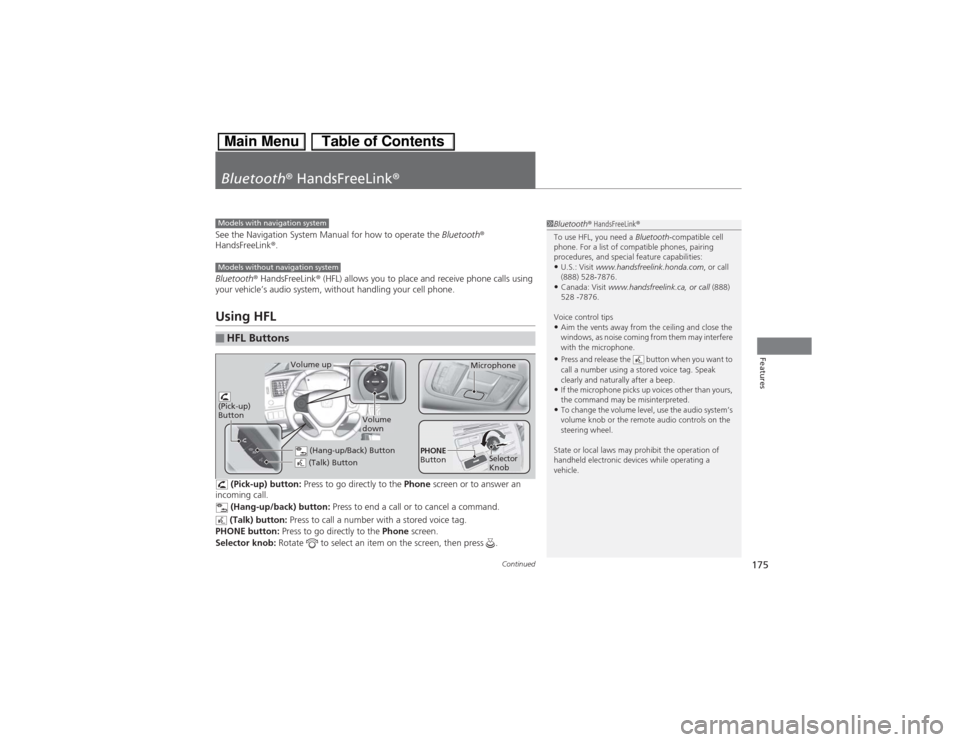
(Pick-up) button: Press to go directly to the Phone screen or to answer an
incoming call.
(Hang-up/back) button: Press to end a call or to cancel a command.
(Talk) button: Press to call a number with a stored voice tag.
PHONE button: Press to go directly to the Phone screen.
Selector knob: Rotate to select an item on the screen, then press .
■HFL Buttons
1Bluetooth® HandsFreeLink®
To use HFL, you need a Bluetooth-compatible cell
phone. For a list of compatible phones, pairing
procedures, and special feature capabilities:•U.S.: Visit www.handsfreelink.honda.com, or call
(888) 528-7876.•Canada: Visit www.handsfreelink.ca, or call (888)
528 -7876.
Voice control tips•Aim the vents away from the ceiling and close the
windows, as noise coming from them may interfere
with the microphone.•Press and release the button when you want to
call a number using a stored voice tag. Speak
clearly and naturally after a beep.•If the microphone picks up voices other than yours,
the command may be misinterpreted.•To change the volume level, use the audio system’s
volume knob or the remote audio controls on the
steering wheel.
State or local laws may prohibit the operation of
handheld electronic devices while operating a
vehicle.
Models with navigation systemModels without navigation system
(Talk) Button
Volume up
Microphone
(Hang-up/Back) Button
(Pick-up)
Button
Volume
down
Selector
Knob PHONE
Button
Page 235 of 346
uuWhen DrivinguLane Departure Warning (LDW)
*
234Driving
LDW may not activate or may not recognize lanes, and may activate even when
keeping in the middle of a lane under the following conditions.■LDW Limitations
Condition
●When you drive in bad weather (rain, fog, etc.).●A heavy load in the rear or modifications to the suspension tilts your vehicle.●An abnormal tire condition is detected (wrong tire size, flat tire, etc.).●When the windshield is blocked by dirt, mud, leaves, wet snow, etc.●When the temperature inside the system is high.●A sudden change between light and dark such as an entrance or exit of a tunnel.●You drive into the sunlight (e.g. at dawn or dusk).●When the windshield is dirty or cloudy.●When you drive in the shadows of trees, buildings, etc.●When you drive on a wet road surface following another vehicle.uThe camera may perceive the tire tracks in the water as lane lines.
●When there is snow or wheel tracks on the side of the road.●When the road has many repaired area or an erased lane line.●When the vehicle is running over painted signs or crosswalk markings.●When you drive in a lane with worn-out lane markings.
1LDW Camera
If the Camera Too Hot message appears:•Use the climate control system to cool down the
interior and, if necessary, the defroster mode when
windows are fogged.•Start driving the vehicle to lower the windshield
temperature, which cools down the area around
the LDW camera.
Page 309 of 346
uuIf a Tire Goes FlatuChanging a Flat Tire
308Handling the Unexpected
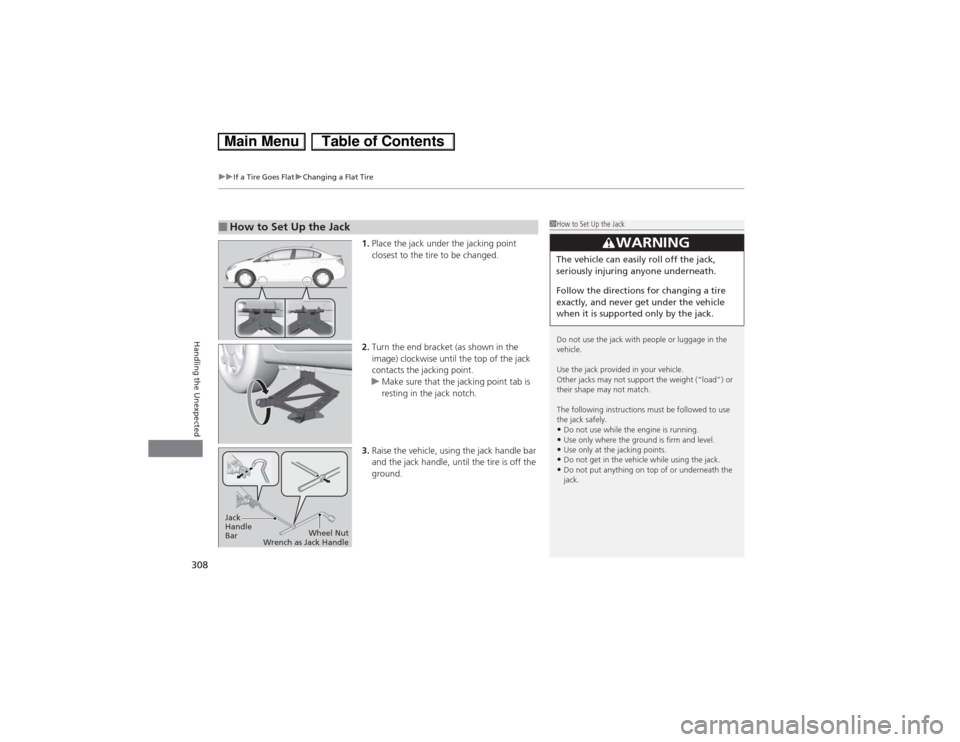
1.Place the jack under the jacking point
closest to the tire to be changed.
2.Turn the end bracket (as shown in the
image) clockwise until the top of the jack
contacts the jacking point.
uMake sure that the jacking point tab is
resting in the jack notch.
3.Raise the vehicle, using the jack handle bar
and the jack handle, until the tire is off the
ground.
■How to Set Up the Jack
1How to Set Up the Jack
Do not use the jack with people or luggage in the
vehicle.
Use the jack provided in your vehicle.
Other jacks may not support the weight (“load”) or
their shape may not match.
The following instructions must be followed to use
the jack safely.•Do not use while the engine is running.•Use only where the ground is firm and level.•Use only at the jacking points.•Do not get in the vehicle while using the jack.•Do not put anything on top of or underneath the
jack.
3
WARNING
The vehicle can easily roll off the jack,
seriously injuring anyone underneath.
Follow the directions for changing a tire
exactly, and never get under the vehicle
when it is supported only by the jack.
Jack
Handle
BarWheel Nut
Wrench as Jack Handle