tow HONDA CIVIC HYBRID 2014 9.G User Guide
[x] Cancel search | Manufacturer: HONDA, Model Year: 2014, Model line: CIVIC HYBRID, Model: HONDA CIVIC HYBRID 2014 9.GPages: 377, PDF Size: 17.8 MB
Page 237 of 377
236
uuBefore Driving uMaximum Load Limit
Driving
(5) Determine the combined weight of luggage and cargo being
loaded on the vehicle. That we ight may not safely exceed the
available cargo and luggage load capacity calculated in step 4.
(6) If your vehicle will be towing a tra iler, load from your trailer will
be transferred to your vehicl e. Consult this manual to
determine how this reduces the available cargo and luggage
load capacity of your vehicle.
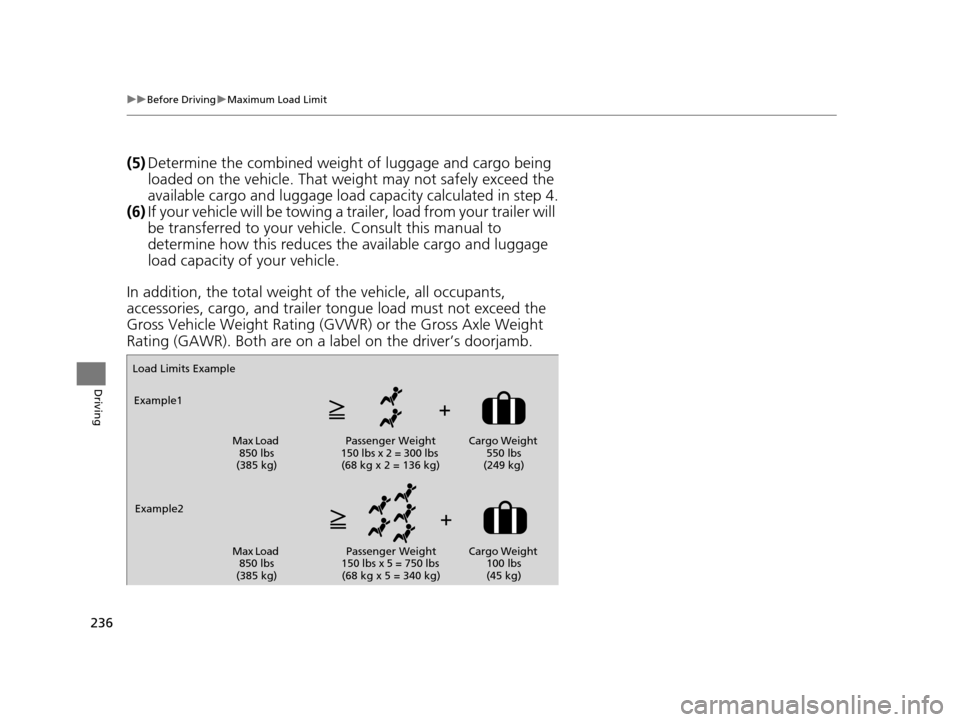
In addition, the total weight of the vehicle, all occupants,
accessories, cargo, and trailer tongue load must not exceed the
Gross Vehicle Weight Rating (GVW R) or the Gross Axle Weight
Rating (GAWR). Both are on a label on the driver’s doorjamb.
Load Limits Example
Example1
Max Load 850 lbs
(385 kg) Passenger Weight
150 lbs x 2 = 300 lbs (68 kg x 2 = 136 kg) Cargo Weight
550 lbs
(249 kg)
Example2 Max Load 850 lbs
(385 kg) Passenger Weight
150 lbs x 5 = 750 lbs (68 kg x 5 = 340 kg) Cargo Weight
100 lbs
(45 kg)
14 CIVIC IMA-31TR26200.book 236 ページ 2013年12月23日 月曜日 午後4時9分
Page 238 of 377
237
Driving
Towing a Trailer
Your vehicle is not designed to tow a trailer. Attempting to do so can void your
warranties.
Towing Your Vehicle
Your vehicle is not designed to be towed behind a motor home. If your vehicle needs
to be towed in an emergency, refer to the emergency towing information.
2Emergency Towing P. 356
14 CIVIC IMA-31TR26200.book 237 ページ 2013年12月23日 月曜日 午後4時9分
Page 243 of 377
242
uuWhen Driving uAutomatic Transmission (CVT)
Driving
Automatic Transmission (CVT)
The engine runs at a higher id le speed and creeping increases.
Keep the brake pedal firmly depressed when stopped.
Quickly depressing the accelerator pedal while driving uphill may cause the
transmission to drop to a lower ratio, unexpectedly increasing vehicle speed.
Depress the accelerator pedal carefully, es pecially on slippery roads and curves.
■Creeping
■Kickdown
1Precautions While Driving
Avoid hard braking for the first 200 miles (300 km).
You should also follow this when the brake pads are
replaced.
NOTICE
Following can damage the under spoiler:
•Parking the vehicle by a parking block
•Parallel pa rking along the road shoulder•Driving towards the bottom of a hill
•Driving up or down to a different surface level
(such as a road shoulder)
•Driving on a rutted or bumpy road
•Driving on a road with potholes
14 CIVIC IMA-31TR26200.book 242 ページ 2013年12月23日 月曜日 午後4時9分
Page 264 of 377
263
uuWhen Driving uTire Pressure Monitoring System (TPMS)
Continued
Driving
Tire Pressure Monitoring System (TPMS)
Instead of directly measuring the pressure in each tire, the TPMS on this vehicle
monitors and compares the rolling radius and rotational characteristics of each
wheel and tire while you are driving to determine if one or more tires are
significantly under-inflated. This will caus e the low tire pressure/TPMS indicator to
come on and a message to appear on the i-MID.
You must start TPMS calibration every time you:
• Adjust the pressure in one or more tires.
• Rotate the tires.
• Replace one or more tires.
Before calibrating the TPMS:
• Set the cold tire pressure in all four tires.
2 Checking Tires P. 308
Make sure:
•The vehicle is at a complete stop.
• The shift lever is in
(P.
• The power mode is in ON.
■TPMS Calibration
U.S. models
1Tire Pressure Monitoring System (TPMS)
The system does not monitor the tires when driving
at low speed.
Conditions such as low ambient temperature and
altitude change directly a ffect tire pressure and can
trigger the low tire pressure/TPMS indicator to come on.
Tire pressure checked and inflated in:
•Warm weather can beco me under-inflated in
colder weather.
•Cold weather can become over-inflated in warmer
weather.
The low tire pressure indica tor will not come on as a
result of over inflation.
The TPMS may not function pr operly if tire type and
size are mixed. Make sure to use the same size and
type of tire. 2 Checking and Maintaining Tires P. 308
The low tire pressure/TPMS indicator may come on
with a delay or may not come on at all when:
•You rapidly accelerate, decelerate, or turn the
steering wheel.
•You drive on snowy or slippery roads.•Snow chains are used.
The low tire pressure/TPMS indicator may come on
under the following conditions:
•A compact spare tire* is used.•There is a heavier and une ven load on the tires,
such as when towing a trailer, than the condition at
calibration.
•Snow chains are used.
* Not available on all models
14 CIVIC IMA-31TR26200.book 263 ページ 2013年12月23日 月曜日 午後4時9分
Page 282 of 377
281
uuBefore Performing Maintenance uSafety When Performing Maintenance
Maintenance
Safety When Performing Maintenance
Some of the most important safe ty precautions are given here.
However, we cannot warn you of every conceivable hazard that can arise in
performing maintenance. Only you can decide whether or not you should perform
a given task.
• To reduce the possibility of fire or explos ion, keep cigarettes, sparks, and flames
away from the battery and all fuel related parts.
• Never leave rags, towels, or other flammable objects under the hood.
u Heat from the engine and exhaust can ignite them causing a fire.
• To clean parts, use a co mmercially available degreas er or parts cleaner, not
gasoline.
• Wear eye protection and protective clothing when working with the 12 volt
battery or compressed air.
• Engine exhaust contains carbon monoxide, which is poisonous and can kill you.
u Only operate the engine if th ere is sufficient ventilation.
• The vehicle must be in a stationary condition.
u Make sure your vehicle is parked on le vel ground, the parking brake is set, and
the engine is off.
• Be aware that hot parts can burn you.
u Make sure to let the engine and exhaust system cool thoroughly before
touching vehicle parts.
• Be aware that moving parts can injure you.
u Do not start the engine unless instruct ed, and keep your hands and limbs away
from moving parts.
• Do not touch the IMA battery and wiring (orange).
■Maintenance Safety
■Vehicle Safety
1Safety When Performing Maintenance
3WARNING
Improperly maintaining this vehicle or
failing to correct a pr oblem before driving
can cause a crash in which you can be
seriously hurt or killed.
Always follow the inspection and
maintenance recommendations according
to the schedules in this owner’s manual.
3WARNING
Failure to properly follow maintenance
instructions and precautions can cause you
to be seriously hurt or killed.
Always follow the procedures and
precautions in this owner’s manual.
14 CIVIC IMA-31TR26200.book 281 ページ 2013年12月23日 月曜日 午後4時9分
Page 290 of 377

289
uuMaintenance Under the Hood uOpening the Hood
Maintenance
Opening the Hood
1. Park the vehicle on a level surface, and set
the parking brake.
2. Pull the hood release handle under the
lower left corner of the dashboard.
u The hood will pop up slightly.
3. Push up the hood latch lever in the center
of the hood to release the lock mechanism,
and open the hood.
4. Remove the support rod from the clamp
using the grip. Mount the support rod in
the hood.
When closing, remove the support rod, and
stow it in the clamp, then gently lower the
hood. Remove your hand at a height of
approximately 12 inches (30 cm) and let the
hood close.1 Opening the Hood
NOTICE
Do not open the hood when the wiper arms are
raised.
The hood will strike the wipers, and may damage
either the hood or the wipers.
When closing the hood, check that the hood is
securely latched.
If the hood latch lever moves stiffly, or if you can
open the hood without lifti ng the lever, the latch
mechanism should be cl eaned and lubricated.
Do not open the hood while the Auto Idle Stop
function is activated.
Hood Release Handle
Pull
Lever
Support Rod Grip
Clamp
14 CIVIC IMA-31TR26200.book 289 ページ 2013年12月23日 月曜日 午後4時9分
Page 292 of 377
291
uuMaintenance Under the Hood uOil Check
Maintenance
Oil Check
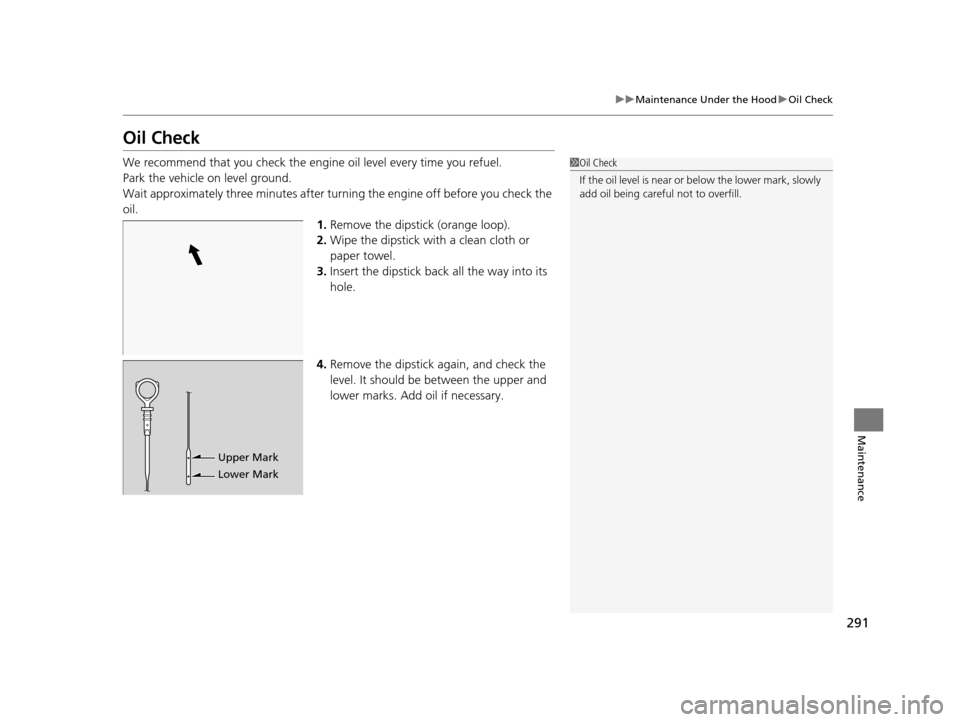
We recommend that you check the engine oil level every time you refuel.
Park the vehicle on level ground.
Wait approximately three minutes after turn ing the engine off before you check the
oil. 1.Remove the dipstick (orange loop).
2. Wipe the dipstick with a clean cloth or
paper towel.
3. Insert the dipstick back all the way into its
hole.
4. Remove the dipstick again, and check the
level. It should be between the upper and
lower marks. Add oil if necessary.1Oil Check
If the oil level is near or below the lower mark, slowly
add oil being careful not to overfill.
Upper Mark
Lower Mark
14 CIVIC IMA-31TR26200.book 291 ページ 2013年12月23日 月曜日 午後4時9分
Page 318 of 377
317
Maintenance
12 Volt Battery
Checking the 12 Volt Battery
Check the battery condition monthly and check the terminals for corrosion.
If your vehicle’s battery is disconnected or goes dead:
• The audio system is disabled.
2 Reactivating the audio system P. 151
•The clock resets.
2 Clock P. 102
•The navigation system* is disabled.
2 Refer to the Navigation System Manual
Charging the Battery
Disconnect both battery cables to prevent damaging your vehicle’s electrical system.
Always disconnect the negative (-) cable first, and reconnect it last.
112 Volt Battery
WARNING: Battery post, terminals,
and related accessories contain lead
and lead compounds.
Wash your hands after handling.
When you find corrosion, cl ean the battery terminals
by applying a baking powder and water solution.
Clean the terminals with a damp towel. Cloth/towel
dry the battery. Coat the terminals with grease to
help prevent future corrosion.
When replacing the battery, the replacement must be
of the same specifications.
Please consult a dealer for more information.
3WARNING
The battery gives off explosive hydrogen
gas during normal operation.
A spark or flame can cause the battery to
explode with enough force to kill or
seriously hurt you.
When conducting any battery
maintenance, wear prot ective clothing and
a face shield, or have a skilled technician do
it.
* Not available on all models
14 CIVIC IMA-31TR26200.book 317 ページ 2013年12月23日 月曜日 午後4時9分
Page 326 of 377
325
Handling the Unexpected
This chapter explains how to handle unexpected troubles.
ToolsTypes of Tools .................................. 326
If a Tire Goes Flat Temporarily Repairi ng a Flat Tire....... 327
Changing a Flat Tire ......................... 335
Engine Does Not Start Checking the Engine ........................ 341
If the Smart Entry Remote Battery is Weak .......................................... 342
Emergency Engine Stop ................... 343
Jump Starting .................................... 344
Shift Lever Does Not Move .............. 346Overheating
How to Handle Overheating............. 347
Indicator, Coming On/Blinking
If the Low Oil Pressure Indicator Comes On.................................................. 349
If the 12 Volt Battery Charging System
Indicator Comes On ....................... 349
If the Malfunction Indicator Lamp Comes On or Blinks ..................................... 350
If the Brake System Indicator (Red) Comes On...................................................... 351
If the Electric Power Steering (EPS) System Indicator Comes On .............................351
If the IMA Indicator Comes On ........ 352
If the Low Tire Pressure/TPMS Indicator
Comes On or Blinks ....................... 352
Fuses Fuse Locations ................................. 353
Inspecting and Changing Fuses ........ 355
Emergency Towing ........................... 356
14 CIVIC IMA-31TR26200.book 325 ページ 2013年12月23日 月曜日 午後4時9分
Page 328 of 377
327Continued
Handling the Unexpected
If a Tire Goes Flat
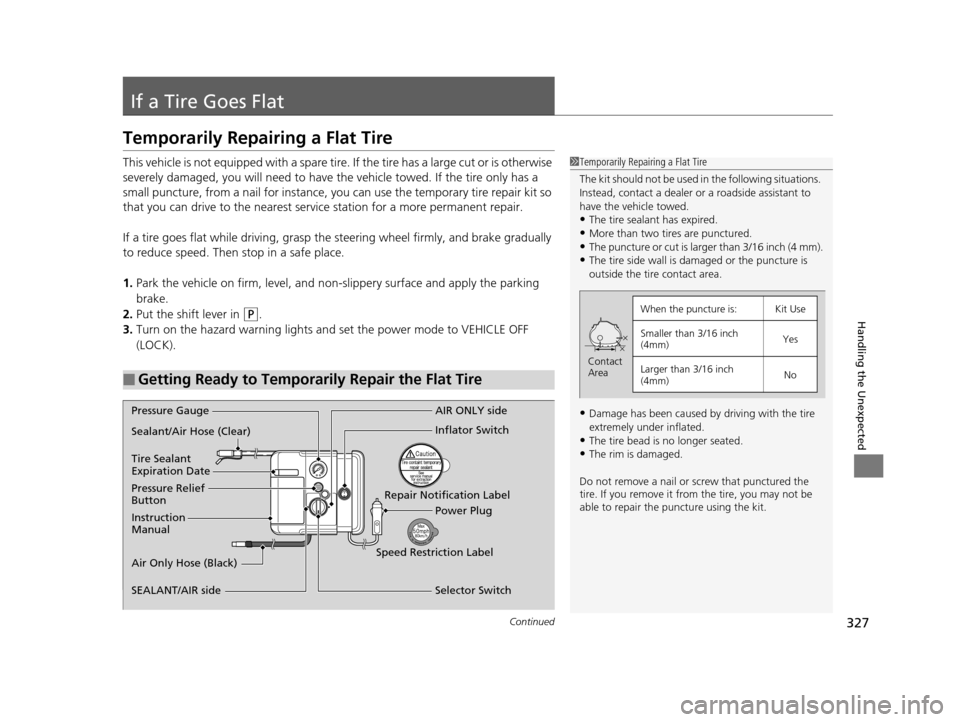
Temporarily Repairing a Flat Tire
This vehicle is not equipped with a spare tire. If the tire has a large cut or is otherwise
severely damaged, you will need to have the vehicle towed. If the tire only has a
small puncture, from a nail for instance, you can use the temporary tire repair kit so
that you can drive to the nearest servic e station for a more permanent repair.
If a tire goes flat while driving, grasp the steering wheel firmly, and brake gradually
to reduce speed. Then stop in a safe place.
1. Park the vehicle on firm, level, and non-slippery surface an d apply the parking
brake.
2. Put the shift lever in
(P.
3. Turn on the hazard warning lights an d set the power mode to VEHICLE OFF
(LOCK).
■Getting Ready to Temporarily Repair the Flat Tire
1 Temporarily Repairing a Flat Tire
The kit should not be used in the following situations.
Instead, contact a dealer or a roadside assistant to
have the vehicle towed.
•The tire sealant has expired.•More than two tires are punctured.
•The puncture or cut is larger than 3/16 inch (4 mm).
•The tire side wall is da maged or the puncture is
outside the tire contact area.
•Damage has been caused by driving with the tire
extremely under inflated.
•The tire bead is no longer seated.
•The rim is damaged.
Do not remove a nail or screw that punctured the
tire. If you remove it from the tire, you may not be
able to repair the puncture using the kit.
When the puncture is:Kit Use
Smaller than 3/16 inch
(4mm) Yes
Larger than 3/16 inch
(4mm) No
Contact
Area
Pressure Gauge
Sealant/Air Hose (Clear)
Tire Sealant
Expiration Date
Pressure Relief
Button
Instruction
Manual
Air Only Hose (Black)
SEALANT/AIR side AIR ONLY side
Inflator Switch
Repair Notification Label Power Plug
Speed Restriction Label Selector Switch
14 CIVIC IMA-31TR26200.book 327 ページ 2013年12月23日 月曜日 午後4時9分