change wheel HONDA CIVIC HYBRID 2015 9.G Quick Guide
[x] Cancel search | Manufacturer: HONDA, Model Year: 2015, Model line: CIVIC HYBRID, Model: HONDA CIVIC HYBRID 2015 9.GPages: 65, PDF Size: 3.32 MB
Page 20 of 65
32 || 33
VEHICLE CONTROLS
VEHICLE CONTROLS
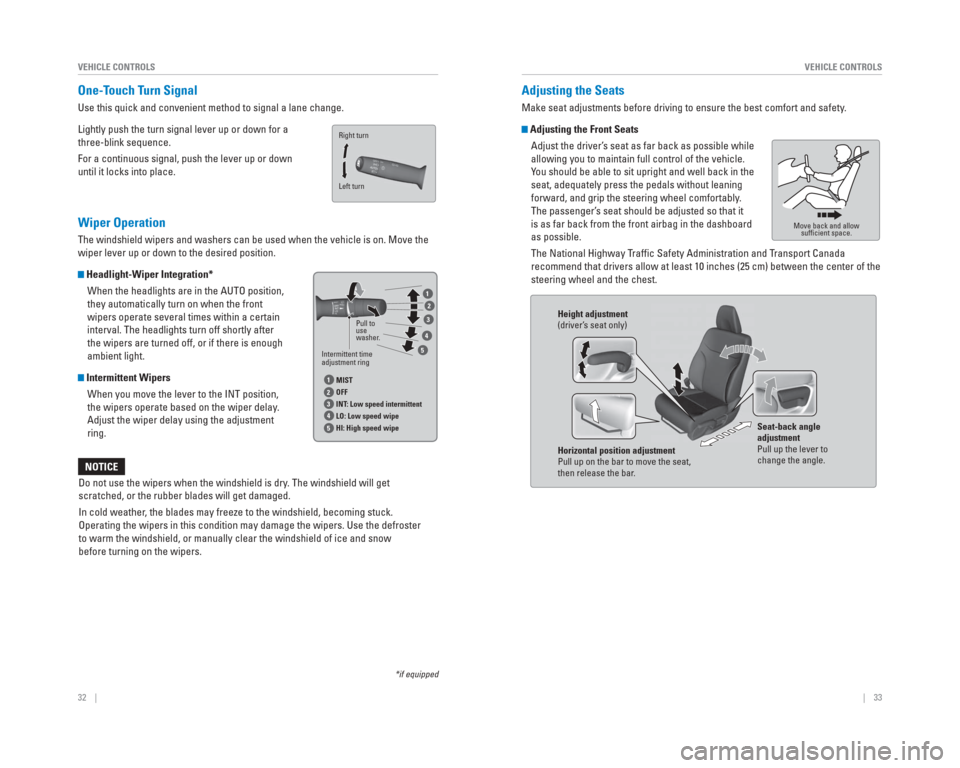
One-Touch Turn Signal
Use this quick and convenient method to signal a lane change.
Lightly push the turn signal lever up or down for a
three-blink sequence.
For a continuous signal, push the lever up or down
until it locks into place.
Wiper Operation
The windshield wipers and washers can be used when the vehicle is on. Mo\
ve the
wiper lever up or down to the desired position.
Headlight-Wiper Integration*
When the headlights are in the AUTO position,
they automatically turn on when the front
wipers operate several times within a certain
interval. The headlights turn off shortly after
the wipers are turned off, or if there is enough
ambient light.
Intermittent WipersWhen you move the lever to the INT position,
the wipers operate based on the wiper delay.
Adjust the wiper delay using the adjustment
ring.
Do not use the wipers when the windshield is dry. The windshield will get
scratched, or the rubber blades will get damaged.
In cold weather, the blades may freeze to the windshield, becoming stuck.
Operating the wipers in this condition may damage the wipers. Use the de\
froster
to warm the windshield, or manually clear the windshield of ice and snow\
before turning on the wipers.
NOTICE
*if equipped
Intermittent time
adjustment ring Pull to
use
washer
.
MIST
OFF
INT : Low speed intermittent
LO: Low speed wipe
HI: High speed wipe
1
1
2
2
3
3
4
4
5
5
Left turn Right turn
Adjusting the Seats
Make seat adjustments before driving to ensure the best comfort and safe\
ty .
Adjusting the Front Seats
Adjust the driver’s seat as far back as possible while
allowing you to maintain full control of the vehicle.
You should be able to sit upright and well back in the
seat, adequately press the pedals without leaning
forward, and grip the steering wheel comfortably.
The passenger’s seat should be adjusted so that it
is as far back from the front airbag in the dashboard
as possible.
The National Highway Traffi c Safety Administration and Transport Canada
recommend that drivers allow at least 10 inches (25 cm) between the ce\
nter of the
steering wheel and the chest.
Move back and allow suffi cient space.
Height adjustment
(driver’ s seat only)
Horizontal position adjustment
Pull up on the bar to move the seat,
then release the bar . Seat-back angle
adjustment
Pull up the lever to
change the angle.
Page 22 of 65
36 || 37
VEHICLE CONTROLS
VEHICLE CONTROLS
Adjusting the Steering Wheel
The steering wheel height and distance from your body can be adjusted so\
that you
can comfortably grip the steering wheel in an appropriate driving postur\
e.
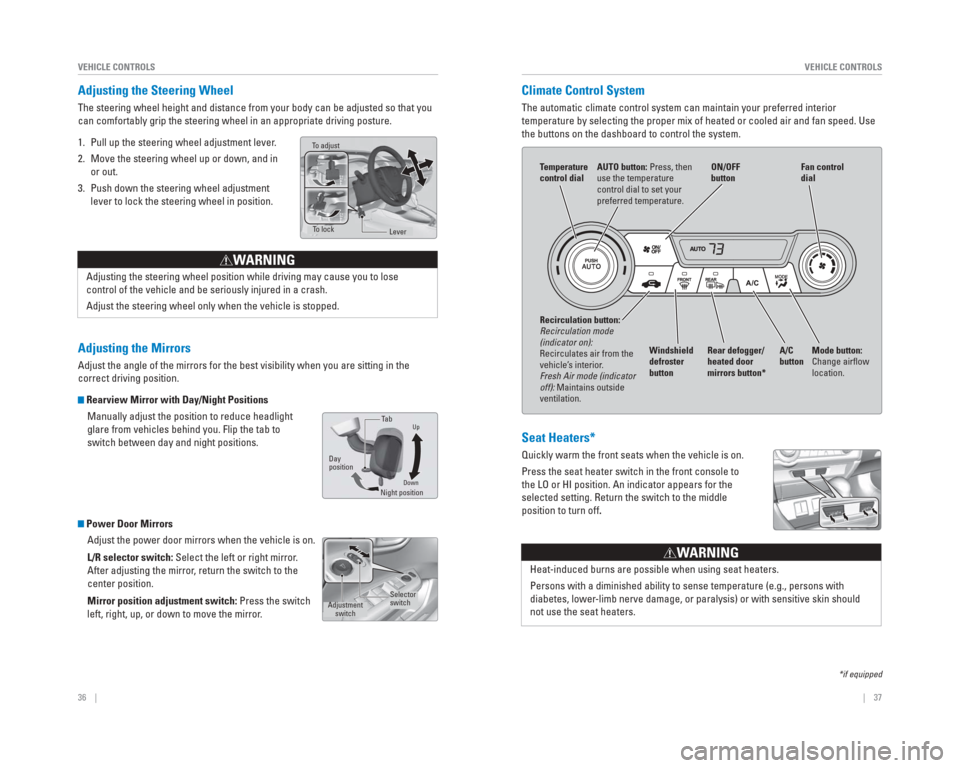
1. Pull up the steering wheel adjustment lever.
2. Move the steering wheel up or down, and in
or out.
3. Push down the steering wheel adjustment lever to lock the steering wheel in position.
Adjusting the Mirrors
Adjust the angle of the mirrors for the best visibility when you are sit\
ting in the
correct driving position.
Rearview Mirror with Day/Night Positions
Manually adjust the position to reduce headlight
glare from vehicles behind you. Flip the tab to
switch between day and night positions.
Power Door MirrorsAdjust the power door mirrors when the vehicle is on.
L/R selector switch: Select the left or right mirror.
After adjusting the mirror, return the switch to the
center position.
Mirror position adjustment switch: Press the switch
left, right, up, or down to move the mirror.
T o adjust
To lock
Lever
Adjusting the steering wheel position while driving may cause you to los\
e
control of the vehicle and be seriously injured in a crash.
Adjust the steering wheel only when the vehicle is stopped.
WARNING
DownNight positionTa
b
Day
position
Up
Adjustment switchSelector
switch
Climate Control System
The automatic climate control system can maintain your preferred interio\
r
temperature by selecting the proper mix of heated or cooled air and fan \
speed. Use
the buttons on the dashboard to control the system.
*if equipped
AUTO button: Press, then
use the temperature
control dial to set your
preferred temperature.
T
emperature
control dial
A/C
buttonFan control
dial
Recirculation button:
Recirculation mode
(indicator on):
Recirculates air from the
vehicle’ s interior .
Fresh Air mode (indicator
off): Maintains outside
ventilation. Rear defogger/
heated door
mirrors button*
Windshield
defroster
button ON/OFF
button
Mode button:
Change airfl
ow
location.
Seat Heaters*
Quickly warm the front seats when the vehicle is on.
Press the seat heater switch in the front console to
the LO or HI position. An indicator appears for the
selected setting. Return the switch to the middle
position to turn off.
Heat-induced burns are possible when using seat heaters.
Persons with a diminished ability to sense temperature (e.g., persons w\
ith
diabetes, lower -limb nerve damage, or paralysis) or with sensitive skin should
not use the seat heaters.
W ARNING
Page 23 of 65
38 || 39
VEHICLE CONTROLS
VEHICLE CONTROLS
Customized Features
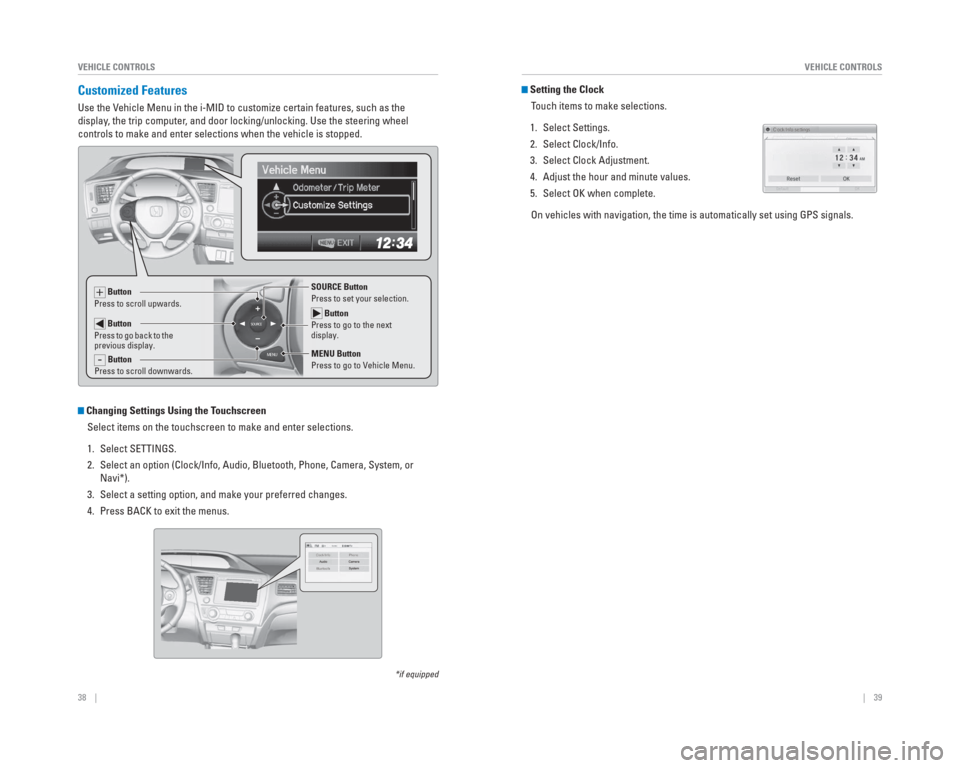
Use the Vehicle Menu in the i-MID to customize certain features, such as the
display, the trip computer, and door locking/unlocking. Use the steering wheel
controls to make and enter selections when the vehicle is stopped.
MENU
SOURCE Button
Press to go to the next
display.
SOURCE Button
Press to set your selection.
MENU Button
Press to go to Vehicle Menu. + Button
Press to scroll upwards.
Button
Press to go back to the
previous display.
- Button
Press to scroll downwards.
Setting the Clock
Touch items to make selections.
1. Select Settings.
2. Select Clock/Info.
3. Select Clock Adjustment.
4. Adjust the hour and minute values.
5. Select OK when complete. On vehicles with navigation, the time is automatically set using GPS sig\
nals.
Changing Settings Using the Touchscreen Select items on the touchscreen to make and enter selections.
1. Select SETTINGS.
2. Select an option (Clock/Info, Audio, Bluetooth, Phone, Camera, System, \
or Navi*).
3. Select a setting option, and make your preferred changes.
4. Press BACK to exit the menus.
*if equipped
Page 24 of 65
40 || 41
AUDIO AND CONNECTIVITY
AUDIO AND CONNECTIVITY
Basic Audio Operation
Connect audio devices and operate buttons and displays for the audio sys\
tem.
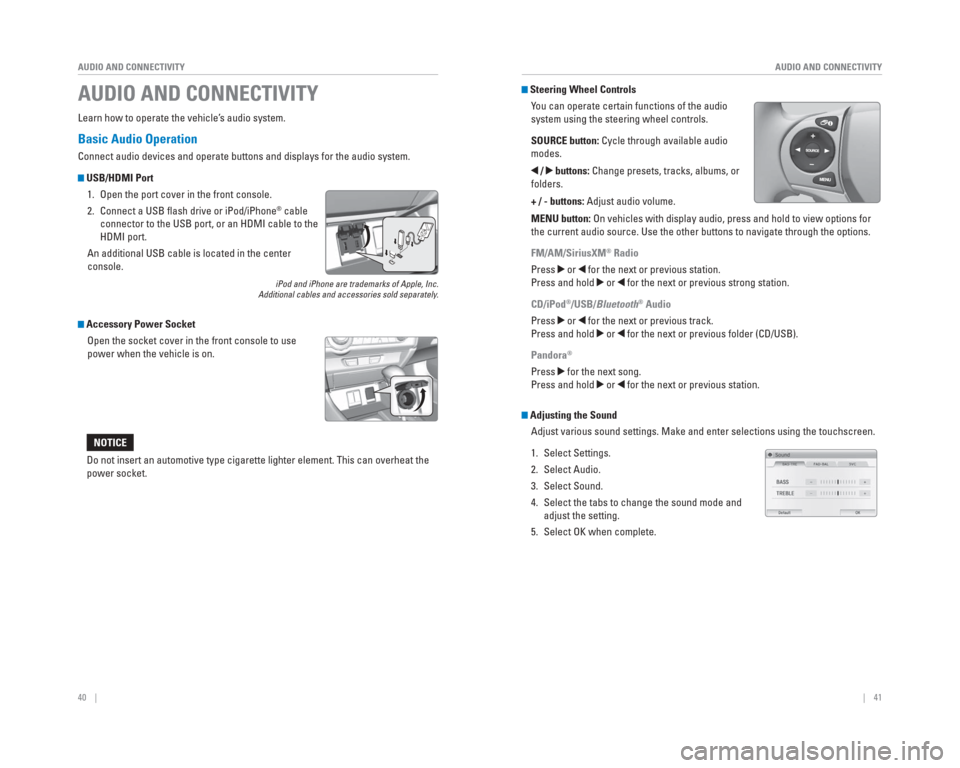
USB/ HDMI Port
1. Open the port cover in the front console.
2. Connect a USB fl ash drive or iPod/iPhone
® cable
connector to the USB port, or an HDMI cable to the
HDMI port.
An additional USB cable is located in the center
console.
iPod and iPhone are trademarks of Apple, Inc.
Additional cables and accessories sold separately.
Accessory Power Socket
Open the socket cover in the front console to use
power when the vehicle is on.
Do not insert an automotive type cigarette lighter element. This can ove\
rheat the
power socket.
NOTICE
AUDIO AND CONNECTIVITY
Learn how to operate the vehicle’ s audio system.
Steering Wheel Controls
You can operate certain functions of the audio
system using the steering wheel controls.
SOURCE button: Cycle through available audio
modes.
/ buttons: Change presets, tracks, albums, or
folders.
+ / - buttons: Adjust audio volume.
MENU button: On vehicles with display audio, press and hold to view options for
the current audio source. Use the other buttons to navigate through the \
options.
FM/AM/SiriusXM
® Radio
Press
or for the next or previous station.
Press and hold
or for the next or previous strong station.
CD/iPod
®/USB/Bluetooth® Audio
Press
or for the next or previous track.
Press and hold
or for the next or previous folder (CD/USB).
Pandora
®
Press for the next song.
Press and hold
or for the next or previous station.
Adjusting the Sound
Adjust various sound settings. Make and enter selections using the touch\
screen.
1. Select Settings.
2. Select Audio.
3. Select Sound.
4. Select the tabs to change the sound mode and adjust the setting.
5. Select OK when complete.
Page 40 of 65
72 || 73
DRIVING
DRIVING
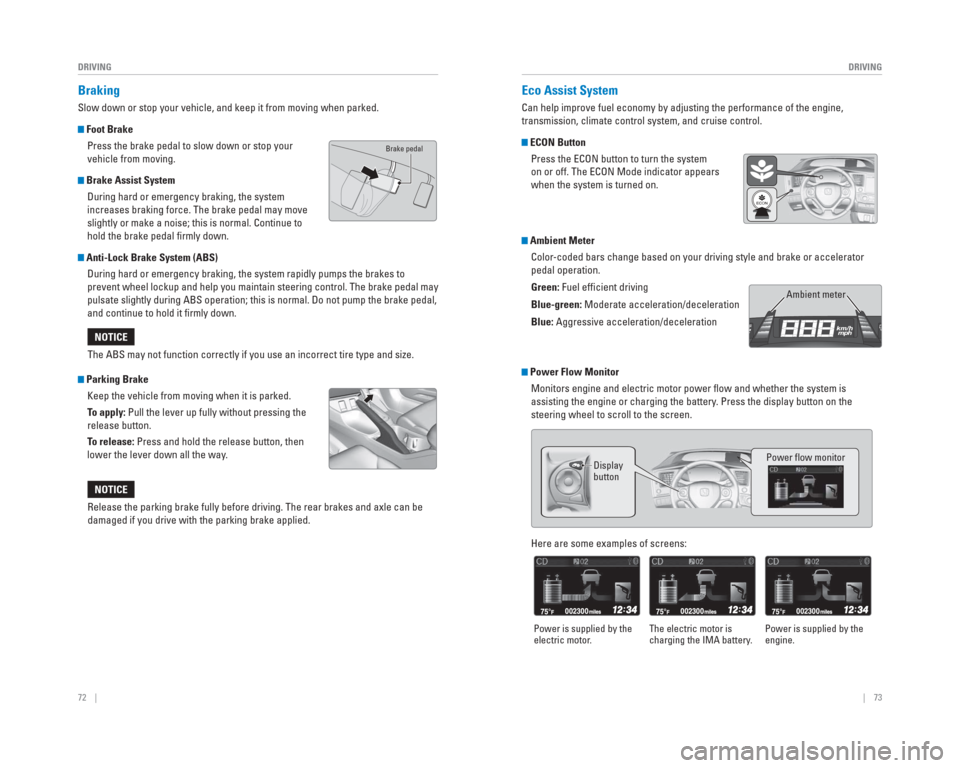
Braking
Slow down or stop your vehicle, and keep it from moving when parked.
Foot Brake
Press the brake pedal to slow down or stop your
vehicle from moving.
Brake Assist System During hard or emergency braking, the system
increases braking force. The brake pedal may move
slightly or make a noise; this is normal. Continue to
hold the brake pedal fi rmly down.
Anti-Lock Brake System (ABS) During hard or emergency braking, the system rapidly pumps the brakes to\
prevent wheel lockup and help you maintain steering control. The brake p\
edal may
pulsate slightly during ABS operation; this is normal. Do not pump the b\
rake pedal,
and continue to hold it fi rmly down.
Parking BrakeKeep the vehicle from moving when it is parked.
To apply: Pull the lever up fully without pressing the
release button.
To release: Press and hold the release button, then
lower the lever down all the way.The ABS may not function correctly if you use an incorrect tire type and\
size.
NOTICE
Release the parking brake fully before driving. The rear brakes and axle\
can be
damaged if you drive with the parking brake applied.
NOTICE
Eco
Assist System
Can help improve fuel economy by adjusting the performance of the engine\
,
transmission, climate control system, and cruise control.
ECON Button
Press the ECON button to turn the system
on or off. The ECON Mode indicator appears
when the system is turned on.
Ambient MeterColor-coded bars change based on your driving style and brake or accelerator \
pedal operation.
Green: Fuel effi cient driving
Blue-green: Moderate acceleration/deceleration
Blue: Aggressive acceleration/deceleration
Ambient meter
Power Flow MonitorMonitors engine and electric motor power fl ow and whether the system is
assisting the engine or charging the battery. Press the display button on the
steering wheel to scroll to the screen.
Display
button Power fl ow monitor
Here are some examples of screens:
Power is supplied by the
electric motor.
The electric motor is
charging the IMA battery. Power is supplied by the
engine.
Brake pedal
Page 43 of 65
78 || 79
DRIVING
DRIVING
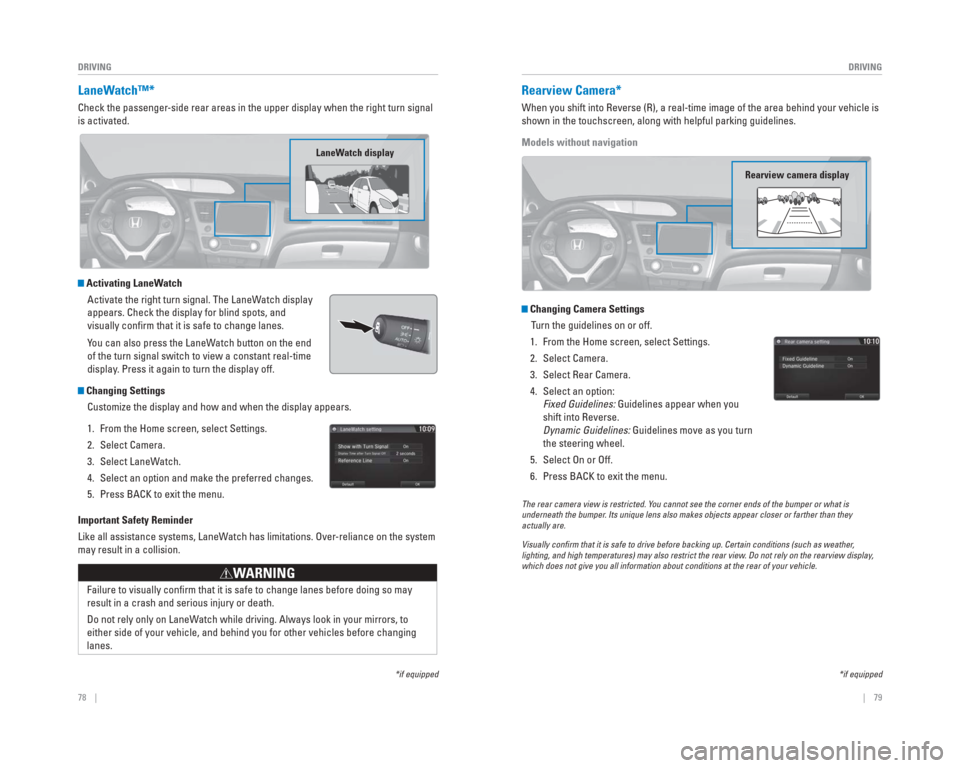
LaneWatch™*
Check the passenger-side rear areas in the upper display when the right turn signal
is activated.
Activating LaneWatch
Activate the right turn signal. The LaneWatch display
appears. Check the display for blind spots, and
visually confi rm that it is safe to change lanes.
You can also press the LaneWatch button on the end
of the turn signal switch to view a constant real-time
display. Press it again to turn the display off.
Changing SettingsCustomize the display and how and when the display appears.
1. From the Home screen, select Settings.
2. Select Camera.
3. Select LaneWatch.
4. Select an option and make the preferred changes.
5. Press BACK to exit the menu.
Important Safety Reminder
Like all assistance systems, LaneWatch has limitations. Over-reliance on the system
may result in a collision.
Failure to visually confi rm that it is safe to change lanes before doing so may
result in a crash and serious injury or death.
Do not rely only on LaneWatch while driving. Always look in your mirrors, to
either side of your vehicle, and behind you for other vehicles before ch\
anging
lanes.
WARNING
*if equipped
LaneWatch display
Rearview Camera*
When you shift into Reverse (R), a real-time image of the area behind \
your vehicle is
shown in the touchscreen, along with helpful parking guidelines.
Models without navigation
Changing Camera Settings
Turn the guidelines on or off.
1. From the Home screen, select Settings.
2. Select Camera.
3. Select Rear Camera.
4. Select an option: Fixed Guidelines: Guidelines appear when you
shift into Reverse.
Dynamic Guidelines: Guidelines move as you turn
the steering wheel.
5. Select On or Off.
6. Press BACK to exit the menu.
The rear camera view is restricted. Y ou cannot see the corner ends of the bumper or what is
underneath the bumper . Its unique lens also makes objects appear closer or farther than they \
actually are.
Visually con� rm that it is safe to drive before backing up. Certain conditions (such\
as weather ,
lighting, and high temperatures) may also restrict the rear view . Do not rely on the rearview display,
which does not give you all information about conditions at the rear of \
your vehicle.
*if equipped
Rearview camera display
Page 44 of 65
80 || 81
DRIVING
DRIVING
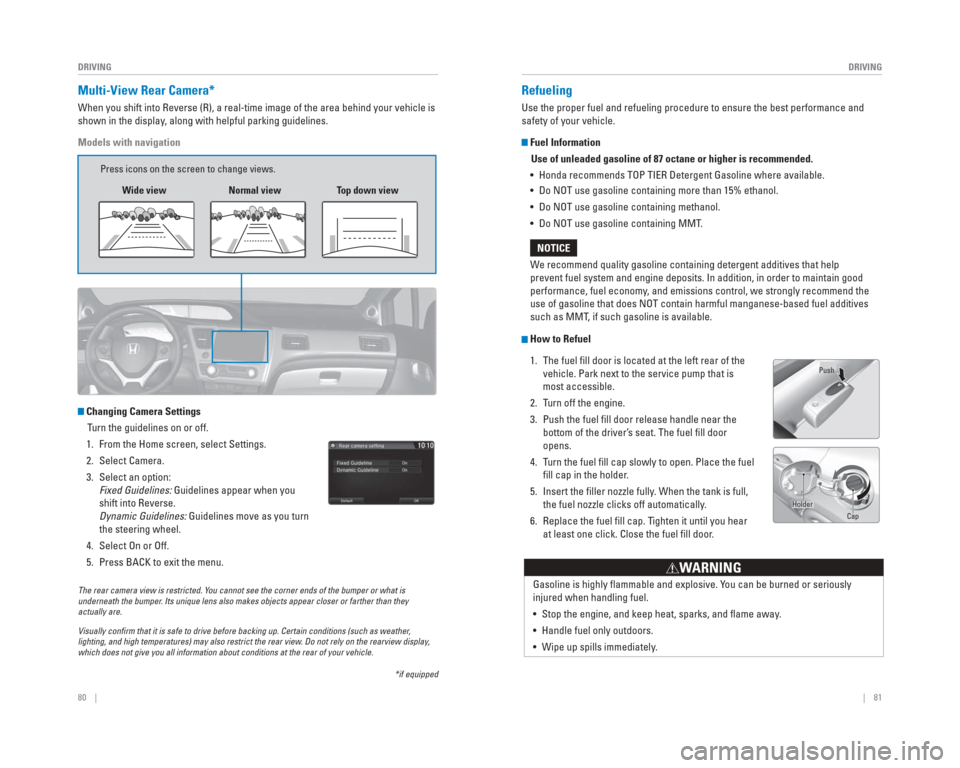
Multi-View Rear Camera*
When you shift into Reverse (R), a real-time image of the area behind \
your vehicle is
shown in the display, along with helpful parking guidelines.
Models with navigation
Changing Camera Settings
Turn the guidelines on or off.
1. From the Home screen, select Settings.
2. Select Camera.
3. Select an option: Fixed Guidelines: Guidelines appear when you
shift into Reverse.
Dynamic Guidelines: Guidelines move as you turn
the steering wheel.
4. Select On or Off.
5. Press BACK to exit the menu.
The rear camera view is restricted. You cannot see the corner ends of the bumper or what is
underneath the bumper. Its unique lens also makes objects appear closer or farther than they \
actually are.
Visually con� rm that it is safe to drive before backing up. Certain conditions (such\
as weather,
lighting, and high temperatures) may also restrict the rear view. Do not rely on the rearview display,
which does not give you all information about conditions at the rear of \
your vehicle.
*if equipped
Wide view
Press icons on the screen to change views.
Normal viewTop down view
Refueling
Use the proper fuel and refueling procedure to ensure the best performan\
ce and
safety of your vehicle.
Fuel Information
Use of unleaded gasoline of 87 octane or higher is recommended.
• Honda recommends TOP TIER Detergent Gasoline where available.
• Do NOT use gasoline containing more than 15% ethanol.
• Do NOT use gasoline containing methanol.
• Do NOT use gasoline containing MMT.
How to Refuel
1. The fuel fi ll door is located at the left rear of the vehicle. Park next to the service pump that is
most accessible.
2. Turn off the engine.
3. Push the fuel fi ll door release handle near the bottom of the driver’s seat. The fuel fi ll door
opens.
4. Turn the fuel fi ll cap slowly to open. Place the fuel fi ll cap in the holder.
5. Insert the fi ller nozzle fully. When the tank is full, the fuel nozzle clicks off automatically.
6. Replace the fuel fi ll cap. Tighten it until you hear at least one click. Close the fuel fi ll door.
We recommend quality gasoline containing detergent additives that help
prevent fuel system and engine deposits. In addition, in order to mainta\
in good
performance, fuel economy, and emissions control, we strongly recommend the
use of gasoline that does NOT contain harmful manganese-based fuel addit\
ives
such as MMT, if such gasoline is available.
NOTICE
Gasoline is highly fl ammable and explosive. You can be burned or seriously
injured when handling fuel.
• Stop the engine, and keep heat, sparks, and fl ame away.
• Handle fuel only outdoors.
• Wipe up spills immediately.
WARNING
Push Cap
Holder
Page 46 of 65
84 || 85
HANDLING THE UNEXPECTED
HANDLING THE UNEXPECTED
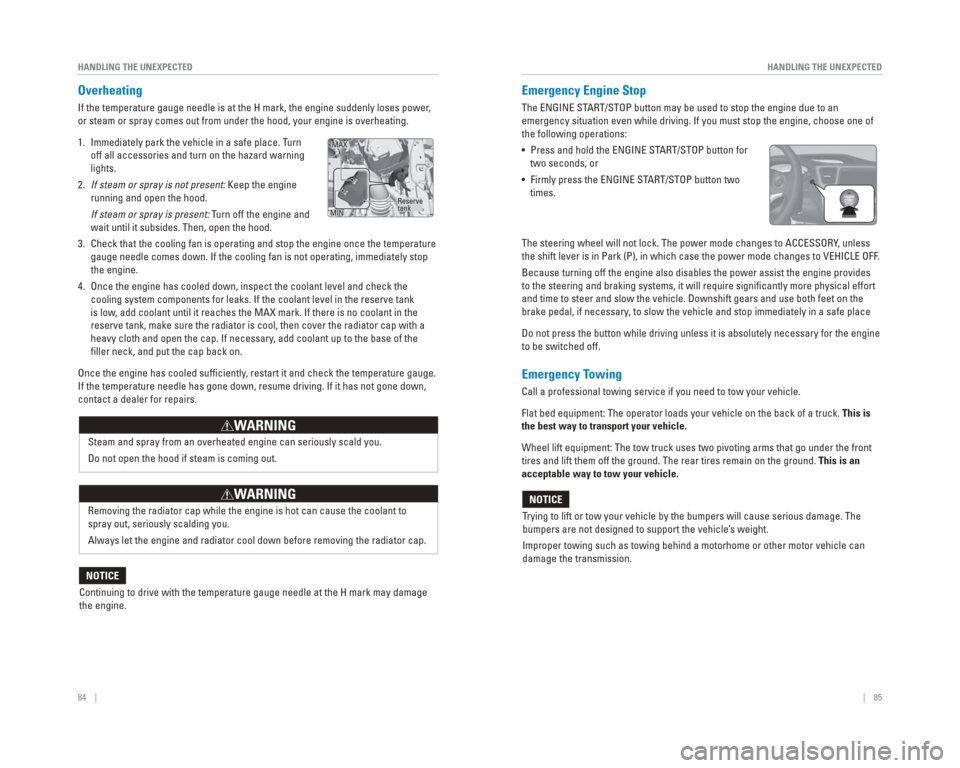
Overheating
If the temperature gauge needle is at the H mark, the engine suddenly lo\
ses power,
or steam or spray comes out from under the hood, your engine is overheat\
ing.
1. Immediately park the vehicle in a safe place. Turn
off all accessories and turn on the hazard warning
lights.
2. If steam or spray is not present: Keep the engine
running and open the hood.
If steam or spray is present: Turn off the engine and wait until it subsides. Then, open the hood.
3. Check that the cooling fan is operating and stop the engine once the tem\
perature gauge needle comes down. If the cooling fan is not operating, immediatel\
y stop
the engine.
4. Once the engine has cooled down, inspect the coolant level and check the\
cooling system components for leaks. If the coolant level in the reserve\
tank
is low, add coolant until it reaches the MAX mark. If there is no coolant in t\
he
reserve tank, make sure the radiator is cool, then cover the radiator ca\
p with a
heavy cloth and open the cap. If necessary, add coolant up to the base of the
fi ller neck, and put the cap back on.
Once the engine has cooled suffi ciently, restart it and check the temperature gauge.
If the temperature needle has gone down, resume driving. If it has not g\
one down,
contact a dealer for repairs.
Steam and spray from an overheated engine can seriously scald you.
Do not open the hood if steam is coming out.
WARNING
Removing the radiator cap while the engine is hot can cause the coolant \
to
spray out, seriously scalding you.
Always let the engine and radiator cool down before removing the radiato\
r cap.
WARNING
Continuing to drive with the temperature gauge needle at the H mark may \
damage
the engine.
NOTICE
Reserve
tank
MAX
MIN
Emergency Engine Stop
The ENGINE START/STOP button may be used to stop the engine due to an
emergency situation even while driving. If you must stop the engine, cho\
ose one of
the following operations:
• Press and hold the ENGINE START/STOP button for two seconds, or
• Firmly press the ENGINE START/STOP button two times.
The steering wheel will not lock. The power mode changes to ACCESSORY, unless
the shift lever is in Park (P), in which case the power mode changes t\
o VEHICLE OFF.
Because turning off the engine also disables the power assist the engine\
provides
to the steering and braking systems, it will require signifi cantly more physical effort
and time to steer and slow the vehicle. Downshift gears and use both fee\
t on the
brake pedal, if necessary, to slow the vehicle and stop immediately in a safe place
Do not press the button while driving unless it is absolutely necessary \
for the engine
to be switched off.
Emergency Towing
Call a professional towing service if you need to tow your vehicle.
Flat bed equipment: The operator loads your vehicle on the back of a tru\
ck. This is
the best way to transport your vehicle.
Wheel lift equipment: The tow truck uses two pivoting arms that go under\
the front
tires and lift them off the ground. The rear tires remain on the ground.\
This is an
acceptable way to tow your vehicle.
Trying to lift or tow your vehicle by the bumpers will cause serious dama\
ge. The
bumpers are not designed to support the vehicle’s weight.
Improper towing such as towing behind a motorhome or other motor vehicle\
can
damage the transmission.
NOTICE
Page 47 of 65
86 || 87
HANDLING THE UNEXPECTED
HANDLING THE UNEXPECTED
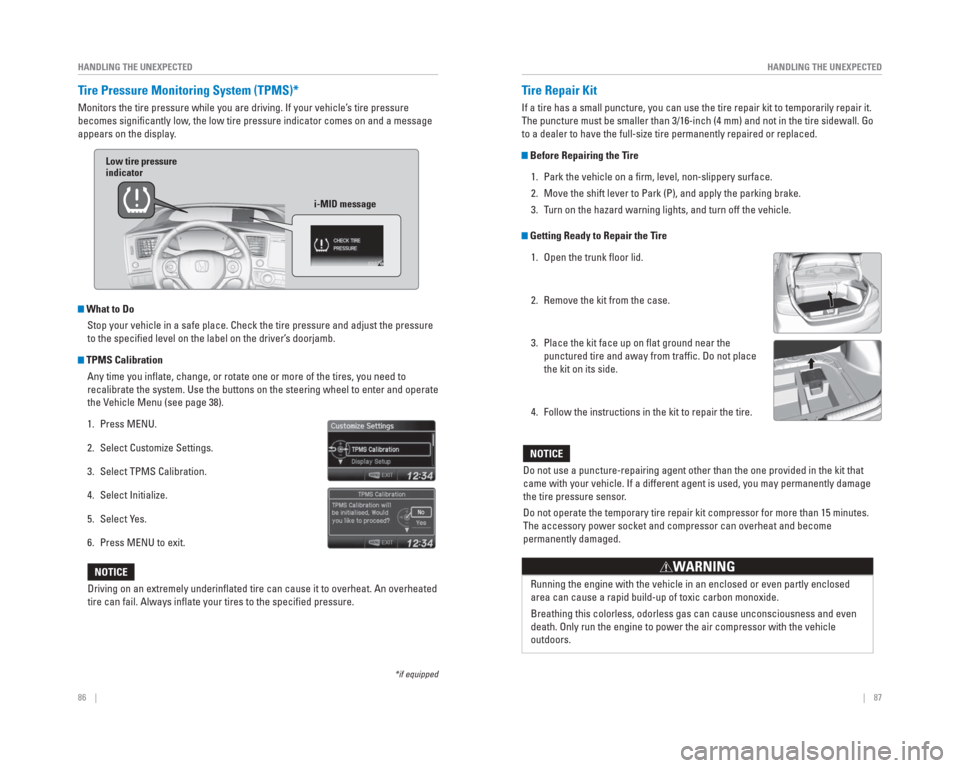
Tire Pressure Monitoring System ( TPMS)*
Monitors the tire pressure while you are driving. If your vehicle’s tire pressure
becomes signifi cantly low, the low tire pressure indicator comes on and a message
appears on the display.
What to Do
Stop your vehicle in a safe place. Check the tire pressure and adjust th\
e pressure
to the specifi ed level on the label on the driver’s doorjamb.
TPMS CalibrationAny time you infl ate, change, or rotate one or more of the tires, you need to
recalibrate the system. Use the buttons on the steering wheel to enter a\
nd operate
the Vehicle Menu (see page 38).
1. Press MENU.
2. Select Customize Settings.
3. Select TPMS Calibration.
4. Select Initialize.
5. Select Yes.
6. Press MENU to exit.
Driving on an extremely underinfl ated tire can cause it to overheat. An overheated
tire can fail. Always infl ate your tires to the specifi ed pressure.
NOTICE
*if equipped
Low tire pressure
indicator
i-MID message
Tire Repair Kit
If a tire has a small puncture, you can use the tire repair kit to tempo\
rarily repair it.
The puncture must be smaller than 3/16-inch (4 mm) and not in the tire\
sidewall. Go
to a dealer to have the full-size tire permanently repaired or replaced.\
Before Repairing the Tire1. Park the vehicle on a fi rm, level, non-slippery surface.
2. Move the shift lever to Park (P), and apply the parking brake.
3. Turn on the hazard warning lights, and turn off the vehicle.
Getting Ready to Repair the Tire1. Open the trunk fl oor lid.
2. Remove the kit from the case.
3. Place the kit face up on fl at ground near the punctured tire and away from traffi c. Do not place
the kit on its side.
4. Follow the instructions in the kit to repair the tire.
Do not use a puncture-repairing agent other than the one provided in the\
kit that
came with your vehicle. If a different agent is used, you may permanentl\
y damage
the tire pressure sensor.
Do not operate the temporary tire repair kit compressor for more than 15\
minutes.
The accessory power socket and compressor can overheat and become
permanently damaged.
NOTICE
Running the engine with the vehicle in an enclosed or even partly enclos\
ed
area can cause a rapid build-up of toxic carbon monoxide.
Breathing this colorless, odorless gas can cause unconsciousness and eve\
n
death. Only run the engine to power the air compressor with the vehicle \
outdoors.
WARNING
Page 48 of 65
88 || 89
HANDLING THE UNEXPECTED
HANDLING THE UNEXPECTED
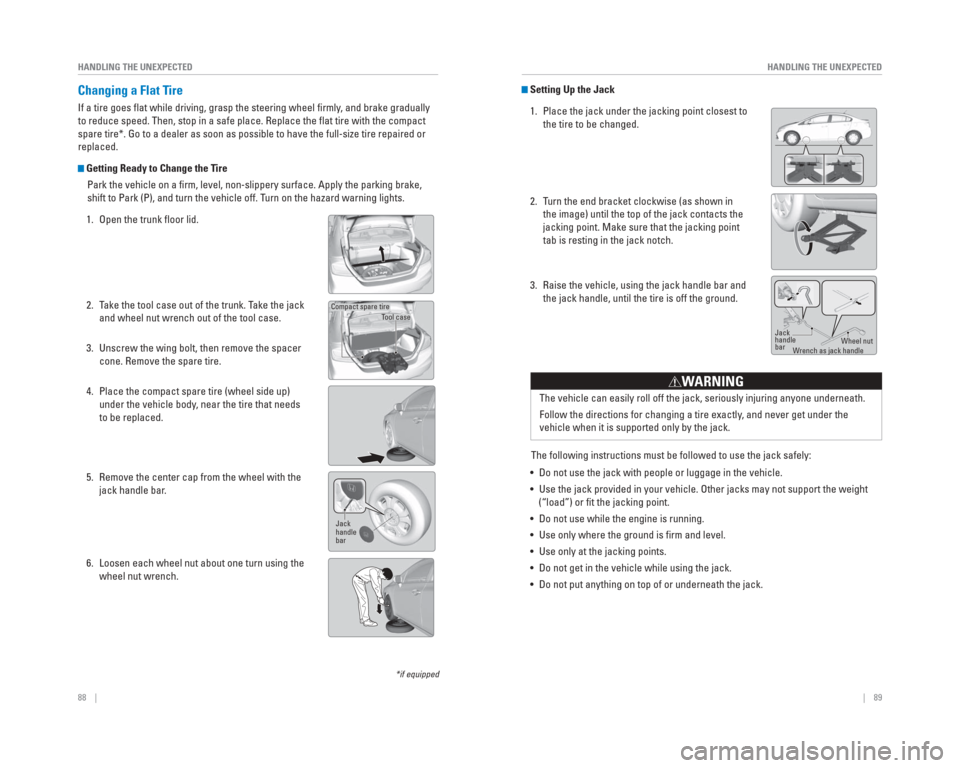
Setting Up the Jack
1. Place the jack under the jacking point closest to the tire to be changed.
2. Turn the end bracket clockwise (as shown in the image) until the top of the jack contacts the
jacking point. Make sure that the jacking point
tab is resting in the jack notch.
3. Raise the vehicle, using the jack handle bar and the jack handle, until the tire is off the ground.
The following instructions must be followed to use the jack safely:
• Do not use the jack with people or luggage in the vehicle.
• Use the jack provided in your vehicle. Other jacks may not support the w\
eight (“load”) or fi t the jacking point.
• Do not use while the engine is running.
• Use only where the ground is fi rm and level.
• Use only at the jacking points.
• Do not get in the vehicle while using the jack.
• Do not put anything on top of or underneath the jack. The vehicle can easily roll off the jack, seriously injuring anyone unde\
rneath.
Follow the directions for changing a tire exactly, and never get under the
vehicle when it is supported only by the jack.
WARNING
Jack
handle
bar
Wheel nut
W rench as jack handle
*if equipped
Changing a Flat Tire
If a tire goes fl at while driving, grasp the steering wheel fi rmly , and brake gradually
to reduce speed. Then, stop in a safe place. Replace the fl at tire with the compact
spare tire*. Go to a dealer as soon as possible to have the full-size ti\
re repaired or
replaced.
Getting Ready to Change the Tire
Park the vehicle on a fi rm, level, non-slippery surface. Apply the parking brake,
shift to Park (P), and turn the vehicle off. Turn on the hazard warning lights.
1. Open the trunk fl oor lid.
2. Take the tool case out of the trunk. Take the jack and wheel nut wrench out of the tool case.
3. Unscrew the wing bolt, then remove the spacer cone. Remove the spare tire.
4. Place the compact spare tire (wheel side up) under the vehicle body, near the tire that needs
to be replaced.
5. Remove the center cap from the wheel with the jack handle bar.
6. Loosen each wheel nut about one turn using the wheel nut wrench.
Tool case
Compact spare tire
Jack
handle
bar