park assist HONDA CIVIC HYBRID 2015 9.G Quick Guide
[x] Cancel search | Manufacturer: HONDA, Model Year: 2015, Model line: CIVIC HYBRID, Model: HONDA CIVIC HYBRID 2015 9.GPages: 65, PDF Size: 3.32 MB
Page 39 of 65
70 || 71
DRIVING
DRIVING
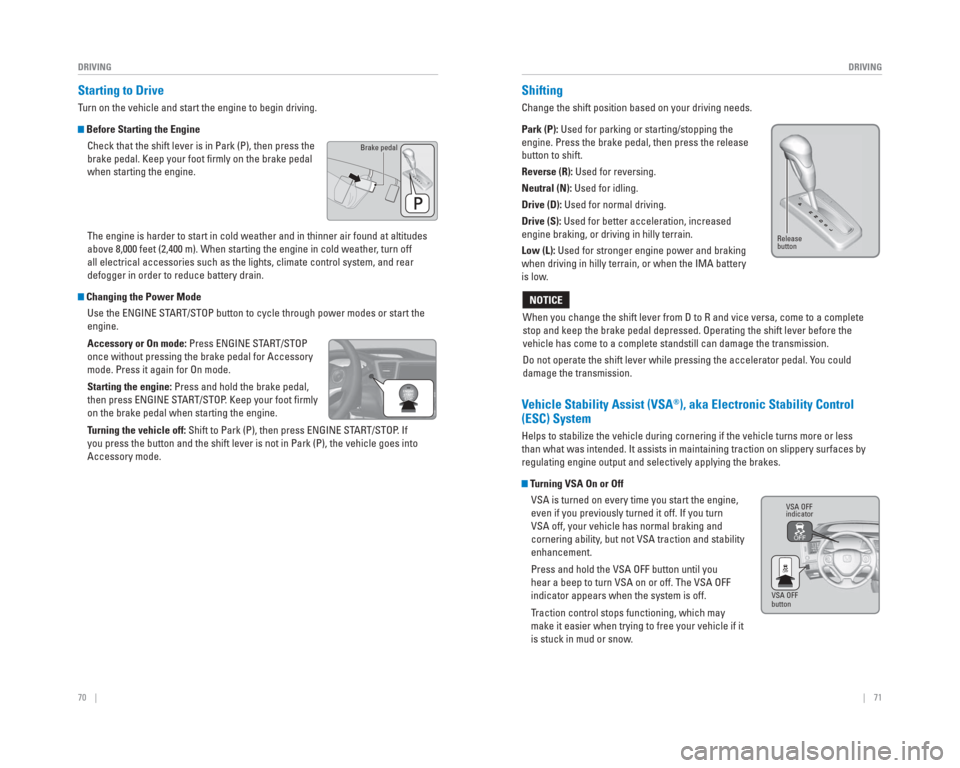
Starting to Drive
Turn on the vehicle and start the engine to begin driving.
Before Starting the Engine
Check that the shift lever is in Park (P), then press the
brake pedal. Keep your foot fi rmly on the brake pedal
when starting the engine.
The engine is harder to start in cold weather and in thinner air found a\
t altitudes
above 8,000 feet (2,400 m). When starting the engine in cold weather, turn off
all electrical accessories such as the lights, climate control system, a\
nd rear
defogger in order to reduce battery drain.
Changing the Power Mode Use the ENGINE START/STOP button to cycle through power modes or start the
engine.
Accessory or On mode: Press ENGINE START/STOP
once without pressing the brake pedal for Accessory
mode. Press it again for On mode.
Starting the engine: Press and hold the brake pedal,
then press ENGINE START/STOP. Keep your foot fi rmly
on the brake pedal when starting the engine.
Turning the vehicle off: Shift to Park (P), then press ENGINE START/STOP. If
you press the button and the shift lever is not in Park (P), the vehic\
le goes into
Accessory mode.
Brake pedal
Shifting
Change the shift position based on your driving needs.
Park (P): Used for parking or starting/stopping the
engine. Press the brake pedal, then press the release
button to shift.
Reverse (R): Used for reversing.
Neutral (N): Used for idling.
Drive (D): Used for normal driving.
Drive (S): Used for better acceleration, increased
engine braking, or driving in hilly terrain.
Low (L): Used for stronger engine power and braking
when driving in hilly terrain, or when the IMA battery
is low .
When you change the shift lever from D to R and vice versa, come to a co\
mplete
stop and keep the brake pedal depressed. Operating the shift lever befor\
e the
vehicle has come to a complete standstill can damage the transmission.
Do not operate the shift lever while pressing the accelerator pedal. Y ou could
damage the transmission.
NOTICE
Release
button
VSA OFF
indicator
VSA OFF
button
V ehicle Stability Assist (VSA®), aka Electronic Stability Control
(ESC) System
Helps to stabilize the vehicle during cornering if the vehicle turns mor\
e or less
than what was intended. It assists in maintaining traction on slippery s\
urfaces by
regulating engine output and selectively applying the brakes.
Turning VSA On or Off
VSA is turned on every time you start the engine,
even if you previously turned it off. If you turn
VSA off, your vehicle has normal braking and
cornering ability, but not VSA traction and stability
enhancement.
Press and hold the VSA OFF button until you
hear a beep to turn VSA on or off. The VSA OFF
indicator appears when the system is off.
Traction control stops functioning, which may
make it easier when trying to free your vehicle if it
is stuck in mud or snow.
Page 40 of 65
72 || 73
DRIVING
DRIVING
Braking
Slow down or stop your vehicle, and keep it from moving when parked.
Foot Brake
Press the brake pedal to slow down or stop your
vehicle from moving.
Brake Assist System During hard or emergency braking, the system
increases braking force. The brake pedal may move
slightly or make a noise; this is normal. Continue to
hold the brake pedal fi rmly down.
Anti-Lock Brake System (ABS) During hard or emergency braking, the system rapidly pumps the brakes to\
prevent wheel lockup and help you maintain steering control. The brake p\
edal may
pulsate slightly during ABS operation; this is normal. Do not pump the b\
rake pedal,
and continue to hold it fi rmly down.
Parking BrakeKeep the vehicle from moving when it is parked.
To apply: Pull the lever up fully without pressing the
release button.
To release: Press and hold the release button, then
lower the lever down all the way.The ABS may not function correctly if you use an incorrect tire type and\
size.
NOTICE
Release the parking brake fully before driving. The rear brakes and axle\
can be
damaged if you drive with the parking brake applied.
NOTICE
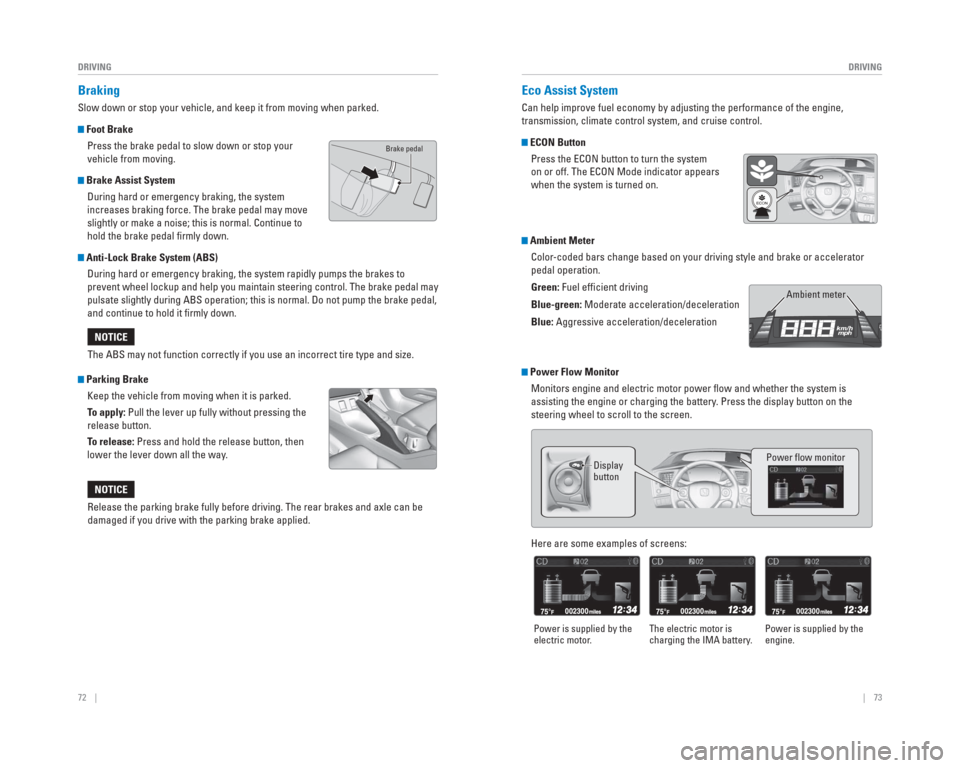
Eco
Assist System
Can help improve fuel economy by adjusting the performance of the engine\
,
transmission, climate control system, and cruise control.
ECON Button
Press the ECON button to turn the system
on or off. The ECON Mode indicator appears
when the system is turned on.
Ambient MeterColor-coded bars change based on your driving style and brake or accelerator \
pedal operation.
Green: Fuel effi cient driving
Blue-green: Moderate acceleration/deceleration
Blue: Aggressive acceleration/deceleration
Ambient meter
Power Flow MonitorMonitors engine and electric motor power fl ow and whether the system is
assisting the engine or charging the battery. Press the display button on the
steering wheel to scroll to the screen.
Display
button Power fl ow monitor
Here are some examples of screens:
Power is supplied by the
electric motor.
The electric motor is
charging the IMA battery. Power is supplied by the
engine.
Brake pedal
Page 43 of 65
78 || 79
DRIVING
DRIVING
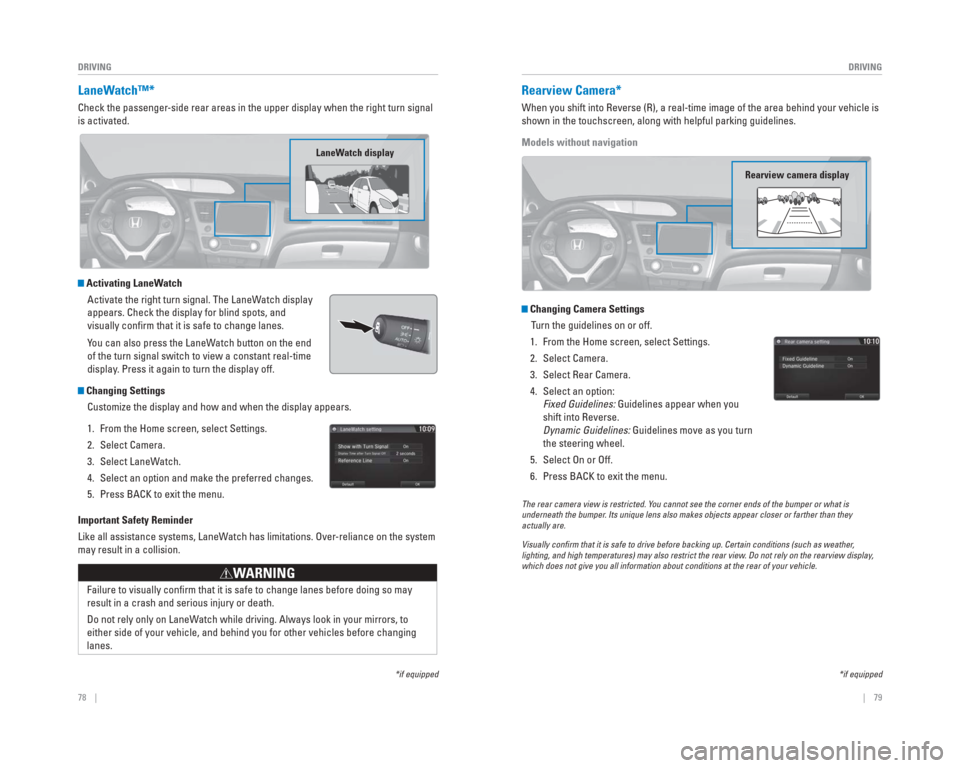
LaneWatch™*
Check the passenger-side rear areas in the upper display when the right turn signal
is activated.
Activating LaneWatch
Activate the right turn signal. The LaneWatch display
appears. Check the display for blind spots, and
visually confi rm that it is safe to change lanes.
You can also press the LaneWatch button on the end
of the turn signal switch to view a constant real-time
display. Press it again to turn the display off.
Changing SettingsCustomize the display and how and when the display appears.
1. From the Home screen, select Settings.
2. Select Camera.
3. Select LaneWatch.
4. Select an option and make the preferred changes.
5. Press BACK to exit the menu.
Important Safety Reminder
Like all assistance systems, LaneWatch has limitations. Over-reliance on the system
may result in a collision.
Failure to visually confi rm that it is safe to change lanes before doing so may
result in a crash and serious injury or death.
Do not rely only on LaneWatch while driving. Always look in your mirrors, to
either side of your vehicle, and behind you for other vehicles before ch\
anging
lanes.
WARNING
*if equipped
LaneWatch display
Rearview Camera*
When you shift into Reverse (R), a real-time image of the area behind \
your vehicle is
shown in the touchscreen, along with helpful parking guidelines.
Models without navigation
Changing Camera Settings
Turn the guidelines on or off.
1. From the Home screen, select Settings.
2. Select Camera.
3. Select Rear Camera.
4. Select an option: Fixed Guidelines: Guidelines appear when you
shift into Reverse.
Dynamic Guidelines: Guidelines move as you turn
the steering wheel.
5. Select On or Off.
6. Press BACK to exit the menu.
The rear camera view is restricted. Y ou cannot see the corner ends of the bumper or what is
underneath the bumper . Its unique lens also makes objects appear closer or farther than they \
actually are.
Visually con� rm that it is safe to drive before backing up. Certain conditions (such\
as weather ,
lighting, and high temperatures) may also restrict the rear view . Do not rely on the rearview display,
which does not give you all information about conditions at the rear of \
your vehicle.
*if equipped
Rearview camera display
Page 45 of 65
82 || 83
HANDLING THE UNEXPECTED
HANDLING THE UNEXPECTED
Learn about what to do in critical or emergency situations.
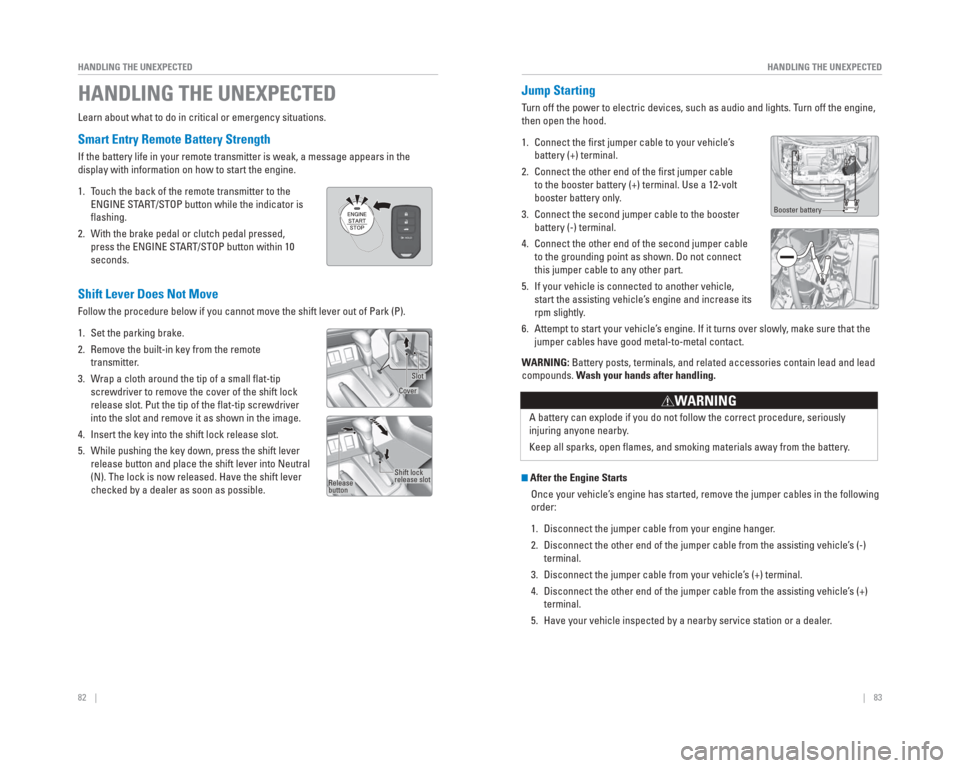
Smart Entry Remote Battery Strength
If the battery life in your remote transmitter is weak, a message appear\
s in the
display with information on how to start the engine.
1. Touch the back of the remote transmitter to the
ENGINE START/STOP button while the indicator is
fl ashing.
2. With the brake pedal or clutch pedal pressed, press the ENGINE START/STOP button within 10
seconds.
HANDLING THE UNEXPECTED
Booster battery
WARNING: Battery posts, terminals, and related accessories contain lead and lead\
compounds. Wash your hands after handling.
A battery can explode if you do not follow the correct procedure, seriou\
sly
injuring anyone nearby.
Keep all sparks, open fl ames, and smoking materials away from the battery.
WARNING
After the Engine StartsOnce your vehicle’s engine has started, remove the jumper cables in the following
order:
1. Disconnect the jumper cable from your engine hanger.
2. Disconnect the other end of the jumper cable from the assisting vehicle’\
s (-) terminal.
3. Disconnect the jumper cable from your vehicle’s (+) terminal.
4. Disconnect the other end of the jumper cable from the assisting vehicle’\
s (+) terminal.
5. Have your vehicle inspected by a nearby service station or a dealer.
Shift Lever Does Not Move
Follow the procedure below if you cannot move the shift lever out of Par\
k (P).
1. Set the parking brake.
2. Remove the built-in key from the remote transmitter.
3. Wrap a cloth around the tip of a small fl at-tip screwdriver to remove the cover of the shift lock
release slot. Put the tip of the fl at-tip screwdriver
into the slot and remove it as shown in the image.
4. Insert the key into the shift lock release slot.
5. While pushing the key down, press the shift lever release button and place the shift lever into Neutral
(N). The lock is now released. Have the shift lever
checked by a dealer as soon as possible.
Slot
Cover
Release
button Shift lock
release slot
Jump
Starting
Turn off the power to electric devices, such as audio and lights. T urn off the engine,
then open the hood.
1. Connect the fi rst jumper cable to your vehicle’ s
battery (+) terminal.
2. Connect the other end of the fi rst jumper cable
to the booster battery (+) terminal. Use a 12-volt
booster battery only .
3. Connect the second jumper cable to the booster
battery (-) terminal.
4. Connect the other end of the second jumper cable
to the grounding point as shown. Do not connect
this jumper cable to any other part.
5. If your vehicle is connected to another vehicle,
start the assisting vehicle’ s engine and increase its
rpm slightly .
6. Attempt to start your vehicle’ s engine. If it turns over slowly , make sure that the
jumper cables have good metal-to-metal contact.
Page 46 of 65
84 || 85
HANDLING THE UNEXPECTED
HANDLING THE UNEXPECTED
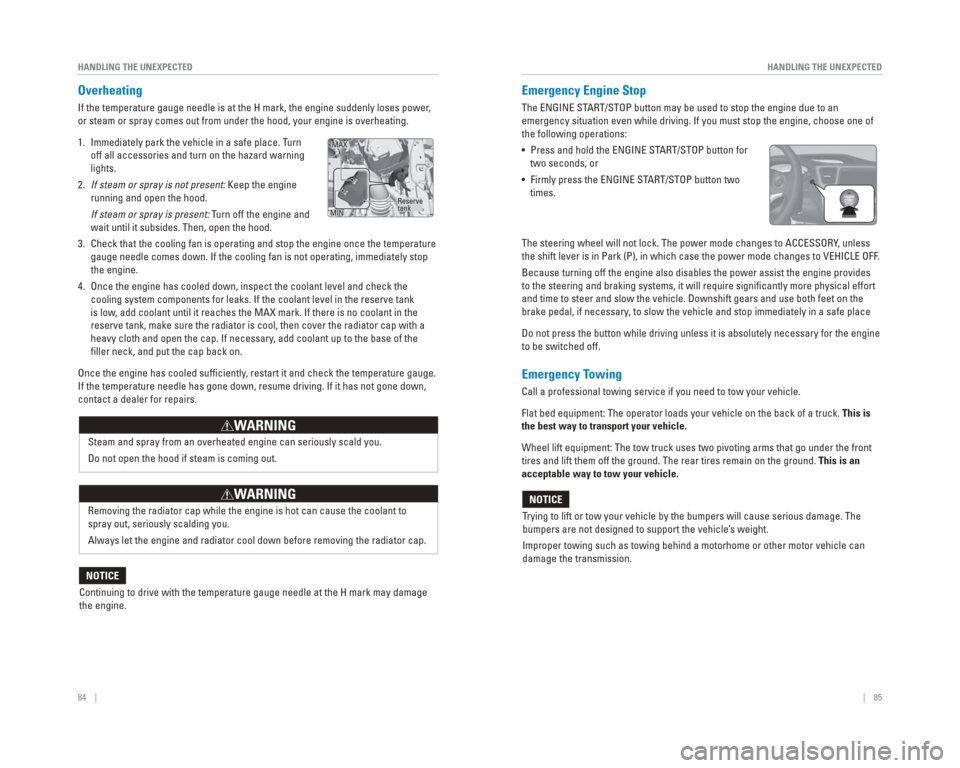
Overheating
If the temperature gauge needle is at the H mark, the engine suddenly lo\
ses power,
or steam or spray comes out from under the hood, your engine is overheat\
ing.
1. Immediately park the vehicle in a safe place. Turn
off all accessories and turn on the hazard warning
lights.
2. If steam or spray is not present: Keep the engine
running and open the hood.
If steam or spray is present: Turn off the engine and wait until it subsides. Then, open the hood.
3. Check that the cooling fan is operating and stop the engine once the tem\
perature gauge needle comes down. If the cooling fan is not operating, immediatel\
y stop
the engine.
4. Once the engine has cooled down, inspect the coolant level and check the\
cooling system components for leaks. If the coolant level in the reserve\
tank
is low, add coolant until it reaches the MAX mark. If there is no coolant in t\
he
reserve tank, make sure the radiator is cool, then cover the radiator ca\
p with a
heavy cloth and open the cap. If necessary, add coolant up to the base of the
fi ller neck, and put the cap back on.
Once the engine has cooled suffi ciently, restart it and check the temperature gauge.
If the temperature needle has gone down, resume driving. If it has not g\
one down,
contact a dealer for repairs.
Steam and spray from an overheated engine can seriously scald you.
Do not open the hood if steam is coming out.
WARNING
Removing the radiator cap while the engine is hot can cause the coolant \
to
spray out, seriously scalding you.
Always let the engine and radiator cool down before removing the radiato\
r cap.
WARNING
Continuing to drive with the temperature gauge needle at the H mark may \
damage
the engine.
NOTICE
Reserve
tank
MAX
MIN
Emergency Engine Stop
The ENGINE START/STOP button may be used to stop the engine due to an
emergency situation even while driving. If you must stop the engine, cho\
ose one of
the following operations:
• Press and hold the ENGINE START/STOP button for two seconds, or
• Firmly press the ENGINE START/STOP button two times.
The steering wheel will not lock. The power mode changes to ACCESSORY, unless
the shift lever is in Park (P), in which case the power mode changes t\
o VEHICLE OFF.
Because turning off the engine also disables the power assist the engine\
provides
to the steering and braking systems, it will require signifi cantly more physical effort
and time to steer and slow the vehicle. Downshift gears and use both fee\
t on the
brake pedal, if necessary, to slow the vehicle and stop immediately in a safe place
Do not press the button while driving unless it is absolutely necessary \
for the engine
to be switched off.
Emergency Towing
Call a professional towing service if you need to tow your vehicle.
Flat bed equipment: The operator loads your vehicle on the back of a tru\
ck. This is
the best way to transport your vehicle.
Wheel lift equipment: The tow truck uses two pivoting arms that go under\
the front
tires and lift them off the ground. The rear tires remain on the ground.\
This is an
acceptable way to tow your vehicle.
Trying to lift or tow your vehicle by the bumpers will cause serious dama\
ge. The
bumpers are not designed to support the vehicle’s weight.
Improper towing such as towing behind a motorhome or other motor vehicle\
can
damage the transmission.
NOTICE
Page 62 of 65
116 || 117
VOICE COMMAND INDEX
VOICE COMMAND INDEX
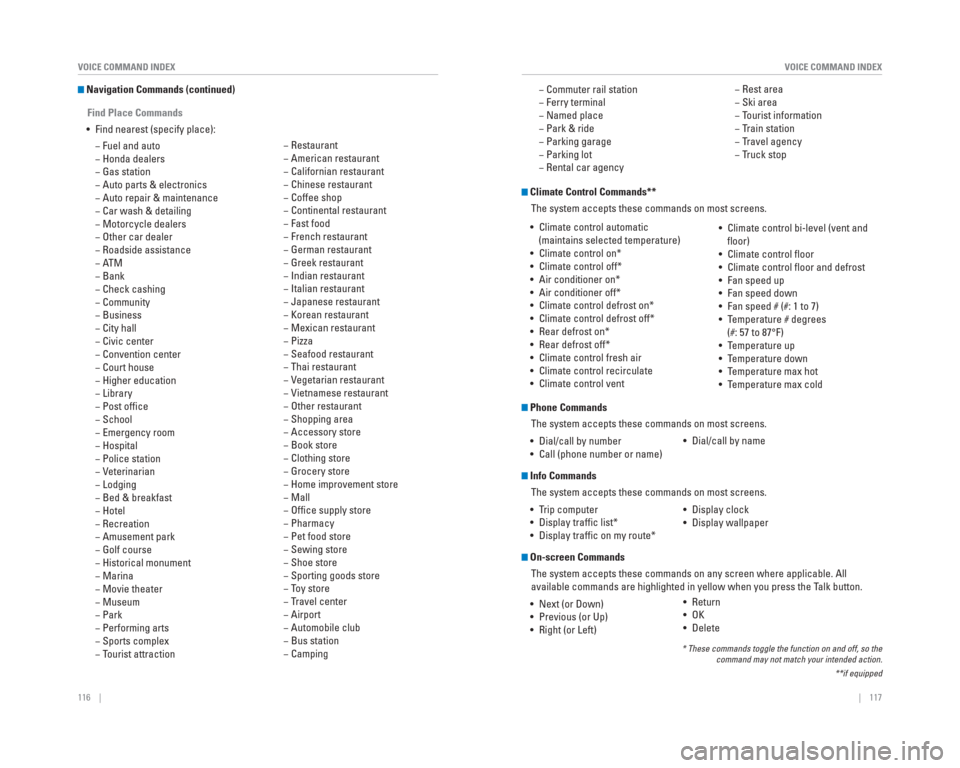
Navigation Commands (continued)
Find Place Commands
• Find nearest (specify place): − Fuel and auto
− Honda dealers
− Gas station
− Auto parts & electronics
− Auto repair & maintenance
− Car wash & detailing
− Motorcycle dealers
− Other car dealer
− Roadside assistance
−ATM
− Bank
− Check cashing
− Community
− Business
− City hall
− Civic center
− Convention center
− Court house
− Higher education
− Library
− Post offi ce
− School
− Emergency room
− Hospital
− Police station
− Veterinarian
− Lodging
− Bed & breakfast
− Hotel
− Recreation
− Amusement park
− Golf course
− Historical monument
− Marina
− Movie theater
− Museum
− Park
− Performing arts
− Sports complex
− Tourist attraction − Restaurant
− American restaurant
− Californian restaurant
− Chinese restaurant
− Coffee shop
− Continental restaurant
− Fast food
− French restaurant
− German restaurant
− Greek restaurant
− Indian restaurant
− Italian restaurant
− Japanese restaurant
− Korean restaurant
− Mexican restaurant
− Pizza
− Seafood restaurant
− Thai restaurant
− Vegetarian restaurant
− Vietnamese restaurant
− Other restaurant
− Shopping area
− Accessory store
− Book store
− Clothing store
− Grocery store
− Home improvement store
− Mall
− Offi ce supply store
− Pharmacy
− Pet food store
− Sewing store
− Shoe store
− Sporting goods store
− Toy store
− Travel center
− Airport
− Automobile club
− Bus station
− Camping − Commuter rail station
− Ferry terminal
− Named place
− Park & ride
− Parking garage
− Parking lot
− Rental car agency
− Rest area
− Ski area
− Tourist information
− Train station
− Travel agency
− Truck stop
Climate Control Commands**
The system accepts these commands on most screens.
* These commands toggle the function on and off, so the command may not match your intended action.
**if equipped
• Climate control automatic (maintains selected temperature)
• Climate control on*
• Climate control off*
• Air conditioner on*
• Air conditioner off*
• Climate control defrost on*
• Climate control defrost off*
• Rear defrost on*
• Rear defrost off*
• Climate control fresh air
• Climate control recirculate
• Climate control vent • Climate control bi-level (vent and
fl oor)
• Climate control fl oor
• Climate control fl oor and defrost
• Fan speed up
• Fan speed down
• Fan speed # (#: 1 to 7)
• Temperature # degrees (#: 57 to 87°F)
• Temperature up
• Temperature down
• Temperature max hot
• Temperature max cold
Phone Commands
The system accepts these commands on most screens.
• Dial/call by number
• Call (phone number or name)
Info Commands The system accepts these commands on most screens.
• Trip computer
• Display traffi c list*
• Display traffi c on my route*
On-screen Commands The system accepts these commands on any screen where applicable. All
available commands are highlighted in yellow when you press the Talk button.
• Next (or Down)
• Previous (or Up)
• Right (or Left) • Dial/call by name
• Display clock
• Display wallpaper
• Return
• OK
• Delete
Page 64 of 65
120 || 121
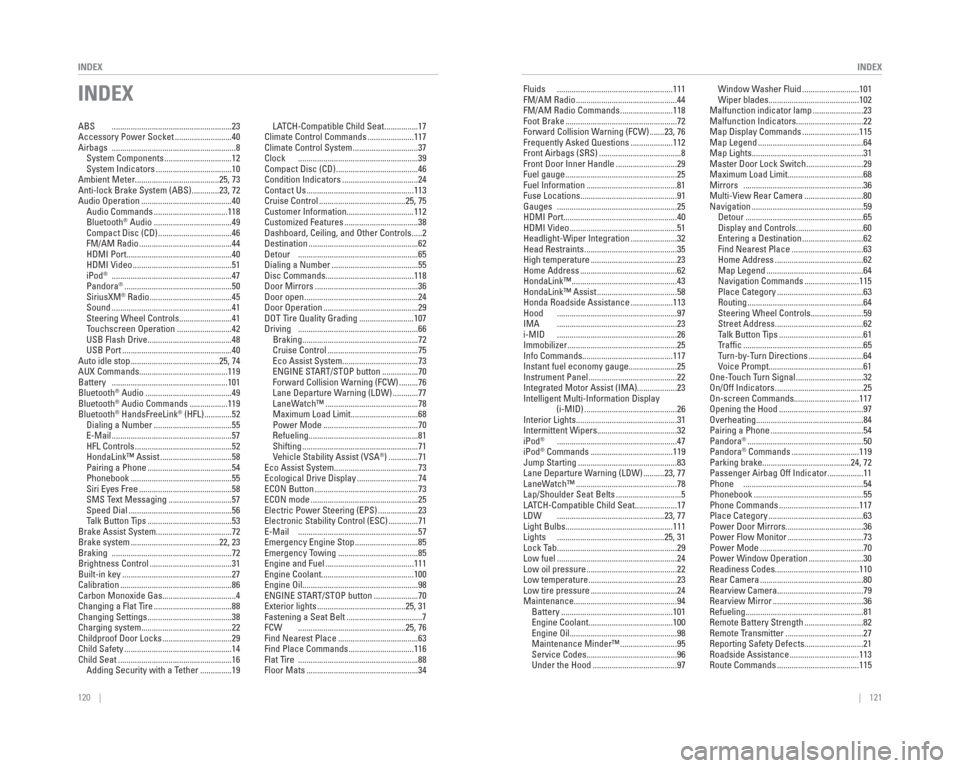
INDEX
INDEX
INDEX
ABS .........................................................23
Accessory Power Socket ...........................40
Airbags ...........................................................8
System Components ................................12
System Indicators ....................................10
Ambient Meter........................................25, 73
Anti-lock Brake System (ABS) .............23, 72
Audio Operation ...........................................40 Audio Commands ...................................118
Bluetooth
® Audio .....................................49
Compact Disc (CD) ...................................46
FM/AM Radio ............................................44
HDMI Port ..................................................40
HDMI Video ...............................................51
iPod
® .........................................................47
Pandora® ...................................................50
SiriusXM® Radio .......................................45
Sound .........................................................41
Steering Wheel Controls .........................41
Touchscreen Operation ..........................42
USB Flash Drive ........................................48
USB Port ....................................................40
Auto idle stop ..........................................25, 74
AUX Commands..........................................119
Battery .......................................................101
Bluetooth
® Audio .........................................49
Bluetooth® Audio Commands ..................119
Bluetooth® HandsFreeLink® (HFL) .............52
Dialing a Number .....................................55
E-Mail .........................................................57
HFL Controls ..............................................52
HondaLink™ Assist ..................................58
Pairing a Phone ........................................54
Phonebook ................................................55
Siri Eyes Free ............................................58
SMS Text Messaging ..............................57
Speed Dial .................................................56
Talk Button Tips ........................................53
Brake Assist System....................................72
Brake system ..........................................22, 23
Braking .........................................................72
Brightness Control .......................................31
Built-in key ....................................................27
Calibration .....................................................86
Carbon Monoxide Gas...................................4
Changing a Flat Tire .....................................88
Changing Settings ........................................38
Charging system...........................................22
Childproof Door Locks .................................29
Child Safety ...................................................14
Child Seat ......................................................16 Adding Security with a Tether ...............19 LATCH-Compatible Child Seat ................17
Climate Control Commands ......................117
Climate Control System ...............................37
Clock .........................................................39
Compact Disc (CD) .......................................46
Condition Indicators ....................................24
Contact Us ...................................................113
Cruise Control .........................................25, 75
Customer Information................................112
Customized Features ...................................38
Dashboard, Ceiling, and Other Controls .....2
Destination ....................................................62
Detour .........................................................65
Dialing a Number .........................................55
Disc Commands..........................................118
Door Mirrors .................................................36
Door open ......................................................24
Door Operation .............................................29
DOT Tire Quality Grading ..........................107
Driving .........................................................66 Braking .......................................................72
Cruise Control ...........................................75
Eco Assist System ....................................73
ENGINE START/STOP button .................70
Forward Collision Warning (FCW) .........76
Lane Departure Warning (LDW) ............77
LaneWatch™ ............................................78
Maximum Load Limit ................................68
Power Mode .............................................70
Refueling ....................................................81
Shifting .......................................................71
Vehicle Stability Assist (VSA
®) ..............71
Eco Assist System........................................73
Ecological Drive Display .............................74
ECON Button .................................................73
ECON mode ...................................................25
Electric Power Steering (EPS) ...................23
Electronic Stability Control (ESC) ..............71
E-Mail .........................................................57
Emergency Engine Stop ..............................85
Emergency Towing ......................................85
Engine and Fuel ..........................................111
Engine Coolant............................................100
Engine Oil.......................................................98
ENGINE START/STOP button .....................70
Exterior lights ..........................................25, 31
Fastening a Seat Belt ....................................7
FCW ...................................................25, 76
Find Nearest Place ......................................63
Find Place Commands ...............................116
Flat Tire .........................................................88
Floor Mats .....................................................34 Fluids .......................................................111
FM/AM Radio ................................................44
FM/AM Radio Commands .........................118
Foot Brake .....................................................72
Forward Collision Warning (FCW) .......23, 76
Frequently Asked Questions ....................112
Front Airbags (SRS) .......................................8
Front Door Inner Handle .............................29
Fuel gauge .....................................................25
Fuel Information ...........................................81
Fuse Locations..............................................91
Gauges .........................................................25
HDMI Port......................................................40
HDMI Video ...................................................51
Headlight-Wiper Integration ......................32
Head Restraints ............................................35
High temperature .........................................23
Home Address ..............................................62
HondaLink™ ..................................................43
HondaLink™ Assist ......................................58
Honda Roadside Assistance ....................113
Hood .........................................................97
IMA .........................................................23
i-MID .........................................................26
Immobilizer ....................................................25
Info Commands...........................................117
Instant fuel economy gauge.......................25
Instrument Panel ..........................................22
Integrated Motor Assist (IMA)...................23
Intelligent Multi-Information Display
(i-MID) ............................................26
Interior Lights................................................31
Intermittent Wipers......................................32
iPod
® .........................................................47
iPod® Commands .......................................119
Jump Starting ...............................................83
Lane Departure Warning (LDW) ..........23, 77
LaneWatch™ ................................................78
Lap/Shoulder Seat Belts ...............................5
LATCH-Compatible Child Seat ....................17
LDW ...................................................23, 77
Light Bulbs...................................................111
Lights ...................................................25, 31
Lock Tab .........................................................29
Low fuel .........................................................24
Low oil pressure ...........................................22
Low temperature ..........................................23
Low tire pressure .........................................24
Maintenance.................................................94 Battery .....................................................101
Engine Coolant ........................................100
Engine Oil ...................................................98
Maintenance Minder™ ...........................95
Service Codes ...........................................96
Under the Hood ........................................97 Window Washer Fluid ...........................101
Wiper blades ...........................................102
Malfunction indicator lamp ........................23
Malfunction Indicators................................22
Map Display Commands ...........................115
Map Legend ..................................................64
Map Lights.....................................................31
Master Door Lock Switch ...........................29
Maximum Load Limit....................................68
Mirrors .........................................................36
Multi-View Rear Camera ............................80
Navigation .....................................................59 Detour ........................................................65
Display and Controls ................................60
Entering a Destination .............................62
Find Nearest Place ..................................63
Home Address ..........................................62
Map Legend ..............................................64
Navigation Commands ..........................115
Place Category .........................................63
Routing .......................................................64
Steering Wheel Controls .........................59
Street Address ..........................................62
Talk Button Tips ........................................61
Traffi c .........................................................65
Turn-by-Turn Directions ..........................64
Voice Prompt.............................................61
One-Touch Turn Signal ................................32
On/Off Indicators ..........................................25
On-screen Commands...............................117
Opening the Hood ........................................97
Overheating...................................................84
Pairing a Phone ............................................54
Pandora
® .......................................................50
Pandora® Commands ................................119
Parking brake..........................................24, 72
Passenger Airbag Off Indicator .................11
Phone .........................................................54
Phonebook ....................................................55
Phone Commands ......................................117
Place Category .............................................63
Power Door Mirrors.....................................36
Power Flow Monitor ....................................73
Power Mode .................................................70
Power Window Operation ..........................30
Readiness Codes........................................110
Rear Camera .................................................80
Rearview Camera.........................................79
Rearview Mirror ...........................................36
Refueling........................................................81
Remote Battery Strength ............................82
Remote Transmitter .....................................27
Reporting Safety Defects............................21
Roadside Assistance .................................113
Route Commands .......................................115