seats HONDA CIVIC HYBRID 2015 9.G Quick Guide
[x] Cancel search | Manufacturer: HONDA, Model Year: 2015, Model line: CIVIC HYBRID, Model: HONDA CIVIC HYBRID 2015 9.GPages: 65, PDF Size: 3.32 MB
Page 3 of 65
Honda Automobile Customer Service
Your authorized Honda dealer should be able to answer any questions you h\
ave
about your vehicle. However, if you are dissatisfi ed with the information you receive,
you can call Honda Automobile Customer Service (see page 113).
Honda Roadside Assistance
24-hour emergency road service is available to you in the United States \
and Canada
throughout your 3-year/36,000-mile warranty term. Services include jump \
starting,
fl at tire and lockout assistance, towing, and more (limitations apply). This Owner’s Guide is intended to help you quickly get acquainted with your 2015
Honda Civic Hybrid. It provides basic information and instructions on te\
chnology and
convenience features, as well as emergency procedures and how to get ass\
istance.
This guide is for vehicles sold in the United States and Canada. It cove\
rs all Civic
Hybrid models, so you may fi nd descriptions of features and equipment that are not
in your vehicle. Images throughout this guide are from U.S. vehicles and\
represent
features and equipment that are available on some, but not all, models.
This guide is not intended to be a substitute for the Owner’s Manual. The Owner
Information CD enclosed in your glove box kit includes the Owner’s Manual,
Navigation Manual, Consumer Information Book, and vehicle and tire warra\
nties in
electronic format. This information can be viewed on a computer (PC or \
Mac platform)
and saved or printed for your reference. You can also visit owners.honda.com (U.S.) or
myhonda.ca (Canada) to view the complete and most current information.
If you are the fi rst registered owner of your vehicle, you may request a complimentary
printed copy of the Owner’s Manual, Navigation Manual, Vehicle Warranty, or
Consumer Information Book within the fi rst six months of vehicle purchase. To request
a copy, visit owners.honda.com (U.S.) and create or log in to your account. In Canada,
please request a copy from your Honda dealer.
American Honda Motor Company strives to be proactive in protecting our
environment and natural resources. By using electronic delivery for a co\
nsiderable
portion of the information typically found in a vehicle owner’s manual, we are further
reducing our impact on the environment.
INTRODUCTION TABLE OF CONTENTS
Call (800) 999-1009 (U.S.) or (888) 946-6329 (Canada)
Call (866) 864-5211 (U.S.) or (800) 465-7587 (Canada)
*if equipped
VISUAL INDEX ................................... 1
Steering Wheel and Nearby
Controls ............................................... 1
Dashboard, Ceiling, and Other
Controls ............................................... 2
SAFETY INFORMATION .................... 3
Important Safety Information .......... 3
Seat Belts ........................................... 5
Airbags ................................................ 8
Child Safety ........................................ 14
Safety Label Locations ..................... 21
Reporting Safety Defects ................. 21
INSTRUMENT PANEL ....................... 22
Malfunction Indicators .................... 22
Condition Indicators ......................... 24
On/Off Indicators ............................... 25
Gauges ................................................ 25
Intelligent Multi-Information Display
(i-MID) ................................................. 26
VEHICLE CONTROLS ......................... 27
Using the Remote Transmitter ........ 27
Smart Entry System ........................... 28
Door Operation .................................. 29
Power Window Operation .............. 30
Interior and Exterior Lights ............. 31
One-Touch Turn Signal ..................... 32
Wiper Operation ................................ 32
Adjusting the Seats .......................... 33
Adjusting the Steering Wheel ........ 36
Adjusting the Mirrors ....................... 36
Climate Control System .................. 37
Seat Heaters* .................................... 37
Customized Features ........................ 38
AUDIO AND CONNECTIVITY ........... 40Basic Audio Operation ..................... 40
Touchscreen Operation ................... 42
HondaLink™ ...................................... 43
FM/AM Radio .................................... 44
SiriusXM
® Radio ............................... 45
Compact Disc (CD) ........................... 46
iPod
®.................................................... 47
USB Flash Drive ................................ 48
Bluetooth
® Audio .............................. 49
Pandora
® ............................................ 50
HDMI Video ........................................ 51
BLUETOOTH
® HANDSFREELINK®
(HFL) ..................................................... 52
Basic HFL Operation ......................... 52
Pairing a Phone ................................. 54
Making a Call .................................... 55
SMS Text Messaging and E-Mail* ... 57
HondaLink™ Assist .......................... 58
Siri™ Eyes Free ................................. 58
NAVIGATION* .................................... 59
Basic Navigation Operation ........... 59
Entering a Destination ..................... 62
Routing ................................................ 64
DRIVING .............................................. 66
Before Driving ................................... 66
Maximum Load Limit ........................ 68
Starting to Drive ................................ 70
Shifting ................................................ 71
Vehicle Stability Assist (VSA
®), aka
Electronic Stability Control (ESC)
System ................................................. 71
Braking ............................................... 72
Eco Assist System ............................. 73
Cruise Control .................................... 75
Page 6 of 65
4 || 5
SAFETY
SAFETY
Carbon Monoxide Gas
The engine exhaust from this vehicle contains carbon monoxide, a colorle\
ss,
odorless, and highly toxic gas. As long as you properly maintain your ve\
hicle and
follow the instructions set forth below, you will not accumulate dangerous levels
of carbon monoxide gas in the vehicle interior.
Have the exhaust system inspected for leaks whenever:
• The exhaust system is making an unusual noise.
• The exhaust system may have been damaged.
• The vehicle is raised for an oil change. When you operate a vehicle with the trunk open, airfl ow can pull exhaust gas
into the interior and create a hazardous condition. If you must drive wi\
th the trunk
open, open all the windows and set the climate control system as shown b\
elow.
1. Select the fresh air mode.
2. Select the
mode.
3. Set the fan speed to high.
4. Set the temperature control to a comfortable setting.
Adjust the climate control system in the same manner if you sit in your \
parked
vehicle with the engine running.
An enclosed area such as a garage can quickly fi ll up with carbon monoxide gas.
Do not run the engine with the garage door closed. Even when the garage \
door is
open, drive out of the garage immediately after starting the engine. Carbon monoxide gas is toxic. Breathing it can cause unconsciousness and\
even kill you.
Avoid any enclosed areas or activities that expose you to carbon monoxide\
.
WARNING
Seat Belts
A seat belt is your best protection in all types of collisions. Airbags \
are designed to
supplement seat belts, not replace them. So even though your vehicle is \
equipped
with airbags, make sure you and your passengers always wear your seat be\
lts and
wear them properly.
Lap/Shoulder Seat Belts
All fi ve seating positions are equipped with lap/shoulder seat belts with
emergency locking retractors. In normal driving, the retractor lets you \
move
freely while keeping some tension on the belt. During a collision or sud\
den stop,
the retractor locks to restrain your body. The rear seat belts also have a lockable
retractor for use with child seats.
The front seats are equipped with automatic seat belt tensioners to enha\
nce
safety. The tensioners automatically tighten the front seat belts during a mod\
erate
to severe frontal collision, sometimes even if the collision is not seve\
re enough to
infl ate the front airbags.
Proper Use of Seat BeltsFollow these guidelines for proper use:
• All occupants should sit upright, well back in the seat, and remain in t\
hat position for the duration of the trip. Slouching and leaning reduces the\
effectiveness of the belt and can increase the chance of serious injury \
in a
crash.
• Never place the shoulder part of a lap/shoulder seat belt under your arm\
or behind your back. This could cause very serious injuries in a crash.
• Two people should never use the same seat belt. If they do, they could be\
very seriously injured in a crash.
• Do not put any accessories on the seat belts. Devices intended to improv\
e comfort or reposition the shoulder part of a seat belt can reduce the pr\
otective
capability and increase the chance of serious injury in a crash.
• No one should sit in a seat with an inoperative seat belt or one that do\
es not appear to be working correctly. Using a seat belt that is not working properly
may not protect the occupant in a crash. Have a dealer check the belt as\
soon
as possible.
Not wearing a seat belt properly increases the chance of a serious injur\
y or
death in a crash, even though your vehicle has airbags.
Be sure you and your passengers always wear seat belts and wear them
properly.
WARNING
Page 7 of 65
6 || 7
SAFETY
SAFETY
Seat Belt Inspection
Regularly check the condition of your seat belts as follows:
• Pull each belt out fully, and look for frays, cuts, burns, and wear.
• Check that the latches work smoothly and the belts retract easily. If a belt does not retract easily, cleaning the belt may correct the problem. Use only mild soap
and warm water. Do not use bleach or cleaning solvents. Make sure the belt is
completely dry before allowing it to retract.
Any belt that is not in good condition or working properly will not prov\
ide proper
protection and should be replaced as soon as possible.
A belt that has been worn during a crash may not provide the same level \
of
protection in a subsequent crash. Have your seat belts inspected by a de\
aler after
any collision.
Not checking or maintaining seat belts can result in serious injury or d\
eath if
the seat belts do not work properly when needed.
Check your seat belts regularly and have any problem corrected as soon a\
s
possible.
WARNING
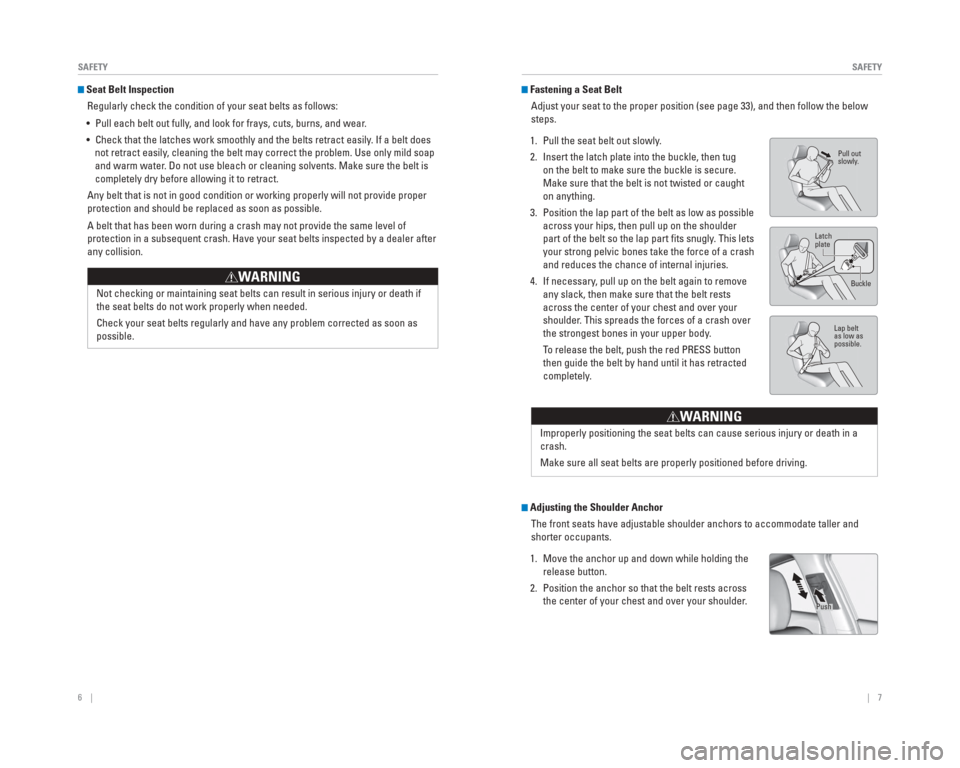
Fastening a Seat BeltAdjust your seat to the proper position (see page 33), and then follow\
the below
steps.
1. Pull the seat belt out slowly.
2. Insert the latch plate into the buckle, then tug on the belt to make sure the buckle is secure.
Make sure that the belt is not twisted or caught
on anything.
3. Position the lap part of the belt as low as possible across your hips, then pull up on the shoulder
part of the belt so the lap part fi ts snugly. This lets
your strong pelvic bones take the force of a crash
and reduces the chance of internal injuries.
4. If necessary, pull up on the belt again to remove any slack, then make sure that the belt rests
across the center of your chest and over your
shoulder. This spreads the forces of a crash over
the strongest bones in your upper body.
To release the belt, push the red PRESS button then guide the belt by hand until it has retracted
completely.
Adjusting the Shoulder Anchor
The front seats have adjustable shoulder anchors to accommodate taller a\
nd
shorter occupants.
1. Move the anchor up and down while holding the release button.
2. Position the anchor so that the belt rests across the center of your chest and over your shoulder.
Pull out
slowly .
Lap belt
as low as
possible.
Latch
plate
Buckle
Improperly positioning the seat belts can cause serious injury or death \
in a
crash.
Make sure all seat belts are properly positioned before driving.
W ARNING
Push
Page 8 of 65
8 || 9
SAFETY
SAFETY
Airbags
Your vehicle is equipped with three types of airbags: front airbags, side\
airbags, and
side curtain airbags.
Front Airbags (SRS)
The front SRS airbags infl ate in a moderate-to-severe frontal collision to help
protect the head and chest of the driver and/or front passenger. They are housed
in the center of the steering wheel for the driver, and in the dashboard for the front
passenger. Both airbags are marked SRS AIRBAG.
SRS (Supplemental Restraint System) indicates that the airbags are des\
igned to
supplement seat belts, not replace them. Seat belts are the occupant’\
s primary
restraint system.
Advanced AirbagsYour front airbags have advanced features to help reduce the likelihood o\
f airbag-
related injuries to smaller occupants.
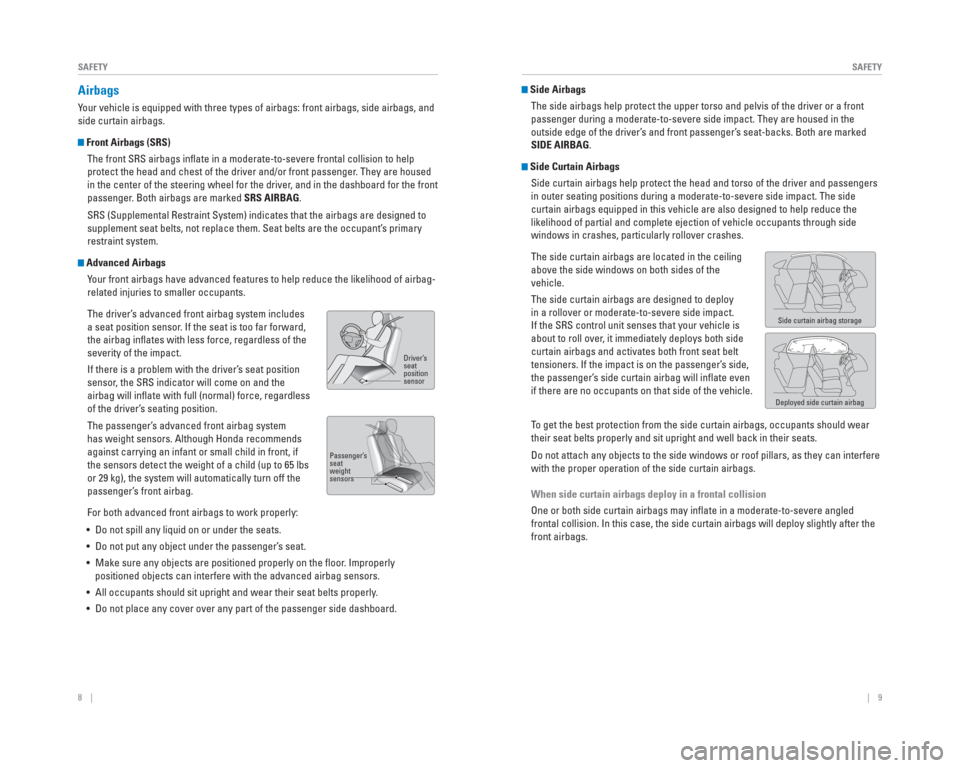
The driver’s advanced front airbag system includes
a seat position sensor. If the seat is too far forward,
the airbag infl ates with less force, regardless of the
severity of the impact.
If there is a problem with the driver’s seat position
sensor, the SRS indicator will come on and the
airbag will infl ate with full (normal) force, regardless
of the driver’s seating position.
The passenger’s advanced front airbag system
has weight sensors. Although Honda recommends
against carrying an infant or small child in front, if
the sensors detect the weight of a child (up to 65 lbs
or 29 kg), the system will automatically turn off the
passenger’s front airbag.
For both advanced front airbags to work properly:
• Do not spill any liquid on or under the seats.
• Do not put any object under the passenger’s seat.
• Make sure any objects are positioned properly on the fl oor. Improperly positioned objects can interfere with the advanced airbag sensors.
• All occupants should sit upright and wear their seat belts properly.
• Do not place any cover over any part of the passenger side dashboard.
Driver’ s
seat
position
sensor
Passenger’ s
seat
weight
sensors
Side Airbags
The side airbags help protect the upper torso and pelvis of the driver o\
r a front
passenger during a moderate-to-severe side impact. They are housed in th\
e
outside edge of the driver’s and front passenger’s seat-backs. Both are marked
SIDE AIRBAG.
Side Curtain AirbagsSide curtain airbags help protect the head and torso of the driver and p\
assengers
in outer seating positions during a moderate-to-severe side impact. The \
side
curtain airbags equipped in this vehicle are also designed to help reduc\
e the
likelihood of partial and complete ejection of vehicle occupants through\
side
windows in crashes, particularly rollover crashes.
The side curtain airbags are located in the ceiling
above the side windows on both sides of the
vehicle.
The side curtain airbags are designed to deploy
in a rollover or moderate-to-severe side impact.
If the SRS control unit senses that your vehicle is
about to roll over, it immediately deploys both side
curtain airbags and activates both front seat belt
tensioners. If the impact is on the passenger’s side,
the passenger’s side curtain airbag will infl ate even
if there are no occupants on that side of the vehicle.
To get the best protection from the side curtain airbags, occupants shoul\
d wear
their seat belts properly and sit upright and well back in their seats.
Do not attach any objects to the side windows or roof pillars, as they c\
an interfere
with the proper operation of the side curtain airbags.
When side curtain airbags deploy in a frontal collision
One or both side curtain airbags may infl ate in a moderate-to-severe angled
frontal collision. In this case, the side curtain airbags will deploy sl\
ightly after the
front airbags.
Side curtain airbag storage
Deployed side curtain airbag
Page 11 of 65
14 || 15
SAFETY
SAFETY
Child Safety
Each year, many children are injured or killed in vehicle crashes because they ar\
e
either unrestrained or not properly restrained. In fact, vehicle collisi\
ons are the
number one cause of death of children ages 12 and under.
The National Highway Traffi c Safety Administration and Transport Canada
recommend that all children ages 12 and under be properly restrained in \
a rear seat.
Some states or provinces/territories have laws restricting where childre\
n may ride.
To reduce the number of child deaths and injuries, every state, Canadian \
province
and territory requires that infants and children be properly restrained \
when they ride
in a vehicle.
Protecting Child Passengers
• An infl ating front or side airbag can injure or kill a child sitting in the fro\
nt seat.
• A child in the front seat is more likely to interfere with the driver’\
s ability to safely control the vehicle.
• Statistics show that children of all sizes and ages are safer when they \
are properly restrained in a rear seat.
• Any child who is too small to wear a seat belt correctly must be restrai\
ned in an approved child seat that is properly secured to the vehicle using either\
the lap
belt portion of the lap/shoulder belt or the lower anchors of the LATCH system.
• Never hold a child on your lap because it is impossible to protect them \
in the event of a collision.
• Never put a seat belt over yourself and a child. During a crash, the bel\
t would likely press deep into the child and cause serious or fatal injuries.
• Never let two children use the same seat belt. Both children could be ve\
ry seriously injured in a crash.
• Do not allow children to operate the doors, windows, or seat adjusters.
• Do not leave children in the vehicle unattended, especially in hot weath\
er when the inside of the vehicle can get hot enough to kill them. They could al\
so activate
vehicle controls, causing it to move unexpectedly.
Children who are unrestrained or improperly restrained can be seriously \
injured or killed in a crash.
Any child too small for a seat belt should be properly restrained in a c\
hild
seat. A larger child should be properly restrained with a seat belt, usi\
ng a
booster seat if necessary.
WARNING
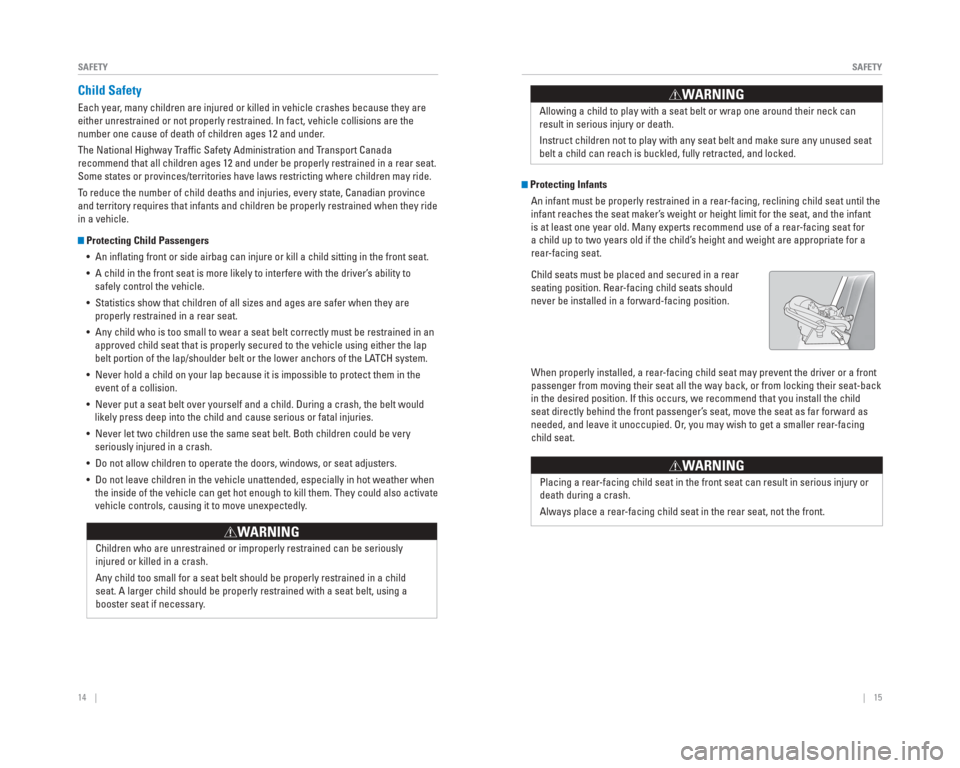
Protecting Infants An infant must be properly restrained in a rear-facing, reclining child seat until the
infant reaches the seat maker’s weight or height limit for the seat, and the infant
is at least one year old. Many experts recommend use of a rear-facing seat for
a child up to two years old if the child’s height and weight are appropriate for a
rear-facing seat.
Child seats must be placed and secured in a rear
seating position. Rear-facing child seats should
never be installed in a forward-facing position.
When properly installed, a rear-facing child seat may prevent the driver or a front
passenger from moving their seat all the way back, or from locking their\
seat-back
in the desired position. If this occurs, we recommend that you install t\
he child
seat directly behind the front passenger’s seat, move the seat as far forward as
needed, and leave it unoccupied. Or, you may wish to get a smaller rear-facing
child seat.
Placing a rear-facing child seat in the front seat can result in serious injury or
death during a crash.
Always place a rear-facing child seat in the rear seat, not the front.
WARNING
Allowing a child to play with a seat belt or wrap one around their neck \
can
result in serious injury or death.
Instruct children not to play with any seat belt and make sure any unuse\
d seat
belt a child can reach is buckled, fully retracted, and locked.
WARNING
Page 12 of 65
16 || 17
SAFETY
SAFETY
Protecting Smaller Children
If a child is at least one year old and within the weight range indicate\
d by the child
seat manufacturer, the child should be properly restrained in a fi rmly secured
forward-facing child seat.
We strongly recommend placing a forward-facing
child seat in a rear seating position.
Placing a forward-facing child seat in the front seat
can be hazardous, even with advanced front airbags
that automatically turn the passenger’s front airbag
off. A rear seat is the safest place for a child.
Selecting a Child SeatMost child seats are LATCH-compatible (Lower Anchors and Tethers for CHildren).
Some have a rigid-type connector, while others have a fl exible-type connector.
Both are equally easy to use. Some existing and previously owned child s\
eats can
only be installed using the seat belt. Whichever type you choose, follow\
the child
seat manufacturer’s use and care instructions as well as the instructions in this
manual. Proper installation is key to maximizing your child’s safety.
In seating positions and vehicles not equipped with LATCH, a LATCH-compatible
child seat can be installed using the seat belt and a top tether for add\
ed security.
This is because all child seats are required to be designed so that they\
can be
secured with a lap belt or the lap part of a lap/shoulder belt. In addit\
ion, the
child seat manufacturer may advise that a seat belt be used to attach a \
LATCH-
compatible seat once a child reaches a specifi ed weight. Please read the child
seat owner’s manual for proper installation instructions.
Important considerations when selecting a child seat
Make sure the child seat meets the following three requirements:
• The child seat is the correct type and size for the child.
• The child seat is the correct type for the seating position.
• The child seat is compliant with Federal Motor Vehicle Safety Standard 213 or Canadian Motor Vehicle Safety Standard 213.
Placing a forward-facing child seat in the front seat can result in seri\
ous
injury or death if the front airbag infl ates.
If you must place a forward-facing child seat in front, move the vehicle\
seat
as far back as possible, and properly restrain the child.
W ARNING
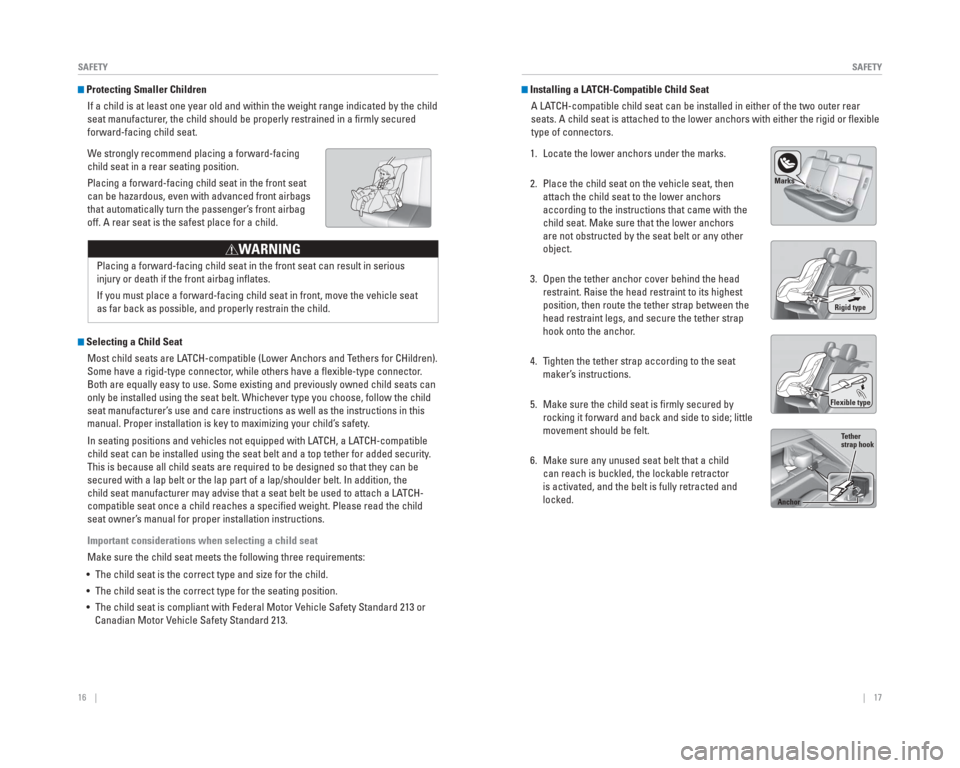
Installing a LATCH-Compatible Child Seat
A LATCH-compatible child seat can be installed in either of the two outer re\
ar
seats. A child seat is attached to the lower anchors with either the rig\
id or fl exible
type of connectors.
1. Locate the lower anchors under the marks.
2. Place the child seat on the vehicle seat, then attach the child seat to the lower anchors
according to the instructions that came with the
child seat. Make sure that the lower anchors
are not obstructed by the seat belt or any other
object.
3. Open the tether anchor cover behind the head restraint. Raise the head restraint to its highest
position, then route the tether strap between the
head restraint legs, and secure the tether strap
hook onto the anchor.
4. Tighten the tether strap according to the seat maker’s instructions.
5. Make sure the child seat is fi rmly secured by rocking it forward and back and side to side; little
movement should be felt.
6. Make sure any unused seat belt that a child can reach is buckled, the lockable retractor
is activated, and the belt is fully retracted and
locked.
Marks
Rigid type
Flexible type Tether
strap hook
Anchor
Page 20 of 65
32 || 33
VEHICLE CONTROLS
VEHICLE CONTROLS
One-Touch Turn Signal
Use this quick and convenient method to signal a lane change.
Lightly push the turn signal lever up or down for a
three-blink sequence.
For a continuous signal, push the lever up or down
until it locks into place.
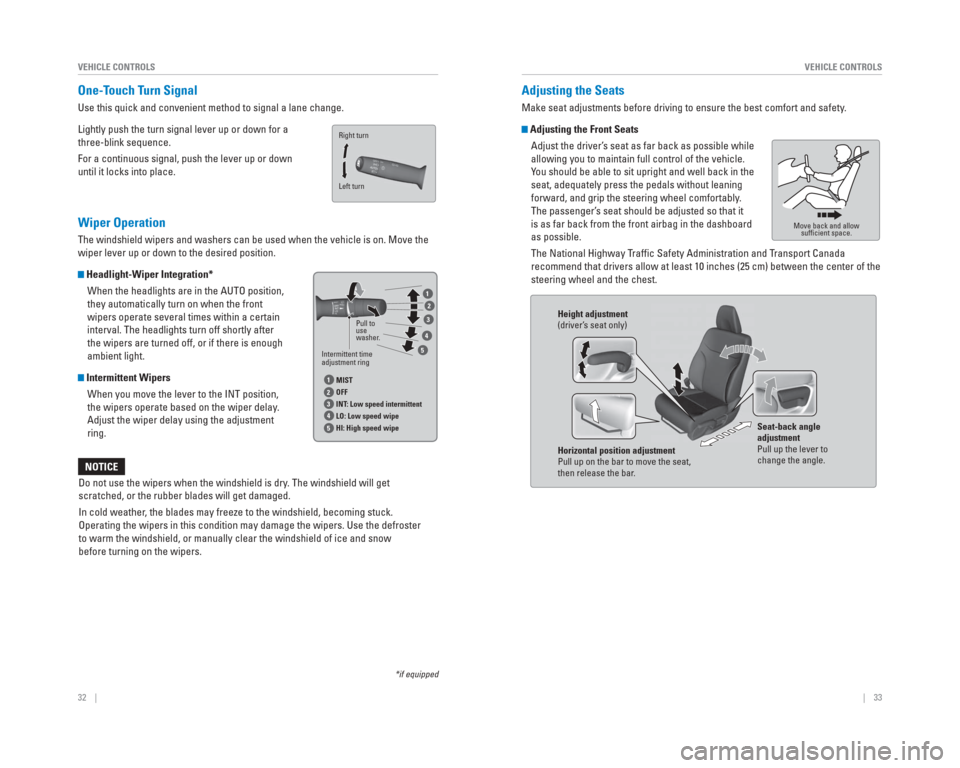
Wiper Operation
The windshield wipers and washers can be used when the vehicle is on. Mo\
ve the
wiper lever up or down to the desired position.
Headlight-Wiper Integration*
When the headlights are in the AUTO position,
they automatically turn on when the front
wipers operate several times within a certain
interval. The headlights turn off shortly after
the wipers are turned off, or if there is enough
ambient light.
Intermittent WipersWhen you move the lever to the INT position,
the wipers operate based on the wiper delay.
Adjust the wiper delay using the adjustment
ring.
Do not use the wipers when the windshield is dry. The windshield will get
scratched, or the rubber blades will get damaged.
In cold weather, the blades may freeze to the windshield, becoming stuck.
Operating the wipers in this condition may damage the wipers. Use the de\
froster
to warm the windshield, or manually clear the windshield of ice and snow\
before turning on the wipers.
NOTICE
*if equipped
Intermittent time
adjustment ring Pull to
use
washer
.
MIST
OFF
INT : Low speed intermittent
LO: Low speed wipe
HI: High speed wipe
1
1
2
2
3
3
4
4
5
5
Left turn Right turn
Adjusting the Seats
Make seat adjustments before driving to ensure the best comfort and safe\
ty .
Adjusting the Front Seats
Adjust the driver’s seat as far back as possible while
allowing you to maintain full control of the vehicle.
You should be able to sit upright and well back in the
seat, adequately press the pedals without leaning
forward, and grip the steering wheel comfortably.
The passenger’s seat should be adjusted so that it
is as far back from the front airbag in the dashboard
as possible.
The National Highway Traffi c Safety Administration and Transport Canada
recommend that drivers allow at least 10 inches (25 cm) between the ce\
nter of the
steering wheel and the chest.
Move back and allow suffi cient space.
Height adjustment
(driver’ s seat only)
Horizontal position adjustment
Pull up on the bar to move the seat,
then release the bar . Seat-back angle
adjustment
Pull up the lever to
change the angle.
Page 22 of 65
36 || 37
VEHICLE CONTROLS
VEHICLE CONTROLS
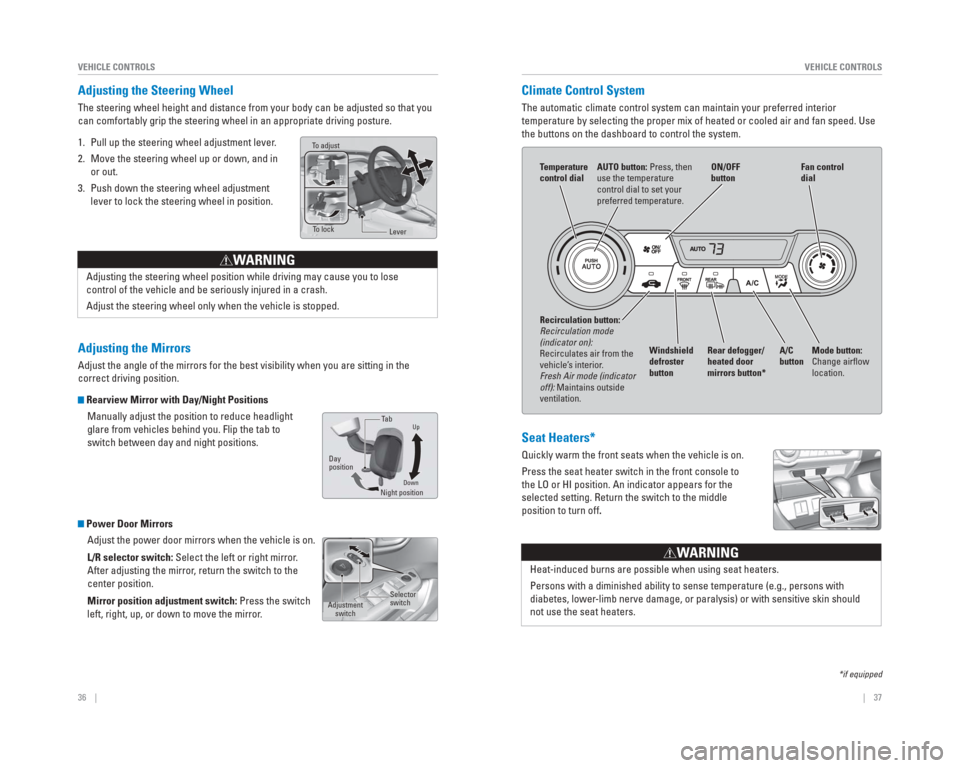
Adjusting the Steering Wheel
The steering wheel height and distance from your body can be adjusted so\
that you
can comfortably grip the steering wheel in an appropriate driving postur\
e.
1. Pull up the steering wheel adjustment lever.
2. Move the steering wheel up or down, and in
or out.
3. Push down the steering wheel adjustment lever to lock the steering wheel in position.
Adjusting the Mirrors
Adjust the angle of the mirrors for the best visibility when you are sit\
ting in the
correct driving position.
Rearview Mirror with Day/Night Positions
Manually adjust the position to reduce headlight
glare from vehicles behind you. Flip the tab to
switch between day and night positions.
Power Door MirrorsAdjust the power door mirrors when the vehicle is on.
L/R selector switch: Select the left or right mirror.
After adjusting the mirror, return the switch to the
center position.
Mirror position adjustment switch: Press the switch
left, right, up, or down to move the mirror.
T o adjust
To lock
Lever
Adjusting the steering wheel position while driving may cause you to los\
e
control of the vehicle and be seriously injured in a crash.
Adjust the steering wheel only when the vehicle is stopped.
WARNING
DownNight positionTa
b
Day
position
Up
Adjustment switchSelector
switch
Climate Control System
The automatic climate control system can maintain your preferred interio\
r
temperature by selecting the proper mix of heated or cooled air and fan \
speed. Use
the buttons on the dashboard to control the system.
*if equipped
AUTO button: Press, then
use the temperature
control dial to set your
preferred temperature.
T
emperature
control dial
A/C
buttonFan control
dial
Recirculation button:
Recirculation mode
(indicator on):
Recirculates air from the
vehicle’ s interior .
Fresh Air mode (indicator
off): Maintains outside
ventilation. Rear defogger/
heated door
mirrors button*
Windshield
defroster
button ON/OFF
button
Mode button:
Change airfl
ow
location.
Seat Heaters*
Quickly warm the front seats when the vehicle is on.
Press the seat heater switch in the front console to
the LO or HI position. An indicator appears for the
selected setting. Return the switch to the middle
position to turn off.
Heat-induced burns are possible when using seat heaters.
Persons with a diminished ability to sense temperature (e.g., persons w\
ith
diabetes, lower -limb nerve damage, or paralysis) or with sensitive skin should
not use the seat heaters.
W ARNING
Page 37 of 65
66 || 67
DRIVING
DRIVING
Learn about preparation for driving, as well as other features.
Before Driving
Check the following items before you begin driving.
Exterior Checks
• Make sure there are no obstructions on the windows, door mirrors, exteri\
or lights, or other parts of the vehicle.
• Remove any frost, snow, or ice.
• Make sure the hood is securely closed.
• Heat from the engine and exhaust can ignite fl ammable materials left under the hood, causing a fi re. If you’ve parked your vehicle for an extended period,
inspect and remove any debris that may have collected, such as dried gra\
ss
and leaves that have fallen or have been carried in for use as a nest by\
a small
animal. Also check under the hood for leftover fl ammable materials after you or
someone else has performed maintenance on your vehicle.
• Make sure the tires are in good condition.
• Make sure there are no people or objects behind or around the vehicle.
Interior Checks • Store or secure all items on board properly.
• Do not pile items higher than the seat height.
• Do not place anything in the front seat footwells. Make sure to secure t\
he fl oor mats.
• If you have any animals on board, do not let them move freely around in \
the vehicle.
• Securely close and lock all doors and the trunk.
• Adjust your seating position, mirrors, and steering wheel properly.
• Make sure items placed on the fl oor behind the front seats cannot roll under the seats.
• Everyone in the vehicle must fasten their seat belt.
• Make sure that the indicators in the instrument panel come on when you s\
tart the vehicle, and go off soon after.
If the doors are frozen shut, use warm water around the door edges to me\
lt any
ice. Do not try to force them open, as this can damage the rubber trim a\
round the
doors. When done, wipe dry to avoid further freezing.
NOTICE
DRIVINGIn addition:
• During the fi rst 600 miles (1,000 km) of operation, avoid sudden acceleration or full throttle operation so as not to damage the engine or powertrain.
• Avoid hard braking for the fi rst 200 miles (300 km). You should also follow this when the brake pads are replaced.
Improper accessories or modifi cations can affect your vehicle’s handling, and
stability, and performance, and cause a crash in which you can be seriously hurt \
or killed.
Follow all instructions in the vehicle owner’s guide regarding accessories and
modifi cations.
WARNING
Page 65 of 65
122 || 123
INDEX
INDEX
Routing .........................................................64
Safety Information .........................................3
Airbags .........................................................8
Child Safety ...............................................14
Reporting Safety Defects ........................21
Safety Label Locations ............................21
Safety Messages .......................................3
Seat Belts ........................................................5 Fastening a Seat Belt ................................7
Seat Belt Inspection ..................................6
Seat Belt Reminder ..................................24
Shoulder Anchor ........................................7
Seat Heaters .................................................37
Seats .........................................................33
Service Codes...............................................96
Settings .........................................................38
Setting the Clock ..........................................39
Shifting .........................................................71
Shift Lever Does Not Move ........................82
Shoulder Anchor ............................................7
Side Airbags....................................................9
Side Curtain Airbags......................................9
Siri Eyes Free ................................................58
SiriusXM
® Radio ...........................................45
SiriusXM® Radio Commands ....................118
Smart Entry system ................................22, 28
SMS Text Messaging ..................................57
Sound .........................................................41
Specifi cations .............................................111
Speed Dial .....................................................56
Speedometer ................................................25
Steering Wheel.............................................36
Steering Wheel and Nearby Controls ........1
Steering Wheel Controls.......................41, 59
Street Address..............................................62
Supplemental Restraint System (SRS) ...10, 22
System message ..........................................25
Talk Button Tips ......................................53, 61
Text Messaging ............................................57
Tire Information ..........................................103 DOT Tire Quality Grading ......................107
Infl ation Guidelines ................................103
Tire and Loading Information Label ....104
Tire and Wheel Replacement ...............104
Tire Chains ...............................................105
Tire Identifi cation Number (TIN) ..........106
Tire Labeling ............................................106
Tire Service Life ......................................105
Tire Terminology .....................................106
Wear Indicators .....................................103
Winter Tires .............................................105
Tire Pressure Monitoring System (TPMS) ...........................................23, 86, 109
Tire Repair Kit ...............................................87
Tires .......................................................111 Touchscreen Operation ..............................42
Towing .........................................................85
TPMS ...........................................23, 86, 109
Traffi c .........................................................65
Trip Computer ...............................................26
Troubleshooting ..........................................112
Trunk open .....................................................24
Trunk Opener ................................................29
Turn-by-Turn Directions ..............................64
Turn Signal ..............................................25, 32
USB Commands..........................................118
USB Flash Drive............................................48
USB Port ........................................................40
Vehicle .......................................................111
Vehicle Stability Assist (VSA
®) ............23, 71
Visual Index.....................................................1
Voice Command Index ..............................115
Voice Prompt ................................................61
VSA ...................................................23, 25
Warranty Coverages .................................114
Wear Indicators .........................................103
Window s .......................................................30
Window Washer Fluid ...............................101
Winter Tires .................................................105
Wiper Blades ..............................................102
Wiper Operation ...........................................32