navigation update HONDA CIVIC SEDAN 2009 Navigation Manual (in English)
[x] Cancel search | Manufacturer: HONDA, Model Year: 2009, Model line: CIVIC SEDAN, Model: HONDA CIVIC SEDAN 2009Pages: 151, PDF Size: 4.27 MB
Page 3 of 151
Navigation System3
Table of Contents
Customer Assistance ................103
Reporting Errors ..........................103
Honda Automobile Customer
Service ......................................103
Visiting Your Dealer ...................104
Obtaining a Navigation Update DVD .........................................104
Changing the DVD ......................105
PC Card Operation ......................106
Inserting the PC Card....................106
Voice Control of PC Card
Functions ....................................106
CD/CD-R Operation ....................106
Voice Control of CD Functions .....107
Coverage Areas .........................108
Map Coverage .............................108
U.S. Detailed Coverage Areas.......108
Canada Detailed Coverage Areas ..........................................113
Operation in Alaska and Hawaii ......................................121
Alaska ............................................121
Hawaii ...........................................121
Shipping a Vehicle To or From
Hawaii ........................................122
Frequently Asked Questions...123
Troubleshooting .......................133
Glossary ....................................135
Glossary .......................................135
Voice Command Index ............138
Global Commands .......................138
Navigation General Commands ................................138
Navigation Display Commands ................................139
Find Place Commands .................140
Radio Voice Commands ..............141
CD Voice Commands ..................142
PC Card Voice Commands ..........142
AUX Voice Commands ...............142
Information Screen Voice Commands ................................143
Setup Screen (first) Commands ................................143
On-Screen Commands .................144
On-Screen Commands Assist .........144
Index .........................................146
2009 Civic
Page 11 of 151
Navigation System11
Getting Started
Joystick/ENT button
Moves left, right, up, and down to move
the highlighting around the display, to
scroll through lists, or to look around a
displayed map. After making a selection
in a menu or list, push in on the joystick
to enter the selection into the system.
In almost all cases, you can enter a
selection into the system by using the
voice control system, highlighting the
item and pushing in on the joystick, or
by touching the appropriate item you
wish to select.
INFO button
Displays the screen for selecting
Cellular Phonebook , Voice
Command Help , Map Legend,
Calendar, and Calculator. See
page
69.
MAP/GUIDE button
Displays the map. When en route,
switches between the map, guidance ,
and Direction list screens. See page
19
or 50.
MENU button
Displays the Enter destination by
screen. When en r oute, displays the
Change route by screen. SETUP button
Displays the
Setup screens to change
and update informa tion in the system.
See page
74 .
CANCEL button
Cancels the current sc reen and returns to
the previous screen display.
NOTE:
The NAVI BACK button on the steering
wheel performs the same basic function.
ZOOM (IN)/ (OUT) buttons
Press ZOOM to zoom in (to show
more detail), or ZOOM to zoom out
(to show more area and less detail)
while a map screen is displayed.
ZOOM IN reduces the scale (showing
less area with greater detail). ZOOM
OUT increases the scale (showing more
area with less detail).
AUDIO button
Press to display the audio screen.
For information on audio system
features, see the Audio section of the
vehicle Owner’s manual. Other buttons
See the Audio sectio
n of the vehicle
Owner's manual.
Screen
All selections and instructions are
displayed on the screen. In addition, the
display is a “touch screen” – you can
enter information into the system by
touching the images (icons) on the
screen with your finger.
For example, if you need to enter a
street name, a keyboard will be
displayed. You can type in the street
name by saying or selecting the
individual character s on the screen.
Clean the screen with a soft damp cloth.
You may use a mild cl eaner intended for
use on liquid crystal displays (LCDs).
Harsher chemicals may damage the
screen.
2009 Civic
Page 20 of 151
20Navigation System
Getting Started
Map Screen Description
Zoom In/Out
Use the ZOOM buttons to change the
scale of the map. Zooming in increases
the detail, while zooming out gives you
a wide area view. After changing the
scale, give the system a few moments to
update the display.
Map Scrolling
To view other areas on the map, move
the joystick left, right, up, or down. The
map will shift in that direction. To
return the map to your current location,
press either the MAP/GUIDE, the
CANCEL , or the NAVI BACK button.
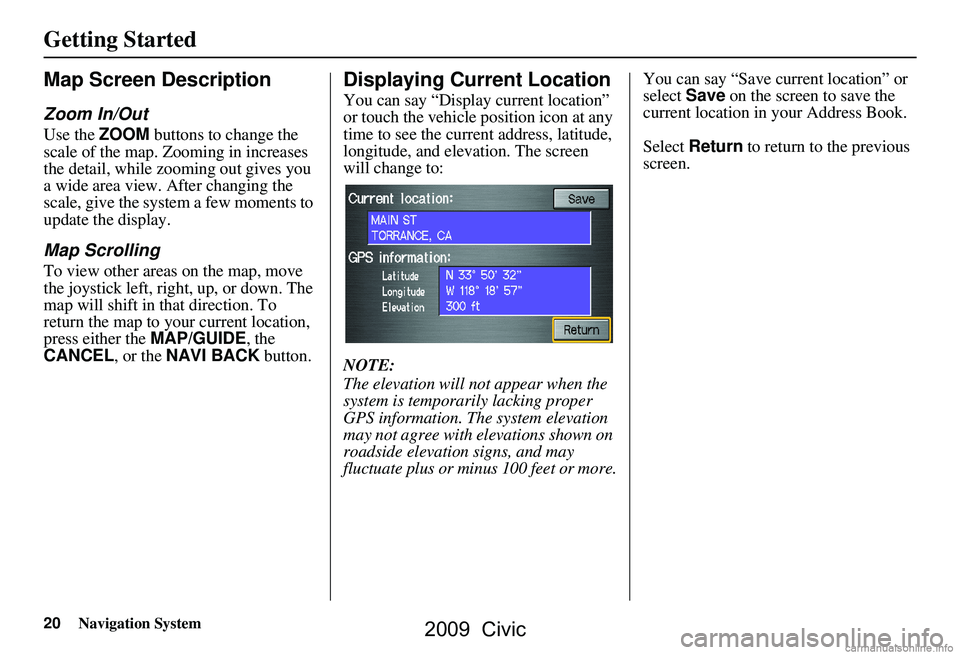
Displaying Current Location
You can say “Display current location”
or touch the vehicle position icon at any
time to see the current address, latitude,
longitude, and elevation. The screen
will change to:
NOTE:
The elevation will not appear when the
system is temporarily lacking proper
GPS information. The system elevation
may not agree with elevations shown on
roadside elevation signs, and may
fluctuate plus or minus 100 feet or more. You can say “Save current location” or
select
Save on the screen to save the
current location in your Address Book.
Select Return to return to the previous
screen.
2009 Civic
Page 54 of 151
54Navigation System
Driving to Your Destination
Map Scale
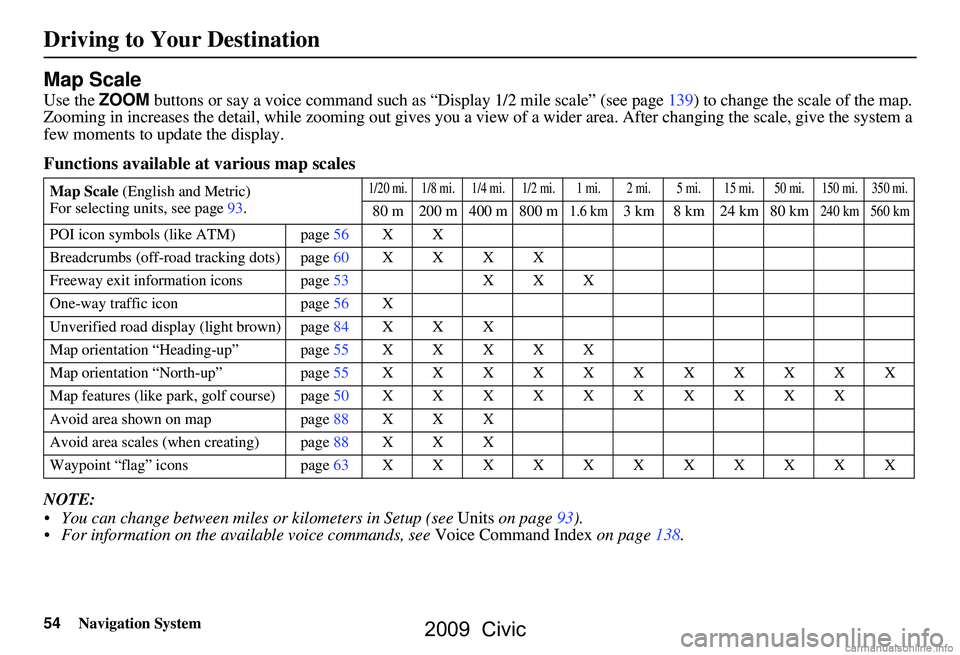
Use the ZOOM buttons or say a voice command such as “Display 1/2 m ile scale” (see page139) to change the scale of the map.
Zooming in increases the detail, while zooming out gives you a vi ew of a wider area. After changing the scale, give the system a
few moments to update the display.
Functions available at various map scales
NOTE:
You can change between miles or kilometers in Setup (see Units on page
93 ).
For information on the available voice commands, see Voice Command Index on page138.
Map Scale (English and Metric)
For selecting uni ts, see page
93.1/20 mi. 1/8 mi. 1/4 mi. 1/2 mi. 1 mi. 2 mi. 5 mi. 15 mi. 50 mi. 150 mi. 350 mi.
80 m 200 m 400 m 800 m1.6 km3 km 8 km 24 km 80 km240 km 560 km
POI icon symbols (like ATM) page 56 X X
Breadcrumbs (off-road tracking dots)page60XXXX
Freeway exit information icons page
53 X X X
One-way traffic icon page
56 X
Unverified road display (light brown) page
84 X X X
Map orientation “Heading-up” page55XXXXX
Map orientation “North-up” page55XXXXXXXXXXX
Map features (like park, golf course)page50XXXXXXXXXX
Avoid area shown on map page
88 X X X
Avoid area scales (w hen creating) page
88 X X X
Waypoint “flag” icons page
63 XXXXXXXXXXX
2009 Civic
Page 74 of 151
74Navigation System
System Setup
Setup Mode
The Setup function consists of two
different screens that allow you to
change and update information in the
system. To display the Setup screens,
use the voice control system and say
“Setup” or press the SETUP button. To
change to another Setup screen, say or
select More in the upper right corner of
the screen.
On any of the Setup screens, you can
use the voice control system to select
any item on the screen.
NOTE:
If some items appear to be grayed out and cannot be selected, it is because
you did not select OK on the initial
Disclaimer screen. See System Start-
up on page16.
For information on the available voice commands, see Voice
Command Index on page138.
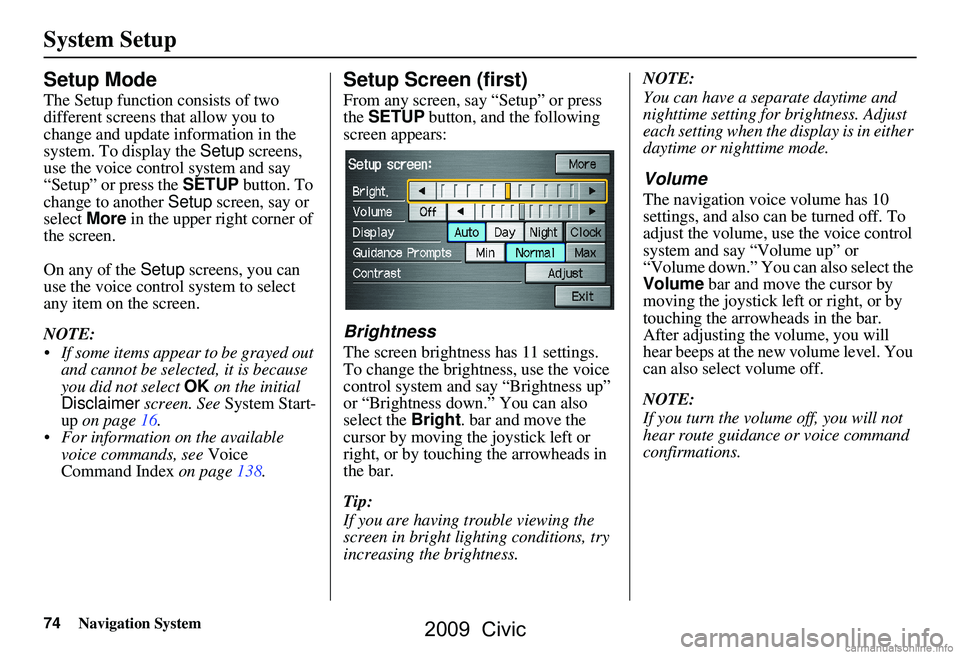
Setup Screen (first)
From any screen, say “Setup” or press
the SETUP button, and the following
screen appears:
Brightness
The screen brightness has 11 settings.
To change the brightness, use the voice
control system and say “Brightness up”
or “Brightness down.” You can also
select the Bright. bar and move the
cursor by moving the joystick left or
right, or by touching the arrowheads in
the bar.
Tip:
If you are having trouble viewing the
screen in bright li ghting conditions, try
increasing the brightness. NOTE:
You can have a separate daytime and
nighttime setting for brightness. Adjust
each setting when the display is in either
daytime or nighttime mode.
Volume
The navigation voice volume has 10
settings, and also can be turned off. To
adjust the volume, us
e the voice control
system and say “Volume up” or
“Volume down.” You can also select the
Volume bar and move the cursor by
moving the joystick left or right, or by
touching the arrowh eads in the bar.
After adjusting the volume, you will
hear beeps at the new volume level. You
can also select volume off.
NOTE:
If you turn the volume off, you will not
hear route guidance or voice command
confirmations.
2009 Civic
Page 93 of 151
Navigation System93
System Setup
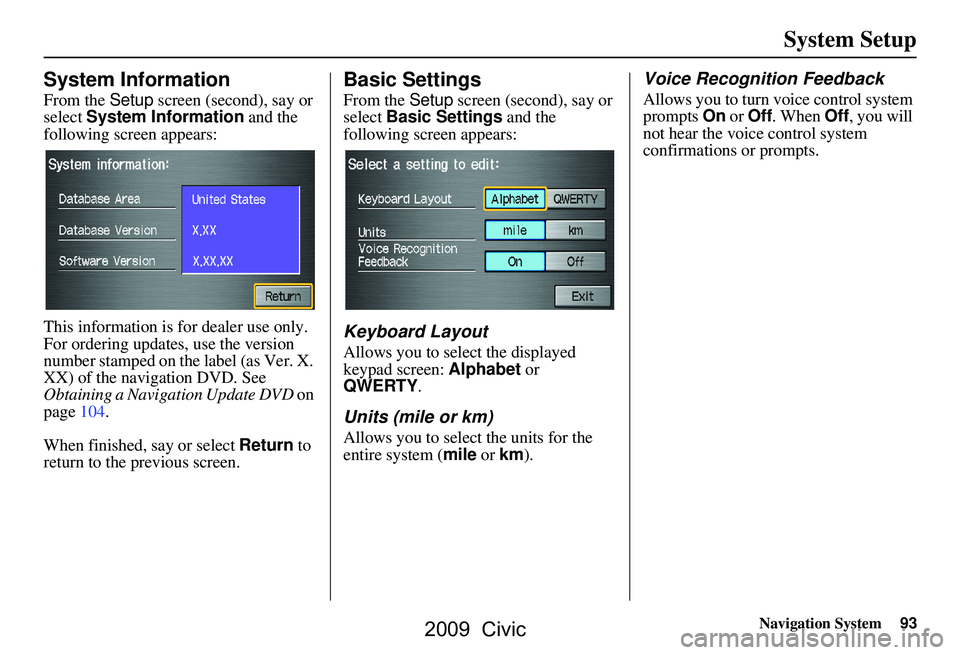
System Information
From the Setup screen (second), say or
select System Information and the
following screen appears:
This information is for dealer use only.
For ordering updates, use the version
number stamped on the label (as Ver. X.
XX) of the navigation DVD. See
Obtaining a Navigation Update DVD on
page104.
When finished, say or select Return to
return to the previous screen.
Basic Settings
From the Setup screen (second), say or
select Basic Settings and the
following screen appears:
Keyboard Layout
Allows you to select the displayed
keypad screen: Alphabet or
QWERTY .
Units (mile or km)
Allows you to select the units for the
entire system ( mile or km).
Voice Recognition Feedback
Allows you to turn voice control system
prompts On or Off . When Off, you will
not hear the voice control system
confirmations or prompts.
2009 Civic
Page 101 of 151
Navigation System101
Database Limitations
You will find that some points of
interest (POI) may be missing when you
search the database. This can be caused
if at the time the database was gathered,
the name was misspelled, the place was
improperly categorized, or the POI
change is not yet in the database. This
means you may not find places listed
that you know exist. This is also true for
police agencies and hospitals. In
outlying areas, facilities listed may not
be the closest. Always check with local
information sources if you need law
enforcement or hospital services.
Every effort has been made to verify
that the system’s database was accurate
at the time it was created. However,
businesses do close or relocate, and new
businesses start in the old locations. For
this reason, you may occasionally find
inaccurate information when you select
and drive to a point of interest (for
example, a restaurant is now a jewelry
store). The number of these inaccuracies
increases the longer you go without an
update. The digitized map database reflects
conditions as they existed at various
points in time before production.
Accordingly, your
DVD may contain
inaccurate or inco mplete data or
information due to the passage of time,
road construction, ch anging conditions,
or other causes.
Due to ongoing software and database
improvements, navigation disc versions
may change in the middle of a
production year. The version shipped
with your vehicle was the most recent
available at the time of production and
is considered standard equipment for
that vehicle. There is no free program to
retrofit early production vehicles with
the latest disc. For DVD ordering
information, see page104. In addition, this database does not
include, analyze, proc
ess, consider, or
reflect any of the following categories
of information:
Neighborhood quality or safety
Population density
Availability or proximity of law enforcement
Emergency, rescue, medical, or other assistance
Construction work, zones, or hazards
Road and lane closures
Legal restrictions (such as vehicular type, weight, load, height, and speed
restrictions)
Road slope or grade
Bridge height, width, weight, or other limits
Road traffic, safety, or conditions
Weather conditions
Special events
Pavement characteristics or conditions
2009 Civic
Page 103 of 151
Navigation System103
Customer Assistance
Reporting Errors
Occasionally, you may encounter
database errors.
If the error pertains to freeways and
main “verified” roads shown in black
on the map, then report it either
online at
http://update.navteq.com/ , or to
Honda Customer Service.
If the error involves a light brown “unverified” road, then do not report
it. These areas have not been verified,
and are provided for reference only
(see Map Overview on page6).
For errors in points of interest (POI), like a business that has changed its
name, do not report them. Keep in
mind that depending on when the data
was collected and when your DVD
was purchased, the database can be
out of date. The business may have
not reported the change(s), or not be
in the database at all. Update
Navigation DVDs are available for
purchase, usually in the fall of each
year. If the error does not involve the
database, such as vehicle position
icon errors, screen error messages, or
other GPS-related errors, see
Frequently Asked Questions on
page123, System Limitations on
page99, or Troubleshooting on
page133.
Honda Automobile
Customer Service
Telephone: (800) 999-1009
Fax: (310) 783-3273
Mail:
Honda Navi
America Honda Motor Co., Inc.
Honda Customer Service
MS 500-2N-7A
1919 Torrance Blvd.
Torrance, CA 90501-2746
2009 Civic
Page 104 of 151
104Navigation System
Customer Assistance
Visiting Your Dealer
We strive to make this manual as
complete as possible and to answer all
questions regarding operation of the
system. Occasionally, you may run into
a specific issue that you cannot find in
the book. You may save yourself a trip
to the dealer by fi rst consulting the
following resources:
The Troubleshooting section (see page133).
The Frequently Asked Questions (FAQs) section (see page123).
The FAQs found on the online DVD order site (see “Obtaining a DVD”).
For detailed questions regarding audio or other systems that interact
with the navigation system, see the
main vehicle Owner’s manual or the
Quick Start Guide. Call Honda Customer Relations (see
“Honda Automobile Customer
Service” on page103).
For database or PO I issues, follow the
guidelines in the “Reporting Errors”
section (see page103).
If your question is still unanswered and
you wish to visit the dealer, please be
prepared to demonstrate the issue to the
service advisor. This way, the service
advisor can document the issue for the
factory to allow more efficient
troubleshooting.
Some issues may at first seem random,
but you may notice a pattern. For
example, they only occur when you
enter a specific address, or when driving
on a certain road, or just when it is cold.
This information is very useful to the
service advisor. Be patient, the service
advisor may be unfamiliar with your
specific issue.
Obtaining a Navigation
Update DVD
Honda is continually expanding the
scope of the navigation system.
Upgraded software may be made
available to navigation system owners
periodically, usually in the fall of each
year.
To purchase an updated DVD or a
replacement DVD, call the Honda
Navigation Disc Fulfillment Center at
(888) 291-4675. You can also order
online by going to
www.hondanavi.com.
NOTE:
DVDs are not available at your dealer. However, the dealer may
order a DVD for you as a courtesy.
There is no program for free DVD
updates.
The DVD order line staff cannot answer technical questions regarding
navigation operation, coverage, or
POIs.
Purchasing used discs from alternate sources or online auctions may cause
operational problems since they are
likely to be incompatible with your
current software.
2009 Civic
Page 108 of 151
108Navigation System
Coverage Areas
Map Coverage
The system provides map coverage for
the lower 48 U.S. states, Hawaii, and
southern Canada. The U.S. map
coverage consists of accurately mapped
(verified) metropolitan areas (in the
following list) and a less accurate
(unverified) rural database. Canada
coverage consists of major metropolitan
areas and major roads connecting the
metropolitan areas within about 100
miles north of the U.S. border. If you
need additional northern Canada
coverage, you may purchase the
Canadian DVD (see Obtaining a
Navigation Update DVD on page104).
See Map Overview on page6 for a
discussion of map coverage.
The cities and metropolitan areas in the
following list are fully mapped. Only
major streets, roads, and freeways have
been verified outside these areas. If your
route passes through these areas, routing
may be limited, depending on your
routing choices. See Unverified Area
Routing on page84. If you desire additional map coverage
information, contact Honda Customer
Services or go to
www.hondanavi.com.
U.S. Detailed Coverage Areas
Alabama
Birmingham/Tuscaloosa
Huntsville
Mobile
Montgomery
Arizona Phoenix Metro
Sedona
Tucson
Yuma
Arkansas Fayetteville
Fort Smith
Hot Springs
Little Rock
California Central Valley - including Fresno, Merced, Modesto, and Stockton
Humboldt
Los Angeles/San Diego Metro
Mammoth Lakes
Sacramento Metro San Francisco Bay
(approximately
Monterey to Sonoma) – including
Monterey County and Hollister
Southern California Area - including
Bakersfield and San Luis Obispo
Yuba
Colorado Denver/Boulder/Colorado Springs/ Ski Resorts Metro area – including
Ft. Collins
Grand Junction
Connecticut Bridgeport
Danbury
Hartford Metro
New Haven Metro
Norwalk
Stamford
Delaware Entire state – including Dover,
Wilmington Metro area, New
Castle County
2009 Civic