HONDA CIVIC SEDAN 2011 Navigation Manual (in English)
Manufacturer: HONDA, Model Year: 2011, Model line: CIVIC SEDAN, Model: HONDA CIVIC SEDAN 2011Pages: 154, PDF Size: 6.2 MB
Page 11 of 154
10Navigation System
Getting Started
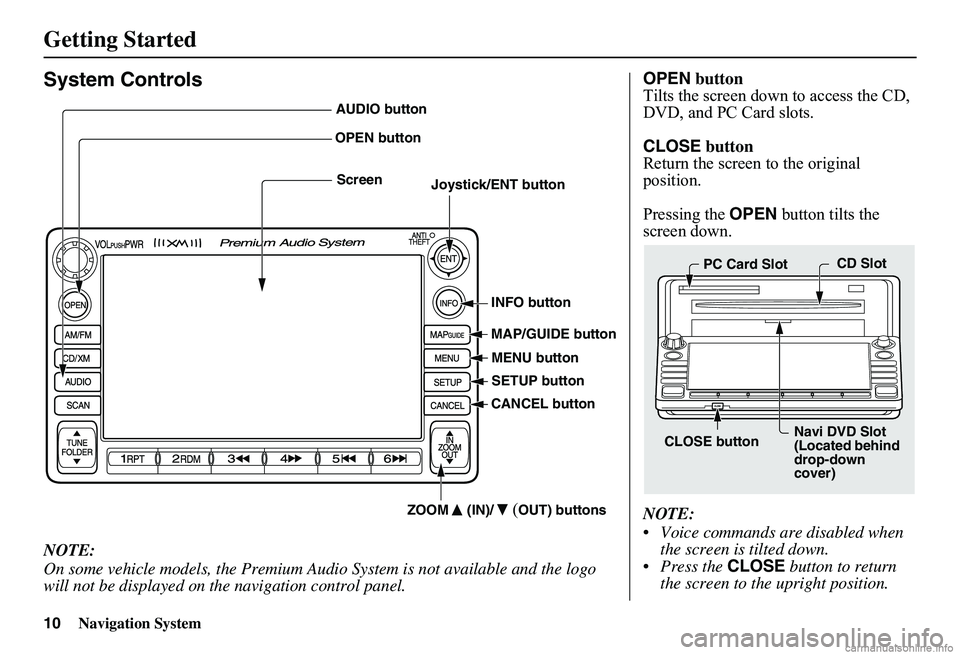
System Controls
NOTE:
On some vehicle models, the Premium Audio System is not available and the logo will not be displayed on the navigation control panel.
Joystick/ENT button
MAP/GUIDE button
CANCEL button
Screen
MENU button
INFO button
AUDIO button
OPEN button
ZOOM (IN)/(OUT) buttons
SETUP button
OPEN button Tilts the screen down to access the CD, DVD, and PC Card slots.
CLOSE button Return the screen to the original position.
Pressing the OPEN button tilts the screen down.
NOTE:
Voice commands are disabled when the screen is tilted down. Press the CLOSE button to return the screen to the upright position.
CLOSE button Navi DVD Slot (Located behind drop-down cover)
PC Card Slot CD Slot
Page 12 of 154
Navigation System11
Getting Started
Joystick/ENT button Moves left, right, up, and down to move the highlighting around the display, to scroll through lists, or to look around a displayed map. After making a selection in a menu or list, push in on the joystick to enter the selection into the system.In almost all cases, you can enter a selection into the system by using the voice control system , highlighting the item and pushing in on the joystick, or by touching the appropriate item you wish to select.
INFO button Displays the screen for selecting Cellular Phonebook , Voice Command Help , Map Legend, Calendar , and Calculator. See page 70.
MAP/GUIDE button Displays the map. When en route, switches between the map, guidance, and Direction list screens. See page 19 or 51.
MENU button Displays the Enter destination by screen. When en r oute, displays the Change route by screen.
SETUP button Displays the Setup screens where you can customize information in the system. See page 75.
CANCEL button Cancels the current sc reen and returns to the previous screen display.
NOTE:
The NAVI BACK button on the steering wheel performs the same basic function.
ZOOM (IN)/ (OUT) buttons Press ZOOM to zoom in (to show more detail), or ZOOM to zoom out (to show more area and less detail) while a map screen is displayed. ZOOM IN reduces the scale (showing less area with greater detail). ZOOM OUT increases the scale (showing more area with less detail).
AUDIO button Press to display the audio screen. For information on audio system features, see the Audio section of your Owner’s Manual.
Other buttons See the Audio section of your Owner's Manual.
Screen All selections and instructions are displayed on the screen. In addition, the display is a “touch screen” – you can enter information into the system by touching the images (icons) on the screen with your finger.
For example, if you need to enter a street name, a keyboard will be displayed. You can type in the street name by saying or selecting the individual character s on the screen.
Clean the screen with a soft damp cloth. You may use a mild cleaner intended for use on liquid crystal displays (LCDs). Harsher chemicals may damage the screen.
Page 13 of 154
12Navigation System
Getting Started
Voice Control Basics
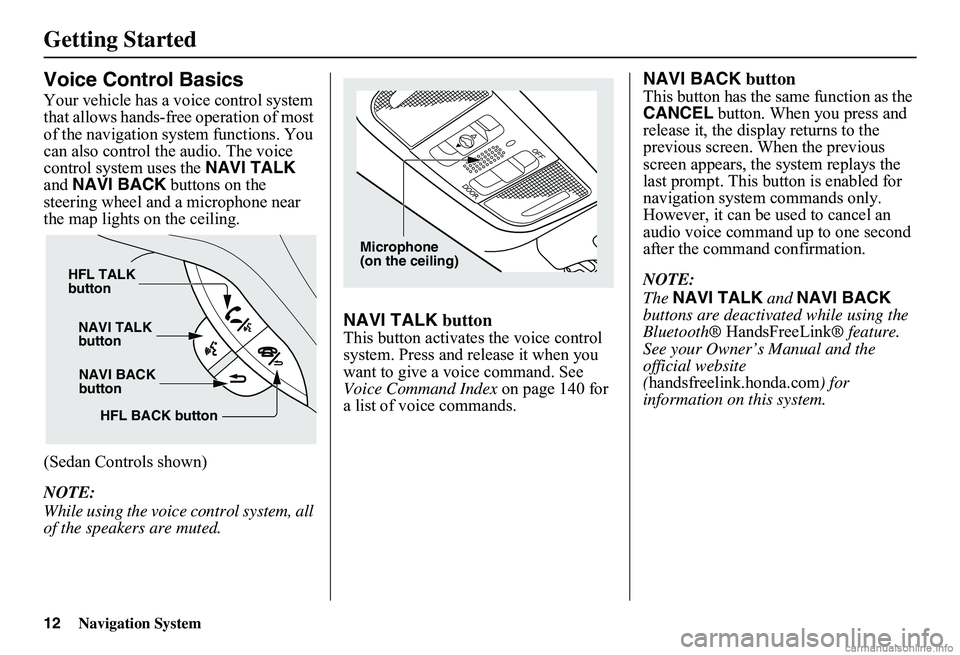
Your vehicle has a voice control system that allows hands-free operation of most of the navigation system functions. You can also control th e audio. The voice control system uses the NAVI TALK and NAVI BACK buttons on the steering wheel and a microphone near the map lights on the ceiling.
(Sedan Controls shown)
NOTE:
While using the voice control system, all of the speakers are muted.
NAVI TALK button
This button activates the voice control system. Press and release it when you want to give a voice command. See Voice Command Index on page 140 for a list of voice commands.
NAVI BACK button
This button has the same function as the CANCEL button. When you press and release it, the disp lay returns to the previous screen. When the previous screen appears, the system replays the last prompt. This button is enabled for navigation system commands only. However, it can be used to cancel an audio voice command up to one second after the command confirmation.
NOTE:
The NAVI TALK and NAVI BACK buttons are deactivated while using the Bluetooth® HandsFreeLink® feature. See your Owner’s Manual and the official website ( handsfreelink.honda.com) for information on this system.
NAVI BACK button
NAVI TALK button
HFL TALK button
HFL BACK button
Microphone (on the ceiling)
Page 14 of 154
Navigation System13
Getting Started
Using the Voice Control System
You should use the voice control system as much as possible, and consider manual entry using the joystick as a backup method of entry.
Most of the system’s functions can be controlled by voice commands activated with the NAVI TALK button. To control the navigation system by voice:
• Press and release the NAVI TALK button.
• Wait for the beep.
• Give a voice command.
Once the microphone picks up your command, the system changes the display in response to the command and prompts you for the next command. Using the NAVI TALK button, answer the prompts as required.
If the system does not understand a command or you wait too long to give a command, it responds with “Pardon,” “Please repeat,” or “Would you say again.” If the system cannot perform a command or the command is not appropriate for the screen you are on, it sounds a beep.
Anytime you are unsure of what voice commands are available on a screen, you can always say “Help.” The system will then read the list of available commands to you.
When you give a command, the system generally either repeats the command as a confirmation or asks you for further information. If you do not wish to hear this feedback, you can turn it off. However, hearing the feedback will familiarize you with the way the system expects commands to be phrased. See the Voice Recognition Feedback setting in Setup.
If you hear a prompt such as “Please use the touch screen to...” or “Please choose an area with the joystick,” the system is asking for input that cannot be performed using the voice control system.
Improving Voice Recognition
To achieve optimum voice recognition when using either the navigation or Bluetooth ® HandsFreeLink® voice control system, the following guidelines should be followed:
NOTE:
Make sure the correct screen is displayed for the vo ice command that you are using. See Voice Command Index on page 140.
• Adjust the dashboard and side vents so air does not blow against the microphone on the ceiling.
• Close the windows and the sunroof.
• If more than one person is speaking at the same time, the system may misinterpret your command.
Page 15 of 154
14Navigation System
Getting Started
• After pressing and releasing the NAVI TALK button, wait for the beep, then give a voice command.
• Give a voice command in a clear, natural speaking voice without pausing between words.
• If the system cannot recognize your command because of background noise, speak louder.
• If you are still having trouble with the voice control sy stem, refer to Voice Command Help on the Information screen.
Selecting an Item (Button)
on the Screen
On most screens, there are items that can be selected (like buttons with titles such as OK or Return). To select an item on any screen, do one of the following:
• Use the voice control system and say the name of the desired item. Almost all selectable items on the screen, including some listed items, are recognized by the voice control system.
• Touch the desired item on the screen.
• Move the highlighting to the desired item with the joystick, then push in on the joystick.
Tip:
If items are grayed out, this means that they cannot be selected.
Selecting an Item in a List
To scroll through a list, do one of the following:
• Use the joystick to scroll through the list item by item.
• Use the voice control system and say “Next” or “Previous” or use the “on-screen” scroll up or down buttons, or the ZOOM buttons to scroll through the list page by page.
If you cannot find the desired name, or have made an error, return to the previous screen by pressing the CANCEL or the NAVI BACK button on the steering wheel.
To select the desired item in the list, do one of the following:
• Use the voice control system, and say the item number of the desired item.
• Touch the item on the screen.
• Use the joystick to move the highlighting to the it em, then push in on the joystick.
Page 16 of 154
Navigation System15
Getting Started
Using the On-screen
Keyboard
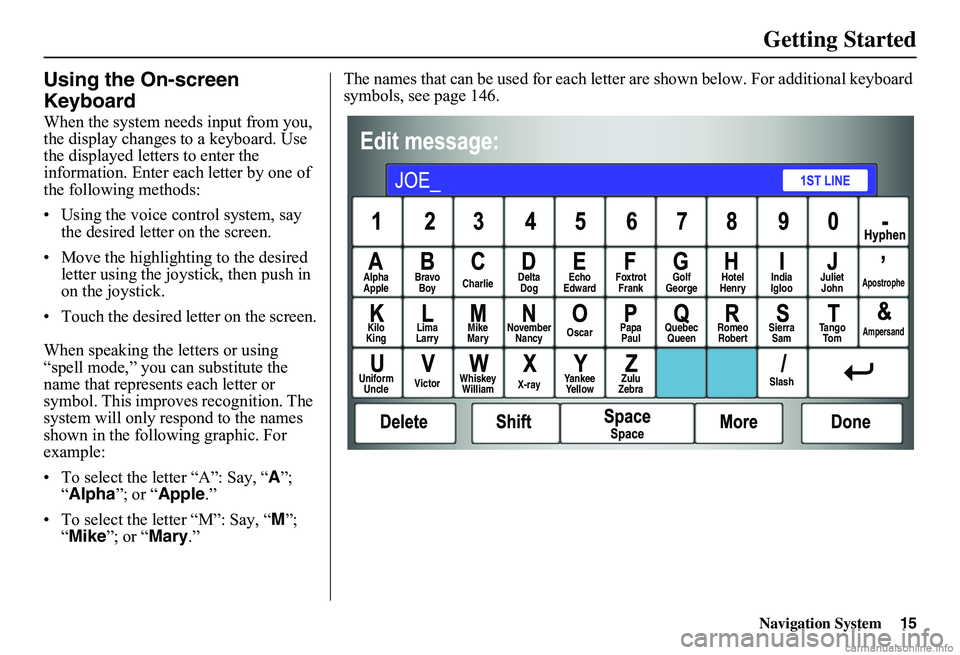
When the system needs input from you, the display changes to a keyboard. Use the displayed letters to enter the information. Enter each letter by one of the following methods:
• Using the voice control system, say the desired letter on the screen.
• Move the highlighting to the desired letter using the joystick, then push in on the joystick.
• Touch the desired le tter on the screen.
When speaking the letters or using “spell mode,” you can substitute the name that represents each letter or symbol. This improves recognition. The system will only re spond to the names shown in the following graphic. For example:
• To select the letter “A”: Say, “ A”; “ Alpha”; or “Apple.”
• To select the letter “M”: Say, “ M”; “ Mike”; or “Mary.”
The names that can be used for each lette r are shown below. For additional keyboard symbols, see page 146.
AlphaApple Bravo Boy Charlie Delta Dog Echo Edward Foxtrot Frank Golf George Hotel Henry Juliet JohnApostrophe
KiloKing Lima Larry Mike Mary November Nancy Oscar Papa Paul Quebec Queen Romeo Robert Sierra Sam Ta n g o To mAmpersand
UniformUncle Victor Whiskey William X-ray Yankee Ye l l o w Zulu Zebra Slash
India Igloo
Page 17 of 154
16Navigation System
Getting Started
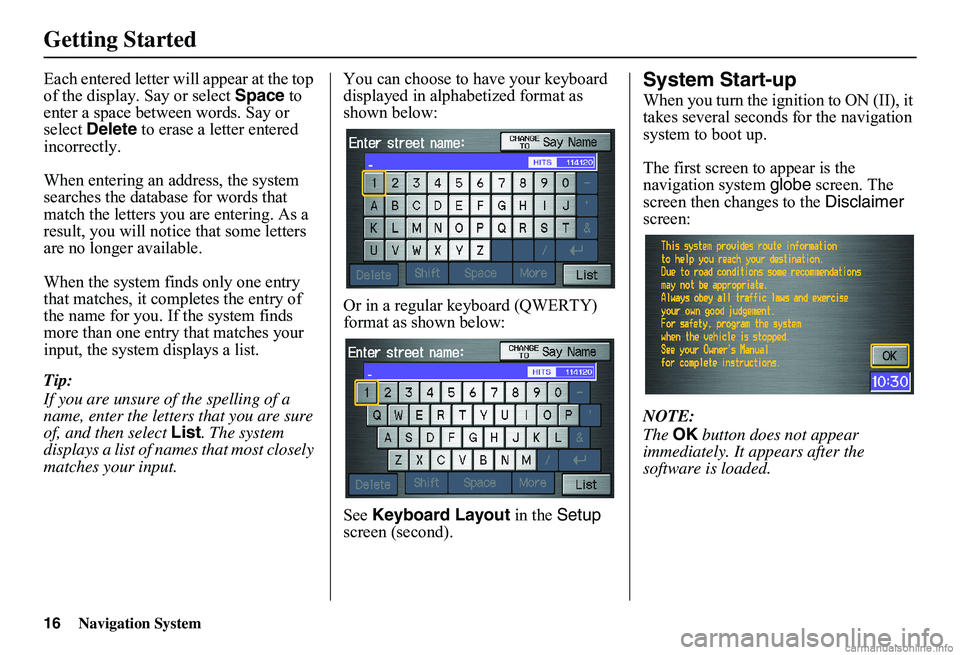
Each entered letter will appear at the top of the display. Say or select Space to enter a space between words. Say or select Delete to erase a letter entered incorrectly.
When entering an address, the system searches the database for words that match the letters you are entering. As a result, you will notice that some letters are no longer available.
When the system finds only one entry that matches, it completes the entry of the name for you. If the system finds more than one entry that matches your input, the system displays a list.
Tip:
If you are unsure of the spelling of a name, enter the lette rs that you are sure of, and then select List. The system displays a list of names that most closely matches your input.
You can choose to have your keyboard displayed in alphabetized format as shown below:
Or in a regular keyboard (QWERTY) format as shown below:
See Keyboard Layout in the Setup screen (second).
System Start-up
When you turn the i gnition to ON (II), it takes several seconds for the navigation system to boot up.
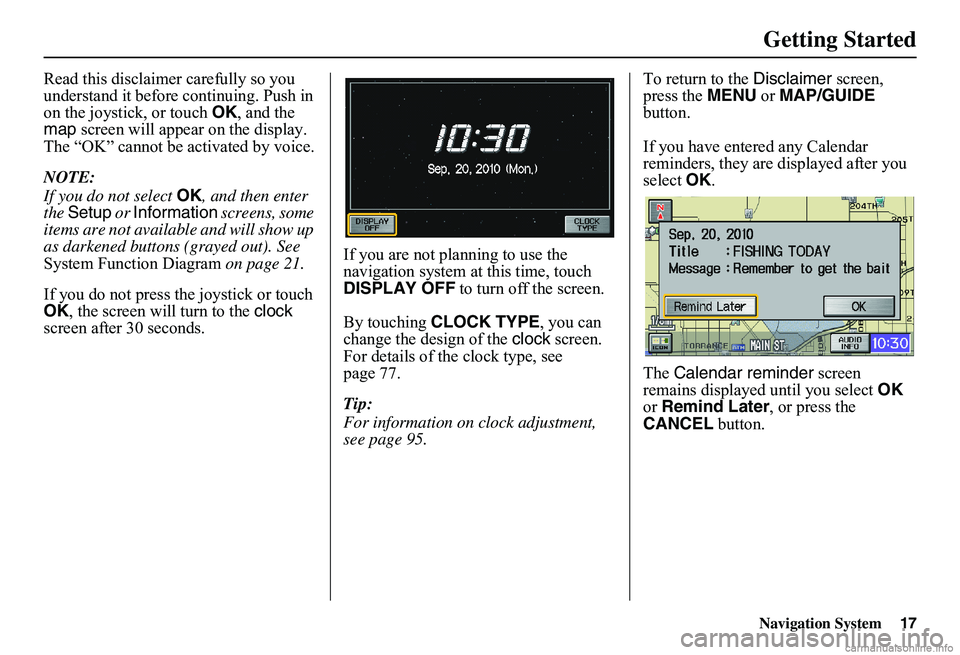
The first screen to appear is the navigation system globe screen. The screen then changes to the Disclaimer screen:
NOTE:
The OK button does not appear immediately. It appears after the software is loaded.
Page 18 of 154
Navigation System17
Getting Started
Read this disclaimer carefully so you understand it before continuing. Push in on the joystick, or touch OK, and the map screen will appear on the display. The “OK” cannot be activated by voice.
NOTE:
If you do not select OK, and then enter the Setup or Information screens, some items are not available and will show up as darkened buttons (grayed out). See System Function Diagram on page 21.
If you do not press the joystick or touch OK , the screen will turn to the clock screen after 30 seconds.
If you are not planning to use the navigation system at this time, touch DISPLAY OFF to turn off the screen.
By touching CLOCK TYPE, you can change the design of the clock screen. For details of the clock type, see page 77.
Tip:
For information on clock adjustment, see page 95.
To return to the Disclaimer screen, press the MENU or MAP/GUIDE button.
If you have entered any Calendar reminders, they are displayed after you select OK.
The Calendar reminder screen remains displayed until you select OK or Remind Later, or press the CANCEL button.
Page 19 of 154
18Navigation System
Getting Started
If you select OK, the reminder will not show up again. If you wish to have the reminder show up again later in the day, touch the Remind Later button.
If you press the CANCEL button, the message will be displayed the next time you start the vehicle.
NOTE:
The system will display the current message and any older or previously unread messages, with the newest message listed first.
Bluetooth® HandsFreeLink®
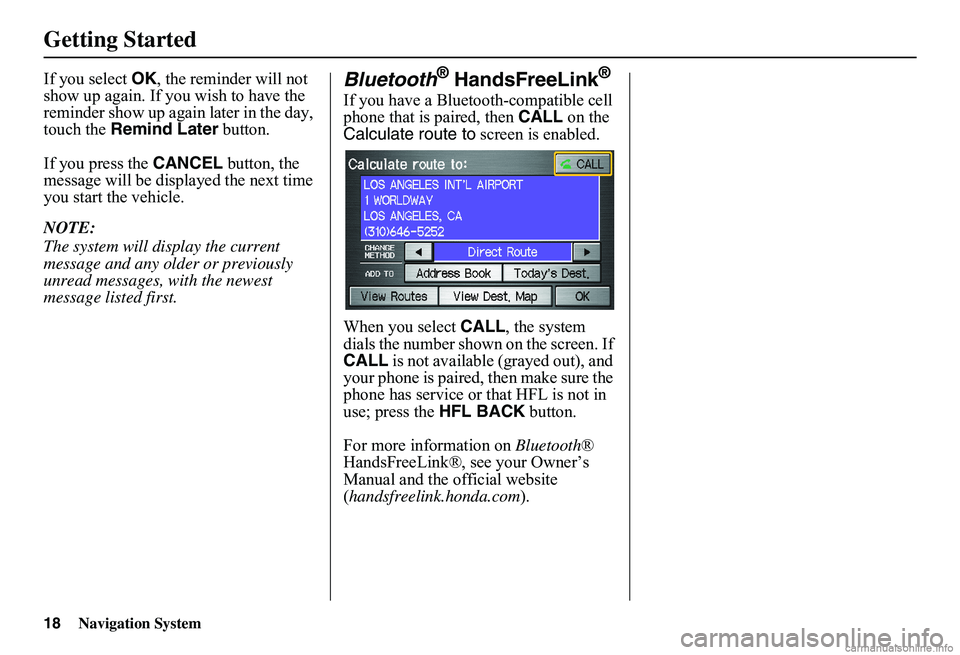
If you have a Bluetooth-compatible cell phone that is paired, then CALL on the Calculate route to screen is enabled.
When you select CALL, the system dials the number shown on the screen. If CALL is not available (grayed out), and your phone is paired, then make sure the phone has service or that HFL is not in use; press the HFL BACK button.
For more information on Bluetooth® HandsFreeLink®, see your Owner’s Manual and the official website ( handsfreelink.honda.com).
Page 20 of 154
Navigation System19
Getting Started
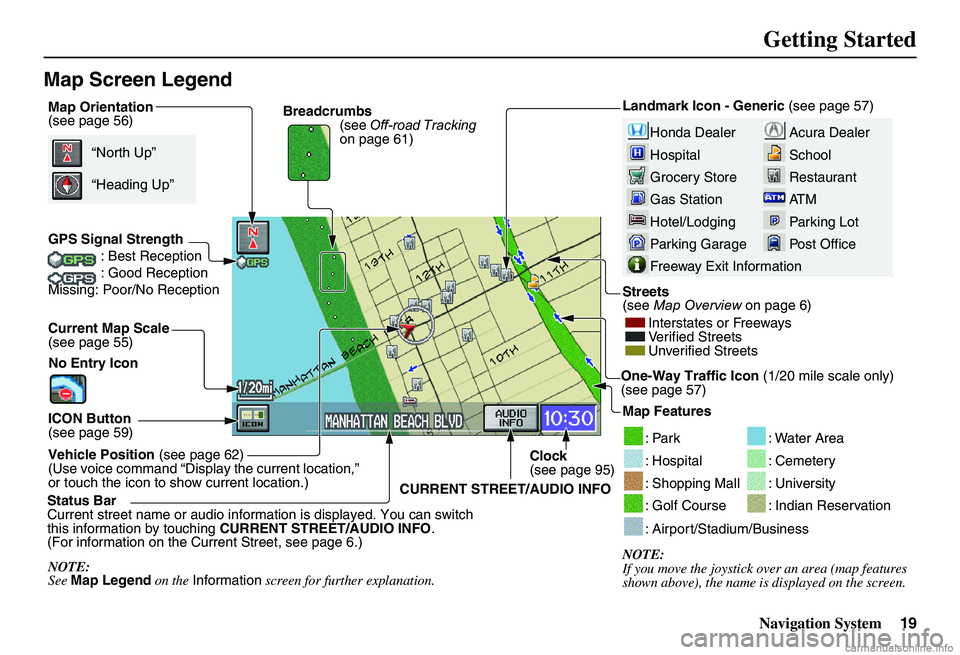
Map Screen Legend
Map Orientation (see page 56)
GPS Signal Strength : Best Reception: Good ReceptionMissing: Poor/No Reception
Current Map Scale (see page 55)
ICON Button (see page 59)
Vehicle Position (see page 62) (Use voice command “Display the current location,” or touch the icon to show current location.)
“North Up”
NOTE: See Map Legend on the Information screen for further explanation.
“Heading Up”
Breadcrumbs (see Off-road Tracking on page 61)Acura Dealer
School
Restaurant
AT M
Parking Lot
Post Office
Honda Dealer
Hospital
Grocery Store
Gas Station
Hotel/Lodging
Parking Garage
Freeway Exit Information
Streets (see Map Overview on page 6)
Interstates or Freeways Verified StreetsUnverified Streets
Landmark Icon - Generic (see page 57)
Map Features
NOTE: If you move the jo ystick over an area (map features shown above), the name is displayed on the screen.
: Par k
: Hospital
: Shopping Mall
: Golf Course
: Water Area
: Cemetery
: University
: Indian Reservation
: Airport/Stadium/Business
One-Way Traffic Icon (1/20 mile scale only) (see page 57)
Status Bar Current street name or audio inform ation is displayed. You can switch this information by touching CURRENT STREET/AUDIO INFO. (For information on the Current Street, see page 6.)
CURRENT STREET/AUDIO INFO
Clock (see page 95)
No Entry Icon