tow HONDA CIVIC SEDAN 2014 (in English) Owner's Guide
[x] Cancel search | Manufacturer: HONDA, Model Year: 2014, Model line: CIVIC SEDAN, Model: HONDA CIVIC SEDAN 2014Pages: 469, PDF Size: 21.06 MB
Page 360 of 469
359
uuMaintenance MinderTMuTo Use Maintenance MinderTM
Continued
Maintenance
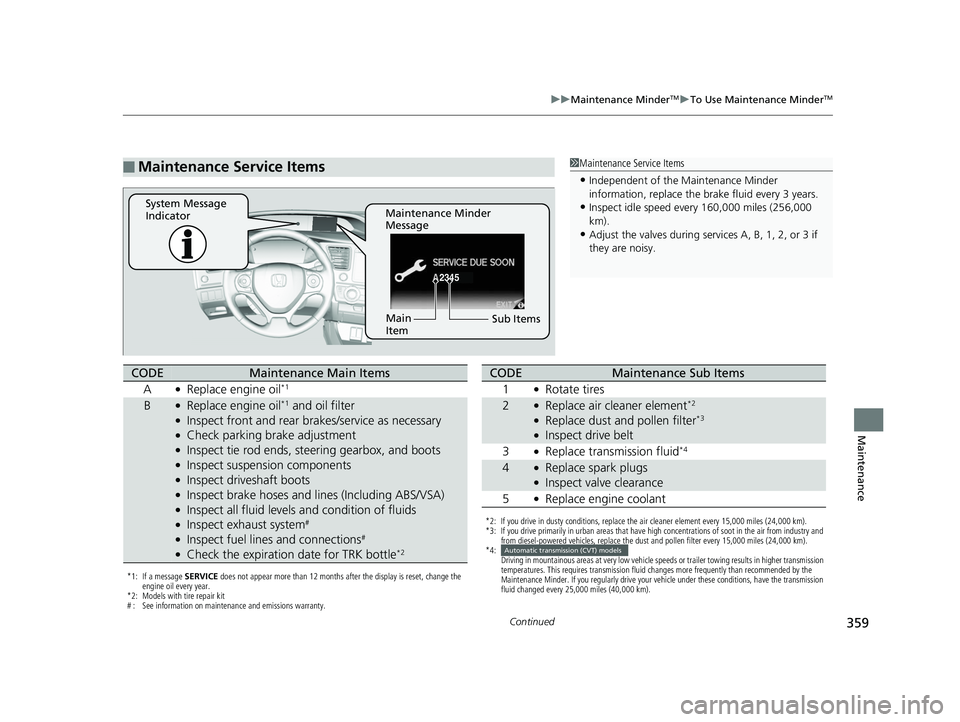
■Maintenance Service Items1Maintenance Service Items
•Independent of the Maintenance Minder
information, replace the brake fluid every 3 years.
•Inspect idle speed every 160,000 miles (256,000
km).
•Adjust the valves during services A, B, 1, 2, or 3 if
they are noisy.
2345
Maintenance Minder
Message
System Message
Indicator
Sub Items
Main
Item
*1: If a message
SERVICE does not appear more than 12 months after the display is reset, change the
engine oil every year.
*2: Models with tire repair kit
# : See information on maintenance and emissions warranty.
CODEMaintenance Main Items
A
●Replace engine oil*1
B●Replace engine oil*1 and oil filter●Inspect front and rear bra kes/service as necessary●Check parking brake adjustment●Inspect tie rod ends, steering gearbox, and boots●Inspect suspension components●Inspect driveshaft boots●Inspect brake hoses and li nes (Including ABS/VSA)●Inspect all fluid levels and condition of fluids●Inspect exhaust system#
●Inspect fuel lines and connections#
●Check the expiration date for TRK bottle*2
*2: If you drive in dusty conditions, replace the air cleaner element every 15,000 miles (24,000 km).
*3: If you drive primarily in urban areas that have high concentrations of soot in the air from industry and
from diesel-powered vehicles, replace the dust and pollen filter every 15,000 miles (24,000 km).
*4: Driving in mountainous areas at very low vehicle speeds or trailer towing results in higher transmission
temperatures. This requires transmission fluid changes more frequently than recommended by the
Maintenance Minder. If you regularly drive your vehicle under these conditions, have the transmission
fluid changed every 25,000 miles (40,000 km).
CODEMaintenance Sub Items
1
●Rotate tires
2●Replace air cleaner element*2
●Replace dust and pollen filter*3
●Inspect drive belt
3
●Replace transmission fluid*4
4●Replace spark plugs●Inspect valve clearance
5
●Replace engine coolant
Automatic transmission (CVT) models
14 CIVIC 4D_SI-31TR36210.book 359 ページ 2014年1月30日 木曜日 午後12時18分
Page 364 of 469
363
uuMaintenance Under the Hood uOpening the Hood
Maintenance
Opening the Hood
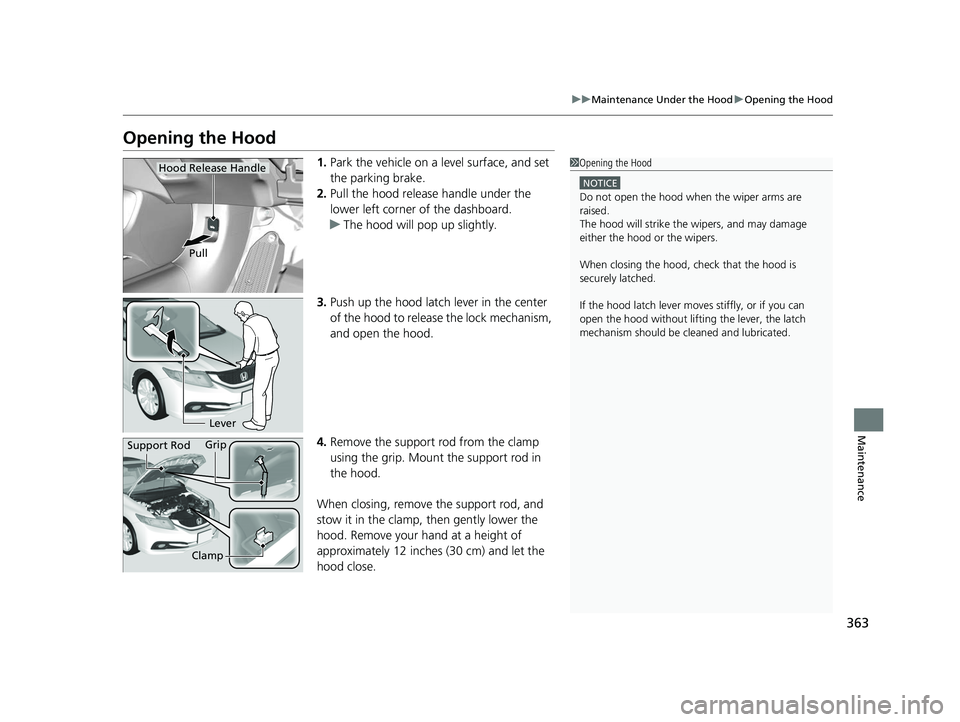
1. Park the vehicle on a level surface, and set
the parking brake.
2. Pull the hood release handle under the
lower left corner of the dashboard.
u The hood will pop up slightly.
3. Push up the hood latch lever in the center
of the hood to release the lock mechanism,
and open the hood.
4. Remove the support rod from the clamp
using the grip. Mount the support rod in
the hood.
When closing, remove the support rod, and
stow it in the clamp, then gently lower the
hood. Remove your hand at a height of
approximately 12 inches (30 cm) and let the
hood close.1 Opening the Hood
NOTICE
Do not open the hood when the wiper arms are
raised.
The hood will strike the wipers, and may damage
either the hood or the wipers.
When closing the hood, check that the hood is
securely latched.
If the hood latch lever moves stiffly, or if you can
open the hood without lifti ng the lever, the latch
mechanism should be cl eaned and lubricated.
Hood Release Handle
Pull
Lever
Support Rod Grip
Clamp
14 CIVIC 4D_SI-31TR36210.book 363 ページ 2014年1月30日 木曜日 午後12時18分
Page 366 of 469
365
uuMaintenance Under the Hood uOil Check
Continued
Maintenance
Oil Check
We recommend that you check the engine oil level every time you refuel.
Park the vehicle on level ground.
Wait approximately three minutes after turn ing the engine off before you check the
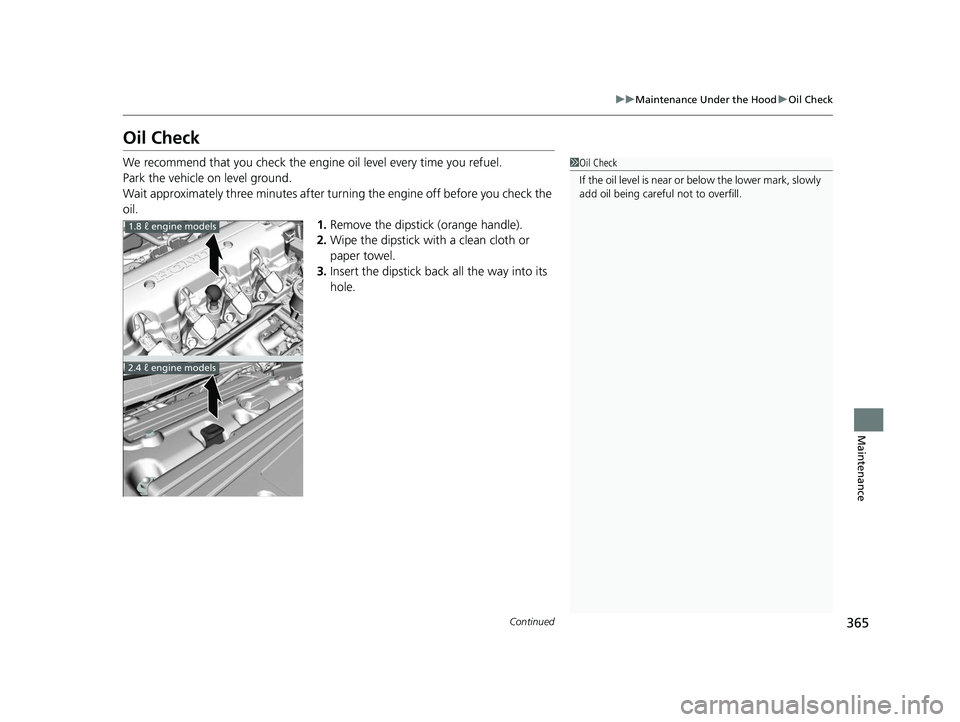
oil. 1.Remove the dipstick (orange handle).
2. Wipe the dipstick with a clean cloth or
paper towel.
3. Insert the dipstick back all the way into its
hole.1Oil Check
If the oil level is near or below the lower mark, slowly
add oil being careful not to overfill.
1.8 ℓ engine models
2.4 ℓ engine models
14 CIVIC 4D_SI-31TR36210.book 365 ページ 2014年1月30日 木曜日 午後12時18分
Page 377 of 469
376
Maintenance
Replacing Light Bulbs
Headlight Bulbs
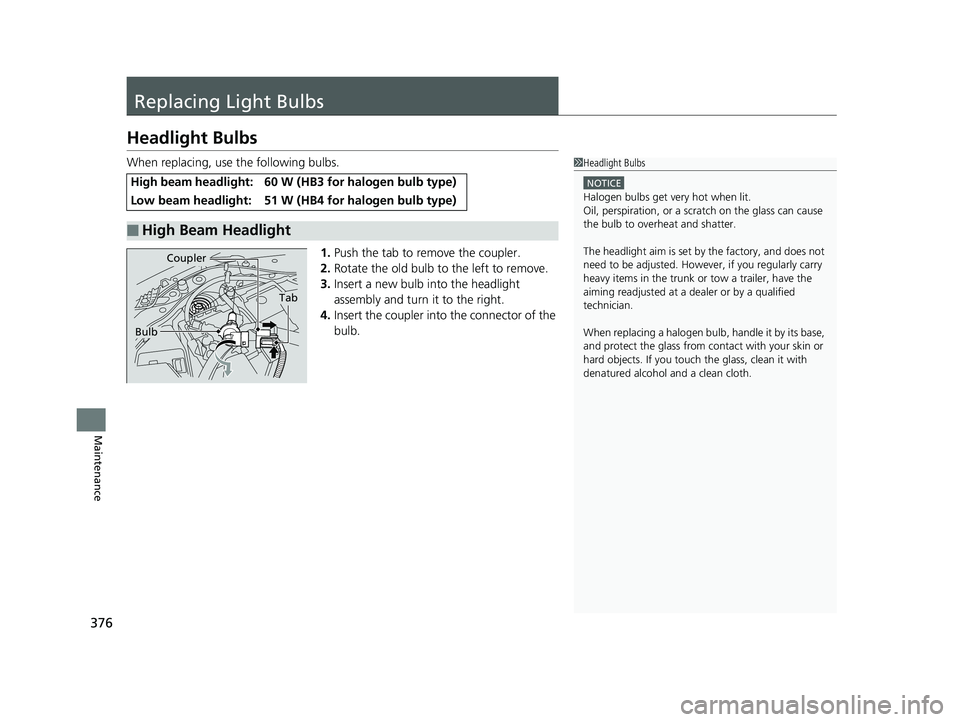
When replacing, use the following bulbs.1.Push the tab to remove the coupler.
2. Rotate the old bulb to the left to remove.
3. Insert a new bulb into the headlight
assembly and turn it to the right.
4. Insert the coupler into the connector of the
bulb.
High beam headlight: 60 W (HB3 for halogen bulb type)
Low beam headlight: 51 W (HB4 for halogen bulb type)
■High Beam Headlight
1Headlight Bulbs
NOTICE
Halogen bulbs get very hot when lit.
Oil, perspiration, or a scratch on the glass can cause
the bulb to overhe at and shatter.
The headlight aim is set by the factory, and does not
need to be adjusted. Howeve r, if you regularly carry
heavy items in the trunk or tow a trailer, have the
aiming readjusted at a de aler or by a qualified
technician.
When replacing a halogen bu lb, handle it by its base,
and protect the glass from c ontact with your skin or
hard objects. If you touch the glass, clean it with
denatured alcohol and a clean cloth.
Tab
Coupler
Bulb
14 CIVIC 4D_SI-31TR36210.book 376 ページ 2014年1月30日 木曜日 午後12時18分
Page 401 of 469
400
Maintenance
Battery
Checking the Battery
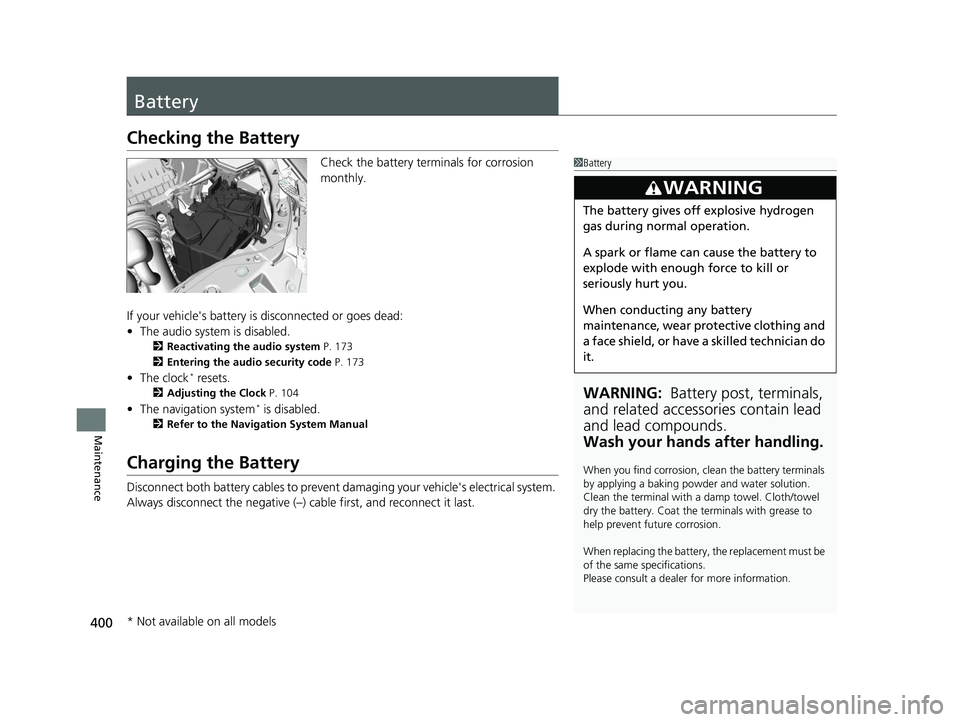
Check the battery terminals for corrosion
monthly.
If your vehicle's battery is disconnected or goes dead:
• The audio system is disabled.
2 Reactivating the audio system P. 173
2 Entering the audio security code P. 173
•The clock* resets.
2 Adjusting the Clock P. 104
•The navigation system* is disabled.
2 Refer to the Navigation System Manual
Charging the Battery
Disconnect both battery cables to prevent da maging your vehicle's electrical system.
Always disconnect the negative (–) cable first, and reconnect it last.
1 Battery
WARNING: Battery post, terminals,
and related accessories contain lead
and lead compounds.
Wash your hands after handling.
When you find corrosion, cl ean the battery terminals
by applying a baking powder and water solution.
Clean the terminal with a damp towel. Cloth/towel
dry the battery. Coat the terminals with grease to
help prevent future corrosion.
When replacing the battery, the replacement must be
of the same specifications.
Please consult a dealer for more information.
3WARNING
The battery gives off explosive hydrogen
gas during normal operation.
A spark or flame can cause the battery to
explode with enough force to kill or
seriously hurt you.
When conducting any battery
maintenance, wear prot ective clothing and
a face shield, or have a skilled technician do
it.
* Not available on all models
14 CIVIC 4D_SI-31TR36210.book 400 ページ 2014年1月30日 木曜日 午後12時18分
Page 410 of 469
409
Handling the Unexpected
This chapter explains how to handle unexpected troubles.
ToolsTypes of Tools .................................. 410
If a Tire Goes Flat Changing a Flat Tire ......................... 411
Temporarily Repairi ng a Flat Tire....... 418
Engine Does Not Start Checking the Engine ........................ 426
If the Smart Entry Remote Battery is Weak .......................................... 427
Emergency Engine Stop ................... 428
Jump Starting .................................... 429
Shift Lever Does Not Move .............. 432Overheating
How to Handle Overheating............. 433
Indicator, Coming On/Blinking
If the Low Oil Pressure Indicator Comes On ............................................. 435
If the Charging System Indicator Comes
On ................................................. 435
If the Malfunction Indicator Lamp Comes On or Blinks ................................... 436
If the Brake System Indicator (Red) Comes On .................................................... 437
If the Electric Power Steering (EPS) System
Indicator Comes On ............................. 437
If the Low Tire Pressure/TPMS Indicator Comes On or Blinks ....................... 438
Fuses Fuse Locations ................................. 439
Inspecting and Changing Fuses ........ 441
Emergency Towing ........................... 442
14 CIVIC 4D_SI-31TR36210.book 409 ページ 2014年1月30日 木曜日 午後12時18分
Page 419 of 469
418
uuIf a Tire Goes Flat uTemporarily Repairing a Flat Tire
Handling the Unexpected
Temporarily Repairing a Flat Tire
This vehicle is not equipped with a spare tire. If the tire has a large cut or is otherwise
severely damaged, you will need to have th e vehicle towed. If the tire only has a
small puncture, from a nail for instance, you can use the temporary tire repair kit so
that you can drive to the nearest service station for a more permanent repair.
If a tire goes flat while driving, grasp the steering wheel firmly, and brake gradually
to reduce speed. Then stop in a safe place.
1. Park the vehicle on firm, level, and non- slippery surface and apply the parking
brake.
2. Put the shift lever in
(P.
3. Turn on the hazard warning lights an d turn the ignition switch to LOCK (0*1.
u When towing a trailer, unhitch the trailer.
*1: Models with the smart entry system have an ENGINE START/STOP button instead of an
ignition switch.
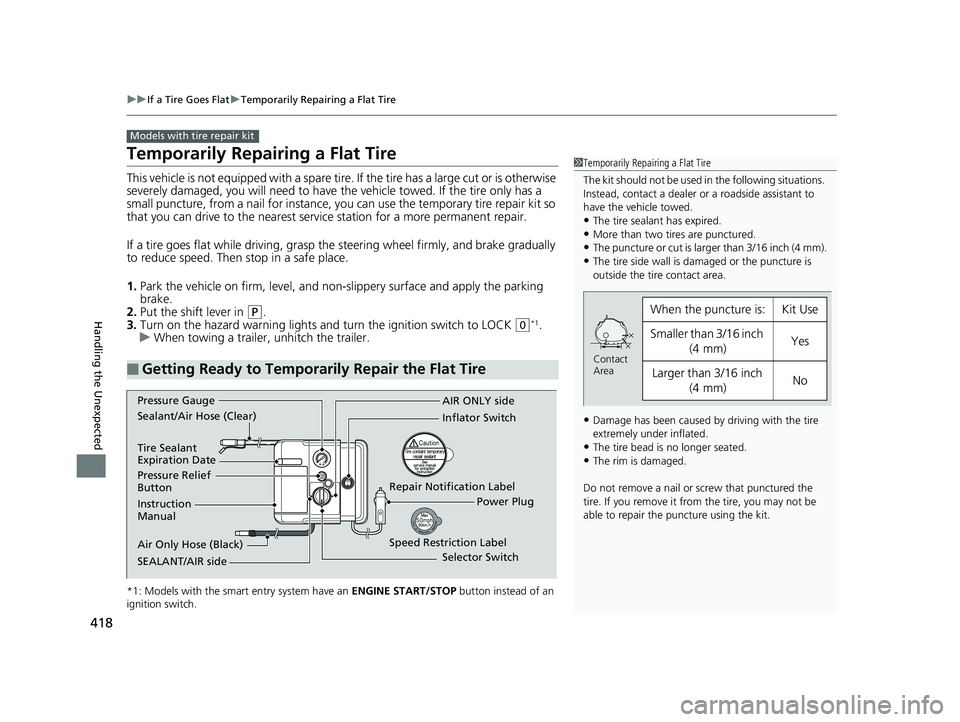
■Getting Ready to Temporarily Repair the Flat Tire
Models with tire repair kit
1 Temporarily Repairing a Flat Tire
The kit should not be used in the following situations.
Instead, contact a dealer or a roadside assistant to
have the vehicle towed.
•The tire sealant has expired.
•More than two tires are punctured.•The puncture or cut is larger than 3/16 inch (4 mm).
•The tire side wall is da maged or the puncture is
outside the tire contact area.
•Damage has been caused by driving with the tire
extremely under inflated.
•The tire bead is no longer seated.•The rim is damaged.
Do not remove a nail or screw that punctured the
tire. If you remove it from the tire, you may not be
able to repair the puncture using the kit.
When the puncture is:Kit Use
Smaller than 3/16 inch (4 mm)Yes
Larger than 3/16 inch (4 mm)No
Contact
Area
Instruction
Manual
Air Only Hose (Black) Speed Restriction Label Repair Notification Label
Pressure Relief
Button Inflator Switch
Selector Switch
SEALANT/AIR side Sealant/Air Hose (Clear) AIR ONLY side
Power Plug
Pressure Gauge
Tire Sealant
Expiration Date
14 CIVIC 4D_SI-31TR36210.book 418 ページ 2014年1月30日 木曜日 午後12時18分
Page 422 of 469
Continued421
uuIf a Tire Goes Flat uTemporarily Repairing a Flat Tire
Handling the Unexpected
4. Plug in the compressor to the accessory
power socket.
u Be careful not to pinch the cord in a
door or window.
5. Start the engine.
u Keep the engine running while injecting
sealant and air.
2 Carbon Monoxide Gas P. 64
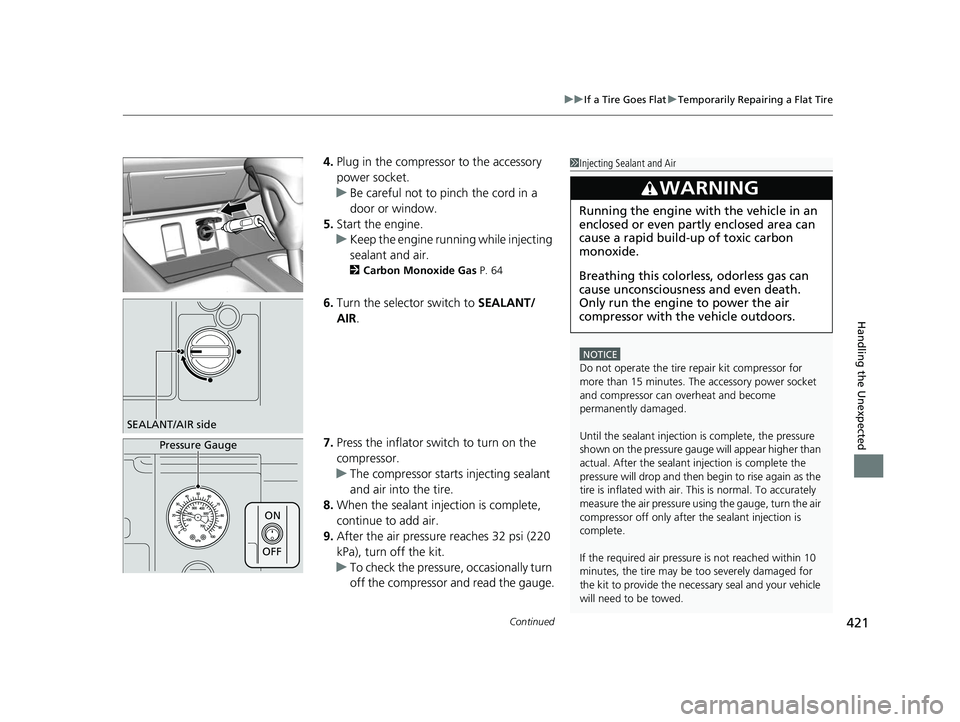
6.Turn the selector switch to SEALANT/
AIR .
7. Press the inflator switch to turn on the
compressor.
u The compressor starts injecting sealant
and air into the tire.
8. When the sealant injection is complete,
continue to add air.
9. After the air pressure reaches 32 psi (220
kPa), turn off the kit.
u To check the pressure, occasionally turn
off the compressor and read the gauge.
1Injecting Sealant and Air
NOTICE
Do not operate the tire repair kit compressor for
more than 15 minutes. The accessory power socket
and compressor can ov erheat and become
permanently damaged.
Until the sealant injection is complete, the pressure
shown on the pressure gauge will appear higher than
actual. After the sealant injection is complete the
pressure will drop and then begin to rise again as the
tire is inflated with air. This is normal. To accurately
measure the air pressure usi ng the gauge, turn the air
compressor off only after the sealant injection is
complete.
If the required air pressure is not reached within 10
minutes, the tire may be too severely damaged for
the kit to provide the necessa ry seal and your vehicle
will need to be towed.
3WARNING
Running the engine with the vehicle in an
enclosed or even partly enclosed area can
cause a rapid build-up of toxic carbon
monoxide.
Breathing this colorless, odorless gas can
cause unconsciousness and even death.
Only run the engine to power the air
compressor with th e vehicle outdoors.
SEALANT/AIR side
Pressure Gauge
ON
OFF
14 CIVIC 4D_SI-31TR36210.book 421 ページ 2014年1月30日 木曜日 午後12時18分
Page 424 of 469
Continued423
uuIf a Tire Goes Flat uTemporarily Repairing a Flat Tire
Handling the Unexpected
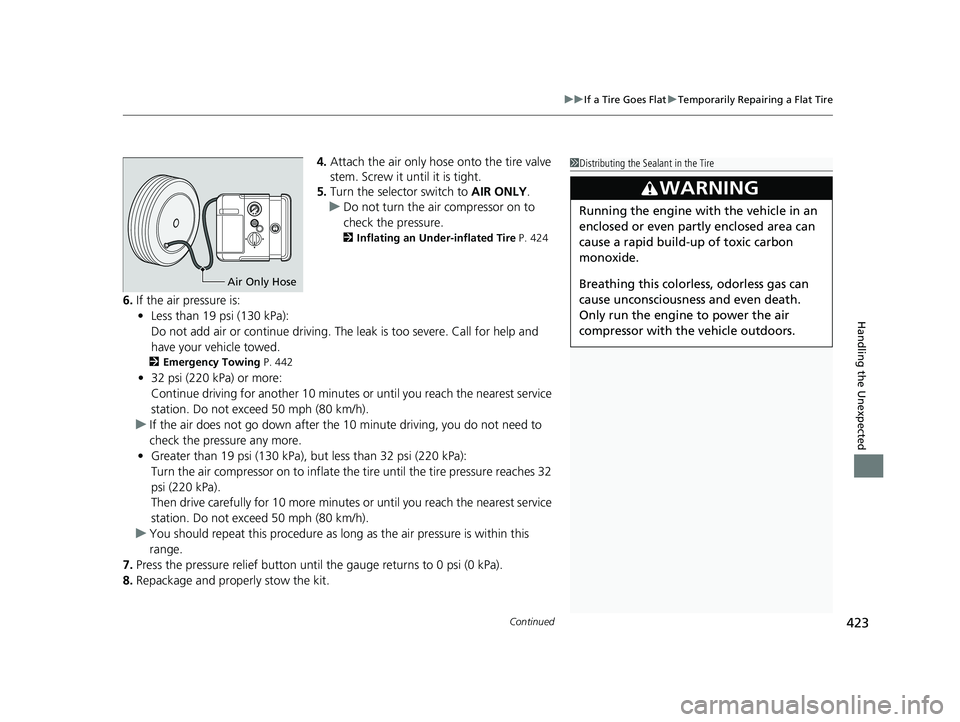
4. Attach the air only hose onto the tire valve
stem. Screw it until it is tight.
5. Turn the selector switch to AIR ONLY.
u Do not turn the air compressor on to
check the pressure.
2 Inflating an Under-inflated Tire P. 424
6.If the air pressure is:
• Less than 19 psi (130 kPa):
Do not add air or continue driving. Th e leak is too severe. Call for help and
have your vehicle towed.
2 Emergency Towing P. 442
•32 psi (220 kPa) or more:
Continue driving for another 10 minutes or until you reach the nearest service
station. Do not exceed 50 mph (80 km/h).
u If the air does not go down after the 10 minute driving, you do not need to
check the pressure any more.
• Greater than 19 psi (130 kPa), but less than 32 psi (220 kPa):
Turn the air compressor on to inflate the tire until the tire pressure reaches 32
psi (220 kPa).
Then drive carefully for 10 more minutes or until you reach the nearest service
station. Do not exceed 50 mph (80 km/h).
u You should repeat this procedure as long as the air pressure is within this
range.
7. Press the pressure relief button until the gauge returns to 0 psi (0 kPa).
8. Repackage and properly stow the kit.
1Distributing the Sealant in the Tire
3WARNING
Running the engine with the vehicle in an
enclosed or even partly enclosed area can
cause a rapid build-up of toxic carbon
monoxide.
Breathing this colorless, odorless gas can
cause unconsciousness and even death.
Only run the engine to power the air
compressor with th e vehicle outdoors.
Air Only Hose
14 CIVIC 4D_SI-31TR36210.book 423 ページ 2014年1月30日 木曜日 午後12時18分
Page 426 of 469
425
uuIf a Tire Goes Flat uTemporarily Repairing a Flat Tire
Handling the Unexpected
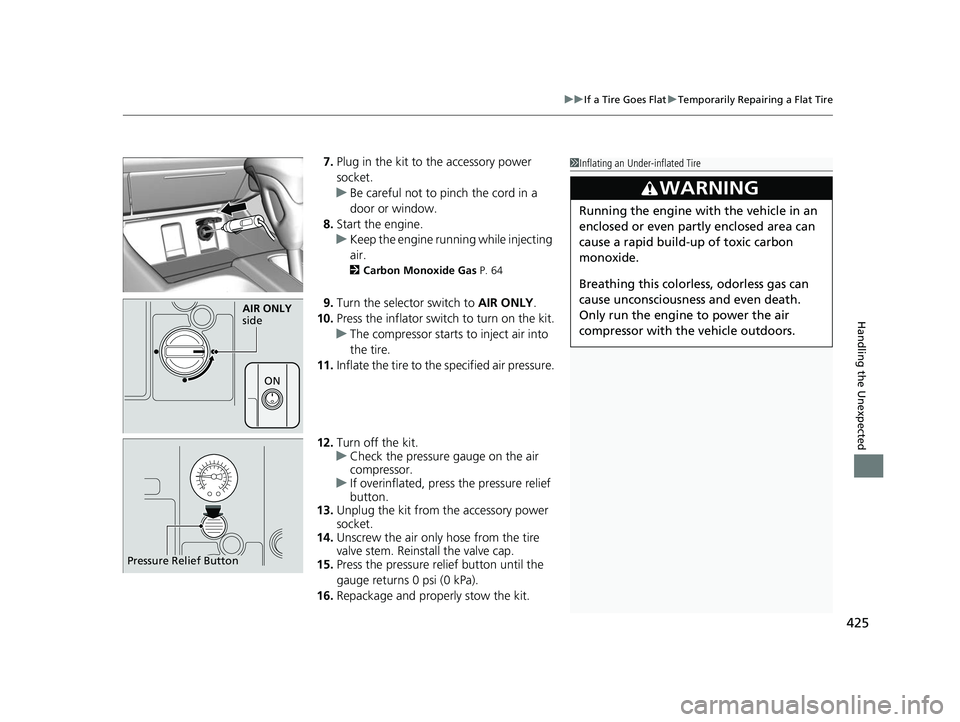
7. Plug in the kit to the accessory power
socket.
u Be careful not to pinch the cord in a
door or window.
8. Start the engine.
u Keep the engine running while injecting
air.
2 Carbon Monoxide Gas P. 64
9.Turn the selector switch to AIR ONLY.
10. Press the inflator swit ch to turn on the kit.
u The compressor starts to inject air into
the tire.
11. Inflate the tire to the specified air pressure.
12. Turn off the kit.
u Check the pressure gauge on the air
compressor.
u If overinflated, press the pressure relief
button.
13. Unplug the kit from the accessory power
socket.
14. Unscrew the air only hose from the tire
valve stem. Reinstall the valve cap.
15. Press the pressure relief button until the
gauge returns 0 psi (0 kPa).
16. Repackage and properly stow the kit.
1Inflating an Under-inflated Tire
3WARNING
Running the engine with the vehicle in an
enclosed or even partly enclosed area can
cause a rapid build-up of toxic carbon
monoxide.
Breathing this colorless, odorless gas can
cause unconsciousness and even death.
Only run the engine to power the air
compressor with th e vehicle outdoors.
AIR ONLY
side
ON
Pressure Relief Button
14 CIVIC 4D_SI-31TR36210.book 425 ページ 2014年1月30日 木曜日 午後12時18分