tire pressure HONDA CLARITY ELECTRIC 2018 (in English) Owner's Guide
[x] Cancel search | Manufacturer: HONDA, Model Year: 2018, Model line: CLARITY ELECTRIC, Model: HONDA CLARITY ELECTRIC 2018Pages: 559, PDF Size: 27.8 MB
Page 482 of 559
480
uuChecking and Maintaining Tires uWear Indicators
Maintenance
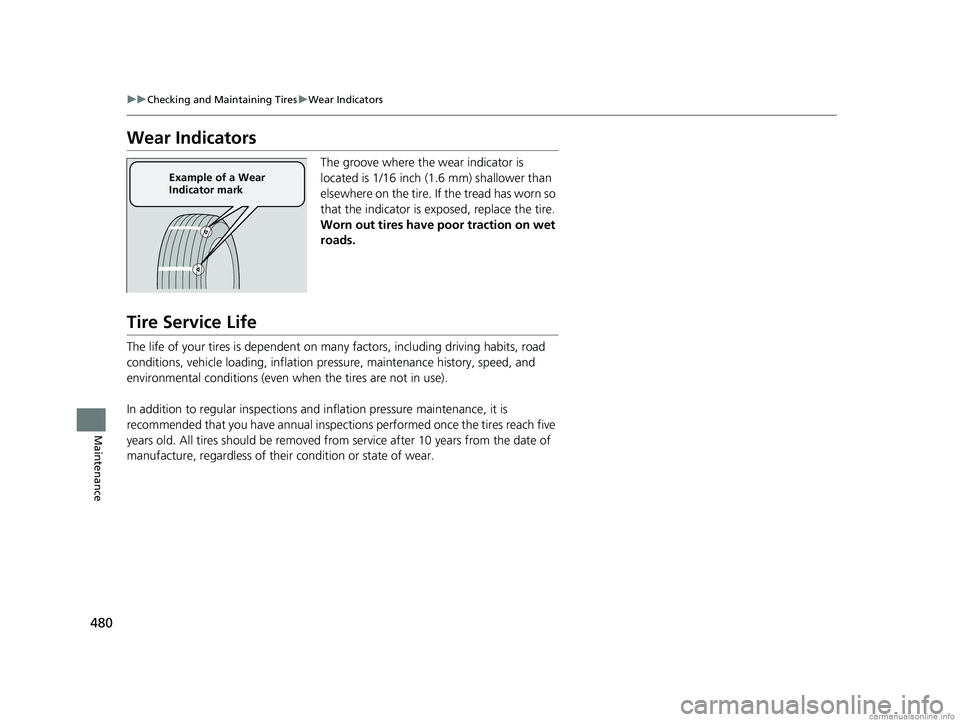
Wear Indicators
The groove where the wear indicator is
located is 1/16 inch (1.6 mm) shallower than
elsewhere on the tire. If the tread has worn so
that the indicator is ex posed, replace the tire.
Worn out tires have poor traction on wet
roads.
Tire Service Life
The life of your tires is dependent on many factors, including driving habits, road
conditions, vehicle loading, inflation pre ssure, maintenance history, speed, and
environmental conditions (even when the tires are not in use).
In addition to regular inspections and inflation pressure maintenance, it is
recommended that you have annual inspections performed once the tires reach five
years old. All tires should be removed fro m service after 10 years from the date of
manufacture, regardless of their condition or state of wear.
Example of a Wear
Indicator mark
18 CLARITY ELECTRIC CSS-31TRV6100.book 480 ページ 2018年2月5日 月曜日 午後12時0分
Page 483 of 559
481
uuChecking and Maintaining Tires uTire and Wheel Replacement
Maintenance
Tire and Wheel Replacement
Replace your tires with radials of the same size, load range, speed rating, and
maximum cold tire pressure rating (as shown on the tire’s sidewall). Using tires of a
different size or construction can cause ce rtain vehicle systems such as the ABS and
Vehicle Stability Assist ® (VSA ®) system to work incorrectly.
It is best to replace all four tires at the same time. If that isn’t possible, replace the
front or rear tires in pairs.
Make sure that the wheel’s specifications match those of the original wheels.1 Tire and Wheel Replacement
3WARNING
Installing improper tires on your vehicle can
affect handling and stability. This can cause
a crash in which you can be seriously hurt or
killed.
Always use the size and type of tires
recommended in this owner’s manual.
18 CLARITY ELECTRIC CSS-31TRV6100.book 481 ページ 2018年2月5日 月曜日 午後12時0分
Page 487 of 559
485
uu12-Volt Battery uCharging the 12-Volt Battery
Maintenance
Charging the 12-Volt Battery
Disconnect both battery cables to prevent damaging your vehicle’s electrical system.
Always disconnect the negative (–) cable first, and reconnect it last.112-Volt Battery
When replacing the battery, the replacement must be
of the same specifications.
Consult an authorized Honda Clarity Electric dealer
for more information.
The indicators for the Vehicle Stability Assist ® (VSA ®)
system, VSA ® OFF, Collision Mitigation Braking
System
TM (CMBSTM), and low tire pressure/Tire
Pressure Monitoring System (TPMS) may come on
along with a message in the driver information
interface when you turn the power system on after
reconnecting the battery.
Drive a short distance at 12 mph (20 km/h). The
indicator should go off. If it does not, have your
vehicle checked by an authorized Honda Clarity
Electric dealer.
18 CLARITY ELECTRIC CSS-31TRV6100.book 485 ページ 2018年2月5日 月曜日 午後12時0分
Page 499 of 559
497
Handling the Unexpected
This chapter explains how to handle unexpected troubles.
If a Tire Goes FlatTemporarily Repairi ng a Flat Tire....... 498
Handling of the Jack ......................... 510
Power System Won’t Start Checking the Procedure ................... 511
If the Smart Entry Remote Battery is Weak .......................................... 512
Emergency Power System Off........... 513
Jump Starting .................................... 514
Overheating How to Handle Overheating ............. 517 Indicator, Coming On/Blinking
If the 12-Volt Battery Charging System Indicator Comes On ....................... 518
If the Brake System Indicator (Red) Comes On or Blinks ....................................... 519
If the Electric Power Steering (EPS) System
Indicator Comes On ........................... 520If the Brake System Indicator (Red) Comes On or Blinks at the Same Time
When the Brake System Indicator
(Amber) Comes On ...................... 521
If the Low Tire Pressure/TPMS Indicator
Comes On or Blinks........................ 522 If the Transmission System Indicator Blinks
along with the Warning Message .... 523
Fuses
Fuse Locations ................................. 524
Inspecting and Changing Fuses ........ 530
Emergency Towing ........................... 531
When You Cannot Open the Charge
Lid ................................................. 532
When You Cannot Disengage the Charging
Connector.................................................533When You Cannot Open the Trunk .. 534
18 CLARITY ELECTRIC CSS-31TRV6100.book 497 ページ 2018年2月5日 月曜日 午後12時0分
Page 501 of 559
Continued499
uuIf a Tire Goes Flat uTemporarily Repairing a Flat Tire
Handling the Unexpected
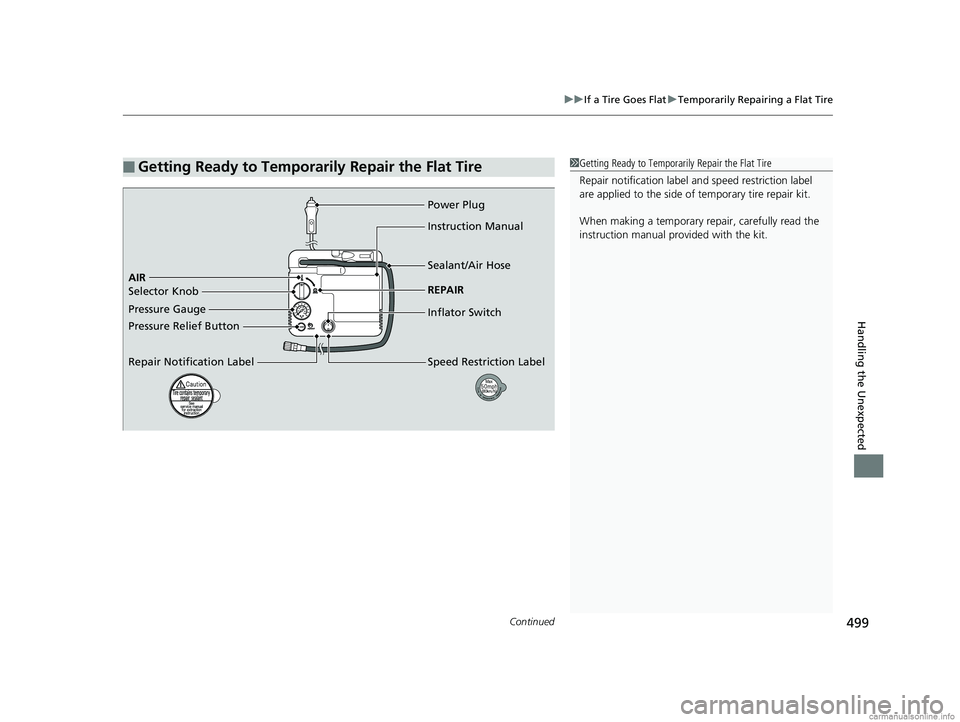
■Getting Ready to Temporarily Repair the Flat Tire1Getting Ready to Temporarily Repair the Flat Tire
Repair notificati on label and speed restriction label
are applied to the side of temporary tire repair kit.
When making a temporary repair, carefully read the
instruction manual provided with the kit.
Pressure Gauge AIR Power Plug
Pressure Relief Button
Repair Notification LabelInstruction Manual
Sealant/Air Hose
REPAIR
Inflator Switch
Speed Restriction Label
Selector Knob
18 CLARITY ELECTRIC CSS-31TRV6100.book 499 ページ 2018年2月5日 月曜日 午後12時0分
Page 505 of 559
Continued503
uuIf a Tire Goes Flat uTemporarily Repairing a Flat Tire
Handling the Unexpected
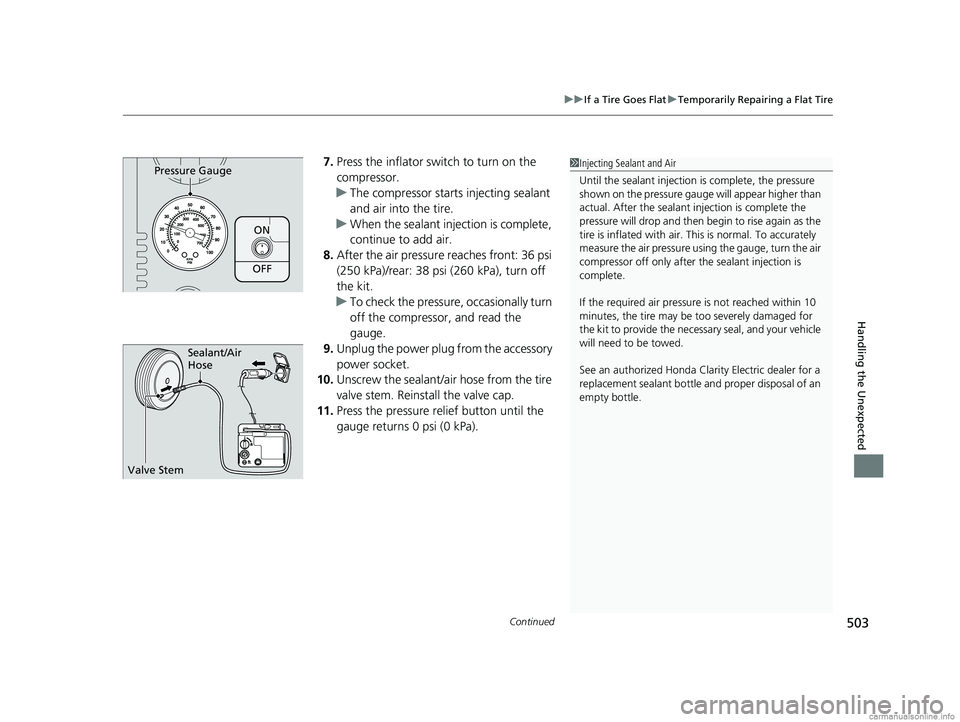
7. Press the inflator switch to turn on the
compressor.
u The compressor starts injecting sealant
and air into the tire.
u When the sealant injection is complete,
continue to add air.
8. After the air pressure reaches front: 36 psi
(250 kPa)/rear: 38 psi (260 kPa), turn off
the kit.
u To check the pressure, occasionally turn
off the compressor, and read the
gauge.
9. Unplug the power plug from the accessory
power socket.
10. Unscrew the sealant/ai r hose from the tire
valve stem. Reinstall the valve cap.
11. Press the pressure relief button until the
gauge returns 0 psi (0 kPa).
ON
OFF
Pressure Gauge1Injecting Sealant and Air
Until the sealant injection is complete, the pressure
shown on the pressure gauge will appear higher than
actual. After the sealant injection is complete the
pressure will drop and then begin to rise again as the
tire is inflated with air. This is normal. To accurately
measure the air pressure usi ng the gauge, turn the air
compressor off only after the sealant injection is
complete.
If the required air pressure is not reached within 10
minutes, the tire may be too severely damaged for
the kit to provide the necessa ry seal, and your vehicle
will need to be towed.
See an authorized Honda Clar ity Electric dealer for a
replacement sealant bottle an d proper disposal of an
empty bottle.
Sealant/Air
Hose
Valve Stem
18 CLARITY ELECTRIC CSS-31TRV6100.book 503 ページ 2018年2月5日 月曜日 午後12時0分
Page 507 of 559
505
uuIf a Tire Goes Flat uTemporarily Repairing a Flat Tire
Continued
Handling the Unexpected
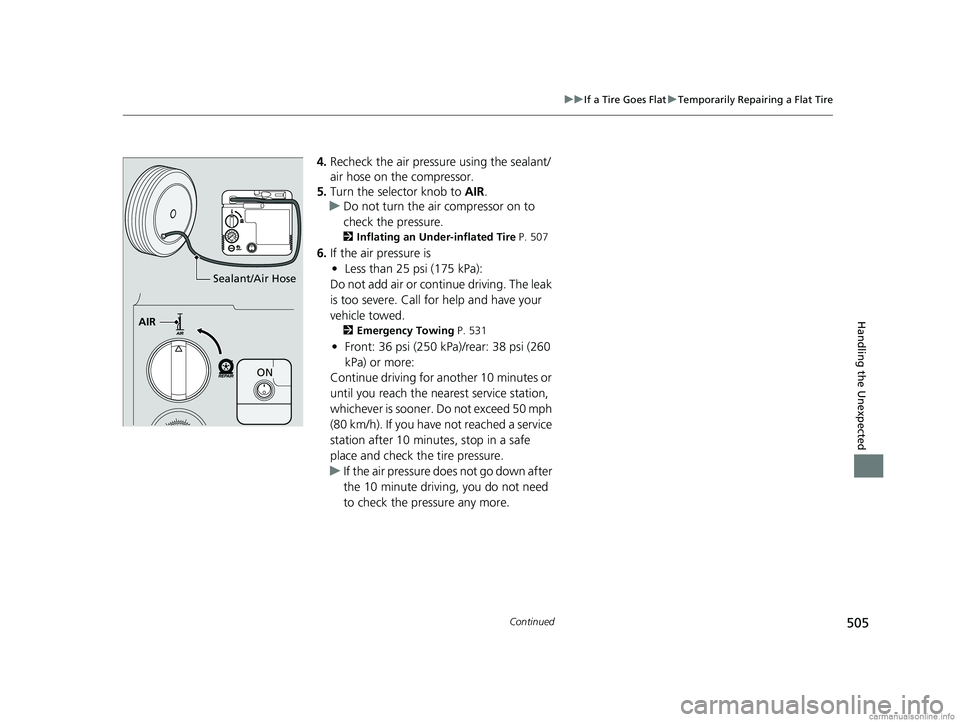
4. Recheck the air pressu re using the sealant/
air hose on the compressor.
5. Turn the selector knob to AIR.
u Do not turn the air compressor on to
check the pressure.
2 Inflating an Under-inflated Tire P. 507
6.If the air pressure is
• Less than 25 psi (175 kPa):
Do not add air or continue driving. The leak
is too severe. Call for help and have your
vehicle towed.
2 Emergency Towing P. 531
•Front: 36 psi (250 kPa)/rear: 38 psi (260
kPa) or more:
Continue driving for another 10 minutes or
until you reach the nearest service station,
whichever is sooner. Do not exceed 50 mph
(80 km/h). If you have not reached a service
station after 10 minutes, stop in a safe
place and check th e tire pressure.
u If the air pressure do es not go down after
the 10 minute driving, you do not need
to check the pressure any more.
AIR
ON
Sealant/Air Hose
18 CLARITY ELECTRIC CSS-31TRV6100.book 505 ページ 2018年2月5日 月曜日 午後12時0分
Page 508 of 559
506
uuIf a Tire Goes Flat uTemporarily Repairing a Flat Tire
Handling the Unexpected
• Greater than 25 psi (175 kPa), but less
than front: 36 psi (250 kPa)/rear: 38 psi
(260 kPa):
Turn the air compressor on to inflate the
tire until the tire pressure reaches front: 36
psi (250 kPa)/rear: 38 psi (260 kPa).
2 Inflating an Under-inflated Tire P. 507
Then drive carefully for 10 more minutes or
until you reach the nearest service station,
whichever is sooner. Do not exceed 50 mph
(80 km/h). If you have not reached a service
station after 10 minutes, stop in a safe
place and check the tire pressure.
u You should repeat this procedure as long
as the air pressure is within this range.
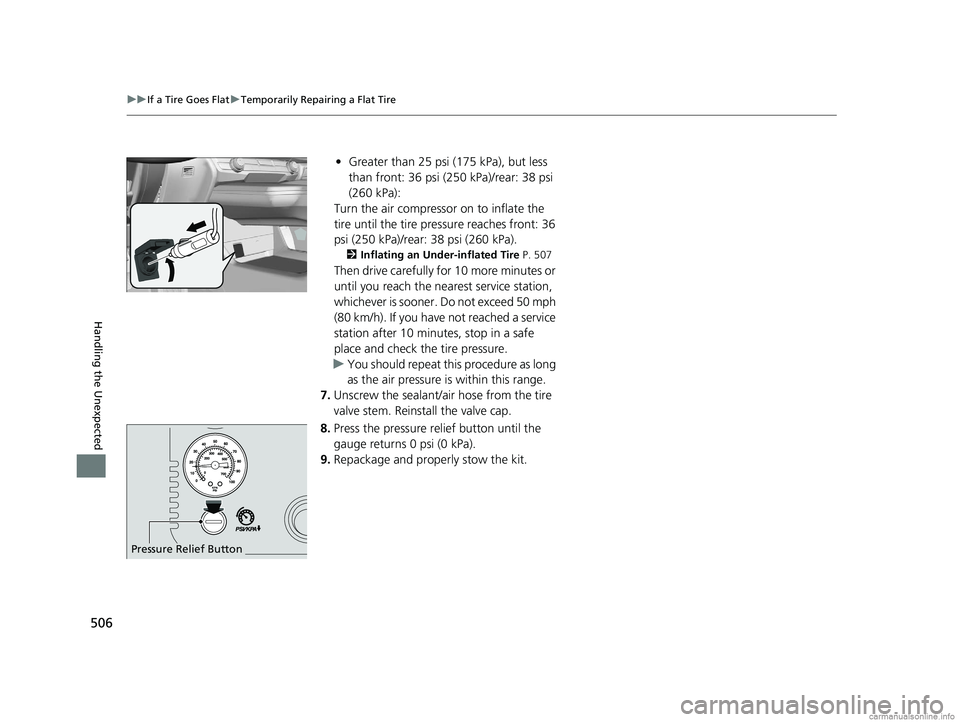
7. Unscrew the sealant/ai r hose from the tire
valve stem. Reinstall the valve cap.
8. Press the pressure relief button until the
gauge returns 0 psi (0 kPa).
9. Repackage and properly stow the kit.
Pressure Relief Button
18 CLARITY ELECTRIC CSS-31TRV6100.book 506 ページ 2018年2月5日 月曜日 午後12時0分
Page 510 of 559
508
uuIf a Tire Goes Flat uTemporarily Repairing a Flat Tire
Handling the Unexpected
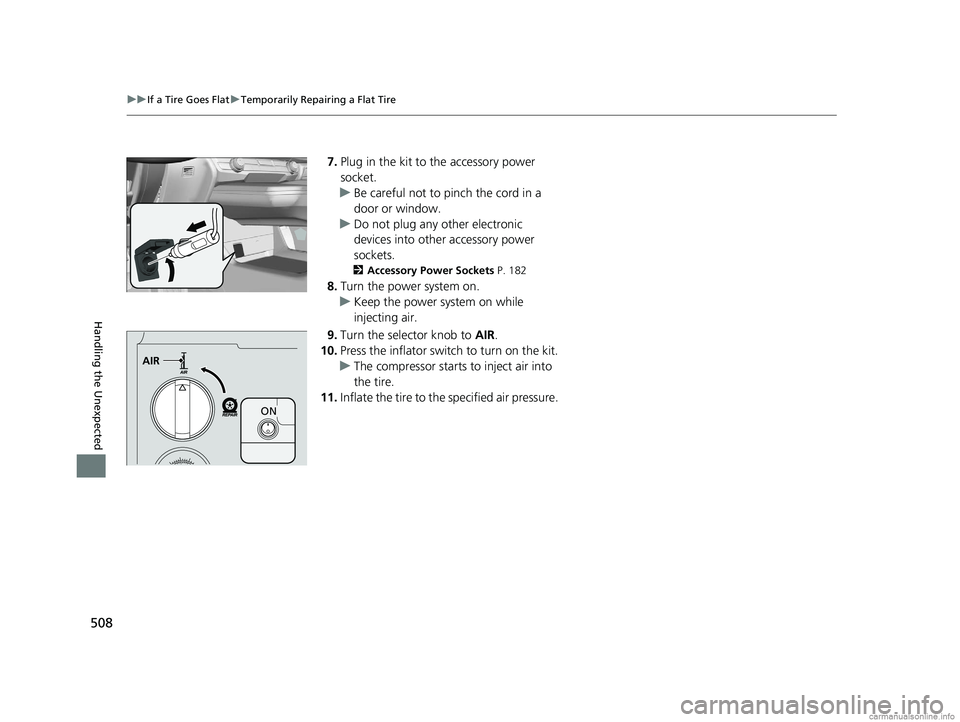
7. Plug in the kit to the accessory power
socket.
u Be careful not to pinch the cord in a
door or window.
u Do not plug any other electronic
devices into other accessory power
sockets.
2 Accessory Power Sockets P. 182
8.Turn the power system on.
u Keep the power system on while
injecting air.
9. Turn the selector knob to AIR.
10. Press the inflator swit ch to turn on the kit.
u The compressor starts to inject air into
the tire.
11. Inflate the tire to the specified air pressure.
AIR
ON
18 CLARITY ELECTRIC CSS-31TRV6100.book 508 ページ 2018年2月5日 月曜日 午後12時0分
Page 511 of 559
509
uuIf a Tire Goes Flat uTemporarily Repairing a Flat Tire
Handling the Unexpected
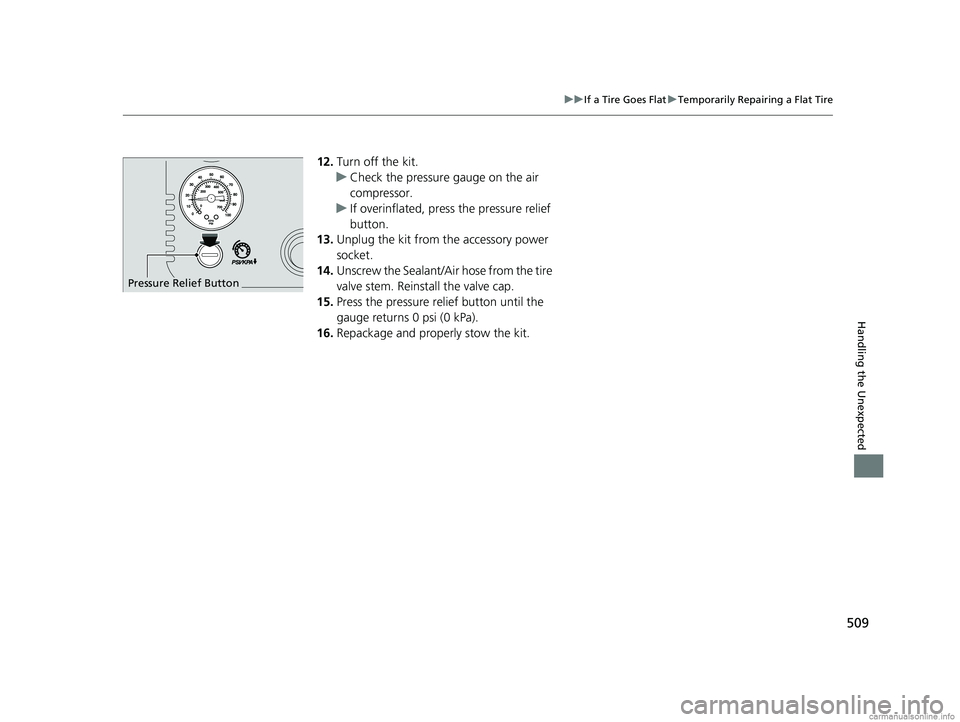
12. Turn off the kit.
u Check the pressure gauge on the air
compressor.
u If overinflated, press the pressure relief
button.
13. Unplug the kit from the accessory power
socket.
14. Unscrew the Sealant/Air hose from the tire
valve stem. Reinstall the valve cap.
15. Press the pressure relief button until the
gauge returns 0 psi (0 kPa).
16. Repackage and properly stow the kit.
Pressure Relief Button
18 CLARITY ELECTRIC CSS-31TRV6100.book 509 ページ 2018年2月5日 月曜日 午後12時0分