HONDA CLARITY ELECTRIC 2018 Owner's Manual (in English)
Manufacturer: HONDA, Model Year: 2018, Model line: CLARITY ELECTRIC, Model: HONDA CLARITY ELECTRIC 2018Pages: 559, PDF Size: 27.8 MB
Page 381 of 559
379
uuWhen Driving uDeceleration Paddle Selector
Continued
Driving
Deceleration Paddle Selector
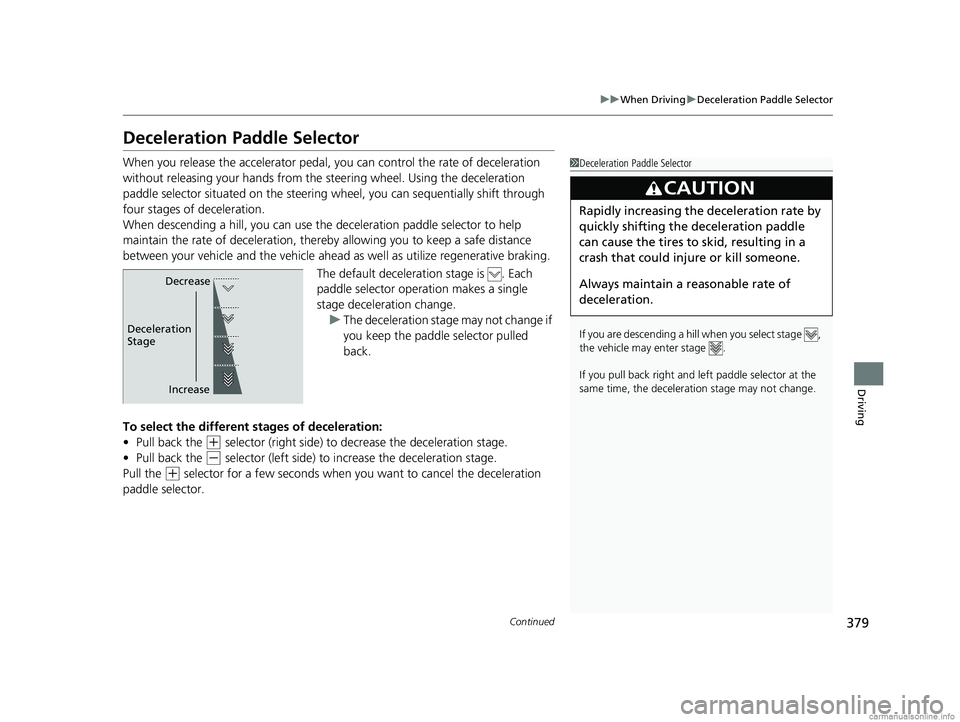
When you release the accelerator pedal, yo u can control the rate of deceleration
without releasing your hands from the steering wheel. Using the deceleration
paddle selector situated on the steering wheel, you can sequentially shift through
four stages of deceleration.
When descending a hill, you can use the deceleration paddle selector to help
maintain the rate of deceleration, thereb y allowing you to keep a safe distance
between your vehicle and the vehicle ahead as well as utilize regenerative braking.
The default deceleration stage is . Each
paddle selector operation makes a single
stage deceleration change. u The deceleration stag e may not change if
you keep the paddle selector pulled
back.
To select the different stages of deceleration:
• Pull back the
(+ selector (right side) to decrease the deceleration stage.
• Pull back the
(- selector (left side) to increase the deceleration stage.
Pull the
(+ selector for a few seconds when you want to cancel the deceleration
paddle selector.
1 Deceleration Paddle Selector
If you are descending a hill when you select stage ,
the vehicle may enter stage .
If you pull back right and le ft paddle selector at the
same time, the deceleration stage may not change.
3CAUTION
Rapidly increasing the deceleration rate by
quickly shifting the deceleration paddle
can cause the tires to skid, resulting in a
crash that could injure or kill someone.
Always maintain a reasonable rate of
deceleration.
Increase
Decrease
Deceleration
Stage
18 CLARITY ELECTRIC CSS-31TRV6100.book 379 ページ 2018年2月5日 月曜日 午後12時0分
Page 382 of 559
uuWhen Driving uDeceleration Paddle Selector
380
Driving
1Deceleration Paddle Selector
In the following situations , the stage may not change
and the stage icon will blink ev en if you pull back the
selector. The dece leration stage may decrease or
cancel automatically:
•The high voltage battery is fully charged or its
temperature is too cold or too hot.
•The speed of the vehicle is beyond the deceleration
range with SPORT mode off.
•Power system protection is needed.
•The paddle selector is opera ted while your vehicle is
stopped automatically by ACC with LSF.
If either paddle selector is operated, ACC with LSF
will cancel automatically.
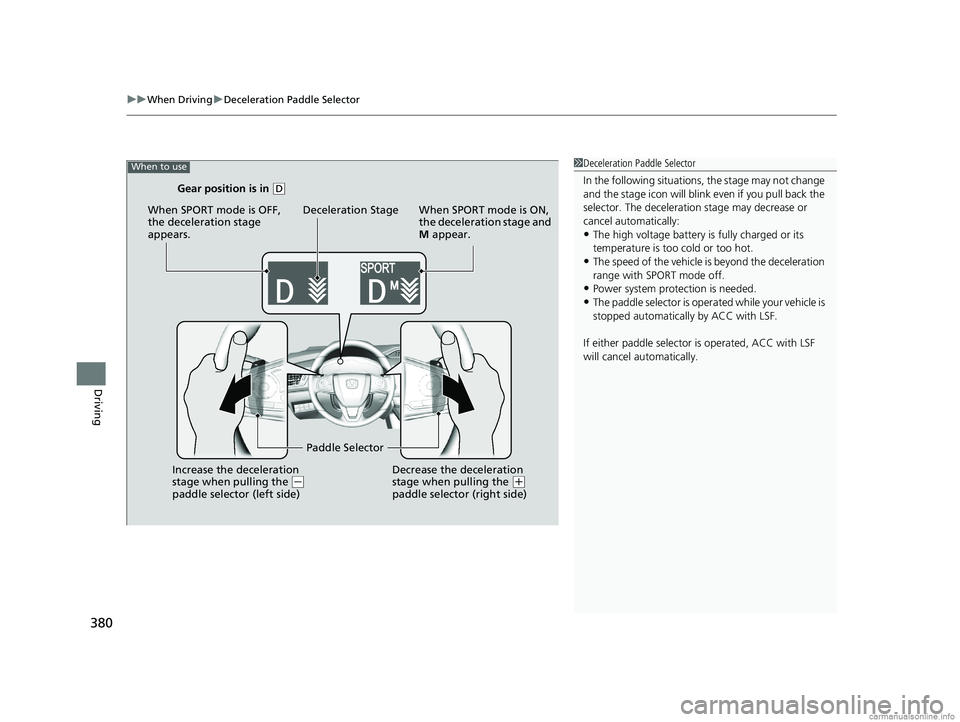
Gear position is in ( D
When SPORT mode is OFF,
the deceleration stage
appears. When SPORT mode is ON,
the deceleration stage and
M
appear.
When to use
Deceleration Stage
Paddle Selector
Increase the deceleration
stage when pulling the
( -
paddle selector (left side) Decrease the deceleration
stage when pulling the (
+
paddle selector (right side)
18 CLARITY ELECTRIC CSS-31TRV6100.book 380 ページ 2018年2月5日 月曜日 午後12時0分
Page 383 of 559
381
uuWhen Driving uDeceleration Paddle Selector
Driving
■When SPORT mode is OFF
If you pull back the paddle selector, the ra te of deceleration will change temporarily,
and the stage will ap pear in the driver information interface.
When you want to cancel the deceleration paddle selector, pull the
(+ selector
(right side) for a few seconds.
The deceleration paddle selector will cancel automatically and deceleration stage in
the driver information interface disappear when you drive with constant speed,
situations of acceleration and decelerate just before stopping your vehicle.
■When SPORT mode is ON
If you pull back the paddle selector, the ra te of deceleration will change and the
stage along with M will appear in the driver in formation interface. The deceleration
stage is not cancel automatica lly while SPORT mode is ON.
When you want to cancel the deceleration paddle selector, turn the SPORT mode
OFF, or pull the
(+ selector (right side) for a few seconds. When canceled,
deceleration stage in the driver information interface disappear.
18 CLARITY ELECTRIC CSS-31TRV6100.book 381 ページ 2018年2月5日 月曜日 午後12時0分
Page 384 of 559
382
uuWhen Driving uAcoustic Vehicle Alerting System
Driving
Acoustic Vehicle Alerting System
Alerts pedestrians that a vehicle is approa ching when the vehicle speed is around 12
mph (20 km/h) or less.
18 CLARITY ELECTRIC CSS-31TRV6100.book 382 ページ 2018年2月5日 月曜日 午後12時0分
Page 385 of 559
383
uuWhen Driving uFront Sensor Camera
Continued
Driving
Front Sensor Camera
The camera, used in systems such as LKAS, RDM, ACC with LSF, and CMBSTM, is
designed to detect an object that tri ggers any of the systems to operate its
functions.
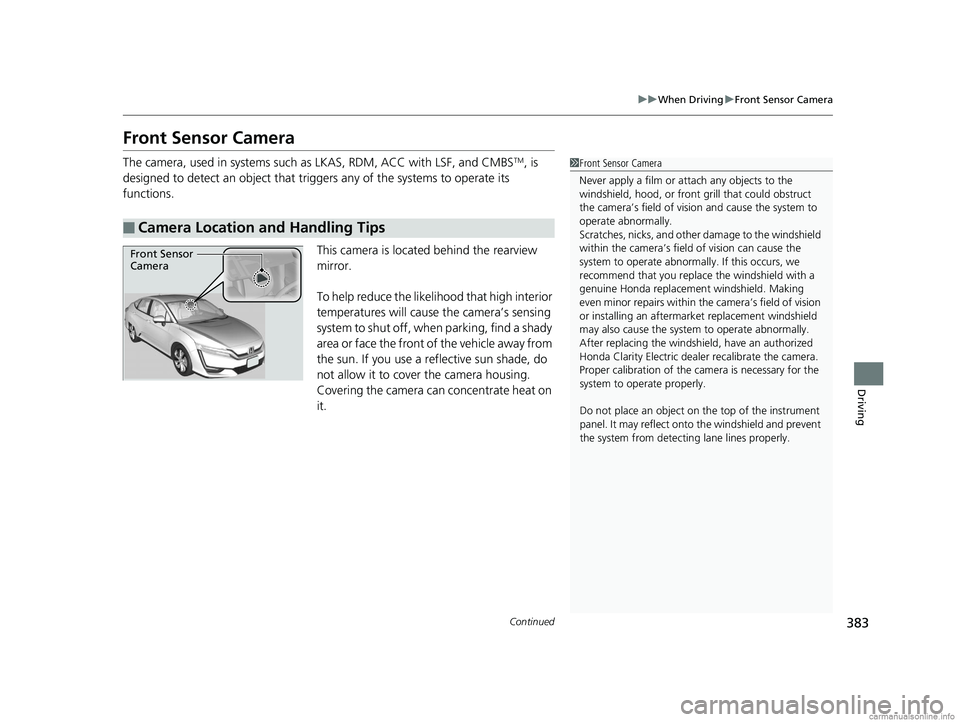
This camera is located behind the rearview
mirror.
To help reduce the likelihood that high interior
temperatures will cause the camera’s sensing
system to shut off, when parking, find a shady
area or face the front of the vehicle away from
the sun. If you use a reflective sun shade, do
not allow it to cover the camera housing.
Covering the camera can concentrate heat on
it.
■Camera Location and Handling Tips
1Front Sensor Camera
Never apply a film or attach any objects to the
windshield, hood, or front grill that could obstruct
the camera’s field of vision and cause the system to
operate abnormally.
Scratches, nicks, and othe r damage to the windshield
within the camera’s fiel d of vision can cause the
system to operate abnormall y. If this occurs, we
recommend that you replac e the windshield with a
genuine Honda replacem ent windshield. Making
even minor repairs within th e camera’s field of vision
or installing an aftermarket replacement windshield
may also cause the system to operate abnormally.
After replacing th e windshield, have an authorized
Honda Clarity Electric dealer recalibrate the camera.
Proper calibrat ion of the camera is necessary for the
system to ope rate properly.
Do not place an object on the top of the instrument
panel. It may reflect onto the windshield and prevent
the system from detecting lane lines properly.
Front Sensor
Camera
18 CLARITY ELECTRIC CSS-31TRV6100.book 383 ページ 2018年2月5日 月曜日 午後12時0分
Page 386 of 559
uuWhen Driving uFront Sensor Camera
384
Driving
1Front Sensor Camera
If the Some Driver Assist Systems Cannot
Operate: Camera Temperature Too High message
appears:
•Use the climate control system to cool down the
interior and, if necessary, also use defroster mode
with the airflow directed towards the camera.
•Start driving the vehicle to lower the windshield
temperature, which cool s down the area around
the camera.
If the Some Driver Assist Systems Cannot
Operate: Clean Front Windshield message
appears:
•Park your vehicle in a sa fe place, and clean the
windshield. If the message does not disappear after
you have cleaned the windshield and driven for a
while, have your vehicle checked by an authorized
Honda Clarity Electric dealer.
18 CLARITY ELECTRIC CSS-31TRV6100.book 384 ページ 2018年2月5日 月曜日 午後12時0分
Page 387 of 559
385
uuWhen Driving uRoad Departure Mitigation (RDM) System
Continued
Driving
Road Departure Mitigation (RDM) System
Alerts and helps to assist you when the system detects a possibility of your vehicle
unintentionally crossing over detected lane markings and/or leaving the roadway
altogether.
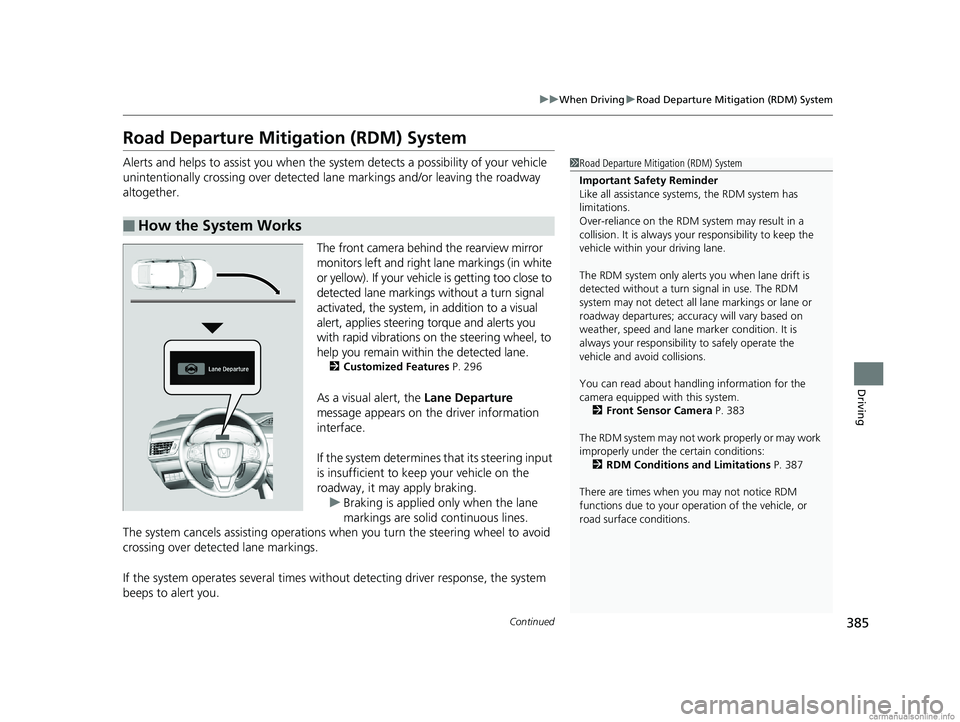
The front camera behind the rearview mirror
monitors left and right lane markings (in white
or yellow). If your vehicl e is getting too close to
detected lane markings without a turn signal
activated, the system, in addition to a visual
alert, applies steering torque and alerts you
with rapid vibrations on the steering wheel, to
help you remain within the detected lane.
2 Customized Features P. 296
As a visual alert, the Lane Departure
message appears on the driver information
interface.
If the system determines that its steering input
is insufficient to keep your vehicle on the
roadway, it may apply braking.
u Braking is applied only when the lane
markings are solid continuous lines.
The system cancels assisting operations wh en you turn the steering wheel to avoid
crossing over detected lane markings.
If the system operates several times with out detecting driver response, the system
beeps to alert you.
■How the System Works
1 Road Departure Mitigation (RDM) System
Important Safety Reminder
Like all assistance systems, the RDM system has
limitations.
Over-reliance on the RDM system may result in a
collision. It is always your responsibility to keep the
vehicle within your driving lane.
The RDM system only alerts you when lane drift is
detected without a turn signal in use. The RDM
system may not detect all la ne markings or lane or
roadway departures; accu racy will vary based on
weather, speed and lane marker condition. It is
always your responsibilit y to safely operate the
vehicle and avoid collisions.
You can read about handling information for the
camera equipped with this system.
2 Front Sensor Camera P. 383
The RDM system may not wo rk properly or may work
improperly under the certain conditions: 2 RDM Conditions and Limitations P. 387
There are times when you may not notice RDM
functions due to your opera tion of the vehicle, or
road surface conditions.
18 CLARITY ELECTRIC CSS-31TRV6100.book 385 ページ 2018年2月5日 月曜日 午後12時0分
Page 388 of 559
uuWhen Driving uRoad Departure Mitigation (RDM) System
386
Driving
The system becomes ready to start sear ching for lane markings when all the
following conditions are met:
• The vehicle is traveling between about 45 and 90 mph (72 and 145 km/h).
• The vehicle is on a straight or slightly curved road.
• The turn signals are off.
• The brake pedal is not depressed.
• The wipers are not in continuous operation.
• The vehicle is not accelerating or braking, and the steering wheel is not being
turned.
• The system makes a determination that th e driver is not actively accelerating,
braking or steering.
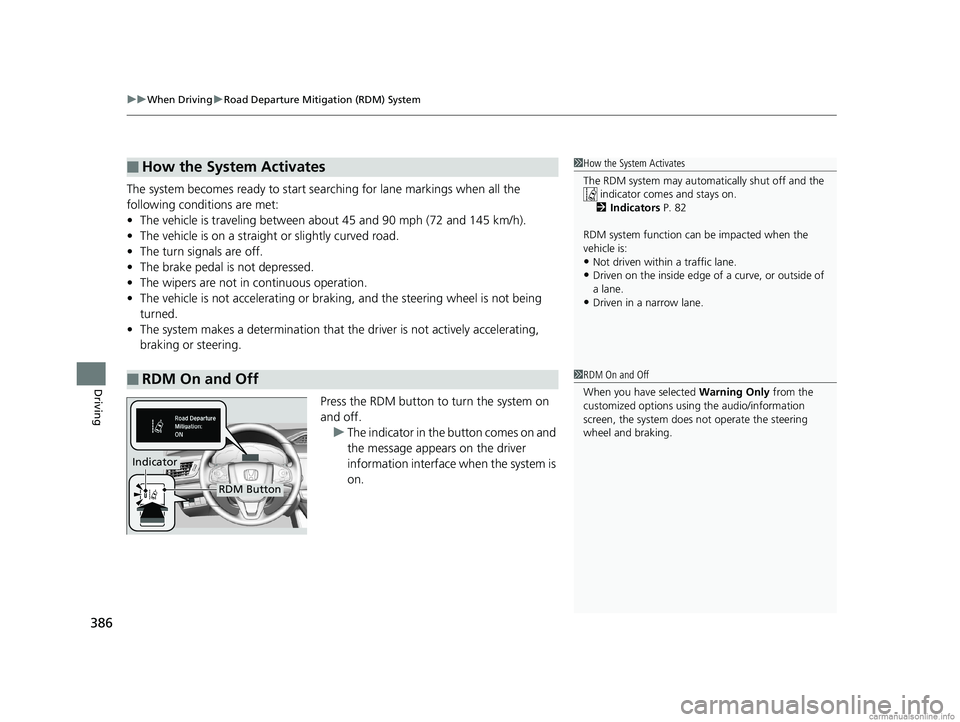
Press the RDM button to turn the system on
and off.u The indicator in the button comes on and
the message appears on the driver
information interface when the system is
on.
■How the System Activates
■RDM On and Off
1How the System Activates
The RDM system may automa tically shut off and the
indicator comes and stays on.
2 Indicators P. 82
RDM system function can be impacted when the
vehicle is:
•Not driven within a traffic lane.•Driven on the inside edge of a curve, or outside of
a lane.
•Driven in a narrow lane.
1 RDM On and Off
When you have selected Warning Only from the
customized options using the audio/information
screen, the system does not operate the steering
wheel and braking.
RDM Button
Indicator
18 CLARITY ELECTRIC CSS-31TRV6100.book 386 ページ 2018年2月5日 月曜日 午後12時0分
Page 389 of 559
387
uuWhen Driving uRoad Departure Mitigation (RDM) System
Continued
Driving
The system may not properly detect lane ma rkings and the position of your vehicle
under certain conditions. Some examples of these conditions are listed below.
■Environmental conditions
• Driving in bad weather (rain, fog, snow, etc.).
• Sudden changes between light and dark, such as an entrance or exit of a tunnel.
• There is little contrast between lane lines and the roadway surface.
• Driving into low sunlight (e.g., at dawn or dusk).
• Strong light is reflec ted onto the roadway.
• Driving in the shadows of trees, buildings, etc.
• Shadows of adjacent objects are parallel to lane markings.
• Roadway objects or structures are misinterpreted as lane markers.
• Reflections on the interi or of the windshield.
■RDM Conditions and Limitations
18 CLARITY ELECTRIC CSS-31TRV6100.book 387 ページ 2018年2月5日 月曜日 午後12時0分
Page 390 of 559
388
uuWhen Driving uRoad Departure Mitigation (RDM) System
Driving
■Roadway conditions
• Driving on a snowy or wet roadway (obs cured lane marking, vehicle tracks,
reflected lights, road spray, high contrast).
• Driving on a road with temporary lane markings.
• Faint, multiple, or varied lane markings are visible on the roadway due to road
repairs or old lane markings.
• The roadway has merging, split, or crossing lines (e.g., such as at an intersection
or crosswalk).
• The lane markings are extremely narrow, wide, or changing.
• The vehicle in front of you is driving near the lane lines.
• The road is hilly or the vehicle is approaching the crest of a hill.
• Driving on rough or unpaved roads, or over bumpy surfaces.
• When objects on the road (curb, guard rail, pylons, etc.) are recognized as white
lines (or yellow lines).
• Driving on roads with double lines.
■Vehicle conditions
• Headlight lenses are dirty or the headlights are not properly adjusted.
• The outside of the windshield is streake d or blocked by dirt, mud, leaves, wet
snow, etc.
• The inside of the windshield is fogged.
• The camera temperature gets too high.
• An abnormal tire or wheel condition (wrong sized, varied size or construction,
improperly inflated tire, etc.).
• The vehicle is tilted due to a heav y load or suspension modifications.
• When tire chains are installed.
18 CLARITY ELECTRIC CSS-31TRV6100.book 388 ページ 2018年2月5日 月曜日 午後12時0分