maintenance reset HONDA CLARITY ELECTRIC 2018 Owner's Manual (in English)
[x] Cancel search | Manufacturer: HONDA, Model Year: 2018, Model line: CLARITY ELECTRIC, Model: HONDA CLARITY ELECTRIC 2018Pages: 559, PDF Size: 27.8 MB
Page 322 of 559
320
uuCustomized Features u
Features
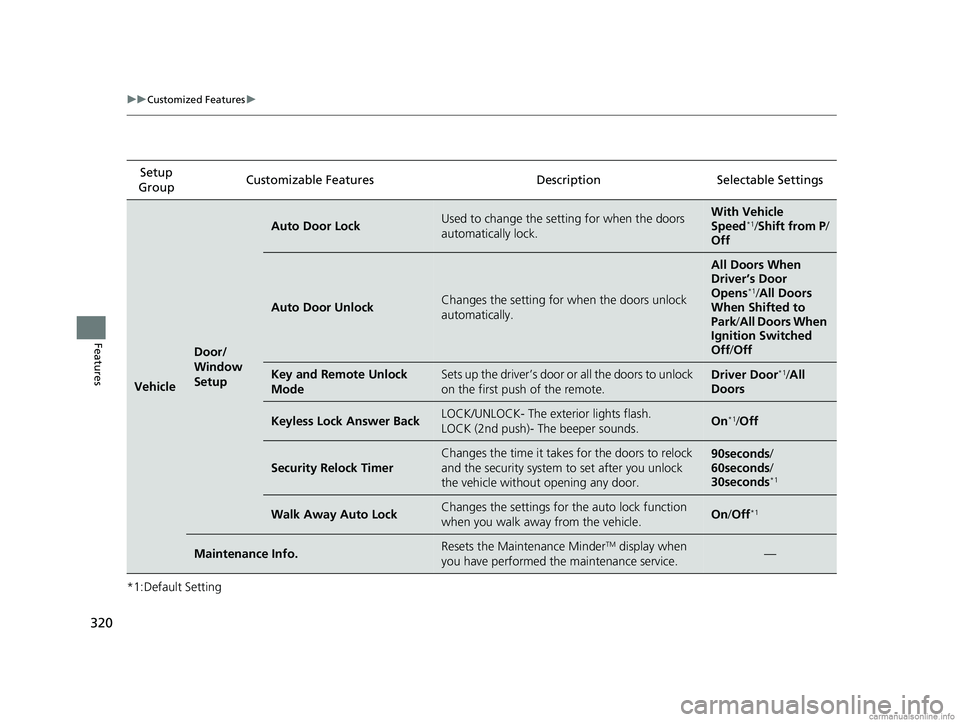
*1:Default SettingSetup
Group Customizable Features Desc
ription Selectable Settings
Vehicle
Door/
Window
Setup
Auto Door LockUsed to change the setting for when the doors
automatically lock.With Vehicle
Speed*1/ Shift from P /
Off
Auto Door UnlockChanges the setting for when the doors unlock
automatically.
All Doors When
Driver’s Door
Opens
*1/ All Doors
When Shifted to
Park/ All Doors When
Ignition Switched
Off /Off
Key and Remote Unlock
ModeSets up the driver’s door or all the doors to unlock
on the first push of the remote.Driver Door*1/All
Doors
Keyless Lock Answer BackLOCK/UNLOCK- The exterior lights flash.
LOCK (2nd push)- The beeper sounds.On*1/ Off
Security Relock Timer
Changes the time it takes for the doors to relock
and the security system to set after you unlock
the vehicle without opening any door.90seconds /
60seconds /
30seconds
*1
Walk Away Auto LockChanges the settings for the auto lock function
when you walk away from the vehicle.On /Off*1
Maintenance Info.Resets the Maintenance MinderTM display when
you have performed the maintenance service.—
18 CLARITY ELECTRIC CSS-31TRV6100.book 320 ページ 2018年2月5日 月曜日 午後12時0分
Page 464 of 559
462
uuMaintenance MinderTMuTo Use Maintenance MinderTM
Maintenance
The system message indicator ( ) comes on al ong with the Maintenance Minder message.
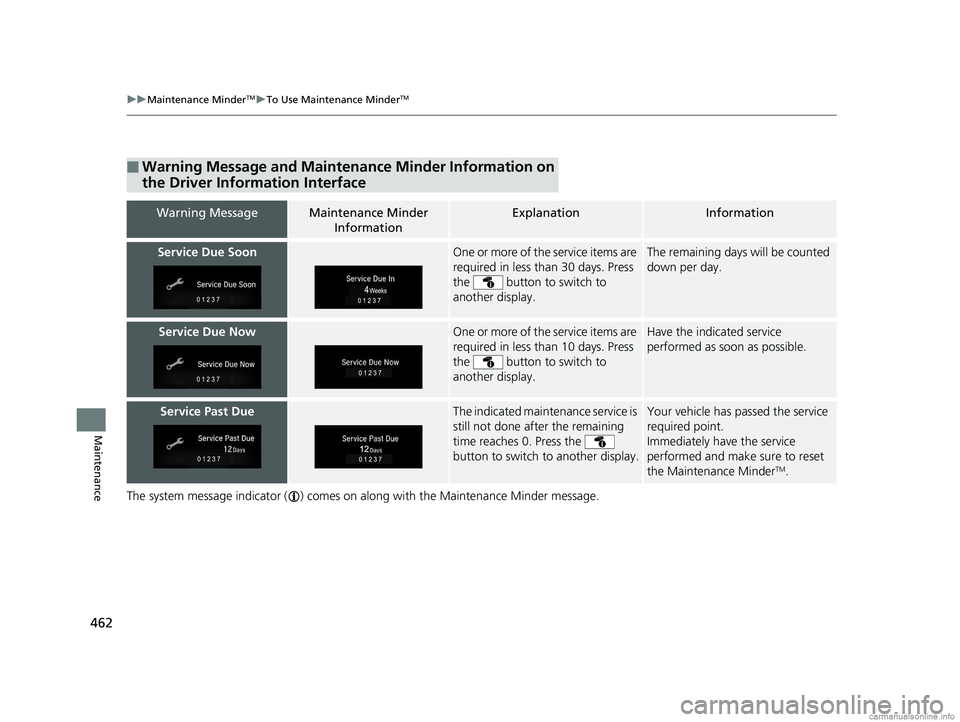
■Warning Message and Maintenance Minder Information on
the Driver Information Interface
Warning MessageMaintenance Minder
InformationExplanationInformation
Service Due SoonOne or more of the service items are
required in less than 30 days. Press
the button to switch to
another display.The remaining days will be counted
down per day.
Service Due NowOne or more of the service items are
required in less than 10 days. Press
the button to switch to
another display.Have the indicated service
performed as soon as possible.
Service Past DueThe indicated maintenance service is
still not done after the remaining
time reaches 0. Press the
button to switch to another display.Your vehicle has passed the service
required point.
Immediately have the service
performed and make sure to reset
the Maintenance Minder
TM.
18 CLARITY ELECTRIC CSS-31TRV6100.book 462 ページ 2018年2月5日 月曜日 午後12時0分
Page 465 of 559
463
uuMaintenance MinderTMuTo Use Maintenance MinderTM
Continued
Maintenance
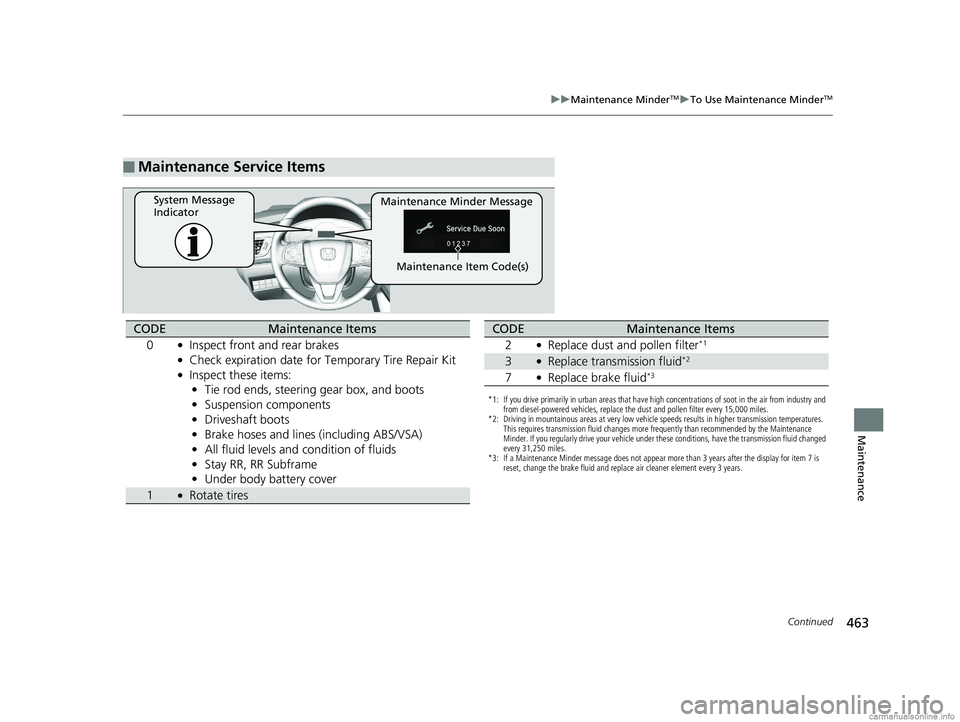
■Maintenance Service Items
Maintenance Minder Message
System Message
Indicator
Maintenance Item Code(s)
CODEMaintenance Items
0
●Inspect front and rear brakes●Check expiration date for Temporary Tire Repair Kit●Inspect these items: • Tie rod ends, steering gear box, and boots
• Suspension components
• Driveshaft boots
• Brake hoses and lines (including ABS/VSA)
• All fluid levels and condition of fluids
• Stay RR, RR Subframe
• Under body battery cover
1●Rotate tires
*1: If you drive primarily in urban areas that have high concentrations of soot in the air from industry and
from diesel-powered vehicles, replace the dust and pollen filter every 15,000 miles.
*2: Driving in mountainous areas at very low vehicle speeds results in higher transmission temperatures. This requires transmission fluid changes more frequently than recommended by the Maintenance
Minder. If you regularly drive your vehicle under these conditions, have the transmission fluid changed
every 31,250 miles.
*3: If a Maintenance Minder message does not appear more than 3 years after the display for item 7 is reset, change the brake fluid and replace air cleaner element every 3 years.
CODEMaintenance Items
2
●Replace dust and pollen filter*1
3●Replace transmission fluid*2
7●Replace brake fluid*3
18 CLARITY ELECTRIC CSS-31TRV6100.book 463 ページ 2018年2月5日 月曜日 午後12時0分
Page 466 of 559
uuMaintenance MinderTMuTo Use Maintenance MinderTM
464
Maintenance
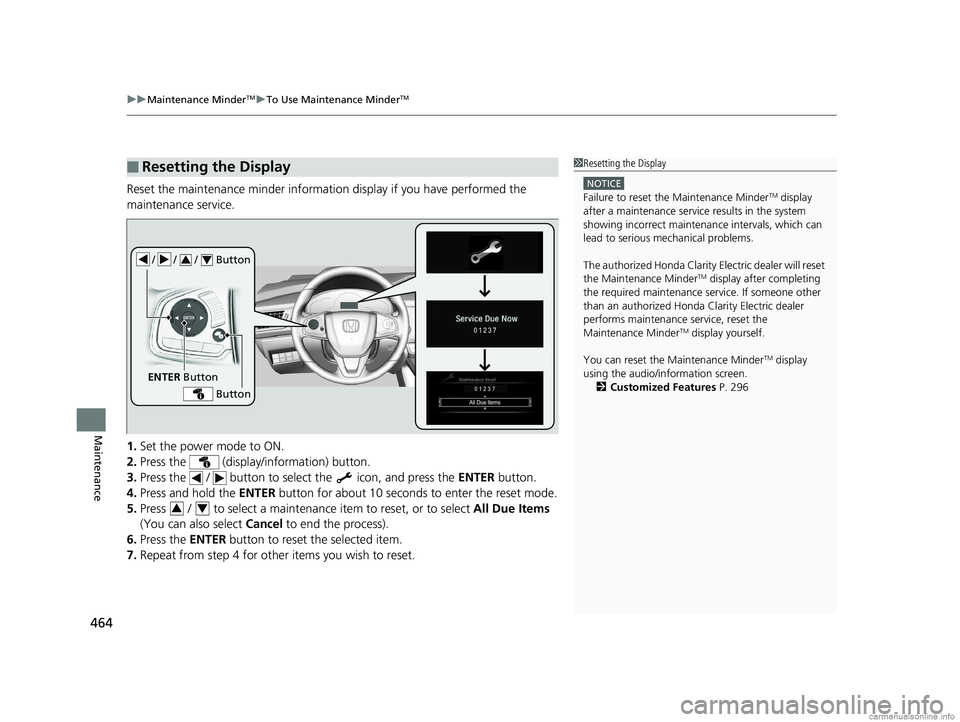
Reset the maintenance minder informat ion display if you have performed the
maintenance service.
1. Set the power mode to ON.
2. Press the (display/information) button.
3. Press the / button to sele ct the icon, and press the ENTER button.
4. Press and hold the ENTER button for about 10 seconds to enter the reset mode.
5. Press / to select a maintenance item to reset, or to select All Due Items
(You can also select Cancel to end the process).
6. Press the ENTER button to reset the selected item.
7. Repeat from step 4 for other items you wish to reset.
■Resetting the Display1Resetting the Display
NOTICE
Failure to reset the Maintenance MinderTM display
after a maintenance servic e results in the system
showing incorrect maintenance intervals, which can
lead to serious mechanical problems.
The authorized Honda Clarity Electric dealer will reset
the Maintenance Minder
TM display after completing
the required maintenance service. If someone other
than an authorized Honda Clarity Electric dealer
performs maintenance service, reset the
Maintenance Minder
TM display yourself.
You can reset the Maintenance Minder
TM display
using the audio/information screen. 2 Customized Features P. 296
/ / / Button34
ENTER Button
Button
34
18 CLARITY ELECTRIC CSS-31TRV6100.book 464 ページ 2018年2月5日 月曜日 午後12時0分
Page 474 of 559
472
Maintenance
Checking and Maintaining Wiper Blades
Checking Wiper Blades
If the wiper blade rubber has deteriorated, it will leave streaks and the hard surfaces
of the blade may scratch the window glass.
Changing the Wiper Blade Rubber
1. Set the power mode to VEHICLE OFF
(LOCK).
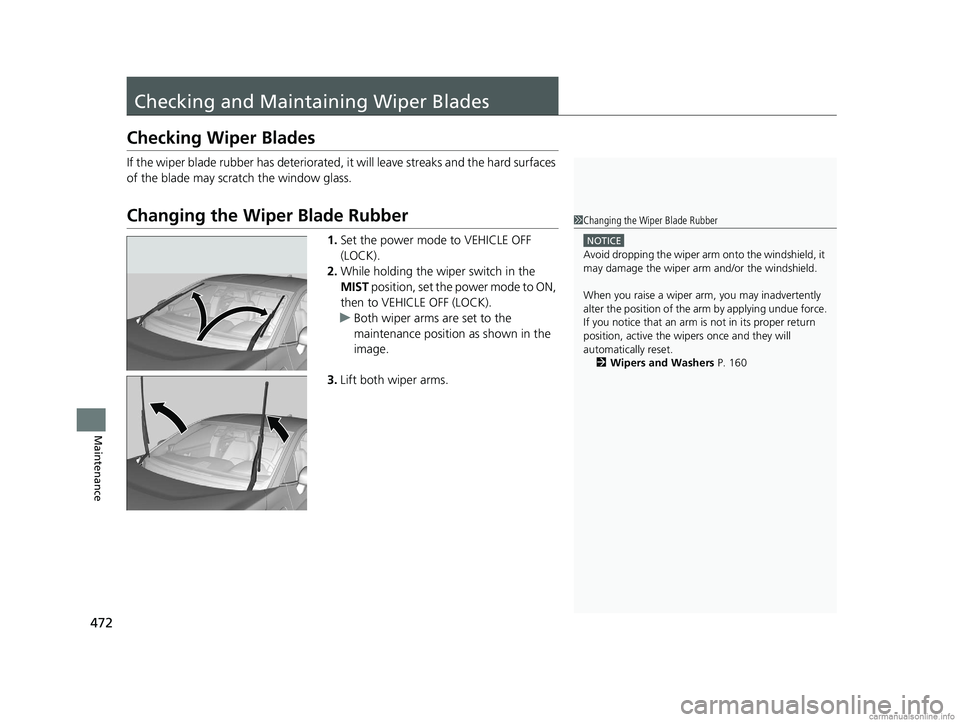
2. While holding the wiper switch in the
MIST position, set the power mode to ON,
then to VEHICLE OFF (LOCK).
u Both wiper arms are set to the
maintenance position as shown in the
image.
3. Lift both wiper arms.
1Changing the Wiper Blade Rubber
NOTICE
Avoid dropping the wiper arm onto the windshield, it
may damage the wiper arm and/or the windshield.
When you raise a wiper arm, you may inadvertently
alter the position of the arm by applying undue force.
If you notice that an arm is not in its proper return
position, active the wipers once and they will
automatically reset. 2 Wipers and Washers P. 160
18 CLARITY ELECTRIC CSS-31TRV6100.book 472 ページ 2018年2月5日 月曜日 午後12時0分
Page 486 of 559
484
Maintenance
12-Volt Battery
Checking the 12-Volt Battery
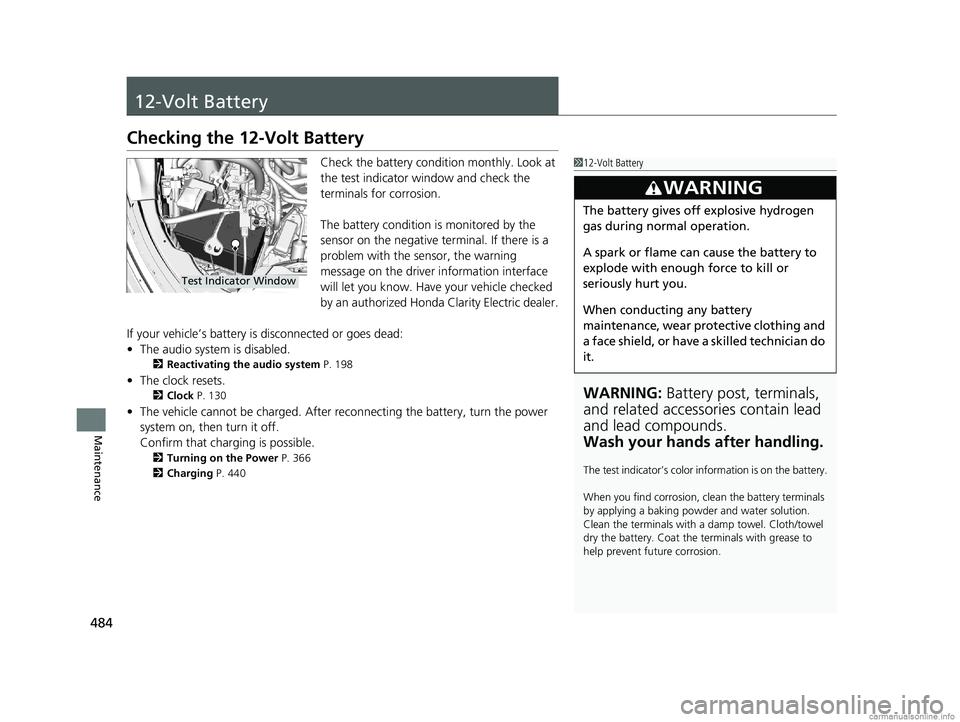
Check the battery condition monthly. Look at
the test indicator window and check the
terminals for corrosion.
The battery condition is monitored by the
sensor on the negative terminal. If there is a
problem with the sensor, the warning
message on the driver information interface
will let you know. Have your vehicle checked
by an authorized Honda Clarity Electric dealer.
If your vehicle’s battery is disconnected or goes dead:
• The audio system is disabled.
2 Reactivating the audio system P. 198
•The clock resets.
2 Clock P. 130
•The vehicle cannot be charged. After reconnecting the batte ry, turn the power
system on, then turn it off.
Confirm that charging is possible.
2 Turning on the Power P. 366
2 Charging P. 440
112-Volt Battery
WARNING: Battery post, terminals,
and related accessories contain lead
and lead compounds.
Wash your hands after handling.
The test indicator’s color in formation is on the battery.
When you find corrosion, cl ean the battery terminals
by applying a baking powder and water solution.
Clean the terminals with a damp towel. Cloth/towel
dry the battery. Coat the terminals with grease to
help prevent future corrosion.
3WARNING
The battery gives off explosive hydrogen
gas during normal operation.
A spark or flame can cause the battery to
explode with enough force to kill or
seriously hurt you.
When conducting any battery
maintenance, wear prot ective clothing and
a face shield, or have a skilled technician do
it.
Test Indicator Window
18 CLARITY ELECTRIC CSS-31TRV6100.book 484 ページ 2018年2月5日 月曜日 午後12時0分
Page 493 of 559
Continued491
uuCleaning uExterior Care
Maintenance
• Keep sufficient distance between the cleaning nozzle and the vehicle body.
• Take particular care around the windows. Standing too close may cause water to
enter the vehicle interior.
• Do not spray high pressure water direct ly into the motor compartment. Instead,
use low pressure water.
• Do not spray water under the hood where the electric motor and other high
voltage system components are located. It could cause a malfunction.
• Do not spray water directly at the charging port.
A good coat of automotive body wax helps protect your vehicle’s paint from the
elements. Wax will wear off over time and expose your vehicle’s paint to the
elements, so reapply as necessary.
If you get coolant or battery fluid on resin coated parts, they may be stained or the
coating may peel. Promptly wipe it away using a soft cloth and clean water.
Wipe using a glass cleaner.
■Using High Pressure Cleaners
■Applying Wax
■Maintaining the Bumpers and Other Resin Coated Parts
■Cleaning the Window
1 Applying Wax
NOTICE
Chemical solvents and st rong cleaners can damage
the paint, metal, and plasti c on your vehicle. Wipe
away spills immediately.
1 Maintaining the Bumpers an d Other Resin Coated Parts
Ask an authorized Honda Clar ity Electric dealer about
the correct coating material when you want to repair
the painted surface of the parts made of resin.
1 Cleaning the Window
When you raise a wiper arm, you may inadvertently
alter the position of the arm by applying undue force.
If you notice that an arm is not in its proper return
position, active the wipers once and they will
automatically reset. 2 Wipers and Washers P. 160
18 CLARITY ELECTRIC CSS-31TRV6100.book 491 ページ 2018年2月5日 月曜日 午後12時0分