battery HONDA CLARITY ELECTRIC 2019 (in English) Manual PDF
[x] Cancel search | Manufacturer: HONDA, Model Year: 2019, Model line: CLARITY ELECTRIC, Model: HONDA CLARITY ELECTRIC 2019Pages: 559, PDF Size: 28.11 MB
Page 467 of 559
465
uuMaintenance MinderTMuTo Use Maintenance MinderTM
Continued
Maintenance
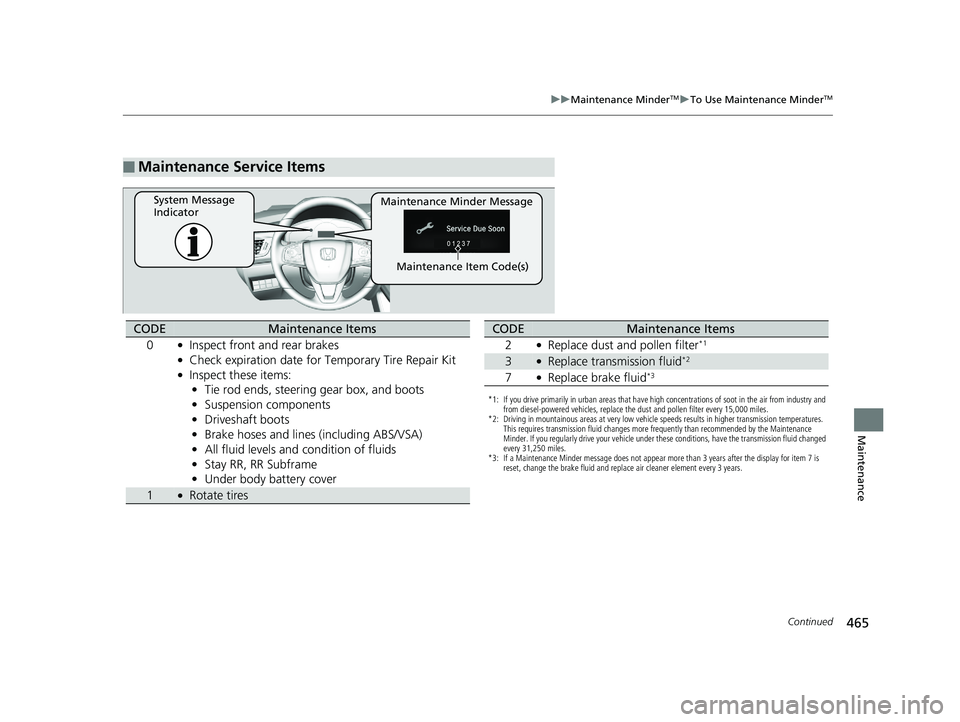
■Maintenance Service Items
Maintenance Minder Message
System Message
Indicator
Maintenance Item Code(s)
CODEMaintenance Items
0
●Inspect front and rear brakes●Check expiration date for Temporary Tire Repair Kit●Inspect these items: • Tie rod ends, steering gear box, and boots
• Suspension components
• Driveshaft boots
• Brake hoses and lines (including ABS/VSA)
• All fluid levels and condition of fluids
• Stay RR, RR Subframe
• Under body battery cover
1●Rotate tires
*1: If you drive primarily in urban areas that have high concentrations of soot in the air from industry and
from diesel-powered vehicles, replace the dust and pollen filter every 15,000 miles.
*2: Driving in mountainous areas at very low vehicle speeds results in higher transmission temperatures. This requires transmission fluid changes more frequently than recommended by the Maintenance
Minder. If you regularly drive your vehicle under these conditions, have the transmission fluid changed
every 31,250 miles.
*3: If a Maintenance Minder message does not appear more than 3 years after the display for item 7 is reset, change the brake fluid and replace air cleaner element every 3 years.
CODEMaintenance Items
2
●Replace dust and pollen filter*1
3●Replace transmission fluid*2
7●Replace brake fluid*3
19 CLARITY BEV-31TRV6200.book 465 ページ 2018年10月29日 月曜日 午前10時54分
Page 469 of 559
467
Maintenance
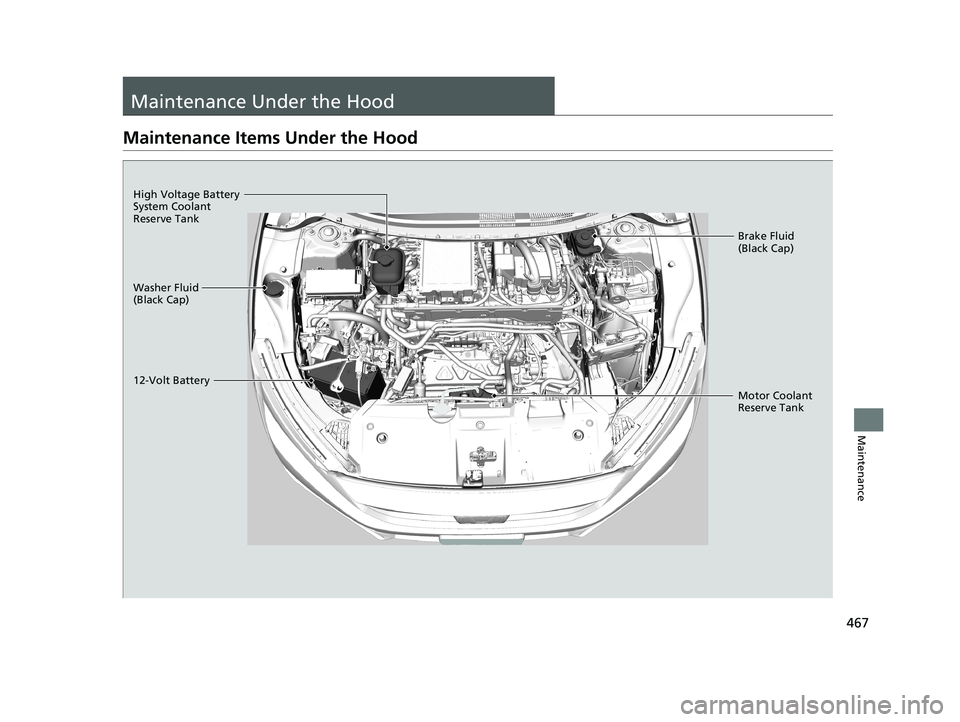
Maintenance Under the Hood
Maintenance Items Under the Hood
Washer Fluid
(Black Cap)
12-Volt BatteryBrake Fluid
(Black Cap)
Motor Coolant
Reserve Tank
High Voltage Battery
System Coolant
Reserve Tank
19 CLARITY BEV-31TRV6200.book 467 ページ 2018年10月29日 月曜日 午前10時54分
Page 471 of 559
469
uuMaintenance Under the Hood uCooling System
Maintenance
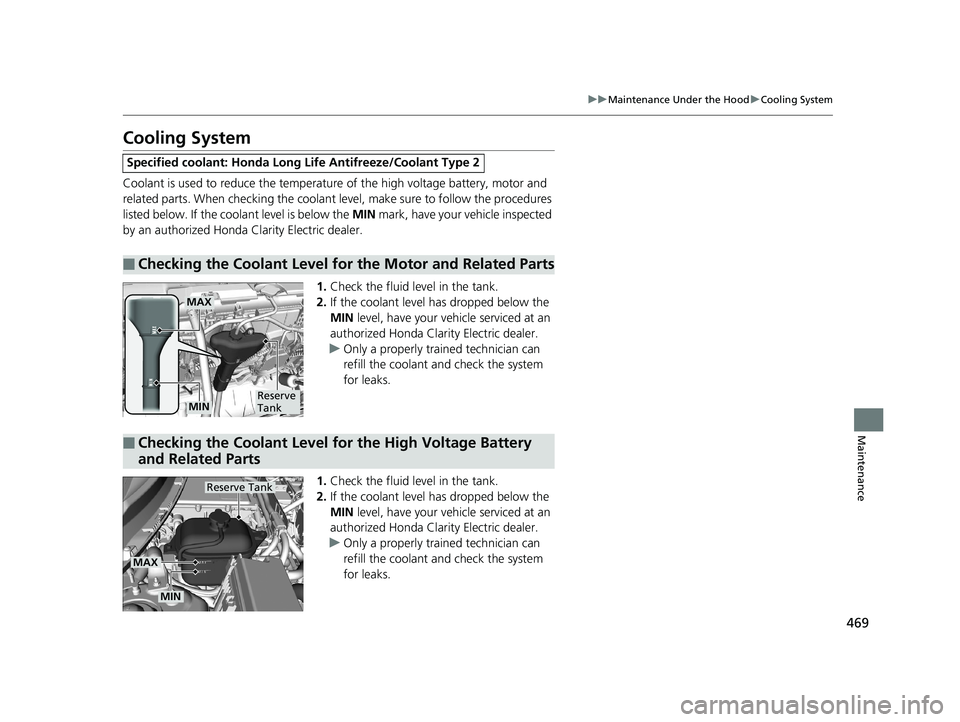
Cooling System
Coolant is used to reduce the temperat ure of the high voltage battery, motor and
related parts. When checking the coolant level, make sure to follow the procedures
listed below. If the cool ant level is below the MIN mark, have your vehicle inspected
by an authorized Honda Clarity Electric dealer.
1.Check the fluid level in the tank.
2. If the coolant level has dropped below the
MIN level, have your ve hicle serviced at an
authorized Honda Clar ity Electric dealer.
u Only a properly trained technician can
refill the coolant and check the system
for leaks.
1. Check the fluid level in the tank.
2. If the coolant level has dropped below the
MIN level, have your ve hicle serviced at an
authorized Honda Clar ity Electric dealer.
u Only a properly trained technician can
refill the coolant and check the system
for leaks.
Specified coolant: Ho nda Long Life Antifreeze/Coolant Type 2
■Checking the Coolant Level for the Motor and Related Parts
MAX
Reserve
TankMIN
■Checking the Coolant Level for the High Voltage Battery
and Related Parts
Reserve Tank
MAX
MIN
19 CLARITY BEV-31TRV6200.book 469 ページ 2018年10月29日 月曜日 午前10時54分
Page 488 of 559
486
Maintenance
12-Volt Battery
Checking the 12-Volt Battery
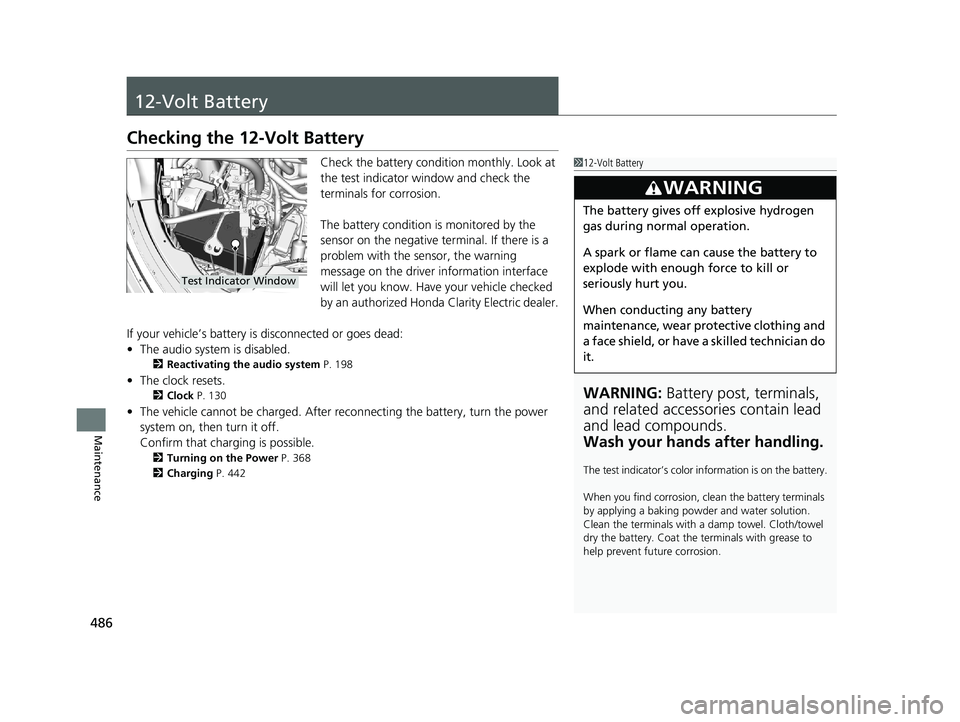
Check the battery condition monthly. Look at
the test indicator window and check the
terminals for corrosion.
The battery condition is monitored by the
sensor on the negative terminal. If there is a
problem with the sensor, the warning
message on the driver information interface
will let you know. Have your vehicle checked
by an authorized Honda Clarity Electric dealer.
If your vehicle’s battery is disconnected or goes dead:
• The audio system is disabled.
2 Reactivating the audio system P. 198
•The clock resets.
2 Clock P. 130
•The vehicle cannot be charged. After reconnecting the batte ry, turn the power
system on, then turn it off.
Confirm that charging is possible.
2 Turning on the Power P. 368
2 Charging P. 442
112-Volt Battery
WARNING: Battery post, terminals,
and related accessories contain lead
and lead compounds.
Wash your hands after handling.
The test indicator’s color in formation is on the battery.
When you find corrosion, cl ean the battery terminals
by applying a baking powder and water solution.
Clean the terminals with a damp towel. Cloth/towel
dry the battery. Coat the terminals with grease to
help prevent future corrosion.
3WARNING
The battery gives off explosive hydrogen
gas during normal operation.
A spark or flame can cause the battery to
explode with enough force to kill or
seriously hurt you.
When conducting any battery
maintenance, wear prot ective clothing and
a face shield, or have a skilled technician do
it.
Test Indicator Window
19 CLARITY BEV-31TRV6200.book 486 ページ 2018年10月29日 月曜日 午前10時54分
Page 489 of 559
487
uu12-Volt Battery uCharging the 12-Volt Battery
Maintenance
Charging the 12-Volt Battery
Disconnect both battery cables to prevent damaging your vehicle’s electrical system.
Always disconnect the negative (–) cable first, and reconnect it last.112-Volt Battery
When replacing the battery, the replacement must be
of the same specifications.
Consult an authorized Honda Clarity Electric dealer
for more information.
The indicators for the Vehicle Stability Assist ® (VSA ®)
system, VSA ® OFF, Collision Mitigation Braking
System
TM (CMBSTM), and low tire pressure/Tire
Pressure Monitoring System (TPMS) may come on
along with a message in the driver information
interface when you turn the power system on after
reconnecting the battery.
Drive a short distance at 12 mph (20 km/h). The
indicator should go off. If it does not, have your
vehicle checked by an authorized Honda Clarity
Electric dealer.
19 CLARITY BEV-31TRV6200.book 487 ページ 2018年10月29日 月曜日 午前10時54分
Page 490 of 559
488
Maintenance
Remote Transmitter Care
Replacing the Button Battery
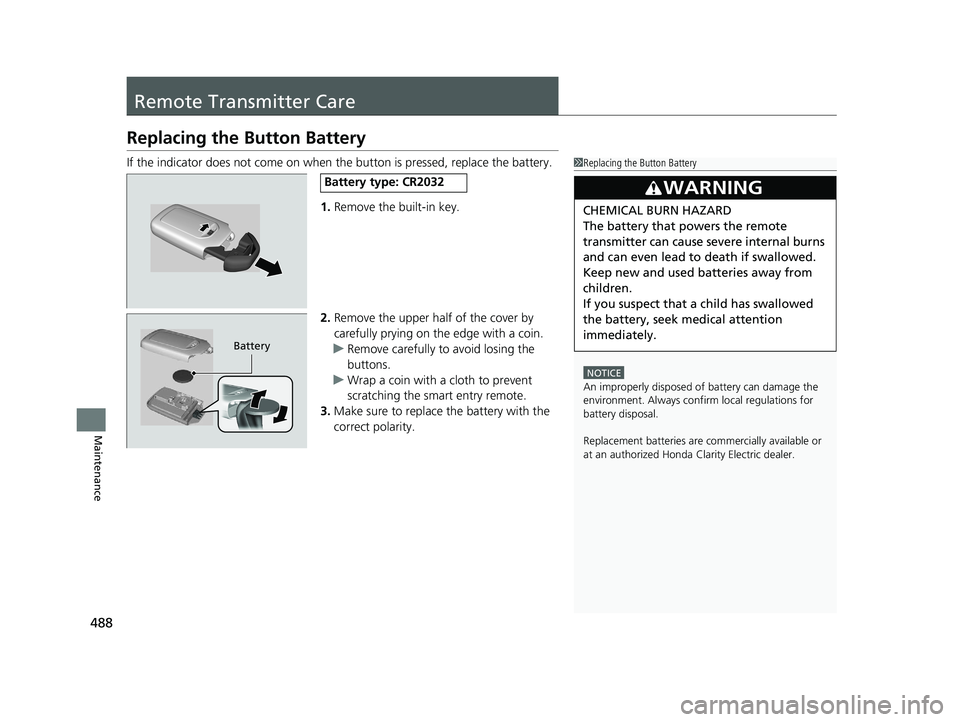
If the indicator does not come on when the button is pressed, replace the battery.
1. Remove the built-in key.
2. Remove the upper half of the cover by
carefully prying on the edge with a coin.
u Remove carefully to avoid losing the
buttons.
u Wrap a coin with a cloth to prevent
scratching the smart entry remote.
3. Make sure to replace the battery with the
correct polarity.1 Replacing the Button Battery
NOTICE
An improperly disposed of battery can damage the
environment. Always conf irm local regulations for
battery disposal.
Replacement batteries are commercially available or
at an authorized Honda Clarity Electric dealer.
3WARNING
CHEMICAL BURN HAZARD
The battery that powers the remote
transmitter can cause severe internal burns
and can even lead to death if swallowed.
Keep new and used batteries away from
children.
If you suspect that a child has swallowed
the battery, seek medical attention
immediately.
Battery type: CR2032
Battery
19 CLARITY BEV-31TRV6200.book 488 ページ 2018年10月29日 月曜日 午前10時54分
Page 495 of 559
Continued493
uuCleaning uExterior Care
Maintenance
• Keep sufficient distance between the cleaning nozzle and the vehicle body.
• Take particular care around the windows. Standing too close may cause water to
enter the vehicle interior.
• Do not spray high pressure water directly into the motor compartment. Instead,
use low pressure water.
• Do not spray water under the hood wh ere the electric motor and other high
voltage system components are located. It could cause a malfunction.
• Do not spray water directly at the charging port.
A good coat of automotive body wax helps protect your vehicle’s paint from the
elements. Wax will wear off over time and expose your vehicle’s paint to the
elements, so reapply as necessary.
If you get coolant or battery fluid on resin coated parts, they may be stained or the
coating may peel. Promptly wipe it aw ay using a soft cloth and clean water.
Wipe using a glass cleaner.
■Using High Pressure Cleaners
■Applying Wax
■Maintaining the Bumpers and Other Resin Coated Parts
■Cleaning the Window
1 Applying Wax
NOTICE
Chemical solvents and strong cleaners can damage
the paint, metal, and plasti c on your vehicle. Wipe
away spills immediately.
1 Maintaining the Bumpers an d Other Resin Coated Parts
Ask an authorized Honda Clar ity Electric dealer about
the correct coating material when you want to repair
the painted surface of the parts made of resin.
1 Cleaning the Window
When you raise a wiper arm, you may inadvertently
alter the position of the arm by applying undue force.
If you notice that an arm is not in its proper return
position, active the wipers once and they will
automatically reset. 2 Wipers and Washers P. 160
19 CLARITY BEV-31TRV6200.book 493 ページ 2018年10月29日 月曜日 午前10時54分
Page 498 of 559
496
Maintenance
Accessories and Modifications
Accessories
When installing accessories, check the following:
• Do not install accessories on the windshie ld. They can obstruct your view and
delay your reaction to driving conditions. In addition, they may become projectiles
in a crash.
• Do not install any accessorie s over areas marked SRS Airbag, on the sides or backs
of the front seats, on front or side pillars, or near the side windows. Accessories
installed in these areas may interfere wi th proper operation of the vehicle’s
airbags or may be propelled into you or another occupant if the airbags deploy.
• Be sure electronic accessories do not over load electrical circuits or interfere with
proper operation of your vehicle.
2 Fuses P. 526
•Before installing any electronic accessory, have the installer contact an authorized
Honda Clarity Electric dealer for assistance . If possible, have an authorized Honda
Clarity Electric dealer inspect the final installation.
1 Accessories and Modifications
Honda Genuine accessor ies are recommended to
ensure proper operati on on your vehicle.
3WARNING
Improper accessories or modifications can
affect your vehicle’s handling, stability, and
performance, and cause a crash in which
you can be seriously hurt or killed.
Follow all instruction s in this owner’s
manual regarding accessories and
modifications.
3WARNING
Use of improperly designed, engineered or
manufactured high-voltage battery
assemblies could cause a fire in your
vehicle.
A vehicle fire could result in a crash or
injury.
Only use a genuine Honda high-voltage
battery assembly, or it s equivalent, in your
vehicle.
19 CLARITY BEV-31TRV6200.book 496 ページ 2018年10月29日 月曜日 午前10時54分
Page 499 of 559
497
uuAccessories and Modifications uModifications
Maintenance
Modifications
Do not modify your vehicle in a manner that may affect its handling, stability, or
reliability, or install non-genuine Honda pa rts or accessories that may have a similar
effect.
Even minor modifications to vehicle systems can affect overall vehicle performance.
Always make sure all equipment is properly installed and maintained, and do not
make any modification to your vehicle or its systems that might cause your vehicle
to no longer meet federal, state, pr ovince, territory, and local regulations.
The on-board diagnostic port (OBD-II/SAE J1 962 connector) installed on this vehicle
is intended to be used with automobile system diagnostic devices or with other
devices that Honda has approved. Use of any other type of device may adversely
affect the vehicle’s electronic systems or allow them to be compromised, possibly
resulting in a system malfunction, drained battery, or other unexpected problems.
Do not modify or attempt to repair your vehicle’s high-voltage power system or
otherwise modify vehicle electrical systems. Disassembling or modifying electrical
equipment can result in a crash or a fire.
If you ever need to replace your vehicle’s high-voltage battery assembly outside of
warranty coverage, we highly recommend that you only use a genuine Honda high-
voltage battery assembly. Genuine Honda high-voltage battery assemblies are
designed to work with your vehicle’s power system and have been designed,
engineered and manufactured to avoid overcharging situations. Non-genuine high-
voltage battery assemblies may not have b een similarly designed, engineered and
manufactured, and installation of such assemb lies could result in overcharging, fires,
loss of power, or other conditions that may increase the likelihood of a crash or
injury.
19 CLARITY BEV-31TRV6200.book 497 ページ 2018年10月29日 月曜日 午前10時54分
Page 501 of 559
499
Handling the Unexpected
This chapter explains how to handle unexpected troubles.
If a Tire Goes FlatTemporarily Repairi ng a Flat Tire....... 500
Handling of the Jack ......................... 512
Power System Won’t Start Checking the Procedure ................... 513
If the Smart Entry Remote Battery is Weak .......................................... 514
Emergency Power System Off........... 515
Jump Starting .................................... 516
Overheating How to Handle Overheating ............. 519 Indicator, Coming On/Blinking
If the 12-Volt Battery Charging System Indicator Comes On ....................... 520
If the Brake System Indicator (Red) Comes On or Blinks ....................................... 521
If the Electric Power Steering (EPS) System
Indicator Comes On ........................... 522If the Brake System Indicator (Red) Comes On or Blinks at the Same Time
When the Brake System Indicator
(Amber) Comes On ...................... 523
If the Low Tire Pressure/TPMS Indicator
Comes On or Blinks........................ 524 If the Transmission System Indicator Blinks
along with the Warning Message .... 525
Fuses
Fuse Locations ................................. 526
Inspecting and Changing Fuses ........ 532
Emergency Towing ........................... 533
When You Cannot Open the Charge
Lid ................................................. 534
When You Cannot Disengage the Charging
Connector.................................................535When You Cannot Open the Trunk .. 536
19 CLARITY BEV-31TRV6200.book 499 ページ 2018年10月29日 月曜日 午前10時54分