instrument panel HONDA CLARITY FUEL CELL 2019 (in English) Repair Manual
[x] Cancel search | Manufacturer: HONDA, Model Year: 2019, Model line: CLARITY FUEL CELL, Model: HONDA CLARITY FUEL CELL 2019Pages: 551, PDF Size: 27.39 MB
Page 217 of 551
Continued215
uuAudio System Basic Operation uAudio/Information Screen
Features
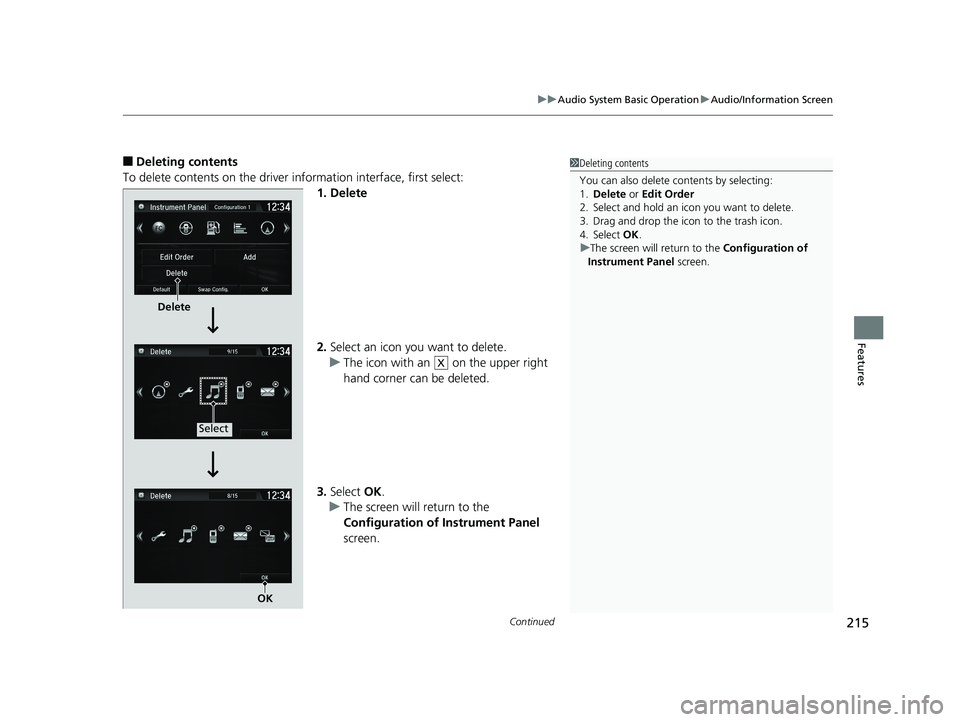
■Deleting contents
To delete contents on the driver information interface, first select:
1. Delete
2.Select an icon you want to delete.
u The icon with an on the upper right
hand corner can be deleted.
3. Select OK.
u The screen will return to the
Configuration of Instrument Panel
screen.1 Deleting contents
You can also delete c ontents by selecting:
1. Delete or Edit Order
2. Select and hold an icon you want to delete.
3. Drag and drop the icon to the trash icon.
4. Select OK .
u The screen will return to the Configuration of
Instrument Panel screen.
Delete
Select
OK
X
19 CLARITY FCV CSS-31TRT6200.book 215 ページ 2019年1月17日 木曜日 午前11 時54分
Page 224 of 551
uuAudio System Basic Operation uAudio/Information Screen
222
Features
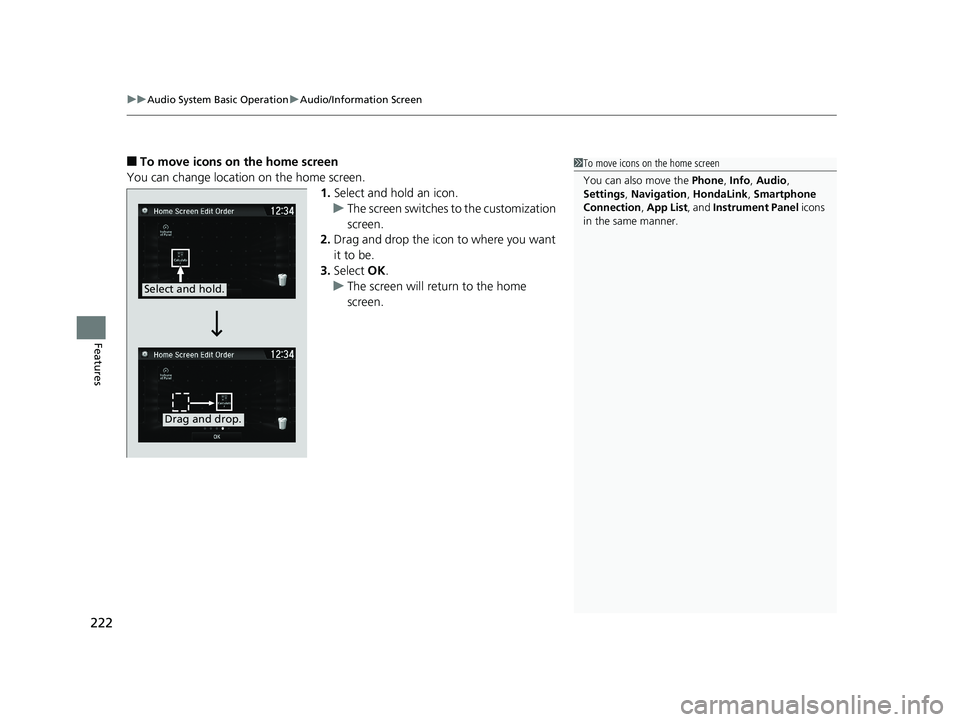
■To move icons on the home screen
You can change location on the home screen. 1.Select and hold an icon.
u The screen switches to the customization
screen.
2. Drag and drop the icon to where you want
it to be.
3. Select OK.
u The screen will return to the home
screen.1To move icons on the home screen
You can also move the Phone, Info, Audio ,
Settings , Navigation , HondaLink, Smartphone
Connection , App List , and Instrument Panel icons
in the same manner.
Select and hold.
Drag and drop.
19 CLARITY FCV CSS-31TRT6200.book 222 ページ 2019年1月17日 木曜日 午前11 時54分
Page 225 of 551
Continued223
uuAudio System Basic Operation uAudio/Information Screen
Features
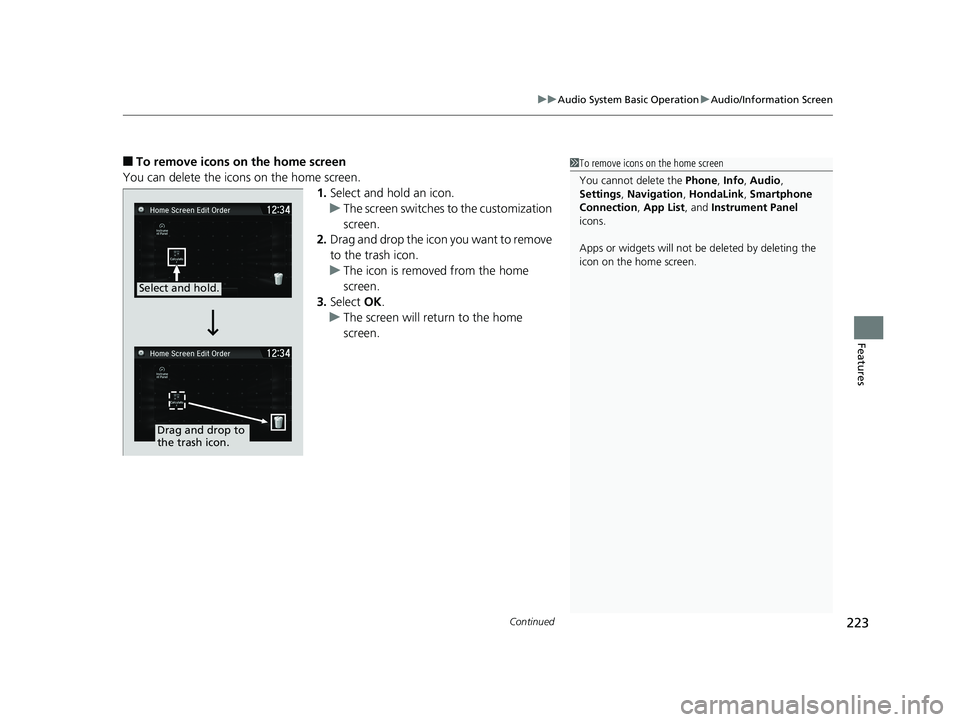
■To remove icons on the home screen
You can delete the icons on the home screen. 1.Select and hold an icon.
u The screen switches to the customization
screen.
2. Drag and drop the icon you want to remove
to the trash icon.
u The icon is removed from the home
screen.
3. Select OK.
u The screen will return to the home
screen.1To remove icons on the home screen
You cannot delete the Phone, Info, Audio ,
Settings , Navigation , HondaLink, Smartphone
Connection , App List, and Instrument Panel
icons.
Apps or widgets will not be deleted by deleting the
icon on the home screen.
Select and hold.
Drag and drop to
the trash icon.
19 CLARITY FCV CSS-31TRT6200.book 223 ページ 2019年1月17日 木曜日 午前11 時54分
Page 305 of 551
303
uuCustomized Features u
Continued
Features
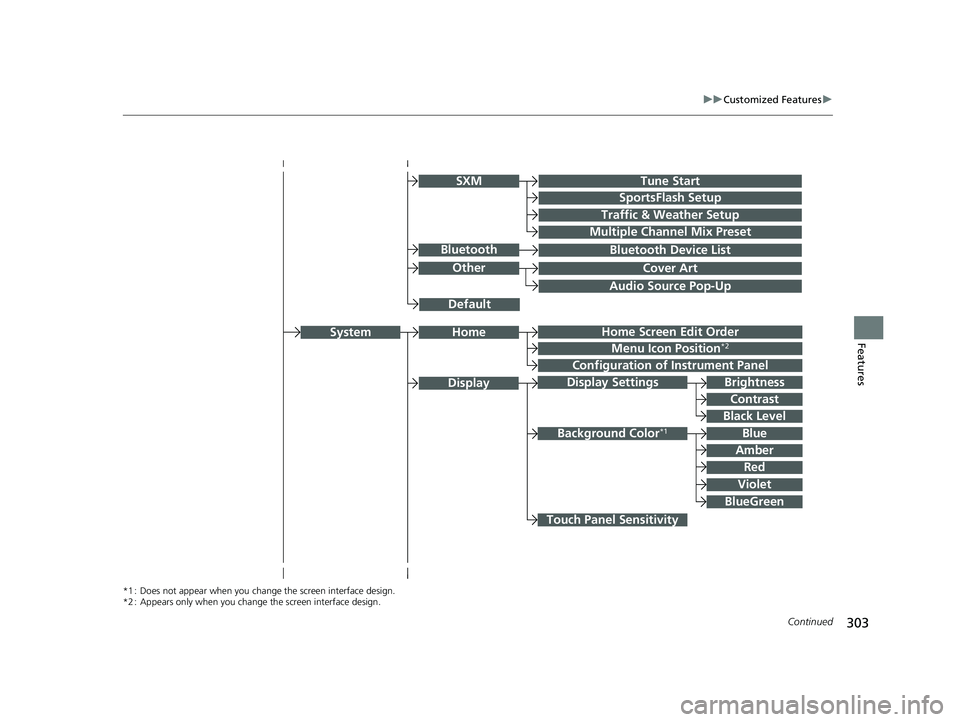
Audio Source Pop-Up
Cover Art
Tune Start
SportsFlash Setup
Traffic & Weather Setup
Other
SXM
Default
Bluetooth Device ListBluetooth
Multiple Channel Mix Preset
Home Screen Edit Order
Configuration of Instrument Panel
Display Settings
Background Color*1
Display
System
Touch Panel Sensitivity
Brightness
Contrast
Black Level
Blue
Amber
Red
Violet
BlueGreen
Home
Menu Icon Position*2
*1 : Does not appear when you chan ge the screen interface design.
*2 : Appears only when you change the screen interface design.
19 CLARITY FCV CSS-31TRT6200.book 303 ページ 2019年1月17日 木曜日 午前11 時54分
Page 317 of 551
315
uuCustomized Features u
Continued
Features
*1:Default Setting
*2:Appears only when you change the screen interface design.
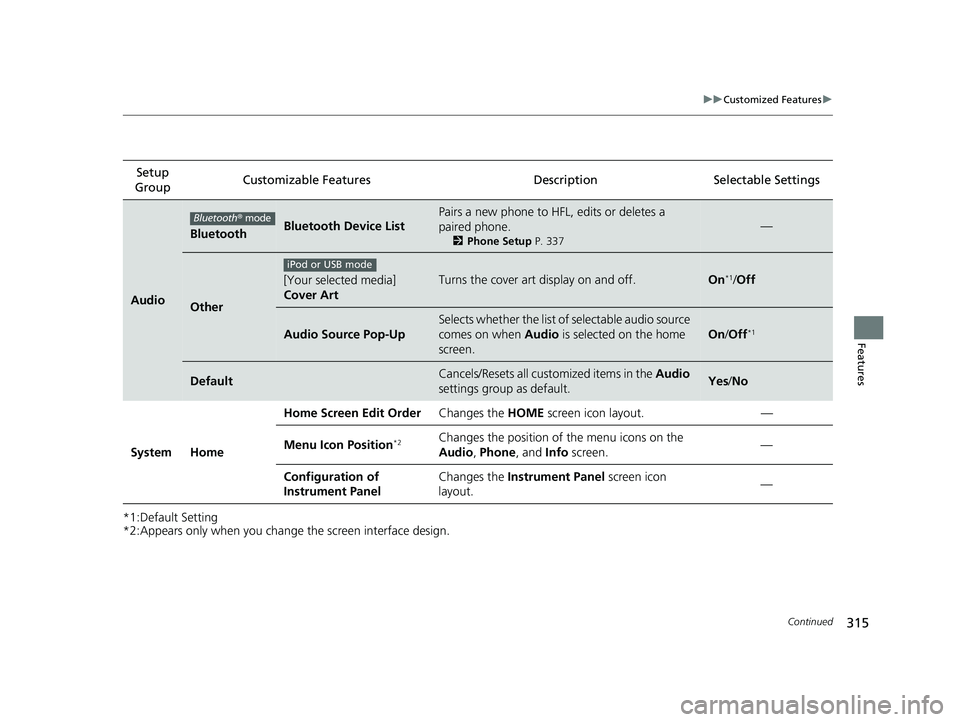
Setup
Group Customizable Features Description Selectable Settings
Audio
BluetoothBluetooth Device List
Pairs a new phone to HFL, edits or deletes a
paired phone.
2
Phone Setup P. 337
—
Other
[Your selected media]
Cover ArtTurns the cover art display on and off.On*1/Off
Audio Source Pop-Up
Selects whether the list of selectable audio source
comes on when Audio is selected on the home
screen.
On /Off*1
DefaultCancels/Resets all customized items in the Audio
settings group as default.Yes /No
System Home Home Screen Edit Order
Changes the HOME screen icon layout. —
Menu Icon Position
*2Changes the position of the menu icons on the
Audio , Phone, and Info screen. —
Configuration of
Instrument Panel Changes the
Instrument Panel screen icon
layout. —
Bluetooth
® mode
iPod or USB mode
19 CLARITY FCV CSS-31TRT6200.book 315 ページ 2019年1月17日 木曜日 午前11 時54分
Page 325 of 551
323
uuCustomized Features u
Continued
Features
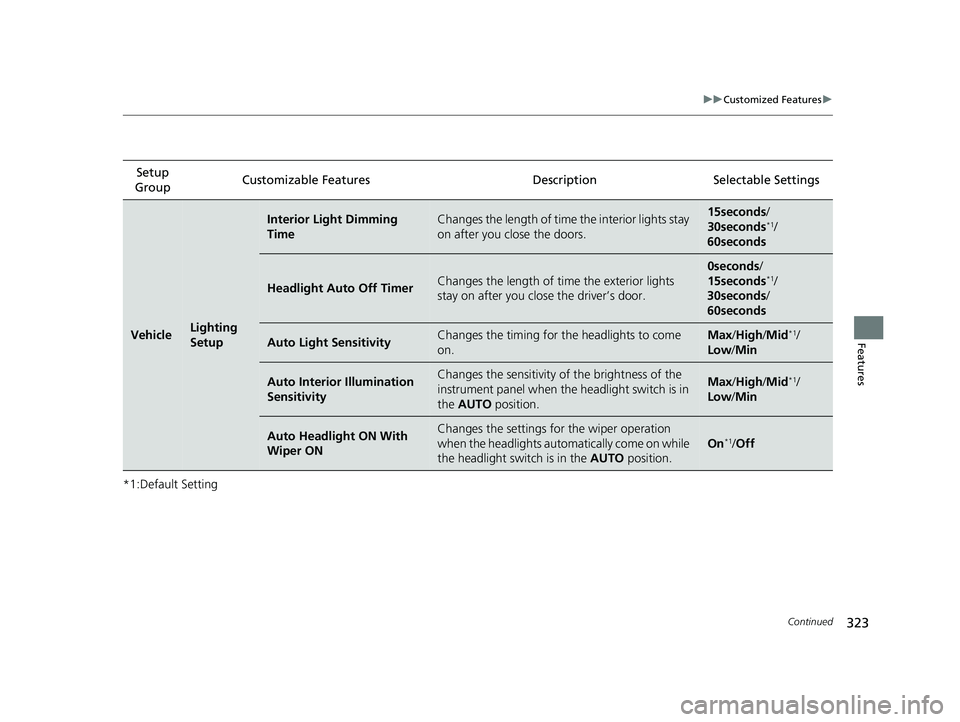
*1:Default SettingSetup
Group Customizable Features Desc
ription Selectable Settings
VehicleLighting
Setup
Interior Light Dimming
TimeChanges the length of time the interior lights stay
on after you close the doors.15seconds/
30seconds*1/
60seconds
Headlight Auto Off TimerChanges the length of time the exterior lights
stay on after you clos e the driver’s door.
0seconds/
15seconds*1/
30seconds /
60seconds
Auto Light SensitivityChanges the timing for th e headlights to come
on.Max /High /Mid*1/
Low/ Min
Auto Interior Illumination
SensitivityChanges the sensitivity of the brightness of the
instrument panel when the headlight switch is in
the AUTO position.Max/High /Mid*1/
Low/ Min
Auto Headlight ON With
Wiper ONChanges the settings for the wiper operation
when the headlights automa tically come on while
the headlight switch is in the AUTO position.
On*1/Off
19 CLARITY FCV CSS-31TRT6200.book 323 ページ 2019年1月17日 木曜日 午前11 時54分
Page 385 of 551
383
uuWhen Driving uFront Sensor Camera
Continued
Driving
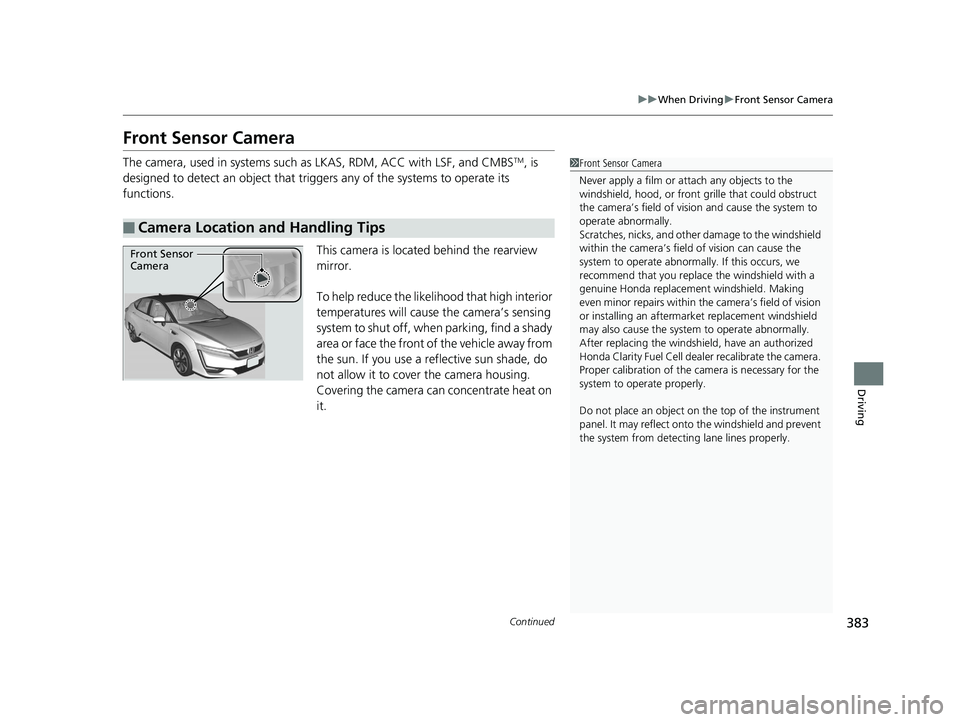
Front Sensor Camera
The camera, used in systems such as LKAS, RDM, ACC with LSF, and CMBSTM, is
designed to detect an object that tri ggers any of the systems to operate its
functions.
This camera is located behind the rearview
mirror.
To help reduce the likelihood that high interior
temperatures will cause the camera’s sensing
s y s t e m t o s h u t o f f , w h e n p a r k i n g , f i n d a s h a d y
area or face the front of the vehicle away from
the sun. If you use a reflective sun shade, do
not allow it to cover the camera housing.
Covering the camera can concentrate heat on
it.
■Camera Location and Handling Tips
1Front Sensor Camera
Never apply a film or attach any objects to the
windshield, hood, or front grille that could obstruct
the camera’s field of vision and cause the system to
operate abnormally.
Scratches, nicks, and othe r damage to the windshield
within the camera’s fiel d of vision can cause the
system to operate abnormall y. If this occurs, we
recommend that you replac e the windshield with a
genuine Honda replacem ent windshield. Making
even minor repairs within th e camera’s field of vision
or installing an aftermarket replacement windshield
may also cause the system to operate abnormally.
After replacing th e windshield, have an authorized
Honda Clarity Fuel Cell deal er recalibrate the camera.
Proper calibrat ion of the camera is necessary for the
system to ope rate properly.
Do not place an object on the top of the instrument
panel. It may reflect onto the windshield and prevent
the system from detecting lane lines properly.
Front Sensor
Camera
19 CLARITY FCV CSS-31TRT6200.book 383 ページ 2019年1月17日 木曜日 午前11 時54分
Page 392 of 551
uuWhen Driving uAdaptive Cruise Control (ACC) with Low Speed Follow (LSF)
390
Driving
■How to activate the system1Adaptive Cruise Control (ACC) with Low Speed Follow (LSF)
When the MAIN button is pressed, both ACC with
LSF and the Lane Keeping Assist System (LKAS) are
either turned on or off.
ACC with LSF may not work properly under certain
conditions. 2 ACC with LSF Conditions and Limitations
P. 395
When not using ACC with LSF: Turn off adaptive
cruise by pressing the MAIN button. This also will
turn off the Lane Keeping Assist System (LKAS).
Do not use ACC with LSF under the following
conditions:
•On roads with heavy traf fic or while driving in
continuous stop and go traffic.
•On roads with sharp turns.
•On roads with steep downhill sections, as the set
vehicle speed can be exceeded by coasting. In such
cases, ACC with LSF will not apply the brakes to
maintain the set speed.
•On roads with toll collection facilities or other
objects between lanes of traffic, or in parking
areas, or faci lities with driv e through access.
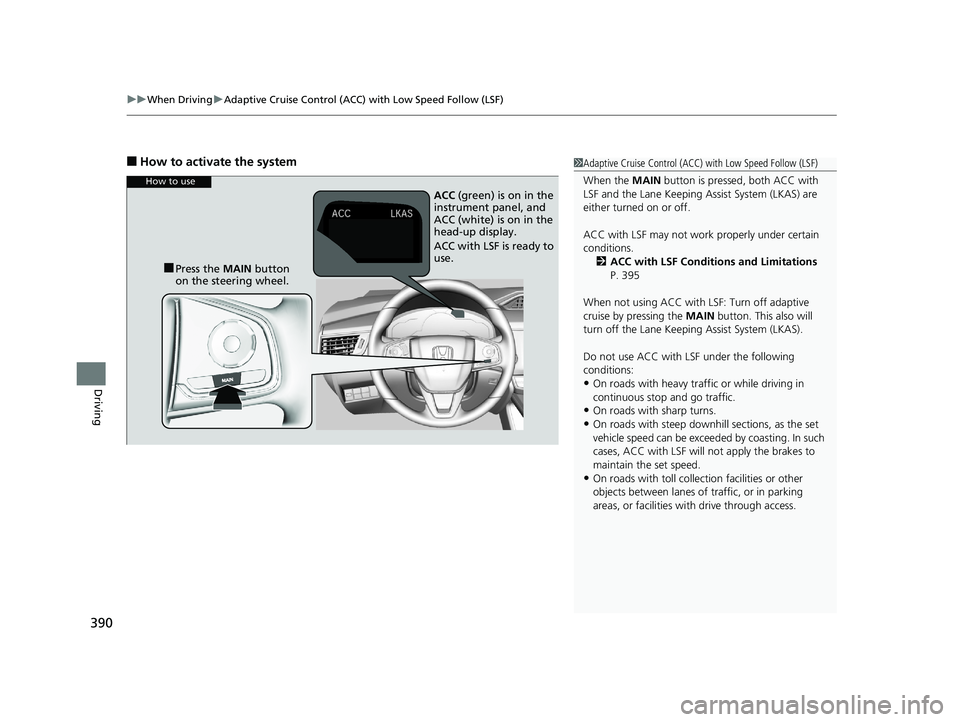
How to use
■Press the MAIN button
on the steering wheel. ACC
(green) is on in the
instrument panel, and
ACC (white) is on in the
head-up display.
ACC with LSF is ready to
use.
19 CLARITY FCV CSS-31TRT6200.book 390 ページ 2019年1月17日 木曜日 午前11 時54分
Page 407 of 551
405
uuWhen Driving uLane Keeping Assist System (LKAS)
Continued
Driving
Lane Keeping Assist System (LKAS)
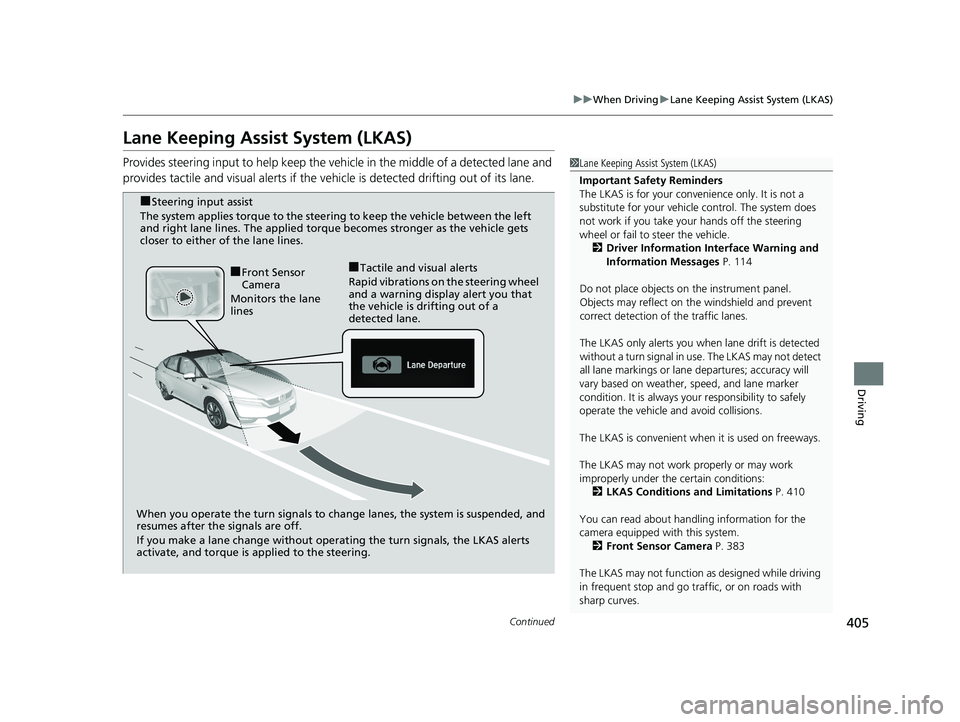
Provides steering input to help keep the vehicle in the middle of a detected lane and
provides tactile and visual al erts if the vehicle is detected drifting out of its lane.1Lane Keeping Assist System (LKAS)
Important Safety Reminders
The LKAS is for your convenience only. It is not a
substitute for your vehicl e control. The system does
not work if you take y our hands off the steering
wheel or fail to steer the vehicle.
2 Driver Information Interface Warning and
Information Messages P. 114
Do not place objects on the instrument panel.
Objects may reflect on th e windshield and prevent
correct detection of the traffic lanes.
The LKAS only alerts you when lane drift is detected
without a turn signal in us e. The LKAS may not detect
all lane markings or lane departures; accuracy will
vary based on weather, speed, and lane marker
condition. It is always your responsibility to safely
operate the vehicle an d avoid collisions.
The LKAS is convenient when it is used on freeways.
The LKAS may not work properly or may work
improperly under the certain conditions:
2 LKAS Conditions and Limitations P. 410
You can read about handling information for the
camera equipped with this system. 2 Front Sensor Camera P. 383
The LKAS may not function as designed while driving
in frequent stop and go traf fic, or on roads with
sharp curves.
When you operate the turn signals to chan ge lanes, the system is suspended, and
resumes after the signals are off.
If you make a lane change without operat ing the turn signals, the LKAS alerts
activate, and torque is applied to the steering.
■Front Sensor
Camera
Monitors the lane
lines■Tactile and visual alerts
Rapid vibrations on the steering wheel
and a warning display alert you that
the vehicle is drifting out of a
detected lane.
■Steering input assist
The system applies torque to the steering to keep the vehicle between the left
and right lane lines. The applied torque becomes stronger as the vehicle gets
closer to either of the lane lines.
19 CLARITY FCV CSS-31TRT6200.book 405 ページ 2019年1月17日 木曜日 午前11 時54分
Page 437 of 551
Continued435
uuBraking uCollision Mitigation Braking SystemTM (CMBSTM)
Driving
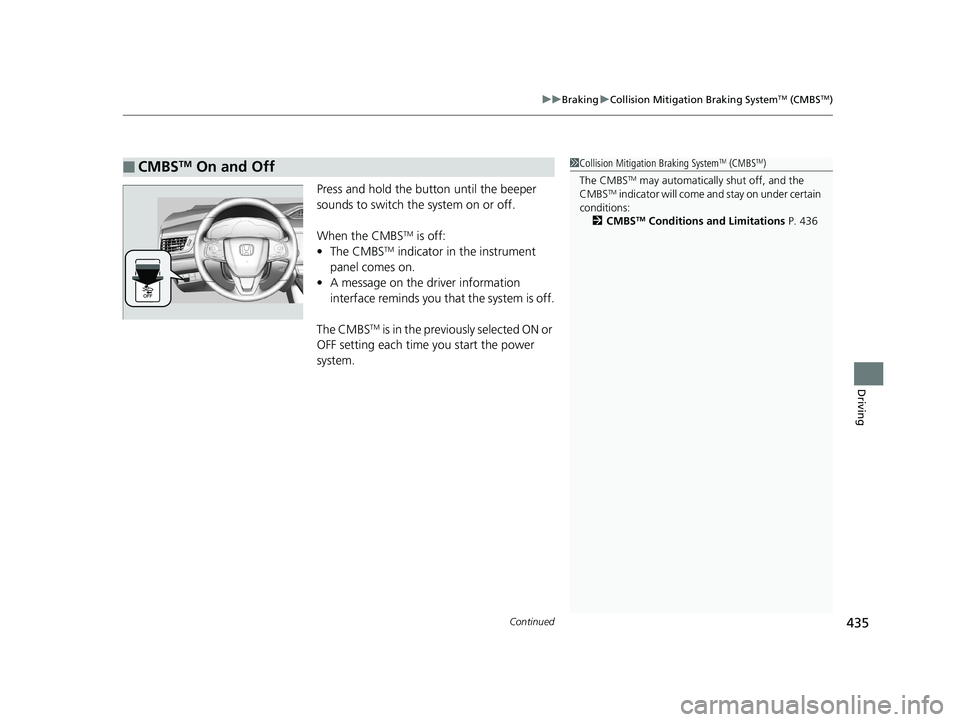
Press and hold the button until the beeper
sounds to switch the system on or off.
When the CMBS
TM is off:
• The CMBSTM indicator in the instrument
panel comes on.
• A message on the driver information
interface reminds you th at the system is off.
The CMBS
TM is in the previously selected ON or
OFF setting each time you start the power
system.
■CMBSTM On and Off1 Collision Mitigation Braking SystemTM (CMBSTM)
The CMBS
TM may automatically shut off, and the
CMBSTM indicator will come and stay on under certain
conditions:
2 CMBS
TM Conditions and Limitations P. 436
19 CLARITY FCV CSS-31TRT6200.book 435 ページ 2019年1月17日 木曜日 午前11 時54分