steering wheel HONDA CLARITY PLUG-IN 2020 (in English) Workshop Manual
[x] Cancel search | Manufacturer: HONDA, Model Year: 2020, Model line: CLARITY PLUG-IN, Model: HONDA CLARITY PLUG-IN 2020Pages: 595, PDF Size: 30.43 MB
Page 439 of 595
Continued437
uuBraking uBrake System
Driving
Your vehicle is equipped with disc brakes at all four wheels. The brake assist system
increases the stopping force when you depress the brake pedal hard in an
emergency situation. The an ti-lock brake system (ABS) helps you retain steering
control when brak ing very hard.
2Brake Assist System P. 442
2 Anti-lock Brake System (ABS) P. 441
■Foot Brake1Parking Brake
The parking brake may not be released automatically
while the following indicators are on:
•POWER SYSTEM indicator•Transmission system indicator
•Parking brake and brake system indicator (amber)
•VSA® system indicator
•ABS indicator•Supplemental restraint system indicator
1Foot Brake
Check the brakes after driving through deep water,
or if there is a buildup of road surface water. If
necessary, dry the brakes by lightly depressing the
pedal several times.
If you hear a continuous me tallic friction sound when
applying the brakes, this is caused by the brake wear
indicator rubbing on the brake rotor and indicates
that the brake pads need to be replaced. Have the
vehicle checked by an aut horized Honda Clarity Plug-
In Hybrid dealer. If you hear only an occasional
squeak or squeal when y ou initially apply the brake
pedal, this may be normal and caused by high
frequency vibration of th e brake pads against the
rotating brake disc.
20 CLARITY PHEV-31TRW6200.book 437 ページ 2019年9月24日 火曜日 午後12時9分
Page 443 of 595
441
uuBraking uAnti-lock Brake System (ABS)
Driving
Anti-lock Brake System (ABS)
Helps prevent the wheels from locking up, and helps you retain steering control by
pumping the brakes rapidly, much faster than you.
The electronic brake distribu tion (EBD) system, which is part of the ABS, also
balances the front-to-rear braking distribution according to vehicle loading.
You should never pu mp the brake pedal. Let the ABS work for you by always
keeping firm, steady pressure on the brake pe dal. This is sometimes referred to as
“stomp and steer.”
■ABS operation
You may hear an operating noise when th e ABS is working. Depress the brake pedal
and keep holding the pedal firmly down. On dry pavement, you will need to press
on the brake pedal very hard before the AB S activates. However, you may feel the
ABS activate immediately if you are trying to stop on snow or ice.
ABS may activate when you depres s the brake pedal when driving on:
• Wet or snow covered roads.
• Roads paved with stone.
• Roads with uneven surf aces, such as potholes, cracks, manholes, etc.
When the vehicle speed goes unde r 6 mph (10 km/h), the ABS stops.
■ABS1Anti-lock Brake System (ABS)
NOTICE
The ABS may not function correctly if you use a tire of
the wrong size or type.
If the ABS indicator comes on while driving, there
may be a problem with the system.
While normal braking will not be affected, there is a
possibility that the ABS wi ll not be operating. Have
your vehicle checked by an authorized Honda Clarity
Plug-In Hybrid dealer immediately.
The ABS is not designed for the purpose of reducing
the time or distance it takes for a vehicle to stop: It is
designed to limit brake lockup which can lead to
skidding and loss of steering control.
In the following cases, yo ur vehicle may need more
distance to stop than a vehicle without the ABS:
•You are driving on rough or uneven road surfaces,
such as gravel or snow.
•The tires are equipped with tire chains.
The following may be observed with the ABS system:
•Motor sounds coming from the engine
compartment when the brakes are applied, or
when system checks are being performed after the
power system has been turned on and while the
vehicle accelerates.
•Brake pedal and/or the vehicle body vibration when
ABS activates.
These vibrations and sou nds are normal to ABS
systems and are no cause for concern.
20 CLARITY PHEV-31TRW6200.book 441 ページ 2019年9月24日 火曜日 午後12時9分
Page 445 of 595
443
uuBraking uCollision Mitigation Braking SystemTM (CMBSTM)
Continued
Driving
Collision Mitigation Braking SystemTM (CMBSTM)
Can assist you when there is a possibility of your vehicle colliding with a vehicle or a
pedestrian detected in front of yours. The CMBSTM is designed to alert you when a
potential collision is determined, as well as to reduce your vehicle speed to help
minimize collision severity when a collision is deemed unavoidable.
■How the system works
1 Collision Mitigation Braking SystemTM (CMBSTM)
Important Safety Reminder
The CMBS
TM is designed to reduce the severity of an
unavoidable collision. It do es not prevent a collision
nor stop the vehicle automati cally. It is still your
responsibility to operate the brake pedal and steering
wheel appropriately acco rding to the driving
conditions.
The CMBS
TM may not activate or may not detect a
vehicle in front of y our vehicle under certain
conditions: 2 CMBS
TM Conditions and Limitations P. 447
You can read about handling information for the
camera equipped with this system. 2 Front Sensor Camera P. 396
Be careful not to severely impact the radar sensor
cover.
1 How the system works
Rapid vibrations on the steering wheel alert you
when the your vehicle speed is between 19 and 62
mph (30 and 100 km/h) with an oncoming vehicle
detected in front of you.
When the CMBS
TM activates, it may automatically
apply the brake. It will be canceled when your vehicle
stops or a potential coll ision is not determined.
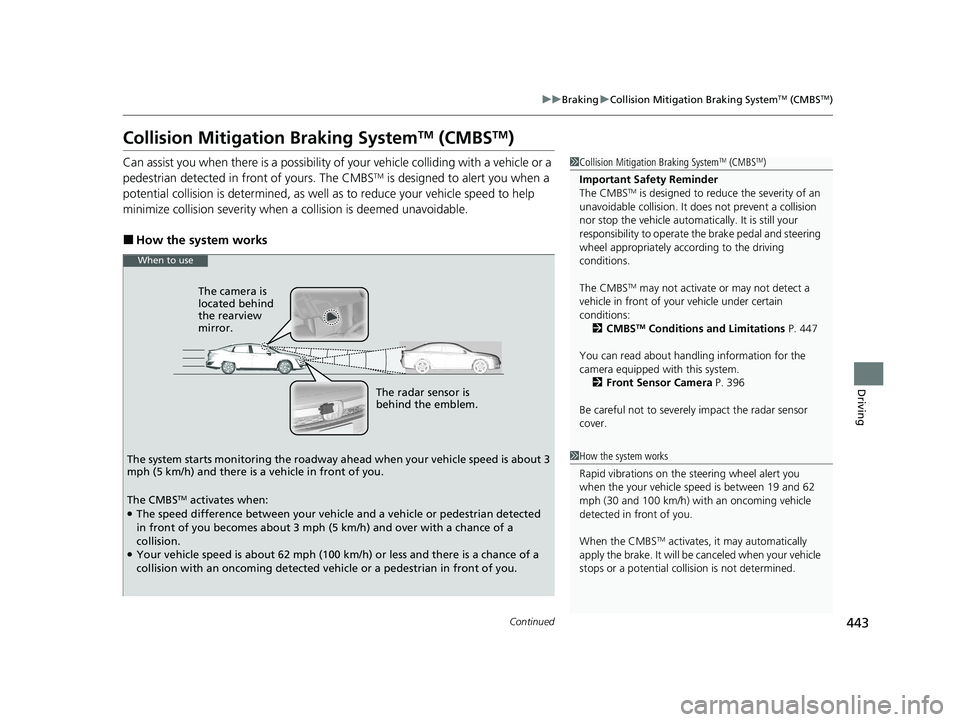
The radar sensor is
behind the emblem.
The camera is
located behind
the rearview
mirror.
The system starts monitoring the roadway ah ead when your vehicle speed is about 3
mph (5 km/h) and there is a vehicle in front of you.
When to use
The CMBSTM activates when:●The speed difference between your vehicle and a vehicle or pedestrian detected
in front of you becomes about 3 mph (5 km/h) and over with a chance of a
collision.
●Your vehicle speed is about 62 mph (100 km/h) or less and there is a chance of a
collision with an oncoming detected vehicle or a pedestrian in front of you.
20 CLARITY PHEV-31TRW6200.book 443 ページ 2019年9月24日 火曜日 午後12時9分
Page 446 of 595
uuBraking uCollision Mitigation Braking SystemTM (CMBSTM)
444
Driving
■When the system activates
At system’s earliest collision alert stage, you can change the distance ( Long/
Normal /Short) between vehicles at which aler ts will come on through audio/
information screen setting options.
2 Customized Features P. 306
■Vibration alert on the steering wheel
When a potential collision to an oncoming detected vehicle is determined, the
system alerts you with rapid vibration on the steering wheel, in addition to visual and
audible alerts. u Take appropriate action to prevent a co llision (apply the brakes, operate the
steering wheel, etc.).
1 When the system activates
The camera in the CMBS
TM is also designed to detect
pedestrians.
However, this pedestrian detection feature may not
activate or may not detect a pedestrian in front of
your vehicle under certain conditions.
Refer to the ones indicating the pedestrian detection
limitations from the list. 2 CMBS
TM Conditions and Limitations P. 447
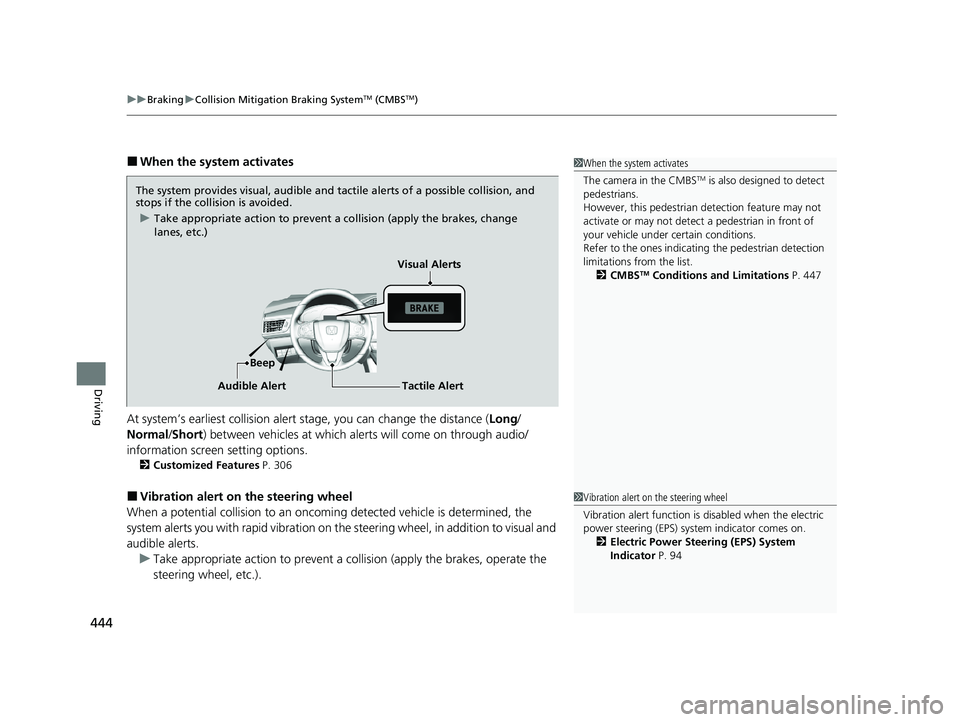
The system provides visual, audible and tactile alerts of a possible collision, and
stops if the collision is avoided.
u Take appropriate action to prevent a collision (apply the brakes, change
lanes, etc.)
Beep Visual Alerts
Audible Alert
Tactile Alert
1 Vibration alert on the steering wheel
Vibration alert function is disabled when the electric
power steering (EPS) system indicator comes on. 2 Electric Power Steering (EPS) System
Indicator P. 94
20 CLARITY PHEV-31TRW6200.book 444 ページ 2019年9月24日 火曜日 午後12時9分
Page 447 of 595
445
uuBraking uCollision Mitigation Braking SystemTM (CMBSTM)
Continued
Driving
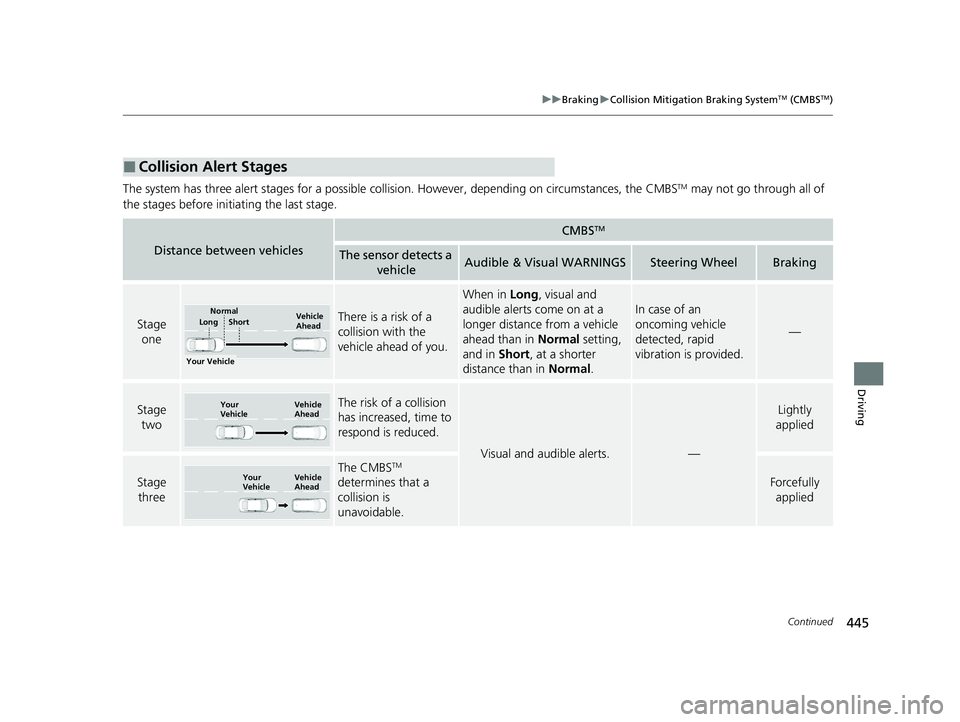
The system has three alert stages for a possible collis ion. However, depending on circumstances, the CMBSTM may not go through all of
the stages before initiating the last stage.
■Collision Alert Stages
Distance between vehicles
CMBSTM
The sensor detects a vehicleAudible & Visual WARNINGSSteering WheelBraking
Stage oneThere is a risk of a
collision with the
vehicle ahead of you.
When in Long, visual and
audible alerts come on at a
longer distance from a vehicle
ahead than in Normal setting,
and in Short, at a shorter
distance than in Normal.
In case of an
oncoming vehicle
detected, rapid
vibration is provided.
—
Stage
twoThe risk of a collision
has increased, time to
respond is reduced.
Visual and audible alerts.—
Lightly
applied
Stage three
The CMBSTM
determines that a
collision is
unavoidable.
Forcefully
applied
Your Vehicle Vehicle
Ahead
Short
LongNormal
Your
Vehicle Vehicle
Ahead
Your
VehicleVehicle
Ahead
20 CLARITY PHEV-31TRW6200.book 445 ページ 2019年9月24日 火曜日 午後12時9分
Page 455 of 595
453Continued
Driving
Multi-View Rear Camera
About Your Multi-View Rear Camera
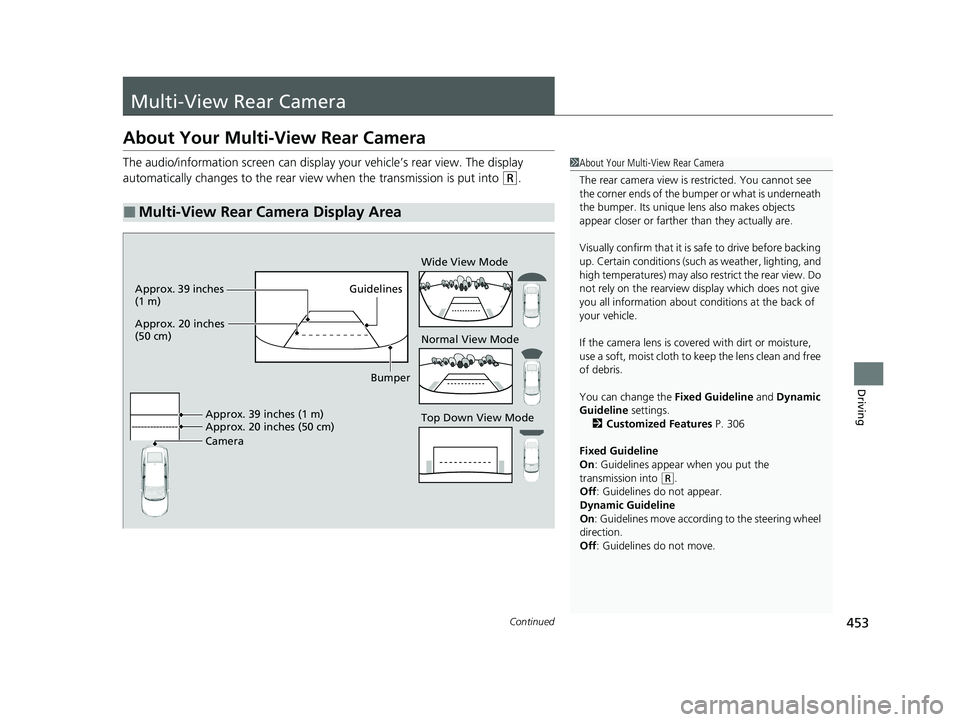
The audio/information screen can display your vehicle’s rear view. The display
automatically changes to the rear view when the transmission is put into
(R.
■Multi-View Rear Camera Display Area
1About Your Multi-View Rear Camera
The rear camera view is restricted. You cannot see
the corner ends of the bumper or what is underneath
the bumper. Its unique le ns also makes objects
appear closer or farther than they actually are.
Visually confirm that it is safe to drive before backing
up. Certain conditions (such as weather, lighting, and
high temperatures) may also restrict the rear view. Do
not rely on the rearview display which does not give
you all information about conditions at the back of
your vehicle.
If the camera lens is cove red with dirt or moisture,
use a soft, moist cloth to keep the lens clean and free
of debris.
You can change the Fixed Guideline and Dynamic
Guideline settings.
2 Customized Features P. 306
Fixed Guideline
On : Guidelines appear when you put the
transmission into
( R.
Off : Guidelines do not appear.
Dynamic Guideline
On : Guidelines move according to the steering wheel
direction.
Off : Guidelines do not move.
Top Down View Mode Normal View Mode Wide View Mode
Guidelines
Bumper
Camera Approx. 20 inches (50 cm) Approx. 39 inches (1 m)
Approx. 39 inches
(1 m)
Approx. 20 inches
(50 cm)
20 CLARITY PHEV-31TRW6200.book 453 ページ 2019年9月24日 火曜日 午後12時9分
Page 513 of 595
511
uuChecking and Maintaining Tires uWinter Tires
Maintenance
Winter Tires
If driving on snowy or frozen roads, mount all season marked M+S tires, snow tires,
or tire chains; reduce speed; and maintain sufficient distance between vehicles when
driving.
Be particularly careful wh en operating the steering wheel or brakes to prevent
skidding.
Use tire chains, snow tires, or all season tires when necessary or according to the law.
When mounting, refer to the following points.
For winter tires:
• Select the size and load ranges that are the same as the original tires.
• Mount the tires to all four wheels.
For tire chains:
• Install them on the front tires only.
• Because your vehicle has limited tire clea rance, we strongly recommend using the
chains listed below:
• Follow the chain manufactur er’s instruction when installing. Mount them as
tightly as you can.
• Check that the chains do not touch the brake lines or suspension.
• Drive slowly.
Cable-type: SCC Radial Chain SC1040
1Winter Tires
NOTICE
Traction devices that are the wrong size or improperly
installed can damage your vehicle’s brake lines,
suspension, body, and wheels. Stop driving if they are
hitting any part of the vehicle.
When tire chains are mounted, follow the chain
manufacturer’s instructi ons regarding vehicle
operational limits.
If your vehicle is equipp ed with summer tires, be
aware that these tires are not designed for winter
driving conditions. For more information, contact an
authorized Honda Clarity Plug-In Hybrid dealer.
3WARNING
Using the wrong chains, or not properly
installing chains, can damage the brake
lines and cause a crash in which you can be
seriously injured or killed.
Follow all instructions in this owner’s
manual regarding the selection and use of
tire chains.
20 CLARITY PHEV-31TRW6200.book 511 ページ 2019年9月24日 火曜日 午後12時9分
Page 528 of 595
526
Handling the Unexpected
If a Tire Goes Flat
Temporarily Repairing a Flat Tire
If the tire has a large cut or is otherwise severely damaged, you will need to have the
vehicle towed. If the tire only has a smal l puncture, from a nail for instance, you can
use the temporary tire repair kit so that you can drive to the nearest service station
for a more permanent repair.
If a tire goes flat while driving, grasp the steering wheel firmly, and brake gradually
to reduce speed. Then stop in a safe place.
1. Park the vehicle on a firm, level, and non-slippery surface and apply the parking
brake.
2. Change the gear position to
(P.
3. Turn on the hazard warning lights an d set the power mode to VEHICLE OFF
(LOCK).
1 Temporarily Repairing a Flat Tire
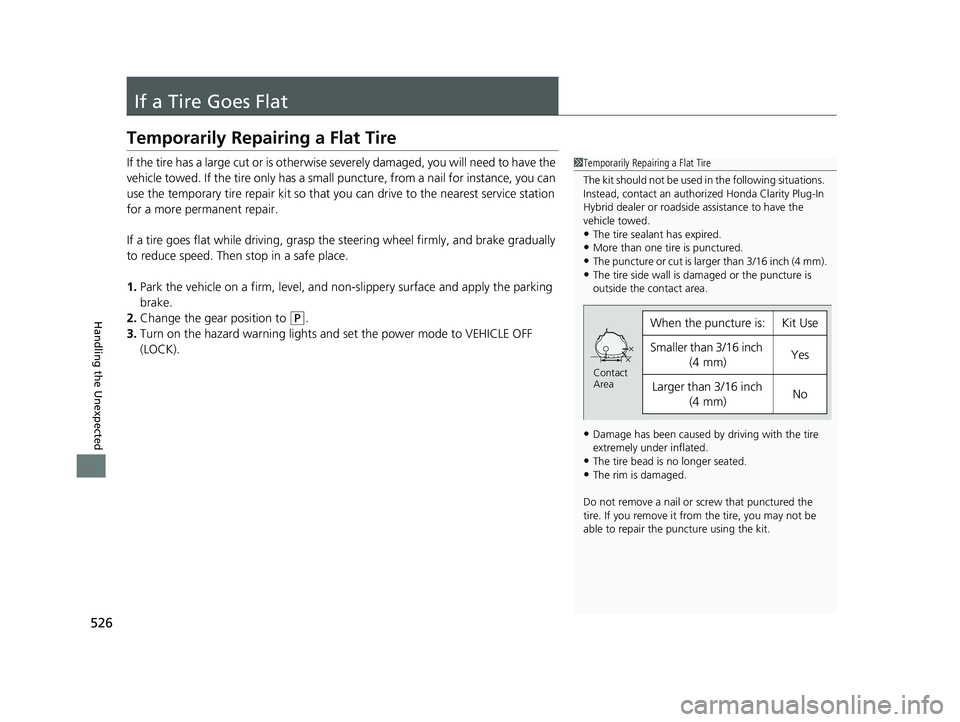
The kit should not be used in the following situations.
Instead, contact an authorized Honda Clarity Plug-In
Hybrid dealer or roadside assistance to have the
vehicle towed.
•The tire sealant has expired.•More than one tire is punctured.
•The puncture or cut is larger than 3/16 inch (4 mm).
•The tire side wall is da maged or the puncture is
outside the contact area.
•Damage has been caused by driving with the tire
extremely under inflated.
•The tire bead is no longer seated.•The rim is damaged.
Do not remove a nail or screw that punctured the
tire. If you remove it from the tire, you may not be
able to repair the puncture using the kit.
When the puncture is:Kit Use
Smaller than 3/16 inch (4 mm)Yes
Larger than 3/16 inch
(4 mm)No
Contact
Area
20 CLARITY PHEV-31TRW6200.book 526 ページ 2019年9月24日 火曜日 午後12時9分
Page 544 of 595
542
uuPower System Won’t StartuEmergency Power System Off
Handling the Unexpected
Emergency Power System Off
The POWER button may be used to turn the po wer system off due to an emergency
situation even while driving. If you must turn the powe r system off, do either of the
following operations:
• Press and hold the POWER button for about two seconds.
• Firmly press the POWER button three times.
The steering wheel will not lock. However, because turning off the power system
disables the power assist the power syst em provides to the steering and braking
systems, it will require significantly more physical effort and time to steer and slow
the vehicle. Use both feet on the brake pe dal to slow down the vehicle and stop
immediately in a safe place.
The gear position automatically changes to
(P after the vehicle comes to a complete
stop. Then, the power mode changes to VEHICLE OFF.
1Emergency Power System Off
Do not press the button while driving unless it is
absolutely necessary for the power system to be
turned off.
20 CLARITY PHEV-31TRW6200.book 542 ページ 2019年9月24日 火曜日 午後12時9分
Page 555 of 595
553
uuIndicator, Coming On/Blinking uIf the Electric Power Steering (EPS) System Indicator Comes On
Handling the Unexpected
If the Electric Power Steeri ng (EPS) System Indicator
Comes On
■Reasons for the indicator to come on
• Comes on when there is a problem with the EPS system.
• If you depress the accelerator peda l repeatedly to increase the motor
speed while the motor is idling, the indicator comes on, and
sometimes the steering wheel becomes harder to operate.
■What to do when th e indicator comes on
• Stop the vehicle in a safe place, turn off the power system, and turn
on the power system again.
If the indicator re-appears and stay s on, immediately have your vehicle
inspected by an authorized Honda Clarity Plug-In Hybrid dealer.
20 CLARITY PHEV-31TRW6200.book 553 ページ 2019年9月24日 火曜日 午後12時9分