set clock HONDA CLARITY PLUG-IN 2021 Owner's Manual (in English)
[x] Cancel search | Manufacturer: HONDA, Model Year: 2021, Model line: CLARITY PLUG-IN, Model: HONDA CLARITY PLUG-IN 2021Pages: 596, PDF Size: 30.45 MB
Page 26 of 596
24
Quick Reference Guide
Controls (P 137)
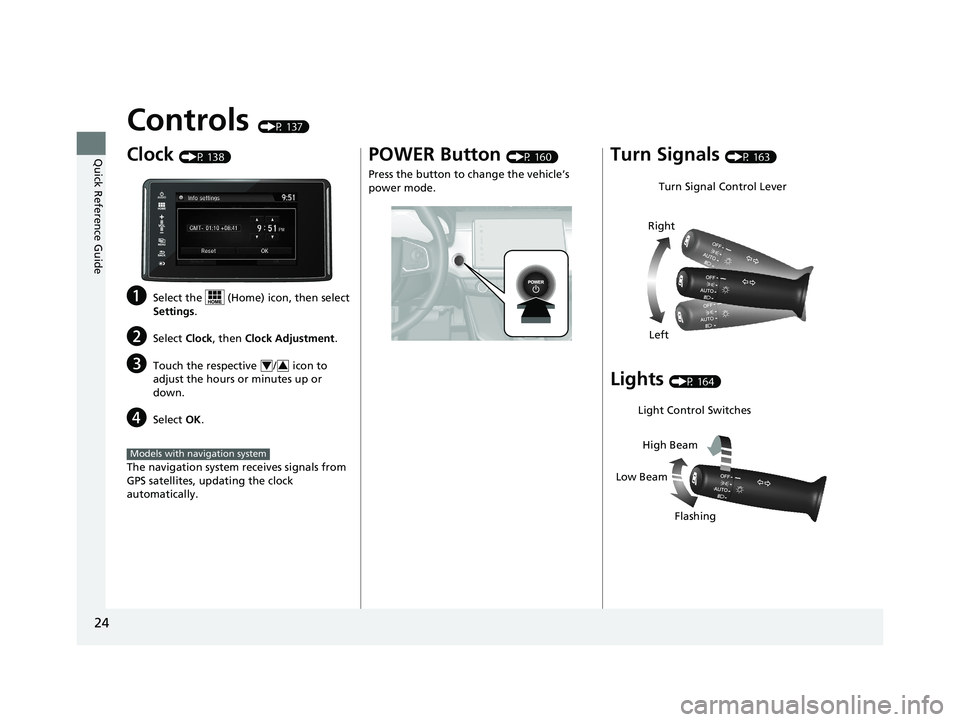
Clock (P 138)
aSelect the (Home) icon, then select
Settings.
bSelect Clock, then Clock Adjustment .
cTouch the respective / icon to
adjust the hours or minutes up or
down.
dSelect OK.
The navigation system receives signals from
GPS satellites, updating the clock
automatically.
43
Models with navigation system
POWER Button (P 160)
Press the button to change the vehicle’s
power mode.Turn Signals (P 163)
Lights (P 164)
Turn Signal Control Lever
Right
Left
Light Control Switches
Low Beam High Beam
Flashing
21 CLARITY PHEV CSS-31TRW6300.book 24 ページ 2020年5月19日 火曜日 午前10 時46分
Page 140 of 596
138
Controls
Clock
Adjusting the Clock
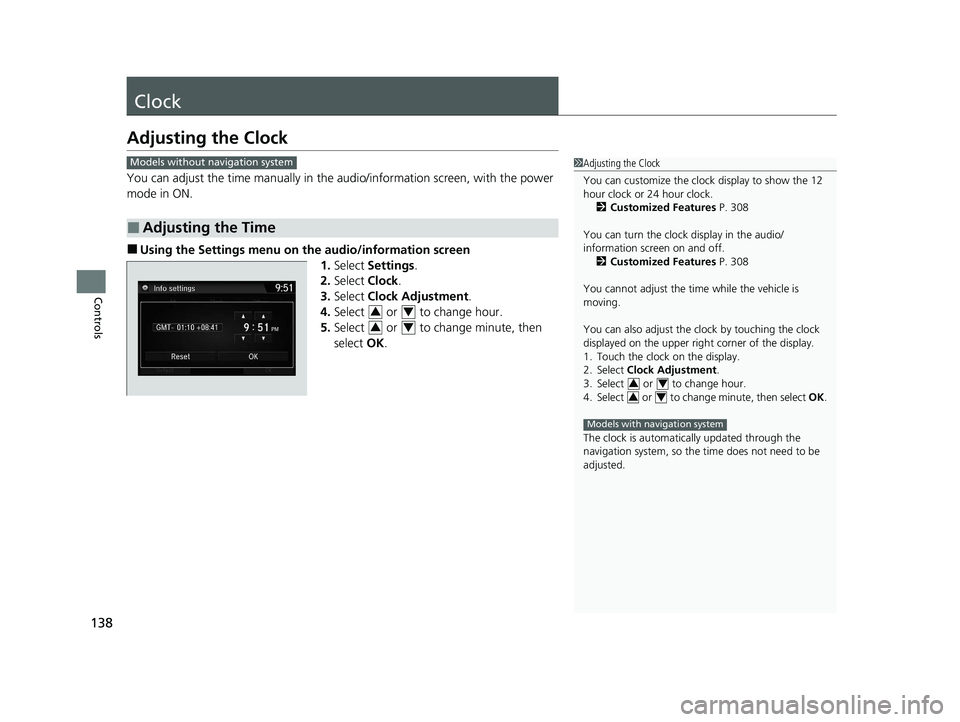
You can adjust the time manually in the audio/information screen, with the power
mode in ON.
■Using the Settings menu on the audio/information screen
1.Select Settings .
2. Select Clock.
3. Select Clock Adjustment .
4. Select or to change hour.
5. Select or to change minute, then
select OK.
■Adjusting the Time
1Adjusting the Clock
You can customize the clock display to show the 12
hour clock or 24 hour clock.
2 Customized Features P. 308
You can turn the clock display in the audio/
information screen on and off. 2 Customized Features P. 308
You cannot adjust the time while the vehicle is
moving.
You can also adjust the clock by touching the clock
displayed on the upper right corner of the display.
1. Touch the clock on the display.
2. Select Clock Adjustment .
3. Select or to change hour.
4. Select or to change minute, then select OK.
The clock is automatica lly updated through the
navigation system, so the ti me does not need to be
adjusted.
34
34
Models with navigation system
Models without navigation system
34
34
21 CLARITY PHEV CSS-31TRW6300.book 138 ページ 2020年5月19日 火曜日 午前10時46分
Page 217 of 596
Continued215
uuAudio System Basic Operation uAudio/Information Screen
Features
■Info
Displays Trip Computer or Clock/Wallpaper . Select on the Info Menu screen
to see all available options: Trip Computer, Voice Info, Clock/Wallpaper ,
System/Device Information and Vehicle energy .
Trip Computer :
• Current Drive tab: Displays the current trip information.
• History of Trip A tab: Displays information for the three previous drives. The
information is stored every time you reset Trip A.
To delete the history manually, select Delete history on the History of Trip A
tab. The confirmation message appears on the screen, then select Yes.
Voice Info : Displays a list of all voice commands.
Clock/Wallpaper : Displays the clock and wallpaper.
System/Device Information :
• System Info : Displays the software version of the audio system.
• USB Info : Displays the memory usage of the USB device.
Vehicle energy :
Displays the ener gy flow screen.
2Energy flow screen P. 217
■Audio
Displays the current audio information.
1 Audio/Information Screen
Touchscreen operation
•Use simple gestures - in cluding touching, swiping
and scrolling - to operate certain audio functions.
•Some items may be grayed out during driving to
reduce the potential for distraction.
•You can select them when the vehicle is stopped or
use voice commands.
•Wearing gloves may limit or prevent touchscreen
response.
You can change the touchs creen sensitivity setting.
2 Customized Features P. 308
21 CLARITY PHEV CSS-31TRW6300.book 215 ページ 2020年5月19日 火曜日 午前10時46分
Page 227 of 596
Continued225
uuAudio System Basic Operation uAudio/Information Screen
Features
You can change, store, and delete the wa llpaper on the audio/information screen.
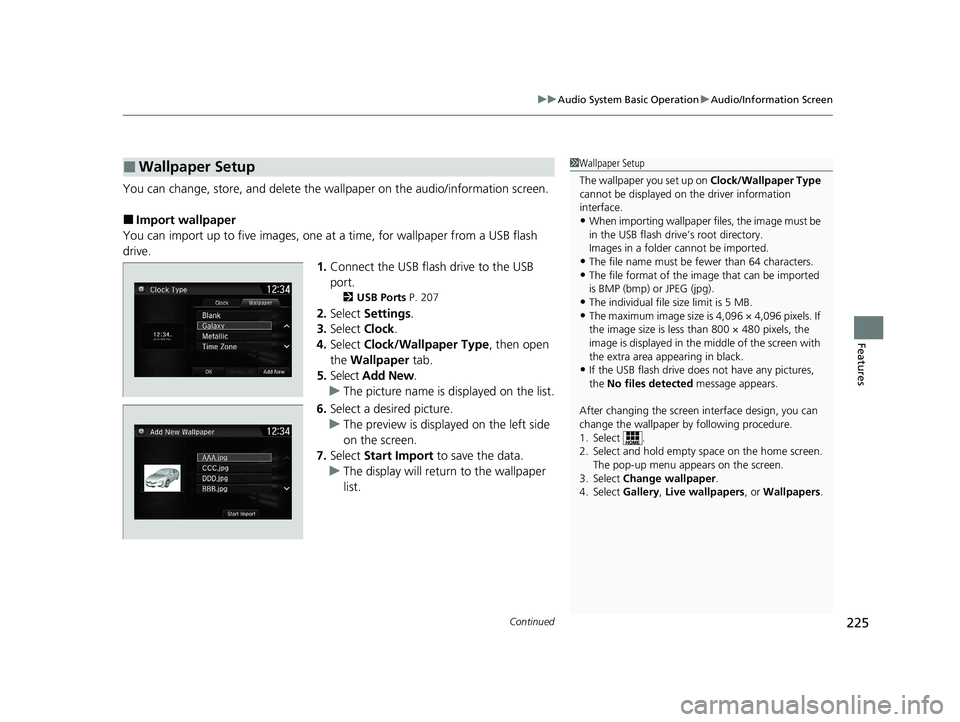
■Import wallpaper
You can import up to five images, one at a time, for wallpaper from a USB flash
drive. 1.Connect the USB flash drive to the USB
port.
2 USB Ports P. 207
2.Select Settings .
3. Select Clock.
4. Select Clock/Wallpaper Type , then open
the Wallpaper tab.
5. Select Add New .
u The picture name is displayed on the list.
6. Select a desired picture.
u The preview is displayed on the left side
on the screen.
7. Select Start Import to save the data.
u The display will return to the wallpaper
list.
■Wallpaper Setup1Wallpaper Setup
The wallpaper you set up on Clock/Wallpaper Type
cannot be displayed on th e driver information
interface.
•When importing wallpaper files, the image must be
in the USB flash drive’s root directory.
Images in a folder cannot be imported.
•The file name must be fewer than 64 characters.•The file format of the im age that can be imported
is BMP (bmp) or JPEG (jpg).
•The individual file size limit is 5 MB.•The maximum image size is 4,096 × 4,096 pixels. If
the image size is less than 800 × 480 pixels, the
image is displayed in the middle of the screen with
the extra area appearing in black.
•If the USB flash drive doe s not have any pictures,
the No files detected message appears.
After changing the screen interface design, you can
change the wallpaper by following procedure.
1. Select .
2. Select and hold empty space on the home screen. The pop-up menu appears on the screen.
3. Select Change wallpaper .
4. Select Gallery , Live wallpapers , or Wallpapers .
21 CLARITY PHEV CSS-31TRW6300.book 225 ページ 2020年5月19日 火曜日 午前10時46分
Page 228 of 596
uuAudio System Basic Operation uAudio/Information Screen
226
Features
■Select wallpaper
1. Select Settings .
2. Select Clock.
3. Select Clock/Wallpaper Type , then open the Wallpaper tab.
u The screen changes to the wallpaper list.
4. Select a desired wallpaper.
u The preview is displayed on the left side on the screen.
u The pop-up menu appears on the screen.
5. Select Set.
u The display will return to the wallpaper list.
■To view wallpaper once it is set
1. Select .
2. Select Info.
3. Select .
4. Select Clock/Wallpaper .
■Delete wallpaper
1. Select Settings .
2. Select Clock.
3. Select Clock/Wallpaper Type , then open the Wallpaper tab.
u The screen changes to the wallpaper list.
4. Select a wallpaper that you want to delete.
u The preview is displayed on the left side on the screen.
u The pop-up menu appears on the screen.
5. Select Delete.
u A confirmation message appears on the screen.
6. Select Yes to delete completely.
u The display will return to the wallpaper list.
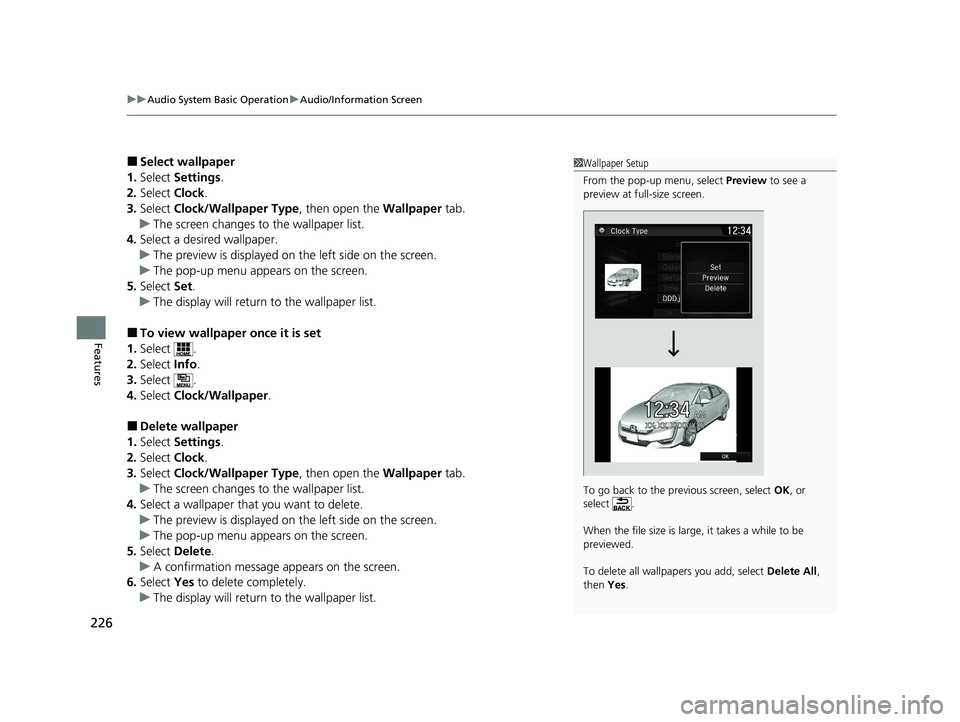
1Wallpaper Setup
From the pop-up menu, select Preview to see a
preview at full-size screen.
To go back to the previous screen, select OK, or
select .
When the file size is large, it takes a while to be
previewed.
To delete all wallpapers you add, select Delete All,
then Yes.
21 CLARITY PHEV CSS-31TRW6300.book 226 ページ 2020年5月19日 火曜日 午前10時46分
Page 311 of 596
309
uuCustomized Features u
Continued
Features
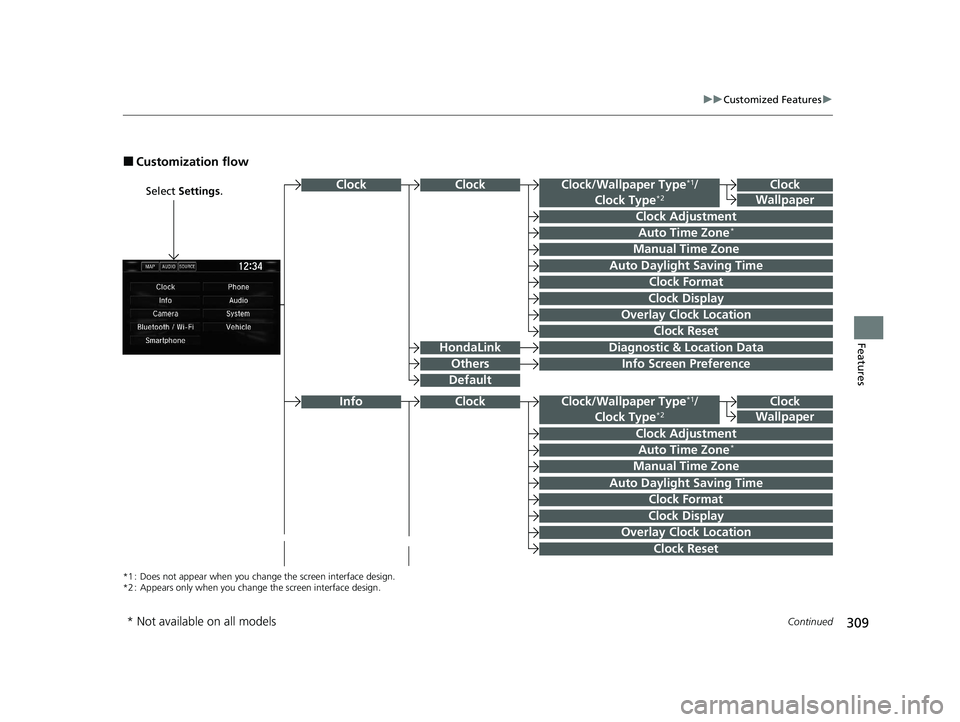
■Customization flow
Select Settings .Clock
Wallpaper
Clock Adjustment
Clock Format
Clock
Auto Time Zone*
Manual Time Zone
Auto Daylight Saving Time
Clock Display
Overlay Clock Location
Info Screen Preference
Clock
Wallpaper
Clock/Wallpaper Type*1/
Clock Type*2
Clock Adjustment
Clock Format
Auto Time Zone*
Manual Time Zone
Auto Daylight Saving Time
Clock Display
Overlay Clock Location
Clock Reset
Info
*1 : Does not appear when you chan ge the screen interface design.
*2 : Appears only when you change the screen interface design.
Diagnostic & Location DataHondaLink
Others
Clock
Clock Reset
Clock/Wallpaper Type*1/
Clock Type*2
Default
Clock
* Not available on all models
21 CLARITY PHEV CSS-31TRW6300.book 309 ページ 2020年5月19日 火曜日 午前10時46分
Page 315 of 596
313
uuCustomized Features u
Continued
Features
Clock
Clock Adjustment
Clock Format
Auto Time Zone*
Manual Time Zone
Auto Daylight Saving Time
Clock Display
Overlay Clock Location
Clock Reset
Clock
Wallpaper
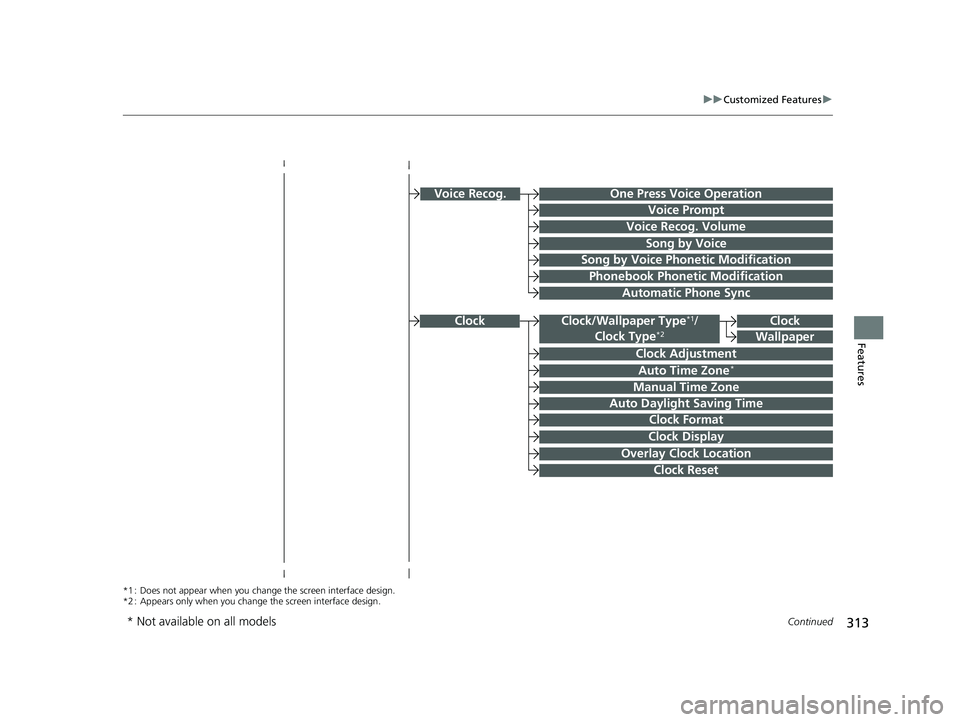
*1 : Does not appear when you chan ge the screen interface design.
*2 : Appears only when you change the screen interface design.
Voice Prompt
Voice Recog. Volume
Song by Voice
Song by Voice Phonetic Modification
Phonebook Phonetic Modification
Automatic Phone Sync
One Press Voice OperationVoice Recog.
Clock/Wallpaper Type*1/
Clock Type*2
* Not available on all models
21 CLARITY PHEV CSS-31TRW6300.book 313 ページ 2020年5月19日 火曜日 午前10時46分
Page 319 of 596
317
uuCustomized Features u
Continued
Features
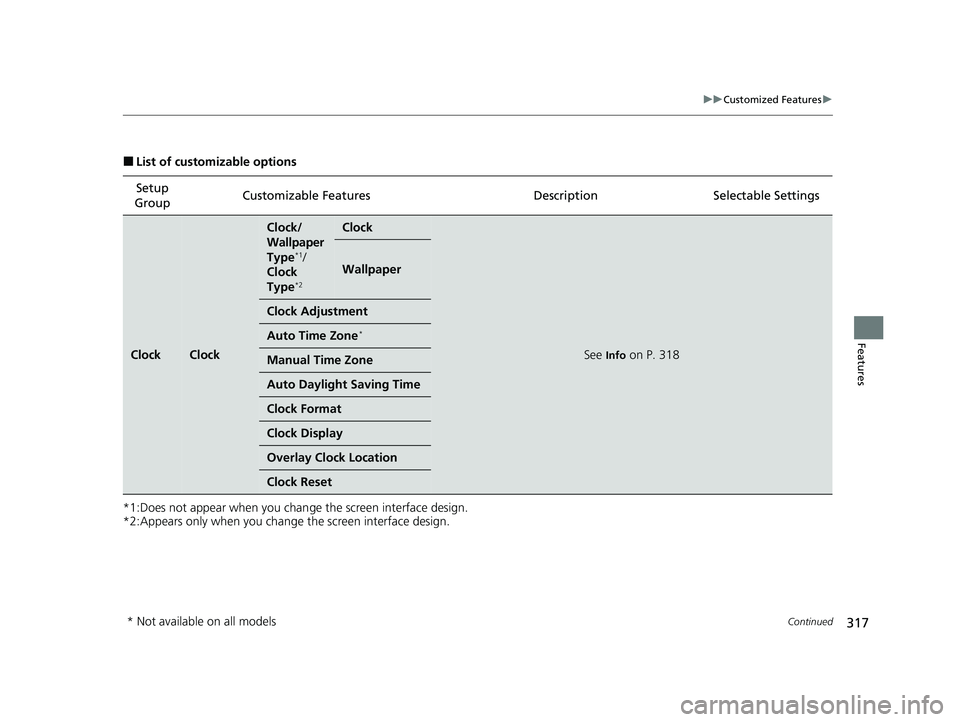
■List of customizable options
*1:Does not appear when you chan ge the screen interface design.
*2:Appears only when you change the screen interface design.
Setup
Group Customizable Features Desc
ription Selectable Settings
ClockClock
Clock/
Wallpaper
Type
*1/
Clock
Type
*2
Clock
See Info on P. 318
Wallpaper
Clock Adjustment
Auto Time Zone*
Manual Time Zone
Auto Daylight Saving Time
Clock Format
Clock Display
Overlay Clock Location
Clock Reset
* Not available on all models
21 CLARITY PHEV CSS-31TRW6300.book 317 ページ 2020年5月19日 火曜日 午前10時46分
Page 320 of 596
318
uuCustomized Features u
Features
*1:Default Setting
*2:Does not appear when you change the screen interface design.
*3:Appears only when you change the screen interface design.Setup
Group Customizable Features Desc
ription Selectable Settings
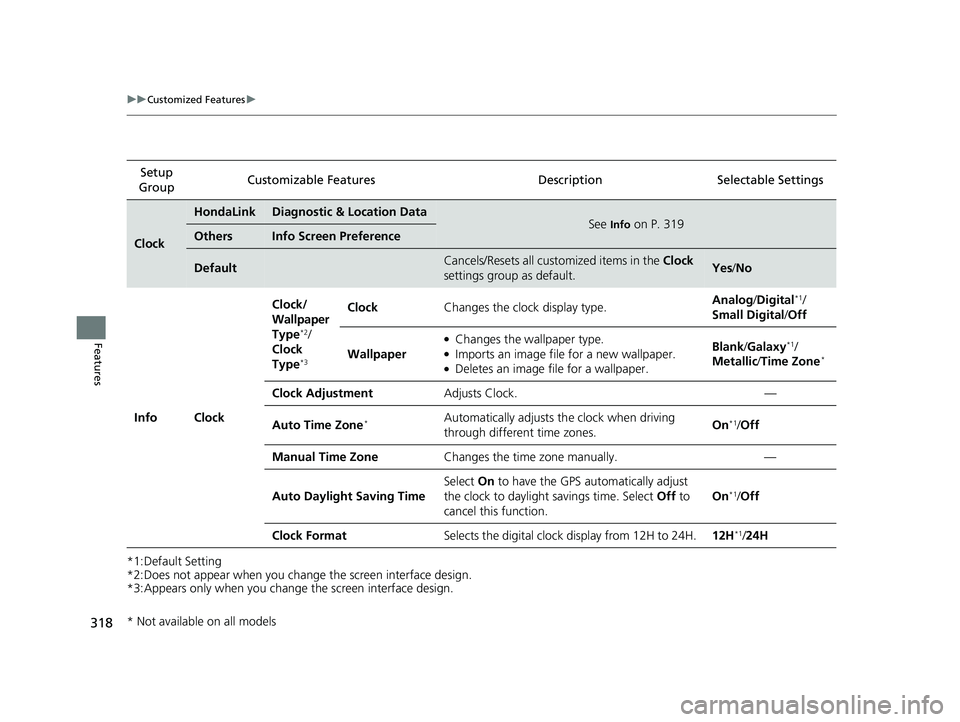
Clock
HondaLinkDiagnostic & Location DataSee Info on P. 319OthersInfo Screen Preference
DefaultCancels/Resets all customized items in the Clock
settings group as default.Yes /No
Info Clock Clock/
Wallpaper
Type
*2/
Clock
Type
*3
Clock Changes the clock display type. Analog
/Digital*1/
Small Digital /Off
Wallpaper
●Changes the wallpaper type.●Imports an image file for a new wallpaper.●Deletes an image file for a wallpaper. Blank
/Galaxy
*1/
Metallic /Time Zone*
Clock Adjustment Adjusts Clock. —
Auto Time Zone
*Automatically adjusts th e clock when driving
through different time zones. On*1/
Off
Manual Time Zone Changes the time zone manually. —
Auto Daylight Saving Time Select
On to have the GPS automatically adjust
the clock to daylight savings time. Select Off to
cancel this function. On
*1/
Off
Clock Format Selects the digital clock display from 12H to 24H. 12H
*1/24H
* Not available on all models
21 CLARITY PHEV CSS-31TRW6300.book 318 ページ 2020年5月19日 火曜日 午前10時46分
Page 321 of 596
319
uuCustomized Features u
Continued
Features
*1:Default SettingSetup
Group Customizable Features Desc
ription Selectable Settings
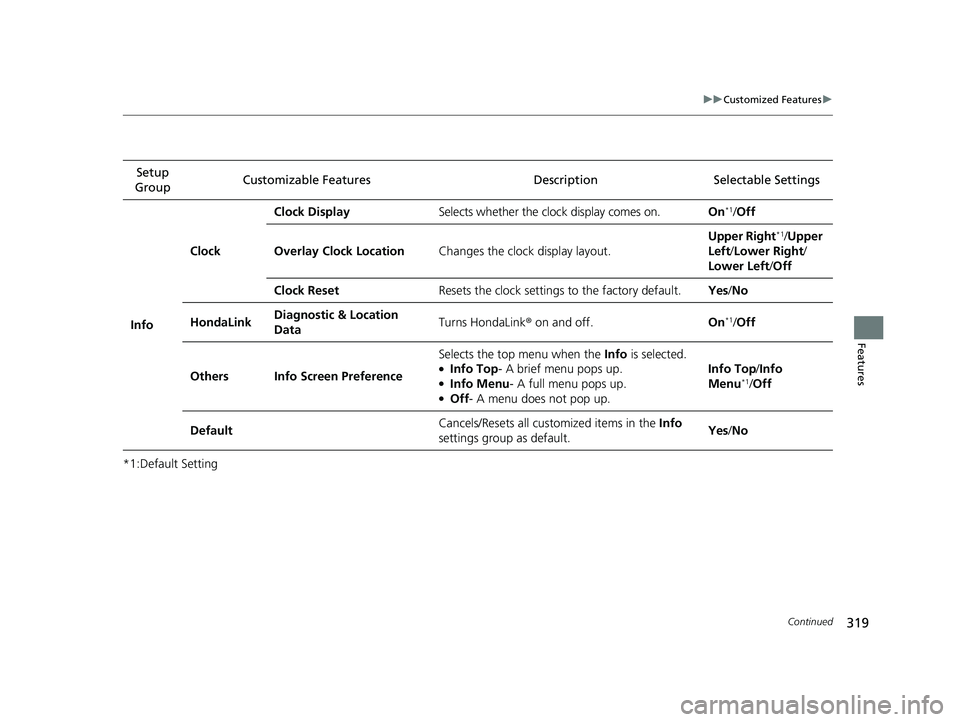
Info
ClockClock Display
Selects whether the clock display comes on. On
*1/Off
Overlay Clock Location Changes the clock display layout. Upper Right
*1/
Upper
Left /Lower Right /
Lower Left /Off
Clock Reset Resets the clock settings to the factory default. Yes/No
HondaLink Diagnostic & Location
Data Turns HondaLink
® on and off. On
*1/Off
Others Info Screen Preference Selects the top menu when the
Info is selected.
●Info Top - A brief menu pops up.●Info Menu- A full menu pops up.●Off- A menu does not pop up. Info Top
/Info
Menu
*1/ Off
Default Cancels/Resets all cust
omized items in the Info
settings group as default. Yes
/No
21 CLARITY PHEV CSS-31TRW6300.book 319 ページ 2020年5月19日 火曜日 午前10時46分