Hub HONDA CR-V 1998 RD1-RD3 / 1.G Workshop Manual
[x] Cancel search | Manufacturer: HONDA, Model Year: 1998, Model line: CR-V, Model: HONDA CR-V 1998 RD1-RD3 / 1.GPages: 1395, PDF Size: 35.62 MB
Page 33 of 1395
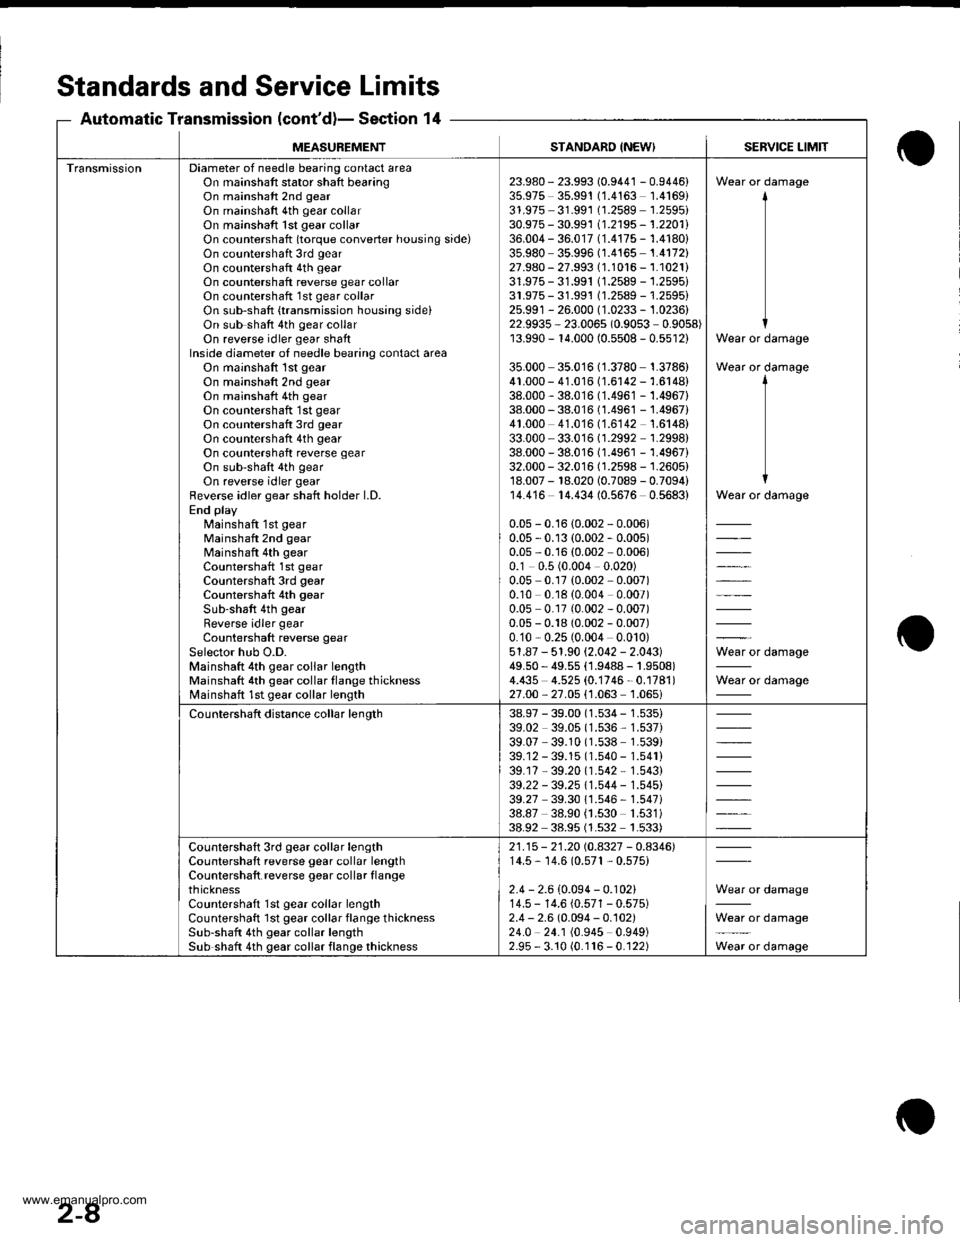
Standards and ServiceLimits
Section 14Automatic Transmission (cont'd)-
MEASUBEMENTSTANDARD {NEW}SERVICE LIMIT
TransmissionDiameter of needle bearing contact areaOn mainshaft stator shaft bearingOn mainshaft 2nd gear
On mainshaft 4th gear collarOn mainshaft 1st gear collarOn countershatt (torque converter housing side)On countershaft 3rd gear
On countershaft 4th gearOn countershaft reverse gear collarOn countershaft 1st gear collarOn sub-shaft {transmission housing sideiOn sub shaft 4th gear collarOn reverse idler gear shaftInside diameter of needle bearing contact areaOn mainshaft 1st gear
On mainshaft 2nd gearOn mainshaft 4th gear
On countershaft 1st gear
On countershaft 3rd gear
On countershaft 4th gear
On countershaft reverse gearOn sub-shaft 4th gear
On reverse idler gearfleverse idler gear shaft holder l.D.End playMainshaft 1st gearMainshaft 2nd gearMainshaft 4th gearCountershaft 1st gearCountershaft 3rd gearCountershaft 4th gear
Sub-shaft 4th gear
Reverse idler gearCountershaft reverse gear
Selector hub O.D.Mainshaft 4th gear collar lengthMainshaft 4th gear collar flange thicknessMainshaft 1st gear collar length
23.980- 23.993 (0.9441 - 0.9446)35.975 35.99'! (1.4163 1.4169)31.975 31.991 (1.2589 1.2595i30.975 - 30.991 11.2195 - 1.2201l'36.004 - 36.017 (1.4175 - 1.4180)35.980 35.996 (1.4165 1.4172)27.980 - 27.993 (1.1016 - 1.1021i31.975- 31.991 (1.2589 -'�j.2595i
31.975- 31.991 (1.2589 - 1.2595)25.991 - 26.000 (1.0233 - 1.0236)22.9935 - 23.006s (0.9053 0.9058)13.990 - r4.000 (0.5508 - 0.5512)
35.000 35.016 (1.3780 1.3786)41.000 - 41.016 (1.6142 - 1.6148)38.000 - 38.016 (1.4961 -'�1.4967)
38.000 - 38.016 (1.496'1 - 1.4967)41.000 41.016 (1.6142 1.6148)33.000 - 33.016 (1.2992 1.2998)38.000 - 38.016 (1.4961 - 1.4967)32.000 - 32.016 (1.2598 - 1.2605)18.007 - 18.020 (0.7089 - 0.7094)14.416 14.434 (0.5676 0.5683)
0.05 - 0.16 {0.002 - 0.006)0.05 - 0.13 (0.002 - 0.005)0.05,0.'16 (0.002 0.006)0.1 0.5 (0.004 0.020)0.05 0.17 {0.002 0.007)0.10 0.18 (0.004 0.007)0.0s 0.17 (0.002 - 0.007)0.05 - 0.18 (0.002 - 0.007)0.10,0.25(0.004 0.010)51.87 - 51.90 (2.042 - 2.043)49.50 - 49.55 (1.9488 - |.9508)4.435 4.525 (0.1746-0.1781)
27.00,27.05 {1.063'1.065i
Wear or damage
Wear or damage
Wear or damage
Wear or damage
il*=lo'. d"'.n"n"
Wear or damage
Countershaft distance collar length38.97 - 39.00 (1.534 - 1.535)39.02 39.05 (1.536, 1.537)39.07 39.10 (1.538 1.539)39.12 - 39.15 (1.540 - 1.541)39.17 - 39.20 (1.542 * 1.543)39.22 - 39.25 11.544 - 1.545)39.27 39.30 1'1.546 - 1.547i38.87 38.90 {1.530 1.531)38.92 38.95 (1.s32 1.533)
Countershaft 3rd gear collar lengthCountershaft reverse gear collar lengthCountershaft reverse gear collar flangethicknessCountershaft 1st gear collar lengthCountershaft lst gear collar flange thicknessSub-shaft 4th gear collar lengthSub shatt 4th gear collar flange thickness
21.15 - 21.20 rc.4327 - 0.4346)14.5, 14.6 (0.57't , 0.575)
2.4 - 2.6 (0.094 - 0.102)14.5 - 14.6 (0.571 - 0.575)2.4 - 2.6 (0.094 - 0.102)24.0 24.1 (0.945 0.949)2.95 - 3.10 (0.116 - 0.122)
Wear or damage
Wear or damage
Wear or damage
2-8
www.emanualpro.com
Page 461 of 1395
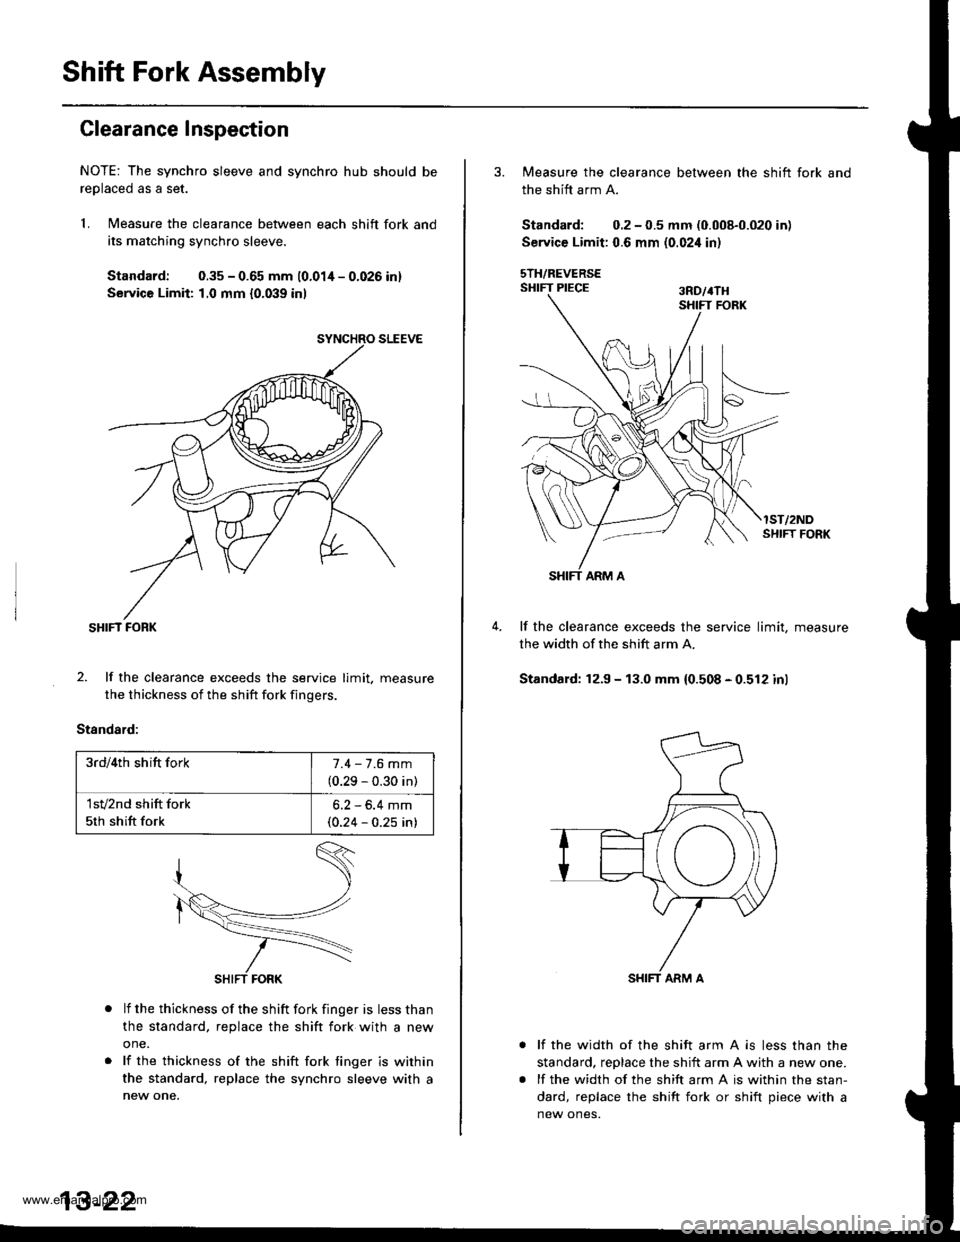
Shift Fork Assembly
Clearance Inspection
NOTE: The synchro sleeve and synchro hub should be
reolaced as a set.
1. Measure the clearance between each shift fork and
its matching synchro sleeve.
Standard: 0.35 - 0.65 mm 10.01/t - 0.026 inl
Service Limit: 1,0 mm {0.039 inl
SHIFT FORK
2. lf the clearance exceeds the service limit. measure
the thickness of the shift fork fingers.
Standard:
lf the thickness of the shift fork finger is less than
the standard, replace the shift fork with a new
one.
lf the thickness of the shift fork tinger is within
the standard, replace the synchro sleeve with a
new one.
3rd/4th shift fork7.4 - 7.6 mm
(0.29 - 0.30 in)
1sv2nd shift fork
5th shift fork
6.2 - 6.4 mm(0.24 - 0.25 in)
3. Measure the clearance between the shift fork and
the shift arm A.
Standard; 0.2 - 0.5 mm (0.008-0.020 in)
Service Limit: 0.6 mm (0.02i1 in)
sTH/REVERSESHIFT PIECE ran,rru
lST/2NDSI{IFT FORK
lf the clearance exceeds the service limit, measure
the width of the shift arm A.
Standard: 12.9 - 13.0 mm 10.508 - 0.512 inl
lf the width of the shift arm A is less than the
standard, reDlace the shift arm A with a new one.
lf the width of the shift arm A is within the stan-
dard, replace the shift fork or shift piece with a
new ones.
www.emanualpro.com
Page 462 of 1395
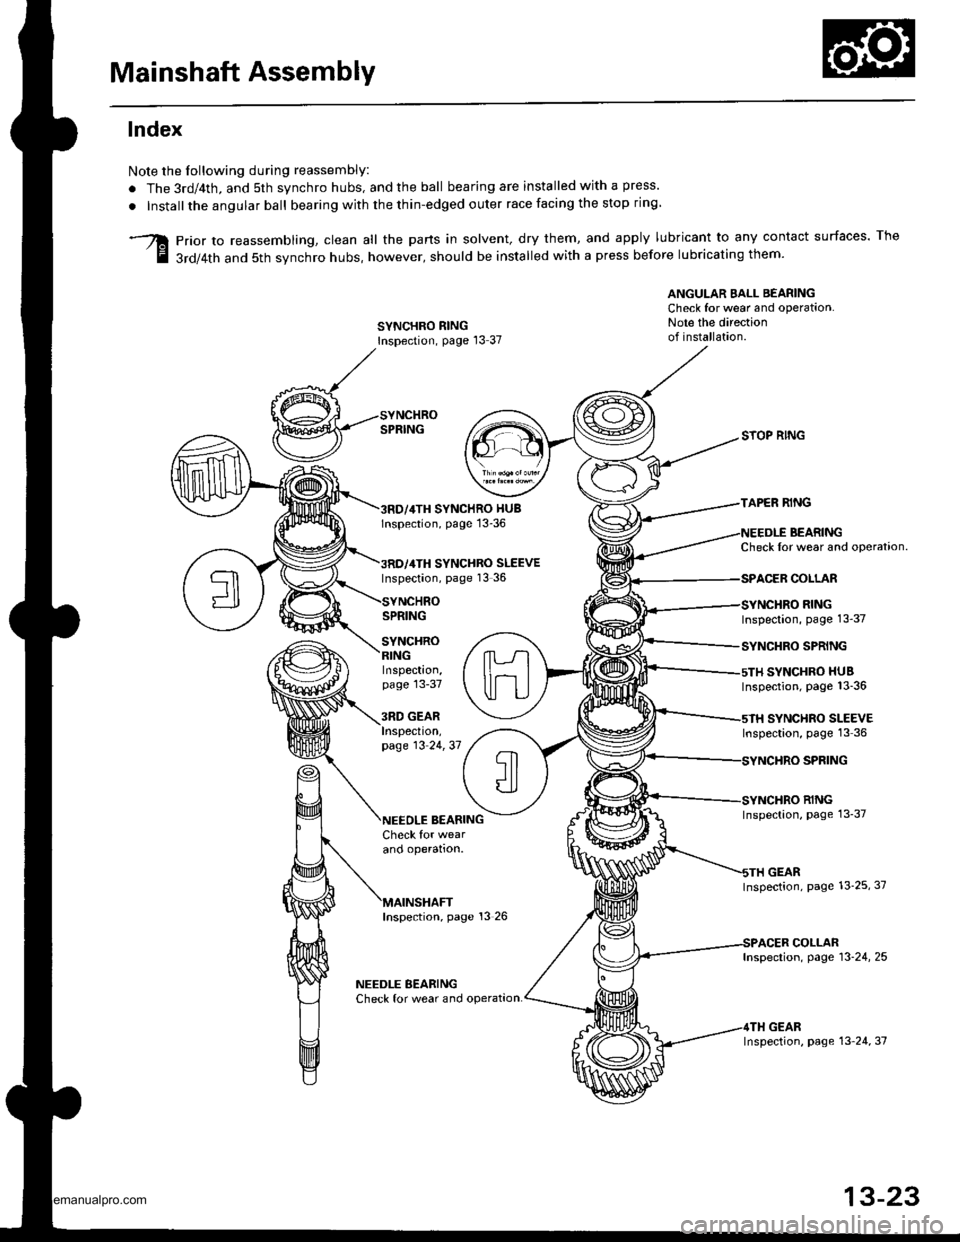
Mainshaft Assembly
lndex
Note the Iollowing during reassembly:
. The 3rd/4th, and 5th synchro hubs, and the ball bearing are installed with a press.
. Installthe angular ball bearing with the thin-edged outer race facing the stop ring
prior to reassembling, clean all the parts in solvent, dry them, and apply lubricant to any contact surfaces. The
3rd/4th and 5th svnchro hubs, however, should be installed with a press before lubricating them'
ANGULAR EALL BEARINGCheck for wear and operation.Note the directionof installation.SYNCHRO RINGInspection, page l3 37
SYNCHRO HUBlnspection, page 13-36
SYNCHRO SLEEVEInspection, page 13 36
SPRING
SYNCHRO
SYOP RING
TAPER RING
BEARINGCheck Ior wear and operataon.
COLLAR
RINGInspection, page 13-37
SYNCHRO SPRING
SYNCHRO HUBInspection, page 13_36
SYNCHRO SLEEVEInspection, page 13 36
SPFING
RINGInspection, page 13_37
GEARInspection, page 13_25, 37
COLLARInspection, page 13-24, 25
GEARInspection, page 13 24, 37
Inspection,page 13-37
3RD GEARInspeclton,page 13 24,37
BEARINGCheck for wearano operalton.
Inspection, page 13 26
NEEDLE BEARINGCheck for wear and operat,on.
13-23
www.emanualpro.com
Page 463 of 1395
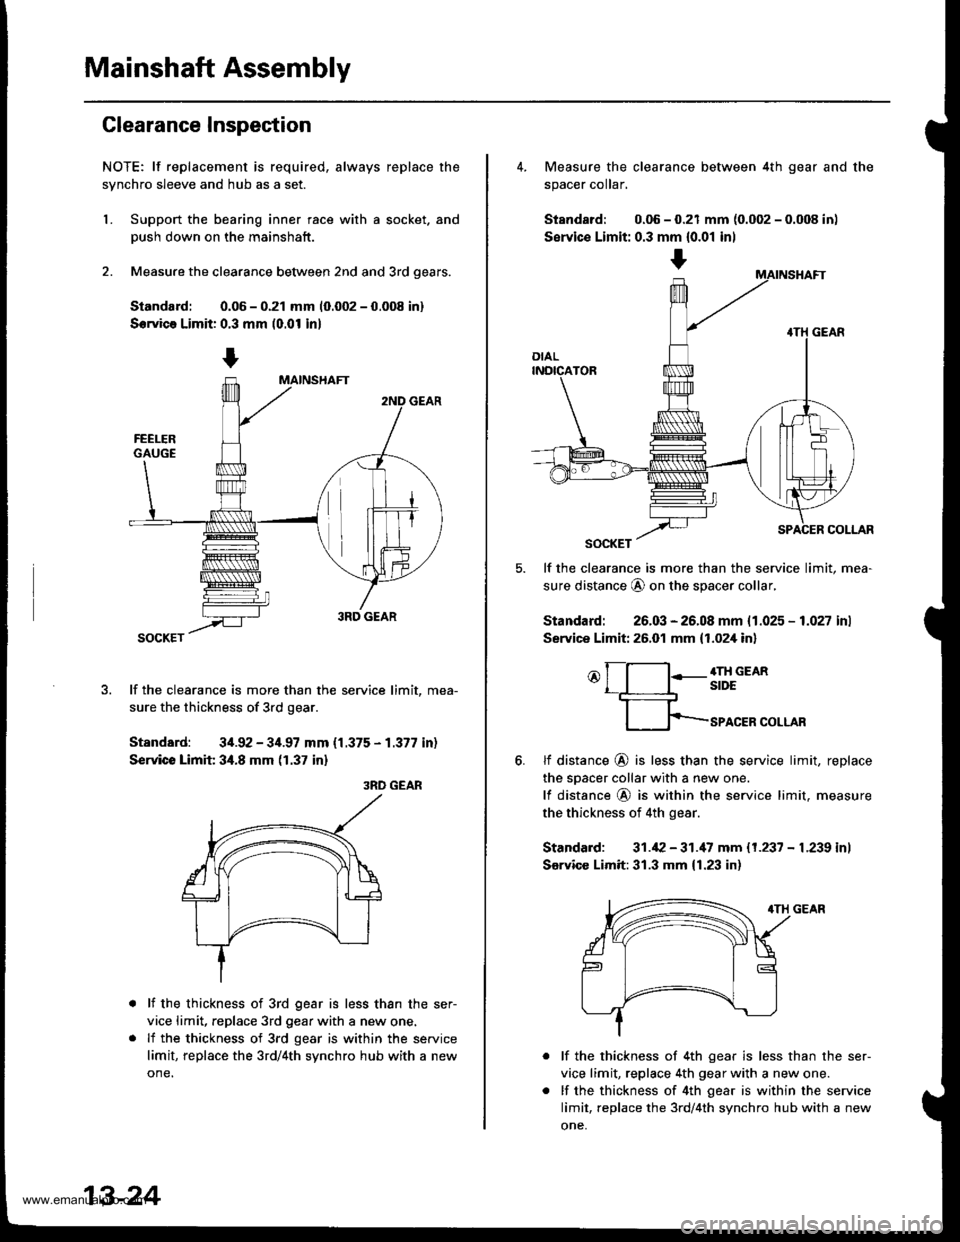
Mainshaft Assembly
Clearance Inspection
NOTE; lf replacement is required, always replace the
synchro sleeve and hub as a set.
L Support the bearing inner race with a socket. and
Dush down on the mainshaft.
2. Measure the clearance between 2nd and 3rd oears.
Siandard: 0.06 - 0.21 mm 10.002 - 0.008 in)
Servica Limit: 0.3 mm (0.01 in)
lf the clearance is more than the service limit, mea-
sure the thickness of 3rd gear.
Standard: 34.92 - 34.97 mm {1.375 - 1.377 in)
Service Limit 34.8 mm (1.37 in)
3RD GEAR
lf the thickness of 3rd gear is less than the ser-
vice limit, replace 3rd gear with a new one.
lf the thickness of 3rd gear is within the service
limit, replace the 3rd/4th synchro hub with a new
one.
13-24
+
4. Measure the clearance between 4th gear and the
spacer coIar,
Standard: 0.06 - 0.21 mm {0.002 - 0.008 in)
Servic€ Limit: 0.3 mm {0.01 inl
lf the clearance is more than the service limit, mea-
sure distance @ on the spacer collar,
Standard: 26.03 - 26.08 mm {1.025 - 1.027 inl
Service Limit: 26.01 mm {1.02,[ in]
o[-l:-g;;em
fp-rro.ERcoLLAR
6.tf distance @ is less than the service limit, replace
the sDacer collar with a new one.
lf distance @ is within the service limit. measure
the thickness of 4th gear.
Standard: 31.42 - 31.'17 mm 11.237 - L239 inl
Sarvicc Limit:31.3 mm {1.23 in)
lf the thickness of 4th gear is less than the ser-
vice limit, replace 4th gear with a new one.
lf the thickness of 4th gear is within the service
limit, replace the 3rd/4th synchro hub with a new
one,
www.emanualpro.com
Page 464 of 1395
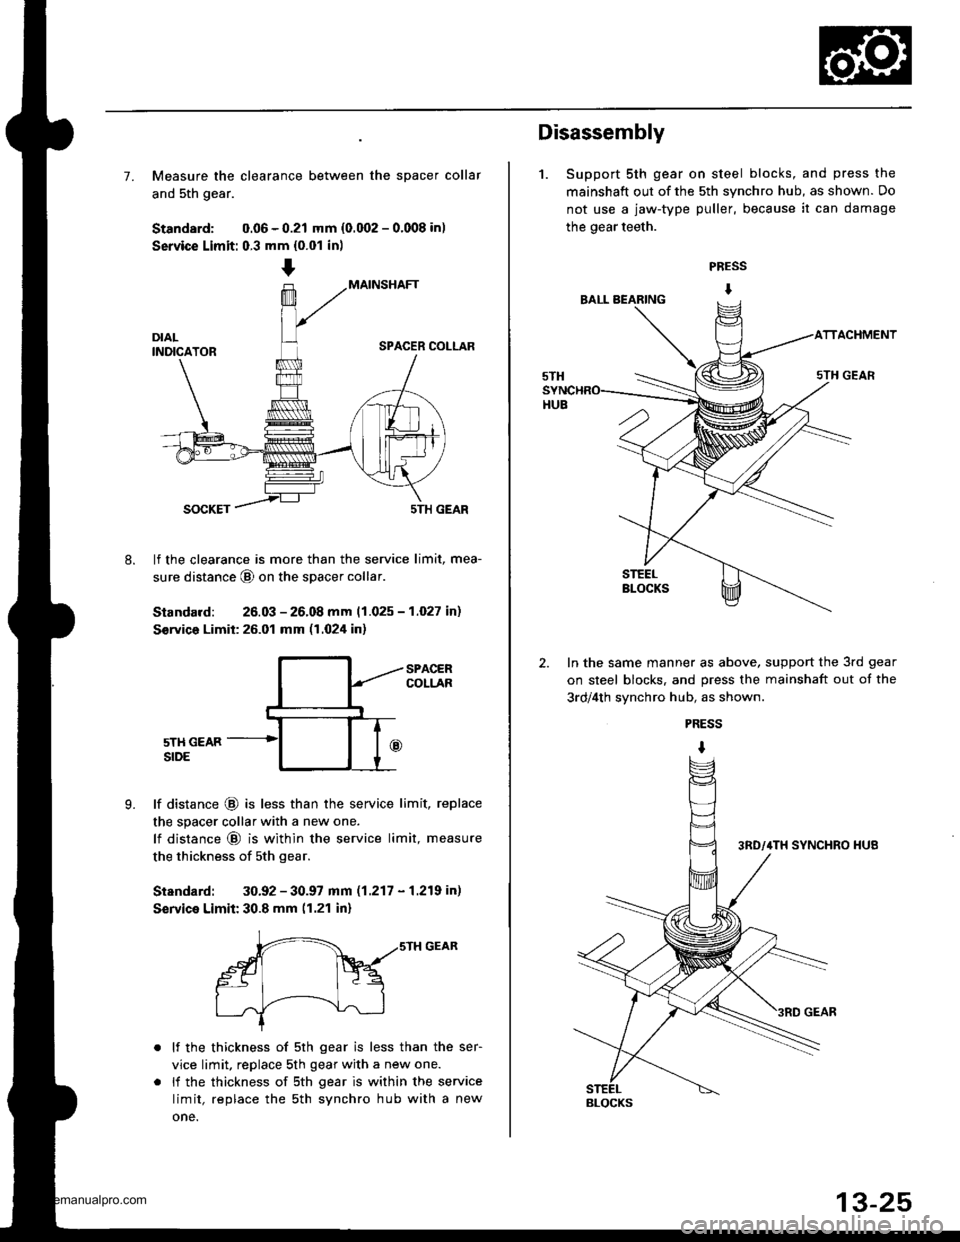
7. Measure the clearance between the spacer collar
and 5th gear.
Standard: 0.06 - 0.21 mm {0.002 - 0.008 in)
Service Limit: 0.3 mm {0.01 in)
MAINSHAFT
SPACER COLLAR
8.
SOCKET5TH GEAR
lf the clearance is more than the service limit, mea-
sure distance @ on the spacer collar
Standard: 26.03 - 26.08 mm 11.025 - 1.027 in)
S€rvico Limit: 26.01 mm (1.024 in)
9.
SPACERCOLLAR
5TH GEARSIDE
lf distance @ is less than the service limit, replace
the spacer collar with a new one.
lf distance @ is within the service limit, measure
the thickness of sth gear.
Standard: 30.92 - 30.97 mm (1.217 - 1.219 in)
Service Limit: 30.8 mm (1.21 in)
r-- ,,srH GEAR
gt Fq
I .J'-----!--\--J-l
lf the thickness of 5th gear is less than the ser-
vice limit, replace 5th gear with a new one.
li the thickness of sth gear is within the service
limit, replace the sth synchro hub with a new
one.
Disassembly
1. Support 5th gear on steel blocks, and press the
mainshaft out of the 5th synchro hub, as shown. Do
not use a jaw-type puller, because it can damage
the gear teeth.
PRESS
I
ACHMENT
In the same manner as above, support the 3rd gear
on steel blocks. and press the mainshaft out of the
3rd/4th svnchro hub, as shown.
PRESS
I
BLOCKS
www.emanualpro.com
Page 466 of 1395
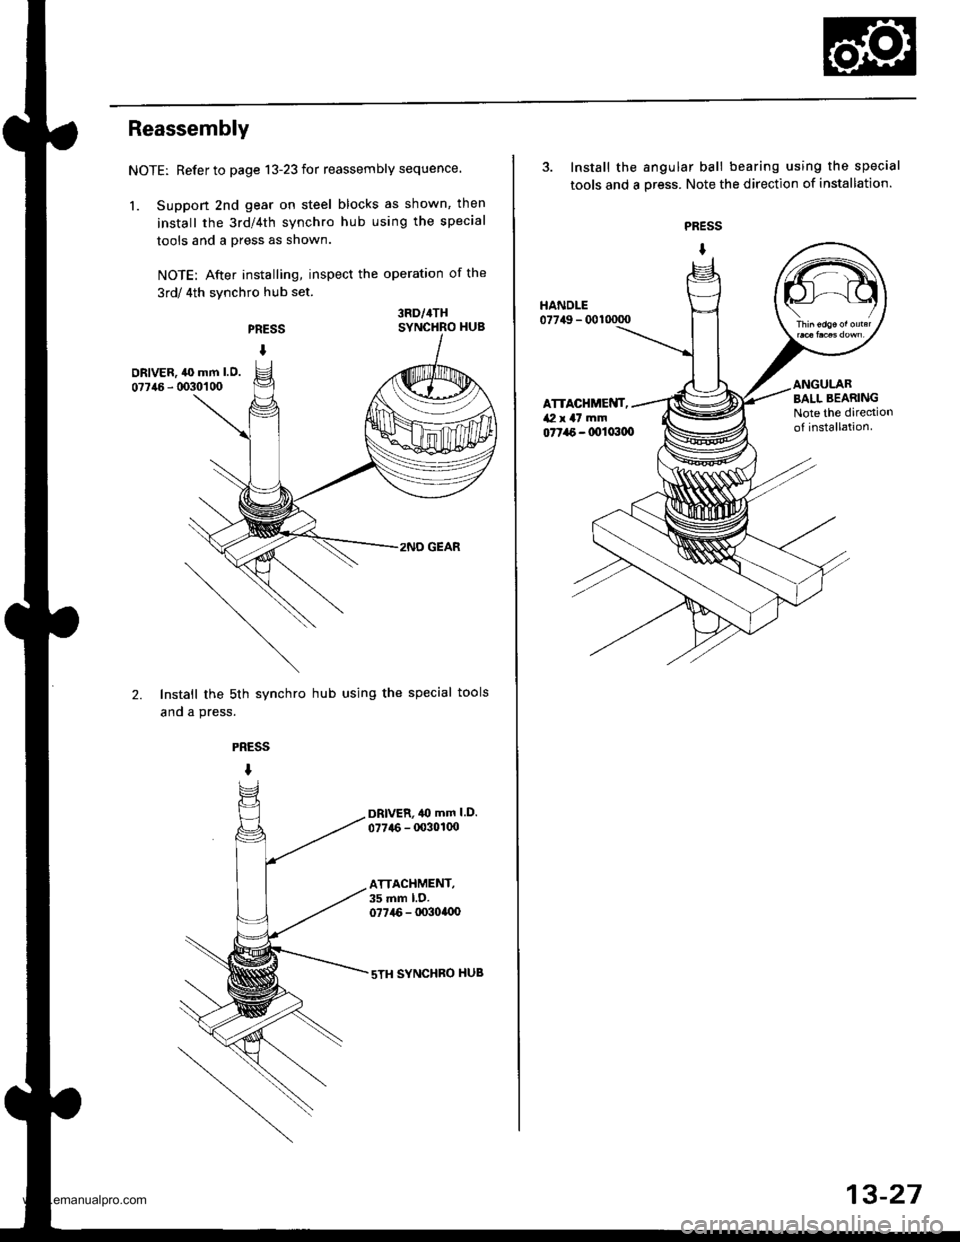
Reassembly
NOTE: Refer to page 13-23 for reassembly sequence.
1. Suppon 2nd gear on steel blocks as shown, then
install the 3rd/4th synchro hub using the special
tools and a press as shown.
NOTE: After installing, inspect the operation of the
3rd/ 4th synchro hub set.
PRESS
I
3RD/4THSYNCHRO HUB
DRIVER, ,l(} mm l.O.
07746 - 0030'�1 00
2.
2NO GEAR
Install the sth synchro hub using the special tools
and a press.
PRESS
I
DRlvER,40 mm l.D.
077{6 - 00301(x)
ATTACHMENT,35 mm l.D.077i16 - lx)3ollx)
sTH SYNCHBO HUB
3. Install the angular ball bearing using the special
tools and a oress. Note the direction of installation.
PRESS
I
077a6 - 0011x100
HANDLE07749 - 0010000
ATTACHMENT,/Vl x a7 mm
BALL BEARINGNote the dirediono{ installation.
13-27
www.emanualpro.com
Page 467 of 1395
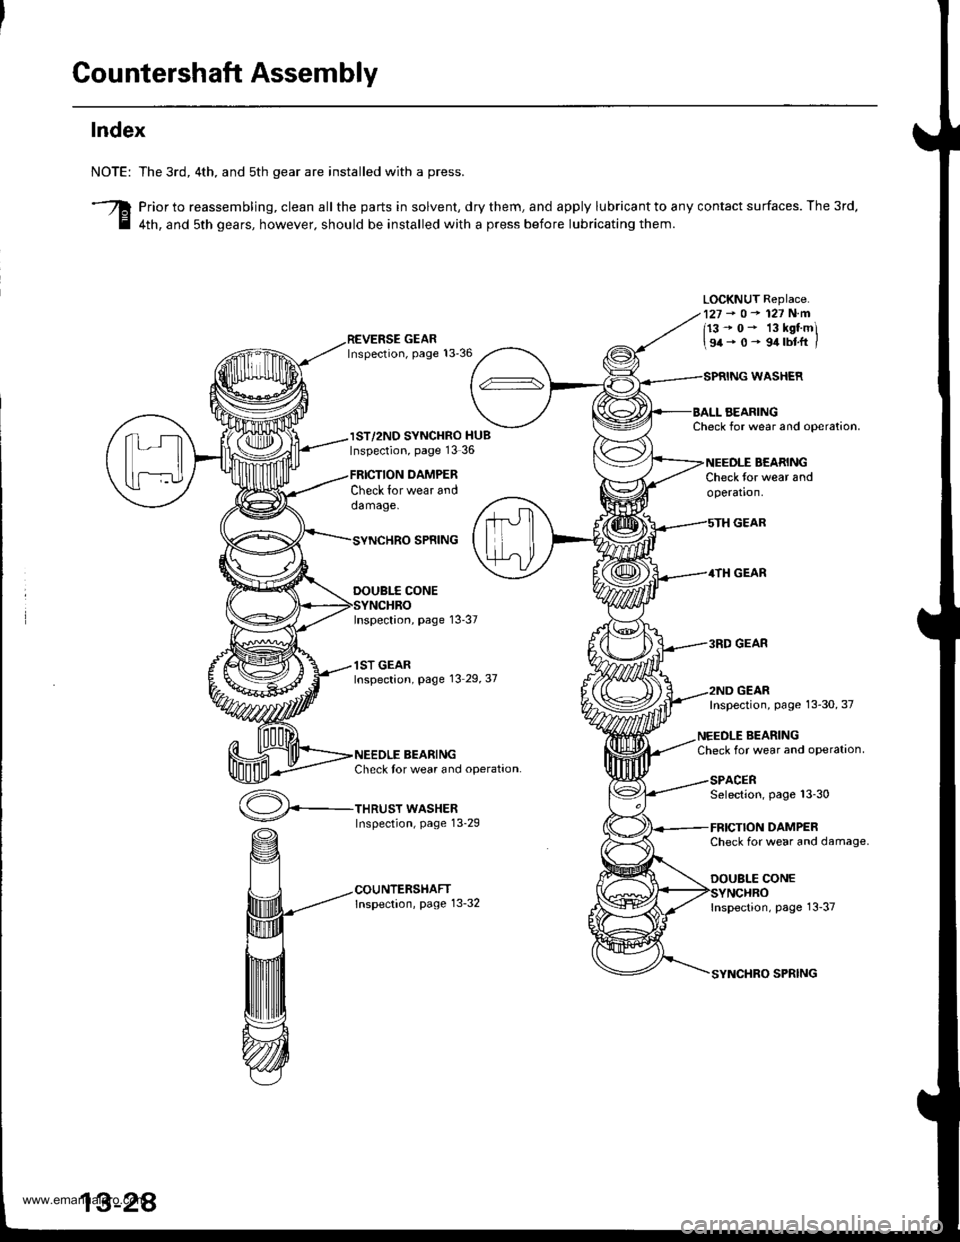
Countershaft Assembly
Index
NOTE:
3
The 3rd, 4th. and sth gear are installed with a press.
Prior to reassembling, clean all the parts in solvent, dry them, and apply lubricant to any contact surfaces. The 3rd,
4th, and sth gears, however. should be installed with a press before lubricating them.
LOCKNUT Replace.127-o-127N.m
113-0- 13kstmi
\94-0- 9.trbtft /
IST/2ND SYNCHRO HUBInspection, page 13 36
Check lor wear anddamage.
THRUST WASHERInspection, page 13-29
DAMPER
WASHER
AEARINGCheck for wear and ooeration.
BEARINGCheck for wear andoperation.
GEAR
4TH GEAR
3RD GEAR
GEAR
SPNING
DOUBI.f CONE
Inspection, page 13-37
1ST GEARInspection, page 13 29,37
BEARINGCheck tor wear and operation.
Inspection, page 13-30, 37
NEEDLE BEARINGCheck for wear and oPeration
SPACERSelection, page 13-30
DAMPERCheck for wear and damage.
DOUBLE CONE
Inspection, page 13-37
SPRING
www.emanualpro.com
Page 468 of 1395
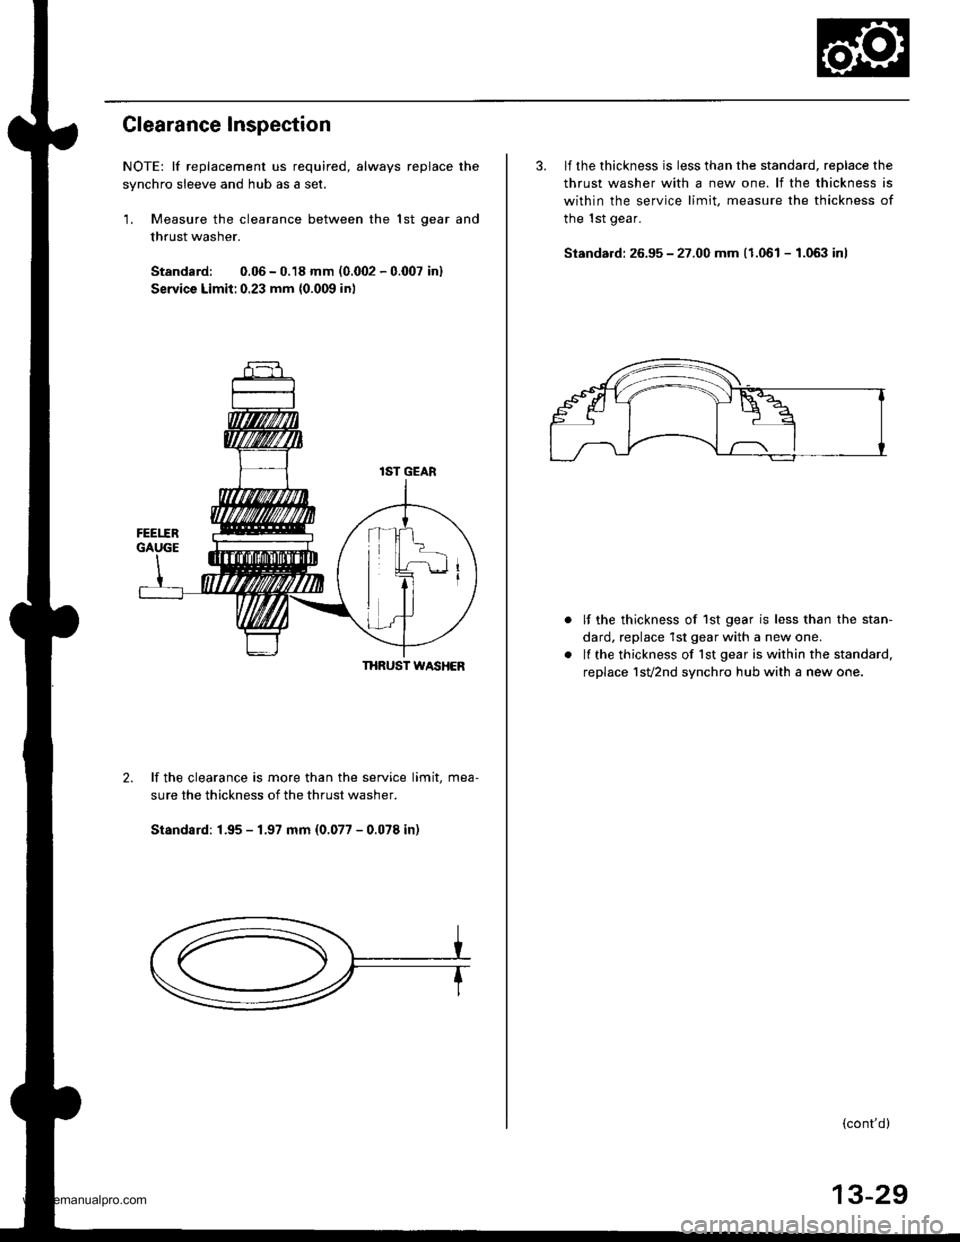
Clearance Inspection
NOTE: lf replacement us required, always replace the
synchro sleeve and hub as a set.
1. Measure the clearance between the lst oear and
thrust washer.
Standard: 0.06 - 0.18 mm (0.@2 - 0.007 in)
Servica Limit:0.23 mm {0.009 in)
THRUST WASHER
2.lf the clearance is more than the service limit, mea-
sure the thickness of the thrust washer.
Standsrd: 1.95 - 1.97 mm (0.077 - 0.078 in)
3. lf the thickness is less than the standard, reDlace the
thrust washer with a new one. lf the thickness is
within the service limit, measure the thickness of
the 1st gear.
Standard: 26.95 - 27.00 mm (1.061 - 1.063 inl
lf the thickness of 1st gear is less than the stan-
dard, replace 1st gear with a new one.
lf the thickness of lst gear is within the standard.
replace 1sv2nd synchro hub with a new one.
{cont'd}
13-29
www.emanualpro.com
Page 469 of 1395
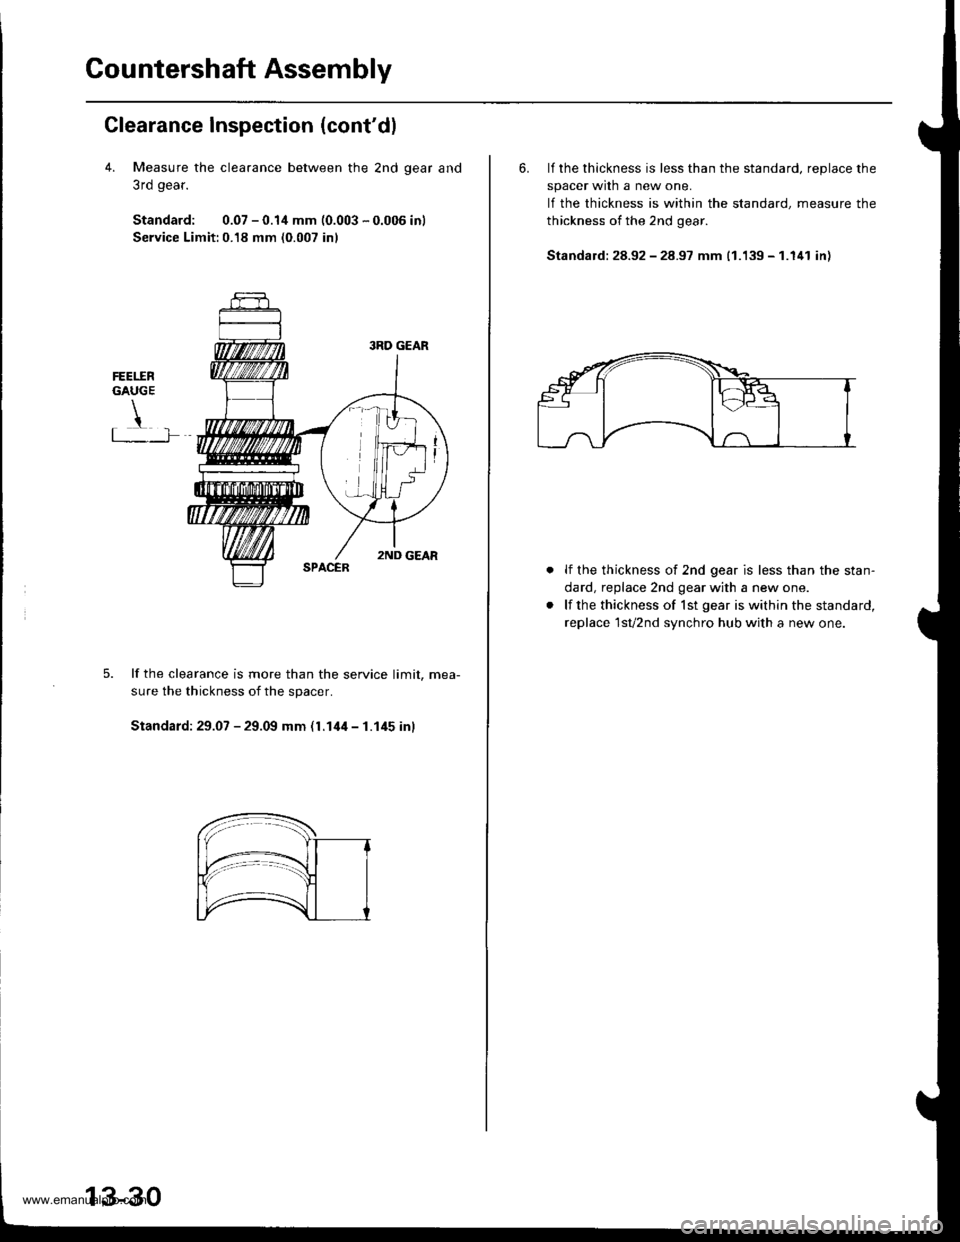
Countershaft Assembly
Clearance Inspection (cont'dl
4. Measure the clearance between the 2nd qear and
3rd gear.
Standard: 0.07 - 0.1,1 mm (0.003 - 0.006 inl
Service Limit:0.18 mm (0.007 inl
FEET.ERGAUGE
!t .�-]�
lf the clearance is more than the service limit. mea-
sure the thickness of the spacer.
Standard: 29.07 - 29.09 mm (l.14il - 1.145 inl
13-30
6. lf the thickness is less than the standard, reDlace the
spacer wrln a new one.
lf the thickness is within the standard, measure the
thickness of the 2nd gear.
Standald: 28.92 - 28.97 mm (1.139 - 1.141 in)
lf the thickness of 2nd gear is less than the stan-
dard, replace 2nd gear with a new one.
lf the thickness of lst gear is within the standard,
replace 1sv2nd synchro hub with a new one.
www.emanualpro.com
Page 472 of 1395
Reassembly
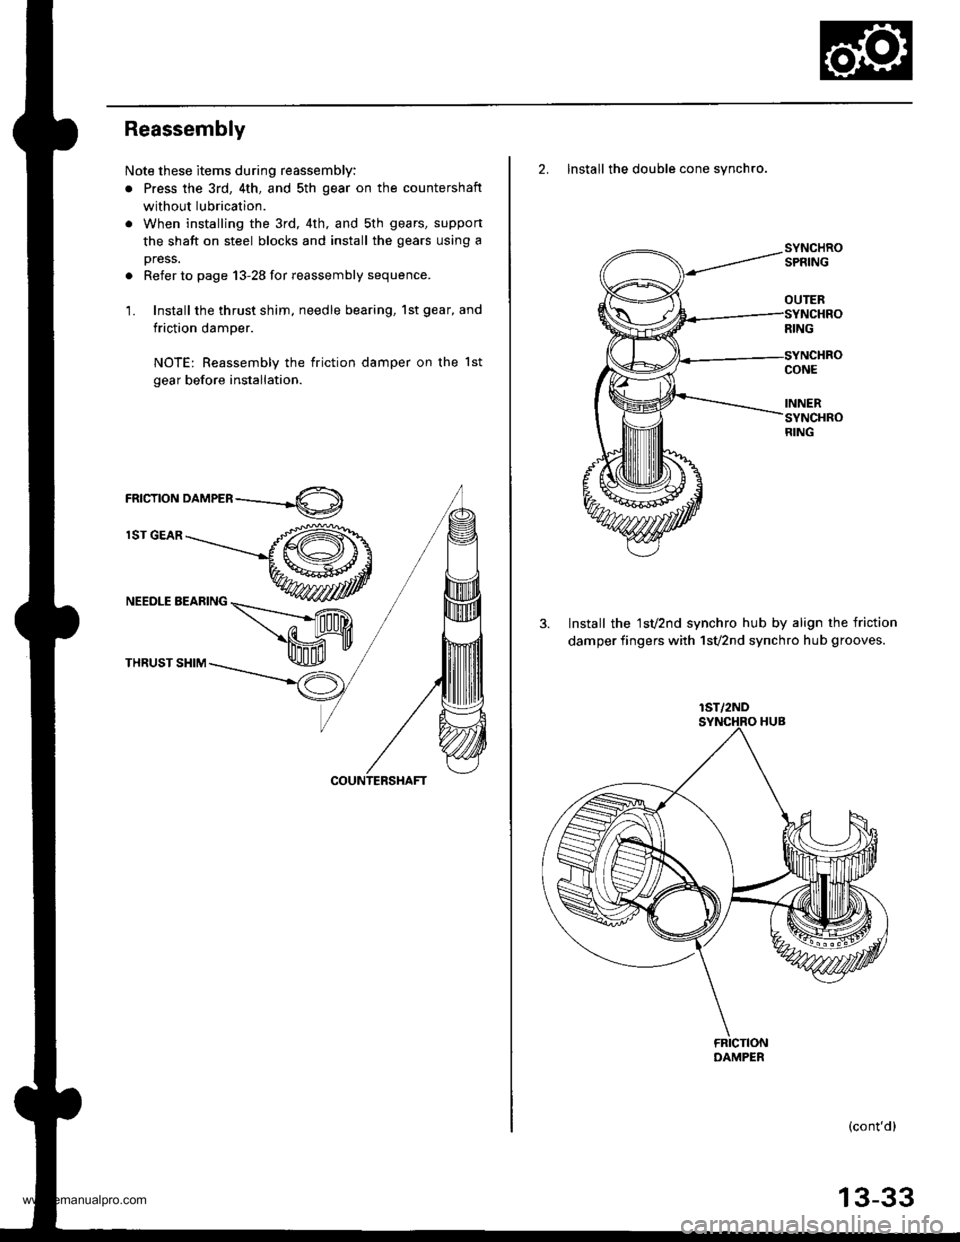
Note these items during reassembly:
. Press the 3rd, 4th, and sth gear on the countershaft
without lubrication.
. When installing the 3rd, 4th. and sth gears, suppon
the shaft on steel blocks and install the gears using a
press.
. Refer to page 13-28 for reassembly sequence.
1. Install the thrust shim, needle bearing, 1st gear, and
friction damper.
NOTE: Reassembly the friction damper on the lst
gear before installation.
rnrcrroru orn,leen ----.-4O)
lST GEAR
NEEDLE BEARING
THRUST SHIM
2. Install the double cone synchro.
3. Install the 1sv2nd synchro hub by align the friction
damper fingers with 1svznd synchro hub grooves.
(cont'd)
OUTER
lST/2ND
13-33
www.emanualpro.com