Page 1 HONDA CR-V 1999 RD1-RD3 / 1.G Workshop Manual
[x] Cancel search | Manufacturer: HONDA, Model Year: 1999, Model line: CR-V, Model: HONDA CR-V 1999 RD1-RD3 / 1.GPages: 1395, PDF Size: 35.62 MB
Page 1379 of 1395
Troubleshooting
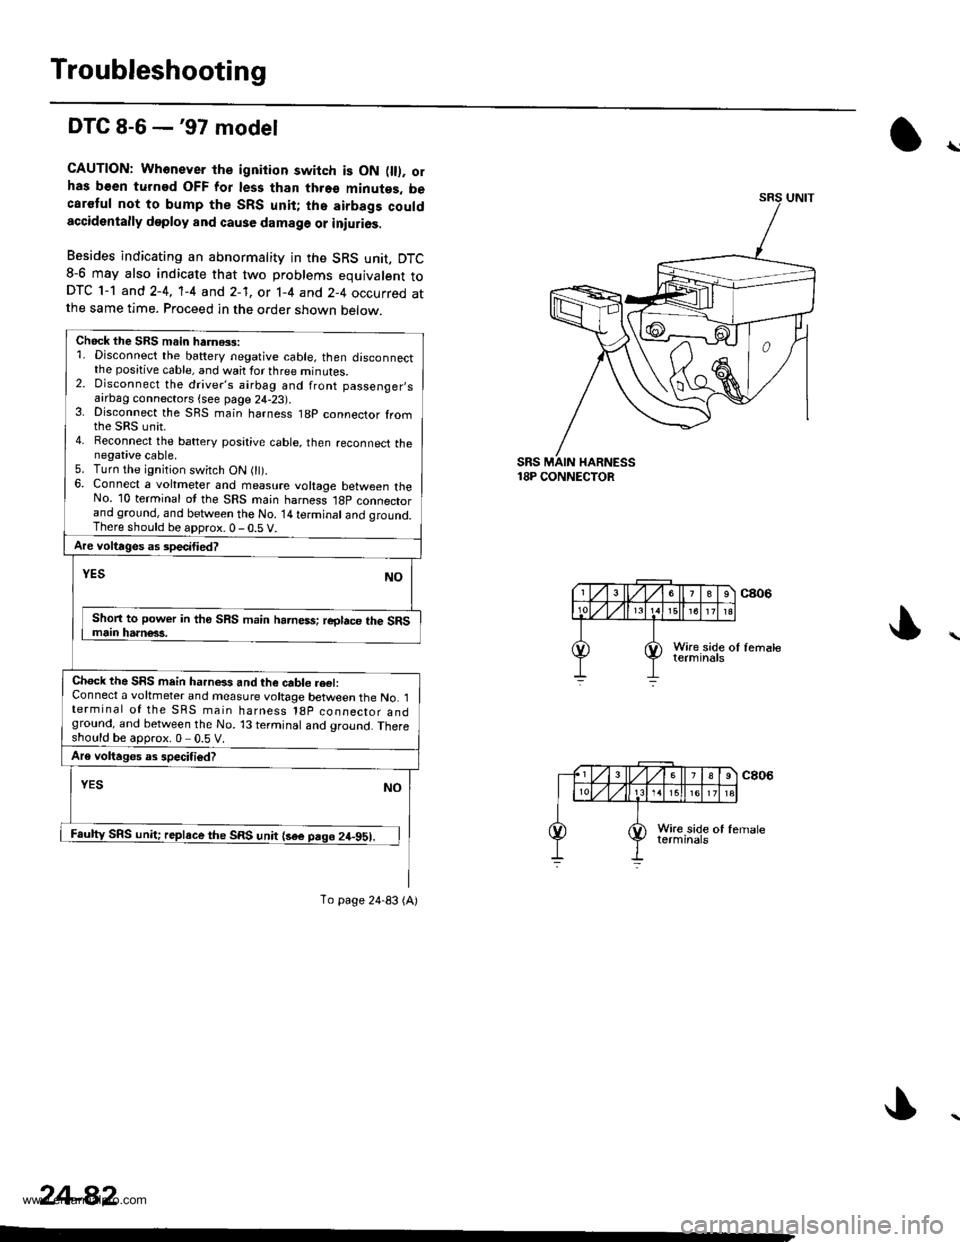
DTC 8-6 -'97 model
CAUTION: Whonever th€ ignition switch is ON fll). olhas b€en turned OFF for les3 than thro€ minutes, becaretul not to bump the SRS unit; tho airbags couldaccidentally deploy and cause damage or iniurios.
Besides indicating an abnormality in the SRS unit, DTC8-6 may also indicate that two problems equivalent toDTC 1-1 and 2-4, 'l-4 and 2-1, or 1-4 and 2-4 occurred atthe same time. Proceed in the order shown below.
18P CONNECTOR
\
Chock the SBS main harnGs:1. Disconnect the battery negative cable, then disconnectthe positive cable, and wait for three minutes.2. Disconnect the driver's airbag and front passenger,safrDag connectors {see page 24-23).3. Disconnect the SRS main harness t8p connector fromthe sRs unit.4. Reconnect the battery posative cable, then reconnect thenegative cable.5. Turn the ignition switch ON 0t).6. Connect a voltmeter and measure voltage between theNo. 10 terminal ot the SRS main harness l8p connectorand ground, and between the No. 14 terminal and qround.There should be aDorox.0-0.5 V.
Are voltages as specitied?
NOYES
Shon to power in tho SRS main harness; reglace the SRSmain harn€63.
Chock the SRS mein harnels and the cable re€l:Connect a voltmeter and measure voltage between the No. 1terminal of the SRS main harness l8p coonector andground, and between the No. 13 terminal and ground. Thereshould be approx.0 0.5 V.
Are voltages as specifiod?
YESNO
Faulty SRS unit; replace the SRS unit {sae pago 24-951.
To page 24-83 (A)
24-82
www.emanualpro.com
Page 1380 of 1395
)
)
From page 24-82 iA)
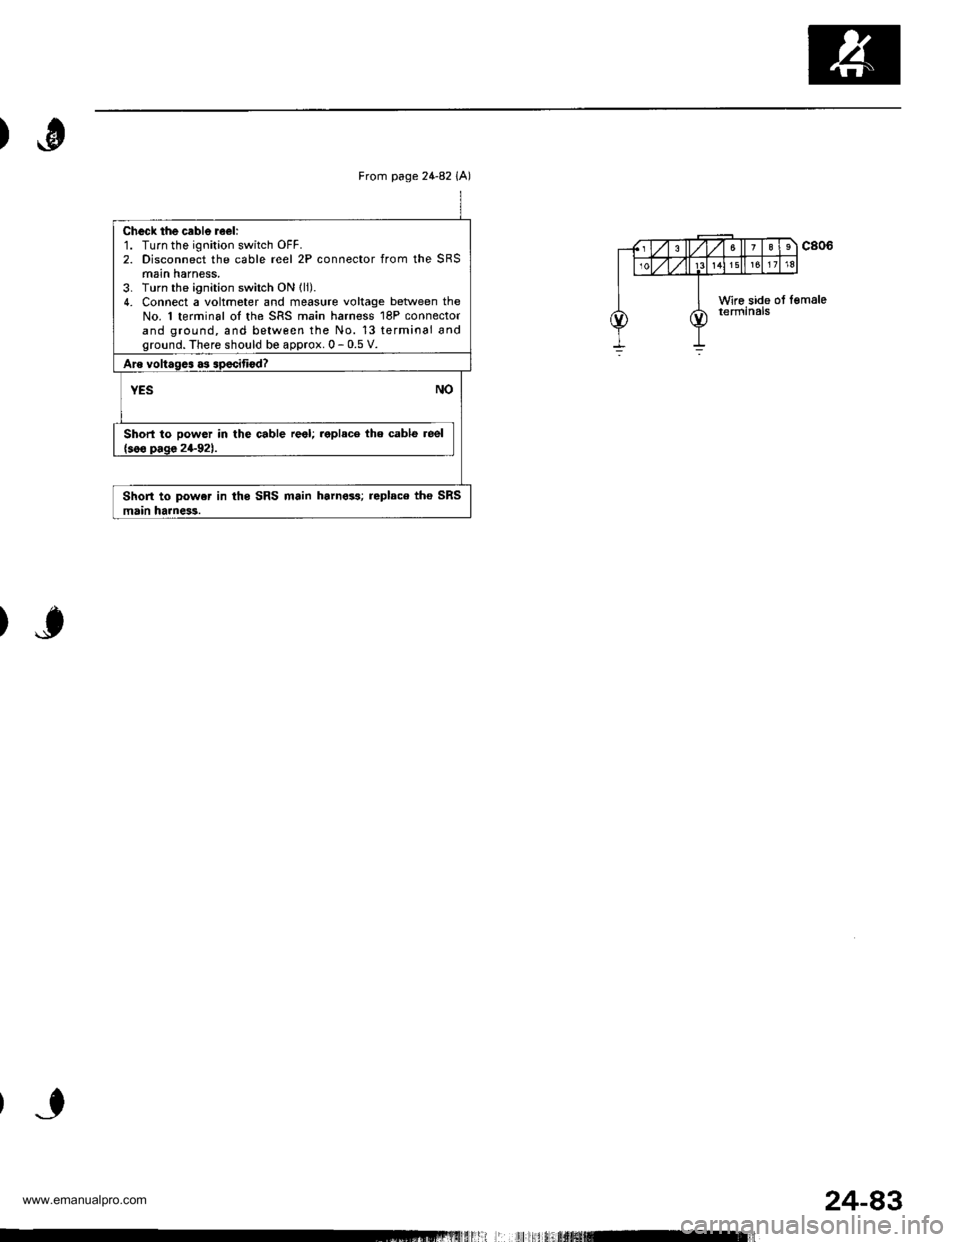
Check the cable reeli1. Turn the ignition switch OFF.2. Disconnect the cable reel 2P connector from the SRSmain harness,3. Turn the ignition switch ON lli).4. Connect a voltmeter and fieasute voltage beNveen theNo. 'l terminal oI the SRS main harness 18P connectorand ground, and between the No. 13 terminal andground. There should be approx. 0 - 0.5 V.
Are voltagcs as specifiod?
YESNO
Short to powor in the cable reel; replace the cable reel{soo oaqa 24-921.
Short to powe. in ths SRS main harn633; replaco tho SRSmain harness.
Lll l| i,ltufiffifil-]ll
24-83
www.emanualpro.com
Page 1381 of 1395
Troubleshooting
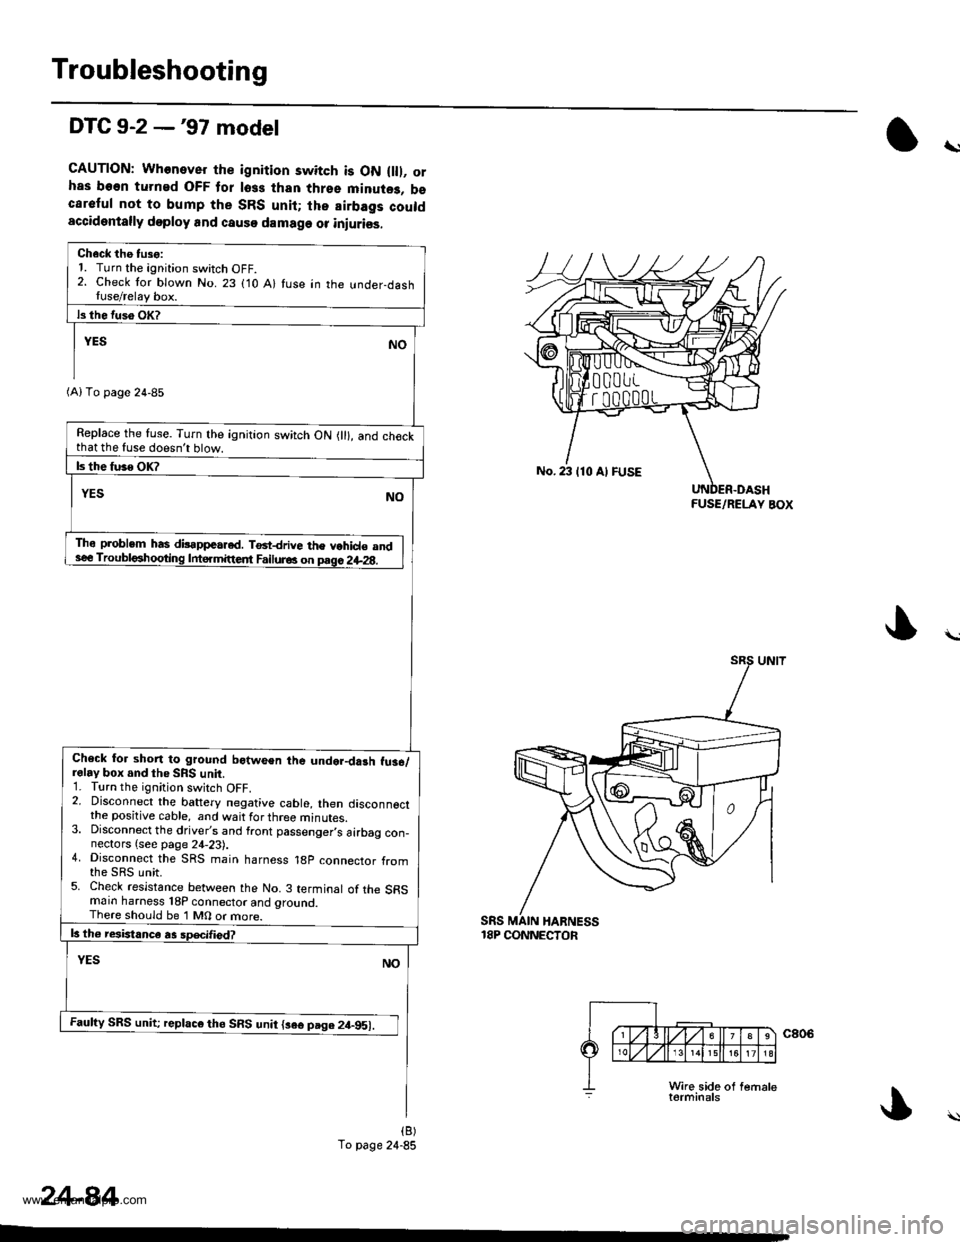
DTC 9-2 -'97 model
CAUTION: Whenever the ignition switch is ON flll, orhas been turned OFF tor loss than thrse minute3, bscareful not to bump the SRS unit; lhe airbags couldaccidentally doploy and causo damage or iniuriss.
\
Ch6ck the tuso:1. Turn the ignition switch OFF.2. Check tor blown No. 23 (10 A) fuse in the !nder-dashIuse/relay box.
Replace the fuse. Turn the ignition switch ON {ll}, and ch€ckthat the fuse doesnt blow.
Tho problem has dilappeared. T6t-drive the vohid€ andsee Troubl6hogting Intermittedt Failur6 on prgc 2il-2g.
Check for shon to ground botween the undor-darh fu36,/relay box and tho SRS unit.1. Turn the ignition switch OFF.2. Disconnect the battery negative cable, then disconnectthe positive cable, and wait for three minutes.3. Disconnect the driver's and front passenger,s airbag con-nectors {see page 24,23).4. Disconnect the SRS main harness 18p connector from
5. Check resistance between the No. 3 terminal of the SFSmain harness 18P connector and grouncl.There should be 1 M0 or more.
Faufty SRS unit; replaco th6 SRS unit {3e€ page 2t-951.
(A) To page 24-85
To page 24-85
No. 23 110 Al FUSE
FUSE/RELAY BOX
sRs18P CONNECTOR
24-84
www.emanualpro.com
Page 1382 of 1395
from page 24'84(B)
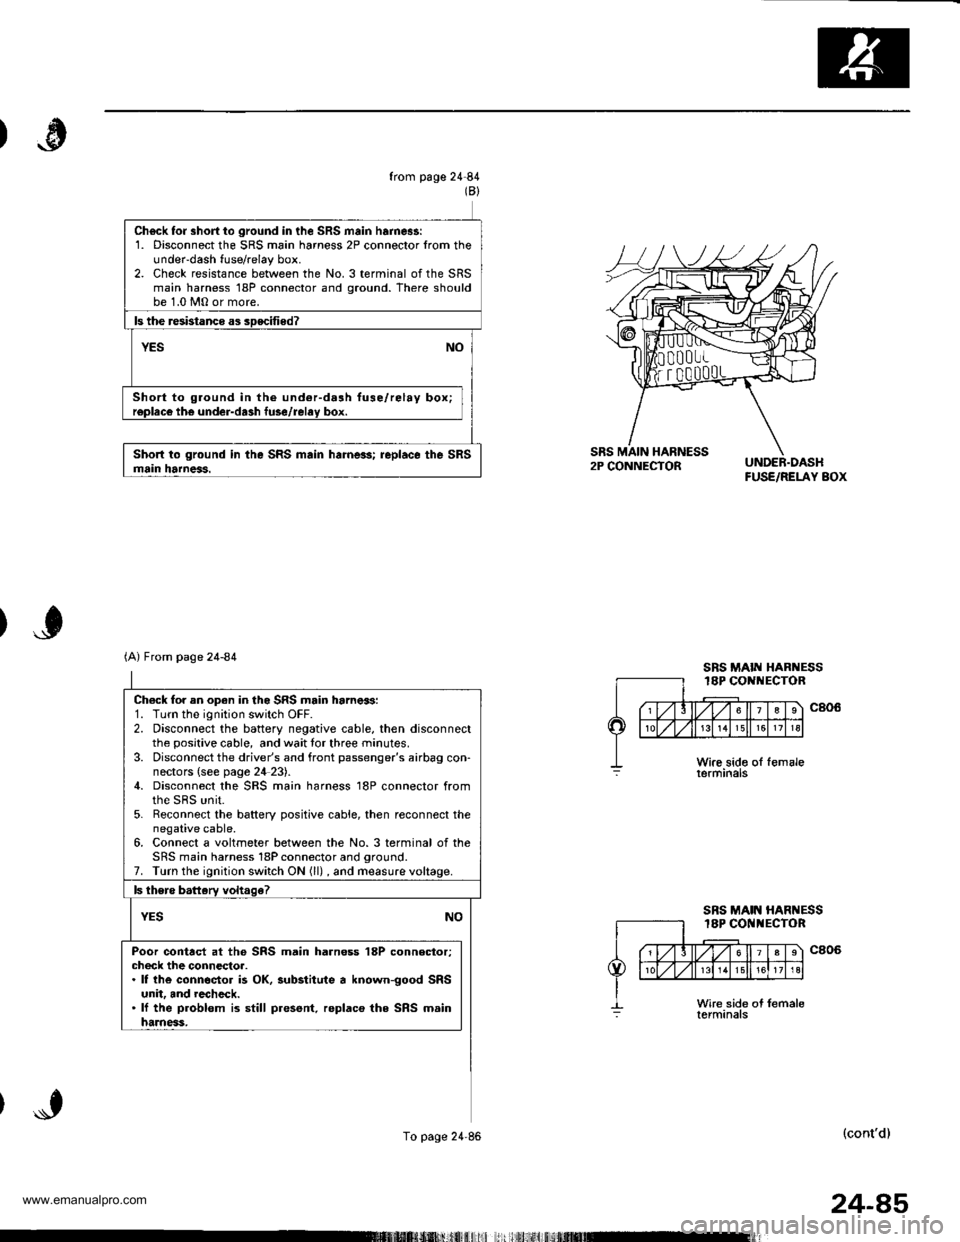
Ch6ck fo. short io ground in the SRS main harnes!:1. Disconnect the SRS main harness 2P connector lrom theunder-dash fuse/relay box.2. Check resistance between the No. 3 terminal of the SRSmain harness 18P connector and ground. There shouldbe 1.0 MO or more.
ls the resbtanco as soecitied?
YESNO
Short to ground in the undor-dalh fuse/relay box;r€placo th€ under-da3h fuse/relav box.
Short to ground in the SRS main harneas; replaco the SRSmain harneas.FUSE/RELAY BOX
Ch€ck for an open in the SRS main harnes:1. Turn the ignition switch OFF.2. Disconnect the battery negative cable, then disconnectthe positive cable, and wait tor three minutes.3. Disconnect the driver's and front passenger's airbag con-nectors {see page 2il 23).4. Disconnect the SRS main harness 18P connector fromthe sRs unit.5. Reconnect the baftery positive cabie, then reconnect thenegative cable.6. Connect a voltmeter between the No. 3 terminal of theSRS main harness 18P connector and oround.7. Turn the ignition switch ON (ll) , and measure
Poor contrct at the SRS main harn€ss 18P connector;check the connectoa.. lf the connsctor is OK, substitute a known-good SRSunit, and rccheck.. lf the problom is still present. replaco the SRS mainharness,
(A) From page 24-84
To page 24'86
SRS MAIN HARNESS18P CONI{ECTOR
SBS MAIN HARNESS18P COI{l{ECTOR
(cont'd)
24-85
www.emanualpro.com
Page 1383 of 1395
Troubleshooting
DTC 9-2 -'97 model lcont'dl
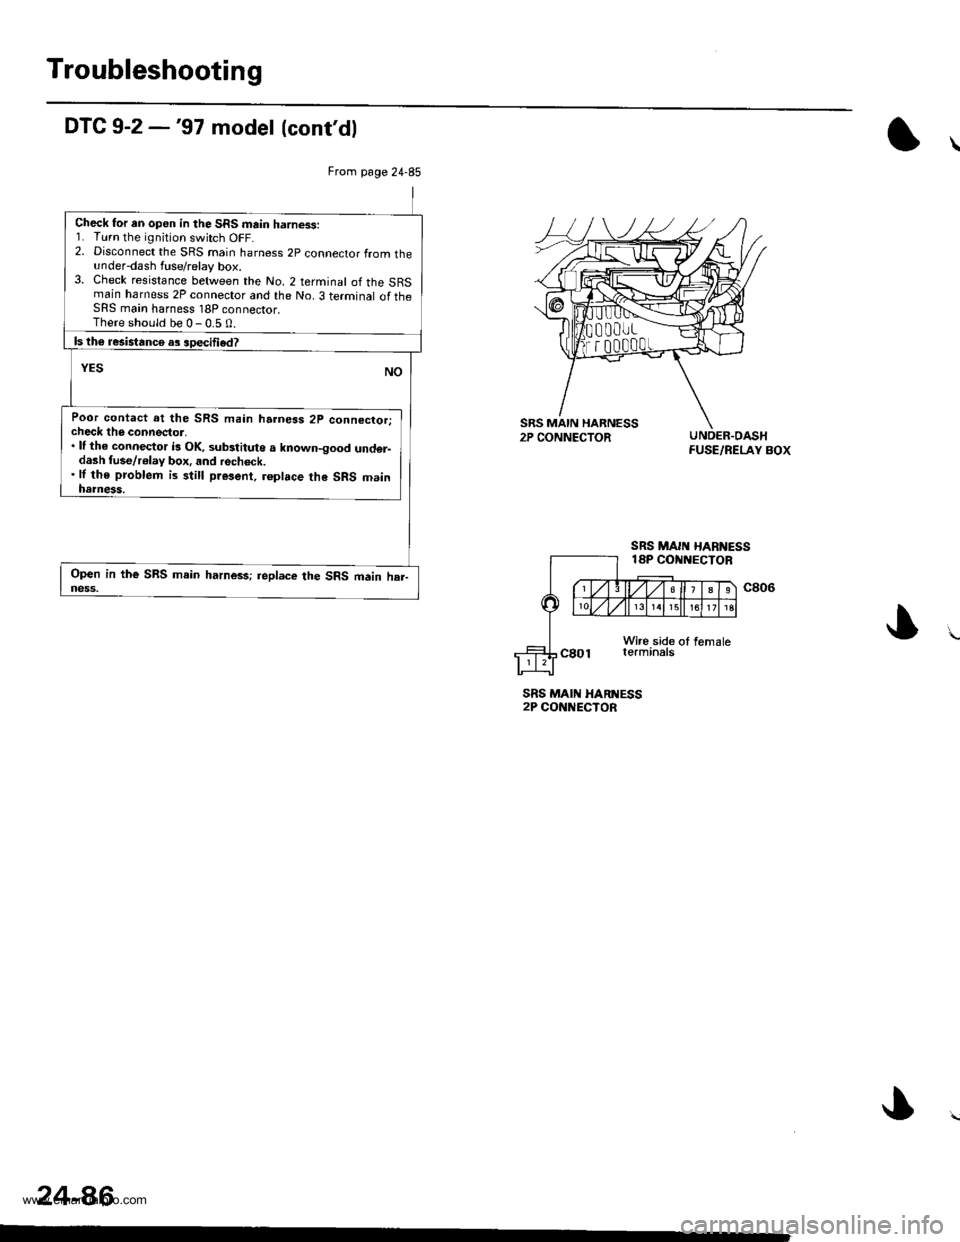
UNDER.OASHFUSE/RELAY BOX
SRS MAII{ HARI{ESS2P CONNECTOR
24-86
From page 24-85
Check for an open in the SRS main harness:1. Turn the ignition switch OFF.2. Disconnect the SRS main harness 2p connector from theunder-dash fuse/relay box.3. Check resistance between the No. 2 terminal of the SRSmain harness 2P connector and the No. 3 terminal of theSRS main harness 18P connector.There should be 0-0.5 0.
ls th6 resistance as soecified?
YESNO
Poor contact at the SRS main harness 2p connector;check tho connector,. lf the connector i3 OK, substituto a known-good und€r-dash fuse/relay box, and recheck.. lf the problem is still present, roplace the SRS mainnatness,
Open in the SRS main harn$s;.eplace the SRS main har-ness.
www.emanualpro.com
Page 1392 of 1395
SRS Unit
).0Replacement
CAUTION:
. Before disconnecting any part of the SRS wire har-
nesg, disconnect the airbag connoctors (and soat beh
tensioner connectorsl.
. During installation or replacament, do not bump(impact wrench, hammer etc.) the area near the SRS
unit.
Do not damage the SFS unit terminalg or connsc-
lors.
Do not disassemble the SRS unit it has no saryice-
able parts,
Store the SRS unit in a clean, dry area.
Do not use any SRS unit which has been subiected
to water damage or shows signs ot being dropped orimproperly handlgd, such as dents, cracks or defor-
mation.
Disconnect the battery negative cable, then discon-
nect the positive cable from the battery, andwaitat
least three minutes.
Disconnect the airbag connectors (and seat belt ten-
sioner connectors). (When disconnected, the airbag
and seat belt tensioner connectors are automatical-
ly shorted.)
Driver's Side:
. Remove the access panel from the steering
wheel, then disconnect the 2P connector
between the driver's airbag and cable reel (see
page 24-231.
Front Passenger's Side:. Disconnect the 2P connector between the frontpassenger's airbag and SRS main harness (see
page 24-231.
Soat Beh Tensionor ('98 - 00 modelsr:. Remove the left and right center pillar lower trimpanels (see section 20).
. Disconnect the seat belt tensioner 2P connectors
from the left side wire harness (driver's side) and
the right wire harness (front passenger's side)(see page 24'231.
2.
a
a
'1.
)
)o
24-95
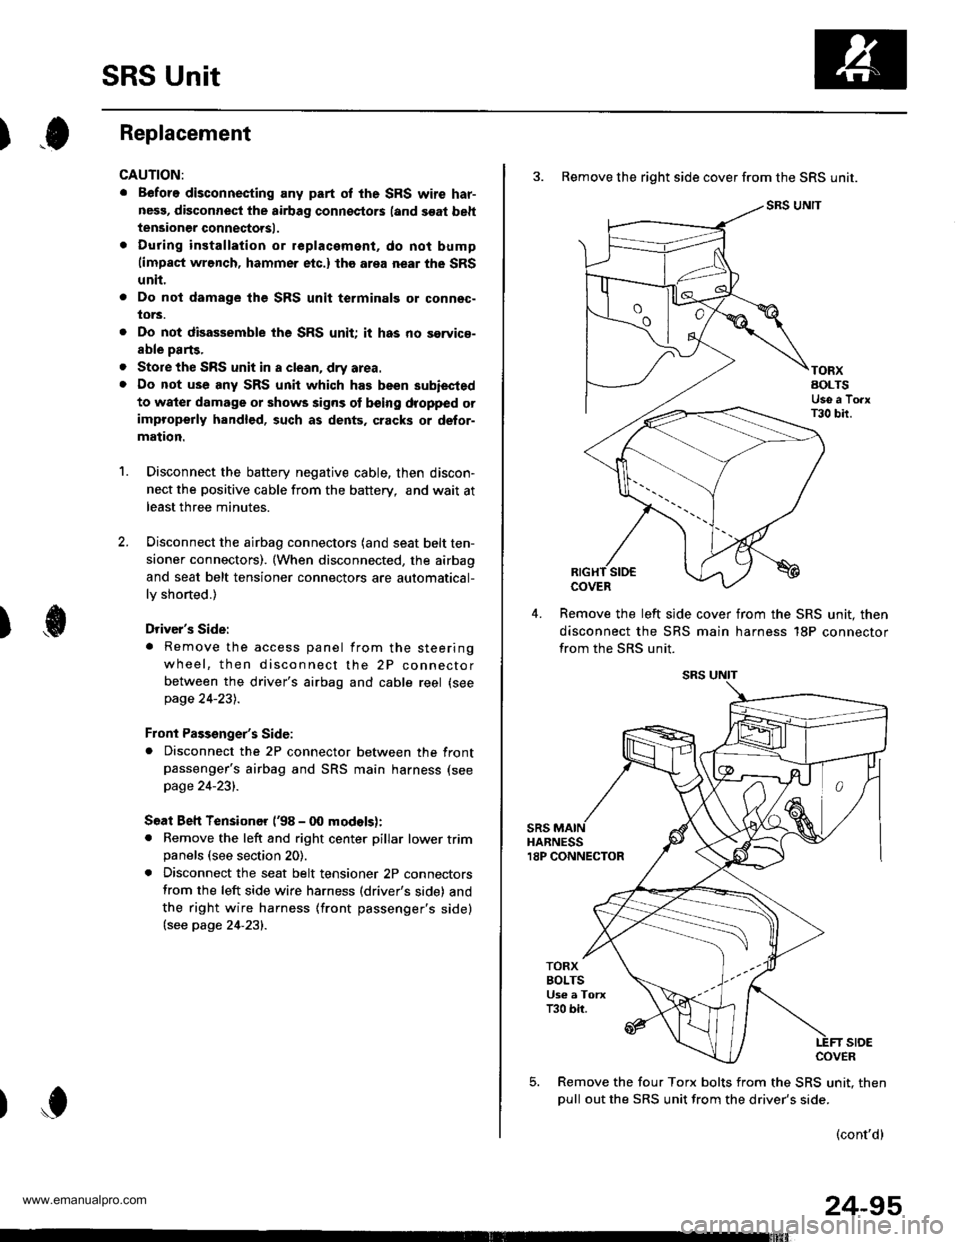
3. Remove the right side cover from the SRS unit.
SRS UNIT
TORXAOLTSUse a TorxT30 bir.
COVER
Remove the left slde cover from the SRS unit. then
disconnect the SRS main harness 18P connector
from the SRS unit.
sRsHARNESS18P CONNECTOR
TORXBOLTSUs€ a TorxT30 bir.
stoECOVER
Remove the four Torx bolts from the SRS unit. then
oull out the SRS unit from the driver's side.
(cont'd)
www.emanualpro.com
Page 1394 of 1395
Airbag/Seat Belt Tensioner
)Disposal
)
Before scrapping any airbags {and seat belt tansioners)
(including those in a whole vehicle to be scrappedl. the
airbags (and seat belt tensioners) must be deployed. lf
the vehicle is still within the warrantv oeriod the Honda
District Service Manager must give approval and/or spe-
cial instructions, before you deploy the airbags (and seat
belt tensioners). Only after the airbags {and seat belt ten-
sioners) have been deployed (as the result of vehicle col-
lision, for example), can they be scrapped.
lf the airbags (and seat belt tensioners) appear intact
(not deployed), treat them with extreme caution.
Follow this procedure:
Doploying tho Airbags (and Soat B6li Ten3ione6):
ln-vehicle
lf an SRS vehicle is to be entirely scrapped, its airbags(and seat belt tensioners) should be deployed while still
in the vehicle. The airbags (and seat belt tensioners)
should not be considered as salvageable parts and
should never be installed in another vehicle.
@ confirm that each airbag {and seat belt
tonsiongr) i3 ggcurely mountod; othgrwise, severe per-
sonal iniury could result from d6ploym6nt,
1. Disconnect the battery negative cable, then discon-
nect the oositive cable.
Confirm that the special tool is functioning properly
by following the check procedure on the tool label
or on page 24-98.
Remove the access panel, then disconnect the 2P
connector between the driver's airbag and the cable
reel (see page 24-23).
Remove the glove box, then disconnect the 2P con-
nector between the front passenger's airbag and
SRS main harness (see page 24-23).
Remove the center pillar lower trim panel, then dis-
connect the 2P connector between the seat belt ten-
sioner and side wire harness ('98 - 00 models) (see
page 24-231.
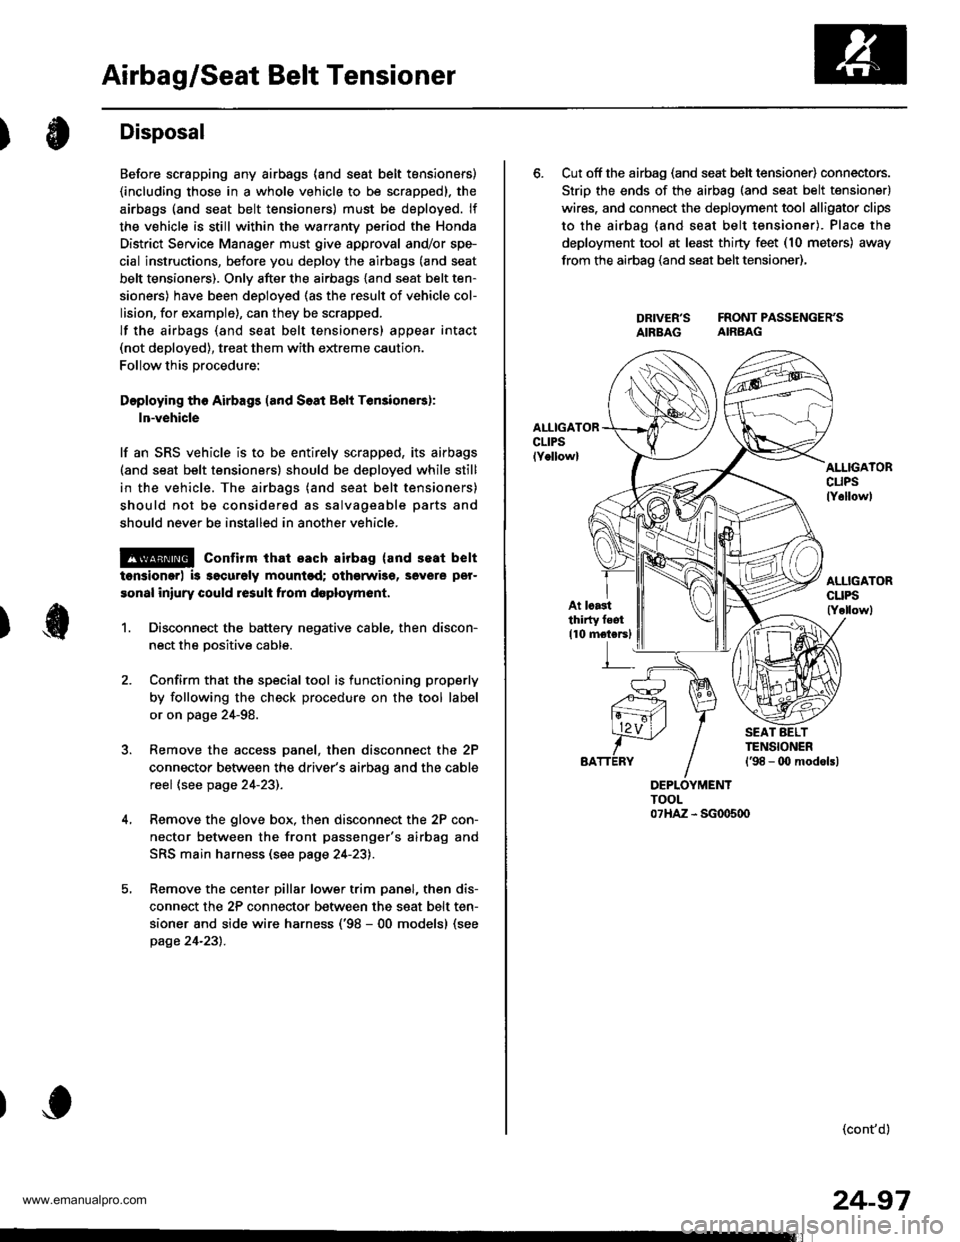
6. Cut off the airbag (and seat belt tensioner) connectors.
Strip the ends of the airbag (and seat belt tensioner)
wires. and connect the deployment tool alligator clips
to the airbag (and seat belt tensioner). Place the
deployment tool at least thirty feet (10 meters) away
from the airbao (and seat belt tensioner),
DRIVER'S FRONTPASSENGER'SAIBBAG AIRBAG
AI.IIGATORcuPslY6llowl
At lcastthirty feot
110 motersl
(cont'd)
24-97
www.emanualpro.com
Page 1395 of 1395
Airbag/Seat Belt Tensioner
1.
Disposal (cont'dl
Connect a 12 volt battery to the tool'
. It the green light on the tool comes on, the air-
bag igniter circuit is defective and cannot deploy
the airbag. Go to Damaged Airbag Special
Procedure.
.lftheredlightonthetool comes on, the airbag is
ready to be deployed.
Push the tool's deployment switch. The airbag
should deploy (deployment is both highly audible
and visible; a loud noise and rapid inflation of the
bag, followed by slow deflation).
. lf the airbags deploy and the green light on the
tool comes on, continue with this procedure.
. lf an airbag doesn't deploy, yet the green light
comes ON, its igniter is defective. Go to Dam-
aged Airbag Special Procedure.
. During deployment, the airbag can become hot
enough to burn you, Wait thirty minutes after
deployment before touching the airbag.
Dispose of the complete airbag. No part of it can be
reused. Place it in a sturdy plastic bag, and seal it
securety.
CAUTION:
. Wear a faco shield and gloves when handling a
deployed airbag.
. Wash your hands and rinse them well with
water after handling a deployed airbag.
24-98
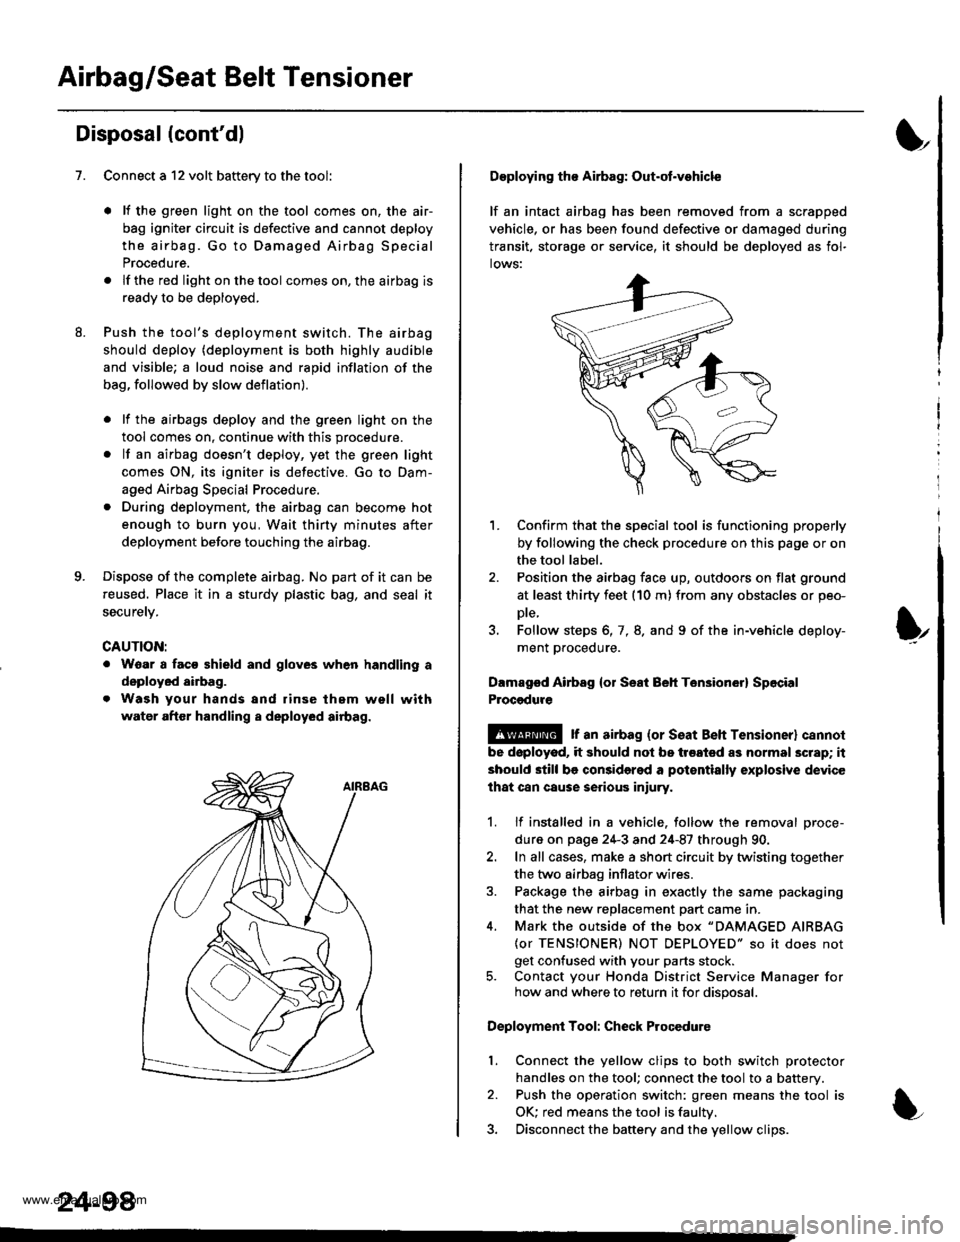
Deploying tho Airbag: Out-ot.vohicle
lf an intact airbag has been removed from a scrapped
vehicle, or has been found defective or damagsd during
transit. storage or seryice, it should be deployed as fol-
lows:
'L Confirm that the special tool is functioning properly
by following the check procedure on this page or on
the tool label.
2. Position the airbag face up, outdoors on flat ground
at least thirty feet (10 m) from any obstacles or peo-
Dte,
3. Follow steps 6, 7, 8. and 9 of the in-vehicle deploy-
ment proceoure.
Dlmaged Airbsg {or Seat Beh Ten3ion6r} Sp6cial
Procgdure
!@ r an airbag {or seat Beh rensioner} cannol
be doployod, it should not be treated as normal scrap; it
should still be considered a pot€ntially explosive device
lhat can cause serious iniury.
1. lf installed in a vehicle. follow the removal proce-
dure on page 24-3 and 24-87 through 90.
2. In all cases, make a short circuit by twisting together
the two airbag inflator wires.
3. Package the airbag in exactly the same packaging
that the new reDlacement Dart came in.
4. Mark the outside of the box "DAMAGED AIRBAG
{or TENSIONER) NOT DEPLOYED" so it does not
get confused with your parts stock.5. Contact your Honda District Service Manager forhow and where to return it for disposal.
Deployment Tool: Check Procedure
Connect the yellow clips to both switch protector
handles on the tool; connect the tool to a battery.
Push the operation switch: green means the tool is
OK: red means the tool is faultv.
Disconnect the baftery and the yellow clips.
I
t
l.
www.emanualpro.com