ELD HONDA CR-V 2000 RD1-RD3 / 1.G Owners Manual
[x] Cancel search | Manufacturer: HONDA, Model Year: 2000, Model line: CR-V, Model: HONDA CR-V 2000 RD1-RD3 / 1.GPages: 322, PDF Size: 4.64 MB
Page 42 of 322
Protectin
g Childre n
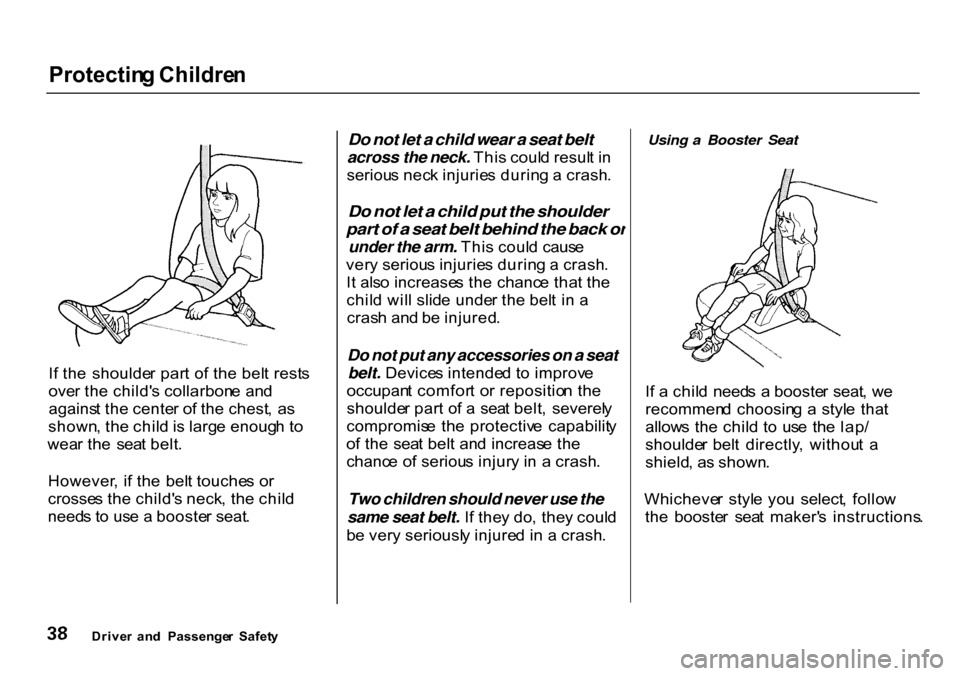
I f th e shoulde r par t o f th e bel t rest s
ove r th e child' s collarbon e an d
agains t th e cente r o f th e chest , a s
shown , th e chil d is larg e enoug h t o
wea r th e sea t belt .
However , i f th e bel t touche s o r
crosse s th e child' s neck , th e chil d
need s t o us e a booste r seat .
Do not let a child wear a seat belt
across the neck. Thi s coul d resul t i n
seriou s nec k injurie s durin g a crash .
Do not let a child put the shoulder
part of a seat belt behind the back or
under the arm. Thi s coul d caus e
ver y seriou s injurie s durin g a crash .
I t als o increase s th e chanc e tha t th e
chil d wil l slid e unde r th e bel t i n a
cras h an d b e injured .
Do not put any accessories on a seat
belt. Device s intende d t o improv e
occupan t comfor t o r repositio n th e
shoulde r par t o f a sea t belt , severel y
compromis e th e protectiv e capabilit y
o f th e sea t bel t an d increas e th e
chanc e o f seriou s injur y i n a crash .
Two children should never use the
same seat belt. I f the y do , the y coul d
b e ver y seriousl y injure d i n a crash . Using a Booster Seat
I f a chil d need s a booste r seat , w e
recommen d choosin g a styl e tha t
allow s th e chil d t o us e th e lap /
shoulde r bel t directly , withou t a
shield , a s shown .
Whicheve r styl e yo u select , follo w
th e booste r sea t maker' s instructions .
Drive r an d Passenge r Safet y
Page 63 of 322
Control
s Nea r th e Steerin g Whee l
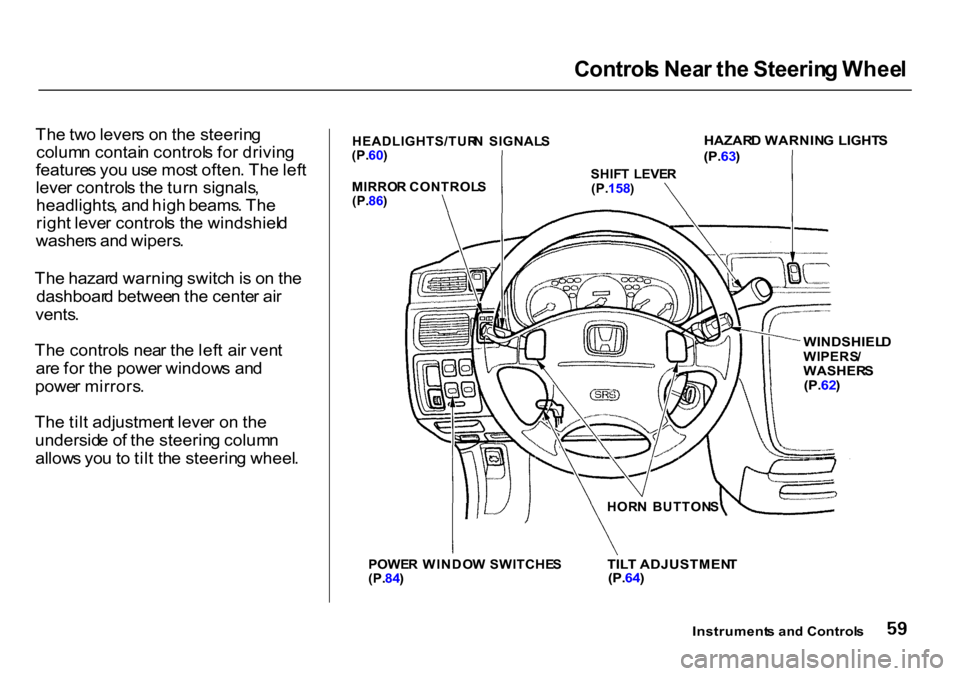
Th e tw o lever s o n th e steerin g
colum n contai n control s fo r drivin g
feature s yo u us e mos t often . Th e lef t
leve r control s th e tur n signals ,
headlights , an d hig h beams . Th e
righ t leve r control s th e windshiel d
washer s an d wipers .
Th e hazar d warnin g switc h is o n th e
dashboar d betwee n th e cente r ai r
vents .
Th e control s nea r th e lef t ai r ven t
ar e fo r th e powe r window s an d
powe r mirrors .
Th e til t adjustmen t leve r o n th e
undersid e o f th e steerin g colum n
allow s yo u to til t th e steerin g wheel . HEADLIGHTS/TUR
N SIGNAL S
(P. 60)
WINDSHIELD
WIPERS /
WASHER S
(P. 62)
POWE R WINDO W SWITCHE S
(P. 84)
Instruments an d Control s
TIL
T ADJUSTMEN T
(P. 64)
HOR
N BUTTON S
SHIF
T LEVE R
(P. 158 )
MIRRO
R CONTROL S
(P. 86)
HAZAR
D WARNIN G LIGHT S
(P. 63)
Page 66 of 322
Control
s Nea r th e Steerin g Whee l
Windshiel d Wiper s
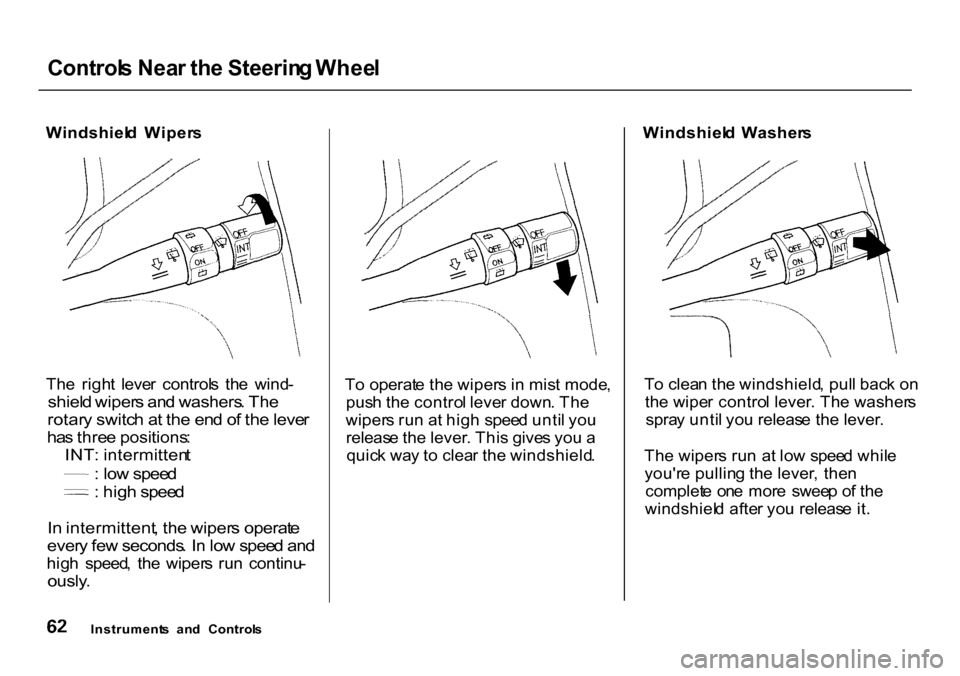
Th e righ t leve r control s th e wind -
shiel d wiper s an d washers . Th e
rotar y switc h a t th e en d o f th e leve r
ha s thre e positions :
INT : intermitten t
:
lo w spee d
:
hig h spee d
I n intermittent , th e wiper s operat e
ever y fe w seconds . I n lo w spee d an d
hig h speed , th e wiper s ru n continu -
ously .
T
o operat e th e wiper s i n mis t mode ,
pus h th e contro l leve r down . Th e
wiper s ru n a t hig h spee d unti l yo u
releas e th e lever . Thi s give s yo u a
quic k wa y t o clea r th e windshield .Windshiel
d Washer s
T o clea n th e windshield , pul l bac k o n
th e wipe r contro l lever . Th e washer s
spra y unti l yo u releas e th e lever .
Th e wiper s ru n a t lo w spee d whil e
you'r e pullin g th e lever , the n
complet e on e mor e swee p o f th e
windshiel d afte r yo u releas e it .
Instrument s an d Control s
Page 103 of 322
Heatin
g an d Coolin g
Mod e Contro l Dia l
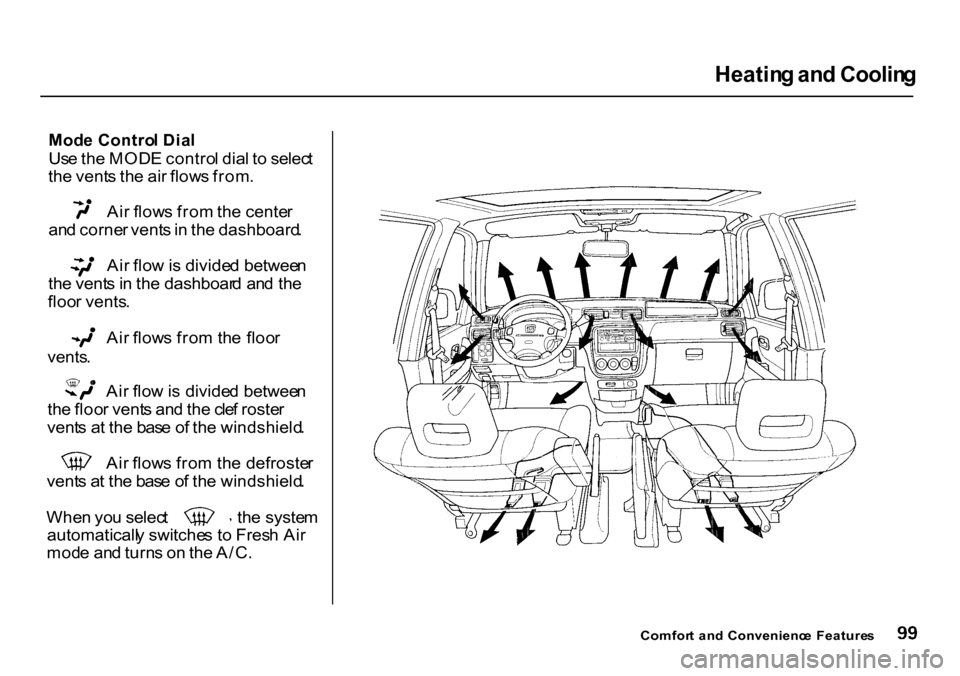
Us e th e MOD E contro l dia l t o selec t
th e vent s th e ai r flow s from . Ai
r flow s fro m th e cente r
an d corne r vent s in th e dashboard .
Ai r flo w is divide d betwee n
th e vent s in th e dashboar d an d th e
floo r vents . Ai
r flow s fro m th e floo r
vents .
Ai
r flo w is divide d betwee n
th e floo r vent s an d th e cle f roste r
vent s a t th e bas e o f th e windshield . Ai
r flow s fro m th e defroste r
vent s a t th e bas e o f th e windshield .Whe
n yo u selec t th e syste m
automaticall y switche s t o Fres h Ai r
mod e an d turn s o n th e A/C .
Comfort an d Convenienc e Feature s
Page 105 of 322
Heatin
g an d Coolin g
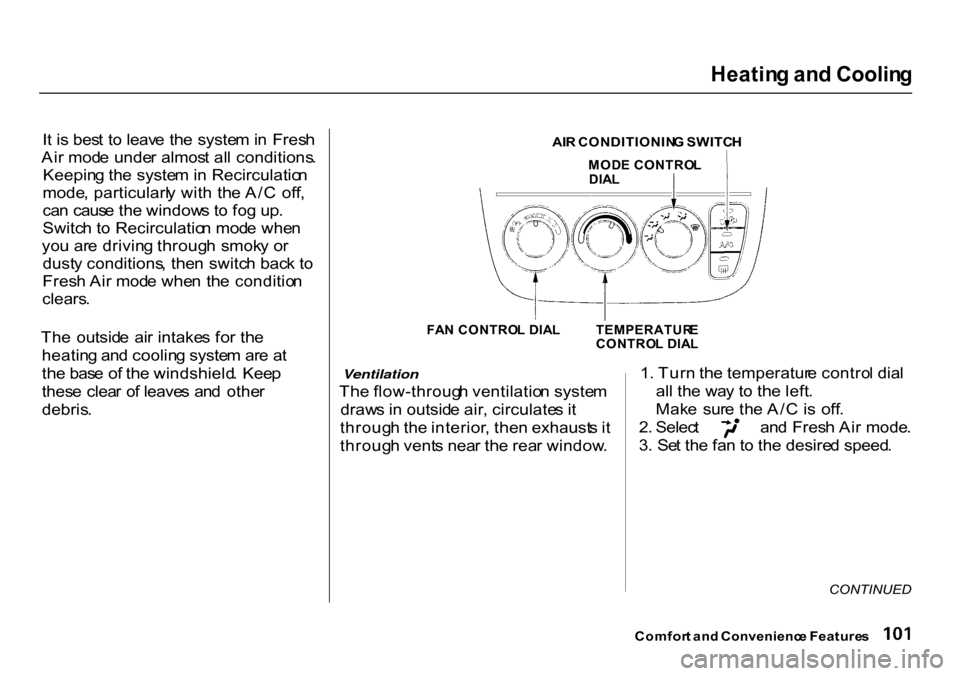
I t i s bes t t o leav e th e syste m in Fres h
Ai r mod e unde r almos t al l conditions .
Keepin g th e syste m in Recirculatio n
mode , particularl y wit h th e A/ C off ,
ca n caus e th e window s t o fo g up .
Switc h t o Recirculatio n mod e whe n
yo u ar e drivin g throug h smok y o r
dust y conditions , the n switc h bac k t o
Fres h Ai r mod e whe n th e conditio n
clears .
Th e outsid e ai r intake s fo r th e
heatin g an d coolin g syste m ar e a t
th e bas e o f th e windshield . Kee p
thes e clea r o f leave s an d othe r
debris .
Ventilation
Th e flow-throug h ventilatio n syste m
draw s i n outsid e air , circulate s i t
throug h th e interior , the n exhaust s it
throug h vent s nea r th e rea r window .1
. Tur n th e temperatur e contro l dia l
al l th e wa y t o th e left .
Mak e sur e th e A/ C is off . 2
. Selec t an d Fres h Ai r mode .
3 . Se t th e fa n to th e desire d speed .
CONTINUED
Comfor t an d Convenienc e Feature s
AI
R CONDITIONIN G SWITC H
MOD E CONTRO L
DIA L
TEMPERATUR E
CONTRO L DIA L
FA
N CONTRO L DIA L
Page 210 of 322
Windshiel
d Washer s
Chec k th e leve l i n th e windshiel d
washe r reservoi r a t leas t monthl y
durin g norma l usage . I n ba d weather ,
whe n yo u us e th e washer s often ,
chec k th e leve l ever y tim e yo u sto p
fo r fuel .
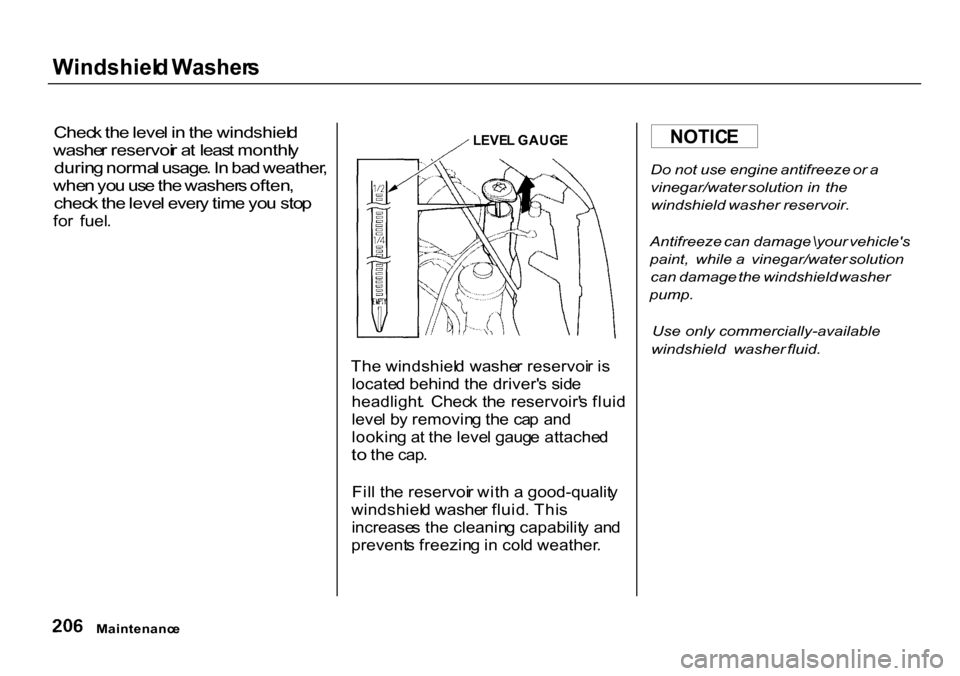
The windshiel d washe r reservoi r i s
locate d behin d th e driver' s sid e
headlight . Chec k th e reservoir' s flui d
leve l b y removin g th e ca p an d
lookin g a t th e leve l gaug e attache d
t o
th e cap .
Fil l th e reservoi r wit h a good-qualit y
windshiel d washe r fluid . Thi s
increase s th e cleanin g capabilit y an d
prevent s freezin g in col d weather .
Do
not use engine antifreeze or a
vinegar/water solution in the
windshield washer reservoir.
Antifreeze can damage \your vehicle's
paint, while a vinegar/water solution
can damage the windshield washer
pump.
Use only commercially-available
windshield washer fluid.
Maintenanc e
NOTIC
E
LEVE L GAUG E
Page 220 of 322
Batter
y
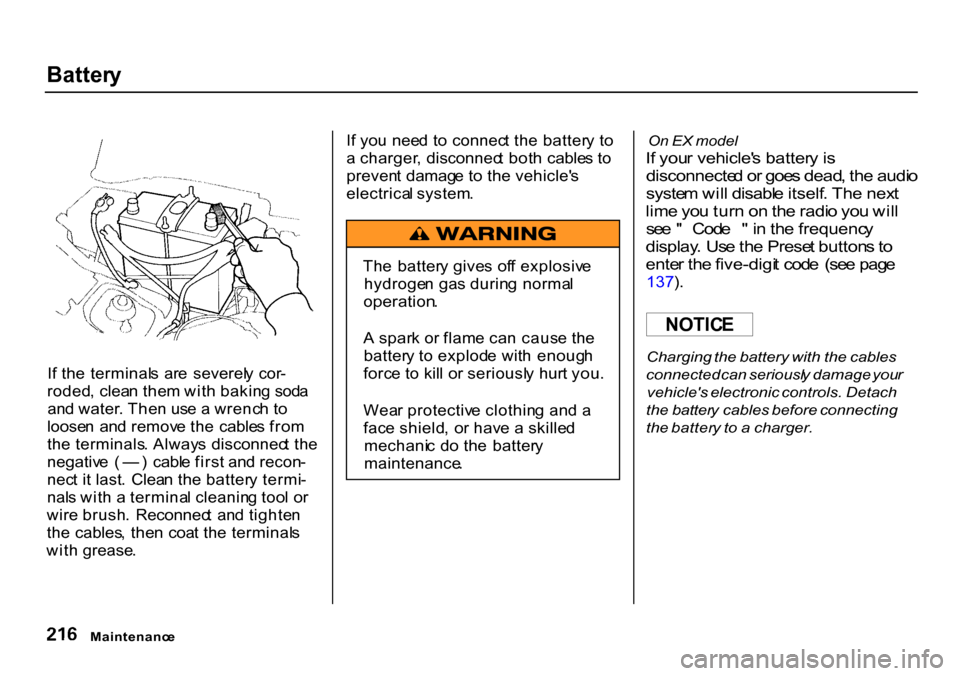
I f th e terminal s ar e severel y cor -
roded , clea n the m wit h bakin g sod a
an d water . The n us e a wrenc h t o
loose n an d remov e th e cable s fro m
th e terminals . Alway s disconnec t th e
negativ e ( — ) cabl e firs t an d recon -
nec t i t last . Clea n th e batter y termi -
nal s wit h a termina l cleanin g too l o r
wir e brush . Reconnec t an d tighte n
th e cables , the n coa t th e terminal s
wit h grease . I
f yo u nee d t o connec t th e batter y t o
a charger , disconnec t bot h cable s t o
preven t damag e t o th e vehicle' s
electrica l system .
On
EX model
I f you r vehicle' s batter y is
disconnecte d o r goe s dead , th e audi o
syste m wil l disabl e itself . Th e nex t
lim e yo u tur n o n th e radi o yo u wil l
se e " Cod e " in th e frequenc y
display . Us e th e Prese t button s to
ente r th e five-digi t cod e (se e pag e
137 ).
Charging the battery with the cables
connected can seriousl y damage your
vehicle's electronic controls. Detach
the batter y cables before connecting
the batter y to a charger.
Maintenanc e
Th
e batter y give s of f explosiv e
hydroge n ga s durin g norma l
operation .
A spar k o r flam e ca n caus e th e
batter y t o explod e wit h enoug h
forc e t o kil l o r seriousl y hur t you .
Wea r protectiv e clothin g an d a
fac e shield , o r hav e a skille d
mechani c d o th e batter y
maintenance .
NOTIC
E
Page 221 of 322
Wipe
r Blade s
Chec k th e conditio n o f th e wipe r
blade s a t leas t ever y si x months .
Loo k fo r sign s o f crackin g in th e
rubber , o r area s tha t ar e gettin g
hard . Replac e th e blade s i f yo u fin d
thes e signs , o r the y leav e streak s
an d unwipe d area s whe n used .
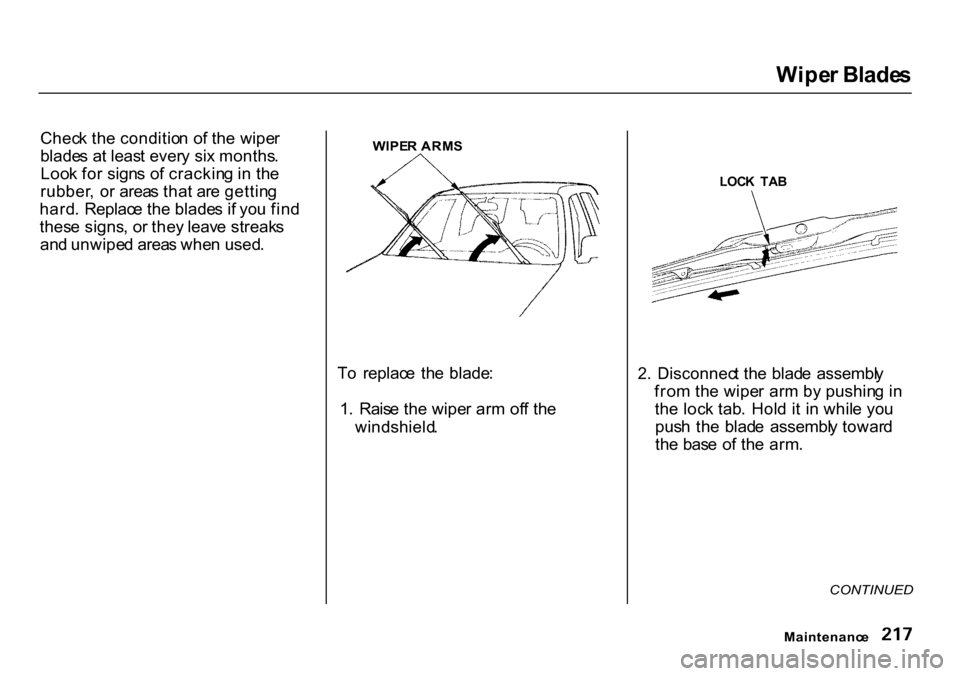
WIPE
R ARM S
T o replac e th e blade :
1 . Rais e th e wipe r ar m of f th e
windshield . LOC
K TA B
2 . Disconnec t th e blad e assembl y
fro m th e wipe r ar m b y pushin g i n
th e loc k tab . Hol d i t i n whil e yo u
pus h th e blad e assembl y towar d
th e bas e o f th e arm .
CONTINUED
Maintenanc e
Page 222 of 322
Wipe
r Blade s
BLAD E
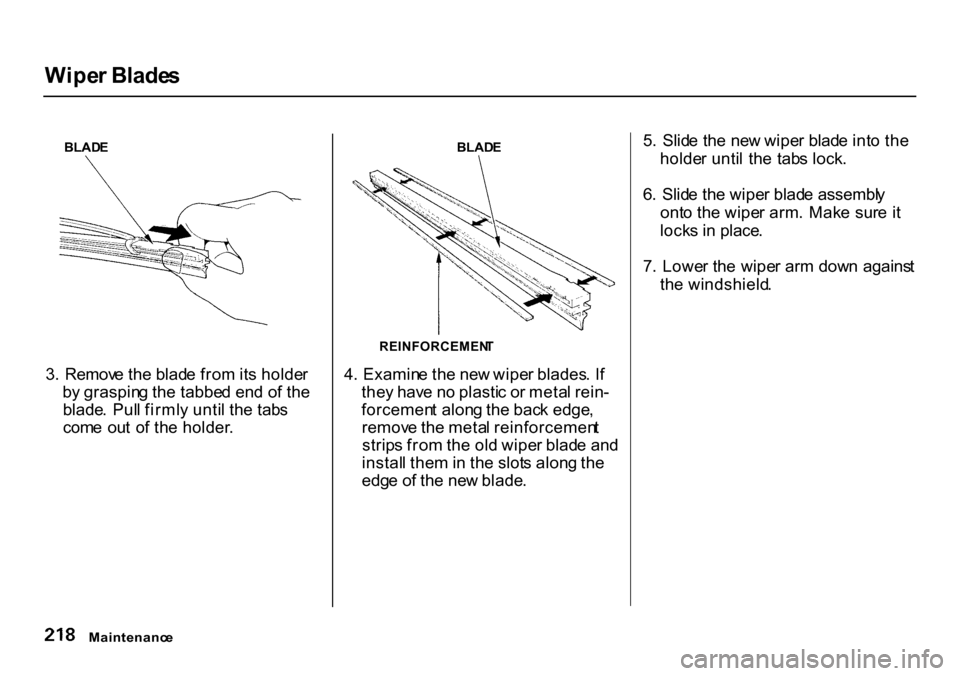
3 . Remov e th e blad e fro m it s holde r
b y graspin g th e tabbe d en d o f th e
blade . Pul l firml y unti l th e tab s
com e ou t o f th e holder .
BLAD
E
4 . Examin e th e ne w wipe r blades . I f
the y hav e n o plasti c o r meta l rein -
forcemen t alon g th e bac k edge ,
remov e th e meta l reinforcemen t
strip s fro m th e ol d wipe r blad e an d
instal l the m in th e slot s alon g th e
edg e o f th e ne w blade . 5
. Slid e th e ne w wipe r blad e int o th e
holde r unti l th e tab s lock .
6 . Slid e th e wipe r blad e assembl y
ont o th e wipe r arm . Mak e sur e i t
lock s i n place .
7 . Lowe r th e wipe r ar m dow n agains t
th e windshield .
Maintenanc e
REINFORCEMEN
T
Page 243 of 322
Storin
g You r Vehicl e
I f yo u nee d t o par k you r vehicl e fo r
a n extende d perio d (mor e tha n on e
month) , ther e ar e severa l thing s yo u
shoul d d o t o prepar e i t fo r storage .
Prope r preparatio n help s preven t
deterioratio n an d make s it . easie r t o
ge t you r vehicl e bac k o n th e road . I f
possible , stor e you r vehicl e indoors .
Fil l th e fue l tank .
Chang e th e engin e oi l an d filte r
(se e pag e 199 ).
Was h an d dr y th e exterio r
completely .
Clea n th e interior . Mak e sur e th e
carpeting , floo r mats , etc . ar e
completel y dry .
Leav e th e parkin g brak e off . Pu t
th e transmissio n in Revers e (5 -
spee d manual ) o r Par k
(automatic) .
Bloc
k th e rea r wheels .
I f th e vehicl e is t o b e store d fo r a
longe r period , i t shoul d b e
supported on jackstand s s o th e
tire s ar e of f th e ground .
Leav e on e windo w ope n slightl y (i f
th e vehicl e is bein g store d
indoors) .
Disconnec t th e battery .
Suppor t th e fron t an d rea r wipe r
blad e arm s wit h a folde d towe l o r
ra g s o the y d o no t touc h th e
windshield .
T o minimiz e sticking , appl y a
silicon e spra y lubrican t t o al l doo r
an d tailgat e seals . Also , appl y a
vehicl e bod y wa x t o th e painte d
surface s tha t mat e wit h th e doo r
an d tailgat e seals . Cove
r th e vehicl e wit h a
"breathable " cover , on e mad e
fro m a porou s materia l suc h a s
cotton . Nonporou s materials , suc h
a s plasti c sheeting , tra p moisture ,
whic h ca n damag e th e paint .
I f possible , ru n th e engin e fo r a
whil e periodicall y (preferabl y onc e
a month) .
I f yo u stor e you r vehicl e fo r 1 2
month s o r longer , hav e you r Hond a
deale r perfor m th e inspection s calle d
fo r i n th e 2 4 months/30,00 0 mile s
(48,00 0 km ) maintenanc e schedul e
(Norma l Conditions ) a s soo n a s yo u
tak e it ou t o f storag e (se e pag e 18 8 ) .
Th e replacement s called for i n th e
maintenanc e schedul e ar e no t
neede d unles s th e vehicl e ha s
actuall y reache d tha t tim e o r mileage .
Maintenanc e