oil HONDA CR-V 2000 RD1-RD3 / 1.G Owners Manual
[x] Cancel search | Manufacturer: HONDA, Model Year: 2000, Model line: CR-V, Model: HONDA CR-V 2000 RD1-RD3 / 1.GPages: 322, PDF Size: 4.64 MB
Page 99 of 322
Interio
r Light s
Spotlight s
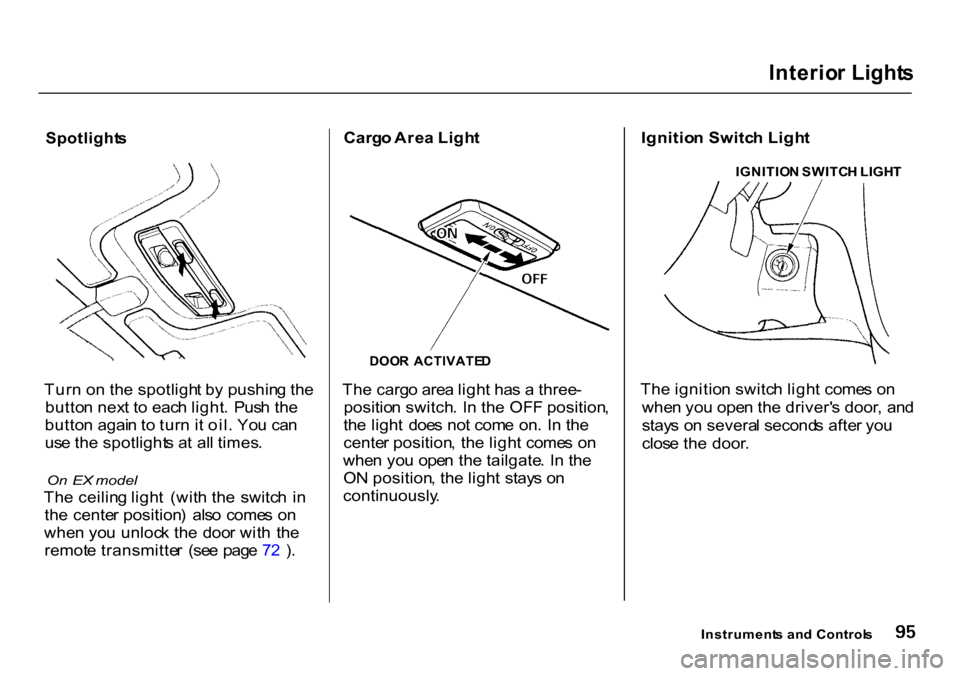
Tur n o n th e spotligh t b y pushin g th e
butto n nex t t o eac h light . Pus h th e
butto n agai n t o tur n i t oil . Yo u ca n
us e th e spotlight s a t al l times .
On EX model
Th e ceilin g ligh t (wit h th e switc h i n
th e cente r position ) als o come s o n
whe n yo u unloc k th e doo r wit h th e
remot e transmitte r (se e pag e 7 2 ) . Carg
o Are a Ligh t
Th e carg o are a ligh t ha s a three -
positio n switch . I n th e OF F position ,
th e ligh t doe s no t com e on . I n th e
cente r position , th e ligh t come s o n
whe n yo u ope n th e tailgate . I n th e
O N position , th e ligh t stay s o n
continuously . Ignitio
n Switc h Ligh t
Th e ignitio n switc h ligh t come s o n
whe n yo u ope n th e driver' s door , an d
stay s o n severa l second s afte r yo u
clos e th e door .
Instrument s an d Control s
DOO
R ACTIVATE D
IGNITIO
N SWITC H LIGH T
Page 147 of 322
Servic
e Statio n Procedure s
SUPPOR T RO D
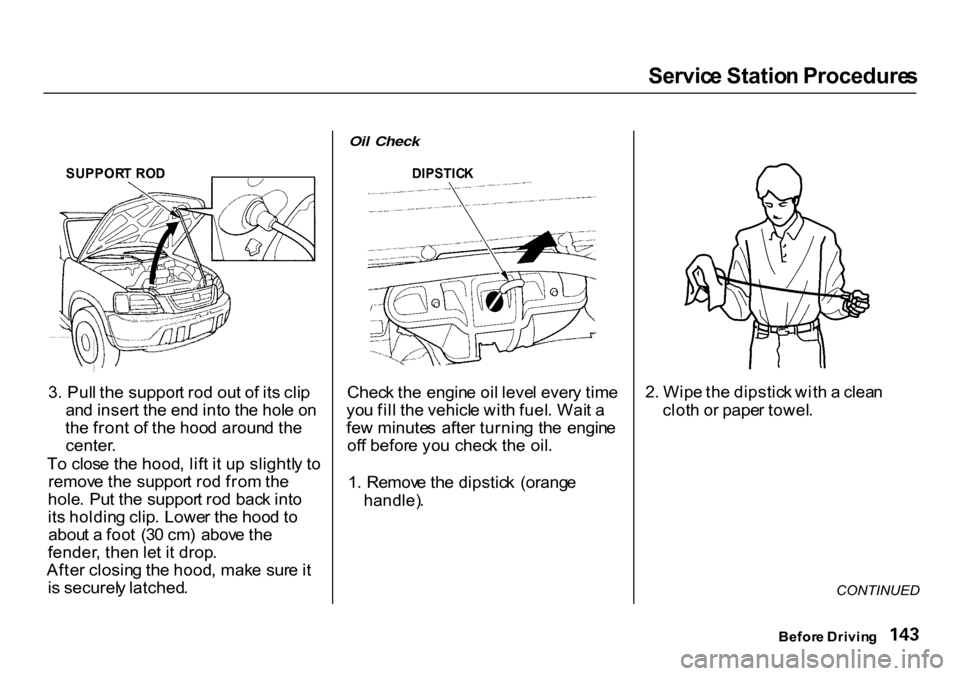
3 . Pul l th e suppor t ro d ou t o f it s cli p
an d inser t th e en d int o th e hol e o n
th e fron t o f th e hoo d aroun d th e
center .
T o clos e th e hood , lif t i t u p slightl y t o
remov e th e suppor t ro d fro m th e
hole . Pu t th e suppor t ro d bac k int o
it s holdin g clip . Lowe r th e hoo d t o
abou t a foo t (3 0 cm ) abov e th e
fender , the n le t i t drop .
Afte r closin g th e hood , mak e sur e it
i s securel y latched .
Oil Check
Chec k th e engin e oi l leve l ever y tim e
yo u fil l th e vehicl e wit h fuel . Wai t a
fe w minute s afte r turnin g th e engin e
of f befor e yo u chec k th e oil .
1 . Remov e th e dipstic k (orang e
handle) .
2
. Wip e th e dipstic k wit h a clea n
clot h o r pape r towel .
CONTINUED
Befor e Drivin g
DIPSTIC
K
Page 184 of 322
Off-Highwa
y Guideline s
Drivin g Tip s
Th e followin g page s contai n practica l
tip s o n basi c off-highwa y operation .
Check Out Your Vehicle
Drivin g off-highwa y ca n b e har d o n a
vehicle . Befor e yo u leav e th e
pavement , b e sur e al l schedule d
maintenanc e an d servic e ha s bee n
done , an d tha t yo u hav e inspecte d
you r vehicle . Pa y specia l attentio n to
th e conditio n o f th e tires , an d us e a
gaug e t o chec k th e tir e pressures .
Afte r yo u retur n t o th e pavement ,
carefull y inspec t you r vehicl e t o
mak e sur e ther e is n o damag e tha t
coul d mak e drivin g it unsafe . Chec k
th e tire s fo r damag e an d fo r prope r
pressure .
Controlling Speed
Off-highway , th e genera l rul e i s t o
kee p you r spee d low . O f course ,
you'l l nee d enoug h spee d t o kee p
movin g forward . Bu t a t highe r
speeds , yo u hav e les s tim e to asses s
condition s an d mak e goo d decisions .
There' s als o a greate r chanc e o f
slidin g if yo u brak e o r tur n to o
quickl y o n we t soil , gravel , o r ice . I n
an y situation , neve r g o faste r tha n
condition s allow .
Accelerating and Braking
Fo r bette r tractio n o n al l surfaces ,
accelerat e slowl y an d graduall y buil d
u p speed . I f yo u tr y t o star t to o fas t
o n we t soil , mud , snow , o r ice , yo u
migh t no t hav e enoug h tractio n t o
ge t underway . Yo u ma y eve n di g
yoursel f int o a hole .
Generally , th e bes t off-pavemen t
brakin g techniqu e is t o gentl y
depres s th e brak e pedal , the n
increas e pressur e a s mor e brakin g is
needed . Avoi d har d braking . Kee p in
min d tha t yo u wil l usuall y nee d mor e
tim e an d distanc e t o brak e t o a sto p
o n unpave d surfaces .
Tes t you r brake s fro m tim e t o tim e
t o mak e sur e the y ar e operatin g
properly . Thi s wil l als o giv e yo u a
fee l fo r ho w muc h tractio n yo u hav e
o n a give n surface .
Drivin g
Page 187 of 322
Maintenanc
e
Thi s sectio n explain s wh y i t i s
importan t t o kee p you r vehicl e wel l
maintaine d an d t o follo w basi c
maintenanc e safet y precautions .
Thi s sectio n als o include s
Maintenanc e Schedule s fo r norma l
drivin g an d sever e drivin g conditions ,
a Maintenanc e Record , an d instruc -
tion s fo r simpl e maintenanc e task s
yo u ma y wan t t o tak e car e o f
yourself .
I f yo u hav e th e skill s an d tool s t o per -
for m mor e comple x maintenanc e
task s o n you r Honda , yo u ma y wan t
t o purchas e th e Servic e Manual . Se e
pag e 29 3 fo r informatio n o n ho w to
obtai n a copy , o r se e you r Hond a
dealer .
Maintenanc e Safety...................... . 18 4
Importan t Safet y Precautions. . 18 5
Maintenanc e Schedule................. . 18 6 Require
d Maintenanc e Record... . 19 3
Owne r Maintenanc e Checks....... . 19 5
Flui d Locations.............................. . 19 6
Engin e Oil...................................... . 19 7
Addin g Oil.................................. . 19 7
Recommende d Oil.................... . 19 7
Syntheti c Oil.............................. . 19 8
Additives.................................... . 19 8
Changin g th e Oi l an d Filter..... . 19 9
Coolin g System............................. . 20 1
Addin g Engin e Coolant............ . 20 1
Replacin g Engin e Coolant....... . 20 3
Windshiel d Washers.................... . 20 6
Transmissio n Fluid....................... . 20 7
Automati c Transmission.......... . 20 7
5-spee d Manua l
Transmission......................... . 20 8
Rea r Differentia l Fluid................. . 20 9
Brak e an d Clutc h Fluid................ . 21 0
Brak e System............................ . 21 0
Clutc h System........................... . 21 1
Powe r Steering.............................. . 21 1
Ai r Cleane r Element..................... . 21 2
Hoo d Latch.................................... . 21 3
Spar k Plugs.................................... . 21 3
Replacement.............................. . 21 3
Specifications............................
. 21 4
Battery........................................... . 21 5
Wipe r Blades................................. . 21 7
Ai r Conditionin g System.............. . 21 9
Ai r Conditionin g Filter................. . 22 0
Driv e Belts..................................... . 22 0
Timin g Belt.................................... . 22 1
Tires............................................... . 22 1
Inflation...................................... . 22 1
Recommende d Tir e
Pressure s fo r Norma l
Driving........................... . 22 2
Inspection.................................. . 22 3
Maintenance.............................. . 22 3
Tir e Rotation............................. . 22 4
Replacin g Tire s an d Wheels... . 22 5
Wheel s an d Tires...................... . 22 6
Winte r Driving.......................... . 22 6
Sno w Tires............................. . 22 6
Tir e Chains............................ . 22 7
Lights............................................. . 22 8
Headligh t Aiming..................... . 23 0
Replacin g Bulbs........................ . 23 2
Storin g You r Vehicle.................... . 23 9
Maintenanc e
Page 188 of 322
Maintenanc
e Safet y
Regularl y maintainin g you r vehicl e i s
th e bes t wa y t o protec t you r
investment . Prope r maintenanc e i s
essentia l t o you r safet y an d th e
safet y o f you r passengers . I t wil l als o
rewar d yo u wit h mor e economical ,
trouble-fre e drivin g an d hel p reduc e
ai r pollution . Thi
s sectio n include s instruction s fo r
simpl e maintenanc e tasks , suc h a s
checkin g an d addin g oil . An y servic e
item s no t detaile d i n thi s sectio n
shoul d b e performe d b y a Hond a
technicia n o r othe r qualifie d
mechanic . Som
e o f th e mos t importan t safet y
precaution s ar e give n here . However ,
w e canno t war n yo u o f ever y
conceivabl e hazar d tha t ca n aris e i n
performin g maintenance . Onl y yo u
ca n decid e whethe r o r no t yo u
shoul d perfor m a give n task .
Maintenanc e
Improperl
y maintainin g thi s
vehicl e o r failin g t o correc t a
proble m befor e drivin g ca n
caus e a cras h i n whic h yo u ca n
b e seriousl y hur t o r killed .
Alway s follo w th e inspectio n
an d maintenanc e
recommendation s an d
schedule s i n thi s owner' s
manual . Failur
e t o properl y follo w
maintenanc e instruction s an d
precaution s ca n caus e yo u t o
b e seriousl y hur t o r killed .
Alway s follo w th e procedure s
an d precaution s i n thi s owner' s
manual .
Page 201 of 322
Engin
e Oi l
Addin g Oi l
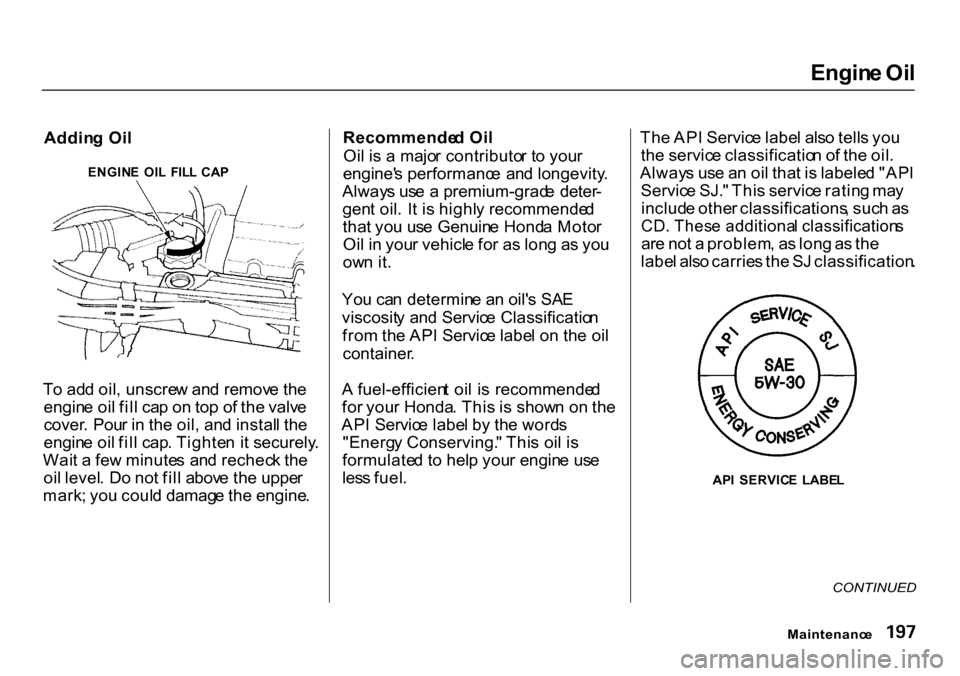
T o ad d oil , unscre w an d remov e th e
engin e oi l fil l ca p o n to p o f th e valv e
cover . Pou r i n th e oil , an d instal l th e
engin e oi l fil l cap . Tighte n i t securely .
Wai t a fe w minute s an d rechec k th e
oi l level . D o no t fil l abov e th e uppe r
mark ; yo u coul d damag e th e engine .Recommende
d Oi l
Oi l i s a majo r contributo r t o you r
engine' s performanc e an d longevity .
Alway s us e a premium-grad e deter -
gen t oil . I t i s highl y recommende d
tha t yo u us e Genuin e Hond a Moto r
Oi l i n you r vehicl e fo r a s lon g a s yo u
ow n it .
Yo u ca n determin e a n oil' s SA E
viscosit y an d Servic e Classificatio n
fro m th e AP I Servic e labe l o n th e oi l
container .
A fuel-efficien t oi l i s recommende d
fo r you r Honda . Thi s i s show n o n th e
AP I Servic e labe l b y th e word s
"Energ y Conserving. " Thi s oi l i s
formulate d t o hel p you r engin e us e
les s fuel . Th
e AP I Servic e labe l als o tell s yo u
th e servic e classificatio n o f th e oil .
Alway s us e a n oi l tha t i s labele d "AP I
Servic e SJ. " Thi s servic e ratin g ma y
includ e othe r classifications , suc h a s
CD . Thes e additiona l classification s
ar e no t a problem , a s lon g a s th e
labe l als o carrie s th e S J classification .
AP I SERVIC E LABE L
CONTINUED
Maintenanc e
ENGIN
E OI L FIL L CA P
Page 202 of 322
Engin
e Oi l
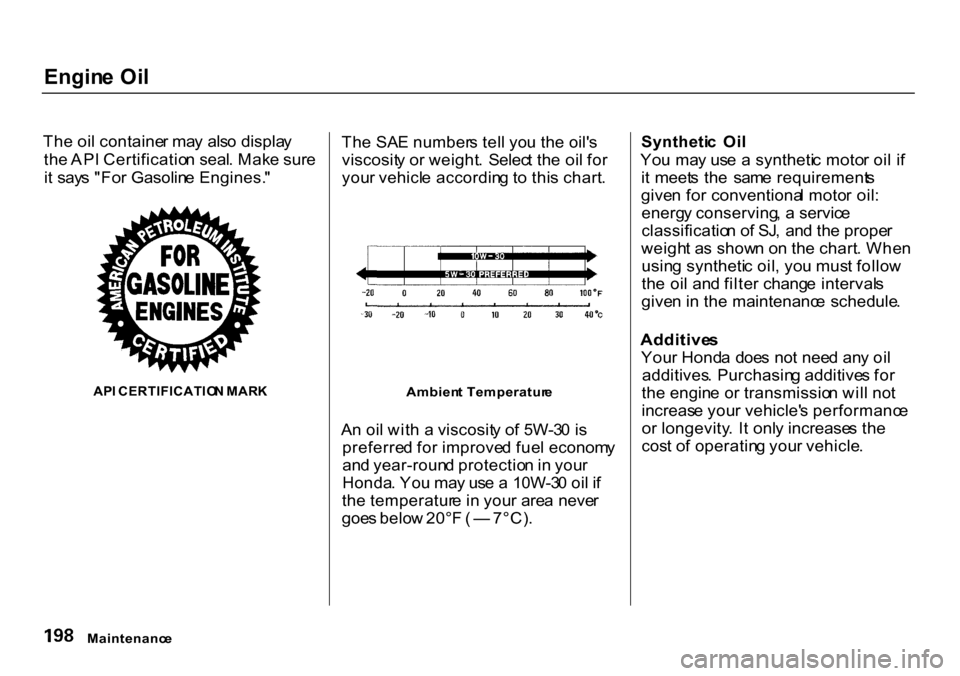
Th e oi l containe r ma y als o displa y
th e AP I Certificatio n seal . Mak e sur e
i t say s "Fo r Gasolin e Engines. "
AP I CERTIFICATIO N MAR K Th
e SA E number s tel l yo u th e oil' s
viscosit y o r weight . Selec t th e oi l fo r
you r vehicl e accordin g t o thi s chart .
A n oi l wit h a viscosit y o f 5W-3 0 is
preferre d fo r improve d fue l econom y
an d year-roun d protectio n in you r
Honda . Yo u ma y us e a 10W-3 0 oi l i f
th e temperatur e i n you r are a neve r
goe s belo w 20° F ( — 7°C) . Syntheti
c Oi l
Yo u ma y us e a syntheti c moto r oi l i f
i t meet s th e sam e requirement s
give n fo r conventiona l moto r oil :
energ y conserving , a servic e
classificatio n o f SJ , an d th e prope r
weigh t a s show n o n th e chart . Whe n
usin g syntheti c oil , yo u mus t follo w
th e oi l an d filte r chang e interval s
give n in th e maintenanc e schedule .
Additive s
You r Hond a doe s no t nee d an y oi l
additives . Purchasin g additive s fo r
th e engin e o r transmissio n wil l no t
increas e you r vehicle' s performanc e
o r longevity . I t onl y increase s th e
cos t o f operatin g you r vehicle .
Maintenanc e
Ambien
t Temperatur e
Page 204 of 322
Engin
e Oi l
5 . Pu t a ne w washe r o n th e drai n bolt ,
the n reinstal l th e drai n bolt .
Tighte n it to :
3 3 Ibf.f t (4 4 N. m , 4. 5 kgf.m )
6 . Refil l th e engin e wit h th e recom -
mende d oil .
Engin e oi l chang e capacit y
(includin g filter) :
4.
0 U S q t (3. 8 , 3.3 Im p qt ) 7
. Replac e th e engin e oi l fil l cap .
Star t th e engine . Th e oi l pressur e
indicato r ligh t shoul d g o ou t withi n
fiv e seconds . I f i t doe s not , tur n of f
th e engin e an d reinspec t you r
work .
8 . Le t th e engin e ru n fo r severa l
minute s an d chec k th e drai n bol t
an d oi l filte r fo r leaks .
9 . Tur n of f th e engine , le t i t si t fo r
severa l minutes , the n chec k th e oi l
level . I f necessary , ad d oi l t o brin g
th e leve l t o th e uppe r mar k o n th e
dipstick .
Improper
disposal of engine oil can he
harmful to the environment. If you
change your own oil, please dispose of
the used oil properly. Put it in a sealed
container and take it to a recycling
center. Do not discard it in a trash bin
or dump it on the ground.
Maintenanc e
NOTIC
E
Page 236 of 322
Light
s
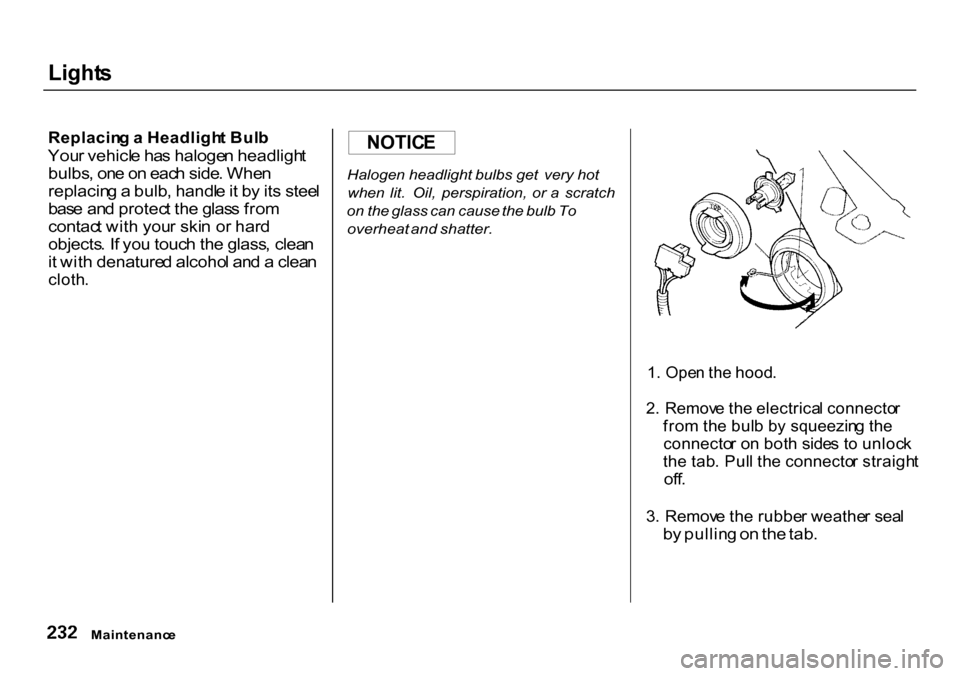
Replacin g a Headligh t Bul b
You r vehicl e ha s haloge n headligh t
bulbs , on e o n eac h side . Whe n
replacin g a bulb , handl e it b y it s stee l
bas e an d protec t th e glas s fro m
contac t wit h you r ski n o r har d
objects . I f yo u touc h th e glass , clea n
i t wit h denature d alcoho l an d a clea n
cloth .
Halogen
headlight bulbs get very hot
when lit. Oil, perspiration, or a scratch
on the glass can cause the bulb To
overheat and shatter.
1. Ope n th e hood .
2 . Remov e th e electrica l connecto r
fro m th e bul b b y squeezin g th e
connecto r o n bot h side s t o unloc k
th e tab . Pul l th e connecto r straigh t
off .
3 . Remov e th e rubbe r weathe r sea l
b y pullin g o n th e tab .
Maintenanc e
NOTIC
E
Page 253 of 322
Takin
g Car e o f th e Unexpecte d
Thi s sectio n cover s th e more -
commo n problem s tha t motorist s
experienc e wit h thei r vehicles . I t
give s yo u informatio n abou t ho w to
safel y evaluat e th e proble m an d wha t
t o d o to correc t it . I f th e proble m ha s
strande d yo u o n th e sid e o f th e road ,
yo u ma y b e abl e to ge t goin g again .
I f not , yo u wil l als o fin d instruction s
o n gettin g you r vehicl e towed .
Changin
g a Fla t Tire.................... . 25 0
I f You r Engin e Won' t Start.......... . 25 8
Nothin g Happen s o r th e Starte r
Moto r Operate s Ver y
Slowly..................................... 258
Th e Starte r Operate s
Normally................................ . 25 9
Jum p Starting................................ . 26 0
I f You r Engin e Overheats............ . 26 2
Low Oil Pressur e Indicato r ......... . 26 4
Chargin g Syste m Indicator.......... . 26 5
Malfunctio n Indicato r Lam p ....... . 26 6
Brak e Syste m Indicator............... . 26 7
Fuses.............................................. . 26 8
Checkin g an d Replacing.......... . 26 9
Emergenc y Towing...................... . 27 3
Takin g Car e o f th e Unexpecte d