HONDA CR-V 2001 RD1-RD3 / 1.G Owners Manual
Manufacturer: HONDA, Model Year: 2001, Model line: CR-V, Model: HONDA CR-V 2001 RD1-RD3 / 1.GPages: 326, PDF Size: 4.58 MB
Page 271 of 326
Changin
g a Fla t Tir e
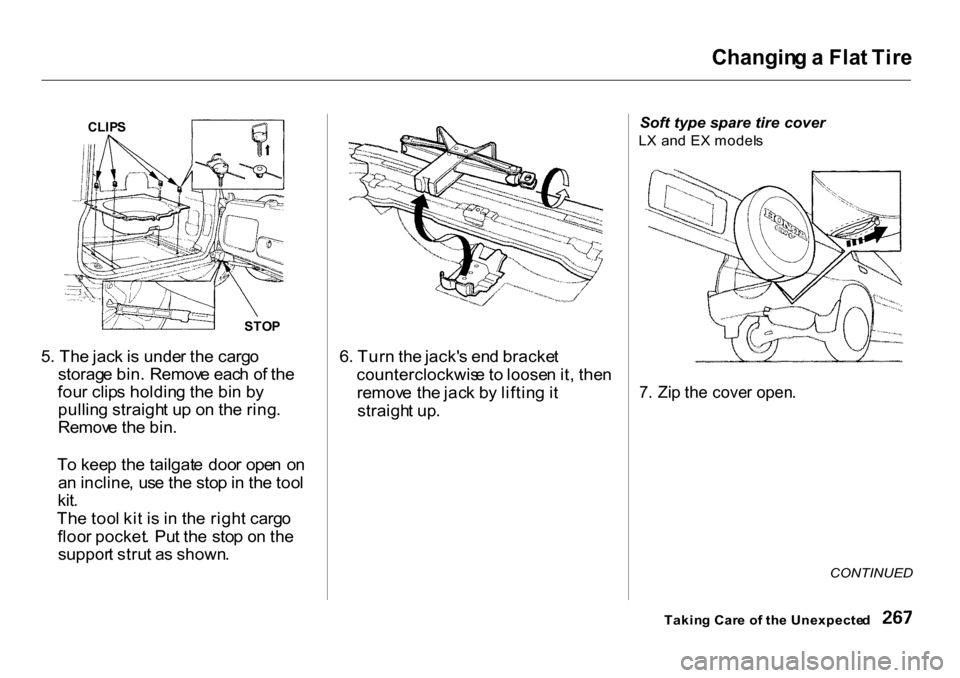
CLIP S
STOP
5 . Th e jac k is unde r th e carg o
storag e bin . Remov e eac h o f th e
fou r clip s holdin g th e bi n b y
pullin g straigh t u p o n th e ring .
Remov e th e bin .
T o kee p th e tailgat e doo r ope n o n
a n incline , us e th e sto p in th e too l
kit .
Th e too l ki t i s i n th e righ t carg o
floo r pocket . Pu t th e sto p o n th e
suppor t stru t a s shown . 6
. Tur n th e jack' s en d bracke t
counterclockwis e t o loose n it , the n
remov e th e jac k b y liftin g it
straigh t up . Soft
type spare tire cover
L X an d E X model s
7 . Zi p th e cove r open .
CONTINUED
Takin g Car e o f th e Unexpecte d
Page 272 of 326
Changin
g a Fla t Tir e
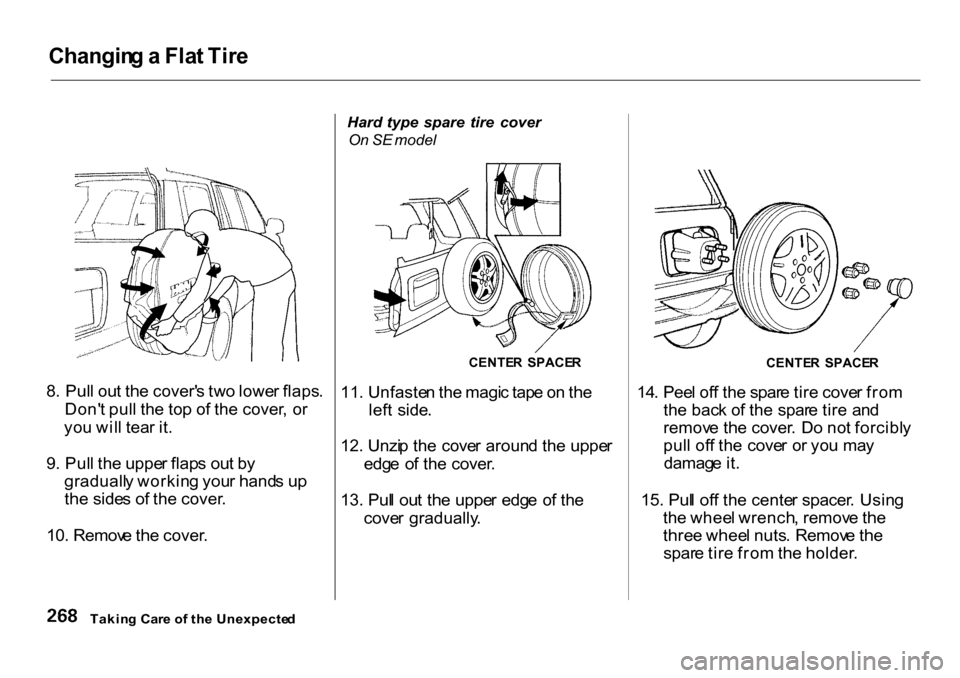
8 . Pul l ou t th e cover' s tw o lowe r flaps .
Don' t pul l th e to p o f th e cover , o r
yo u wil l tea r it .
9 . Pul l th e uppe r flap s ou t b y
graduall y workin g you r hand s u p
th e side s o f th e cover .
10. Remov e th e cover . Hard
type spare tire cover
On SE model
CENTER SPACE R
11 . Unfaste n th e magi c tap e o n th e
lef t side .
12. Unzi p th e cove r aroun d th e uppe r
edg e o f th e cover .
13. Pul l ou t th e uppe r edg e o f th e
cove r gradually . 14
. Pee l of f th e spar e tir e cove r fro m
th e bac k o f th e spar e tir e an d
remov e th e cover . D o no t forcibl y
pul l of f th e cove r o r yo u ma y
damag e it .
15. Pul l of f th e cente r spacer . Usin g
th e whee l wrench , remov e th e
thre e whee l nuts . Remov e th e
spar e tir e fro m th e holder .
Takin g Car e o f th e Unexpecte d
CENTE
R SPACE R
Page 273 of 326
Changin
g a Fla t Tir e
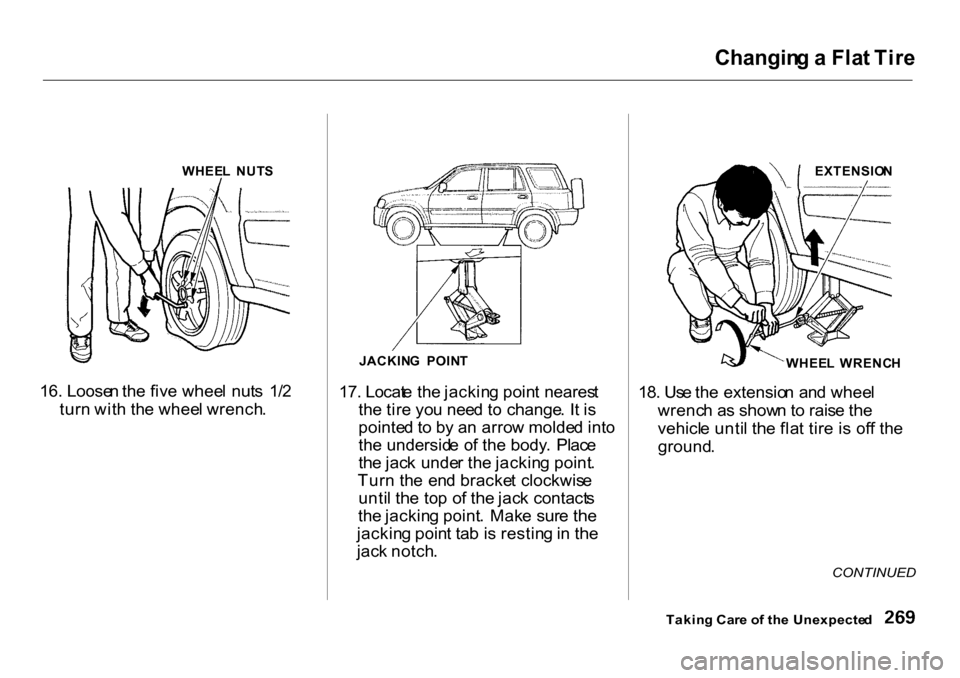
16. Loose n th e fiv e whee l nut s 1/ 2
tur n wit h th e whee l wrench . JACKIN
G POIN T
17. Locat e th e jackin g poin t neares t
th e tir e yo u nee d t o change . I t i s
pointe d t o b y a n arro w molde d int o
th e undersid e o f th e body . Plac e
th e jac k unde r th e jackin g point .
Tur n th e en d bracke t clockwis e
unti l th e to p o f th e jac k contact s
th e jackin g point . Mak e sur e th e
jackin g poin t ta b i s restin g in th e
jac k notch . EXTENSIO
N
WHEE L WRENC H
18. Us e th e extensio n an d whee l
wrenc h a s show n to rais e th e
vehicl e unti l th e fla t tir e i s of f th e
ground .
CONTINUED
Takin g Car e o f th e Unexpecte d
WHEE
L NUT S
Page 274 of 326
Changin
g a Fla t Tir e
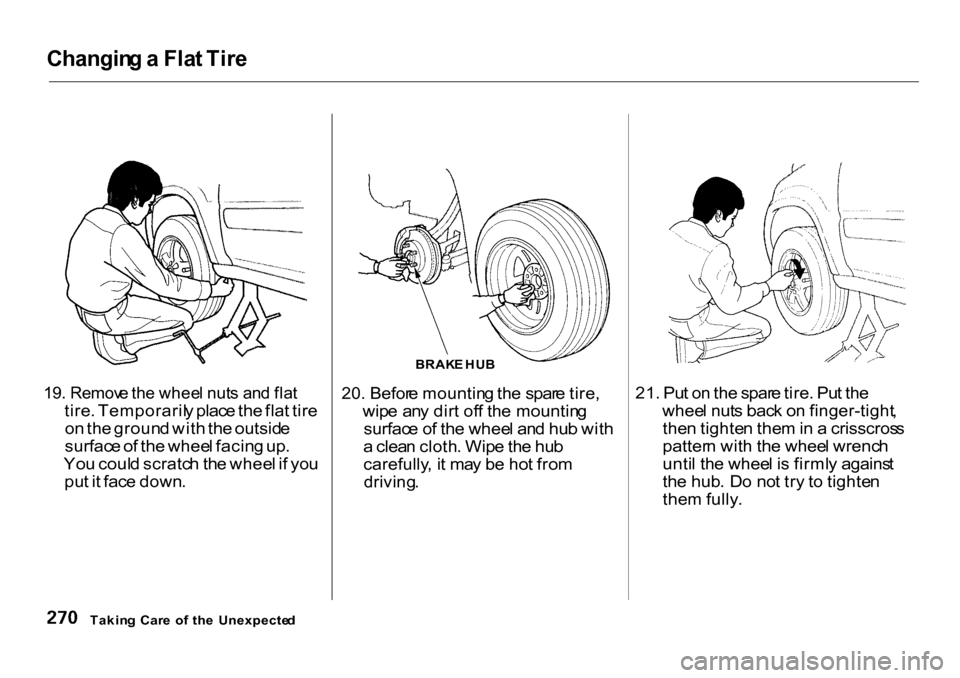
19. Remov e th e whee l nut s an d fla t
tire . Temporaril y plac e th e fla t tir e
o n th e groun d wit h th e outsid e
surfac e o f th e whee l facin g up .
Yo u coul d scratc h th e whee l i f yo u
pu t i t fac e down . BRAK
E HU B
20. Befor e mountin g th e spar e tire ,
wip e an y dir t of f th e mountin g
surfac e o f th e whee l an d hu b wit h
a clea n cloth . Wip e th e hu b
carefully , i t ma y b e ho t fro m
driving .
21
. Pu t o n th e spar e tire . Pu t th e
whee l nut s bac k o n finger-tight ,
the n tighte n the m in a crisscros s
patter n wit h th e whee l wrenc h
unti l th e whee l i s firml y agains t
th e hub . D o no t tr y t o tighte n
the m fully .
Takin g Car e o f th e Unexpecte d
Page 275 of 326
Changin
g a Fla t Tir e
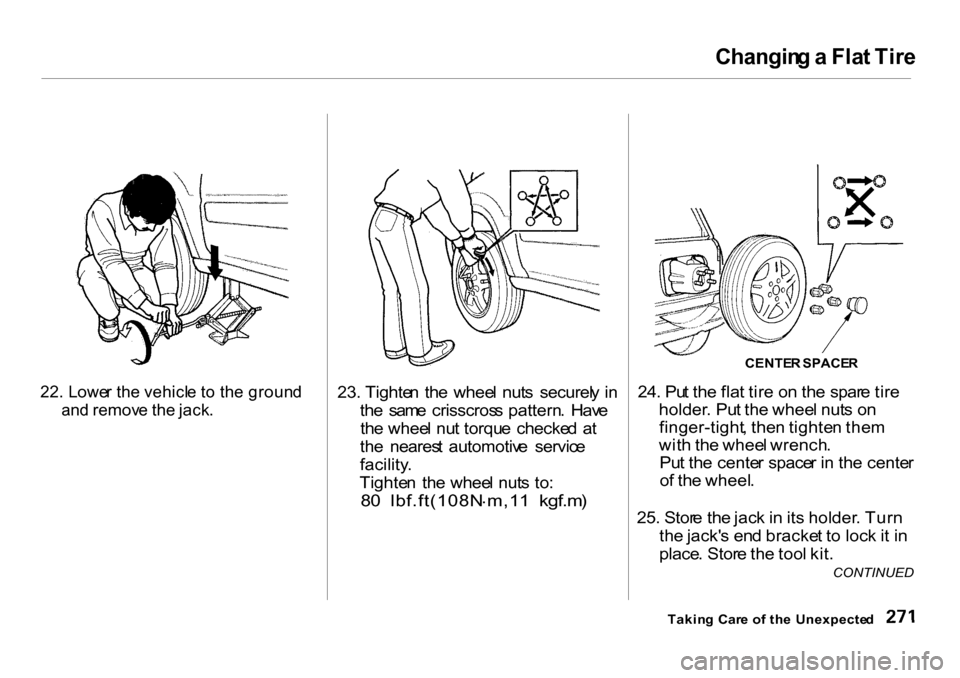
22. Lowe r th e vehicl e t o th e groun d
an d remov e th e jack .
23. Tighte
n th e whee l nut s securel y i n
th e sam e crisscros s pattern . Hav e
th e whee l nu t torqu e checke d a t
th e neares t automotiv e servic e
facility .
Tighte n th e whee l nut s to :80 lbf.ft(108N .
m,1 1 kgf.m )
CENTER SPACE R
24. Pu t
th
e fla t tir e o n th e spar e tir e
holder . Pu t th e whee l nut s o n
finger-tight , the n tighte n the m
wit h th e whee l wrench .
Pu t th e cente r space r i n th e cente r
o f th e wheel .
25. Stor e th e jac k in it s holder . Tur n
th e jack' s en d bracke t t o loc k it i n
place . Stor e th e too l kit .
Takin g Car e o f th e Unexpecte d
CONTINUED
Page 276 of 326
Changin
g a Fla t Tir e
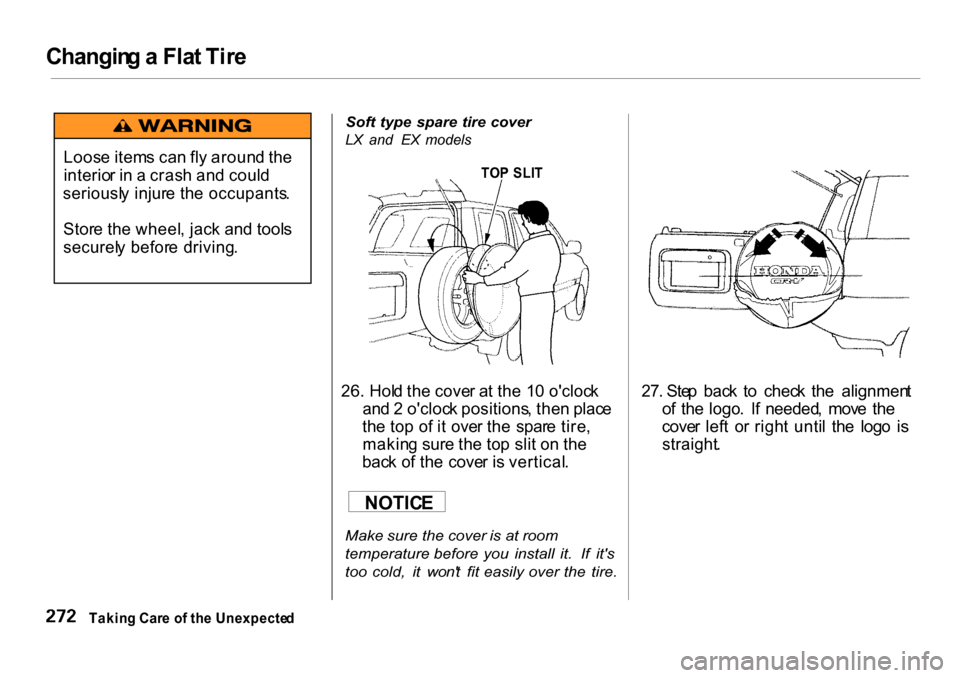
Soft type spare tire cover
LX and EX models
TOP SLI T
26. Hol d th e cove r a t th e 1 0 o'cloc k
an d 2 o'cloc k positions , the n plac e
th e to p o f i t ove r th e spar e tire ,
makin g sur e th e to p sli t o n th e
bac k o f th e cove r i s vertical .
Make sure the cover is at room
temperature before you install it. If it's
too cold, it won' t fit easily over the tire.
27. Ste
p bac k t o chec k th e alignmen t
o f th e logo . I f needed , mov e th e
cove r lef t o r righ t unti l th e log o i s
straight .
Takin g Car e o f th e Unexpecte d
NOTIC
E
Loos
e item s ca n fl y aroun d th e
interio r i n a cras h an d coul d
seriousl y injur e th e occupants .
Stor e th e wheel , jac k an d tool s
securel y befor e driving .
Page 277 of 326
Changin
g a Fla t Tir e
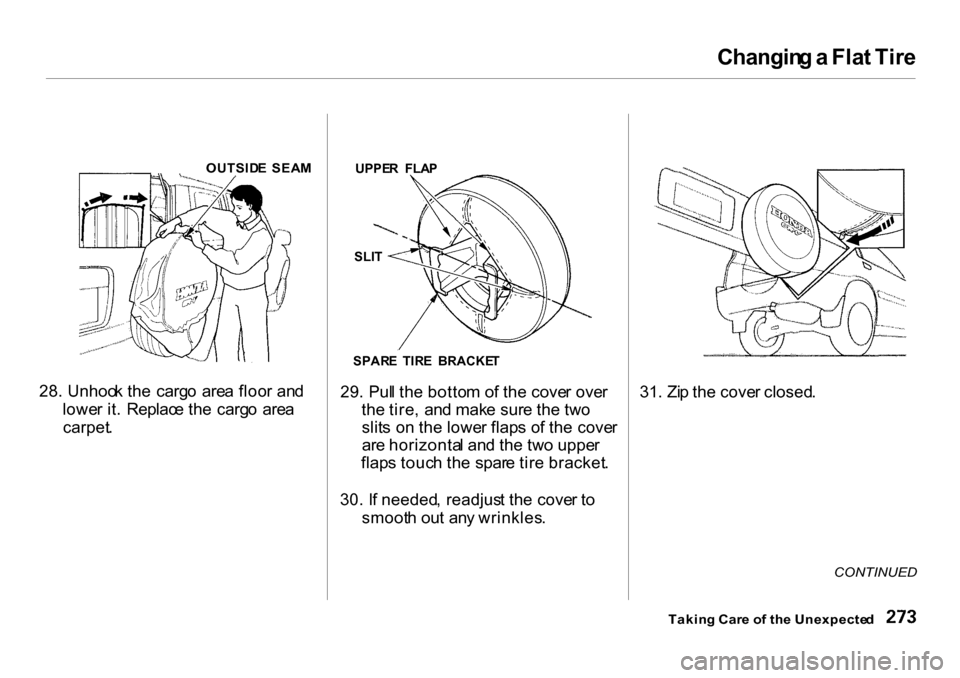
OUTSID E SEA M
28. Unhoo k th e carg o are a floo r an d
lowe r it . Replac e th e carg o are a
carpet . UPPE
R FLA P
SLI T
29. Pul l th e botto m o f th e cove r ove r
th e tire , an d mak e sur e th e tw o
slit s o n th e lowe r flap s o f th e cove r
ar e horizonta l an d th e tw o uppe r
flap s touc h th e spar e tir e bracket .
30. I f needed , readjus t th e cove r t o
smoot h ou t an y wrinkles . 31. Zi
p th e cove r closed .
CONTINUED
Takin g Car e o f th e Unexpecte d
SPAR
E TIR E BRACKE T
Page 278 of 326
Changin
g a Fla t Tir e
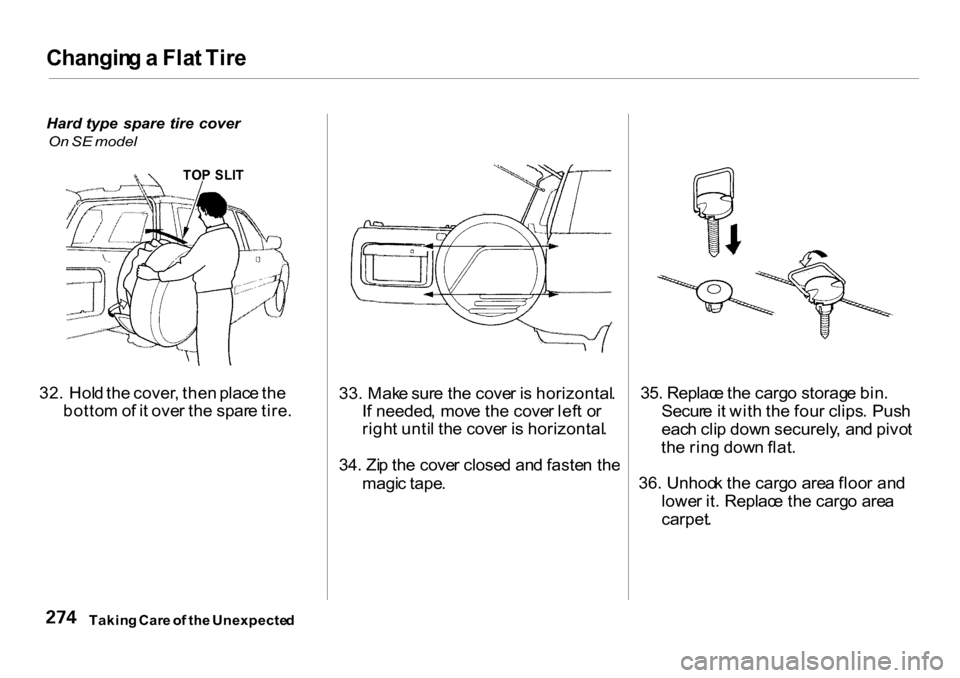
Hard type spare tire cover
On SE model
TOP SLI T
32. Hol d th e cover , the n plac e th e
botto m of i t ove r th e spar e tire . 33. Mak
e sur e th e cove r i s horizontal .
I f needed , mov e th e cove r lef t o r
righ t unti l th e cove r i s horizontal .
34. Zi p th e cove r close d an d faste n th e
magi c tape . 35. Replac
e th e carg o storag e bin .
Secur e it wit h th e fou r clips . Pus h
eac h cli p dow n securely , an d pivo t
th e rin g dow n flat .
36. Unhoo k th e carg o are a floo r an d
lowe r it . Replac e th e carg o are a
carpet .
Takin g Car e o f th e Unexpecte d
Page 279 of 326
I
f You r Engin e Won' t Star t
Diagnosin g wh y you r engin e won' t
star t fall s int o tw o areas , dependin g
o n wha t yo u hea r whe n yo u tur n th e
ke y t o STAR T (III) : Yo
u hea r nothing , o r almos t
nothing . Th e engine' s starte r
moto r doe s no t operat e a t all , o r
operate s ver y slowly . Yo
u ca n hea r th e starte r moto r
operatin g normally , o r th e starte r
moto r sound s lik e it i s spinnin g
faste r tha n normal , bu t th e engin e
doe s no t star t u p an d run . Nothin
g Happen s o r th e Starte r
Moto r Operate s Ver y Slowl y
Whe n yo u tur n th e ignitio n switc h t o
STAR T (III) , yo u d o no t hea r th e
norma l nois e o f th e engin e tryin g to
start . Yo u ma y hea r a clickin g soun d
or serie s of clicks , or nothin g at all .
Chec k thes e things : Chec
k th e transmissio n interlock .
I f yo u hav e a manua l transmission ,
th e clutc h peda l mus t b e pushe d
al l th e wa y t o th e floo r o r th e
starte r wil l no t operate . Wit h a n
automati c transmission , i t mus t b e
i n Par k o r Neutral . Tur
n th e ignitio n switc h t o O N (II) .
Tur n o n th e headlight s an d chec k
thei r brightness . I f th e headlight s
ar e ver y di m o r don' t ligh t a t all ,
th e batter y is discharged . Se e
Jum p Startin g o n pag e 27 7.
Tur
n th e ignitio n switc h t o STAR T
(III) . I f th e headlight s d o no t dim ,
chec k th e conditio n o f th e fuses . I f
th e fuse s ar e OK , ther e is proba -
bl y somethin g wron g wit h th e
electrica l circui t fo r th e ignitio n
switc h o r starte r motor . Yo u wil l
nee d a qualifie d technicia n to
determin e th e problem . (Se e
Emergenc y Towin g o n pag e 29 0.)
CONTINUED
Takin g Car e o f th e Unexpecte d
Page 280 of 326
I
f You r Engin e Won' t Star t
I f th e headlight s di m noticeabl y o r
g o ou t whe n yo u tr y t o star t th e
engine , eithe r th e batter y is dis -
charge d o r th e connection s ar e
corroded . Chec k th e conditio n o f th e
batter y an d termina l connection s
(se e pag e 229 ). Yo u ca n the n tr y
jum p startin g th e vehicl e fro m a
booste r batter y (se e pag e 27 7). Th
e Starte r Operate s Normall y
I n thi s case , th e starte r motor' s
spee d sound s normal , o r eve n faste r
tha n normal , whe n yo u tur n th e
ignitio n switc h t o STAR T (III) , bu t
th e engin e doe s no t run . Ar
e yo u usin g th e prope r startin g
procedure ? Refe r t o Startin g th e
Engin e o n pag e 16 6. D
o yo u hav e fuel ? Tur n th e
ignitio n switc h t o O N (II ) fo r a
minut e an d watc h th e fue l gauge .
Th e lo w fue l leve l warnin g ligh t
ma y no t b e working , s o yo u wer e
no t reminde d t o fil l th e tank . Ther
e ma y b e a n electrica l
problem , suc h a s n o powe r t o th e
fue l pump . Chec k al l th e fuse s
(se e pag e 286 ).
I f yo u fin d nothin g wrong , yo u wil l
nee d a qualifie d technicia n to fin d
th e problem . Se e Emergenc y
Towin g o n pag e 29 0.
Takin g Car e o f th e Unexpecte d