radiator HONDA CR-V 2002 RD4-RD7 / 2.G User Guide
[x] Cancel search | Manufacturer: HONDA, Model Year: 2002, Model line: CR-V, Model: HONDA CR-V 2002 RD4-RD7 / 2.GPages: 372, PDF Size: 4.49 MB
Page 293 of 372

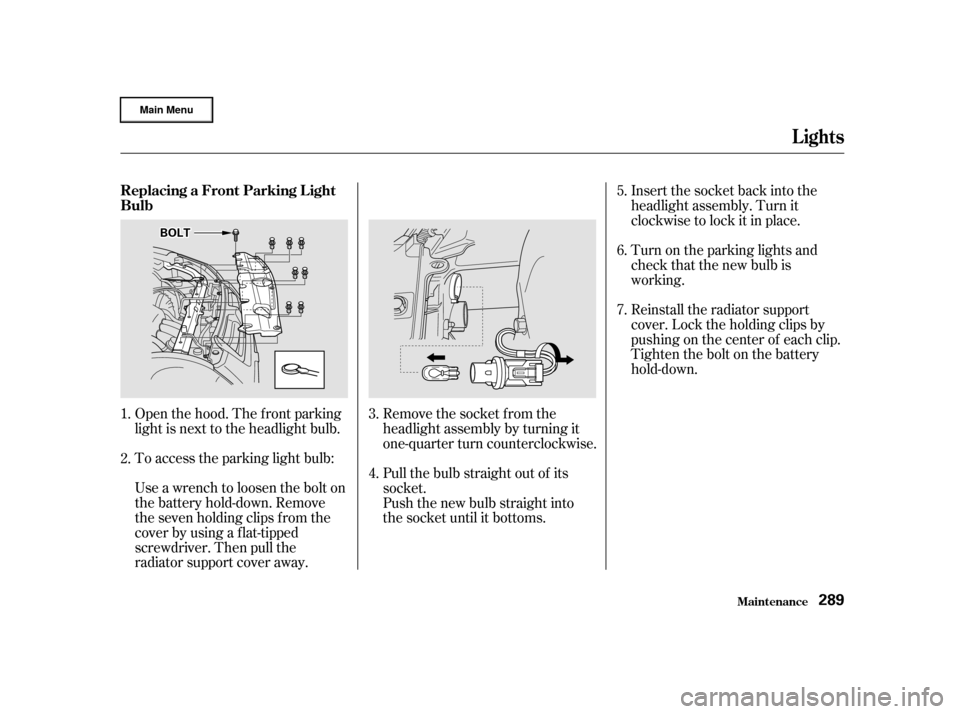
Use a wrench to loosen the bolt on
the battery hold-down. Remove
the seven holding clips f rom the
cover by using a flat-tipped
screwdriver. Then pull the
radiator support cover away. To access the parking light bulb: Open the hood. The f ront parking
light is next to the headlight bulb.Insert the socket back into the
headlight assembly. Turn it
clockwise to lock it in place.
Turn on the parking lights and
check that the new bulb is
working.
Reinstall the radiator support
cover. Lock the holding clips by
pushing on the center of each clip.
Tighten the bolt on the battery
hold-down.
Push the new bulb straight into
the socket until it bottoms. Pull the bulb straight out of its
socket. Remove the socket from the
headlight assembly by turning it
one-quarter turn counterclockwise.
1.
2. 3.
4.5.
6.
7.
Lights
Maint enance
Replacing a Front Parking L ight
Bulb
289
B BO
OL LTT
Page 328 of 372

Look f or any obvious coolant leaks,
such as a split radiator hose.
Everything is still extremely hot,
so use caution. If you f ind a leak, it
must be repaired bef ore you
continue driving (seeon page ).
If you don’t f ind an obvious leak,
check the coolant level in the
radiator reserve tank (see page ). If the level is below the
MIN mark, add coolant to halfway
between the MIN and MAX marks. Using gloves or a large heavy
cloth, turn the radiator cap
counterclockwise, without pushing
down, to the f irst stop. This
releases any remaining pressure in
the cooling system. After the
pressure releases, push down on
the cap and turn it until it comes
off.Start the engine and set the
temperature control dial to
maximum. Add coolant to the
radiator up to the base of the f iller
neck. If you do not have the
proper coolant mixture available,
you can add plain water.
Remember to have the cooling
system drained and ref illed with
the proper mixture as soon as you
can.
If there was no coolant in the
reserve tank, you may also have to
add coolant to the radiator. Let the
engine cool down until the pointer
reaches the middle of the tempera-
ture gauge, or lower, bef ore check-
ing the radiator. Put the radiator cap back on
tightly. Run the engine and watch
the temperature gauge. If it goes
back to the red mark, the engine
needs repair. (See
on page .)
If the temperature stays normal,
check the coolant level in the
radiator reserve tank. If it has
gone down, add coolant to the
MAX mark. Put the cap back on
tightly.
10.
9.
8. 7.
6.
11.
12.
337
189
337
Emergency
Towing
Emergency
Towing
If Your Engine Overheats
T aking Care of t he Unexpect ed324
Removing the radiator cap
while the engine is hot can
cause the coolant to spray out,
seriously scalding you.
Always let the engine and
radiator cool down before
removing the radiator cap.
Page 368 of 372

...................
Neutral Gear Position . 206
..................
New Vehicle Break-in . 184
.....................
Normal Shif t Speeds .203
...................
NOTICE, Explanation of . i
...............
Numbers, Identif ication . 340
...................
Radiator Overheating . 323
Radio/Cassette/CD Sound ........................................
System .137
...........................
Readiness Codes .328
.................
Rear Dif f erential Fluid . 262
..
Rear Lights, Bulb Replacement . 290
........................
Rear Seat, Folding .104
..........................
Rear View Mirror .114
.................
Rear Window Def ogger . 81
.
Rear Window Wiper and Washer . 80
...............
Reclining the Seat Backs . 97
.......
Recommended Shif t Speeds . 203
.............................
Reminder Lights .65
.......................
Remote Transmitter .89
...
Octane Requirement, Gasoline . 184
.........................................
Odometer .73
...............................
Odometer, Trip .73
..............
Of f -Highway Guidelines . 226
Oil ........................
Change, How to .249
......................
Change, When to .238
......................
Checking Engine .188
..............
Pressure Indicator . 66,325
Selecting Proper Viscosity ......................................
Chart .248
...........
ON (Ignition Key Position) . 87
Onboard Ref ueling Vapor ....................................
Recovery .348
..
Operation in Foreign Countries . 347
............................
Outside Mirrors .114 ....
Outside Temperature Indicator . 73
.....................................
Over Drive .207
....................
Overheating, Engine .323
.......
Owner Maintenance Checks . 245
.........................
Oxygenated Fuels .346
..............................
Paint Touch-up .300
..............
Panel Brightness Control . 77
........................
Park Gear Position .205
...........................................
Parking .210
.................................
Parking Brake .82
Parking Brake and Brake .................
System Indicator . 66,329
.................................
Parking Lights .76
..
Parking Over Things that Burn . 210
.............................
PGM-FI System .349
..................
Polishing and Waxing . 299
............
Pre-Drive Saf ety Checklist . 12
.........
Pregnancy, Using Seat Belts . 21
............................
Protecting Adults .13
...
Additional Safety Precautions . 22
.....
Advice f or Pregnant Women . 21
........................
Protecting Children .24
.......................
Protecting Inf ants .34 .......
Protecting Larger Children . 42
.........
Protecting Small Children . 38
Using Child Seats with .....................................
Tethers .46
.............................
Using LATCH .48
Index
N
O R
P
VI