engine HONDA CR-V 2002 RD4-RD7 / 2.G Owners Manual
[x] Cancel search | Manufacturer: HONDA, Model Year: 2002, Model line: CR-V, Model: HONDA CR-V 2002 RD4-RD7 / 2.GPages: 372, PDF Size: 4.49 MB
Page 1 of 372

2002 CR-V Online Reference Owner's Manual
Use these links (and links throughout this manual) to navigate through this reference.
For a printed owner's manual, click on authorized manuals or go to www.helminc.com.
Contents
Owner's Identification Form
Introduction ........................................................................\
............................................................................. i
A Few Words About Safety ........................................................................\
.................................................. ii
Important Handling Information ........................................................................\
..................................... iii
Your Vehicle at a Glance ........................................................................\
....................................................... 2
Driver and Passenger Safety ........................................................................\
............................................... 5
Proper use and care of your vehicle's seat belts, and Supplemental Restraint System.
Instruments and Controls ........................................................................\
................................................... 63
Instrument panel indicator and gauge, and how to use dashboard and steering column controls.
Comfort and Convenience Features ........................................................................\
............................... 127
How to operate the climate control system, the audio system, and other convenience features.
Before Driving ........................................................................\
..................................................................... 183
What gasoline to use, how to break-in your new ve hicle, and how to load luggage and other cargo.
Driving ........................................................................\
................................................................................... 197
The proper way to start the engine, shift the tr ansmission, and park, plus towing a trailer.
Maintenance ........................................................................\
......................................................................... 233
The Maintenance Schedule shows you when you need to take your vehicle to the dealer.
Appearance Care ........................................................................\
................................................................. 297
Tips on cleaning and protecting your vehicle. Things to look for if your vehicle ever needs body repairs.
Taking Care of the Unexpected ........................................................................\
....................................... 307
This section covers several problems motorists someti mes experience, and how to handle them.
Technical Information ........................................................................\
....................................................... 339
ID numbers, dimensions, capaciti es, and technical information.
Warranty and Customer Relations (U.S. and Canada) ......................................................................353
A summary of the warranties covering your new Honda, and how to contact us.
Authorized Manuals (U.S. only) ........................................................................\
....................................... 357
How to order manuals and other technical literature.
Index ........................................................................\
......................................................................................... I
Service Information Summary
A summary of information you need wh en you pull up to the fuel pump.
Page 24 of 372

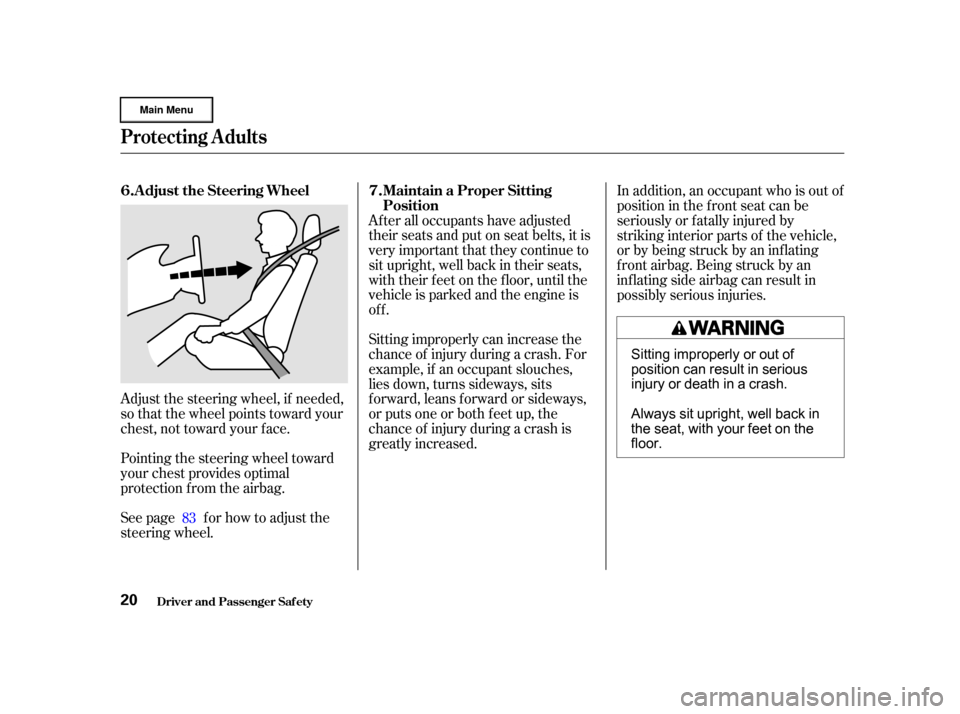
Adjust the steering wheel, if needed,
so that the wheel points toward your
chest, not toward your f ace.
Pointing the steering wheel toward
your chest provides optimal
protection f rom the airbag.
See page f or how to adjust the
steering wheel.Sitting improperly can increase the
chance of injury during a crash. For
example, if an occupant slouches,
lies down, turns sideways, sits
forward, leans forward or sideways,
or puts one or both f eet up, the
chance of injury during a crash is
greatly increased. After all occupants have adjusted
their seats and put on seat belts, it is
very important that they continue to
sit upright, well back in their seats,
with their feet on the floor, until the
vehicle is parked and the engine is
off.
In addition, an occupant who is out of
position in the f ront seat can be
seriously or f atally injured by
striking interior parts of the vehicle,
or by being struck by an inf lating
f ront airbag. Being struck by an
inf lating side airbag can result in
possibly serious injuries.
83
Driver and Passenger Saf ety
Protecting Adults
Adjust the Steering Wheel Maintain a Proper Sitting
Position
6.
7.
20
Sitting improperly or out of
position can result in serious
injury or death in a crash.
Always sit upright, well back in
the seat, with your feet on the
floor.
Page 61 of 372

If the light comes on at any other
time, or does not come on at all, you
should have the system checked by
your dealer. For example:If the SRS indicator light does not
come on after you turn the ignition
ON (II).
If the light stays on after the
engine starts.
If the light comes on or f lashes on
andoff whileyoudrive.
The SRS indicator light
alerts you to a potential
problem with your f ront airbags and
automatic seat belt tensioners.
On models with side airbags, this
light will also alert you to a potential
problem with your side airbags or
passenger’s side airbag automatic
cutof f system (see page ).
When you turn the ignition ON (II),
this indicator will light brief ly then
go out. This tells you that the system
is working properly. If you see any of these indications,
your f ront or side airbags may not
deploy, your passenger’s side airbag
automatic cutoff system may not
work properly, or your seat belt
tensioners may not work when you
need them. See your Honda dealer
as soon as possible.
58
How the SRS Indicator L ight
Works
Additional Inf ormation About Your Airbags
Driver and Passenger Saf ety57
Ignoring the SRS indicator light
can result in serious injury or
death if the airbags, cutoff
system, or tensioners do not
work properly.
Have your vehicle checked by a
dealer as soon as possible if
theSRSlightalertsyoutoa
potential problem.
Page 64 of 372

Your vehicle’s exhaust contains
carbon monoxide gas. You should
have no problem with carbon
monoxide entering the vehicle in
normal driving if you maintain your
vehicle properly.High levels of carbon monoxide can
collect rapidly in enclosed areas,
such as a garage. Do not run the
engine with the garage door closed.
Even with the door open, run the
engine only long enough to move the
vehicle out of the garage.
Have the exhaust system inspected
f or leaks whenever:
The vehicle is raised f or an oil
change.
You notice a change in the sound
of the exhaust.
The vehicle was in an accident
that may have damaged the under-
side. With the tailgate/hatch glass open,
air flow can pull exhaust gas into
your vehicle’s interior and create a
hazardous condition. If you must
drive with the tailgate/hatch glass
open, open all the windows and set
the heating and cooling system as
shown below.
If you must sit in your parked vehicle,
even in an unconf ined area, with the
engine running, adjust the heating
and cooling system as f ollows:
Select the Fresh Air mode.
Select the mode.
Turn the f an on high speed.
Set the temperature control to a
comfortable setting.
1.
2.
3.
4.
Carbon Monoxide Hazard
Driver and Passenger Saf ety60
Carbon monoxide gas is toxic.
Breathing it can cause
unconsciousness and even kill
you.
Avoid any enclosed areas or
activities that expose you to
carbon monoxide.
Page 70 of 372

See page .
The instrument panel has many
indicators to give you important
inf ormation about your vehicle.
This light has two f unctions:
This indicator comes on when you
turn the ignition switch ON (II). It
is a reminder to check the parking
brake. Driving with the parking
brake not f ully released can
damage the brakes and tires.
If the indicator remains lit af ter
you have fully released the
parking brake while the engine is
running, or if it comes on while
driving, it can indicate a problem
in the brake system. For complete
information, see page .
The engine can be severely damaged
if this light f lashes or stays on when
the engine is running. For complete
inf ormation, see page .
If this light comes on when the
engine is running, the battery is not
being charged. For complete
inf ormation, see page .
2. 1.
329
327
325
326
Indicator L ights
Inst rument s and Cont rols
Malf unction Indicator
Lamp Parking Brake and
Brake System
Indicator
L ow Oil Pressure
Indicator
Charging System
Indicator
66
U.S. Canada
Page 72 of 372

Only on models equipped with ABS (seepage ) 212
This light normally comes on f or a
f ew seconds when you turn the
ignition switch ON (II), and when
the ignition switch is turned to
START (III). If this light comes on at
any other time, there is a problem in
theABS.If thishappens,takethe
vehicle to your dealer to have it
checked. With the light on, your
vehicle still has normal braking
ability but no anti-lock. For complete
inf ormation, see page . This indicator comes on f or a f ew
seconds when you turn the ignition
switch ON (II). It will then go of f if
you have inserted a properly-coded
ignition key. If it is not a properly-
coded key, the indicator will blink
and the engine will not start (see
page ).
This indicator also blinks several
times when you turn the ignition
switch f rom ON (II) to ACCESSORY
(I) or LOCK (0).
The lef t or right turn signal light
blinks when you signal a lane change
or turn. If the light does not blink or
blinks rapidly, it usually means one
of the turn signal bulbs is burned out
(see page ). Replace the bulb as
soon as possible, since other drivers
cannot see that you are signalling.
WhenyouturnontheHazard
Warning switch, both turn signal
lights blink. All turn signals on the
outside of the vehicle should f lash.
214 85
288
Anti-lock Brake System
(A BS) Indicator
Immobilizer System
Indicator
Turn Signal and Hazard Warning
Indicators
Indicator L ights
Inst rument s and Cont rols68
Canada
U.S.
Page 75 of 372

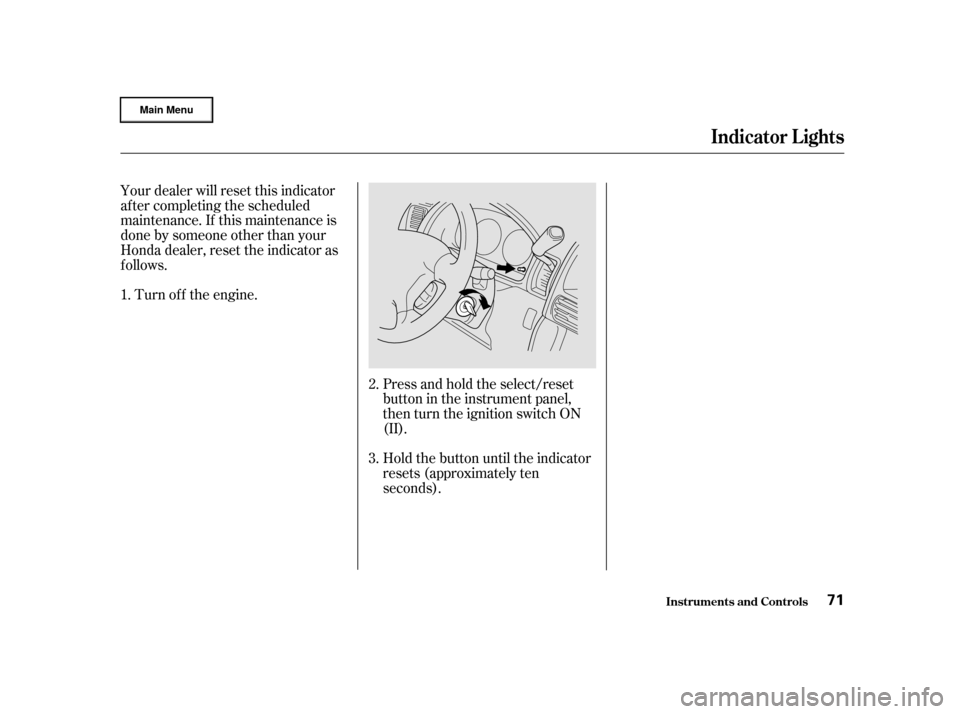
Your dealer will reset this indicator
af ter completing the scheduled
maintenance. If this maintenance is
done by someone other than your
Honda dealer, reset the indicator as
f ollows.Turn of f the engine.
Press and hold the select/reset
button in the instrument panel,
then turn the ignition switch ON
(II).
Hold the button until the indicator
resets (approximately ten
seconds).
1.
2.
3.
Indicator L ights
Inst rument s and Cont rols71
Page 76 of 372

U.S. ModelsCanadian Models
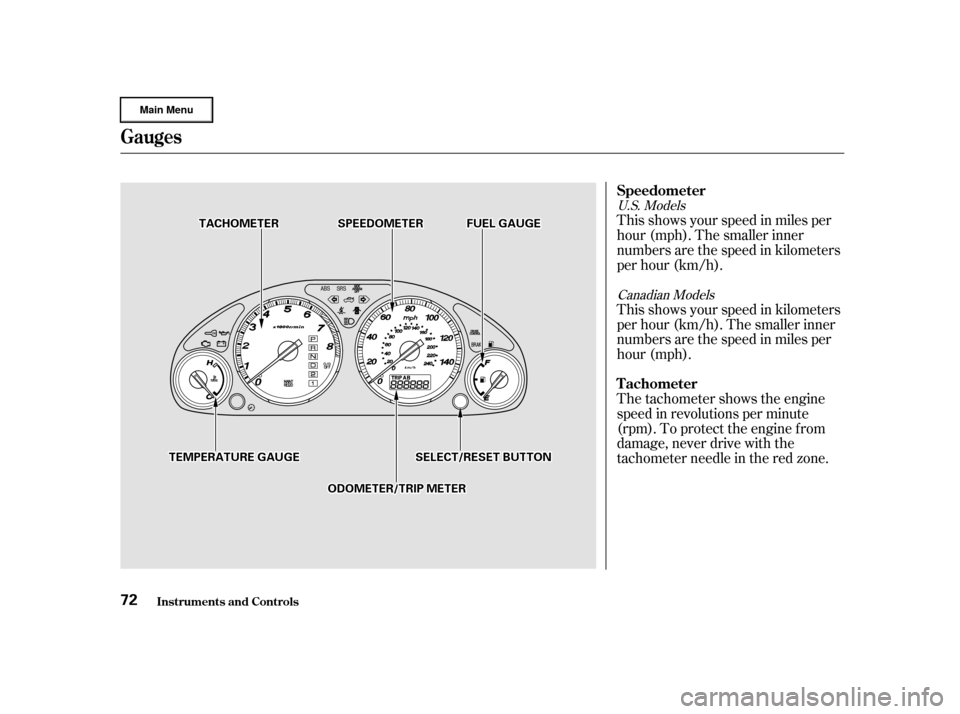
This shows your speed in miles per
hour (mph). The smaller inner
numbers are the speed in kilometers
per hour (km/h).
This shows your speed in kilometers
per hour (km/h). The smaller inner
numbers are the speed in miles per
hour (mph).
The tachometer shows the engine
speed in revolutions per minute
(rpm). To protect the engine f rom
damage, never drive with the
tachometer needle in the red zone.
Gauges
Inst rument s and Cont rols
Speedometer
T achometer
72
T TA
A C
CHH O
OM M E
ET
TE
ER
R S
SPPE
EE
ED
D O
OM M E
ET
TE
ER
R F
FUUE EL
L G
GAAU
UG GEE
O
OD DO
OM M E
ET
TE
ER
R/ /T
T R
RI IPP M
M E
ET
TE
ER
R
S
SE
EL
LEE C
CT T/
/R
RE ES
SE ET
T B
BUUT TT
TO
ON N
T
T E
EM
M P
PE
ER
RA A T
TU
UR REE G
GAAU
UG GEE
Page 78 of 372

This shows the temperature of the
engine’s coolant. During normal
operation, the pointer should rise
from the bottom white mark to about
the middle of the gauge. In severe
driving conditions, such as very hot
weather or a long period of uphill
driving, the pointer may rise to the
upper white zone. If it reaches the
red (Hot) mark, pull saf ely to the
side of the road. Turn to page f or
instructions and precautions on
checking the engine’s cooling
system.
The temperature sensor is located in
the f ront bumper. Theref ore, the
temperature reading can be af f ected
by heat ref lection f rom the road sur-
f ace, engine heat, and the exhaust
f rom the surrounding traf f ic. This
can cause the temperature reading
not to be correct when your speed is
under 19 mph (30 km/h).
This shows how much f uel you have.
It is most accurate when the vehicle
is on level ground. It may show
slightly more or less than the actual
amount when you are driving on
curvy or hilly roads.
The needle returns to the bottom
after you turn off the ignition. The
gauge shows the f uel level reading
immediately af ter you turn the
ignition switch back ON (II).
When the outside temperature goes
down below 37°F (3°C) the f irst
time, the temperature reading blinks
about ten times to show you the
outside temperature is low. In certain
weather conditions, temperature
readings near f reezing 32°F (0°C)
couldmeanthaticeisformingonthe
road surf ace. 323
Temperature Gauge
Fuel Gauge
Gauges
Inst rument s and Cont rols74
Avoid driving with an extremely low
f uel level. Running out of f uel could
cause the engine to misf ire, damaging
the catalytic converter.
Page 88 of 372

These keys contain electronic
circuits that are activated by the
Immobilizer System. They will not
work to start the engine if the
circuits are damaged.Protect the keys f rom direct
sunlight, high temperature, and
high humidity.
The keys do not contain batteries.
Do not try to take them apart. Keep the keys away f rom liquids.
If they get wet, dry them immedi-
ately with a soft cloth. Donotdropthekeysorsetheavy
objects on them.
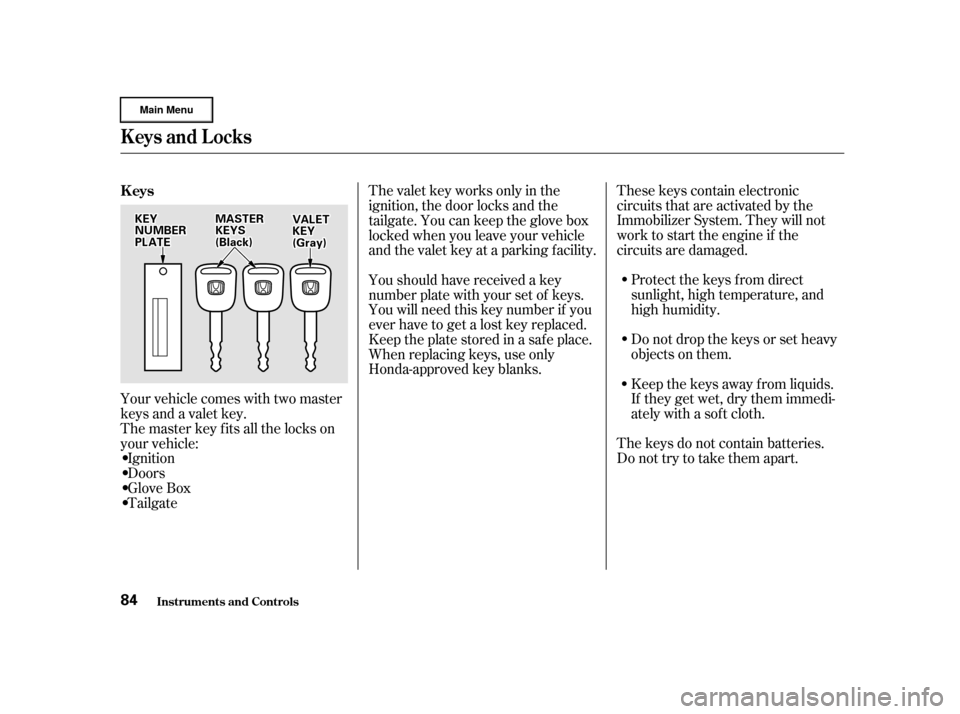
Your vehicle comes with two master
keys and a valet key.
The master key fits all the locks on
your vehicle:
Ignition
Doors
GloveBox
Tailgate The valet key works only in the
ignition, the door locks and the
tailgate. You can keep the glove box
locked when you leave your vehicle
and the valet key at a parking f acility.
Youshouldhavereceivedakey
number plate with your set of keys.
You will need this key number if you
ever have to get a lost key replaced.
Keep the plate stored in a saf e place.
When replacing keys, use only
Honda-approved key blanks.
Keys
Keys and Locks
Inst rument s and Cont rols84
V V
A
AL
LEE T
T
K
KE EY
Y
(
( G
Gr raay y))
K
KE
EY
Y
N
NU UMM B
BEER
R
P
P L
LAA T
TE
E M
M
A
AS
STTE
ER
R
K
KE EY
YS S
(
( B
Bl laac ckk) )