belt HONDA CR-V 2005 RD4-RD7 / 2.G Service Manual
[x] Cancel search | Manufacturer: HONDA, Model Year: 2005, Model line: CR-V, Model: HONDA CR-V 2005 RD4-RD7 / 2.GPages: 274, PDF Size: 4.34 MB
Page 60 of 274

This indicator also blinks several
times when you turn the ignition
switch f rom the ON (II) position to
the ACCESSORY (I) or the LOCK
(0) position.
This indicator comes on brief ly when
you turn the ignition switch to the
ON (II) position. If it comes on at
any other time, it indicates a
potential problem with your f ront
airbags. This indicator will also alert
you to a potential problem with your
side airbags, passenger’s side airbag
automatic cutoff system, side curtain
airbags, automatic seat belt
tensioners, driver’s seat position
sensor, or the f ront passenger’s
weight sensors. For more
inf ormation, see page . This indicator comes on f or a f ew
seconds when you turn the ignition
switch to the ON (II) position. It will
then go of f if you have inserted a
properly-coded ignition key. If it is
not a properly-coded key, the
indicator will blink, and the engine
will not start (see page ).
This indicator comes on when you
turn the ignition switch to the ON
(II) position. If it comes on at any
other time, it indicates that the
passenger’s side airbag has automatically shut off. For more
inf ormation, see page .
This indicator normally comes on f or
a f ew seconds when you turn the
ignition switch to the ON (II)
position, and when the ignition
switch is turned to the START (III)
position. If it comes on at any other
time, there is a problem with the
ABS. If this happens, have your
vehicle checked at a dealer. With
this indicator on, your vehicle still
has normal braking ability but no
anti-lock f unction. For more
inf ormation, see page .
29 29
71
168
Supplemental Restraint
System Indicator
Immobilizer System
Indicator
Side Airbag Of f Indicator Anti-lock Brake System
(A BS) Indicator
Instrument Panel Indicators
Inst rument s and Cont rols
57
Canada
U.S.
Page 82 of 274
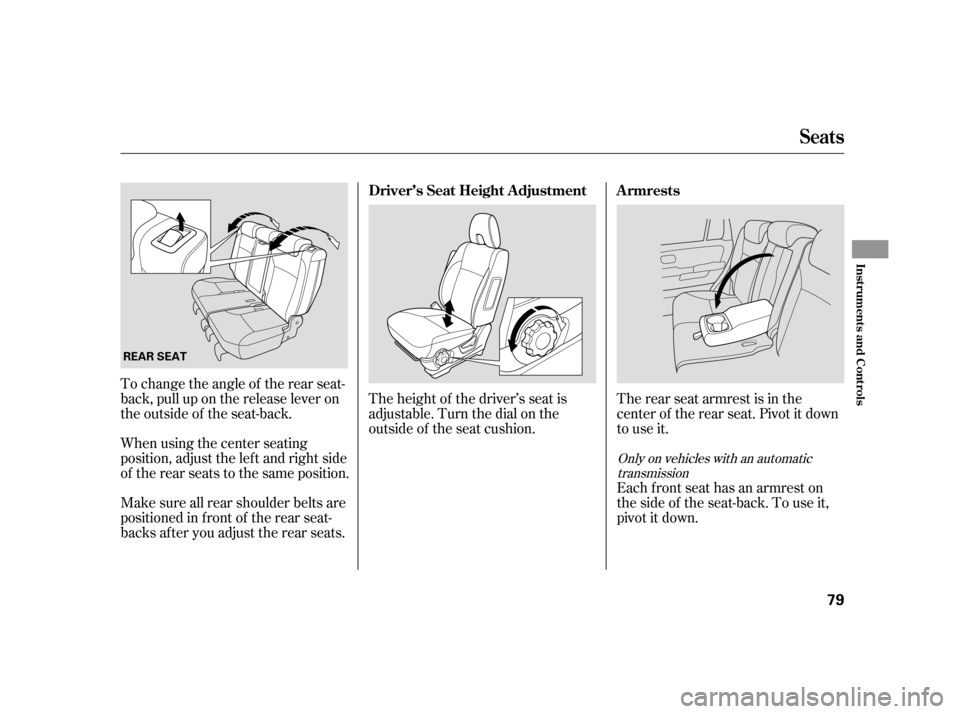
The rear seat armrest is in the
center of the rear seat. Pivot it down
to use it.
Each front seat has an armrest on
thesideof theseat-back.Touseit,
pivotitdown.
To change the angle of the rear seat-
back, pull up on the release lever on
the outside of the seat-back.
When using the center seating
position, adjust the lef t and right side
of the rear seats to the same position.
Make sure all rear shoulder belts are
positioned in f ront of the rear seat-
backs af ter you adjust the rear seats.
The height of the driver’s seat is
adjustable. Turn the dial on the
outside of the seat cushion.
Only on vehicles with an automatic
transmission
Driver’s Seat Height A djustment A rmrests
Seats
Inst rument s and Cont rols
79
REAR SEAT
Page 85 of 274
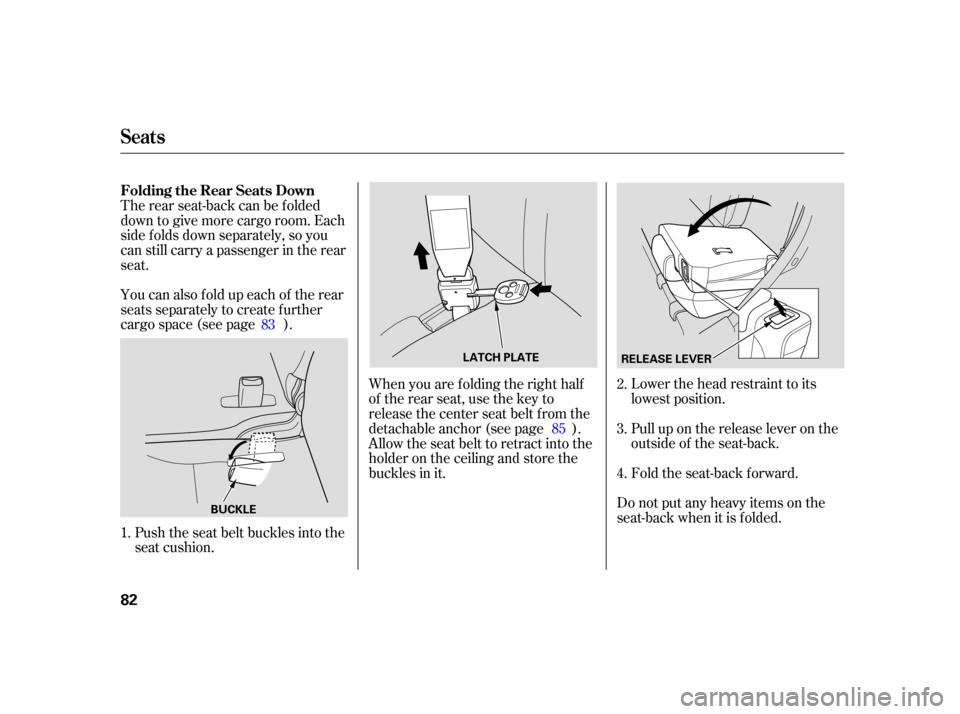
You can also f old up each of the rear
seats separately to create further
cargo space (see page ).Push the seat belt buckles into the
seat cushion. Lower the head restraint to its
lowest position.
Pull up on the release lever on the
outside of the seat-back.
Fold the seat-back forward.
Do not put any heavy items on the
seat-back when it is folded.
The rear seat-back can be f olded
down to give more cargo room. Each
side f olds down separately, so you
can still carry a passenger in the rear
seat.
When you are f olding the right half
of therearseat,usethekeyto
release the center seat belt from the
detachable anchor (see page ).
Allow the seat belt to retract into the
holder on the ceiling and store the
buckles in it.
1. 83
852.
3.
4.
Folding the Rear Seats Down
Seats
82
BUCKLE
LATCH PLATE
RELEASE LEVER
Page 86 of 274
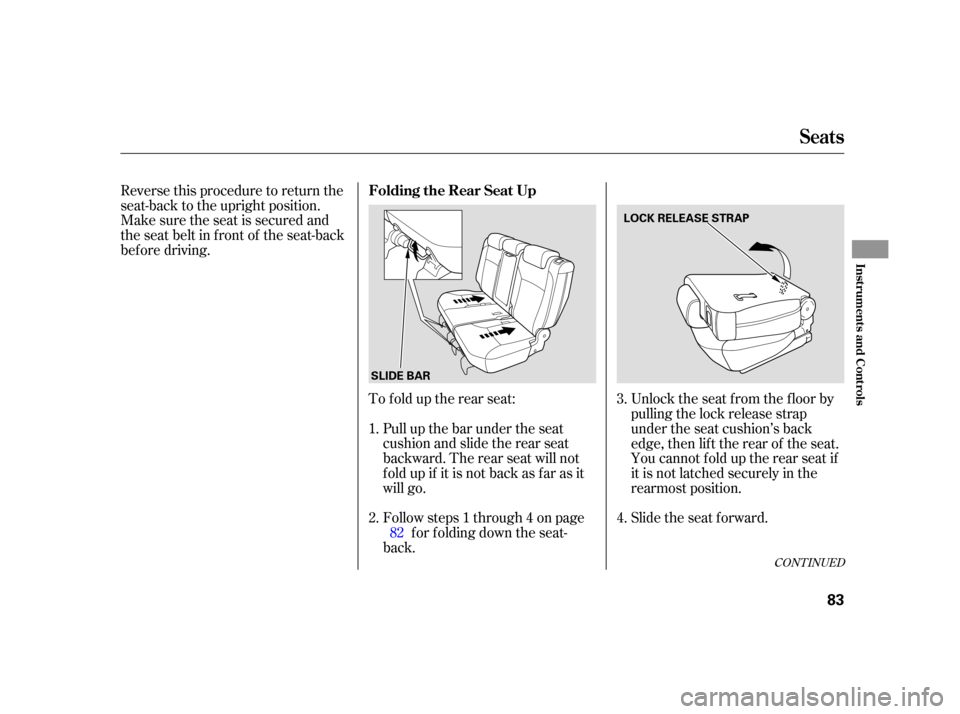
Reverse this procedure to return the
seat-back to the upright position.
Make sure the seat is secured and
the seat belt in f ront of the seat-back
bef ore driving.To f old up the rear seat:Pull up the bar under the seat
cushion and slide the rear seat
backward. The rear seat will not
f old up if it is not back as f ar as it
will go.
Followsteps1through4onpage f or f olding down the seat-
back. Unlock the seat f rom the f loor by
pulling the lock release strap
under the seat cushion’s back
edge, then lif t the rear of the seat.
You cannot fold up the rear seat if
it is not latched securely in the
rearmost position.
Slide the seat forward.
2. 1.
82 3.
4.
CONT INUED
Seats
Folding the Rear Seat Up
Inst rument s and Cont rols
83
SLIDE BAR LOCK RELEASE STRAP
Page 87 of 274
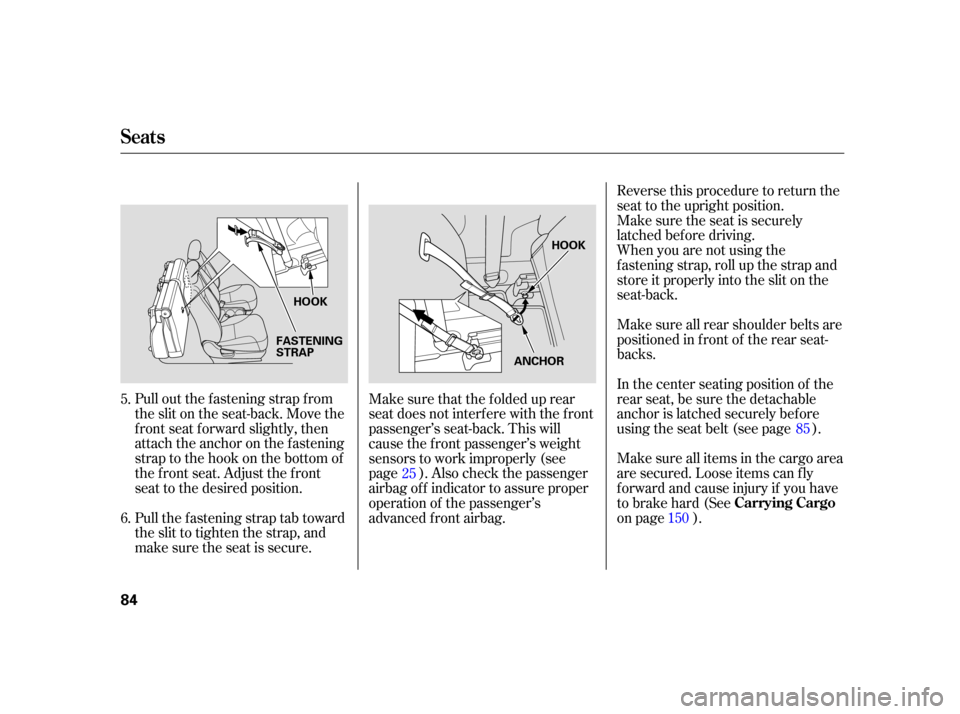
Pull out the f astening strap f rom
the slit on the seat-back. Move the
f ront seat f orward slightly, then
attach the anchor on the fastening
strap to the hook on the bottom of
the f ront seat. Adjust the f ront
seat to the desired position.Reverse this procedure to return the
seat to the upright position.
Make sure the seat is securely
latched bef ore driving.
When you are not using the
fasteningstrap,rollupthestrapand
store it properly into the slit on the
seat-back.
Make sure all rear shoulder belts are
positioned in f ront of the rear seat-
backs.
In the center seating position of the
rear seat, be sure the detachable
anchor is latched securely bef ore
using the seat belt (see page ).
Make sure all items in the cargo area
are secured. Loose items can f ly
f orward and cause injury if you have
to brake hard (See
on page ).
Pull the fastening strap tab toward
the slit to tighten the strap, and
make sure the seat is secure. Make sure that the f olded up rear
seat does not interf ere with the f ront
passenger’s seat-back. This will
cause the f ront passenger’s weight
sensors to work improperly (see
page ). Also check the passenger
airbag of f indicator to assure proper
operation of the passenger’s
advanced front airbag.
5.
6.
85
25 150
Seats
Carrying Cargo
84
HOOK
FASTENING
STRAP HOOK
ANCHOR
Page 88 of 274
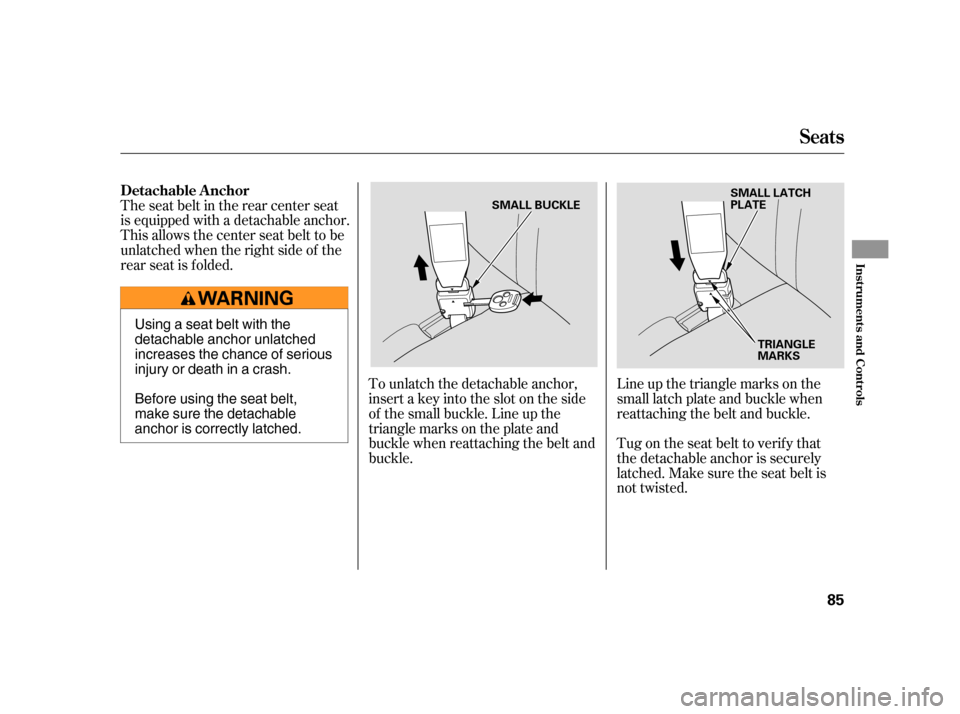
Line up the triangle marks on the
small latch plate and buckle when
reattaching the belt and buckle.
Tug on the seat belt to verify that
the detachable anchor is securely
latched. Make sure the seat belt is
not twisted.
The seat belt in the rear center seat
is equipped with a detachable anchor.
This allows the center seat belt to be
unlatched when the right side of the
rear seat is folded.
To unlatch the detachable anchor,
insert a key into the slot on the side
of the small buckle. Line up the
triangle marks on the plate and
buckle when reattaching the belt and
buckle.
Seats
Detachable A nchor
Inst rument s and Cont rols
85
SMALL LATCH PLATE
TRIANGLE MARKS
SMALL BUCKLE
Using a seat belt with the
detachable anchor unlatched
increases the chance of serious
injury or death in a crash.
Before using the seat belt,
make sure the detachable
anchor is correctly latched.
Page 96 of 274
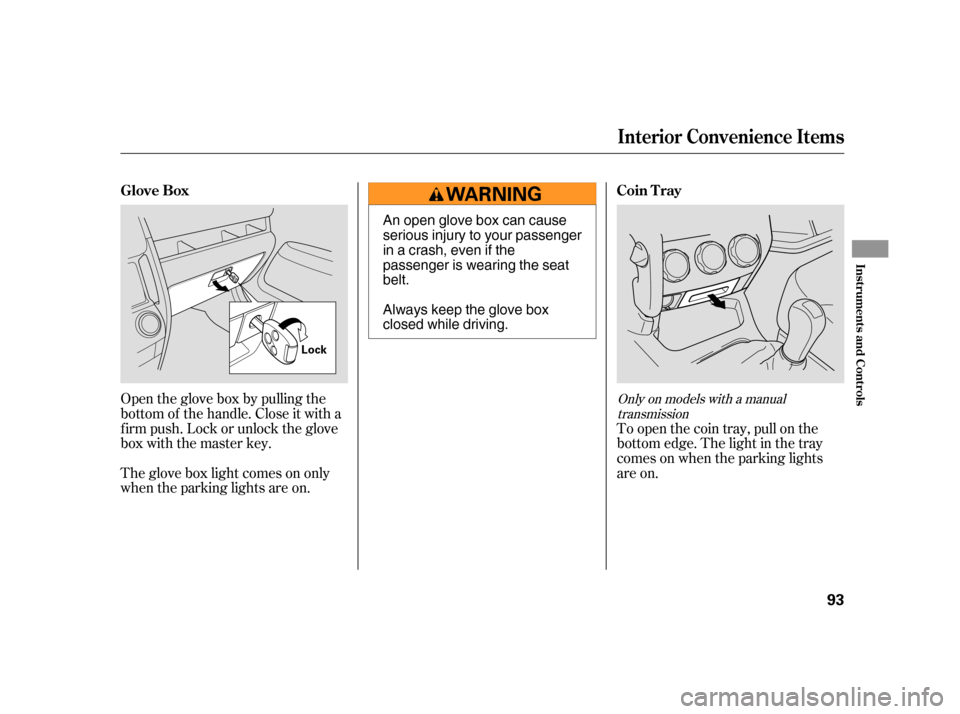
Open the glove box by pulling the
bottom of the handle. Close it with a
f irm push. Lock or unlock the glove
box with the master key.
The glove box light comes on only
when the parking lights are on.
Toopenthecointray,pullonthe
bottom edge. The light in the tray
comes on when the parking lights
are on.
Only on models with a manual
transmission
Glove Box Coin T ray
Interior Convenience Items
Inst rument s and Cont rols
93
Lock
An open glove box can cause
serious injury to your passenger
inacrash,evenifthe
passenger is wearing the seat
belt.
Always keep the glove box
closed while driving.
Page 160 of 274

Make sure all windows, mirrors,
and outside lights are clean and
unobstructed. Remove f rost, snow,
or ice.
Check that the hood is f ully closed.Check the seat adjustment (see
page ).
Check the adjustment of the
inside and outside mirrors (see
page ).
Check the steering wheel
adjustment (see page ).
Make sure the doors, the tailgate,
and the hatch glass are securely
closed and locked.
Fasten your seat belt. Check that
your passengers have f astened
their seat belts (see page ).
When you start the engine, check
the gauges and indicators in the
instrument panel (see page ).
Check that any items you may be
carrying are stored properly or
f astened down securely. Visually check the tires. If a tire
looks low, use a gauge to check its
pressure (see page ).
Youshoulddothesechecksand
adjustments bef ore you drive your
vehicle:
1.
2.
10.78
88
14
3.
4. 5.
6.
7.
8.
9.
55
213 69
Driving Guidelines
Preparing to Drive
Driving
157
Page 182 of 274
To avoid loss of control or rollover,
be sure to f ollow all precautions and
recommendations.Wherever you drive, make sure
you and your passengers always
wear seat belts.
Keep your speed low, and never
go faster than the conditions allow.
It’s up to you to continually assess
the situation and drive within the
limits.
If you decide to drive on unpaved
roads, you will f ind that it requires
somewhat dif f erent driving skills.
Your vehicle will also handle
somewhat dif f erently than it does on
pavement. So be sure to read this
owner’s manual, pay special attention
to the precautions and tips in this
section, and get acquainted with
your vehicle before you leave the
pavement. Be sure to store cargo properly,
and do not exceed your vehicle
cargo load limits (see pages
and ).
Your vehicle has been designed
primarily f or use on pavement. But
its higher ground clearance allows
you to occasionally travel on unpaved
roads, such as campgrounds, picnic
sites, and similar locations. It is not
designed f or trail-blazing, mountain
climbing, or other challenging of f -
road activities.
151 172
General Inf ormation
Important Saf ety Precautions
Of f -Highway Driving Guidelines
Driving
179
Follow all instructions and
guidelines in this owner’s
manual.
Keep your speed low, and
don’t drive faster than
conditions permit.
Improperly operating this
vehicle on or off pavement can
cause an accident or rollover in
which you and your passengers
could be seriously injured or
killed.
Page 186 of 274

This section explains why it is
important to keep your vehicle well
maintained and how to f ollow basic
maintenance saf ety precautions.
If you have the skills and tools to
perf orm more complex maintenance
tasks on your vehicle, you may want
to purchase the service manual. See
page f or inf ormation on how to
obtain a copy, or see your dealer.......................
Maintenance Saf ety .184
.................
Maintenance Schedule . 185
....................
Maintenance Record .189
..............................
Fluid Locations .192
........................
Adding Engine Oil .193
.........
Changing the Oil and Filter . 194
..............................
Engine Coolant .196
....................
Windshield Washers .198
.......................
Transmission Fluid .199
Automatic Transmission .......................................
Fluid .199
....
Manual Transmission Fluid . 200
.................
Rear Dif f erential Fluid . 201
................
Brake and Clutch Fluid . 201
....................
Power Steering Fluid . 202
.............................................
Lights .203
................
Cleaning the Seat Belts . 208
.....................................
Floor Mats .208
..............................
Audio Antenna .209
..................
DustandPollenFilter . 209
.................................
Wiper Blades .210
...............................................
Tires .211
...................
Checking the Battery . 217
.............................
Vehicle Storage .218
This section also includes
maintenance schedules f or normal
driving and severe driving conditions,
a maintenance record, and
instructions f or simple maintenance
tasks you may want to take care of
yourself .
259
Maintenance
Maint enance
183