flat tire HONDA CR-V 2007 RD1-RD5, RE7 / 3.G Owners Manual
[x] Cancel search | Manufacturer: HONDA, Model Year: 2007, Model line: CR-V, Model: HONDA CR-V 2007 RD1-RD5, RE7 / 3.GPages: 352, PDF Size: 5.77 MB
Page 68 of 352

This indicator normally comes on for
a few seconds when you turn the
ignition to the ON (II) position.
If it comes on while driving, it
indicates that one or more of your
vehicl e’s tires are extremely low on
pressure.
If this happens, pull to the side of the
ro ad when it is safe, check which tire
has lost the pressure, and determine
the cause. If it is because of a flat tire,
replace the flat tire with the compact
spare (see page ), and have the
f lat tire repaired as soon as possible.
If two or more tires are underinf lated,
call a prof essional towing service
(see page ). Ref er to page f or more inf ormation. This indicator normally comes on f or
a f ew seconds when you turn the
ignition switch to the ON (II)
position.
This indicator reminds you that the
exterior lights are on. It comes on
when the light switch is in either the
or position. If you turn the
ignition switch to the ACCESSORY
(I) or LOCK (0) position without
turning of f the light switch, this
indicator will stay on. A reminder
chime will also sound when you open
the driver’s door.
If this indicator comes on and stays
on at any other time, or if it does not
come on when you turn the ignition
switch to the ON (II) position, there
is a problem with the TPMS. With
this indicator on, the low tire
pressure indicator will not come on
when a tire loses pressure. Take the
vehicle to your dealer to have the
system checked.
298
317
242 Low Tire Pressure
Indicator
Tire Pressure Monitoring
System (T PMS) IndicatorLights On Indicator
Instrument Panel Indicators
64
Page 247 of 352

For example, if you check and fill
your tires in a warm area, then drive
in extremely cold weather, the tire
pressure will be lower than
measured and could be underinflated
and cause the low tire pressure
indicator to come on. Or, if you
check and adjust your tire pressure
in cooler conditions, and drive into
extremely hot conditions, the tire
maybecomeoverinflated.However,
the low tire pressure indicator will
not come on if the tires are
overinflated.
Refer to page for tire inflation
guidelines. When
you restart the vehicle with
thecompactsparetire,theTPMS
indicator may also come on and stay
on after driving several miles
(kilometers).
Al though your tire pressure is
monito red, you must manually check
thetirepressuresmonthly.
Each tire, including the spare, should
be checked monthly when cold, and
set to the recommended inflation
pressure as specified on the tire information
label and in the owner’s
manual (see page ).
This indicator comes on and stays on
if there is a problem with the tire
pressure monitoring system.
If this happens, the system will shut
off and no longer monitor tire
pressures. Have the system checked
by your dealer as soon as possible.
If the low tire pressure indicator or
TPMS indicator comes on, the VSA
system automatically turns on even
when the VSA system is turned off
by pressing the VSA OFF switch
(see page ). If this happens, you
cannot turn the VSA system of f by
pressing the VSA of f switch again.
288 290
241
Tire Pressure Monitoring System (TPMS)
Tire Pressure Monitoring
System (T PMS) Indicator
Driving
243
Page 248 of 352

As required by the FCC:
This device complies with Part 15 of the
FCC rules. Operation is subject to the
following two conditions: (1) This device
may not cause harmful interference, and
(2) this device must accept any
interference received, including
interference that may cause undesired
operation.
Changes or modifications not expressly
approved by the party responsible for
compliance could void the user’s
au thority to operate the equipment.
This device complies with Industry
Canada Standard RSS-210.
Operation is subject to the following two
conditions: (1) this device may not cause
interference, and (2) this device must
accept any interference that may cause
undesired operation of the device.
If you have a flat tire, the low tire
pressure indicator will come on.
Replace the flat tire with the
compact spare tire (see page ). Never use a puncture-repairing agent
in a f lat tire. If used, you will have to
replace the tire pressure sensor.
Havetheflattirerepairedbyyour
dealer as soon as possible.
Each wheel (except the compact
sparetirewheel)isequippedwitha
tire pressure sensor mounted inside
the tire behind the valve stem. You
must use TPMS specif ic wheels. It is
recommended that you always have
your tires serviced by your dealer or
qualif ied technician.
Af ter you replace the f lat tire, the
low tire pressure indicator stays on.
This is normal; the system is not
monitoring the spare tire pressure.
Manually check the spare tire
pressure to be sure it is correct. 298
Tire Pressure Monitoring System (TPMS)
Changing a T ire with T PMS
244
Page 253 of 352

Crosswinds and air turbulence
caused by passing trucks can disrupt
your steering and cause the trailer to
sway. When being passed by a large
vehicle, keep a constant speed, and
steer straight ahead. Do not try to
make quick steering or braking
corrections. If youmuststopwhenfacinguphill,
use the f oot brake or parking brake.
Do not try to hold the vehicle in
place by pressing on the accelerator,
as this can cause the automatic
transmission to overheat. When driving down hills, reduce
your speed and use the D3 position.
Do not ‘‘ride’’ the brakes, and
remember it will take longer to slow
downandstopwhentowingatrailer.
When climbing hills, closely watch
your temperature gauge. If it nears
the red (Hot) mark, turn the air conditioning of f , reduce speed and, if
necessary, pull to the side of the
road to let the engine cool.
Maketurnsmoreslowlyandwider
than normal. The trailer tracks a
smaller arc than your vehicle, and it
canhitorrunoversomethingthe
vehicle misses. Allow more time and
distance f or braking. Do not brake or
turn suddenly as this could cause the
trailer to jackknif e or turn over. Drive slower than normal in all
driving situations, and obey posted
speed limits f or vehicles with trailers.
Use the D position when towing a
trailer on level roads. D is the
proper shif t lever position to use
when towing a trailer in hilly terrain.
(See ‘‘ ’’ in the
f ollowing column f or additional gear
inf ormation.)
The lights and brakes on your
vehicle and the trailer are working
properly.
Your vehicle tires and spare are
properly inf lated, and the trailer
tires and spare are inflated as
recommended by the trailer
maker.
The added weight, length, and
height of a trailer will af f ect your
vehicle’s handling and perf ormance,
so driving with a trailer requires
some special driving skills and
techniques.
Foryoursafetyandthesafetyof
others,taketimetopracticedriving
maneuvers bef ore heading f or the
open road, and f ollow the guidelines
in this section.
3
Towing a Trailer
Handling Crosswinds and Buf f et ing
Driving on Hills
Making T urns and Braking
Driving on Hills
T owing Speeds and Gears
Driving Saf ely With a T railerDriving
249
Page 254 of 352

Your vehicle can be towed behind a
motorhome at legal highway speeds
up to 65 mph (100 km/h). Do not
exceed 65 mph (100 km/h).
Otherwise, severe transmission
damage will occur. To avoid damage
to the 4WD system, your vehicle
must be towed with all four wheels
on the ground (flat towing).
Wh en purchasing a tow bar, make
sure you select a reputable
manufacturer and installer. Follow
the manufacturer’s attachment
instru ctions carefully.
Perform the following procedure
every day imme diately before you
begin towing. Otherwise severe
automatic transmission damage will
occur.
Al
ways drive slowly and have
someone guide you when backing up.
Grip the of the steering
wheel; then turn the wheel to the left
to get the trailer to move to the left,
andturnthewheel righttomovethe
trailer to the right.
Follow all norm al precau tions when
parking, including firmly setting the
parking brake and putting the
tran smission in Park. Also, place
wheel chocks at each of the trailer’s
tires.
When you stop towing your vehic le
and shift out of the neutral position,
you may not be able to move the
shift lever from neutral to reverse or
Park.Ifthishappens,press the
brake pedal and turn the ignition
switch to the ON (II) position, then
shift out of neutral.
Leave
the ignition switch in the
ACCESSORY (I) position so the
steering wheel does not lock.
Make sure the radio and any items
plugged into the accessory power
sockets are turned off so you do
not run down the battery.
Release the parking brake. ShifttoD,thentoN.Letthe
engine run f or 3 minutes, then
turn it off. Press on the brake pedal. Move
the shif t lever through all its
positions. Check the transmission f luid level
(see page ).
Start the engine.
273
bottom Do not overf ill.
T owing a T railer, T owing Your Vehicle Behind a Motorhome
Towing Your Vehicle Behind a
MotorhomeBacking Up
Parking
250
Page 292 of 352

To safely operate your vehicle, your
ti res must be the proper type and
size, in good condition with adequate
tread, and correctly inflated.
The following pages give more
detailed information on how to take
care of your tires and what to do
when they need to be replaced. Keeping
the tires properly inflated
provides the best combination of
handling, tread life, and riding
comfort.
Underinflated tires wear unevenly,
adversely affect handling and fuel
economy, and are more likely to
fail from being overheated.
Overinflated tires can make your
vehicleridemoreharshly,are
more prone to damage from road
hazards, and wear unevenly. The tire pressure monitoring system
(TPMS) warns you when a tire
pressure is low. See page f or
more inf ormation.
Even though your vehicle is
equipped with TPMS, we
recommend that you visually check
your tires every day. If you think a
tire might be low, check it
immediately with a tire gauge.
242
Inf lation Guidelines
Tires
288
Using tires that are excessively
worn or improperly inflated can
cause a crash in which you can
be seriously hurt or killed.
Follow all instructions in this
owner’s manual regarding tire
inflation and maintenance.
Page 293 of 352

Use a gauge to measure the air
pressure in each tire at least once a
month. Even tires that are in good
condition may lose 1 to 2 psi (10 to
20 kPa, 0.1 to 0.2 kgf/cm ) per
month. Remember to check the
sparetireatthesametime. If
you check air pressures when the
tires are hot [driven for several miles
(kilometers)], you will see readings 4
to6psi(30to40kPa,0.3 to0.4
kgf/cm ) higher than the cold
readings. This is normal. Do not let
air out to match the recommended
cold air pressure. The tire will be
underinflated.
Youshouldgetyourowntire
pressure gauge and use it whenever
you check your tire pressures. This
will make it easier for you to tell if a
pressu re loss is due to a tire problem
and not due to a variation between
gauges.
While tubeless tires have some
ability to self-seal if they are
punctured, you should look closely
for punctures if a tire starts losing
pressure. The
following chart shows the
recommended cold tire pressures for
most normal and high-speed driving
conditions.
Thecompactsparetirepressureis:
For convenience, the recommended
tire sizes and cold tire pressures are
on a lab el on the driver’s doorjamb.
For additional information about
your tires, see page .
Check
the air pressures when the
tires are cold. This means the
vehicle has been parked f or at least 3
hours, or driven less than 1 mile (1.6
km). Add or release air, if needed, to
match the recommended cold tire
pressuresonthispage.
324
Tire Size Cold Tire Pressurefor Normal Driving
Front/Rear:
Tires
Recommended T ire Pressures
Maint enance
289
60 psi (420 kPa , 4.2 kgf/cm)
225/65R17 102T 30 psi (210 kPa ,
2.1 kgf/cm
)
Page 301 of 352

This section covers the more
common problems that motorists
experience with their vehicles. It
gives you inf ormation about how to
safely evaluate the problem and what
to do to correct it. If the problem has
stranded you on the side of the road,
you may be able to get going again.
If not, you will also f ind instructions
on getting your vehicle towed.......................
Compact Spare Tire .298
....................
Changing a Flat Tire .299
.............
If the Engine Won’t Start .303
................................
Jump Starting .305
..............
If the Engine Overheats .307
.........
Low Oil Pressure Indicator .309
..........
Charging System Indicator .309
.......
Malf unction Indicator Lamp .310
...............
Brake System Indicator .311
..............................................
Fuses .312
..............................
Fuse Locations .315
......................
Emergency Towing .317
Taking Care of the Unexpected
T aking Care of t he Unexpect ed
297
Page 303 of 352

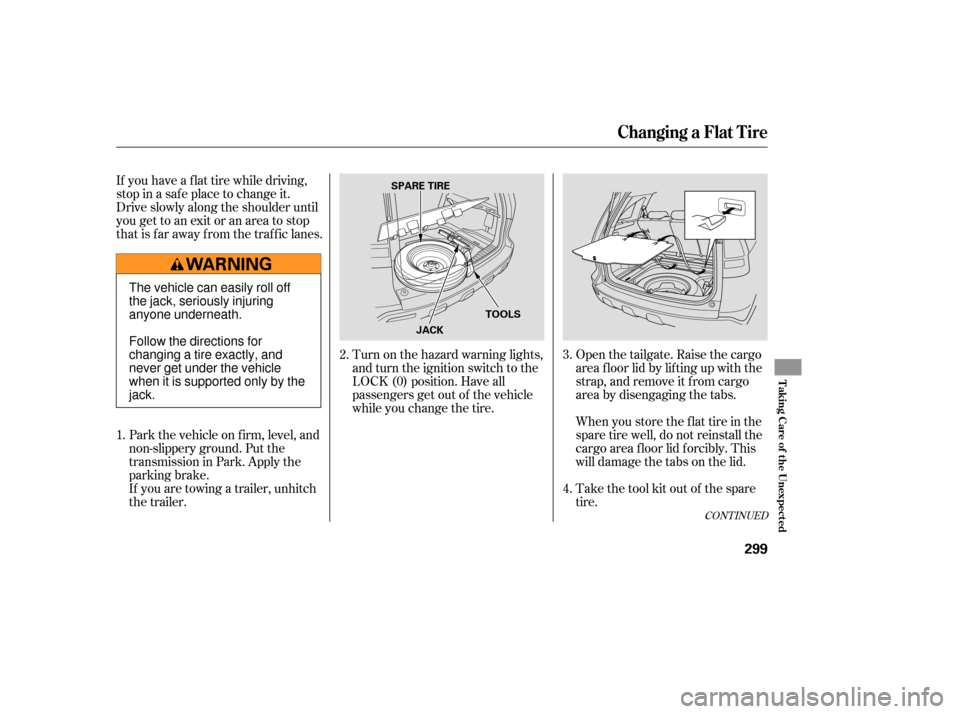
If you have a f lat tire while driving,
stop in a saf e place to change it.
Drive slowly along the shoulder until
you get to an exit or an area to stop
that is far away from the traffic lanes.Park the vehicle on f irm, level, and
non-slippery ground. Put the
transmission in Park. Apply the
parking brake.
If you are towing a trailer, unhitch
the trailer. Turn on the hazard warning lights,
and turn the ignition switch to the
LOCK (0) position. Have all
passengers get out of the vehicle
while you change the tire.
Open the tailgate. Raise the cargo
area f loor lid by lif ting up with the
strap, and remove it f rom cargo
area by disengaging the tabs.
When you store the f lat tire in the
spare tire well, do not reinstall the
cargo area f loor lid f orcibly. This
will damage the tabs on the lid.
Take the tool kit out of the spare
tire.
1. 2.
3.
4.
CONT INUED
Changing a Flat Tire
T aking Care of t he Unexpect ed
299
JACK
SPARE TIRE
TOOLS
The vehicle can easily roll off
the jack, seriously injuring
anyone underneath.
Follow the directions for
changing a tire exactly, and
never get under the vehicle
when it is supported only by the
jack.
Page 304 of 352

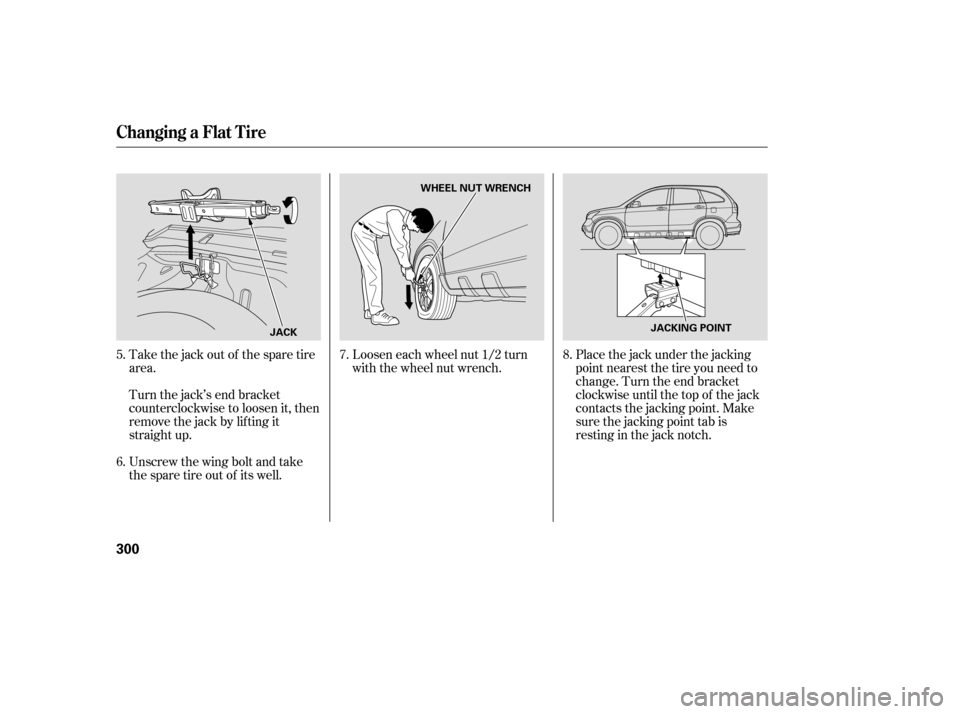
Take the jack out of the spare tire
area.
Turn the jack’s end bracket
counterclockwise to loosen it, then
remove the jack by lif ting it
straight up.
Unscrew the wing bolt and take
the spare tire out of its well.Loosen each wheel nut 1/2 turn
with the wheel nut wrench.
Placethejackunderthejacking
point nearest the tire you need to
change. Turn the end bracket
clockwise until the top of the jack
contacts the jacking point. Make
sure the jacking point tab is
restinginthejacknotch.
6. 5. 7. 8.
Changing a Flat Tire
300
JACK WHEEL NUT WRENCH
JACKING POINT