HONDA CR-V 2010 RD1-RD5, RE7 / 3.G Owners Manual
Manufacturer: HONDA, Model Year: 2010, Model line: CR-V, Model: HONDA CR-V 2010 RD1-RD5, RE7 / 3.GPages: 441, PDF Size: 8.12 MB
Page 321 of 441

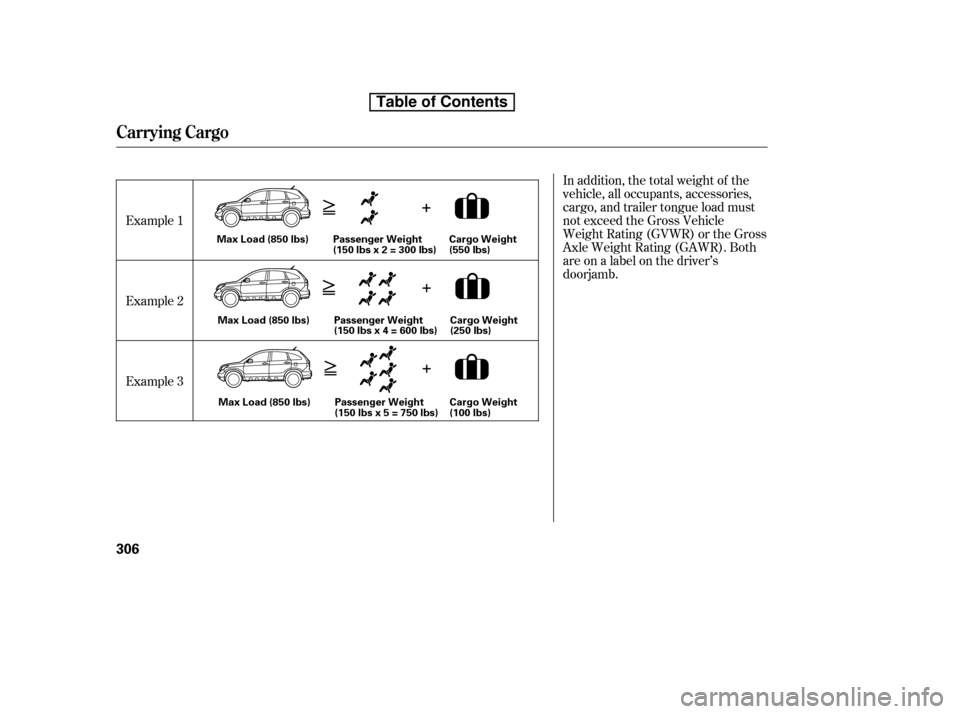
In addition, the total weight of the
vehicle, all occupants, accessories,
cargo, and trailer tongue load must
not exceed the Gross Vehicle
Weight Rating (GVWR) or the Gross
Axle Weight Rating (GAWR). Both
areonalabelonthedriver’s
doorjamb.
Example 1
Example 2
Example 3
Carrying Cargo
306
Max Load (850 lbs)
Max Load (850 lbs)
Max Load (850 lbs) Passenger Weight
(150 lbs x 2 = 300 lbs)
Passenger Weight
(150 lbs x 4 = 600 lbs)
Passenger Weight
(150 lbs x 5 = 750 lbs) Cargo Weight
(550 lbs)
Cargo Weight
(250 lbs)
Cargo Weight
(100 lbs)
Table of Contents
Page 322 of 441

Store or secure all items that could
be thrown around and hurt
someone during a crash.
Be sure items placed on the f loor
behind the f ront seats cannot roll
underneath and interf ere with the
proper operation of the seats, the
sensors under the seats, or the
driver’s ability to operate the
pedals.
Keep the lower glove box closed
while driving. If it is open, a
passenger could injure their knees
during a crash or sudden stop.If you carry large items that
prevent you f rom closing the
tailgate, exhaust gas can enter the
passenger area. To avoid the
possibility of
, f ollow the instructions
on page .
Distribute cargo evenly on the
f loor of the cargo area, placing the
heaviest items on the bottom and
as far forward as possible. Tie
down items that could be thrown
about the vehicle during a crash or
sudden stop.
Do not stack items higher than the
back of the rear seats. They can
block your view and be thrown
around the vehicle during a crash.
If youfoldtherearseatsupor
down, tie down items that could be
thrown about the vehicle during a
crash or sudden stop. Also, keep
all cargo below the bottom of the
windows. If it is higher, it could
interf ere with the proper operation
of thesidecurtainairbags.
Do not use the dual deck cargo shelf
with any rear seat f olded up or down.
55
CONT INUED
If equipped
Carrying Cargo in the Passenger
Compartment
carbon monoxide
poisoning
Carrying Cargo in the Cargo A rea
or on a Roof Rack
Carrying Cargo
Bef ore Driving
307
Table of Contents
Page 323 of 441

If you carry any items on a roof
rack,besurethetotalweightof
the rack and the items does not
exceed 165 lbs (75 kg).
If you use an accessory roof rack,
the roof rack weight limit may be
lower. Ref er to the inf ormation that
came with your roof rack.
Do not exceed the dual deck cargo
shelf load limit of 20 lbs on U.S.
models, and 10 kg on Canadian
models.
Do not use the dual deck cargo shelf
if the rear seats are f olded down.
Do not put any items on the dual
deck cargo shelf that could block
your view or be thrown around the
vehicle during a crash.
If equipped
On U.S. model is shown
Carrying Cargo on the Dual Deck
Cargo Shelf
Carrying Cargo
308
Table of Contents
Page 324 of 441

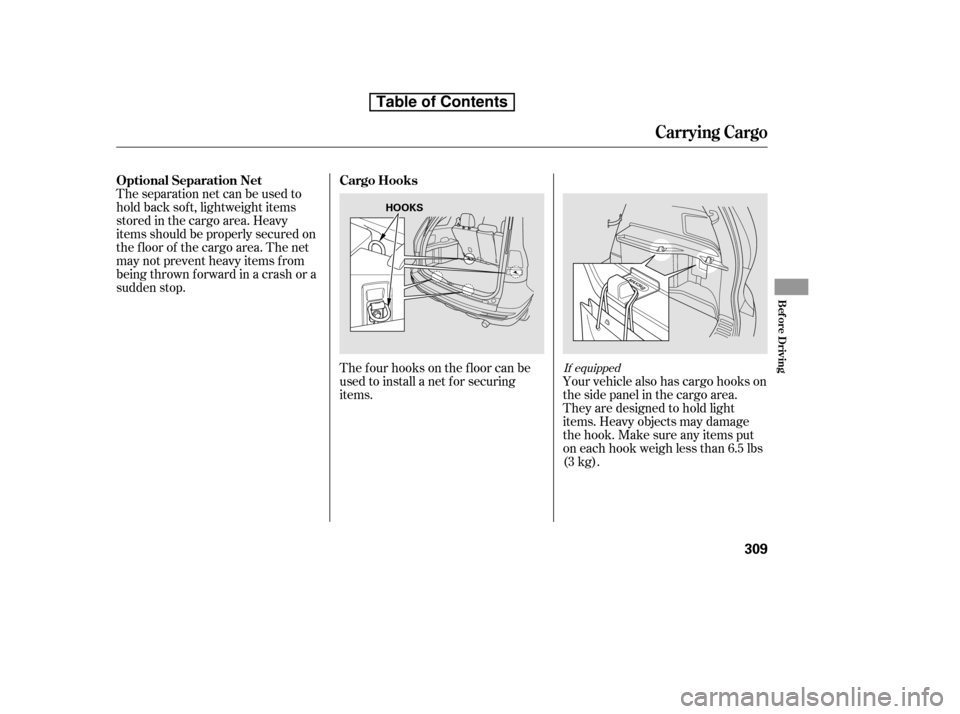
The f our hooks on the f loor can be
used to install a net f or securing
items.
Theseparationnetcanbeusedto
hold back sof t, lightweight items
stored in the cargo area. Heavy
items should be properly secured on
the f loor of the cargo area. The net
may not prevent heavy items f rom
being thrown f orward in a crash or a
sudden stop.
Your vehicle also has cargo hooks on
the side panel in the cargo area.
They are designed to hold light
items. Heavy objects may damage
thehook.Makesureanyitemsput
on each hook weigh less than 6.5 lbs
(3 kg).If equipped
Cargo Hooks
Optional Separation Net
Carrying Cargo
Bef ore Driving
309
HOOKS
Table of Contents
Page 325 of 441

310
Table of Contents
Page 326 of 441

This section gives you tips on
starting the engine under various
conditions, and how to operate the
automatic transmission. It also
includes important inf ormation on
parking your vehicle, the braking
system, the vehicle stability assist
(VSA
) system, the tire pressure
monitoring system (TPMS), and
f acts you need if you are planning to
tow a trailer or drive off-highway. ........................
Driving Guidelines . 312
........................
Preparing to Drive . 313
.......................
Starting the Engine . 314
..............
Automatic Transmission . 315
...........................................
Parking . 320
.............................
Braking System . 321
...............
Anti-lock Brakes (ABS) . 322
Vehicle Stability Assist (VSA
),
aka Electronic Stability ........
Control (ESC), System . 324
Tire Pressure Monitoring System ......................................
(TPMS) . 326
...........................
Towing a Trailer . 329
Towing Your Vehicle Behind a
................................
Motorhome . 334
Of f -Highway Driving ..................................
Guidelines . 336
Driving
Driving
311
Page 327 of 441

Because your vehicle rides higher
of f the ground, it has a high center
of gravity that can cause it to roll
over if you make abrupt turns. Utility
vehicles have a signif icantly higher
roll over rate than other types of
vehicles.
To prevent rollovers or loss of
control:Take corners at slower speeds
than you would with a passenger
vehicle.
Avoid sharp turns and abrupt
maneuvers whenever possible. Do not carry heavy cargo on the
roof .
Do not modif y your vehicle in any
way that would raise the center of
gravity.
You still need to exercise the same
care when accelerating, steering, and
brakingthatyouwouldinatwo-
wheel drive vehicle.
Your vehicle has higher ground
clearance that allows you to travel
over bumps, obstacles, and rough
terrain. It also provides good
visibility so you can anticipate
problems earlier.
Your vehicle is equipped with a f our-
wheel drive (4WD) system. When
the system senses a loss of front-
wheel traction, it automatically
transf ers some power to the rear
wheels. This gives you better
traction and mobility.
Four-wheel drive models
See page f or of f -highway drivingguidelines. 336
Driving Guidelines
312
Table of Contents
Page 328 of 441

Check the adjustment of the
inside and outside mirrors (see
page ).
Check the steering wheel
adjustment (see page ).
Fasten your seat belt. Check that
your passengers have f astened
their seat belts (see page ).
Make sure the doors and the
tailgate are securely closed and
locked.
Youshoulddothefollowingchecks
and adjustments bef ore you drive
your vehicle.
Make sure all windows, mirrors,
and outside lights are clean and
unobstructed. Remove f rost, snow,
or ice.
Check that the hood is f ully closed.
Visually check the tires. If a tire
looks low, use a gauge to check its
pressure.
Check that any items you may be
carrying are stored properly or
f astened down securely. When you start the engine, check
the gauges and indicators in the
instrument panel (see pages to
).
Check the seat adjustment (see
pages and ).
1. 2.
10.
3. 4. 5. 6. 7. 8. 9.
114
81
15
68 61
97 98
Preparing to Drive
Driving
313
Table of Contents
Page 329 of 441

Apply the parking brake.
In cold weather, turn of f all
electrical accessories to reduce
the drain on the battery.Without touching the accelerator
pedal, turn the ignition key to the
START (III) position. Do not hold
the key in the START (III)
position f or more than 15 seconds
at a time. If the engine does not
start right away, pause for at least
10 seconds bef ore trying again.
Make sure the shif t lever is in
Park. Press on the brake pedal.
1. 2. 3.
4.
Starting the Engine
314
T he immobilizer system protects your
vehicle f rom thef t. If an improperly-
coded key (or other device) is used, the
engine’s f uel system is disabled. For
more inf ormation, see page .The engine is harder to start in cold
weather. Also, the thinner air f ound at
altitudes above 8,000 f eet (2,400
meters) adds to this problem.
83
Table of Contents
Page 330 of 441

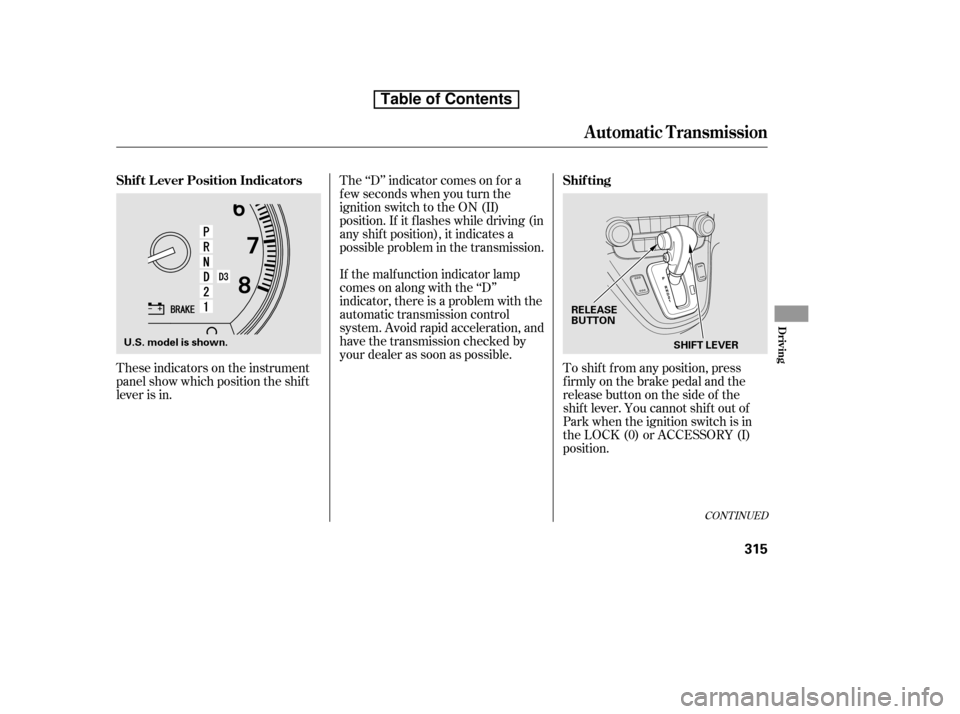
These indicators on the instrument
panel show which position the shif t
lever is in.The ‘‘D’’ indicator comes on f or a
f ew seconds when you turn the
ignition switch to the ON (II)
position. If it f lashes while driving (in
any shif t position), it indicates a
possible problem in the transmission.
If the malf unction indicator lamp
comes on along with the ‘‘D’’
indicator, there is a problem with the
automatic transmission control
system. Avoid rapid acceleration, and
have the transmission checked by
your dealer as soon as possible.
To shif t f rom any position, press
f irmly on the brake pedal and the
release button on the side of the
shiftlever.Youcannotshiftoutof
Park when the ignition switch is in
the LOCK (0) or ACCESSORY (I)
position.
CONT INUED
Shif t L ever Position Indicators Shif ting
Automatic Transmission
Driving
315
SHIFT LEVER
RELEASE
BUTTON
U.S. model is shown.
Table of Contents